SmartStar Cube -A Series Mount and Telescopes (For ... - iOptron
SmartStar Cube -A Series Mount and Telescopes (For ... - iOptron
SmartStar Cube -A Series Mount and Telescopes (For ... - iOptron

You also want an ePaper? Increase the reach of your titles
YUMPU automatically turns print PDFs into web optimized ePapers that Google loves.
®<br />
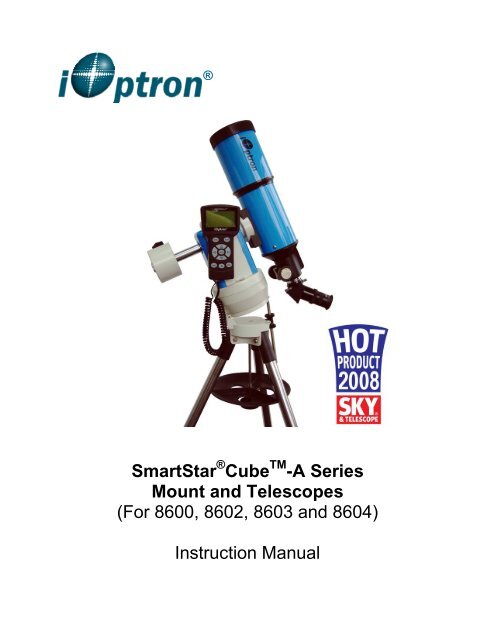
<strong>SmartStar</strong> ® <strong>Cube</strong> TM -A <strong>Series</strong><br />
<strong>Mount</strong> <strong>and</strong> <strong>Telescopes</strong><br />
(<strong>For</strong> 8600, 8602, 8603 <strong>and</strong> 8604)<br />
Instruction Manual
Table of Content<br />
Table of Content ...........................................................................................................................2<br />
1. SmarStar ® <strong>Cube</strong> TM -A <strong>Series</strong> Overview .....................................................................................4<br />
1.1. <strong>SmartStar</strong> ® <strong>Cube</strong> TM -A <strong>Series</strong> Features ..............................................................................4<br />
1.2. Assembly Terms ................................................................................................................6<br />
2. Telescope Assembly.................................................................................................................7<br />
3. GoToNova ® 8401 H<strong>and</strong> Controller..........................................................................................10<br />
3.1. Key Description................................................................................................................10<br />
3.2. The LCD Screen ..............................................................................................................11<br />
4. Getting Started........................................................................................................................12<br />
4.1. Level <strong>and</strong> Align the <strong>Mount</strong> ...............................................................................................12<br />
4.1.1. Level the <strong>Mount</strong>.........................................................................................................12<br />
4.1.2. Initial Positions ..........................................................................................................12<br />
4.2. Setting Up the <strong>Mount</strong> .......................................................................................................12<br />
4.2.1. Set Up Local Time <strong>and</strong> Site Info ...............................................................................13<br />
4.2.2. Set <strong>Mount</strong> Type.........................................................................................................14<br />
4.2.3. Set Anti-backlash ......................................................................................................15<br />
4.2.4. Using your telescope.................................................................................................16<br />
4.2.5. Go to the Moon .........................................................................................................16<br />
4.2.6. Initial Star Alignment .................................................................................................17<br />
4.3. Turn Off the <strong>Mount</strong>...........................................................................................................17<br />
5. Operate <strong>SmartStar</strong> ® <strong>Cube</strong> TM -A mount in EQ Mode.................................................................18<br />
6. Use <strong>SmartStar</strong> ® <strong>Cube</strong> TM -A <strong>Telescopes</strong>...................................................................................20<br />
6.1. Manual Operation of a Telescope....................................................................................20<br />
6.2. Slew to an Object.............................................................................................................20<br />
6.2.1. Planets, Sun, Moon...................................................................................................20<br />
6.2.2. Deep Sky Objects .....................................................................................................20<br />
6.2.3. Comets......................................................................................................................20<br />
6.2.4. Asteroids ...................................................................................................................21<br />
6.2.5. Stars..........................................................................................................................21<br />
6.2.6. Constellations............................................................................................................21<br />
6.2.7. User Objects .............................................................................................................21<br />
6.2.8. Enter R.A. DEC .........................................................................................................21<br />
6.3. Sync to Target..................................................................................................................21<br />
6.4. Electric Focuser ...............................................................................................................21<br />
6.5. Set Up Controller .............................................................................................................22<br />
6.5.1. Set Up Local Time.....................................................................................................22<br />
6.5.2. Set Up Site ................................................................................................................22<br />
6.5.3. Set N/S Hemisphere .................................................................................................22<br />
6.5.4. Set Display Contrast .................................................................................................22<br />
6.5.5. Set Eyepiece Light ....................................................................................................22<br />
6.5.6. Set Backlight .............................................................................................................22<br />
6.5.7. Set Anti-backlash ......................................................................................................22<br />
6.5.8. Set Key Beep ............................................................................................................22<br />
6.5.9. Set <strong>Mount</strong> Type.........................................................................................................22<br />
6.5.10. Reset All..................................................................................................................22<br />
6.5.11. Update Firmware.....................................................................................................22<br />
6.5.12. Set gear ratio...........................................................................................................22<br />
6.5.13. Set Language..........................................................................................................23<br />
6.6. Align .................................................................................................................................23<br />
2
6.6.1. One Star Align...........................................................................................................23<br />
6.6.2. Two Star Alignment...................................................................................................23<br />
6.6.3. Three-Star Align ........................................................................................................23<br />
6.6.4. Dis R.A axis error ......................................................................................................23<br />
6.6.5. Test Anti-backlash.....................................................................................................24<br />
6.6.6. Polaris Position .........................................................................................................24<br />
6.7. PEC Option ......................................................................................................................24<br />
6.8. Set Up Tracking ...............................................................................................................24<br />
6.9. User Object List................................................................................................................24<br />
6.10. Auto Guide .....................................................................................................................24<br />
6.11. Park Scope ....................................................................................................................24<br />
6.12. To Park Position.............................................................................................................24<br />
7. Maintenance <strong>and</strong> Servicing.....................................................................................................25<br />
7.1. Maintenance ....................................................................................................................25<br />
7.2. Storage <strong>and</strong> Transport .....................................................................................................25<br />
7.3. Troubleshooting ...............................................................................................................26<br />
7.4. <strong>iOptron</strong> Customer Service................................................................................................27<br />
Appendix A. Technical Specifications .........................................................................................29<br />
Appendix B. GoToNova ® 8401 HC MENU STRUCTURE...........................................................30<br />
Appendix C. GoToNova ® Star List ..............................................................................................32<br />
Appendix D. Set Up USB-PC Connection...................................................................................38<br />
Appendix E. Firmware Upgrade..................................................................................................45<br />
Appendix F. Use a PC to Control an <strong>iOptron</strong> <strong>Mount</strong> ...................................................................48<br />
WARNING!<br />
NEVER USE A TELESCOPE TO LOOK AT THE SUN!<br />
Looking at or near the Sun will cause instant <strong>and</strong> irreversible damage to your eye.<br />
Children should always have adult supervision while observing.<br />
2011.12.15 Ver 2.1<br />
3
1. SmarStar ® <strong>Cube</strong> TM -A <strong>Series</strong> Overview<br />
1.1. <strong>SmartStar</strong> ® <strong>Cube</strong> TM -A <strong>Series</strong> Features<br />
Alt-Azimuth <strong>Mount</strong>– The <strong>Cube</strong>, with AltAzi/EQ dual application<br />
The <strong>SmartStar</strong> ® <strong>Cube</strong> tm -A series come with our patented Alt-Azimuth (AltAzi) mount,<br />
a.k.a. The <strong>Cube</strong>. This compact mount design is probably the most functional <strong>and</strong> flexible unit<br />
on the market. It was named “Hot Product 2008” by Sky <strong>and</strong> Telescope. Both axis motors are<br />
built into a small single unit with optical encoders which provides accurate GOTO <strong>and</strong> tracking.<br />
The mount is universally compatible with all telescopes using a dove-tail connection. In addition,<br />
there are no “dead spots” – so you can point your telescope to ANYWHERE above the horizon,<br />
whereas, other mounts block the telescope tube at certain points of rotation. This mount also<br />
comes st<strong>and</strong>ard with AC connection. An optional DC adaptor is available so you can plug your<br />
telescope mount into your car if you’re camping or at any remote location.<br />
With the integrated wedge <strong>and</strong> a st<strong>and</strong>ard counterweight, the A-series can also be<br />
operated as a German equatorial mount (EQ) for those who want to get familiar to or<br />
demonstrate a GOTO EQ mount operation.<br />
32-Channel GPS Module<br />
All A-series telescopes come st<strong>and</strong>ard with a 32-channel GPS module for fully<br />
automated operation. Simply turn on the GoToNova ® H<strong>and</strong> Controller <strong>and</strong> the GPS module will<br />
automatically synchronize your telescope location <strong>and</strong> time with the GoToNova ® computerized<br />
control system. View celestial objects without having to manually punch in the date, time,<br />
latitude or longitude.<br />
GoToNova ® Computerized Control System<br />
The revolutionary GoToNova ® computerized control system is by far the most<br />
technologically advanced automated tracking system available on the market today. With a<br />
database of 130,000 celestial objects, including all of the most famous galaxies, nebulae, star<br />
clusters, not to mention the planets, you’ll be able to enjoy star gazing with the simple push of a<br />
button.<br />
The easy to underst<strong>and</strong> controller on the market<br />
The GoToNova ® h<strong>and</strong> controller is much easier to use than other similar products. The<br />
h<strong>and</strong> controller is more intuitive with menu categories better organized. It also has a larger LCD<br />
screen with more lines of content compared with the competition. Using the easy-to-use h<strong>and</strong><br />
controller <strong>and</strong> its large LCD screen, you can easily set up your telescope <strong>and</strong> select where you<br />
want to go.<br />
More precise speed control for viewing objects<br />
The 8401 h<strong>and</strong> controller comes with the A-series allows you to slew the telescope at 9<br />
different drive speeds, keeping the object within the telescope’s viewfinder for as long as you<br />
wish.<br />
Compatible with many OTAs<br />
4
Most light weight (
1.2. Assembly Terms<br />
1. Telescope tube<br />
2. Dovetail lock<br />
3. H<strong>and</strong> controller<br />
4. Altitude lock<br />
5. <strong>Mount</strong><br />
Polaris<br />
6. Tripod<br />
7. Tripod shaft<br />
8. Tray<br />
9. Tray lock<br />
10. Azimuth lock screw<br />
11. Wedge tilt screw<br />
12. Tilt locks<br />
13. Counterweight <strong>and</strong> shaft (not included)<br />
Zenith<br />
5<br />
10<br />
13 11<br />
7<br />
8<br />
9<br />
6<br />
12<br />
Figure 1. Assembly Terms<br />
6
2. Telescope Assembly<br />
Step 1. Preparing the Tripod<br />
1. Extend tripod legs to full<br />
extension.<br />
2. Slide tray on bottom of shaft<br />
(#7). Then screw on round<br />
black knob (#9).<br />
Step 2. Attaching the <strong>Mount</strong><br />
1. Raise wedge plate on the tripod by turning two tilt<br />
locks (12);<br />
2. Attach mount to wedge plate using supplied azimuth<br />
lock screw (10).<br />
3. lower wedge plate to it’s lowest position by turning the<br />
upper tilt lock upward while lightly push the mount<br />
down. Secure the mount by tightening the lower lock.<br />
Step 3a. Installing Batteries (not included)<br />
Note: you may use 8 AA batteries (Step 3) or the AC<br />
adaptor (Step 5) to operate the mount.<br />
Pull the batteries compartment cover (shown) open.<br />
Gently pull the batteries holder (shown next) out of the<br />
compartment to avoid breaking the attached wires.<br />
Step 3b.<br />
Insert 8 AA batteries (not included) according to the<br />
diagrams on the holder. Refer to the diagram on the holder<br />
to orient the batteries properly. Replace the holder back<br />
into the batteries compartment <strong>and</strong> replace the cover.<br />
<strong>For</strong> reference: the battery pack fits in with wires on the<br />
bottom right (See arrow in photo). Use only fresh batteries.<br />
Using/mixing old or low batteries may cause error<br />
messages.<br />
Optional AC Adapter <strong>and</strong> Car Charger accessories are<br />
available at www.ioptron.com<br />
Step 4. Attaching Telescope<br />
Attach telescope to mount using the dovetail lock knob<br />
(#2).<br />
Dovetail<br />
lock (#2)<br />
(Picture shows 80mm refractor. However all scopes<br />
will attach in the same manner.)<br />
7
Plug in AC<br />
adaptor<br />
here<br />
Step 5. Plug in h<strong>and</strong> controller <strong>and</strong> AC adaptor.<br />
Plug h<strong>and</strong> controller into either one of the two HBX ports on<br />
the mount. Next plug in AC adaptor. (Or use batteries—see<br />
step 3). Turn on power (the red light should go on).<br />
At this point you can begin observing manually. Use the 4<br />
Arrow keys (▲▼◄►) to rotate the scope Up, Down, Left,<br />
<strong>and</strong> Right. Use the SPEED key to change the slew rate<br />
from the slowest (2X) to the fastest (MAX).<br />
The other HBX is reserved for accessories, such as<br />
external GPS module, electronic focuser or laser pointer.<br />
DO NOT plug non-<strong>iOptron</strong> accessories into the unit to<br />
avoid damaging the mount or accessories.<br />
<strong>For</strong> 80mm Refractor (#8502)…….....................................................<br />
Insert 45º diagonal: Insert the diagonal into the eyepiece<br />
side of the telescope. Tighten the thumbscrews to a firm<br />
feel only.<br />
45º diagonal<br />
eyepiece<br />
Insert the eyepiece: Slide the eyepiece into the open end<br />
of the diagonal. Tighten the thumbscrews to a firm feel<br />
only. Remove the dust cover from the other end of optical<br />
tube assembly.<br />
Use the focus knob to bring objects into focus. You may<br />
need to turn the focus knob quite a few turns to focus your<br />
telescope for the first time. Always start observing using a<br />
Focus knob<br />
low power eyepiece (such as a 25mm eyepiece) to get a<br />
nice wide field of view. Later you can change to high power<br />
if so desired. Higher powered eyepieces have a much<br />
narrower field of view. So it’s more difficult to initially locate<br />
objects using higher powered eyepieces.<br />
<strong>For</strong> 114mm Newtonian (#8503) …….................................................<br />
Attach the red dot finder scope to the telescope tube (#1):<br />
Point toward open<br />
end of telescope<br />
First remove the two washers on the tube. Then place the<br />
finder scope onto the two bolts <strong>and</strong> re-attach the washers<br />
securely. The finder scope should face towards the open<br />
Bolts end of the tube (see arrow in diagram).<br />
Switch<br />
Turn on the beam using the switch on the side. (note: you<br />
may need to remove the plastic insulation placed next to<br />
the battery underneath)<br />
8
<strong>For</strong> 90mm Maksutov-Cassegrain (#8504)………………………………….<br />
Diagonal<br />
Install Diagonal by screwing it onto the back end of the<br />
scope. You can adjust the position of the diagonal by<br />
loosening the free-spinning threader on the diagonal.<br />
Eyepiece<br />
Install the Finderscope by sliding the dovetail plate onto<br />
the sleeve (see arrow) <strong>and</strong> tightening the side screw.<br />
The eyepiece can be placed on the end of the scope or on<br />
the side (see next step). Secure the eyepiece using the<br />
side screw.<br />
Flip<br />
switch<br />
Use the focus knob to adjust the focus.<br />
This picture shows the eyepiece on the side. Remove the<br />
protective cap to insert the eyepiece. The diagonal is not<br />
used for side viewing.<br />
Use the flip switch to flip the internal mirror to view from<br />
the side or the end of the scope.<br />
9
3. GoToNova ® 8401 H<strong>and</strong> Controller<br />
HBX<br />
Port<br />
USB<br />
Port<br />
Figure 1. GoToNova 8401 H<strong>and</strong> Controller<br />
GoToNova ® 8401 h<strong>and</strong> controller (HC) is the st<strong>and</strong>ard controller for a <strong>SmartStar</strong> ®<br />
<strong>Cube</strong> TM -A series mount <strong>and</strong> telescope, as shown in Figure 1. (The earlier version equipped with<br />
a 8402 h<strong>and</strong> controller. Contact <strong>iOptron</strong> for instruction.)<br />
3.1. Key Description<br />
• MENU: Press “MENU” to enter the Main Menu.<br />
• BACK: Move back to the previous screen, or end/cancel current operation, such as<br />
slewing.<br />
• ENTER: Confirm an input, go to the next menu, select a choice, or slew the telescope<br />
to a selected object.<br />
• Arrow (▲▼►◄): Press ▲▼ buttons to move a telescope along the DEC direction,<br />
►◄ to move a telescope along the RA direction. Brows the menu or move the cursor<br />
in operating menu.<br />
• Number Keys: Input numerical values. Also used to adjust speeds (1: 1X; 2: 2X; 3: 8X;<br />
4: 16X; 5: 64X; 6: 128X; 7: 256X; 8: 512X; 9: MAX)<br />
10
• Light Key(☼): Turns on/off the red LED reading light on the back of the controller.<br />
• ? Key: <strong>For</strong> help or extra information.<br />
• STOP/0 Key: Stop/Start tracking.<br />
• HBX (H<strong>and</strong>box) port: connect the HC to MiniTower mount using a 6-wire RJ11 cable.<br />
• USB port: connect the HC to a Computer via a USB cable.<br />
3.2. The LCD Screen<br />
The 8401 HC is designed to use for <strong>SmartStar</strong>-A GOTO mount <strong>and</strong> telescopes. It can<br />
also be used for <strong>iOptron</strong>’s equatorial (EQ) mount, such as the <strong>SmartStar</strong> ® -PR GOTO German<br />
Equatorial <strong>Mount</strong> <strong>and</strong> the GoToNova ® Equatorial Kit, as well as all other AltAzimuth (A/A)<br />
mounts, which include all <strong>SmartStar</strong> ® GOTO mounts <strong>and</strong> telescopes. It consists of a large 8-line<br />
LCD screen, which displays all the information as shown in Figure 2. The user interface is<br />
simple <strong>and</strong> easy to learn.<br />
Figure 2. 8401 HC LCD Information Screen<br />
1. GPS Status: when the power is turned on, it shows “GPS ON”, which means a GPS receiver<br />
is connected. When the GPS receiver finds the satellite <strong>and</strong> receives GPS signal, it shows<br />
“GPS OK”. The “GPS OK” will turn off after few minutes.<br />
2. Slew speed: It has 9 speeds: 1X, 2X, 8X, 16X, 64X, 128X, 256X(1º/sec), 512X(2º/sec),<br />
MAX(4º/sec). Press SPEED key to change it.<br />
3. Tracking speed: It has 4 speeds: Cel (celestial), Sol (Solar), Lun (Lunar), Def (user defined)<br />
4. Altitude of the telescope (zenith is 90º).<br />
5. Azimuth of the telescope (north is 0º, east 90º, south 180º, <strong>and</strong> west 270º).<br />
6. Local Date <strong>and</strong> Time: display local time in a format of YYYY-MM-DD HH:MM:SS.<br />
7. <strong>Mount</strong> Type: EQ is equatorial <strong>and</strong> A/A altazimuth.<br />
8. N/S Hemisphere: display the observation hemisphere.<br />
11
4. Getting Started<br />
In order to experience the full GOTO capability of GoToNova technology, it is very<br />
important to set up the mount correctly before observation.<br />
4.1. Level <strong>and</strong> Align the <strong>Mount</strong><br />
4.1.1. Level the <strong>Mount</strong>.<br />
Leveling is critical for a good GOTO <strong>and</strong> tracking accuracy.<br />
Level the mount by observing the bubble (shown) on the<br />
base of the mount by adjusting tripod legs. The bubble should be in<br />
the center of the circle. It is also recommended to use additional<br />
levelers (such as a torpedo leveler) to assure precise leveling. Turn<br />
the mount around by pressing ► or ◄ button to make sure it is<br />
always leveled.<br />
4.1.2. Initial Positions<br />
Each time the mount is turned on, the default<br />
position is Park Position. <strong>For</strong> the A/A operation mode, its<br />
altitude is 90º 00’ 00” <strong>and</strong> azimuth is 180º 00’ 00”, which<br />
means the “SOUTH” mark is pointing to south <strong>and</strong> the<br />
telescope is pointing straight up at the zenith. To set the<br />
Park Position, you can:<br />
2) Up<br />
1. Align the mount to south by turning the mount so that 1) South<br />
Alt lock (#4)<br />
the South mark facing south. An additional compass is<br />
needed. Unlock the altitude lock (#4) <strong>and</strong> rotate the<br />
telescope to point straight up at the Zenith. A torpedo<br />
level may help. Make sure the mount is leveled. Retighten the altitude lock. Then turn the<br />
mount power on.<br />
or<br />
2. Turn the mount power on. Press the SPEED button to select a slew speed (MAX for fast<br />
slew <strong>and</strong> 1X for fine tuning). Turn the SOUTH mark pointing to south using ► or ◄ button.<br />
An additional compass may be needed. Rotate the telescope point to the zenith using ▲ or<br />
▼ button. A torpedo level may help. Then turn the mount power off <strong>and</strong> turn it on.<br />
4.2. Setting Up the <strong>Mount</strong><br />
A <strong>SmartStar</strong> <strong>Cube</strong>-A is equipped with a GPS receiver, which will receive the local time,<br />
longitude <strong>and</strong> latitude information from a satellite after the link is established. However, manual<br />
input is still needed for time zone <strong>and</strong> Daylight Saving setting.<br />
A clear sky outside is needed for GPS to communicate well with the satellites.<br />
12
4.2.1. Set Up Local Time <strong>and</strong> Site Info<br />
Press MENU button, from the main menu, scroll down <strong>and</strong> select “Set up controller”<br />
Select <strong>and</strong> Slew<br />
Sync. to Target<br />
Electronic Focuser<br />
Set Up Controller<br />
Align<br />
Set Up Tracking<br />
User Objects<br />
Auto Guide<br />
Press ENTER. Select “Set Up Local Time”<br />
Set Up Local Time<br />
Set Up Site<br />
Set N/S Hemisphere<br />
Set Display Contrast<br />
Set Eyepiece Light<br />
Set Backlight<br />
Set Snti-backlash<br />
Set Key Beep<br />
Press ENTER. The “Set Local Time” screen will show:<br />
Set Local Time:<br />
2009-06-01 11:55:09<br />
300 Min. behind UT<br />
Daylight Saving Time Y<br />
The local time will be updated when the GPS picks up satellite signals. If for any reason<br />
your GPS can’t pick up a signal you can manually enter the time. Press ◄ or ► key to move the<br />
cursor <strong>and</strong> using ▲ or ▼ key to change the number.<br />
Press ◄ or ► key, move the cursor to the line below time info to set the time zone<br />
information (add or subtract 60 minutes per time zone). Enter minutes “ahead of” or “behind” UT<br />
(universal time).<br />
• New York City is 300 minutes “behind” UT<br />
• Los Angeles is 480 minutes “behind” UT<br />
• Rome is 60 minutes “ahead of” UT<br />
• Beijing is 480 minutes “ahead of” UT<br />
• Sydney is 600 minutes “ahead of” UT<br />
All the time zones in North America are behind UT (universal time), as shown in the<br />
following table. So make sure it shows “behind” instead of “ahead of” UT.<br />
Time Zone Hawaii Alaska Pacific <strong>Mount</strong>ain Central Eastern<br />
Hour behind UT -10 -9 -8 -7 -6 -5<br />
Enter Minutes 600 540 480 420 360 300<br />
13
To adjust minutes, move the cursor to each digit <strong>and</strong> use ▲ or ▼ key to change the<br />
number. To change the “behind” or “ahead of” UT, move the cursor to “ahead of” <strong>and</strong> using ▲<br />
or ▼ key to toggle between “behind” <strong>and</strong> “ahead of”. <strong>For</strong> other parts of the world, you can find<br />
out your “time zone” information from internet, such as http://www.time<strong>and</strong>date.com/worldclock/.<br />
DO NOT COUNT DAYLIGHT SAVING TIME.<br />
To set daylight saving time, use the ◄ or ► key to move the cursor to the bottom of the<br />
screen, use ▲ or ▼ button to toggle the Daylight Saving Time between N, which means “No”<br />
<strong>and</strong> Y, which means (Yes).<br />
Press BACK to go to previous screen. Select “Set Up Site” <strong>and</strong> press ENTER to check<br />
your site info.<br />
Set up site info:<br />
Longitude:<br />
W071d27m47s<br />
Latitude:<br />
N42d15m40s<br />
The longitude <strong>and</strong> latitude coordinates will be updated when the GPS picks up satellite<br />
signals. “W/E” means west/east hemisphere; “N/S” means north/south hemisphere; “d” means<br />
degree; “m” means minute; <strong>and</strong> “s” means second.<br />
If for any reason your GPS can’t pick up a signal you can manually enter the GPS<br />
coordinates. Press ◄ or ► key to move the cursor <strong>and</strong> using ▲ or ▼ key to toggle between<br />
“W” <strong>and</strong> “E”, “N” <strong>and</strong> “S”, or to change the numbers. It is always a good idea to do your home<br />
work to get the GPS coordinates before traveling to a new observation site.<br />
The site coordinates information can be found from internet, such as GPSVisualizer<br />
(http://www.gpsvisualizer.com/geocode), by entering the city name or address. In case you only<br />
find the site information in decimal format you can convert them into d:m:s format by multiplying<br />
the decimal numbers by 60. <strong>For</strong> example, N47.53 can be changed to N47º31'48”: 47.53º = 47º<br />
+0.53º, 0.53º=0.53x60'=31.8', 0.8'=0.8x60"=48". Therefore, 47.53º=47º31'48" or 47d31m48s.<br />
Same as N47º31.8’: 31.8’=31’+0.8’, 0.8’=0.8x60”=48”.<br />
4.2.2. Set <strong>Mount</strong> Type<br />
The <strong>SmartStar</strong>-A series can be operated in both A/A <strong>and</strong> EQ mode, for the A/A<br />
operation, the mount type needs to be set correctly. Scroll down <strong>and</strong> select “Set <strong>Mount</strong> Type”,<br />
Set Up Site<br />
Set N/S Hemisphere<br />
Set Display Contrast<br />
Set Eyepiece Light<br />
Set Backlight<br />
Set Anti-backlash<br />
Set Key Beep<br />
Set <strong>Mount</strong> Type<br />
14
Press Enter.<br />
Equatorial <strong>Mount</strong><br />
Alt/Azi <strong>Mount</strong><br />
Select Alt/Azi mount <strong>and</strong> press ENTER to go back the previous screen.<br />
4.2.3. Set Anti-backlash<br />
<strong>For</strong> an Alt/Azi operation, both R.A. <strong>and</strong> DEC anti-backlash should be set to 0 step.<br />
Scroll down <strong>and</strong> select “Set anti-backlash”<br />
Set Up Local Time<br />
Set Up Site<br />
Set N/S Hemisphere<br />
Set Display Contrast<br />
Set Eyepiece Light<br />
Set Backlight<br />
Set Anti-backlash<br />
Set Key Beep<br />
Press ENTER. A R.A. anti-backlash will display:<br />
R.A. anti-backlash:<br />
0000 steps<br />
One steps equal to<br />
1.5 arc second.<br />
To adjust steps move the cursor to each digit <strong>and</strong> use the number keys to input number<br />
directly. Press ENTER – “DEC anti-backlash” will display:<br />
DEC anti-backlash:<br />
0000 steps<br />
One steps equal to<br />
1.5 arc second.<br />
Move the cursor to each digit <strong>and</strong> use the number keys to set the anti-backlash to 0.<br />
Press ENTER to go back the previous screen.<br />
Press BACK button to go back to main menu.<br />
15
4.2.4. Using your telescope<br />
Selecting an Eyepiece:<br />
1. Always begin viewing with the lowest power eyepiece. (Note: a 25 mm focal length<br />
eyepiece has a lower power than a 10 mm one.) A formula can be used to determine the power<br />
of each eyepiece: Telescope focal length divided by eyepiece focal length equals magnification.<br />
Ex. 400mm ÷ 25mm = 16X (magnification). The rule of thumb is that the magnification should<br />
not be too much larger than the OTA aperture, otherwise view <strong>and</strong> color distortion may occur.<br />
2. A 45° Erecting Diagonal Prism may be included in the R80 or MC90 telescope. The<br />
Erecting Diagonal Prism is used to erect the image you will see. Astronomical telescopes are<br />
designed in such a way that the image you see may be UPSIDE DOWN <strong>and</strong> REVERSED. This<br />
is perfect for viewing celestial bodies. However, it will feel strange when observing a l<strong>and</strong> object<br />
or a bird.<br />
Focusing Telescope:<br />
1. After selecting the desired eyepiece aim the telescope tube at a l<strong>and</strong>-based target at<br />
least 200 yards away (e.g. A telephone pole or building). Fully extend focusing tube by turning<br />
the focus knob.<br />
2. While looking through selected eyepiece, slowly retract focusing tube by turning<br />
focusing knob until object comes into focus.<br />
Aligning Finderscope:<br />
1. Look through main telescope tube <strong>and</strong> establish a well-defined target (see focusing<br />
telescope section). Tighten all lock knobs (Declination, Latitude, Right Ascension, Horizontal<br />
Axis) so that telescope’s aim is not disturbed.<br />
2. Turn on the red dot finder <strong>and</strong> look through the finder window. Adjust the red dot<br />
alignment screws to center the red dot on the object.<br />
3. Now, objects located with the finderscope first will be centered in field of view of the<br />
main telescope.<br />
4.2.5. Go to the Moon<br />
After performing these setups, the mount is ready to GOTO <strong>and</strong> track objects. One of<br />
the most common objects is the Moon.<br />
Press MENU button, select “Select <strong>and</strong> Slew” by press ENTER button. Select “Planets,<br />
Sun, Moon”, <strong>and</strong> using ▲ or ▼ button to select Moon. Press ENTER. The telescope will<br />
automatically slew to the Moon <strong>and</strong> lock on. It will automatically begin to track once it locks on to<br />
it. Use the arrow keys to center the Moon in your eyepiece, if it is not centered. Press BACK key<br />
to stop GOTO during the slew. Press ENTER key to stop the tracking.<br />
16
4.2.6. Initial Star Alignment<br />
A simple alignment/synchronization can be performed to improve the GOTO <strong>and</strong><br />
tracking accuracy. To do so, press MENU button, scroll down to “Align”, select “One Star Align”<br />
<strong>and</strong> press ENTER. A list of three bright objects, such as Moon, Venus, <strong>and</strong> other stars, will be<br />
displayed for you to select from. Select an object using ▲ or ▼ key. Then press ENTER. Use ◄<br />
► ▲ or ▼ key to center the object in your eyepiece. Press SPEED button to change the slew<br />
speed if needed. Then press ENTER to complete the alignment. Or press the BACK key to<br />
cancel the process.<br />
You may need to use SPEED key to change the slewing speed to make the centering<br />
procedure easier.<br />
An alternate way is performing “Sync to Target”. To do so, press MENU button, select<br />
“Select <strong>and</strong> Slew” <strong>and</strong> press ENTER. Then select a known sky object, such as Moon from<br />
“Planets, Sun, Moon” menu <strong>and</strong> press ENTER. The mount will slew to the Moon. When the<br />
mount stopped slewing, the Moon could be just inside your eyepiece or way off. Press MENU<br />
button <strong>and</strong> scroll down the menu to “Sync to Target” <strong>and</strong> press ENTER. Follow the instruction,<br />
use ◄ ► ▲ <strong>and</strong> ▼ keys to move the Moon in the center of your eyepiece <strong>and</strong> press ENTER.<br />
4.3. Turn Off the <strong>Mount</strong><br />
When finishing observing, always move the mount to Park Position. If the mount is not<br />
moved, no initial set up is needed when powered on the next time. To do so, press the MENU<br />
button, scroll down to “Park Telescope” <strong>and</strong> press ENTER. Turn the power off.<br />
17
5. Operate <strong>SmartStar</strong> ® <strong>Cube</strong> TM -A mount in EQ Mode<br />
The <strong>SmartStar</strong> can precisely track a celestial object while in the alt-az position. The<br />
integrated wedge of an A-series telescope allows the telescope to be operated in an equatorial<br />
mode, which is a great option for those who want get familiar with the EQ operation.<br />
Please Note: the Park Position of an EQ mode is different from that of an A/A<br />
mode.<br />
Follow the steps below to change the mount from A/A mode to EQ mode:<br />
R.A. Axis<br />
(azi axle)<br />
DEC Axis<br />
(alt axle)<br />
north-facing tripod leg<br />
1. Make sure that the tripod is leveled while in A/A mode.<br />
2. Align the north-facing tripod leg to the north.<br />
3. Raise the wedge by loosen the tilt locks, until its tilt angle approximately equals to<br />
the observation site latitude;<br />
4. Replace the ALT lock with counterweight shaft if a counterweight is needed.<br />
18
5. Align the altitude axle (with or without counterweight) that is pointing straight down, in<br />
line with the north-facing tripod leg. This can be done by either loosen the azimuth<br />
lock (10) or turn the mount using left or right arrow key. The altitude axle will served<br />
as the DEC axis of the EQ mode.<br />
6. <strong>Mount</strong> the OTA onto the mount <strong>and</strong> align its optical axis parallel to the azimuth axle<br />
of the mount. This can be done by either loosen the altitude lock (4) or turn the<br />
mount using up or down arrow key. The azimuth axle will served as the R.A. axis of<br />
the EQ mode.<br />
7. Adjust the tilt. Find Polaris in your finder scope <strong>and</strong>/or your telescope eyepiece.<br />
Center it. Lock the tilt into position.<br />
8. In the main menu of your h<strong>and</strong> controller, select “Set Up Controller”, then select “Set<br />
<strong>Mount</strong> Type”, <strong>and</strong> select Equatorial mode.<br />
9. Turn off the mount power.<br />
Now your <strong>SmartStar</strong>-A mount is set at the park position of an EQ mode <strong>and</strong> is ready to<br />
observe.<br />
19
6. Use <strong>SmartStar</strong> ® <strong>Cube</strong> TM -A <strong>Telescopes</strong><br />
6.1. Manual Operation of a Telescope<br />
You may observe l<strong>and</strong> <strong>and</strong> astronomical objects using GoToNova’s arrow keys.<br />
After the telescope was assembled (referring to Section 2. Telescope Assembly), flip the<br />
I/O switch on the telescope mount to turn on the mount. Use ►,◄,▼ or ▲ buttons to point the<br />
telescope to desired object. You may need using SPEED key to change the slewing speed.<br />
6.2. Slew to an Object<br />
Press MENU button, from the main menu, select “Select <strong>and</strong> Slew.” Select an object you<br />
would like to observe <strong>and</strong> press ENTER key.<br />
The GoToNova ® 8401 h<strong>and</strong> controller has a database consists of over120,000 objects.<br />
Use ► or ◄ button to move the cursor <strong>and</strong> ▼ or ▲ button to change the number. A check mark<br />
“√” indicates the object is above the horizon, <strong>and</strong> cross mark “X” means it is below the horizon.<br />
Only those objects above the horizon can be observed. In some catalogs, those stars below<br />
the horizon may not be displayed.<br />
6.2.1. Planets, Sun, Moon<br />
There are 9 objects in Solar system.<br />
6.2.2. Deep Sky Objects<br />
This menu includes objects outside our Solar system such as galaxies, star clusters,<br />
quasars, nebulae.<br />
• Named Deepsky Objects: It consists of 60 deep sky objects with their common<br />
names. A list of named deep sky objects is also attached in Appendix C.<br />
• Messier Catalog: It consists of all 110 objects in Messier catalog.<br />
• NGC IC Catalog: consists of 7,840 objects in NGC catalog <strong>and</strong> 5,386 objects in IC<br />
catalog. To select an object from NGC or IC catalog, move the cursor to NGC,<br />
using▲ or ▼ button to toggle between NGC <strong>and</strong> IC. Then move the cursor to<br />
numerical position <strong>and</strong> use the number button to select the object.<br />
• UGC Catalog: consists of 12,939 objects.<br />
• MCG Catalog: consists of 29,004 objects. They are listed numerically from MCG+15<br />
to MCG-05.<br />
• Caldwell Catalog: consists of 109 objects.<br />
• Abell Catalog: consists of 2,712 objects.<br />
• Herschel Catalog: consists of 400 objects.<br />
6.2.3. Comets<br />
This catalog contains 190 comets. This database is customer upgradeable.<br />
20
6.2.4. Asteroids<br />
6.2.5. Stars<br />
I his catalog contains up to 4,096 asteroids. This database is customer upgradeable.<br />
• Named Stars: It consists of 191 stars with their common names. They are listed<br />
alphabetically. A list is attached in Appendix C.<br />
• Double Stars: It consists of 40 double stars. A list is attached in Appendix C.<br />
• SAO Bright Stars: It consists of 26,584 SAO catalog objects.<br />
• GCVS Variable Stars: consists of 38,624 GCVS variable stars. They are listed<br />
numerically.<br />
6.2.6. Constellations<br />
This catalog consists of 88 modern constellations with their names. They are listed<br />
alphabetically. A list is attached in Appendix C.<br />
6.2.7. User Objects<br />
It can consist up to 256 user predefined objects. These objects need to be entered<br />
before they can be selected for slewing.<br />
6.2.8. Enter R.A. DEC<br />
Here you can go to a target by entering its R.A. <strong>and</strong> DEC numbers.<br />
6.3. Sync to Target<br />
This operation will match the telescope's current coordinates to Target Right Ascension<br />
<strong>and</strong> Declination. After slew to an object, press MENU—then scroll to “Sync to Target” <strong>and</strong> press<br />
ENTER. Follow the screen to do the sync. Using this function will re-calibrate the computer to<br />
the selected object. Multiple syncs can be performed if needed.<br />
“Sync to Target” will only work after “Select <strong>and</strong> slew” is performed. Otherwise, the<br />
system may perform incorrectly. You can change the slewing speed to make the centering<br />
procedure easier. Simply press a number (1 through 9) to change the speed. The default slew<br />
speed is 64X.<br />
“Sync to Target” has the similar performance that “One Star Align” has <strong>and</strong> will greatly<br />
improve the GOTO accuracy locally. It is very useful for finding a faint object near a bright star.<br />
6.4. Electric Focuser<br />
N/A<br />
21
6.5. Set Up Controller<br />
6.5.1. Set Up Local Time<br />
Refer to 4.2.1.<br />
6.5.2. Set Up Site<br />
Refer to 4.2.1.<br />
6.5.3. Set N/S Hemisphere<br />
Set northern or southern hemisphere.<br />
6.5.4. Set Display Contrast<br />
Use arrow keys to adjust LCD display contrast.<br />
6.5.5. Set Eyepiece Light<br />
If you have an illuminated-reticule eyepiece or illuminated polar scope, <strong>and</strong> it is<br />
supported by GoToNova h<strong>and</strong> controller-- use this option to adjust the light intensity.<br />
6.5.6. Set Backlight<br />
Adjust LCD <strong>and</strong> keypad backlight.<br />
6.5.7. Set Anti-backlash<br />
Use Array Keys to move the cursor <strong>and</strong> Number Keys to change the number. 0 is<br />
suggested for Alt/Azi mount. <strong>For</strong> an EQ mount, the default setting is 150 for both DEC <strong>and</strong> R.A.<br />
6.5.8. Set Key Beep<br />
Turn the key beep on/off.<br />
6.5.9. Set <strong>Mount</strong> Type<br />
Set the mount as Equator <strong>Mount</strong> or Alt/Azi <strong>Mount</strong>.<br />
6.5.10. Reset All<br />
Reset all settings to factory default data.<br />
6.5.11. Update Firmware<br />
Firmware updating using <strong>iOptron</strong> Downloader through USB port on h<strong>and</strong> controller.<br />
(Refer to Appendix E.)<br />
6.5.12. Set gear ratio<br />
Not supported.<br />
22
6.5.13. Set Language<br />
Select h<strong>and</strong> controller display language in English or French.<br />
6.6. Align<br />
This function is used for align the telescope. Before star alignment, please make sure<br />
the mount is well leveled. The system also provides “One Star Align” <strong>and</strong> “Two Star Align”. Any<br />
one can be selected for telescope alignment.<br />
6.6.1. One Star Align<br />
From the main menu, select “Align”. Select “One Star Align” <strong>and</strong> press ENTER. Three<br />
most popular objects, such as Moon, a planet or a bright star that are above the horizon will be<br />
provided for selection. Use ▲ or ▼ button to select an alignment star <strong>and</strong> press ENTER. Then<br />
manually slew the telescope to the object <strong>and</strong> center the object in your eyepiece using ◄ ► ▲<br />
or ▼ key. Press SPEED button to adjust the slew speed. Then press ENTER to complete the<br />
alignment. Or press the BACK key to cancel the process.<br />
If you have a very good initial setup, one star alignment should be sufficient for good<br />
GOTO accuracy. To increase the accuracy you may choose to do two star alignment.<br />
6.6.2. Two Star Alignment<br />
Two star alignment will increase the GOTO accuracy of the mount. It is suggested to do<br />
two star alignment after one star alignment. Two star alignment requires a wider view of the sky,<br />
since the two align stars need to be far apart. Select “Two Star Align” in the Align menu. When<br />
you finish the first star, the system will prompt you to choose the second star. If the star you<br />
choose is too close to the first one, the system will let you choose another one. When you are<br />
aligned with the second star, two star alignment is finished. You can reject the suggested star if<br />
it is blocked by the tree or behind the house.<br />
“Two Star Align” result will be overridden if “One Star Align” or “Sync. to Target” is<br />
performed after “Two Star Align.”<br />
6.6.3. Three-Star Align<br />
N/A.<br />
6.6.4. Dis R.A axis error<br />
This only works for EQ mode. This displays the pointing error between the R.A. axis <strong>and</strong><br />
the polar axis. When the HC shows, for example:<br />
7.5" lower<br />
4.3" east,<br />
23
it means the polar axis of the mount is pointing 7.5” lower <strong>and</strong> 4.3” to the east to the North Pole.<br />
Pointing error is zero when you power on the mount (unless you “Park Telescope” before<br />
powering off).<br />
6.6.5. Test Anti-backlash<br />
This comm<strong>and</strong> tests the backlashes in both R.A. <strong>and</strong> DEC. The saved numbers will<br />
show in “Set Anti-backlash” menu. However, if no high accuracy is needed or your equatorial<br />
mount is not a high accuracy unit (i.e. the worm gear has different clearance in different<br />
positions), you can omit this procedure.<br />
6.6.6. Polaris Position<br />
Polaris is NOT at the exact point of the Polar Axis. This shows the offset (about 40 min)<br />
between the Polaris <strong>and</strong> the actual Celestial Pole (Polar Axis), as well as the direction of the<br />
Polaris to the Polar Axis at the observing location.<br />
6.7. PEC Option<br />
Not supported.<br />
6.8. Set Up Tracking<br />
A user can set up tracking in the main menu by selecting “Set up tracking”. Then the<br />
user can select “Sidereal speed”, “Solar speed”, “Lunar speed”, <strong>and</strong> “User defined speed”. <strong>For</strong><br />
“User defined speed” this can be adjusted from 91% to 109% of sidereal speed by pressing the<br />
▲or ▼ buttons.<br />
6.9. User Object List<br />
Besides various star lists available in the h<strong>and</strong> controller, users can add, edit or delete<br />
defined objects. All data you enter is supposedly J2000.0 epoch.<br />
6.10. Auto Guide<br />
This function is not supported in Alt/Azi mode.<br />
6.11. Park Scope<br />
This procedure only needs to be done if you do not move your telescope mount after you<br />
power off the GoToNova. Celestial pole pointing error will be stored to flash memory <strong>and</strong><br />
recalled when you power on again.<br />
6.12. To Park Position<br />
This moves your telescope to park position. When power is turned on, the mount<br />
assumes the physical position is the park position. This is its reference point for all other objects.<br />
24
7. Maintenance <strong>and</strong> Servicing<br />
7.1. Maintenance<br />
The <strong>SmartStar</strong> ® <strong>Cube</strong>-A mount or telescope is a precision instrument designed to yield a<br />
lifetime of rewarding applications. Given the care <strong>and</strong> respect due any precision instrument,<br />
your telescope will rarely require factory servicing or maintenance. Maintenance guidelines<br />
include:<br />
1. Using wet cloth to clean the mount <strong>and</strong> h<strong>and</strong> controller. Do not use the solvent.<br />
2. Leave the dust cap on while not operating the telescope. Avoid cleaning the telescope’s<br />
optics. A little dust on the front surface of the telescope’s correcting lens causes virtually<br />
no degradation of image quality <strong>and</strong> should not be considered a reason to clean the lens.<br />
3. When absolutely necessary, dust on the front lens should be removed with gentle strokes<br />
of a camel hair brush, a soft glass clean cloth or blown off with an ear syringe (available at<br />
any pharmacy). Do not use a commercial photographic lens cleaner.<br />
4. Organic materials (e.g., fingerprints) on the front lens may be removed with a solution of 3<br />
parts distilled water to 1 part isopropyl alcohol. Use soft, white facial tissues or cotton balls<br />
<strong>and</strong> make short, gentle strokes. Change tissues often. Do not use scented, colored, or<br />
lotioned tissues as damage could result to the optics.<br />
5. If your telescope is used outdoors on a humid night, telescope surfaces may accumulate<br />
water condensation. While such condensation does not normally cause any damage to the<br />
telescope, it is recommended that wait the entire telescope be dried before being packed<br />
away. Do not wipe any of the optical surfaces. In addition, the dust cap should not be<br />
placed back on to the optical tube until the telescope is thoroughly dry.<br />
6. If your telescope is not to be used for an extended period, perhaps for one month or more,<br />
it is advisable to remove the batteries from battery holder, if they are installed. Batteries<br />
left installed for prolonged periods may leak, causing damage to the telescope’s electronic<br />
circuitry.<br />
7. Do not leave your telescope outdoors on a warm day or inside a sealed car for an<br />
extended period of time. Excessive ambient temperatures can damage the telescope’s<br />
internal lubrication <strong>and</strong> electronic circuitry.<br />
7.2. Storage <strong>and</strong> Transport<br />
When not in use, store the telescope in a cool, dry place. Do not expose the instrument<br />
to excessive heat or moisture. It is best to store the telescope in its original box with the altitude<br />
lock knob unlocked. If shipping the telescope, use the original box <strong>and</strong> packing material to<br />
protect the telescope during shipment.<br />
When transporting the telescope, take care not to bump or drop the instrument; this type<br />
of abuse can damage the optics or affect the GOTO tracking accuracy.<br />
25
7.3. Troubleshooting<br />
The following suggestions may be helpful with operation of the <strong>SmartStar</strong> ®<br />
mount or telescope.<br />
<strong>Cube</strong>-A<br />
The power indicator light on the mount does not come on or there is no response when<br />
pressing h<strong>and</strong> controller’s arrow keys:<br />
(1) Verify that the power switch on the mount is in the ON position.<br />
(2) Verify that the h<strong>and</strong> controller cord is firmly connected to the HBX port on the mount,<br />
or switch the cord to the other HBX port.<br />
(3) Check the power source, which include:<br />
• Using the battery? Are the batteries installed correctly? Are the batteries fresh?<br />
How long have they been used? (frequent slew <strong>and</strong> GOTO will deplete battery<br />
power very quickly)<br />
• Using AC or DC adapter? Check the plugs to the mount <strong>and</strong> to the power outlet.<br />
• Using extension cord? Make sure the cord is in good condition. Power drop along<br />
the extension cord was known to cause the problem. Also check all the plugs <strong>and</strong><br />
connections.<br />
(4) If the telescope does not respond to comm<strong>and</strong>s, set the power switch to OFF <strong>and</strong><br />
then back to ON.<br />
(5) If the telescope does not slew after power is applied or if the motor quits or stalls,<br />
verify that there are no physical obstructions that would impede telescope movement.<br />
Cannot seem to focus (No image appears in the eyepiece):<br />
(1) Confirm that the dust cap has been removed from the telescope.<br />
(2) Keep turning the focus knob. Your telescope has a fine focusing mechanism which<br />
allows you to focus an image very precisely. However, this means that you may have<br />
to rotate the focus knob 20 to 40 complete turns to achieve focus, particularly the first<br />
time you use your telescope. After that, fewer turns will be needed.<br />
Images through the eyepiece appear unfocused or distorted:<br />
(1) The magnification used may be too high for the seeing conditions. Back off to a lower<br />
power eyepiece.<br />
(2) If inside a warm house or building, move outside. Interior air conditions may distort<br />
terrestrial (l<strong>and</strong>) or celestial images, making it difficult, if not impossible, to obtain a<br />
sharp focus. <strong>For</strong> optimal viewing, use the telescope outside in the open air instead of<br />
observing through an open or closed window or screen.<br />
(3) If viewing a l<strong>and</strong> object on a warm day, heat waves distort the image.<br />
(4) The optics within the telescope need time to adjust to the outside ambient<br />
temperature to provide the sharpest image. To "cool down" the optics, set the<br />
telescope outside for 10 to 15 minutes before observing begins.<br />
Error Message “Warning! DEC. (or R.A.) driver motor over current. Please check<br />
balance.”<br />
(1) Check if the mount or OTA is blocked by any obstructions.<br />
(2) Try to operate the mount without an OTA.<br />
(3) Check the power supply. This is a common reason for this message <strong>and</strong><br />
unexpected slew behavior or movement. which include:<br />
• Batteries: Are the batteries fresh? How long have they been used? (frequent<br />
slewing <strong>and</strong> GOTO will deplete battery power very quickly)<br />
• AC or DC adapter: Check the plugs to the mount <strong>and</strong> to the power outlet.<br />
26
• Extension cord: Make sure the cord is in good condition. Power drop along the<br />
extension cord has been known to cause this error message. Also check all the<br />
plugs <strong>and</strong> connections.<br />
(4) Check the h<strong>and</strong> controller cord. Unplug it <strong>and</strong> re-plug into the other HBX port.<br />
Error Message “Warning! Can not communicate with DEC motor controller.”<br />
(1) Check the h<strong>and</strong> controller cord. Unplug it <strong>and</strong> re-plug into another HBX port.<br />
(2) Check the power supply, which include:<br />
• Using the battery? Is the battery fresh? How long it has been used? (frequent<br />
slew <strong>and</strong> GOTO will deplete battery power very quickly)<br />
• Using AC or DC adapter? Check the plugs to the mount <strong>and</strong> to the power outlet.<br />
• Using extension cord? Make sure the cord is in good condition. Power drop along<br />
the extension cord was known to cause the problem. Also check all the plugs <strong>and</strong><br />
connections.<br />
The object is jumping up <strong>and</strong> down in the eyepiece or over-slewed, <strong>and</strong> other unexpected<br />
slew behavior or movement.<br />
(1) Use most updated firmware.<br />
(2) Set backlash to 0 in both DEC <strong>and</strong> RA.<br />
(3) Check the power supply, which include:<br />
• Using the battery? Is the battery fresh? How long it has been used? (frequent<br />
slew <strong>and</strong> GOTO will deplete battery power very quickly)<br />
• Using AC or DC adapter? Check the plugs to the mount <strong>and</strong> to the power outlet.<br />
• Using extension cord? Make sure the cord is in good condition. Power drop along<br />
the extension cord was known to cause the problem. Also check all the plugs <strong>and</strong><br />
connections.<br />
(4) System balancing.<br />
The telescope does not GOTO the right object, or the alignment is always wrong:<br />
(1) Leveling (very important).<br />
(2) Site information (minutes “ahead of “or “behind” UT, DST).<br />
(3) System balancing.<br />
(4) Use most updated firmware.<br />
(5) Select right mount type (A/A or EQ).<br />
(6) Starting form backlash of 0 in both DEC <strong>and</strong> RA.<br />
(7) Check the power supply, which include:<br />
• Using the battery? Is the battery fresh? How long it has been used? (frequent<br />
slew <strong>and</strong> GOTO will deplete battery power very quickly)<br />
• Using AC or DC adapter? Check the plugs to the mount <strong>and</strong> to the power outlet.<br />
• Using extension cord? Make sure the cord is in good condition. Power drop along<br />
the extension cord was known to cause the problem. Also check all the plugs <strong>and</strong><br />
connections.<br />
7.4. <strong>iOptron</strong> Customer Service<br />
If you have a question concerning your telescope, contact the <strong>iOptron</strong> Customer Service<br />
Department. Customer Service hours are 9:00 AM to 5:00 PM, Easter Time, Monday through<br />
Friday. In the unlikely event that the telescope requires factory servicing or repairs, write or call<br />
the <strong>iOptron</strong> Customer Service Department first, before returning the telescope to the factory,<br />
giving full particulars as to the nature of the problem, as well as your name, address, <strong>and</strong><br />
27
daytime telephone number. The great majority of servicing issues can be resolved by telephone,<br />
avoiding return of the telescope to the factory.<br />
It is also strongly suggested that to send your technical questions to<br />
support@ioptron.com.<br />
28
Appendix A. Technical Specifications<br />
<strong>SmartStar</strong> ® <strong>Cube</strong> TM -A GOTO <strong>Mount</strong><br />
<strong>Mount</strong> AltAzimuth/Equatorial Dual <strong>Mount</strong><br />
Body Materials<br />
Die-cast Aluminum<br />
Motor Dual-Axis DC Servo motor with encoders<br />
Gear Acetal worm wheel/Nylon 6 worm gear<br />
Bearing<br />
4 steel ball bearings<br />
Slew Speed<br />
Dual-Axis, 9-Gear, Electronic<br />
(1X,2X,8X,16X,64X,128X,256X,512X,MAX)<br />
GOTO System GoToNova ® 8401<br />
Processor<br />
32bit ARM<br />
Object in Database 120,000 +<br />
GOTO accuracy<br />
1 Arc Min. (Typical)<br />
Tracking<br />
Automatic<br />
Payload<br />
7 lbs<br />
Battery<br />
AA x 8(Not Included)<br />
Power Requirement<br />
DC 12V±2V, >1.2A<br />
Operating Temperature 0 ~ 40ºC<br />
Weight with tripod<br />
5.5 lbs (without OTA)<br />
Refractor Telescope<br />
Optical Design<br />
Achromatic Refractor<br />
Clear Aperture<br />
80 mm<br />
Focal Length<br />
400 mm<br />
Focal Ratio f/5<br />
Resolving Power<br />
1.4 arc sec<br />
Weight<br />
2.2 lbs<br />
Newtonian Reflector Telescope<br />
Optical Design<br />
Clear Aperture<br />
Focal Length<br />
Focal Ratio<br />
Resolving Power<br />
Finderscope<br />
Weight<br />
Maksutov-Cassegrain Telescope<br />
Optical Design<br />
Clear Aperture<br />
Focal Length<br />
Focal Ratio<br />
Resolving Power<br />
Finderscope<br />
Weight<br />
Reflector<br />
114 mm<br />
1000 mm<br />
f/8.8<br />
1 arc sec<br />
Red dot<br />
4 lbs<br />
Maksutov-Cassegrain<br />
90 mm<br />
1200 mm<br />
f/13.3<br />
1.3 arc sec<br />
Red dot<br />
4 lbs<br />
29
Appendix B. GoToNova ® 8401 HC MENU STRUCTURE<br />
MENU<br />
Select <strong>and</strong> Slew<br />
Sync. To Target<br />
Electric Focuser<br />
Planets, Sun, Moon<br />
Deep Sky Objects<br />
Comets<br />
Asteroids<br />
Stars<br />
Constellations<br />
User Objects<br />
Enter R.A. <strong>and</strong> DEC<br />
Focus<br />
Set Anti-backlash<br />
Mercury<br />
Venus<br />
Mars<br />
Jupiter<br />
Saturn<br />
Uranus<br />
Neptune<br />
Pluto<br />
Sun<br />
Moon<br />
Named Deepsky Object<br />
Messier Catalog<br />
NGC IC Catalog<br />
UGC Catalog<br />
MCG Catalog<br />
Caldwell Catalog<br />
Abell Catalog<br />
Herschel Catalog<br />
Named Stars<br />
Double Stars<br />
GCVS Variable Stars<br />
SAO Catalog<br />
30
Set Up Controller<br />
Align<br />
PEC Option<br />
Set Up Tracking<br />
User Objects<br />
Set Up Local Time<br />
Set Up Site<br />
Set N/S Hemisphere<br />
Set Display Contrast<br />
Set Eyepiece Light<br />
Set Backlight<br />
Set Anti-backslash<br />
Set Key Beep<br />
Set <strong>Mount</strong> Type<br />
Reset All<br />
Upgrade Firmware<br />
Set Gear Ratio<br />
Set Language<br />
Easy One Star Align<br />
One Star Align<br />
Two Star Align<br />
Three Star Align<br />
Disp. R.A. Axis Error<br />
Test Anti-backslash<br />
Polaris Position<br />
PEC Play Back<br />
Record PEC<br />
Delete PEC Record<br />
Sidereal Speed<br />
Solar Speed<br />
Lunar Speed<br />
User Defined Speed<br />
Add A New Record<br />
Modify Records<br />
Delete One Record<br />
Erase All Records<br />
Auto Guide<br />
Park Scope<br />
To Park Position<br />
31
Appendix C. GoToNova ® Star List<br />
GoToNova Deep Sky Object List<br />
for 8401<br />
ID No. OBJECT NGC # Messier # IC# A(Abell) U(UGC)<br />
1 Andromeda Galaxy 224 31<br />
2 Barnards Galaxy 6822<br />
3 Beehive Cluster 2632 44<br />
4 Blackeye Galaxy 4926 64<br />
5 Blinking Planetary Nebula 6826<br />
6 Blue Flash Nebula 6905<br />
7 Blue Planetary 3918<br />
8 Blue Snowball Nebula 7662<br />
9 Box Nebula 6309<br />
10 Bubble Nebula 7635<br />
11 Bipolar Nebula 6302<br />
12 Butterfly Cluster 6405 6<br />
13 California Nebula 1499<br />
14 Cat's Eye Nebula 6543<br />
15 Cocoon Nebula 5146<br />
16 Cone Nebula 2264<br />
17 Cork Nebula 650-51 76<br />
18 Crab Nebula 1952 1<br />
19 Crescent Nebula 6888<br />
20 Draco Dwarf 10822<br />
21 Duck Nebula 2359<br />
22 Dumbbell Nebula 6853 27<br />
23 Eagle Nebula 16<br />
24 Eight-Burst Nebula 3132<br />
25 Eskimo Nebula 2392<br />
26 Flaming Star Nebula 405<br />
27 Ghost of Jupiter 3242<br />
28 Great Cluster 6205 13<br />
29 Helix Nebula 7293<br />
30 Hercules Galaxy Cluster 2151<br />
31 Hind's Variable Nebula 1555<br />
32 Hubble's Variable Nebula 2261<br />
33 Integral Sign Galaxy 3697<br />
34 Jewel Box Cluster 4755<br />
35 Keyhole Nebula 3372<br />
32
36 Lagoon Nebula 6523 8<br />
37 Little Gem 6445<br />
38 Little Gem Nebula 6818<br />
39 Little Ghost Nebula 6369<br />
40 North American Nebula 7000<br />
41 Omega Nebula 6618 17<br />
42 Orion Nebula 1976 42<br />
43 Owl Nebula 3587 97<br />
44 Pelican Nebula 5070<br />
45 Phantom Streak Nebula 6741<br />
46 Pinwheel Galaxy 598 33<br />
47 Pleiades 45<br />
48 Ring Nebula 6720 57<br />
49 Ring Tail Galaxy 4038<br />
50 Rosette Nebula 2237<br />
51 Saturn Nebula 7009<br />
52 Sextans B Dwarf 5373<br />
53 Small Magellanic Cloud 292<br />
54 Sombrero Galaxy 4594 104<br />
55 Spindle Galaxy 3115<br />
56 Tank Track Nebula 2024<br />
57 Trifid Nebula 6514 20<br />
58 Ursa Minor Dwarf 9749<br />
59 Whirlpool Galaxy 5194 51<br />
60 Wild Duck Cluster 6705 11<br />
33
Messier<br />
This table is licensed under the GNU Free Documentation License. It uses material from the<br />
Wikipedia article List of Messier objects<br />
34
Modern Constellations<br />
No. Constellation Abbreviation No. Constellation Abbreviation<br />
1 Andromeda And 45 Lacerta Lac<br />
2 Antlia Ant 46 Leo Leo<br />
3 Apus Aps 47 Leo Minor LMi<br />
4 Aquarius Aqr 48 Lepus Lep<br />
5 Aquila Aql 49 Libra Lib<br />
6 Ara Ara 50 Lupus Lup<br />
7 Aries Ari 51 Lynx Lyn<br />
8 Auriga Aur 52 Lyra Lyr<br />
9 Boötes Boo 53 Mensa Men<br />
10 Caelum Cae 54 Microscopium Mic<br />
11 Camelopardalis Cam 55 Monoceros Mon<br />
12 Cancer Cnc 56 Musca Mus<br />
13 Canes Venatici CVn 57 Norma Nor<br />
14 Canis Major CMa 58 Octans Oct<br />
15 Canis Minor CMi 59 Ophiuchus Oph<br />
16 Capricornus Cap 60 Orion Ori<br />
17 Carina Car 61 Pavo Pav<br />
18 Cassiopeia Cas 62 Pegasus Peg<br />
19 Centaurus Cen 63 Perseus Per<br />
20 Cepheus Cep 64 Phoenix Phe<br />
21 Cetus Cet 65 Pictor Pic<br />
22 Chamaeleon Cha 66 Pisces Psc<br />
23 Circinus Cir 67 Piscis Austrinus PsA<br />
24 Columba Col 68 Puppis Pup<br />
25 Coma Berenices Com 69 Pyxis Pyx<br />
26 Corona Australis CrA 70 Reticulum Ret<br />
27 Corona Borealis CrB 71 Sagitta Sge<br />
28 Corvus Crv 72 Sagittarius Sgr<br />
29 Crater Crt 73 Scorpius Sco<br />
30 Crux Cru 74 Sculptor Scl<br />
31 Cygnus Cyg 75 Scutum Sct<br />
32 Delphinus Del 76 Serpens Ser<br />
33 Dorado Dor 77 Sextans Sex<br />
34 Draco Dra 78 Taurus Tau<br />
35 Equuleus Equ 79 Telescopium Tel<br />
36 Eridanus Eri 80 Triangulum Tri<br />
37 <strong>For</strong>nax <strong>For</strong> 81 Triangulum Australe TrA<br />
38 Gemini Gem 82 Tucana Tuc<br />
39 Grus Gru 83 Ursa Major UMa<br />
40 Hercules Her 84 Ursa Minor UMi<br />
41 Horologium Hor 85 Vela Vel<br />
42 Hydra Hya 86 Virgo Vir<br />
43 Hydrus Hyi 87 Volans Vol<br />
44 Indus Ind 88 Vulpecula Vul<br />
35
GoToNova Named Star List<br />
001 Acamar 049 Ascella 097 Kaus Australis 145 Rassalas<br />
002 Achernar 050 Asellus Australis 098 Kaus Borealis 146 Rasagethi<br />
003 Acrux 051 Asellus Borealis 099 Kaus Media 147 Rasalhague<br />
004 Acubens 052 Aspidiske 100 Keid 148 Rastaba<br />
005 Adhafera 053 Atik 101 Kitalpha 149 Regulus<br />
006 Adhara 054 Atlas 102 Kochab 150 Rigel<br />
007 Al Na’ir 055 Atria 103 Kornephoros 151 Rigel Kentaurus<br />
008 Albali 056 Avoir 104 Kurhah 152 Ruchbah<br />
009 Alberio 057 Azha 105 Lesath 153 Rukbat<br />
010 Alchibar 058 Baten Kaitos 106 Maia 154 Sabik<br />
011 Alcor 059 Beid 107 Marfik 155 Sadachbia<br />
012 Alcyone 060 Bellatrix 108 Markab 156 Sadalbari<br />
013 Aldebaran 061 Betelgeuse 109 Matar 157 Sadalmelik<br />
014 Alderamin 062 Biham 110 Mebsuta 158 Sadalsuud<br />
015 Alfirk 063 Canopus 111 Megrez 159 Sadr<br />
016 Algedi 064 Capella 112 Meissa 160 Saiph<br />
017 Algenib 065 Caph 113 Mekbuda 161 Scheat<br />
018 Algiebra 066 Castor 114 Menkalinan 162 Schedar<br />
019 Algol 067 Celabrai 115 Menkar 163 Seginus<br />
020 Algorab 068 Celaeno 116 Menkent 164 Shaula<br />
021 Alhena 069 Chara 117 Menkib 165 Sheiak<br />
022 Alioth 070 Chertan 118 Merak 166 Sheratan<br />
023 Alkaid 071 Cor Caroli 119 Merope 167 Sirius<br />
024 Alkalurops 072 Cursa 120 Mesartim 168 Skat<br />
025 Alkes 073 Dabih 121 Miaplacidus 169 Spica<br />
026 Almach 074 Deneb 122 Mintaka 170 Sterope<br />
027 Alnasl 075 Deneb Algedi 123 Mira 171 Sulafat<br />
028 Alnilam 076 Deneb Kaitos 124 Mirach 172 Syrma<br />
029 Alnitak 077 Denebola 125 Mirfak 173 Talitha<br />
030 Alphard 078 Dubhe 126 Mirzam 174 Tania Australis<br />
031 Alphecca 079 Edasich 127 Mizar 175 Tania Borealis<br />
032 Alpheratz 080 Electra 128 Muphrid 176 Tarazed<br />
033 Alrakis 081 Elnath 129 Muscida 177 Taygeta<br />
034 Alrescha 082 Eltanin 130 Nashira 178 Thuban<br />
035 Alshain 083 Enif 131 Nekkar 179 Unukalhai<br />
036 Altair 084 Errai 132 Nihal 180 Vega<br />
037 Altais 085 Fomalhaut 133 Nunki 181 Vindemiatrix<br />
038 Alterf 086 Furud 134 Nusakan 182 Wasat<br />
039 Aludra 087 Gacrux 135 Peacock 183 Wazn<br />
040 Alula Australis 088 Giausar 136 Phact 184 Yed Posterior<br />
041 Alula Borealis 089 Gienah 137 Phecda 185 Yed Prior<br />
042 Alya 090 Gomeisa 138 Pherkad 186 Zaniah<br />
043 Ancha 091 Graffias 139 Pleione 187 Zaurak<br />
044 Ankaa 092 Groombridge 1830 140 Polaris 188 Zavijava<br />
045 Antares 093 Grumium 141 Pollux 189 Zosma<br />
046 Arcturus 094 Hamal 142 Porrima 190 Zubenelgenubi<br />
047 Arkab 095 Homan 143 Procyon 191 Zubeneschamali<br />
048 Arneb 096 Izar 144 Propus<br />
36
GoToNova Double Star List<br />
No. Object Const SAO Name<br />
1 Eta Cas 21732 Achird<br />
2 Alpha Psc 110291 Alrisha<br />
3 Theta Per 38288<br />
4 Alpha <strong>For</strong> 168373 <strong>For</strong>nacis<br />
5 Alpha Aur 40186 Capella<br />
6 Sigma Ori 132406<br />
7 Mu Ori 113389<br />
8 Alpha CMa 151881 Sirius<br />
9 Delta Gem 79294 Wasat<br />
10 Alpha Gem 60198 Castor<br />
11 Alpha CMi 115756<br />
12 Epsilon Hya 117112<br />
13 HR 3579 42642<br />
14 Kapa UMa 42661<br />
15 Psi Vel 221234<br />
16 Gamma Leo 81298 Algieba<br />
17 HR 4167 222199<br />
18 Mu Vel 222321<br />
19 Alpha UMa 15384 Dubhe<br />
20 Zeta UMa 28737 Mizar<br />
21 Iota Leo 99587<br />
22 Gamma Cen 223603<br />
23 Gamma Vir 138917 Porrima<br />
24 Beta Mus 252019<br />
25 HR 5089 204545<br />
26 Alpha Cen 252838<br />
27 Zeta Boo 101145<br />
28 Gamma Lup 225938<br />
29 Gamma CrA 83958<br />
30 Xi Sco 159665<br />
31 Alpha Sco 184415 Antares<br />
32 Lambda Oph 121658 Marfic<br />
33 Zeta Her 65485<br />
34 Eta Oph 160332 Sabik<br />
35 70 Oph 123107<br />
36 Zeta Sgr 187600 Ascella<br />
37 Delta Cyg 48796<br />
38 Beta Del 106316 Rotanev<br />
39 Tau Cyg 71121<br />
40 Epsilon Lyr 67310 double double<br />
37
Appendix D. Set Up USB-PC Connection<br />
1. Download USB2COM driver (cp2102.zip file for 8401) from <strong>iOptron</strong> Website<br />
2. Install CP210x (usb2com) driver<br />
Choose the appropriate driver for your OS. In this case is a Windows XP operation system.<br />
Double click on it, <strong>and</strong> you will see:<br />
Click “Next”.<br />
38
Select “I accept the terms of license agreement”, <strong>and</strong> click “Next”<br />
Using the default installation path, c:\SiLabs\MCU\CP210x, or specify your own path by click<br />
“Change”. Click “Next”. Then click “Install”.<br />
39
When finished installation, click “Finish”<br />
3. Plug the USB cable in to the USB port on your PC, plug the other end of the USB<br />
cable to h<strong>and</strong> controller. Turn on the power on the mount.<br />
4. Install the Hardware<br />
The computer will find a new hardware <strong>and</strong> show the following screen<br />
Select “No, not this time” <strong>and</strong> click “Next”.<br />
40
Select “Install from a list or specific location” <strong>and</strong> click “Next”.<br />
Select “Search for the best driver in these locations,” <strong>and</strong> check “Include this location in the<br />
search.”<br />
Click on “Browse” <strong>and</strong> select the CP210x driver from directory<br />
c:\SiLabs\MCU\CP210x\Win2K_XP, click OK.<br />
41
Click “Next”. The computer will start to install the driver for the USB2COM. When the installation<br />
is done, click “Finish”.<br />
If the computer shows “find a new hardware” screen again, just repeat the steps in this<br />
section again.<br />
42
Now you computer should be ready for Firmware Upgrading, computer communication with the<br />
mount via ASCOM platform <strong>and</strong> planetarium software applications. However, you need to find<br />
assigned COM port number for the USB connection. To do so, right click “My Computer”, <strong>and</strong><br />
click “Properties”<br />
Click “Hardware”, click “Device Manager”<br />
43
Double click on “Ports(COM & LPT)”, find out the COM number <strong>and</strong> write it down (in the<br />
following figure, it is COM3)<br />
44
Appendix E. Firmware Upgrade<br />
1. Download <strong>and</strong> install Firmware Downloader from <strong>iOptron</strong> Website<br />
2. Double click <strong>and</strong> open “<strong>iOptron</strong> Downloader”<br />
On the interface, select appropriate port using pull-down menu (in this case, COM3):<br />
45
Click “Open Data File”, <strong>and</strong> select appropriate “.bin” file that matches your h<strong>and</strong> controller, <strong>and</strong><br />
click “Open”. Select “Main Program” ONLY in Update Type.<br />
Click “Start Download”. <strong>iOptron</strong>Download will display:<br />
“Please reset GoToNova[GOTOSTAR], waiting for connection…”<br />
On the h<strong>and</strong> controller, press “MENU”, <strong>and</strong> using ▼▲ scroll to select “Set up controller”, press<br />
“ENTER”, then select “Upgrade firmware”, press “ENTER” <strong>and</strong> the upgrade starts.<br />
46
Now the upgrade is finished.<br />
Typical Errors:<br />
1. Invalid Port Number: in Device Manager, make sure you have the correct COM port<br />
number for CP210x.<br />
2. Wrong “.bin” file: make sure you have the correct “.bin” file for firmware upgrade.<br />
3. Wrong downloader, you should use <strong>iOptron</strong> Downloader instead of the Flash<br />
Downloader.<br />
4. Use CP210x driver provided by <strong>iOptron</strong>. The newest version from SiLab may not work<br />
properly for <strong>iOptron</strong>’s h<strong>and</strong> controller.<br />
What can I do if the firmware is not loading or the screen is blank, due to any reason?<br />
• Turn on the mount to power on the h<strong>and</strong> controller (the key pad should be lit)<br />
• Click on the <strong>iOptron</strong> Downloader. Change the Serial Port to the right COM port in the<br />
pull-down menu (example: COM4)<br />
• Click on Open Data ile(O) button to select the right Firmware for your h<strong>and</strong> controller.<br />
(example: 8401_Ver090701.bin)<br />
• DON’T click on Start Download (D) button yet. Turn the mount power off.<br />
• Turn the mount power back on. Right after hearing the “beep”, click on Start<br />
Download (D) button. The timing is very important. The downloading process will begin<br />
• When the download is successfully finished, turn the mount off <strong>and</strong> back on to check<br />
the h<strong>and</strong> controller. Double check the settings, such as time <strong>and</strong> site info, mount type,<br />
anti-backlash, to see if they are changed<br />
• You may need to practice a few times to get the procedure work correctly.<br />
47
Appendix F. Use a PC to Control an <strong>iOptron</strong> <strong>Mount</strong><br />
In general you need the followings to use a PC to control a <strong>SmartStar</strong>-A mount,<br />
1. Download USB2COM driver (CP210x.zip file for 8401)<br />
http://www.ioptron.com/support.aspx?catalog=28;<br />
2. Install USB2COM <strong>and</strong> establish the connection between the mount <strong>and</strong> the PC (see<br />
instruction);<br />
3. ASCOM platform (download from http://ascom-st<strong>and</strong>ards.org/);<br />
4. <strong>iOptron</strong> ASCOM drive (download it from <strong>iOptron</strong> website); <strong>and</strong><br />
5. Planetarium software.<br />
Some company has integrated <strong>iOptron</strong>’s products into their planetarium software, such<br />
as Voyage <strong>and</strong> The Sky X Pro. Therefore, an ASCOM plug-in will not be needed. Most<br />
planetarium software can be used to control <strong>iOptron</strong>’s product via ASCOM.<br />
Some other ASCOM drivers, such as LX200 Generic ASCOM driver <strong>and</strong> AstroPhysics<br />
GTO driver, are also compatible to <strong>SmartStar</strong> ® mount.<br />
48