Steps for Creating and Uploading Assessment Correction Data
Steps for Creating and Uploading Assessment Correction Data
Steps for Creating and Uploading Assessment Correction Data

You also want an ePaper? Increase the reach of your titles
YUMPU automatically turns print PDFs into web optimized ePapers that Google loves.
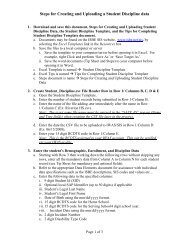
<strong>Steps</strong> <strong>for</strong> <strong>Creating</strong> <strong>and</strong> <strong>Uploading</strong> <strong>Assessment</strong> <strong>Correction</strong> <strong>Data</strong><br />
1. Authorized user must request the <strong>Assessment</strong> <strong>Correction</strong> .csv file from<br />
IWAS/SIS/Request File screen.<br />
a. Authorized user must login to IWAS<br />
b. Access SIS from System Listing<br />
c. Click Request File link within SIS<br />
d. Select the <strong>Assessment</strong> <strong>Correction</strong> option from the drop down <strong>and</strong> select one of the<br />
three options – Grades 3 – 8, Grade 11 or all (includes grades 3-8 <strong>and</strong> 11). Press<br />
the Request <strong>for</strong> <strong>Assessment</strong> <strong>Correction</strong> button to submit your request <strong>for</strong> your<br />
school/district’s file.<br />
2. Authorized User must download the <strong>Assessment</strong> <strong>Correction</strong> .csv file from<br />
IWAS/SIS/Download File screen.<br />
a. Authorized user must login to IWAS<br />
b. Access SIS from System Listing<br />
c. Click Download File link within SIS<br />
d. Locate the <strong>Assessment</strong> <strong>Correction</strong> File named – ISBE_Asses_Corr_.csv.<br />
i) Example: ISBE_Asses_Corr_01001001026.csv<br />
e. Save the file to a local computer or server<br />
NOTE: DO NOT OPEN THE FILE AND THEN SAVE WHILE THE FILE IS OPEN.<br />
Save the file be<strong>for</strong>e opening in Excel. Some browsers allow a right Click <strong>and</strong> per<strong>for</strong>m<br />
‘Save As’ or ‘Save Target As’. You will need to determine what your browser allows.<br />
3. Download the <strong>Assessment</strong> <strong>Correction</strong> Excel Template, Tips Sheet, <strong>and</strong> <strong>Steps</strong> <strong>for</strong><br />
Correcting <strong>Assessment</strong> <strong>Data</strong>.<br />
a. Located on the SIS Website – www.isbe.net/sis<br />
b. In the Resources box (Right side of page) click on Excel Templates<br />
c. Excel Template is named <strong>Assessment</strong> <strong>Correction</strong> Template<br />
d. Excel Tips is named Tips <strong>for</strong> Completing ISBE <strong>Assessment</strong> <strong>Correction</strong><br />
Template<br />
e. <strong>Steps</strong> document is named <strong>Steps</strong> <strong>for</strong> Correcting <strong>and</strong> <strong>Uploading</strong> <strong>Assessment</strong><br />
<strong>Data</strong><br />
f. Save the files to a local computer or server<br />
NOTE: DO NOT OPEN THE FILE AND THEN SAVE WHILE THE FILE IS OPEN.<br />
Save the file be<strong>for</strong>e opening in Excel. For example, right Click <strong>and</strong> per<strong>for</strong>m ‘Save<br />
As’ or ‘Save Target As’.<br />
4. Appropriate personnel must import the data to the <strong>Assessment</strong> <strong>Correction</strong> excel<br />
template.<br />
a. Open the CSV <strong>Assessment</strong> <strong>Correction</strong> file (ISBE_Asses_Corr_.csv) in excel (DO NOT SAVE IT).<br />
b. Open the <strong>Assessment</strong> <strong>Correction</strong>s excel template.<br />
c. Keep both the source data spreadsheet <strong>and</strong> the template open.<br />
d. Highlight the cells - Row 2/Column A through Column Z <strong>and</strong> all rows with<br />
student data.<br />
Page 1 of 4
<strong>Steps</strong> <strong>for</strong> <strong>Creating</strong> <strong>and</strong> <strong>Uploading</strong> <strong>Assessment</strong> <strong>Correction</strong> <strong>Data</strong><br />
i) Make sure the Result Codes <strong>and</strong> Result Messages (AA <strong>and</strong> AB) are not copied<br />
into the template.<br />
ii) Do not highlight beyond column Z or highlight the entire row.<br />
e. Select Edit Copy<br />
f. Navigate to the <strong>Assessment</strong> <strong>Correction</strong>s Excel Template<br />
g. Click on cell Row 3/Column A prior to pasting the data<br />
h. Select Edit Paste Special<br />
i. When the pop-up box opens Select Values <strong>and</strong> click Ok.<br />
5. Review the <strong>Assessment</strong> <strong>Data</strong> relocated to the <strong>Assessment</strong> <strong>Correction</strong> excel<br />
template.<br />
6. Make Changes.<br />
a. All corrections need to be made in the <strong>Assessment</strong> <strong>Correction</strong> excel template<br />
b. Do not make any changes to in<strong>for</strong>mation in the CSV <strong>for</strong>mat as the <strong>for</strong>matting will<br />
be lost <strong>and</strong> errors may result when submitted.<br />
c. Correct all errors identified by an ‘F’ or ‘I’ in Column AA. The result message<br />
follows in Column AB.<br />
d. Change inaccurate data such as program indicators, grade levels, gender codes<br />
etc.<br />
e. Column A should be marked “01” if the student tested <strong>and</strong> “02” if the student did<br />
not test.<br />
f. When a record is marked as ‘02’ (Student did not test), Column B - Reason <strong>for</strong><br />
Not Testing must have an entry or the action to that record will fail. The only time<br />
a reason code in Column B is entered is when a student did not test.<br />
Note: Do not add students to this file <strong>for</strong> other grade levels.<br />
7. Create the <strong>Assessment</strong> <strong>Correction</strong> .csv File Header in Row 1/Columns B, C, D &<br />
E.<br />
a. Row 1/Column B is the number of student records being submitted<br />
b. Row 1/Column C is the File Name (NOTE: This name is used to create the .csv<br />
file. This item must include the .csv extension)<br />
c. Row 1/Column D is the date the file is being submitted to IWAS/SIS<br />
d. Row 1/Column E is the 15 digit District/School’s RCDTS code<br />
Note: This is the RCDTS assigned to your IWAS account. This can be verified<br />
via your IWAS profile.<br />
8. Save the <strong>Assessment</strong> <strong>Correction</strong> Excel Template as a .csv file.<br />
a. Open the <strong>Assessment</strong> <strong>Correction</strong>s Excel Template, or if you already have the<br />
spreadsheet open, save the Excel version (.XLS extension).<br />
b. Save the document as a comma delimited file (.csv).<br />
c. On the File menu click File Save As<br />
d. In the File Name box type the same file name as you typed in 1-C excluding the<br />
‘.csv”.<br />
Page 2 of 4
<strong>Steps</strong> <strong>for</strong> <strong>Creating</strong> <strong>and</strong> <strong>Uploading</strong> <strong>Assessment</strong> <strong>Correction</strong> <strong>Data</strong><br />
e. Look at the Save in: <strong>and</strong> either take note of where the file is being saved or<br />
change the location to another desired location. Keep the Save As type, Microsoft<br />
Excel Workbook click Save.<br />
f. After saving the backup file, on the File menu click File click Save As a<br />
second time.<br />
g. In the Save As Type list, select CSV (Comma delimited).<br />
h. Click Save.<br />
i. When notified that the file may contain features not compatible with CSV click<br />
Yes to keep the workbook in the current <strong>for</strong>mat <strong>and</strong> finish saving the file.<br />
j. Close the Excel file.<br />
i) When prompted to save your changes to the CSV file click No.<br />
Note: There will be 2 files at the end of these actions: the excel template <strong>and</strong> a .csv<br />
file<br />
9. Upload the .csv file via IWAS/SIS/File Upload screen.<br />
a. Login into IWAS/SIS using appropriate role <strong>for</strong> uploading – RCDT/ADMIN role.<br />
b. Access SIS from System Listing<br />
c. Click Upload File link within SIS<br />
d. Click Browse to locate the CSV Student Demographics - Enrollment File named –<br />
(what you entered in 1-C).csv.<br />
i) Example: Riverton.csv<br />
e. Click Open to return to the Upload File page<br />
f. Click the Upload button to complete the transmission to SIS.<br />
g. If you receive a message indicating your file has been uploaded successfully you<br />
are finished<br />
h. Download your file once it has been processed <strong>and</strong> is ready on your Download<br />
File screen.<br />
i. If you receive any file <strong>for</strong>mat errors you will want to go back to your Excel<br />
Template (XLS) version that you saved to make your changes <strong>and</strong> then re-create a<br />
new CSV file.<br />
Note: Never make any changes in the CSV version as the <strong>for</strong>matting will be lost<br />
causing records to fail.<br />
Note: There is no limitation on the number of times the <strong>Assessment</strong> <strong>Correction</strong> file<br />
may be uploaded within the assessment correction period.<br />
10. Review the Result Codes <strong>and</strong> Result Messages in Columns AA <strong>and</strong> AB after the<br />
file is processed <strong>and</strong> returned to you.<br />
a. Login to IWAS.<br />
b. Access SIS from System Listing.<br />
c. Click Download File link within SIS.<br />
d. Locate the <strong>Assessment</strong> <strong>Correction</strong> File named – (what you entered in 1-C).csv.<br />
i) Example: Riverton.csv<br />
e. Save the file to your pc or a server.<br />
Page 3 of 4
<strong>Steps</strong> <strong>for</strong> <strong>Creating</strong> <strong>and</strong> <strong>Uploading</strong> <strong>Assessment</strong> <strong>Correction</strong> <strong>Data</strong><br />
Note: DO NOT OPEN THE FILE AND THEN SAVE WHILE THE FILE IS OPEN.<br />
Save the file be<strong>for</strong>e opening in Excel. For example, right Click <strong>and</strong> per<strong>for</strong>m ‘Save<br />
As’ or ‘Save Target As’.<br />
11. Make Changes if corrections are required <strong>and</strong> re-submit a new .csv file to<br />
IWAS/SIS.<br />
a. All corrections are made in the <strong>Assessment</strong> <strong>Correction</strong> Excel template<br />
b. Open the original <strong>Assessment</strong> <strong>Correction</strong> template to make the corrections.<br />
c. Do not make any changes to in<strong>for</strong>mation in the CSV <strong>for</strong>mat as the <strong>for</strong>matting will<br />
be lost <strong>and</strong> errors may result when submitted.<br />
d. Correct all errors identified by an ‘F’ or ‘I’ in Column AA<br />
e. Change inaccurate data such as program indicators, grade levels, RCDTS codes,<br />
etc.<br />
f. When all changes are complete, create a new .csv file following the SAVE AS<br />
process.<br />
g. Upload the file to IWAS/SIS/File Upload screen.<br />
Note: There is no limitation on the number of times the Student Demographic -<br />
Enrollment file may be uploaded.<br />
Page 4 of 4