floppy-ear crochet bunny - Joann.com
floppy-ear crochet bunny - Joann.com
floppy-ear crochet bunny - Joann.com

Create successful ePaper yourself
Turn your PDF publications into a flip-book with our unique Google optimized e-Paper software.
3 skill<br />
level<br />
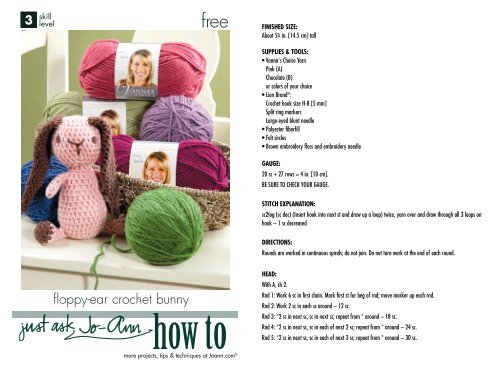
free<br />
FINISHED SIZE:<br />
About 5 3 ⁄4 in. [14.5 cm] tall<br />
SUPPLIES & TOOLS:<br />
• Vanna's Choice Yarn<br />
Pink (A)<br />
Chocolate (B)<br />
or colors of your choice<br />
• Lion Brand ® :<br />
Crochet hook size H-8 [5 mm]<br />
Split ring markers<br />
Large-eyed blunt needle<br />
• Polyester fiberfill<br />
• Felt circles<br />
• Brown embroidery floss and embroidery needle<br />
GAUGE:<br />
20 sc + 27 rows = 4 in. [10 cm].<br />
BE SURE TO CHECK YOUR GAUGE.<br />
STITCH EXPLANATION:<br />
sc2tog (sc dec) (Insert hook into next st and draw up a loop) twice, yarn over and draw through all 3 loops on<br />
hook – 1 sc decreased<br />
DIRECTIONS:<br />
Rounds are worked in continuous spirals; do not join. Do not turn work at the end of each round.<br />
<strong>floppy</strong>-<strong>ear</strong> <strong>crochet</strong> <strong>bunny</strong><br />
HEAD:<br />
With A, ch 2.<br />
Rnd 1: Work 6 sc in first chain. Mark first st for beg of rnd; move marker up each rnd.<br />
Rnd 2: Work 2 sc in each sc around – 12 sc.<br />
Rnd 3: *2 sc in next sc, sc in next sc; repeat from * around – 18 sc.<br />
Rnd 4: *2 sc in next sc, sc in each of next 2 sc; repeat from * around – 24 sc.<br />
Rnd 5: *2 sc in next sc, sc in each of next 3 sc; repeat from * around – 30 sc.<br />
more projects, tips & techniques at <strong>Joann</strong>.<strong>com</strong> ®
Rnds 6-10: Sc in each sc around.<br />
Rnd 11: *Sc2tog, sc in each of next 3 sc; repeat from * around – 24 sts.<br />
Rnd 12: *Sc2tog, sc in each of next 2 sc; repeat from * around – 18 sts.<br />
Rnd 13: *Sc2tog, sc in next sc; repeat from * around – 12 sts.<br />
Stuff firmly.<br />
Rnd 14: Sc2tog around – 6 sts.<br />
Fasten off. Sew on beads or felt circles for eyes. With 2 strands of floss, embroider a straight stitch ‘Y’ at center<br />
of face for nose.<br />
BODY:<br />
Note: Body is worked beginning at lower edge.<br />
With A, ch 2.<br />
Rnd 1: Work 6 sc in first chain. Mark first st for beg of rnd; move marker up every rnd.<br />
Rnd 2: Work 2 sc in each sc around – 12 sc.<br />
Rnd 3: *2 sc in next sc, sc in next sc; repeat from * around – 18 sc.<br />
Rnd 4: *2 sc in next sc, sc in each of next 2 sc; repeat from * around – 24 sc.<br />
Rnd 5: *2 sc in next sc, sc in each of next 3 sc; repeat from * around – 30 sc.<br />
Rnds 6-8: Sc in each sc around.<br />
Rnd 9: *Sc2tog, sc in each of next 3 sc; repeat from * around – 24 sts.<br />
Rnds 10 and 11: Sc in each sc around.<br />
Begin stuffing firmly, add stuffing as work progresses.<br />
Rnd 12: *Sc2tog, sc in each of next 2 sc; repeat from * around – 18 sts.<br />
Rnds 13-15: Sc in each sc around.<br />
Rnd 16: *Sc2tog, sc in next sc; repeat from * around – 12 sts .<br />
Rnd 17: Sc in each sc around.<br />
Fasten off, leaving a long tail for sewing to Head.<br />
EARS (MAKE 2):<br />
With B, ch 2.<br />
Rnd 1: Work 4 sc in first chain. Mark first st for beg of rnd; move marker up every rnd.<br />
Rnds 2 and 3: Sc in each sc around.<br />
Rnd 4: *2 sc in next sc, sc in next sc; repeat from * around – 6 sc.<br />
Rnds 5 and 6: Sc in each sc around.<br />
Rnd 7: *2 sc in next sc, sc in each of next 2 sc; repeat from * around – 8 sc.<br />
Rnds 8 and 9: Sc in each sc around.<br />
Rnd 10: *2 sc in next sc, sc in each of next 3 sc; repeat from * around – 10 sc.<br />
Rnds 11-12: Sc in each sc around.<br />
Rnd 13: *2 sc in next sc, sc in each of next 4 sc; repeat from * around – 12 sc.<br />
Rnds 14 and 15: Sc in each sc around.<br />
Rnd 16: *2 sc in next sc, sc in each of next 5 sc; repeat from * around – 14 sc.<br />
Rnds 17-26: Sc in each sc around.<br />
Fasten off, leaving a long tail for sewing to Head.<br />
LEGS (MAKE 2):<br />
With B, ch 2.<br />
Rnd 1: Work 6 sc in first chain. Mark first st for beg of rnd; move marker up each rnd.<br />
Rnd 2: Work 2 sc in each sc around – 12 sc.<br />
Rnd 3: Sc in each sc around. End off B.<br />
Rnds 4 and 5: Join A. Sc in each sc around.<br />
Stuff firmly.<br />
Rnd 6: Sc2tog around – 6 sc.<br />
Rnds 7 and 8: Sc in each sc around.<br />
Fasten off, leaving a long tail for sewing to Body.<br />
ARMS (MAKE 2):<br />
With A, ch 2.<br />
Rnd 1: Work 6 sc in first chain. Mark first st for beg of rnd; move marker up each rnd.<br />
Rnds 2-6: Sc in each sc around.<br />
Fasten off, leaving a long tail for sewing to Body. Stuff firmly.
Project courtesy of<br />
Lion Brand ®<br />
TAIL:<br />
With B, ch 2.<br />
Rnd 1: Work 6 sc in first chain. Mark first st for beg of rnd; move marker up each rnd.<br />
Rnd 2: Work 2 sc in each sc around – 12 sc.<br />
Rnds 3 and 4: Sc in each sc around.<br />
Rnd 5: Sc2tog around – 6 sc.<br />
Stuff very lightly. Fasten off, leaving a long tail for sewing to Body.<br />
FINISHING:<br />
Sew Head to Body. Sew Arms on either side of upper Body. Flatten Ears and sew to Head. Sew Feet on either side<br />
of lower Body. Sew Tail to lower back of Body.<br />
ABBREVIATIONS:<br />
beg = begin(ning)<br />
ch = chain<br />
dec = decreas(e)(es)(ing)<br />
rnd = round<br />
sc = single <strong>crochet</strong><br />
st(s) = stitch(es)<br />
Skill Level 3: Crochet experience needed<br />
Please read and follow all manufacturers’ instructions for all tools and materials used.<br />
Provide adult supervision if children participate in this project.<br />
©2009 Jo-Ann Stores, Inc. All rights reserved.<br />
P120-193