Users Manual Tron ARR.pdf - Jotron
Users Manual Tron ARR.pdf - Jotron
Users Manual Tron ARR.pdf - Jotron

You also want an ePaper? Increase the reach of your titles
YUMPU automatically turns print PDFs into web optimized ePapers that Google loves.
Amendment<br />
No.<br />
Incorp.<br />
By<br />
Date Page(S) Version Change<br />
Note<br />
( EM)<br />
1 FIT 27.05.05 21 A<br />
2<br />
3<br />
4<br />
5<br />
6<br />
7<br />
8<br />
9<br />
10<br />
11<br />
12<br />
13<br />
14<br />
15<br />
16<br />
17<br />
18<br />
10<br />
20<br />
21<br />
22<br />
23<br />
24<br />
25<br />
26<br />
27<br />
28<br />
29<br />
30
The information in this book has been carefully checked and is<br />
believed to be accurate. However, no responsibility is assumed<br />
for inaccuracies.<br />
JOTRON electronics a.s reserves the right to make changes<br />
without further notice to any products or modules described<br />
herein to improve reliability, function or design. JOTRON<br />
electronic a.s does not assume any liability arising out of the<br />
application or use of the described product.<br />
SAFETY INSTRUCTIONS<br />
CAUTION!<br />
This equipment contains CMOS integrated circuits. Observe handling<br />
precautions to avoid static discharges which may damage these devices.
LIST OF CONTENTS<br />
1. INTRODUCTION.................................................................... 5<br />
1.1 GENERAL ......................................................................... 5<br />
1.2 FEATURES ....................................................................... 7<br />
2. TECHNICAL DESCRIPTION ................................ 8<br />
3. INSTALLATION ................................................................... 10<br />
3.1 POWERED BY BATTERY: ................................................. 10<br />
3.1.1 Directly mounted on battery: ....................................... 10<br />
3.1.2 Using Lifeboat bracket, 92424:.................................... 10<br />
3.1.3 Using Outside Lifeboat bracket, 93494: ...................... 11<br />
3.2 POWERED BY EXTERNAL POWER SOURCE (12 V) ..... 12<br />
3.2.1 Mounted on mounting flange, w/ 7m cable, 92936 .... 14<br />
3.2.2 Mounted on bracket with 1”x14 thread, 81836 ........... 15<br />
4. OPERATING INSTRUCTIONS .......................................... 16<br />
4.1 BATTERY POWERED .............................................................. 16<br />
4.1.1 Activating the <strong>Tron</strong> <strong>ARR</strong> .............................................. 16<br />
4.1.2 Deactivating the <strong>Tron</strong> <strong>ARR</strong> .......................................... 16<br />
4.2 POWER BY EXTERNAL 12V SOURCE....................................... 16<br />
4.2.1 Activating the <strong>Tron</strong> <strong>ARR</strong> .............................................. 16<br />
4.2.2 Deactivating the <strong>Tron</strong> <strong>ARR</strong> .......................................... 16<br />
4.3 TESTING THE TRON <strong>ARR</strong> ...................................................... 17<br />
5. MAINTENANCE ................................................................... 19<br />
5.1 MAINTENANCE :.................................................................... 19<br />
5.2 BATTERY REPLACEMENT (IF EQUIPPED)................................ 19<br />
6. TECHNICAL SPECIFICATIONS....................................... 20<br />
6.1 ELECTRICAL SPECIFICATIONS........................................ 20<br />
6.2 MECHANICAL SPECIFICATIONS ..................................... 21<br />
6.2.1 Layout of bracket 92936 ............................................. 21
1. INTRODUCTION<br />
1.1 GENERAL<br />
<strong>Tron</strong> <strong>ARR</strong> consists of :<br />
1. <strong>Tron</strong> <strong>ARR</strong> Main unit (97496)<br />
2. Operators <strong>Manual</strong> (92875)<br />
3. (Option) Mounting flange (92936)<br />
4. (Option) Bracket, for 1”x14 std<br />
mount (81836)<br />
97496 mounted on<br />
bracket 81836<br />
5. (Option) Universal bracket 1”x14 for wall and mast<br />
mounting (81977)<br />
6. (Option) 1 meter suspension cord w/ hook<br />
(98796).<br />
7. (Option) Battery, 4 year maintenance kit<br />
(96978). The battery can either be<br />
connected directly to the <strong>Tron</strong> <strong>ARR</strong> or<br />
through a cable using the mounting flange<br />
as shown on the piture to the right.<br />
8. (Option) Bracket, 92422, Bracket for <strong>Tron</strong><br />
<strong>ARR</strong> if mounted ontop of the battery ( see<br />
left picture)<br />
97946 mounted on<br />
81836 +81977<br />
<strong>Tron</strong> <strong>ARR</strong> mounted with<br />
battery and mounting<br />
flange 92936
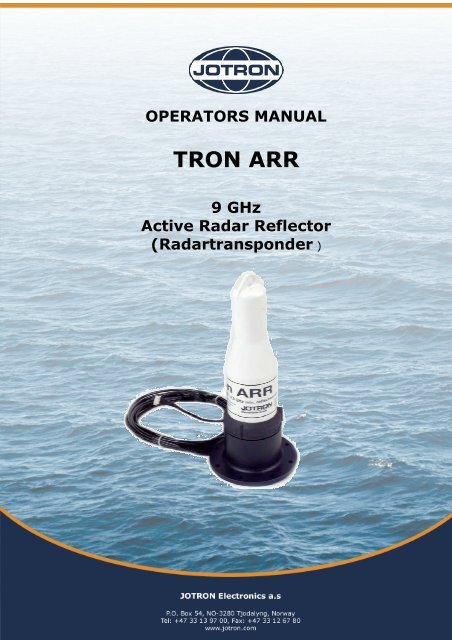
The JOTRON 9 GHz radar transponder type <strong>Tron</strong> <strong>ARR</strong> is an active<br />
radar transponder that extends the range the boat or object can be<br />
seen on a radar. It can also give an indication to the user that there<br />
is radar activity in the area, and sends out one pulse to indicate the<br />
transponders position on the radar display.<br />
The operating range of the <strong>Tron</strong> <strong>ARR</strong> is up to 30 nautical miles,<br />
depending on the height of the electronic unit and the radar height<br />
of the vessel carrying the radar. With a radar height of 20m and the<br />
<strong>Tron</strong> <strong>ARR</strong> placed at 1m a.s.l.(above sea level) the range will be up<br />
to 10 nautical miles.<br />
<strong>Tron</strong> <strong>ARR</strong> is buoyant if connected to the battery directly, however to<br />
obtain maximum performance the transponder should be placed in<br />
a vertical position and as high up as possible in order to achieve<br />
maximum coverage.<br />
Several mounting brackets and mounting aids are developed to<br />
ease a correct mounting and use of the radar transponder.<br />
When the <strong>Tron</strong> <strong>ARR</strong> is interrogated (hit) by a radar signal, it will<br />
immediately start to transmit a sweep covering the complete<br />
maritime 3 cm radar band. This sweep is detected on the radar<br />
screen and can be used to find the distance and bearing to the<br />
<strong>Tron</strong> <strong>ARR</strong>.<br />
In addition, the <strong>Tron</strong> <strong>ARR</strong> will give an audible signal that tells the<br />
operator that there is radar activity in the area (Only if mounted<br />
directly ontop of the Battery, 96978). It is therefore perfect for small<br />
vessels sailing in open sea as an early warning for ships in the<br />
area.<br />
Maximum distance to a ship will normally be about 10 nm and<br />
approximately 30 nm to a helicopter, dependent on the helicopters<br />
altitude. The transponder will not give any signals when located<br />
further away than this.<br />
The batteries of the <strong>Tron</strong> <strong>ARR</strong> will last at least 96 hours in standby<br />
after activation and then minimum 8 hours of continuous operation<br />
(continuously interrogated).
1.2 FEATURES<br />
• Watertight:<br />
<strong>Tron</strong> <strong>ARR</strong> is watertight to a depth of minimum 1 meter.<br />
• Buoyant:<br />
<strong>Tron</strong> <strong>ARR</strong> is buoyant in case the transponder is accidentally<br />
dropped into the water (Only if mounted directly ontop of the<br />
Battery, 96978. To increase coverage the <strong>Tron</strong> <strong>ARR</strong> should<br />
always be held or mounted as high as possible.<br />
• Rugged design:<br />
The <strong>Tron</strong><strong>ARR</strong> is resistant to seawater, oil and sunlight.<br />
• Handling:<br />
The <strong>Tron</strong> <strong>ARR</strong> is made for easy operation, with a brief<br />
operating instruction printed on the unit.<br />
• It comes standard with a mounting bracket. Indicators:<br />
The <strong>Tron</strong> <strong>ARR</strong> battery unit are equipped with a LED and a built<br />
in speaker to show operation of the <strong>ARR</strong>(Only if connected to<br />
the Battery, 96978). An external LED or buzzer may be used if<br />
not connected to the battery, but long power cables may<br />
interfere and give false alerts.The LED will normally flash with a<br />
frequency of 1 per second to show that the <strong>ARR</strong> is activated.<br />
When a vessel with an active radar is approaching, the<br />
internal speaker will sound each time the <strong>ARR</strong> is hit by the<br />
radar. A continuos sound in the loudspeaker means that the<br />
ship or helicopter is close to the <strong>ARR</strong> and the radar is hitting<br />
the <strong>ARR</strong> continuously.
• Battery unit.(If equipped)<br />
The battery unit consists of the complete lower half of the <strong>Tron</strong><br />
<strong>ARR</strong>, and must be replaced when battery expiration date is<br />
due.<br />
A new battery comes complete with switch and indicators and are<br />
easily replaced by connecting the new battery to the cable running<br />
from the <strong>ARR</strong> unit.<br />
2. TECHNICAL DESCRIPTION<br />
The <strong>Tron</strong> <strong>ARR</strong> is a X-band radartransponder which returns 2<br />
sweeps (1 return and 1 forward) covering the X-band when hit by<br />
a radar pulse.<br />
The transmission characteristics of the <strong>ARR</strong> is as follows (after a<br />
radar pulse is detected)<br />
• First an initial delay of maximum 0.5 µs.<br />
• return sweep over a period of 0.4 (+/- 0.1) µs sweeping from<br />
9.2 to 9.5 GHz.<br />
• forward sweep over a period of 7.5 (+/- 1) µs sweeping from<br />
9.5 to 9.2 GHz.<br />
The delay compared to a passive target will vary, depending on<br />
the frequency of the radar.<br />
Close to the transponder (
The radar pulse travels with a speed of 3*10 8 m/s. On a radar<br />
screen 1 µs delay gives an error of 150 m because the signal<br />
travels both ways (to and from the target).<br />
The maximum distance offset on a radar screen will be appear<br />
when the radar operates in the lower part of the X-band, 9.2 GHz,<br />
and will be (0.5+0.5+7.5)*150 = 1275 metres (0.7 nm).<br />
The minimum distance offset on a radar screen will be when the<br />
radar operates at 9.5 GHz.<br />
(0.5+0.5)*150 = 150 metres (0.1 nm).<br />
The sweep is linear, i.e. in the centre of the band, 9.35 GHz the<br />
offset will be:<br />
(0.5+0.5+3.75)*150 = 712 metres (0.4 nm).<br />
Because the frequency of the radar is fixed and the sweep<br />
characteristics of the transponder is fixed, the delay will not vary<br />
more than the drift caused by temperature in both units.<br />
Therefore, the distance offset on a particular radar can be found<br />
by experiments and taken into consideration when calculating the<br />
distance to the transponder.<br />
The direction to the transponder will be accurate within the<br />
horizontal beamwidth of the radar antenna.
3. Installation<br />
<strong>Tron</strong> Arr can be installed in several different ways dependent of<br />
what kind of boat it shall be installed on. As a general rule, the<br />
transponder should be mounted as high as possible to increase<br />
line of sight to the search and rescue units.<br />
Metal objects close to the transponder should be avoided, these<br />
will limit the performance in the directions they are located. There<br />
are however, two main different installation instruction dependent<br />
if the <strong>Tron</strong> <strong>ARR</strong> is powered by a directly connected battery, 96978<br />
or if powered by external 12V power supply.<br />
3.1 Powered by battery:<br />
3.1.1 Directly mounted on battery:<br />
If <strong>Tron</strong> <strong>ARR</strong> is powered by battery 96978, it can be<br />
mounted either with the standard bracket shown<br />
here, 92422. This bracket is made of anodised<br />
aluminium, with a rubber sleeve locking the <strong>Tron</strong><br />
<strong>ARR</strong> to the bracket. This bracket should be<br />
mounted high on the boat, but it must be possible<br />
to activate it even in high seas.<br />
3.1.2 Using Lifeboat<br />
bracket, 92424:<br />
If <strong>Tron</strong> <strong>ARR</strong> is mounted with the Lifeboat<br />
Bracket, the <strong>Tron</strong> <strong>ARR</strong> can be mounted<br />
higher than the above method. This bracket<br />
is delivered with 5 meter cable, so it is<br />
possible to have the battery with the switch<br />
and indicators inside a lifeboat, while the<br />
antenna and electronics are outside.
3.1.3 Using Outside Lifeboat bracket, 93494:<br />
If <strong>Tron</strong> <strong>ARR</strong> is mounted with the Outside<br />
Lifeboat Bracket, the <strong>Tron</strong> <strong>ARR</strong> can be mounted<br />
similar to the other lifeboat bracket. This bracket<br />
is not delivered with a cable since the battery is<br />
attached directly to the <strong>Tron</strong> <strong>ARR</strong> here. A<br />
lanyard secures the <strong>Tron</strong> <strong>ARR</strong> from falling out of<br />
the bracket. This bracket is made of anodised<br />
aluminium. In emergency, it is required that the<br />
user need to activate the unit before put it in this<br />
bracket.
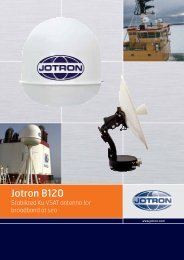
3.2 Powered by external power source (12 v)<br />
It is a special filter mounted inside the <strong>Tron</strong> <strong>ARR</strong> to withstand<br />
spikes from external power sources as outboard/inboard engines<br />
with alternators. All these installations requires an external switch<br />
to the power source or can be connected to be activated with the<br />
ignition on a boat. Below is a schematic of how this connection is<br />
done:
Table showing what to connect were:<br />
Color: Funktion:<br />
Yellow<br />
Green<br />
Brown<br />
White<br />
Grey<br />
Battery + 12V DC<br />
Can be connected through a switch to 12 V DC or the<br />
switch can be placed between the Green an Brown<br />
cable<br />
Switch connected to Brown, or can be grounded if<br />
the switch is connected in series with the power<br />
supply (Yellow)<br />
- Switch connected to Green unless the switch is<br />
connected in series with power supply (Yellow)<br />
-Battery 0V DC (ground -)<br />
If a LED is connected to indicate hit by radars, the<br />
positive end of a LED is connected here (Long leg)<br />
Can be attached to a buzzer, but the not<br />
recommended if the boat has lot of “electrical noise”<br />
that can activate the <strong>Tron</strong> <strong>ARR</strong>
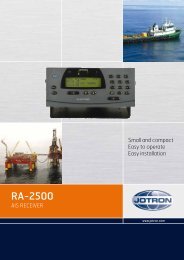
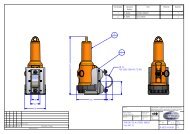
3.2.1 Mounted on mounting flange, w/<br />
7m cable, 92936<br />
<strong>Tron</strong> Arr can be mounted with this bracket if used<br />
on RIB boats or others with targa as seen on<br />
picture below.
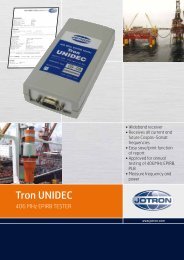
3.2.2 Mounted on bracket with 1”x14<br />
thread, 81836<br />
<strong>Tron</strong> Arr can be mounted with this<br />
bracket if used on sailing boats or others<br />
using a bracket that can be fitted on<br />
standard 1”x14 thread used for antennas<br />
etc. Bracket with this thread is widely<br />
available. Delivered with 7 meter cable
4. OPERATING INSTRUCTIONS<br />
4.1 Battery powered<br />
4.1.1 Activating the <strong>Tron</strong> <strong>ARR</strong><br />
Pull locking pin on the battery unit’s switch and make sure<br />
that the switch enters the «ON» position.<br />
an audible «beep» will be heard and the indicator led will<br />
start to flash.<br />
When the <strong>Tron</strong> <strong>ARR</strong> is within range of an active 3 cm<br />
radar, the internal loudspeaker (Buzzer) will be activated.<br />
4.1.2 Deactivating the <strong>Tron</strong> <strong>ARR</strong><br />
1. Move the switch to the «off» position.<br />
2. Replace the locking pin.<br />
4.2 Power by external 12v source<br />
4.2.1 Activating the <strong>Tron</strong> <strong>ARR</strong><br />
• If connected to the boats ignition it will automatically<br />
be turned on when starting the engine. The indicator<br />
led (If connected) will start to flash.<br />
• If connected through a switch, turn this ON The<br />
indicator led (If connected) will start to flash.<br />
4.2.2 Deactivating the <strong>Tron</strong> <strong>ARR</strong><br />
- Turn off the engine (If connected throught the ignition)<br />
- Set the external Switch to “OFF” (if connected through a<br />
switch)
4.3 Testing the <strong>Tron</strong> <strong>ARR</strong><br />
Test of the <strong>Tron</strong> <strong>ARR</strong> is done using the ships own 3 cm radar.<br />
The radar display will show different patterns depending on the<br />
range to the transponder.Figure C shows details of the radar<br />
display. Note that the examples shown are typical and will vary<br />
with the radar performance (height, power output and sensitivity).<br />
With the transponder located close to the radar the signals will<br />
appear as a ring on the radar display.<br />
The ring may be broken in some sectors, depending on ship<br />
construction and other obstacles, and does not indicate an error<br />
in the transponder.Placing it further away will reduce the signals<br />
to 1 dot on the radar display, showing the distance and direction<br />
to the transponder.<br />
1. a) Hold the switch on the <strong>Tron</strong> <strong>ARR</strong> battery unit in the «TEST»<br />
position. (Battery powered)<br />
b) Turn the <strong>Tron</strong> <strong>ARR</strong> “ON” with the Switch (Ignition or<br />
external)<br />
2. Simultaneously a person should observe the radar display to<br />
check for correct pattern.<br />
3. the test should preferably be done in open sea to avoid<br />
interference on the radar display from land echoes.<br />
Figure A<br />
Typ. display w/<strong>Tron</strong> <strong>ARR</strong> located<br />
near (
Figure B<br />
Typ. display w/<strong>Tron</strong> <strong>ARR</strong> located<br />
close (≈1nm) to the radar.<br />
Radar range is 10 nm<br />
Rings are at 2 nm<br />
The response is a stretched point<br />
on the display.<br />
Figure C<br />
Typ. display w/<strong>Tron</strong> <strong>ARR</strong> located<br />
away (>2 nm) from the radar.<br />
Radar range is 10 nm<br />
Rings are at 2 nm<br />
The reponse is as a normal<br />
reflection<br />
If LED is flashing with long flash, but no indication on the display,<br />
check the following:<br />
1. Range of the radar – select correct range<br />
2. Radar sensitivity<br />
3. Are you to close to land, or other ships, so you can’t<br />
differentiate the boat with <strong>Tron</strong><strong>ARR</strong> from other objects?<br />
If all above is correct, but still no indication on the radar display,<br />
may indicate that the <strong>Tron</strong> <strong>ARR</strong> need to be calibrated by<br />
JOTRON.
5. MAINTENANCE<br />
<strong>Jotron</strong> <strong>Tron</strong> <strong>ARR</strong> is a Active radar reflector designed for<br />
challenging environment. With the battery attached, it can<br />
withstand high G-forces, like when being thrown into the water<br />
from 20 m height. Therefore, very little maintenance is needed to<br />
get a long life of enhanced radar visibility. There are a few points<br />
worth noting described here:<br />
5.1 Maintenance :<br />
<br />
• Keep the antenna clean – wash with fresh water if lots<br />
of salt is attached to the antenna.<br />
• Do not paint – Paint can reduce sensitivity and power<br />
output from the <strong>Tron</strong> <strong>ARR</strong>.<br />
• Check that screw ring is tightened – Just tighten with<br />
your hand, do not use tools.<br />
5.2 Battery replacement (If equipped)<br />
Disconnect the old battery unit and replace with a new one.<br />
BATTERY UNIT<br />
O-RING<br />
X-96974 X-90624
6. TECHNICAL SPECIFICATIONS<br />
6.1 Electrical specifications<br />
Frequency:<br />
X-band (3 cm) (9.2 - 9.5 GHz)<br />
Temperature range:<br />
Operating: -20 to +55 o C<br />
Storage: -30 to +65 o C<br />
Radiated power:<br />
> 400 mW e.i.r.p (+26 dBm)<br />
Sweep type:<br />
1 sweep sawtooth type<br />
Forward 7.5 us ±1 µs<br />
Return 0.4 us ±0.1 µs<br />
starts with return sweep.<br />
Receive sensitivity:<br />
Better than -50 dBm e.r.s.<br />
Response delay:<br />
Max 0.5 µs<br />
Antenna pattern:<br />
Horizontal polarisation.<br />
Omnidirectional radiation in the horizontal plane.<br />
Greater than ±12.5 degrees elevation angle in the vertical plane.<br />
(Option)Battery capacity:<br />
96 hours standby +8 hours continuous operating when activated by<br />
a radar with 1 kHz prf at -20 o C. 4 years storage.
6.2 Mechanical specifications<br />
Materials used:<br />
Transponder housing: Polycarbonate with 10% glass.<br />
(Option) Bracket, 92936 & 81836 :<br />
POM<br />
(Option) Universal Bracket, 1”x 14: Stainless Steel, A4<br />
Dimensions<br />
Transponder:<br />
Max diameter: 85 mm<br />
Length(w/Mounting Flange, 92936: 285 mm<br />
Length(w/ Battery) 370 mm<br />
Weight(w/ Battery) 1050 g<br />
Transponder with standard storage bracket (If equipped w/<br />
battery):<br />
Max diameter: 96 mm<br />
Length:<br />
376 mm<br />
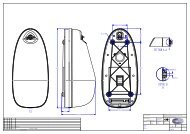
6.2.1 Layout of<br />
bracket 92936