Electronic Safe Lock Axessor - Kaba Mauer GmbH
Electronic Safe Lock Axessor - Kaba Mauer GmbH
Electronic Safe Lock Axessor - Kaba Mauer GmbH

You also want an ePaper? Increase the reach of your titles
YUMPU automatically turns print PDFs into web optimized ePapers that Google loves.
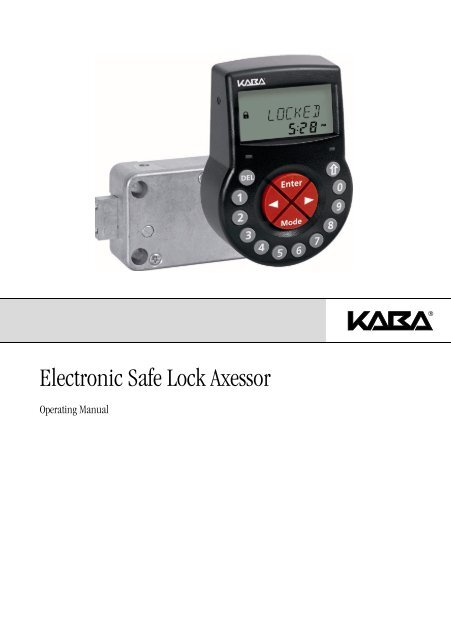
<strong>Electronic</strong> <strong>Safe</strong> <strong>Lock</strong> <strong>Axessor</strong><br />
Operating Manual
VdS<br />
<strong>Axessor</strong><br />
System overview - <strong>Electronic</strong> safe lock <strong>Axessor</strong><br />
12<br />
1<br />
13<br />
11<br />
10<br />
9<br />
2<br />
3<br />
4<br />
14<br />
15<br />
12345678<br />
SL 52x<br />
XXXXXXXXXX<br />
XXXXX.XXXXXX/XXX<br />
90048.xx 2007<br />
Version<br />
Certs.<br />
Type<br />
Part No.<br />
Serial No.<br />
19<br />
18<br />
8<br />
5<br />
17<br />
16<br />
7<br />
6<br />
20<br />
30<br />
21<br />
31<br />
22<br />
22<br />
24<br />
25<br />
AXESSOR<br />
AS 280 / I<br />
AXESSOR<br />
AS 284 / Ad<br />
AXESSOR<br />
AS 284 / Ad<br />
AXESSOR<br />
AS 284 / Op<br />
26<br />
32<br />
33<br />
27<br />
28<br />
29<br />
KSW3s528.0043 / en 2010.09<br />
Page 2<br />
Operating Manual<br />
Subject to change without prior notice
<strong>Axessor</strong><br />
Input Unit<br />
1 Housing<br />
2 Connection cable to lock unit<br />
3 Interface (USB) for PC connection<br />
4 key (enter, confirm)<br />
5 key (activate info display or escape/go back to upper level)<br />
6 Battery compartment<br />
7 key (activate Programming Mode)<br />
8 and key (directional keys to navigate)<br />
9 ... (numeric keys 0...9)<br />
10 key (delete, close lock)<br />
11 LCD (liquid crystal display)<br />
12 Buzzer<br />
<strong>Lock</strong><br />
13 <strong>Lock</strong> housing<br />
14 Terminal blocks (Inputs/Outputs)<br />
15 Pin for cable tie holder<br />
16 Connecting socket Q1 (cable from input unit) and Q2 (external power supply<br />
or cable from e-B@x)<br />
17 Warranty seal<br />
18 Type label<br />
19 VdS-label (protects spring bolt setting screw)<br />
20 External power supply (option)<br />
e-B@x (Option)<br />
21 Power supply e-B@x (accessory)<br />
22 e-B@x connector<br />
23 e-B@x<br />
24 Fixation supports<br />
25 Network status LEDs<br />
26 Grounding cable<br />
27 RJ45 socket (network connection)<br />
28 e-B@x status LED<br />
29 Connecting sockets (cable to lock unit)<br />
Software (Option)<br />
30 <strong>Axessor</strong> CD-ROM<br />
31 Dongle for AS280 Installation software (Installer)<br />
32 Dongles for AS284 Programming software (2 Administrator, 1 Operator)<br />
33 USB cable (to connect PC to input unit)<br />
Operating Manual KSW3s528.0043 / en 2010.09<br />
Subject to change without prior notice Page 3
<strong>Axessor</strong><br />
TABLE OF CONTENT<br />
1 Introduction 8<br />
1.1 To the very beginning 8<br />
1.2 Notes regarding the Operating Manual 8<br />
1.2.1 Validity 8<br />
1.2.2 Target group 8<br />
1.2.3 Limitation 8<br />
1.2.4 Supplementary documentation 8<br />
1.2.5 Symbols used in this operating manual 9<br />
1.2.6 Text marking 9<br />
2 <strong>Safe</strong>ty and Environment 10<br />
2.1 General 10<br />
2.2 Qualification of personnel 10<br />
2.3 Prohibited modifications to the unit 10<br />
2.4 Environment 10<br />
3 Product overview 11<br />
3.1 Product description 11<br />
3.2 Field of application 13<br />
3.3 Intended use 13<br />
3.4 Conformity 13<br />
4 Installation 14<br />
4.1 Important information prior to the installation 14<br />
4.2 Upacking and checking the delivery 14<br />
4.3 Installing the Input Unit 15<br />
4.4 Installing the lock 20<br />
4.5 Perform wiring check after lock installation 22<br />
4.6 External connections at the lock 23<br />
4.7 Installing the e-B@x (option) 25<br />
4.8 External connections at the e-B@x 26<br />
4.9 Perform wiring check after e-B@x installation 28<br />
KSW3s528.0043 / en 2010.09<br />
Page 4<br />
Operating Manual<br />
Subject to change without prior notice
<strong>Axessor</strong><br />
5 Operating 29<br />
5.1 Operating and display elements of the Input Unit 29<br />
5.2 Operating modes 30<br />
5.2.1 Normal operating mode 30<br />
5.2.2 Programming mode 30<br />
5.2.3 Information menu 30<br />
5.3 Buzzer signals 31<br />
5.4 Status messages 31<br />
5.4.1 <strong>Lock</strong>ed 31<br />
5.4.2 Open 31<br />
5.4.3 Immediate time lock 31<br />
5.4.4 Time lock (Weekly) 32<br />
5.4.5 Time lock (Holiday) 32<br />
5.4.6 Time Delay 32<br />
5.4.7 Confirmation after elapse of Time Delay 32<br />
5.4.8 Enter second code (Dual Mode activated) 33<br />
5.4.9 Penalty after wrong trials 33<br />
5.4.10 Remote Disabling 33<br />
5.4.11 Identification with denied code /<br />
Non Return Time Delay engaged 33<br />
5.4.12 The battery compartment has been opened 34<br />
5.4.13 Connected with Programming Software 34<br />
5.4.14 External power supply available 34<br />
5.5 Access Codes 34<br />
5.5.1 Code hierarchy and code formats 34<br />
5.5.2 Code types 35<br />
5.5.2.1 Master Code 36<br />
5.5.2.2 Manager Codes 36<br />
5.5.2.3 User Codes 37<br />
5.5.2.4 Courier Code 37<br />
5.5.3 Shelve Function 37<br />
5.5.4 Duress Code 38<br />
5.6 Code entry 39<br />
5.7 Opening procedure 40<br />
5.8 Closing procedure 41<br />
Operating Manual KSW3s528.0043 / en 2010.09<br />
Subject to change without prior notice Page 5
<strong>Axessor</strong><br />
6 Programming Mode 42<br />
6.1 Operating the programming mode 42<br />
6.1.1 Activating the programming mode 42<br />
6.1.2 Navigating in the Programming Mode 43<br />
6.1.3 Modify and save settings in the Programming Mode 43<br />
6.1.4 Exiting the Programming Mode 44<br />
6.2 Menu overview 45<br />
6.3 Access rights 46<br />
6.4 Programming 47<br />
6.4.1 Menu TIME 47<br />
6.4.1.1 Setting the time - submenu TIME 47<br />
6.4.1.2 Setting the time - submenu DATE 48<br />
6.4.1.3 Setting the time format - submenu AM/PM 48<br />
6.4.2 Menu PROG 49<br />
6.4.2.1 Configuring weekly <strong>Lock</strong>ing Periods - Submenu WEEKLY 49<br />
6.4.2.1.1 Adding a Weekly <strong>Lock</strong>ing Period 49<br />
6.4.2.1.2 Modifying an existing Weekly <strong>Lock</strong>ing Period 50<br />
6.4.2.1.3 Deleting an existing Weekly <strong>Lock</strong>ing Period 50<br />
6.4.2.2 Activating an Immediate Time <strong>Lock</strong> - Submenu IMM-TL 51<br />
6.4.2.3 Configuring Holiday <strong>Lock</strong>ing Periods - Submenu HOLIDAY 52<br />
6.4.2.3.1 Adding a Holiday <strong>Lock</strong>ing Period 52<br />
6.4.2.3.2 Modifying an existing Holiday <strong>Lock</strong>ing Period 53<br />
6.4.2.3.3 Deleting an existing Holiday <strong>Lock</strong>ing Period 53<br />
6.4.3 Menu DELAY 54<br />
6.4.3.1 Setting/Deactivating Time Delays - Submenus DELAY 1...4 54<br />
6.4.3.2 Configuring the Confirmation Window -<br />
Submenu CNF WIN 55<br />
6.4.4 Menu CODE 56<br />
6.4.4.1 Changing the Master Code - Submenu MASTER 56<br />
6.4.4.2 Setting Manager Codes - Submenu MANAGER 57<br />
6.4.4.3 Setting User Codes - Submenu USER 58<br />
6.4.4.4 Setting the Courier Code - Submenu COURIER 59<br />
6.4.4.5 Reset the whole <strong>Axessor</strong> safe lock system to factory defaults -<br />
Submenu SHELVE 60<br />
6.4.4.6 Modifying a code 60<br />
6.4.4.7 Deleting a code 61<br />
6.4.5 Menu MISC 62<br />
6.4.5.1 Activating/Deactivating Code Denial - Submenu CDE DEN 62<br />
6.4.5.2 Activating/Deactivating Remote Disabling -<br />
Submenu RMT-DIS 63<br />
6.4.5.3 Activating/Deactivating Duress Code function -<br />
Submenu DURESS 64<br />
6.4.5.4 Activating/Deactivating Dual Mode - Submenu DUAL 65<br />
6.4.5.5 Setting the display language - Submenu LANG 66<br />
KSW3s528.0043 / en 2010.09<br />
Page 6<br />
Operating Manual<br />
Subject to change without prior notice
<strong>Axessor</strong><br />
7 Servicing 67<br />
7.1 Cleaning 67<br />
7.2 Replacing the batteries 67<br />
7.3 Customer Service 68<br />
7.4 Spare parts and accessories 69<br />
8 Error messages 70<br />
9 Technical data 73<br />
9.1 Functions 73<br />
9.2 <strong>Electronic</strong>s 75<br />
9.3 Mechanics 76<br />
9.4 Approvals and Certificates 76<br />
9.5 Factory settings 77<br />
Operating Manual KSW3s528.0043 / en 2010.09<br />
Subject to change without prior notice Page 7
<strong>Axessor</strong><br />
1 Introduction<br />
1.1 To the very beginning<br />
We thank you for having opted for the electronic safe lock <strong>Axessor</strong> with network<br />
capabilities.<br />
The electronic safe lock <strong>Axessor</strong> incorporates the latest technical advances and<br />
meets all recognized safety standards. Nevertheless, improper use of the electronic<br />
safe lock <strong>Axessor</strong> may result in impairment of material assets.<br />
To ensure a safe, proper, and economical operation of the electronic safe lock<br />
<strong>Axessor</strong>, please observe and comply with all information and safety instructions<br />
contained in the present Operating Manual as well as the instructions given in the<br />
manuals for the components used in conjunction with the safe lock.<br />
If you have questions, which are not or insufficiently answered in this Operating<br />
Manual, please contact your supplier. They will be glad to assist you.<br />
1.2 Notes regarding the Operating Manual<br />
1.2.1 Validity<br />
This Operating Manual describes the electronic safe lock <strong>Axessor</strong> with<br />
firmware version 91700.08 (lock unit) / 91800.09 (input unit) or newer. <strong>Safe</strong><br />
locks with older firmware version may differ in its functionality.<br />
1.2.2 Target group<br />
This Operating Manual addresses itsself to well trained personnel which is in<br />
charge with the installation, the commissioning, the operation, the servicing and<br />
the trouble shooting of the electronic safe lock <strong>Axessor</strong>.<br />
1.2.3 Limitation<br />
This Operating Manual is restricted to the installation, commissioning, operation,<br />
servicing and trouble shooting of the electronic safe lock <strong>Axessor</strong>.<br />
The available options (AS 280 Installation Software and AS 284 Programming<br />
Software) are only described insofar as this is necessary for proper operation of<br />
the safe lock. Further information on the optional software packages can be<br />
obtained in the respective help function of the corresponding software.<br />
1.2.4 Supplementary documentation<br />
This operating manual is supplemented with the <strong>Axessor</strong> Quick Reference Guide.<br />
KSW3s528.0043 / en 2010.09<br />
Page 8<br />
Operating Manual<br />
Subject to change without prior notice
<strong>Axessor</strong><br />
1.2.5 Symbols used in this operating manual<br />
The following symbols are used in this operating manual to direct your attention<br />
on particular situation, e.g. to indicate a hazardous situation, requirements which<br />
must be met, etc.:<br />
Warning!<br />
Indicates a hazard which can cause damage to the unit or have a serious effect<br />
on the function or use of the unit if unobserved.<br />
Important!<br />
Indicates important information which must be observed during the described<br />
procedure.<br />
Note!<br />
Indicates notes, information or pointers, which facilitate work or provide additional<br />
background information or point out specific details.<br />
Requirement!<br />
Indicates requirements that must be met for the execution, activation, modification<br />
or deletion of the described function. These requirements must be met before<br />
proceeding.<br />
AS 284 Programming Software<br />
Refers to the AS 284 Programming Software (optionally available), which allows<br />
additional settings and functions.<br />
1.2.6 Text marking<br />
• The character „“ stands for „see“, „refer to“ or „also consult“ (sample: for a<br />
description of Access Code Hierarchy Code hierarchy and code formats on<br />
page 34).<br />
• Text appearing on the display is marked in capitals and set into quotation<br />
marks (sample: „LOCKED“).<br />
• Keys to be used are marked in bold capitals and set into angle brackets:<br />
<br />
= Delete key<br />
= Numeric keys 0…9<br />
= Information/Escape key<br />
= Enter key<br />
<br />
= Mode key<br />
<br />
= Left arrow key<br />
= Right arrow key<br />
Operating Manual KSW3s528.0043 / en 2010.09<br />
Subject to change without prior notice Page 9
<strong>Axessor</strong><br />
2 <strong>Safe</strong>ty and Environment<br />
2.1 General<br />
Every person working with the <strong>Axessor</strong> must have read and understood the operating<br />
manual before carrying out any work.<br />
Knowing and understanding the contents of the operating manual is a basic<br />
requirement for protecting the personnel against any kind of danger, to prevent<br />
faulty operation, and to operate the unit safely and correctly.<br />
2.2 Qualification of personnel<br />
All actions described in the present operating manual (installation, commissioning,<br />
operation, etc.) must be carried out only by well trained and sufficiently qualified<br />
personnel.<br />
For safety and warranty reasons any action beyond the scope of this manual<br />
must be carried out only by qualified personnel authorised by the manufacturer.<br />
It is assumed that all persons working with the <strong>Axessor</strong> are familiar and comply<br />
with the appropriate regulations on work safety and the prevention of accidents.<br />
2.3 Prohibited modifications to the unit<br />
Modifications on the electronic safe lock <strong>Axessor</strong> are explicitly not recommended,<br />
it may void warranty and impair the security and safety of the unit.<br />
For the replacement of defective components use exclusively original accessories<br />
and spare parts available from your supplier.<br />
2.4 Environment<br />
Packing and consumable material (e.g. batteries) must be disposed of and/or<br />
recycled according to the local regulations.<br />
At the end of the service life the unit and its components must be returned to the<br />
manufacturer or to a collecting point for disposal or recycling according to the<br />
local regulations.<br />
In case of doubt please contact your supplier.<br />
KSW3s528.0043 / en 2010.09<br />
Page 10<br />
Operating Manual<br />
Subject to change without prior notice
VdS<br />
Version<br />
Certs.<br />
<strong>Axessor</strong><br />
3 Product overview<br />
3.1 Product description<br />
The electronic safe lock <strong>Axessor</strong> is an intelligent motor-bolt lock with integrated<br />
terminals used for instance to connect to an alarm centre. It features a wide range<br />
of functionalities, such as a code hierarchy with User Group management, Courier<br />
Code, Dual Mode, Duress Code, Time Delay, Time <strong>Lock</strong> functions, Remote<br />
Disabling and Code Denial. The operation and the programming is done via the<br />
Input Unit.<br />
The electronic safe lock <strong>Axessor</strong> may also be configured with the AS 284 Programming<br />
Software (optionally available). This gives access to an even<br />
enhanced functionality and allows customer-tailored solutions to almost every<br />
extent.<br />
Unit configuration standard version<br />
12345678<br />
Type<br />
Part No.<br />
Serial No.<br />
SL 52x<br />
XXXXXXXXXX<br />
XXXXX.XXXXXX/XXX<br />
90048.xx 2007<br />
In its standard version the electronic safe lock <strong>Axessor</strong> is battery powered and<br />
consist of: the input unit, the lock and the connection cable. The lock includes<br />
2 inputs and 2 outputs (assignment External connections at the lock on page<br />
23 ). Optionally, an external power supply (6VDC/500mA) can be connected to<br />
one of the lock sockets „Q1“ or „Q2“.<br />
Only use the original <strong>Axessor</strong> power supply. Even if the external power supply is<br />
connected, the batteries must remain in the battery compartment at all times.<br />
They are mainly but not exclusively used in case of a power failure. Only use nonrechargeable<br />
AA Alcaline or AA Lithium batteries.<br />
Operating Manual KSW3s528.0043 / en 2010.09<br />
Subject to change without prior notice Page 11
VdS<br />
Version<br />
Certs.<br />
VdS<br />
Version<br />
Certs.<br />
9 048. x 2 07<br />
VdS<br />
Version<br />
Certs.<br />
9 048. x 2 07<br />
VdS<br />
Version<br />
Certs.<br />
9 048. x 2 07<br />
<strong>Axessor</strong><br />
Unit configuration for network integration<br />
Network integration of the electronic safe lock <strong>Axessor</strong> is established via the<br />
optionally available e-B@x. The e-B@x is featuring 5 inputs and 5 outputs, all<br />
of them freely configurable. The inputs and the outputs as well as an external<br />
power supply (9 ... 26VDC/700 ... 200mA) are connected via the e-B@x connector.<br />
The e-B@x functions, i.e. network connection and inputs/outputs require an<br />
external power supply. In case of a power failure, the batteries inside the input<br />
unit only cover the lock functions, not the e-B@x functions.<br />
To set-up and configure the electronic safe lock <strong>Axessor</strong> for network integration<br />
AS280 Installation software and the AS 284 Programming Software are required.<br />
12345678<br />
Type<br />
Part No.<br />
Serial No.<br />
SL 52x<br />
XXXXXXXXXX<br />
XXXXX.XXXXXX/XXX<br />
90048.xx 2007<br />
<strong>Safe</strong> 1 <strong>Safe</strong> 2 <strong>Safe</strong> n<br />
12345678<br />
Type<br />
Part No.<br />
Serial No.<br />
SL 52x<br />
X<br />
X. X/ X<br />
12345678<br />
12345678<br />
Type<br />
Part No.<br />
Serial No.<br />
SL 52x<br />
X<br />
X. X/ X<br />
Type<br />
Part No.<br />
Serial No.<br />
SL 52x<br />
X<br />
X. X/ X<br />
Local Area Network<br />
(10/100BaseT Ethernet)<br />
Internet<br />
Router<br />
Firewall<br />
Other devices<br />
PC with<br />
AS 284 Programming Software<br />
KSW3s528.0043 / en 2010.09<br />
Page 12<br />
Operating Manual<br />
Subject to change without prior notice
<strong>Axessor</strong><br />
3.2 Field of application<br />
The electronic safe lock <strong>Axessor</strong> provides a wide range of functions for applications<br />
in the high security sector. They permit programming of various codes and<br />
code combinations, time related functions as well as storage and recall of a<br />
detailed event log (Audit Trail).<br />
The programming can be done via the input unit or by connecting a computer running<br />
the AS 284 Programming Software to the input unit via USB cable or IP network.<br />
This electronic safe lock is especially suitable for applications where high security,<br />
multiple users, traceability and flexibility are required.<br />
3.3 Intended use<br />
The electronic safe lock <strong>Axessor</strong> serves to block and release the mechanical<br />
blocking point of a safe, vault, data cabinet, ATM etc. which is usually activated<br />
manually by a boltwork. The electronic safe lock <strong>Axessor</strong> can be employed<br />
instead of a mechanical combination or key lock. Applicable regulations and<br />
standards have to be observed.<br />
Enabling (lock opening) is only performed upon entry of one or several codes on<br />
the Input Unit. The opening procedure can also be made dependent on time functions<br />
and/or external signals.<br />
The electronic safe lock <strong>Axessor</strong> may only be employed and operated in accordance<br />
with its intended use – blocking and releasing the mechanical blocking<br />
points of above mentioned equipment. Any other type of application is explicitely<br />
not recommended.<br />
The electronic safe lock <strong>Axessor</strong> is designed for indoor applications (environmentally<br />
protected areas) – they are not suitable for direct exposure to environmental<br />
impact.<br />
Operation of the equipment in the intended manner requires that all the information<br />
in this operating manual is observed.<br />
3.4 Conformity<br />
Please find the Declaration of CE Conformity on page 79.<br />
This product is compliant to the european guideline regarding the Restriction of<br />
Use of Hazardous Substances - RoHS 2002/95/EC.<br />
Operating Manual KSW3s528.0043 / en 2010.09<br />
Subject to change without prior notice Page 13
<strong>Axessor</strong><br />
4 Installation<br />
4.1 Important information prior to the installation<br />
Warning!<br />
Please observe the following:<br />
• Compliance to described sequence is a necessity. Improper assembly or different<br />
sequence may cause damage to the unit!<br />
• To avoid any damage make sure to keep cables away from moving parts! Do not<br />
lead cables over sharp edges!<br />
• Do not close the safe door until all installation steps have been completed successfully!<br />
Important!<br />
Please observe the following:<br />
• Removal of or damage to the warranty seal ( System overview - <strong>Electronic</strong><br />
safe lock <strong>Axessor</strong>, item 17) voids warranty!<br />
• The mounting screws must be secured against loosening, e.g. by using screw<br />
cement, such as LOCTITE 243 (medium, blue).<br />
• Removal of or damage to the VdS label ( System overview - <strong>Electronic</strong> safe<br />
lock <strong>Axessor</strong>, item 19 ) voids VdS approval!<br />
• For VdS and UL conformity lock must not be mounted directly behind leadthroughs!<br />
Clog or secure leadthroughs correspondingly. A suitable steel plate to<br />
protect the lock is available from your suplier.<br />
4.2 Unpacking and checking the delivery<br />
Unpack the delivery and check the content of completeness.<br />
The <strong>Axessor</strong> delivery includes:<br />
• Input Unit<br />
• <strong>Lock</strong><br />
• Connection cable<br />
• Plastic bag containing installation material<br />
• 3 batteries AA-size<br />
• CD-ROM with Product documentation<br />
The optional e-B@x is delivered with:<br />
• e-B@x<br />
• Connection cable<br />
• Plastic bag containing installation material<br />
The optional computer software package is delivered in a package containing:<br />
• CD-ROM with Software<br />
• USB Connection cable<br />
• 1 Dongle (Installer) for AS280 Installation Software<br />
• 3 Dongles (2 Administrator, 1 Operator) for AS 284 Programming Software<br />
KSW3s528.0043 / en 2010.09<br />
Page 14<br />
Operating Manual<br />
Subject to change without prior notice
<strong>Axessor</strong><br />
4.3 Installing the Input Unit<br />
Mounting the base plate<br />
1. Mark either the fixation bores 3 and 5 or 2 and 4 plus bore 1 (recommended).<br />
Also mark one of the two bores 6 (cable leadthrough) Do so<br />
according to the illustration below or by using the template ( Template Input<br />
Unit on page 80).<br />
1<br />
6<br />
10<br />
4 x M4<br />
2<br />
40<br />
55<br />
41.3<br />
6<br />
10<br />
3<br />
5<br />
4<br />
193<br />
90<br />
2. Drill the 3 fixation bores Ø3.2 x 14 mm and the cable leadthrough bore<br />
Ø10 mm. Remove burrs. Tap M4 threads into the 3 fixation bores.<br />
Operating Manual KSW3s528.0043 / en 2010.09<br />
Subject to change without prior notice Page 15
<strong>Axessor</strong><br />
3. Remove the 3 screws on the bottom of the cover (1 at the battery compartment,<br />
2 at the housing). Lift-off the cover from the base plate, then carefully<br />
remove the battery compartment.<br />
4. Fix the base plate with the enclosed special M4x12 flat-head screws to the<br />
door.The Input unit must be fixed to the door with at least two oppositely positioned<br />
screws. The third screw (Pos. 1) is recommended.<br />
KSW3s528.0043 / en 2010.09<br />
Page 16<br />
Operating Manual<br />
Subject to change without prior notice
<strong>Axessor</strong><br />
Connecting the cables<br />
5. Carefully lead the enclosed connection cable through the Ø10mm bore in the<br />
door and carefully draw it towards the lock chamber.<br />
6. Mount battery compartment in place. Then, carefully lead the battery cable<br />
through strain relief guides of the battery compartment and the base plate.<br />
Make sure not to squeeze the cable!<br />
Finally check for free movability of the battery compartment.<br />
Make sure the spiral cable lays flat when moving the battery compartment<br />
(i.e. the cable does not move in other directions when extended<br />
and compressed)<br />
Operating Manual KSW3s528.0043 / en 2010.09<br />
Subject to change without prior notice Page 17
<strong>Axessor</strong><br />
7. Position the cover on top of the base plate in an angle >90°.<br />
8. Plug the battery cable into the terminal BATTERY J3 and the connection<br />
cable into the terminal LOCK J2.<br />
Check correct position of the plugs before connecting them. Do not use<br />
exessive force to plug-in, but make sure that proper connection is<br />
given.<br />
BATTERY J3<br />
<strong>Lock</strong> J2<br />
KSW3s528.0043 / en 2010.09<br />
Page 18<br />
Operating Manual<br />
Subject to change without prior notice
<strong>Axessor</strong><br />
Mounting the cover<br />
9. Engage the cover at notch on top of base plate.<br />
10. Slowly flip down the cover onto the base plate while carefully pulling the connection<br />
cable towards the lock chamber; leave some spare loop.<br />
Make sure that cables are not squeezed. Check battery compartment for<br />
free movability: carefully push the battery compartment into place, then slide<br />
it out again.<br />
11. Fix the cover on the base plate using two M3x6 countersink screws.<br />
12. Check battery compartment for proper movability: carefully push the battery<br />
compartment into place, then slide it out again<br />
Do not insert the batteries and do not fix the battery compartment<br />
screw yet.<br />
Operating Manual KSW3s528.0043 / en 2010.09<br />
Subject to change without prior notice Page 19
<strong>Axessor</strong><br />
4.4 Installing the lock<br />
Mounting the lock<br />
1. Mark the 3 fixation bores (A) according to the illustration below or by using<br />
the template ( Template <strong>Lock</strong> on page 81).<br />
3 x Ø5<br />
A<br />
A<br />
11.5<br />
13<br />
2.5<br />
25.2<br />
12345678<br />
41.3<br />
15<br />
VdS<br />
Type<br />
Part No.<br />
Serial No.<br />
Version<br />
Certs.<br />
SL 52x<br />
XXXXXXXXXX<br />
XXXXX.XXXXXX/XXX<br />
90048.xx 2007<br />
7.8<br />
2 x M4<br />
A<br />
66.7<br />
7.9<br />
2. Drill the bores Ø5mm. Remove the burrs and tap M6 threads into the bores.<br />
3. Mount the lock with the 3 enclosed M6x10 screws (equivalent Inch screws<br />
may be used instead).<br />
Make sure that the screw heads rest on the base of the shouldered<br />
bore! Make sure to keep the space underneath the lock free for a<br />
relocker system or the connection cable!<br />
4. If the lock is to be operated in spring bolt function, remove the retainer screw<br />
(B) underneath the VdS label.<br />
Be aware, that this operating mode voids VdS approval!<br />
B<br />
KSW3s528.0043 / en 2010.09<br />
Page 20<br />
Operating Manual<br />
Subject to change without prior notice
Version<br />
Certs.<br />
VdS<br />
<strong>Axessor</strong><br />
5. If needed, use the two M4 threads at the front end of the lock bolt to attach an<br />
extension.<br />
Observe the maximum moving force of 5N in both directions.<br />
11.5<br />
13<br />
max. 1000N<br />
25.2<br />
15<br />
12345678<br />
XXXXX.XXXXXX/XXX<br />
90048.xx 2007<br />
XXXXXXXXXX<br />
SL 52x<br />
Certs.<br />
Version<br />
Serial No.<br />
Part No.<br />
Type<br />
VdS<br />
max. 5N<br />
max. 1000N<br />
7.8<br />
2 x M4<br />
max. 1000N<br />
Connecting the cable<br />
6. Verify correct position of the connector, then carefully plug connection cable<br />
into one of the lock sockets „Q1“ or „Q2“.<br />
12345678<br />
SL 52x<br />
XXXXXXXXXX<br />
XXXXX.XXXXXX/XXX<br />
90048.xx 2007<br />
Type<br />
Part No.<br />
Serial No.<br />
Q1,Q2<br />
7. Secure the cable with the cable tie and carefully fix any exess cable.<br />
Operating Manual KSW3s528.0043 / en 2010.09<br />
Subject to change without prior notice Page 21
<strong>Axessor</strong><br />
4.5 Perform wiring check after lock installation<br />
Requirement<br />
To perform wiring check the door must be open.<br />
1. Carefully slide out the battery compartment until it comes to a stop.<br />
2. Insert the 3 enclosed batteries (3x AA mignon, Alkaline type) according to the<br />
markings in receptacles – observe polarity!<br />
As soon as the batteries are inserted a test routine is initiated. The following<br />
displays appear successively and the „BEEP signal“ sounds:<br />
3. Close battery compartment. Wait until the error message „BAT-CMP OPEN“<br />
reappears again.<br />
4. Confirm the error message by entering the current Master Code (default:<br />
00123456) with the keys, then press the key. The<br />
lock opens and closes again after approx. 6 seconds.<br />
5. Fix battery compartment with hexagon countersink screw.<br />
Important!<br />
If during wiring test the error message „LINE OFF“ appears, the connection cable<br />
is either connected incorrectly or it was damaged during installation. Do not continue<br />
installation and proceed as follows:<br />
• Check connection cable for correct connection or damage. Disconnect connection<br />
cable and replace if necessary.<br />
• Reconnect connection cable as described in sections Installing the Input<br />
Unit on page 15 and Installing the lock on page 20.<br />
If another error message appeared please refer to section Error messages on<br />
page 70.<br />
KSW3s528.0043 / en 2010.09<br />
Page 22<br />
Operating Manual<br />
Subject to change without prior notice
<strong>Axessor</strong><br />
4.6 External connections at the lock<br />
If desired, connect additional external signals at the lock terminal block. Refer to<br />
the table and the wiring examples below.<br />
Terminal Description Capacity / Remarks<br />
12345678<br />
IN2<br />
GND<br />
IN1+<br />
IN1-<br />
OUT1 A<br />
OUT1 B<br />
OUT2 A<br />
OUT2 B<br />
Note: Function and polarity of the Inputs and Outputs can be<br />
changed with optional AS 284 Programming Software.<br />
1 / 2 Output 2<br />
standard: bolt or motor open<br />
3 / 4 Output 1<br />
standard: Duress alarm<br />
5(–) / 6(+) Input 1<br />
standard: not assigned<br />
optional: remote disabling, or<br />
controlled disabling<br />
7 / 8 Input 2<br />
standard: not assigned<br />
optional: Programmable with<br />
AS 284 Programming Software<br />
30 VDC/2A, 50 VAC/0.5A<br />
with resistive load.<br />
Relay with potential-free working<br />
contacts (NO - normally open).<br />
12 VDC (min. 20mA)<br />
Do not apply any voltage –<br />
potential free contact only!<br />
Recommendation: Suitable micro<br />
switch with gold-plated contacts for<br />
12 VDC/50mA (e.g. „DB series“ by<br />
Cherry).<br />
Socket Description Capacity / Remarks<br />
12345678<br />
Q1<br />
Q2<br />
Q1, Q2 Connection to input unit or<br />
to e-B@x<br />
or<br />
Connection of power supply<br />
Enclosed connection cable must be<br />
used.<br />
Use only the original <strong>Axessor</strong> power<br />
supply that is available as optional<br />
accessory<br />
Operating Manual KSW3s528.0043 / en 2010.09<br />
Subject to change without prior notice Page 23
<strong>Axessor</strong><br />
Example of wiring „Door Contact“<br />
12345678<br />
Example of wiring several locks in a way that only one lock may be opened<br />
at the same time<br />
The following settings must be made with the AS 284 Programming Software in<br />
addition:<br />
Output 2= bolt or motor open<br />
Input 1= Controlled disabling<br />
+12V / 20mA<br />
12345678<br />
...<br />
12345678<br />
12345678<br />
GND<br />
KSW3s528.0043 / en 2010.09<br />
Page 24<br />
Operating Manual<br />
Subject to change without prior notice
VdS<br />
Version<br />
Certs.<br />
<strong>Axessor</strong><br />
4.7 Installing the e-B@x (option)<br />
Mounting the e-B@x<br />
1. Mark the 2 fixation bores (A) according to the illustration below or by using<br />
the template ( Template e-B@x on page 82).<br />
A<br />
A<br />
27<br />
93.5<br />
27<br />
130.5<br />
2. Drill fixation bores Ø5mm. Remove the burrs and tap M6 threads into the<br />
bores.<br />
3. Mount e-B@x with the 2 enclosed M6x10 socket screws (equivalent Inch<br />
screws may be used instead).<br />
Connect cable<br />
4. Verify correct position of the connector, then carefully plug enclosed e-B@x<br />
connection cable into one of the e-B@x sockets and one of the lock sockets<br />
„Q1“ or „Q2“.<br />
Q2<br />
12345678<br />
SL 52x<br />
XXXXXXXXXX<br />
XXXXX.XXXXXX/XXX<br />
90048.xx 2007<br />
Type<br />
Part No.<br />
Serial No.<br />
Q1<br />
Operating Manual KSW3s528.0043 / en 2010.09<br />
Subject to change without prior notice Page 25
<strong>Axessor</strong><br />
4.8 External connections at the e-B@x<br />
The e-B@x provides 5 additional inputs and outputs, two bus sockets and a RJ45<br />
socket. Refer to the table and the wiring example below to connect the input and<br />
output signals as well as the e-B@x and the network cable.<br />
The e-B@x functions are available only if it is connected to an <strong>Axessor</strong> lock, and<br />
if the e-B@x is connected to a power supply. In case of power failure, the batteries<br />
in the input unit will backup the lock functions, but not the e-B@x functions.<br />
Terminal Description Capacity / Remarks<br />
7 mm<br />
OUT 3B<br />
OUT 4B<br />
OUT 5B<br />
OUT 6B<br />
OUT 7B<br />
IN 3<br />
IN 5<br />
IN 7<br />
Power supply<br />
GND<br />
2 4 6 8 10 12 14 16 18 20<br />
1 3 5 7 9 11 13 15 17 19<br />
OUT 3A<br />
OUT 4A<br />
OUT 5A<br />
OUT 6A<br />
OUT 7A<br />
IN 4<br />
IN 6<br />
GND<br />
GND<br />
GND<br />
Note: the function of the Inputs and Outputs can be<br />
assigned with the optional AS 284 Programming Software.<br />
18 / 20 Power supply 9 VDC ... 26 VDC / 700 ... 200 mA<br />
1 / 2 Output 3<br />
standard: not assigned<br />
3 / 4 Output 4<br />
standard: not assigned<br />
5 / 6 Output 5<br />
standard: not assigned<br />
7 / 8 Output 6<br />
standard: not assigned<br />
9 / 10 Output 7<br />
fix set for „external power“<br />
Output voltage strength:<br />
24 VAC<br />
Cont. Output Load current:<br />
0.4 A at 25°C<br />
0.3 A at 50 °C<br />
Internal Output impendance:<br />
max. 2 Ohms<br />
Relay with potential-free working<br />
contacts (NO - normally open).<br />
KSW3s528.0043 / en 2010.09<br />
Page 26<br />
Operating Manual<br />
Subject to change without prior notice
<strong>Axessor</strong><br />
12 / GND Input 3<br />
standard: not assigned.<br />
11 / GND Input 4<br />
standard: not assigned<br />
14 / GND Input 5<br />
standard: not assigned<br />
13 / GND Input 6<br />
standard: not assigned<br />
16 / GND Input 7<br />
standard: not assigned<br />
Internal Input impendance:<br />
min. 4 kOhms<br />
Input switch impendance:<br />
max. 10 kOhms<br />
12 ... 24 VDC (min. 5mA)<br />
Socket Description Capacity / Remarks<br />
Q3<br />
Q4<br />
Q3, Q4 Connection to lock (only one lock<br />
ca be connected to an e-B@x).<br />
RJ45 Connection to Local Area<br />
Network<br />
RJ45<br />
Enclosed connection cable must be<br />
used.<br />
10/100Base T Ethernet<br />
Min. CAT5 cable required.<br />
Connecting network devices must<br />
have ground connection.<br />
Wiring diagram e-B@x<br />
OUT 3A ... 7A<br />
Load<br />
Power supply<br />
OUT 3B ... 7B<br />
IN 1 ... 7<br />
Inputs Outputs<br />
e-B@x Internal Circuit<br />
GND<br />
Operating Manual KSW3s528.0043 / en 2010.09<br />
Subject to change without prior notice Page 27
<strong>Axessor</strong><br />
4.9 Perform wiring check after e-B@x installation<br />
After having finished the installation, the electronic safe lock <strong>Axessor</strong> is commissioned<br />
as follows:<br />
1. Perform wiring check ( Perform wiring check after lock installation on page<br />
22).<br />
2. If e-B@x is connected after start initialization period, the e-B@x LED must<br />
blink green twice every 2 seconds.<br />
KSW3s528.0043 / en 2010.09<br />
Page 28<br />
Operating Manual<br />
Subject to change without prior notice
<strong>Axessor</strong><br />
5 Operating<br />
5.1 Operating and display elements of the Input Unit<br />
1<br />
2<br />
10 11 12<br />
13 14<br />
3<br />
9<br />
4<br />
8<br />
15<br />
5<br />
6<br />
7<br />
16<br />
17 19<br />
18<br />
1 LC-Display<br />
2 Buzzer<br />
3 (delete, close lock)<br />
4 keys (numeric keys 0…9)<br />
5 key (directional key to navigate)<br />
6 key (activate Programming Mode)<br />
7 key (directional key to navigate)<br />
8 key (activate info display or escape/go back to upper level)<br />
9 key (enter, confirm)<br />
10 Menu TIME (to set time/date)<br />
11 Menu PROG (to program <strong>Lock</strong>ing Periods)<br />
12 Menu DELAY (to program Time Delays)<br />
13 Menu CODE (to modify codes)<br />
14 Menu MISC (to access additional settings)<br />
15 Symbol „<strong>Lock</strong> open“ (unlocked) or „<strong>Lock</strong> closed“ (locked)<br />
16 Symbol „Replace batteries“<br />
17 Symbol „Warning“<br />
18 Time format (12/24 Hrs.)<br />
19 Text lines<br />
Operating Manual KSW3s528.0043 / en 2010.09<br />
Subject to change without prior notice Page 29
<strong>Axessor</strong><br />
5.2 Operating modes<br />
5.2.1 Normal operating mode<br />
Normal operating mode for opening/closing operation. All programmed functions<br />
are carried out, alarms will be supported and forwarded, diagnose is carried out<br />
and possible errors are displayed with a message.<br />
5.2.2 Programming mode<br />
The Programming Mode is used to alter factory set parameters and to change<br />
settings, codes etc. Depending on the programming level, different codes are<br />
required.<br />
5.2.3 Information menu<br />
The information menu is accessible by pressing the key while the<br />
display shows “OPEN” or “LOCKED”. Pressing the key will initiate<br />
an 6 second auto-display showing:<br />
• remaining time to the next opening (if applicable)<br />
• opening counter,<br />
• battery level (% of nominal capacity),<br />
• code entry format (ID+PIN or PIN+ID).<br />
Note!<br />
Pressing the key again will move one step ahead.<br />
KSW3s528.0043 / en 2010.09<br />
Page 30<br />
Operating Manual<br />
Subject to change without prior notice
<strong>Axessor</strong><br />
5.3 Buzzer signals<br />
Buzzer signal Display Cause<br />
1 short beep key stroke<br />
1 short, low-frequency beep REFUSED action refused<br />
1 short beep<br />
every 60 seconds<br />
3 short beeps<br />
every 60 seconds<br />
10 short beeps<br />
every 10 seconds<br />
10 short beeps<br />
every 30 seconds<br />
WAIT<br />
CONF<br />
BAT-CMP<br />
OPEN<br />
OPEN<br />
Time Delay or Duress Time Delay<br />
active<br />
Confirmation Window active (waiting<br />
for confirmation code after elapse of<br />
Time Delay)<br />
battery compartment has been<br />
opened<br />
lock open<br />
AS 284 Programming Software<br />
• Buzzer signal during „OPEN“ (lock open), during „WAIT“ (Time delay) and during<br />
„CONF“ (Confirmation window) can be deactivated.<br />
• Buzzer volume may be set to „high“, „low“ or „off“.<br />
5.4 Status messages<br />
During normal operation the following status messages can occur:<br />
5.4.1 <strong>Lock</strong>ed<br />
The lock is mechanically closed – the current time is displayed.<br />
It may be opened by entering a valid code.<br />
5.4.2 Open<br />
The lock is mechanically open. The boltwork or the safe<br />
door can be opened during a set period of time (factory<br />
default: 6 seconds). If the boltwork is not opened, the lock<br />
automatically closes after the set bolt open time has<br />
elapsed.<br />
5.4.3 Immediate time lock<br />
The lock is blocked by the Immediate time lock function and<br />
cannot be opened – the current time is displayed. It may<br />
only be opened by entering a valid code once the set <strong>Lock</strong>ing<br />
Period has elapsed.<br />
Operating Manual KSW3s528.0043 / en 2010.09<br />
Subject to change without prior notice Page 31
<strong>Axessor</strong><br />
5.4.4 Time lock (Weekly)<br />
The lock is in a Weekly <strong>Lock</strong>ing Period and cannot be<br />
opened – the current time is displayed. It may only be<br />
opened by entering a valid code once the set <strong>Lock</strong>ing Period<br />
has elapsed.<br />
5.4.5 Time lock (Holiday)<br />
The lock is in a Holiday <strong>Lock</strong>ing Period and cannot be<br />
opened – the current time is displayed. It may only be<br />
opened by entering a valid code once the set <strong>Lock</strong>ing Period<br />
has elapsed.<br />
5.4.6 Time Delay<br />
After entering a valid code to open the lock the set Time<br />
Delay starts counting – the remaining time is displayed. A<br />
„BEEP signal“ is emitted every 60 seconds. Once the counter<br />
has elapsed, the end of the Time Delay is indicated with<br />
another „BEEP signal“.<br />
Notes!<br />
• The duration of a Time Delay may vary between the code groups.<br />
• The Time Delay my be set to „count down“, „count up“ or „no count (00:00)“<br />
• If the key is pressed, the Time Delay is reset and the lock automatically<br />
returns to „LOCKED“ status.<br />
• The Courier Code overrides a Time Delay.<br />
• An input may be defined to override a Time Delay<br />
5.4.7 Confirmation after elapse of Time Delay<br />
Once the Time Delay has elapsed, a code must be enteredagain<br />
as confirmation, within a set period of time. The<br />
remaining time allowance to enter the code is displayed.<br />
The „CONF“ display is also shown after entry of the Courier<br />
Code, if „Courier does not open but skips Time Delay“ is set.<br />
The opening procedure must then start during count-down.<br />
An „BEEP signal“ is emitted every 60 seconds. If the code is<br />
not confirmed, the lock automatically returns to locked status<br />
once the counter reached 00:00.<br />
Notes!<br />
• If the key is pressed, the lock automatically returns to „LOCKED“ status.<br />
• If Dual Mode is activated proceed as follows in the confirmation window: Repeat<br />
two codes for confirmation, whereby the sequence is irrelevant. The codes must<br />
comply to the settings made with the AS 284 Programming Software: „any<br />
code“, „same code group“, „different code group“<br />
KSW3s528.0043 / en 2010.09<br />
Page 32<br />
Operating Manual<br />
Subject to change without prior notice
<strong>Axessor</strong><br />
5.4.8 Enter second code (Dual Mode activated)<br />
If Dual Mode is activated, 2 codes must be entered to open<br />
the lock. This message prompts you to enter the second<br />
code.<br />
Notes!<br />
Master Code and Courier Code override the Dual Mode – the lock can be opened<br />
without any additional code.<br />
5.4.9 Penalty after wrong trials<br />
A time penalty of 5 minutes is initiated after the fourth consecutive<br />
incorrect code is entered upon opening or accessing<br />
programming mode. During this period no code entries<br />
are accepted, neither bypassing nor cancellation is possible.<br />
The remaining penalty time is displayed.<br />
5.4.10 Remote Disabling<br />
Local opening of the lock can be disabled by a remote disabling<br />
signal either by an input signal, or via the AS 284<br />
Prgramming Software or by entering the user code 48 if set<br />
so. While Remote Disabling is active this message is shown<br />
while the lock is closed.<br />
5.4.11 Identification with denied code /<br />
Non Return Time Delay engaged<br />
Codes can be denied with a superior code, i.e. declared as<br />
invalid until possible further re-permission. Identification with<br />
a denied code is answered with this message. The selected<br />
function is not executed, the lock condition remains<br />
unchanged. This message is also displayed upon attempting<br />
to open the lock with a Manager Code or the Master<br />
Code if the respective Code type is set to„cannot open“.<br />
The message „DENIED“ is also shown as long as the programmed<br />
Non Return Time Delay refuses opening of the<br />
lock.<br />
Operating Manual KSW3s528.0043 / en 2010.09<br />
Subject to change without prior notice Page 33
<strong>Axessor</strong><br />
5.4.12 The battery compartment has been opened<br />
If the battery compartment, which also serves as a dismounting<br />
protection for the Input Unit, has been opened.<br />
This message appears when<br />
• lock is open while battery compartment is open, and when<br />
• lock is locked and the battery compartment has been<br />
opened and closed again.<br />
The message can only be deleted by entering a valid Master<br />
Code or Manager Code.<br />
5.4.13 Connected with Programming Software<br />
While the lock is connected to a computer via USB cable<br />
and a data exchange with the AS 284 Programming Software<br />
(optionally available) is in progress, the opposite display<br />
is shown. The Input Unit is not operative, all keys are<br />
disabled.<br />
While the lock is connected to a computer via LAN and a<br />
data exchange with the AS 284 Programming Software<br />
(optionally available) is in progress, he opposite display is<br />
@<br />
shown. The Input Unit is not operative, all keys are disabled.<br />
5.4.14 External power supply available<br />
A dot is shown in the display if external power on the lock or<br />
on the e-B@x is available. This status is updated every full<br />
hour.<br />
5.5 Access Codes<br />
5.5.1 Code hierarchy and code formats<br />
For operation and programming a Master Code, Manager Codes, User Codes<br />
and a Courier Code are available. Each code consists of an 8 digit number composed<br />
of an ID (identification) and a PIN (Personal Identification Number).<br />
• The ID (2 digits) is pre-defined and identifies the code type.<br />
• The PIN (remaining 6 digits) can be individually chosen.<br />
Note!<br />
With the AS 284 Programming Software the sequence to enter a code can be<br />
changed from ID followed by PIN to PIN followed by ID.<br />
Through the entire description of this manual the code format ID+PIN (ID followed<br />
by PIN) is used.<br />
KSW3s528.0043 / en 2010.09<br />
Page 34<br />
Operating Manual<br />
Subject to change without prior notice
<strong>Axessor</strong><br />
AS 284 Programming Software<br />
The code format ID+PIN can be changed to PIN+ID. Information on the code format<br />
currently used is available in the info menu accessed by pressing the key ( Information menu on page 30 ).<br />
MASTER 00<br />
0 0 x x x x x x<br />
MANAGER 10<br />
1 0 x x x x x x<br />
MANAGER 20<br />
2 0 x x x x x x<br />
MANAGER 30<br />
3 0 x x x x x x<br />
MANAGER 40<br />
4 0 x x x x x x<br />
USER 11<br />
1 1 x x x x x x<br />
USER 21<br />
2 1 x x x x x x<br />
USER 31<br />
3 1 x x x x x x<br />
USER 41<br />
4 1 x x x x x x<br />
USER 12<br />
1 2 x x x x x x<br />
USER 22<br />
2 2 x x x x x x<br />
USER 32<br />
3 2 x x x x x x<br />
USER 42<br />
4 2 x x x x x x<br />
USER 13<br />
1 3 x x x x x x<br />
USER 23<br />
2 3 x x x x x x<br />
USER 33<br />
3 3 x x x x x x<br />
USER 43<br />
4 3 x x x x x x<br />
User Group 21<br />
USER 14<br />
1 4 x x x x x x<br />
USER 15<br />
1 5 x x x x x x<br />
User Group 2<br />
USER 24<br />
2 4 x x x x x x<br />
USER 25<br />
2 5 x x x x x x<br />
User Group 3<br />
USER 34<br />
3 4 x x x x x x<br />
USER 35<br />
3 5 x x x x x x<br />
User Group 4<br />
USER 44<br />
4 4 x x x x x x<br />
USER 45<br />
4 5 x x x x x x<br />
USER 16<br />
1 6 x x x x x x<br />
USER 16<br />
2 6 x x x x x x<br />
USER 16<br />
3 6 x x x x x x<br />
USER 46<br />
4 6 x x x x x x<br />
USER 17<br />
1 7 x x x x x x<br />
USER 17<br />
2 7 x x x x x x<br />
USER 17<br />
3 7 x x x x x x<br />
USER47<br />
4 7 x x x x x x<br />
USER 18<br />
1 8 x x x x x x<br />
USER 28<br />
2 8 x x x x x x<br />
USER 38<br />
3 8 x x x x x x<br />
USER48<br />
4 8 x x x x x x<br />
USER 19<br />
1 9 x x x x x x<br />
USER 29<br />
2 9 x x x x x x<br />
USER 39<br />
3 9 x x x x x x<br />
USER 49<br />
4 9 x x x x x x<br />
COURIER 90<br />
9 0 x x x x x x<br />
5.5.2 Code types<br />
The factory set Master Code 0 0 1 2 3 4 5 6 is identical on all locks of this type,<br />
and therefore not suitable for daily use.<br />
Upon initialization and testing the Master Code must be changed to an individually<br />
selected code.<br />
Important!<br />
During commissioning and start-up of the unit all codes must be personalized.<br />
Never use any simple combination of numbers (e.g. 11223344, 12345678) or personal<br />
data (e.g. birthdays). For safety reasons, codes should be altered at regular<br />
intervals!<br />
Operating Manual KSW3s528.0043 / en 2010.09<br />
Subject to change without prior notice Page 35
<strong>Axessor</strong><br />
5.5.2.1 Master Code<br />
The Master Code is the highest code within the code hierarchy. It cannot be<br />
deleted.<br />
Factory setting: 0 0 1 2 3 4 5 6<br />
Functions: Opening the lock (even alone in Dual Mode)<br />
Alteration of all codes<br />
Accessing full range of function<br />
AS 284 Programming Software<br />
The Master Code can be defined as „cannot open the lock“. Thereupon, entering<br />
the Master Code for lock opening is confirmed with the message „DENIED“ – the<br />
lock does not open.<br />
Warning!<br />
Lost codes can only be deleted and redefined with a higher-level code.<br />
Please take note, that a lost Master Code can neither be located nor restored<br />
under any circumstances. There is no so called „Override code“ or „Super code“!<br />
5.5.2.2 Manager Codes<br />
4 Manager Codes (Manager Code 1 to Manager Code 4) are available. Each<br />
Manager Code can administrate a group of User Codes.<br />
Factory setting: no code assigned<br />
Functions: Opening the lock<br />
Alteration of own Code<br />
Activation, deletion and alteration of subordinated User Codes<br />
Denial and permission of subordinated User Group<br />
Alteration of subordinated Time Delay and Confirmation Window<br />
Activation of Immediate Time <strong>Lock</strong> function<br />
Reading audit with AS 286 Audit Viewer<br />
AS 284 Programming Software<br />
• The Manager Codes can be defined as „cannot open the lock“. Thereupon,<br />
entering a Manager Code for lock opening is confirmed with the message<br />
„DENIED“ – the lock does not open.<br />
• The Manager Codes can be defined as: „cannot activate Immediate Time <strong>Lock</strong>“,<br />
„cannot change Time Delays“ and/or „cannot change Confirmation Window“.<br />
When entering the Programming Mode with a so defined Manager Code the<br />
corresponding submenus are not accessible any longer.<br />
• The Manager Codes can be defined as: „Dual Manager for Programming<br />
Mode“. If set so, 2 Manager Codes are necessary to enter the Programming<br />
Mode.<br />
• The Manager Codes can be defined as: „Manager Cross Access User Codes“.<br />
If set so, the Manager can alter also Codes of the other User Groups.<br />
KSW3s528.0043 / en 2010.09<br />
Page 36<br />
Operating Manual<br />
Subject to change without prior notice
<strong>Axessor</strong><br />
5.5.2.3 User Codes<br />
A total of 36 User Codes in 4 groups of up to 9 each can be defined. User Codes<br />
can be defined even if no Manager Code is active.<br />
Factory setting: no code assigned<br />
Functions: Opening the lock<br />
Alteration of respective User Code<br />
AS 284 Programming Software<br />
• The User Codes can be defined as: „can activate Immediate Time <strong>Lock</strong>“. If set<br />
so, the submenu „IMM-TL“ is accessible for the users.<br />
• User 47 can be defined as time code. If set so, the user has access to all time<br />
functions e.g. time, date, weekly and holiday programms. The time code can‘t<br />
be used to open the lock.<br />
• Users 48 and 49 can be defined for lock disabling/enabling. If set so, entering<br />
User Code 48 disables lock opening and entering User Code 49 enables lock<br />
opening.<br />
5.5.2.4 Courier Code<br />
1 Courier Code can be provided to personnel filling/emptying secured containers<br />
(CIT - Cash-In-Transit Services) without any programmed Time Delays being of<br />
relevance.<br />
Factory setting: no code assigned<br />
Functions: Opening the lock (even alone in Dual Mode) by bypassing Time<br />
Delay<br />
Alteration of Courier Code<br />
AS 284 Programming Software<br />
The Courier Code can be defined as: „Courier does not Open but Skips Delay“.<br />
Thereupon, entering the Courier Code for lock opening skips the Time Delay for<br />
the next opening. The Confirmation window count-down indicates for how long<br />
this condition is given (opening procedure must start during count-down).<br />
5.5.3 Shelve Function<br />
All codes, parameters and data (e.g <strong>Lock</strong>ing Periods, Time Delays etc.) are reset<br />
to factory settings. This also applies for all e-B@x settings, i.e. network related<br />
data. Audit Trail, opening counter and Time/Date setting remain unchanged. This<br />
function is only available if Programming Mode is accessed with Master Code.<br />
Operating Manual KSW3s528.0043 / en 2010.09<br />
Subject to change without prior notice Page 37
<strong>Axessor</strong><br />
5.5.4 Duress Code<br />
If the lock is connected to an external alarm system, a silent duress alarm (unnoticeable<br />
for the aggressor) can be initiated by the operator.<br />
To trigger a duress alarm, the value 1 has to be added or deducted to the last<br />
digit of the code. Duress alarms can be initiated with all code types at any time.<br />
Example: Code Duress Code<br />
00123456 ----> 00123457 or 00123455<br />
00000000 ----> 00000001 or 00000009<br />
00999999 ----> 00999990 or 00999998<br />
Entering the Duress Code for lock opening starts the set Duress Time Delay.<br />
Requirement!<br />
Duress Codes are recognized only if this function is enabled by the Master Code<br />
( Activating/Deactivating Duress Code function - Submenu DURESS on page<br />
64).<br />
Important!<br />
If Code format is set to PIN+ID the entry sequence changes. To trigger a duress<br />
alarm, value 1 has to be added or deducted to the first digit of the code!<br />
Example: Code Duress Code<br />
12345600 ----> 22345600 or 02345600<br />
00000000 ----> 10000000 or 90000000<br />
99999900 ----> 09999900 or 89999900<br />
Note!<br />
After entering a Duress Code, the duress status is maintained until the Duress<br />
Time Delay has elapsed and the lock has been opened, one more non-duress<br />
code has been entered!<br />
AS 284 Programming Software<br />
• Four Duress Time Delays are available:<br />
• the first is valid for Master, Manager 1 and Users 11 ... 19<br />
• the second for Manager 2 and Users 21 ... 29<br />
• the third for Manager 3 and Users 31 ... 39<br />
• the fourth for Manager 4 and Users 41 ... 49.<br />
• The Duress Time Delays can be set independent (longer or shorter) of the normal<br />
Time Delays.<br />
• The counting of the Duress Time Delay is the same as set for the Time Delay:<br />
„count up“, count down“ or „no-count“.<br />
KSW3s528.0043 / en 2010.09<br />
Page 38<br />
Operating Manual<br />
Subject to change without prior notice
<strong>Axessor</strong><br />
5.6 Code entry<br />
Codes are entered in 2 groups of 4 digits. To enter a code (to open the lock or to<br />
enter the Programming mode) proceed as follows:<br />
1. Press any key to wake up the display (if necessary). The lock status appears<br />
(e.g. „LOCKED“).<br />
2. Key-in the Code (e.g. 11123456) using the keys (an asterisks<br />
appears for every digit entered).<br />
3. Press the key to confirm the Code.<br />
Note!<br />
During code entry a possible observer can be diverted. Only the first 7 and the<br />
last entered digit will be considered as code.<br />
• Enter your code as usual (at least the first 7 digits) and keep on adding any<br />
combination as desired.<br />
• Enter the last digit of your code and press the key.<br />
(Example: 00123458921031...257)<br />
Operating Manual KSW3s528.0043 / en 2010.09<br />
Subject to change without prior notice Page 39
<strong>Axessor</strong><br />
5.7 Opening procedure<br />
The Display switches off automatically after 1 minute without any key being<br />
pressed.<br />
1. Press any key to wake up the display (if necessary).The lock status appears.<br />
2. Key-in the Code (e.g. 11123456) using the keys (an asteriks<br />
appears for every digit entered). Press the key to confirm the<br />
Code.<br />
3. If unit is set to Dual Mode enter second code as described above.<br />
4. Press the key to confirm the Code. The lock opens.<br />
5. Open the safe.<br />
6. If desired continue in Programming Mode ( Programming mode on page<br />
30).<br />
Note!<br />
Opening is not possible during following conditions:<br />
• Penalty after wrong trials ( page 33).<br />
• During active <strong>Lock</strong>ing Period (Immediate, Weekly, Holiday) ( page 32).<br />
• While the battery compartment is open ( page 34).<br />
• During Remote Disabling is in process ( page 33).<br />
• Active connection with the Programming Software ( page 34).<br />
• During Non Return Time Delay ( page 33).<br />
KSW3s528.0043 / en 2010.09<br />
Page 40<br />
Operating Manual<br />
Subject to change without prior notice
<strong>Axessor</strong><br />
5.8 Closing procedure<br />
The lock normally closes automatically when the boltwork is closed.<br />
Note!<br />
Depending on the safe design the closing procedure can be made dependent<br />
on additional factors.<br />
Contact the supplier of the safe or consult section ( Installing the lock on page<br />
20).<br />
Operating Manual KSW3s528.0043 / en 2010.09<br />
Subject to change without prior notice Page 41
<strong>Axessor</strong><br />
6 Programming Mode<br />
6.1 Operating the programming mode<br />
6.1.1 Activating the programming mode<br />
1. Open the lock ( Opening procedure on page 40).<br />
2. Press the key.<br />
3. Enter the code, e.g. „16023054“ using the keys and confirm the<br />
code with the key.<br />
You are now in the programming mode. The main menu is displayed. The<br />
content of the main menu depends on the code you have entered.<br />
AS 284 Programming Software<br />
If the setting „ Dual Manager for Programming Mode“ is activated, two Manager<br />
codes must be entered to access the programming mode. The content of the<br />
menu then comprises of the accessible content of both codes.<br />
Important!<br />
If no key is pressed in programming mode within 1 minute, the unit returns automatically<br />
to normal operating mode and the display switches off. Any changes<br />
which have not been confirmed with the key and the message<br />
„ACCEPTED“ will be lost!<br />
KSW3s528.0043 / en 2010.09<br />
Page 42<br />
Operating Manual<br />
Subject to change without prior notice
<strong>Axessor</strong><br />
6.1.2 Navigating in the Programming Mode<br />
• Use the and key to:<br />
• scroll to a menu item within the main menu or the submenu.<br />
• select an individual digit or entry field within a settings display.<br />
• Use the key to confirm settings and selections.<br />
• Use the key to quit a setting or submenu without action and<br />
jump to the next higher menu level..<br />
• Use the key to delete selected data from a submenu or menu item.<br />
• Use the key to quit the Programming Mode and return to Normal<br />
Operating Mode.<br />
6.1.3 Modify and save settings in the Programming Mode<br />
To modify a individual setting proceed as follows:<br />
1. Select the desired setting in the menu (e.g. „TIME“) and press the <br />
key.<br />
2. Modify the setting according to the instructions for the corresponding setting<br />
( 6.4 Programming).<br />
3. Confirm the setting with the key.<br />
4. In the upcoming save dialog select „YES“ using the or key<br />
(if necessary), then press the key to save the setting. The Message<br />
„ACCEPTED“ appears shortly and the unit returns to the corresponding<br />
setting.<br />
Note!<br />
• The modification dialog can be interrupted without saving at any time by pressing<br />
the key. Any changes will not be saved.<br />
• The save dialog can be cancelled by selcting „NO“ with the or<br />
key and pressing the key!<br />
Operating Manual KSW3s528.0043 / en 2010.09<br />
Subject to change without prior notice Page 43
<strong>Axessor</strong><br />
6.1.4 Exiting the Programming Mode<br />
Press the key or press repeatedly the key (jumps to the<br />
next higher menu level) to return to normal operating mode.<br />
Important!<br />
Any changes which have not been confirmed with the key and the<br />
message „ACCEPTED“ will be lost!<br />
KSW3s528.0043 / en 2010.09<br />
Page 44<br />
Operating Manual<br />
Subject to change without prior notice
<strong>Axessor</strong><br />
6.2 Menu overview<br />
The following menus and submenus (settings) are available in Programming<br />
Mode:<br />
Menu „TIME“ (setting time, date and time format)<br />
Submenus: „TIME“, „DATE“, „AM/PM“<br />
Menu „PROG“ (configuring <strong>Lock</strong>ing Periods)<br />
Submenus: „WEEKLY“, „IMM-TL“, „HOLIDAY“<br />
Menu „DELAY“ (configuring Time Delays)<br />
Submenus: „DELAY 1“, „DELAY 2“, „DELAY 3“, „DELAY 4“, „CNF WIN“<br />
Menu „CODE“ (modifying codes)<br />
Submenus: „MASTER“, „MANAGER“, „USER“, „COURIER“, „SHELVE“<br />
Menu MISC (accessing additional settings)<br />
Submenus: „CDE DEN“, „RMT-DIS“, „DURESS“, „DUAL“, „LANG“<br />
Operating Manual KSW3s528.0043 / en 2010.09<br />
Subject to change without prior notice Page 45
<strong>Axessor</strong><br />
6.3 Access rights<br />
Depending on the acess code used upon activating the Programming Mode the<br />
following entries and settings can be made.<br />
Function<br />
Set Date<br />
Set Time<br />
Set Time format<br />
Set Weekly <strong>Lock</strong>ing Period<br />
Activate Immediate Time <strong>Lock</strong><br />
function<br />
Set Holiday <strong>Lock</strong>ing Period /<br />
repeated Holiday <strong>Lock</strong>ing<br />
Period<br />
Set Time Delays<br />
Authorization<br />
MA Mx U C<br />
Remarks<br />
Legend: MA Master Code U User Codes<br />
Mx Manager Codes 1, 2, 3, 4 C Courier Code<br />
* only if set so by AS 284 Programming Software<br />
<br />
<br />
<br />
<br />
* *<br />
<br />
*<br />
Set Confirmation Window *<br />
Change Master Code<br />
Change Manager Code <br />
Delete Manager Code<br />
Change Courier Code <br />
Delete Courier Code<br />
Delete User Codes <br />
Change User Code<br />
Employ Shelve Function<br />
Deny/permit<br />
subordinated codes<br />
Activate/deactivate<br />
Remote Disabling<br />
Activate/deactivate<br />
Duress Code<br />
Activate/deactivate Dual Mode<br />
<br />
<br />
<br />
<br />
<br />
<br />
<br />
*<br />
Change Display Language <br />
<br />
<br />
Master: Time Delays 1 ... 4<br />
Manager 1: Time Delay 1<br />
Manager 2: Time Delay 2<br />
Manager 3: Time Delay 3<br />
Manager 4: Time Delay 4<br />
Master Code cannot be<br />
deleted!<br />
Respective User Codes will<br />
not be deleted!<br />
User can only change own<br />
code!<br />
Entire group of User Codes<br />
will be denied/permitted!<br />
User 48: disabling<br />
User 49: enabling<br />
KSW3s528.0043 / en 2010.09<br />
Page 46<br />
Operating Manual<br />
Subject to change without prior notice
<strong>Axessor</strong><br />
6.4 Programming<br />
Requirement!<br />
To enable the programming the lock must remain open during the entire programming<br />
procedure.<br />
Important!<br />
If no key is pressed for 1 minute in the Programming Mode the display will be<br />
turned off and the Programming Mode will automatically be exit. Any unsaved<br />
entries will be lost!<br />
6.4.1 Menu TIME<br />
6.4.1.1 Setting the time - submenu TIME<br />
Authorization: Master Code<br />
1. Select the submenu „TIME“.<br />
2. Press the key. The currently set time is displayed.<br />
3. Enter the time using the keys. After each number the cursor<br />
moves automatically one digit to the right. Use the or key to<br />
select an individual digit to modify.<br />
Note!<br />
If time format „AM/PM“ is activated ( 6.4.1.3 Setting the time format - submenu<br />
AM/PM) the time must be entered in 12-Hour-Format (e.g. 14:25 as 02:25 PM).<br />
The suffix AM or PM can be selected with the key.<br />
4. Press the key and confirm the setting in the save dialog.<br />
Operating Manual KSW3s528.0043 / en 2010.09<br />
Subject to change without prior notice Page 47
<strong>Axessor</strong><br />
6.4.1.2 Setting the time - submenu DATE<br />
Authorization: Master Code<br />
1. Select the submenu „DATE“.<br />
2. Press the key. The currently set date is displayed.<br />
3. Move the cursor to its left limit using the key. Enter the month (2 digits:<br />
January= 01, February= 02, … December= 12), the day (2 digits) and the<br />
year (4 digits) using the keys. After each entry the cursor moves<br />
automatically one digit to the right. Use the or key to select<br />
an individual digit to modify.<br />
4. Press the key to confirm the set date in the save dialog.<br />
Note!<br />
The respective weekdays and leap years are automatically calculated with the<br />
internal calendar (calendar range: Jan-1-2002 ... Dec-31-2099).<br />
6.4.1.3 Setting the time format - submenu AM/PM<br />
Authorization: Master Code<br />
1. Select submenu „AM/PM“..<br />
2. Press the key. The currently set time format is displayed.<br />
3. Select either „ON“ or „OFF“ by toggling with the or key.<br />
Note!<br />
With „AM/PM ON“ the time is displayed in 12-Hour-Format (1:00 – 12:59 with suffix<br />
AM (ante meridiem = before noon) or PM (post meridiem = after noon).<br />
With „AM/PM OFF” the time is displayed in 24-Hour-Format (00:00 – 23:59).<br />
4. Press the key to confirm the setting in the upcoming save dialog.<br />
KSW3s528.0043 / en 2010.09<br />
Page 48<br />
Operating Manual<br />
Subject to change without prior notice
<strong>Axessor</strong><br />
6.4.2 Menu PROG<br />
6.4.2.1 Configuring weekly <strong>Lock</strong>ing Periods - Submenu WEEKLY<br />
Up to 16 weekly repeated time windows can be defined, during which the lock<br />
cannot be opened (e.g. outside business opening hours).<br />
Authorization: Master Code<br />
6.4.2.1.1 Adding a Weekly <strong>Lock</strong>ing Period<br />
1. Select submenu „WEEKLY“.<br />
2. Press the key. If any Weekly <strong>Lock</strong>ing Periods are already defined,<br />
the settings for the starting point of first <strong>Lock</strong>ing Period is displayed.<br />
3. Press the or key until „“ is displayed.<br />
Note!<br />
If the maximum of 16 Weekly <strong>Lock</strong>ing Periods are already defined<br />
„“ is displayed. No additional <strong>Lock</strong>ing Period can be defined.<br />
4. Press the key.<br />
5. Use the keys to set the day and the time of the starting point<br />
of the <strong>Lock</strong>ing Period (indicated by the „lock closed” symbol).<br />
Note!<br />
Time and day entry depend on the AM/PM setting (6.4.1.3 Setting the time format<br />
- submenu AM/PM).<br />
If time format is set to 12-hours (AM/PM On) the week days are numbered: Sunday=<br />
1, Monday= 2, ... Saturday= 7;<br />
If time format is set to 24-hours (AM/PM Off) the week days are numbered: Monday=<br />
1, Tuesday= 2, … Sunday= 7.<br />
6. Press the key to confirm the setting in the upcoming save dialog.<br />
Operating Manual KSW3s528.0043 / en 2010.09<br />
Subject to change without prior notice Page 49
<strong>Axessor</strong><br />
7. Use the keys to set the day ( note below step 5) and the time<br />
of the end point of the <strong>Lock</strong>ing Period (indicated by the „lock open” symbol).<br />
8. Press the key to confirm the setting in the upcoming save dialog.<br />
9. Repeat steps 2 to 7 to define other <strong>Lock</strong>ing Periods or press the <br />
key to exit the function.<br />
Note!<br />
• Weekly <strong>Lock</strong>ing Periods can last 1 minute to 6 days, 23 hours and 59 minutes.<br />
• Between two Weekly <strong>Lock</strong>ing Periods opening must be possible. Therefore the<br />
time gap must be larger than: the defined Time Delay (or Duress Time Delay, if<br />
larger) + the Confirmation Window + one additional minute.<br />
• Weekly <strong>Lock</strong>ing Periods are saved in chronological order, starting with Monday.<br />
6.4.2.1.2 Modifying an existing Weekly <strong>Lock</strong>ing Period<br />
Proceed as described for adding a new Weekly <strong>Lock</strong>ing Period ( Adding a<br />
Weekly <strong>Lock</strong>ing Period on page 49). Instead of „“ select the Weekly<br />
<strong>Lock</strong>ing Period you wish to alter and overwrite it.<br />
6.4.2.1.3 Deleting an existing Weekly <strong>Lock</strong>ing Period<br />
1. Select submenu „WEEKLY“.<br />
2. Press the key. The starting point of the first defined Weekly <strong>Lock</strong>ing<br />
Period is displayed.<br />
3. Use the or key to select the starting point of the Weekly<br />
<strong>Lock</strong>ing Period (indicated by the „lock closed” symbol) you wish to delete.<br />
4. Press the key.<br />
5. In the upcoming delete dialog select „YES“ using the or key,<br />
then press the key. The corresponding <strong>Lock</strong>ing Period will be<br />
deleted.<br />
KSW3s528.0043 / en 2010.09<br />
Page 50<br />
Operating Manual<br />
Subject to change without prior notice
<strong>Axessor</strong><br />
6.4.2.2 Activating an Immediate Time <strong>Lock</strong> - Submenu IMM-TL<br />
This function permits activation of a <strong>Lock</strong>ing Period with immediate action. Upon<br />
closing the lock cannot be opened for the programmed duration.<br />
Example: For shorter business hours due to public holiday, the time until beginning<br />
of the regular <strong>Lock</strong>ing Period can be bridged.<br />
Authorization: Master Code or any Manager Codeor any User Code<br />
AS 284 Programming Software<br />
• Only if the Manager Codes are defined as: „can activate Immediate Time <strong>Lock</strong>“,<br />
this setting is available with Manager Codes.<br />
• Only if the User Codes are defined as: „can activate Immediate Time <strong>Lock</strong>“, this<br />
setting is available with User Codes.<br />
1. Select submenu „IMM-TL“.<br />
2. Press the key.<br />
3. Use the keys to set the duration in hours the Immediate Time<br />
<strong>Lock</strong> should be active after the lock is closed.<br />
4. Press the key to confirm the settings in the upcoming save dialog.<br />
Notes!<br />
• Maximum duration is 144 hours.<br />
• Overwriting with „000:00“ will deactivate the Immediate Time <strong>Lock</strong>.<br />
• The Immediate Time <strong>Lock</strong> is not related to Time/Date. Therefore, by changing<br />
Time/Date setting the Immediate Time <strong>Lock</strong> cannot be bypassed.<br />
Operating Manual KSW3s528.0043 / en 2010.09<br />
Subject to change without prior notice Page 51
<strong>Axessor</strong><br />
6.4.2.3 Configuring Holiday <strong>Lock</strong>ing Periods - Submenu HOLIDAY<br />
This function permits defining of up to 22 date-related time windows, during which<br />
the lock cannot be opened (e.g. during holidays or on public holidays).<br />
Authorization: Master Code<br />
6.4.2.3.1 Adding a Holiday <strong>Lock</strong>ing Period<br />
1. Select submenu „HOLIDAY“.<br />
2. Press the key. If any Holiday <strong>Lock</strong>ing Periods are already defined,<br />
the settings for the starting point of the first <strong>Lock</strong>ing Period is displayed.<br />
3. Press the or key until „“ is displayed..<br />
Note!<br />
If the maximum of 22 Holiday <strong>Lock</strong>ing Periods are already defined<br />
„“ is displayed. No additional <strong>Lock</strong>ing Period can be defined.<br />
4. Press the key.<br />
5. Use the keys to set the month (January= 01, February= 02, …<br />
December= 12) the day and the year of the starting point of the Holiday<br />
<strong>Lock</strong>ing Period (indicated by the „lock closed” symbol).<br />
6. Press the key to confirm the settings in the upcoming save dialog.<br />
7. Use the keys to set the month (January= 01, February= 02, …<br />
December= 12) the day and the year of the end point of the Holiday <strong>Lock</strong>ing<br />
Period (indicated by the „lock open” symbol).<br />
8. Press the key to confirm the settings in the upcoming save dialog.<br />
KSW3s528.0043 / en 2010.09<br />
Page 52<br />
Operating Manual<br />
Subject to change without prior notice
<strong>Axessor</strong><br />
Notes!<br />
• Holiday <strong>Lock</strong>ing Periods last from 00:00:00 (12:00 AM) of the first day until<br />
23:59:59 (11:59:59 PM) of the last day. Therefore, if a Holiday <strong>Lock</strong>ing Period of<br />
one day is to be programmed, both, start date and end date must be the same<br />
date.<br />
• The maximum duration of a Holiday <strong>Lock</strong>ing Period is limited to 35 days.<br />
• Between two Holiday <strong>Lock</strong>ing Periods a time gap of at least 1 day must be<br />
observed. Exception: Feb 28 th – March 1 st due to leap year.<br />
• Holiday <strong>Lock</strong>ing Periods are saved in chronological order.<br />
• During an active Holiday <strong>Lock</strong>ing Period possibly defined Weekly <strong>Lock</strong>ing Periods<br />
( Configuring weekly <strong>Lock</strong>ing Periods - Submenu WEEKLY on page 49)<br />
have no effect – the Holiday <strong>Lock</strong>ing Period is simply overlaid.<br />
• Entering „0000“ for both, starting and ending year will repeat the Holiday <strong>Lock</strong>ing<br />
Period every year.<br />
• If the end date of a yearly repeated Holiday <strong>Lock</strong>ing Period is to be last day of<br />
February, it is recommended to set it to February 29 th in order to include leap<br />
years as well.<br />
6.4.2.3.2 Modifying an existing Holiday <strong>Lock</strong>ing Period<br />
Proceed as described for adding a new Holiday <strong>Lock</strong>ing Period ( Adding a Holiday<br />
<strong>Lock</strong>ing Period on page 52). Instead of „“ select the Holiday <strong>Lock</strong>ing<br />
Period you wish to alter and overwrite it.<br />
6.4.2.3.3 Deleting an existing Holiday <strong>Lock</strong>ing Period<br />
1. Select submenu „Holiday“.<br />
2. Press the key. The starting point of the first defined Holiday <strong>Lock</strong>ing<br />
Period is displayed.<br />
3. Use the or key to select the starting point of the Holiday<br />
<strong>Lock</strong>ing Period (indicated by the „lock closed” symbol) you wish to delete.<br />
4. Press the key.<br />
5. In the upcoming delete dialog select „YES“ using the or key,<br />
then press the key.<br />
Important!<br />
Once elapsed, Holiday <strong>Lock</strong>ing Periods that carry a year value (not 0000) are<br />
automatically deleted! This also applies if the date is accidentally set to a future<br />
date and then reset to a date in the past!<br />
Operating Manual KSW3s528.0043 / en 2010.09<br />
Subject to change without prior notice Page 53
<strong>Axessor</strong><br />
6.4.3 Menu DELAY<br />
6.4.3.1 Setting/Deactivating Time Delays - Submenus DELAY 1...4<br />
Once a valid code is entered, the lock only opens after the configured time delay<br />
has elapsed. A time delay can be set between 0 (deactivated, no Time Delay)<br />
and 99 minutes. Four Time Delays can be programmed:<br />
• Time Delay 1: valid for Master, Manager 1 and Users 11 ... 19<br />
• Time Delay 2: valid for Manager 2 and Users 21 ... 29<br />
• Time Delay 3: valid for Manager 3 and Users 31 ... 39<br />
• Time Delay 4: valid for Manager 4 and Users 41 ... 49.<br />
Authorization: Master Code or Manager Code<br />
AS 284 Programming Software<br />
If the Manager Codes are defined as: „Manager can change Time Delay“, this<br />
setting is available with Manager Codes.<br />
1. Select the submenu „DELAY 1“, „DELAY 2“, „DELAY 3“ or „DELAY 4“.<br />
2. Press the key. The currently set Time Delay is displayed.<br />
3. Use the keys to set the desired Time Delay (setting range „00:00“<br />
(deactivated, no Time Delay) to „99:00“ minutes).<br />
Note!<br />
• Upon delivery Time Delays are deactivated (set to „00:00“).<br />
• The programmable maximum value of a Time Delay may be limited by the minimum<br />
time gap between two Weekly <strong>Lock</strong>ing Periods ( Adding a Weekly <strong>Lock</strong>ing<br />
Period on page 49)<br />
• Entering a Courier Code opens the lock without any Time Delay.<br />
4. Press the key to confirm the setting in the upcoming save dialog.<br />
AS 284 Programming software<br />
• Four Duress Time Delays can be configured:<br />
• Duress Time Delay 1: valid for Master, Manager 1 and Users 11 ... 19<br />
• Duress Time Delay 2: valid for Manager 2 and Users 21 ... 29<br />
• Duress Time Delay 3: valid for Manager 3 and Users 31 ... 39<br />
• Duress Time Delay 4: valid for Manager 4 and Users 41 ... 49.<br />
• The Duress Time Delays can be set independent (longer or shorter) of normal<br />
Time Delays.<br />
KSW3s528.0043 / en 2010.09<br />
Page 54<br />
Operating Manual<br />
Subject to change without prior notice
<strong>Axessor</strong><br />
• It is also possible to suppress Time Delays with an external signal ( External<br />
connections at the lock on page 23). This allows to open the lock (e.g. to empty<br />
ATMs) without a Time Delay.<br />
• It is also possible to automatically trigger the Duress Time Delay. This is the<br />
case if no external signal was triggered – e.g., by a push-button – within 1 minute<br />
before a code-entry to open (function Duress by Omission, External connections<br />
at the lock on page 23).<br />
6.4.3.2 Configuring the Confirmation Window -<br />
Submenu CNF WIN<br />
To prevent the lock from automatic opening once a Time Delay has elapsed, a<br />
confirmaton window is displayed, during which a code has to be entered again<br />
within a certain time.<br />
Authorization: Master Code or any Manager Code<br />
AS 284 Programming Software<br />
If the Manager Codes are defined as: „Manager can change Confirmation Window“,<br />
this setting is available with Manager Codes.<br />
1. Select the submenu „CNF WIN“.<br />
2. Press the key. The currently set confirmaton time is displayed.<br />
3. Use the keys to set the desired confirmaton time (setting range<br />
„1:00“ to „99:00“ minutes).<br />
Note!<br />
• Upon delivery Confirmation Window is set to 5 minutes.<br />
• The minimum value is 1 minute.<br />
• The programmable maximum value of a Time Delay may be limited by the minimum<br />
time gap between two Weekly <strong>Lock</strong>ing Periods ( Adding a Weekly <strong>Lock</strong>ing<br />
Period on page 49).<br />
• The value set for the Confirmation window is also used for Courier Code opening<br />
if set to „ Courier does not open but Skips Time Delay“ ( Courier Code on<br />
page 37).<br />
• The Confirmation Window can not be deactivated.<br />
4. Press the key to confirm the setting in the upcoming save dialog.<br />
Operating Manual KSW3s528.0043 / en 2010.09<br />
Subject to change without prior notice Page 55
<strong>Axessor</strong><br />
6.4.4 Menu CODE<br />
The following table shows the authorizations of codes to perform modifications<br />
(for an overview of available code types and their respective formats ( Access<br />
Codes on page 34).<br />
can be modified by<br />
owner of…<br />
Master Code<br />
Legend: A Activate M Modify D Delete<br />
6.4.4.1 Changing the Master Code - Submenu MASTER<br />
Authorization: Master Code<br />
1. Select the submenu „MASTER“.<br />
Manager<br />
Codes<br />
User Codes<br />
Courier Code<br />
Master Code M A M D A M D A M D<br />
respective<br />
– M A M D –<br />
Manager Code<br />
respective<br />
User Codes<br />
– – M –<br />
Courier Code – – – M<br />
2. Press the key.<br />
3. Select „YES“ (using the or key), then press the <br />
key.<br />
4. Use the keys to enter the new code (observe code format <br />
Code hierarchy and code formats on page 34).<br />
5. Press the key to confirm.<br />
6. „CONFIRM“ is displayed shortly to prompt you to enter the same code again<br />
for confirmation. Use the keys to enter the same code again.<br />
7. Press the key to confirm.<br />
KSW3s528.0043 / en 2010.09<br />
Page 56<br />
Operating Manual<br />
Subject to change without prior notice
<strong>Axessor</strong><br />
6.4.4.2 Setting Manager Codes - Submenu MANAGER<br />
Authorization: Master Code or respective Manager Code<br />
1. Select the submenu „MANAGER“.<br />
2. Press the key.<br />
3. This step must be performed only, if programming mode was entered with<br />
Master Code or Dual Manager Code: use the or key to<br />
select the Manager Code you wish to alter (Manager Codes already activated<br />
are displayed by „USED“ not activated codes are displayed by „– – – – –“).<br />
4. Press the key.If you have selected an already activated code you<br />
are asked whether or not you want to modify the code.<br />
5. Select „YES“ (using the or key), then press the <br />
key.<br />
6. Use the keys to enter the new code (observe code format <br />
Code hierarchy and code formats on page 34).<br />
7. Press the key to confirm.<br />
8. „CONFIRM“ is displayed shortly to prompt you to enter the same code again<br />
for confirmation. Use the keys to enter the same code again.<br />
9. Press the key to confirm.<br />
Operating Manual KSW3s528.0043 / en 2010.09<br />
Subject to change without prior notice Page 57
<strong>Axessor</strong><br />
6.4.4.3 Setting User Codes - Submenu USER<br />
Authorization: Master Code, respective Manager Code or<br />
respective User Code<br />
AS 284 Programming Software<br />
• If the Manager Codes are defined as: „Manager can Cross Access User<br />
Codes“, Manger can also modify User Codes of another User Group.<br />
• The User Codes 48 and 49 can be defined as: „disabling/enabling the lock“.<br />
Thereupon, User Codes 48 and 49 can no longer open the lock, they can only<br />
disable/enable the lock. Entering the User Code 48 disables the lock whereas<br />
entering the User Code 49 enables the lock.<br />
1. Select the submenu „USER“.<br />
2. Press the key.<br />
3. This step must be performed only, If programming mode was entered with<br />
Master Code or a Manager Code: use the or key to select<br />
the User Code you wish to alter (User Codes already activated are displayed<br />
by „USED“ not activated codes are displayed by „– – – – –“).<br />
4. Press the key. If you have selected an already activated code you<br />
are asked whether or not you want to modify the code.<br />
5. Select „YES“ (using the or key), then press the <br />
key.<br />
6. Use the keys to enter the new code (observe code format <br />
Code hierarchy and code formats on page 34).<br />
7. Press the key to confirm.<br />
8. „CONFIRM“ is displayed shortly to prompt you to enter the same code again<br />
for confirmation. Use the keys to enter the same code again.<br />
9. Press the key to confirm.<br />
KSW3s528.0043 / en 2010.09<br />
Page 58<br />
Operating Manual<br />
Subject to change without prior notice
<strong>Axessor</strong><br />
6.4.4.4 Setting the Courier Code - Submenu COURIER<br />
Authorization: Master Code or Courier Code<br />
1. Select the submenu „COURIER“.<br />
2. Press the key.<br />
3. A Courier Code already activated is indicated with „USED“, a Courier Code<br />
not activated it is indicated by „– – – – –“. Press the key. If the Courier<br />
Code is already activated you are asked whether or not you want to modify<br />
the code.<br />
4. Select „YES“ (using the or key), then press the <br />
key.<br />
5. Use the keys to enter the new code (observe code format <br />
Code hierarchy and code formats on page 34).<br />
6. Press the key to confirm.<br />
7. „CONFIRM“ is displayed shortly to prompt you to enter the same code again<br />
for confirmation. Use the keys to enter the same code again.<br />
8. Press the key to confirm.<br />
Operating Manual KSW3s528.0043 / en 2010.09<br />
Subject to change without prior notice Page 59
<strong>Axessor</strong><br />
6.4.4.5 Reset the whole <strong>Axessor</strong> safe lock system to factory<br />
defaults - Submenu SHELVE<br />
Important!<br />
The Employment of the Shelve Function will erase all codes and will set all<br />
parameters, such as Time Delay, Time <strong>Lock</strong> function, Dual Mode, display language,<br />
inputs, outputs, e-B@x settings and network data, etc. to factory set values.<br />
Time/date, opening counter and Audit Trail will remain unchanged.<br />
• Before continuing, be aware that all data will be lost!<br />
• Saving data with AS 284 Programming Software prior to shelving is recommended!<br />
• Take note that codes cannot be saved!<br />
Authorization: Master Code<br />
1. Select the submenu „SHELVE“.<br />
2. Press the key.<br />
3. You are asked wether or not you are sure to reset all data of the <strong>Axessor</strong> back<br />
to factory default setting . Select „YES“ (using the or key),<br />
then press the key. All data is reset to factory default settings.<br />
6.4.4.6 Modifying a code<br />
Authorization: Access Codes on page 34<br />
1. Select the Menu „CODE“.<br />
2. Press the key.<br />
3. This step must be performed only, if the Programming Mode was entered with<br />
a code of a higher level, than the one you wish to alter: use the or<br />
key to select the code type (e.g. „User“) you wish to alter. Press<br />
the key. Use the or key to select the Code (e.g.<br />
„User 11“) you wish to alter.<br />
4. Press the key. You are asked whether or not you want to modify<br />
the code<br />
KSW3s528.0043 / en 2010.09<br />
Page 60<br />
Operating Manual<br />
Subject to change without prior notice
<strong>Axessor</strong><br />
5. Select „YES“ (using the or key), then press the <br />
key.<br />
6. Use the keys to enter the new code (observe code format <br />
Code hierarchy and code formats on page 34).<br />
7. Press the key to confirm.<br />
8. „CONFIRM“ is displayed shortly to prompt you to enter the same code again<br />
for confirmation. Use the keys to enter the same code again.<br />
9. Press the key to confirm.<br />
6.4.4.7 Deleting a code<br />
Authorization: Access Codes on page 34<br />
1. Select the Menu „CODE“.<br />
2. Press the key.<br />
3. Use the or key to select the code type (e.g. „User“) you<br />
wish to alter, then press the key.<br />
4. Use the or key to select the Code (e.g. „User 11“) you<br />
wish to alter.<br />
5. Press the key. You are asked whether or not you want to delete the<br />
code.<br />
6. Select „YES“ (using the or key), then press the <br />
key<br />
7. Press the key to confirm the deletion.<br />
Operating Manual KSW3s528.0043 / en 2010.09<br />
Subject to change without prior notice Page 61
<strong>Axessor</strong><br />
Note!<br />
• The Master Code cannot be deleted.<br />
• Upon deletion of a Manager Code the corresponding group of User Codes<br />
remain unchanged and will not be deleted.<br />
6.4.5 Menu MISC<br />
6.4.5.1 Activating/Deactivating Code Denial - Submenu CDE DEN<br />
A higher-level code can deny access for lower-leveled codes until possible repermission.<br />
As an example, „Off-Duty-Shifts“ can be locked out and reassigned<br />
again once they start their shift.<br />
An entire User Group (with or without its corresponding Manager Code) can be<br />
denied from acess.<br />
Authorization: Master Code or any Manager Code<br />
1. Select the submenu „CDE DEN“.<br />
2. Press the key.The Code Denial status of the User Group 1 is displayed.<br />
3. Use the or key to select the desired User Group or Manager.<br />
4. Press the key to confirm your selection.<br />
5. Use the or key to activate („CDE DEN ON“, access<br />
denied) or deactivate („CDE DEN OFF“, access permitted) the Code<br />
Denial for the corresponding User Group or Manager.<br />
6. Press the key to confirm the setting in the upcoming save dialog.<br />
7. Repeat steps 2 to 5 for all User Groups and Managers desired.<br />
AS 284 Programming Software<br />
• Every single User can be denied individually.<br />
• A User can be denied even if the code itself is not yet programmed.<br />
• When calling up the Code Denial submenu, code groups with a mixture of<br />
denied and permitted codes are indicated with „“ in the display.<br />
KSW3s528.0043 / en 2010.09<br />
Page 62<br />
Operating Manual<br />
Subject to change without prior notice
<strong>Axessor</strong><br />
6.4.5.2 Activating/Deactivating Remote Disabling -<br />
Submenu RMT-DIS<br />
Opening of the closed lock can be disabled by an external signal. This function<br />
can e.g. be employed when additional identification (e.g. badge, biometrics) is<br />
desired or to prevent opening during certain circumstances (e.g. when alarm system<br />
is armed).<br />
Note!<br />
The function is not active when lock is open – lock can then be operated normally.<br />
Authorization: Master Code<br />
1. Select the submenu „RMT-DIS“.<br />
2. Press the key.The currently set status of the Remote Disabling<br />
function (by default: „OFF“) is displayed.<br />
3. Use the or key to activate („RMT-DIS ON“) or deactivate<br />
(„RMT-DIS OFF“) the Remote disabling function.<br />
4. Press the key to confirm the setting in the upcoming save dialog.<br />
Operating Manual KSW3s528.0043 / en 2010.09<br />
Subject to change without prior notice Page 63
<strong>Axessor</strong><br />
6.4.5.3 Activating/Deactivating Duress Code function -<br />
Submenu DURESS<br />
If the lock is connected to an external alarm system, a silent duress alarm (not<br />
noticeable for the aggressor) can be triggered by entering a Duress Code (<br />
Duress Code on page 38).<br />
Duress Codes are recognized if this function has been activated.<br />
Entering the Duress Code for opening the lock also starts the defined Duress<br />
Time delay.<br />
Authorization: Master Code<br />
1. Select the submenu „DURESS“.<br />
2. Press the key.The currently set status of the Duress Code (by<br />
default: „OFF“) is displayed.<br />
3. Use the or key to activate („DURESS ON“) or deactivate<br />
(„DURESS OFF“) the Duress Code recognition.<br />
4. Press the key to confirm the setting in the upcoming save dialog.<br />
AS 284 Programming Software<br />
• The Duress Time Delay can be set independent (longer or shorter) of the Time<br />
Delay.<br />
• It is also possible to automatically trigger a duress alarm. This is the case if no<br />
external signal was triggered – e.g., by a push-button – within 1 minute before a<br />
code-entry to open (function Duress by Omission).<br />
KSW3s528.0043 / en 2010.09<br />
Page 64<br />
Operating Manual<br />
Subject to change without prior notice
<strong>Axessor</strong><br />
6.4.5.4 Activating/Deactivating Dual Mode - Submenu DUAL<br />
The lock can be set to require 2 codes for opening. It can be employed when only<br />
2 persons together are supposed to be able to open the lock.<br />
Authorization: Master Code<br />
1. Select the submenu „DUAL“.<br />
2. Press the key. The currently set status of the Dual Mode (by<br />
default: „OFF“) is displayed.<br />
3. Use the or key to activate („DUAL ON“) or deactivate<br />
(„DUAL OFF“) Dual Mode.<br />
4. Press the key to confirm the setting in the upcoming save dialog.<br />
Note!<br />
• Depending on the Dual Mode settings („Two Codes of same group“, „Two Codes<br />
of different groups“ or „any two codes“) different code combinations („Manager<br />
and Master“, „User and User“, „Manager and User“, etc.) can open the lock.<br />
Master Code (if set to „Master can open <strong>Lock</strong>“) and Courier Code can open the<br />
lock without any second code.<br />
• If Opening Time Delay is activated:<br />
• Two codes must be entered for verification in the Comfirmation Window, once<br />
the Time Delay has elapsed. Here again, above mentioned Dual Mode settings<br />
apply.<br />
• if two codes were entered, the opening delay of the last code will be performed.<br />
Exception: if the first entered code was a Duress Code, its Duress<br />
Time Delay will be performed.<br />
• if Master Code or Courier Code is entered first in Confirmation Window no<br />
second code will be required upon confirmation.<br />
AS 284 Programming Software<br />
• Code combinations to open the lock can be set to: „Two Codes of same group“,<br />
„Two Codes of different groups“ or „Any two codes“.<br />
• Master Code can be defined as „cannot open“. If so, the Master Code can neither<br />
be used to open the lock nor to start the Time Delay. The message<br />
„DENIED“ is shown instead. However, if only one operable code is programmed<br />
in Dual Mode, Master Code can open, though!<br />
Operating Manual KSW3s528.0043 / en 2010.09<br />
Subject to change without prior notice Page 65
<strong>Axessor</strong><br />
6.4.5.5 Setting the display language - Submenu LANG<br />
By default the system language is set to English. If desired, the display language<br />
can be set to another language (available display languages ).<br />
Authorization: Master Code or any Manager Code<br />
1. Select the submenu „LANG“.<br />
2. Press the key. The currently set display language (by default:<br />
„ENGLISH“) is displayed.<br />
3. Use the or key to select desired display language.<br />
4. Press the key to confirm the setting in the upcoming save dialog.<br />
KSW3s528.0043 / en 2010.09<br />
Page 66<br />
Operating Manual<br />
Subject to change without prior notice
<strong>Axessor</strong><br />
7 Servicing<br />
7.1 Cleaning<br />
If necessary, clean the outside of the Input Unit with a soft, damp cloth and a mild<br />
household cleaning agent.<br />
Warning!<br />
• On no account use any cleaning agents, which contain solvents or other<br />
aggressive substances.<br />
• Ensure that no liquid comes into contact with the Input Unit.<br />
7.2 Replacing the batteries<br />
The Input Unit is powered by three 1.5 Volt ALKALINE batteries or 1.5 Volt<br />
Lithium batteries (type AM3, AA) with a service life of approximately 2 to 3<br />
years (about double with Lithium batteries).<br />
Batteries must be replaced once the „battery low“ symbol appears in the display,<br />
at least if the text prompts „CHANGE BATT“. The lock remains fully operational<br />
until the battery voltage drops below the value required for correct operation.<br />
Proceed as follows:<br />
1. Undo the screw of the battery compartment on the bottom side of Input Unit.<br />
2. Carefully slide out the battery compartment until it comes to a stop.<br />
3. Replace old batteries by 3 new ones of the same type (3x AA mignon, Alkaline<br />
or Lithium type). Observe polarity (see polarity markings in receptacles).<br />
Operating Manual KSW3s528.0043 / en 2010.09<br />
Subject to change without prior notice Page 67
<strong>Axessor</strong><br />
Warning!<br />
If the Input Unit is without power for more than approximately 5 minutes the internal<br />
clock will cease and reset to the last clock hour. All other settings are saved in<br />
the power-failure proof memory of the Input Unit. To set time and date anew (<br />
Menu TIME on page 47).<br />
4. As soon as the batteries are inserted a test routine is initiated. The following<br />
displays appear successively (version display may vary) and the „BEEP signal“<br />
sounds:<br />
5. Close the battery compartment and fix it with the screw. Wait until the error<br />
message „BAT-CMP OPEN“ reappears again.<br />
6. Confirm the message by entering the Master Code or one of the Manager<br />
Codes. The lock opens and closes again after the set opening time. The <strong>Lock</strong><br />
is in normal operating mode.<br />
If no reaction on Master Code or Manager Code: close lock with door open.<br />
If still no reaction: wait 2 minutes and enter Master Code or Manager Code<br />
again.<br />
Important!<br />
Do not dispose of used batteries in domestic waste. Please return used batteries<br />
to the vendor or dispose of the batteries according the applicable local regulations.<br />
7.3 Customer Service<br />
Should any functional errors or operating problems occur, please contact your<br />
safe supplier ( refer to rear cover of this manual for contact details).<br />
KSW3s528.0043 / en 2010.09<br />
Page 68<br />
Operating Manual<br />
Subject to change without prior notice
<strong>Axessor</strong><br />
7.4 Spare parts and accessories<br />
Following items are available:<br />
Accessories<br />
Part number<br />
Power supply for <strong>Axessor</strong> e-B@x 302.012<br />
<strong>Axessor</strong> e-B@x (full kit)<br />
528BX-S<br />
Power supply for <strong>Axessor</strong> lock<br />
52xVDC6<br />
AS 280 <strong>Axessor</strong> Installation Software<br />
AS280<br />
AS 283 <strong>Axessor</strong> SDK Software Development Kit<br />
AS283<br />
AS 284 <strong>Axessor</strong> Programming Software<br />
AS284-LAN<br />
AS 284 Operator Dongle (spare or additional dongle) AS284/O<br />
Spare parts<br />
<strong>Axessor</strong> lock unit<br />
528 LOCK<br />
<strong>Axessor</strong> input unit<br />
528 IU-S<br />
Battery compartment for <strong>Axessor</strong> input unit<br />
52x BAT-S<br />
<strong>Axessor</strong> installation kit<br />
52x INST-S<br />
Installation kit for <strong>Axessor</strong> e-B@x<br />
528BX-INST<br />
Connector for <strong>Axessor</strong> e-B@x<br />
528BX-PLUG<br />
USB data cable 1.8 m 1364-8<br />
Connection cable lock/input unit/e-B@x, 30 cm<br />
52x+CAB30<br />
Connection cable lock/input unit/e-B@x, 55 cm<br />
52x+CAB55<br />
Connection cable lock/input unit/e-B@x, 80 cm<br />
52x+CAB80<br />
Connection cable lock/input unit/e-B@x, 120 cm<br />
52x+CAB120<br />
Connection cable lock/input unit/e-B@x, 150 cm<br />
52x+CAB150<br />
Operating Manual KSW3s528.0043 / en 2010.09<br />
Subject to change without prior notice Page 69
<strong>Axessor</strong><br />
8 Error messages<br />
Operating errors, false entries or possible defects can result in error messages.<br />
Their significance and most possible cause are described in table below.<br />
Display Menu Submenu Cause<br />
BAT-CMP<br />
OPEN<br />
LINE<br />
OFF<br />
ID ERR<br />
REFUSED<br />
REFUSED<br />
02<br />
REFUSED<br />
04<br />
REFUSED<br />
08<br />
CODE<br />
CODE<br />
PROG<br />
MASTER<br />
MANAGER<br />
USER<br />
COURIER<br />
MASTER<br />
MANAGER<br />
USER<br />
COURIER<br />
IMM-TL<br />
after confirmation of an entry in<br />
Programming Mode<br />
TIME<br />
PROG<br />
PROG<br />
DATE<br />
WEEK<br />
HOLIDAY<br />
Battery compartment has been<br />
opened.<br />
Connection between lock and<br />
Input Unit is interrupted.<br />
ID is not „00“<br />
ID is not „10“, „20“, „30“ or „40“<br />
ID is not „11…19“, „21…29“,<br />
„31…39“ or „41…49“<br />
ID is not „90“<br />
Code modification:<br />
Code entered did not match the<br />
code entered first.<br />
Unknown command.<br />
Desired function not available.<br />
Installed components not<br />
compatible.<br />
Call vendor for technical support.<br />
No Weekly <strong>Lock</strong>ing Period<br />
programmed.<br />
<strong>Lock</strong> is closed (programming<br />
possible with lock open only!)<br />
• Invalid date (e.g. Sep 31 st ).<br />
• Date out of limit (Jan 1 st 2002<br />
until Dec 31 st 2099).<br />
Time window too long (max. 6<br />
days, 23 hours, 59 minutes).<br />
• Time window too long (max. 35<br />
days)<br />
• End date before start date<br />
• Invalid date (e.g. Sep 31 st )<br />
• Date out of limit (Jan 1 st 2002<br />
until Dec 31 st 2099)<br />
KSW3s528.0043 / en 2010.09<br />
Page 70<br />
Operating Manual<br />
Subject to change without prior notice
<strong>Axessor</strong><br />
PROG<br />
WEEK<br />
Minimum interval (pause) until<br />
start of next Weekly <strong>Lock</strong>ing<br />
Period ignored. Also observe<br />
delay / confirm window limits.<br />
REFUSED<br />
16<br />
REFUSED<br />
32<br />
REFUSED<br />
64<br />
REFUSED<br />
128<br />
PROG<br />
PROG<br />
PROG<br />
PROG<br />
HOLIDAY<br />
DELAY<br />
WEEK<br />
HOLIDAY<br />
Minimum interval (pause) of 1<br />
day until start of next Weekly<br />
<strong>Lock</strong>ing Period ignored. Also<br />
observe delay / confirm window<br />
limits.<br />
Observe delay / confirm window<br />
limits in relation to Weekly and<br />
Holiday <strong>Lock</strong>ing Periods.<br />
The minimum time period is<br />
calculated by adding the<br />
confirmation window plus one<br />
minute to the bigger value of the<br />
two delay times (time delay or<br />
duress time delay).<br />
Memory full (max. 16 Weekly<br />
<strong>Lock</strong>ing Periods)<br />
Memory full (max. 22 Holiday<br />
<strong>Lock</strong>ing Periods)<br />
Unexpected data error. Try again.<br />
Call vendor for technical support<br />
if error keeps re-appearing.<br />
<strong>Lock</strong> is no longer in programming<br />
mode (only menu navigation but<br />
no data sent to lock for<br />
>5 minutes).<br />
MOT FLT<br />
Motion Fault during bolt<br />
movement.<br />
• Reboot unit by removing<br />
batteries for one hour and<br />
inserting new batteries.<br />
• Check if bolt movement is<br />
smooth or if bolt is<br />
mechanically blocked<br />
• call vendor for tech support<br />
(replace lock)<br />
Operating Manual KSW3s528.0043 / en 2010.09<br />
Subject to change without prior notice Page 71
<strong>Axessor</strong><br />
HDW FLT<br />
OVFLW<br />
AUdit<br />
Hardware fault: Proceed as with<br />
MOT FLT.<br />
The complete audit memory<br />
capacity (4800 lines) was filled<br />
up within the last 7 days,<br />
therefore manipulation is<br />
suspected. Only Master Code or<br />
Manager Codes allowed for<br />
confirmation of this error<br />
message.<br />
For opening Courier Code stays<br />
valid, all User Codes are denied.<br />
Proceed with<br />
• Read-out Audit Trail.<br />
• Set clock close before<br />
midnight.Let clock run over<br />
midnight. Repeat this step for<br />
each following day, up to 7<br />
times if necessary.<br />
• Set clock back to actual time.<br />
If multiple causes lead to multiple error messages „REFUSED xx“, the error numbers<br />
will be added.<br />
Examples:<br />
REFUSED 12 = REFUSED 04 + REFUSED 08<br />
REFUSED 50 = REFUSED 02 + REFUSED 16 + REFUSED 32<br />
KSW3s528.0043 / en 2010.09<br />
Page 72<br />
Operating Manual<br />
Subject to change without prior notice
<strong>Axessor</strong><br />
9 Technical data<br />
9.1 Functions<br />
Code functions<br />
ID (2-digit) + PIN (6-digit)<br />
Code format<br />
Note: Entry sequence can be reversed to PIN+ID (with<br />
AS 284 Programming Software)<br />
1 Master Code (8 digits)<br />
bearer: e.g. <strong>Safe</strong>ty Officer, Head of Security, etc.<br />
Note: can open alone in Dual Mode.<br />
Note: Can be set to „cannot open“ with AS 284<br />
Programming Software.<br />
4 Manager Codes (8 digits each)<br />
bearer: e.g. Head Cashier, Shift Manager, etc.<br />
Note: Can be set to „cannot open“ with AS 284<br />
Programming Software.<br />
Code types<br />
36 User Codes (8 digits each, subordinated in 4<br />
groups of 9 each to the respective Manager Code)<br />
bearer: e.g. Cashier, Sales Assistant.<br />
Note: User Codes 48 and 49 can be set to disable/<br />
enable lock opening with AS 284 Programming<br />
Software<br />
1 Courier Code (8 digits, opening permission without<br />
opening delays)<br />
bearer: e.g. auditor, CIT (Cash In Transit service<br />
provider), etc.<br />
Note: opens alone in Dual Mode.<br />
Note: can be set to „not open but Skips Time Delay for<br />
next opening“ with AS 284 Programming Software<br />
Duress Code (can be performed by any code, if<br />
function is activated).<br />
Dual Mode (two codes needed)<br />
Code options<br />
Note: Master Code and Courier Code can open alone.<br />
Code denial (individual codes or entire code groups<br />
can be admitted/disabled).<br />
Time functions<br />
Date / Time Continuous calendar until 2099.<br />
Summer/winter time<br />
(Daylight Saving Time)<br />
<strong>Lock</strong>ing periods<br />
Algorithm (e.g. last Sunday in May),<br />
Note: requires AS 284 Programming Software.<br />
16 Weekly <strong>Lock</strong>ing Periods (repeated weekly, each up<br />
to 7 days long).<br />
22 Holiday <strong>Lock</strong>ing Periods (date-related, each up to<br />
35 days long, can be defined as yearly repeatable).<br />
Operating Manual KSW3s528.0043 / en 2010.09<br />
Subject to change without prior notice Page 73
<strong>Axessor</strong><br />
Immediate Time <strong>Lock</strong><br />
Time Delays<br />
Duress Time Delays<br />
Confirmation Window<br />
Non Return Time<br />
Delay<br />
General<br />
<strong>Lock</strong>ing<br />
Event memory<br />
Shelve Function<br />
<strong>Lock</strong>ing with immediate action for a selectable duration<br />
(max. 144 hours).<br />
4 Time Delays (each programmable from 0…99 min).<br />
• Time Delay 1: valid for Master, Manager 1 and User<br />
11...19<br />
• Time Delay 2: valid for Manager 2 and User 21...29<br />
• Time Delay 3: valid for Manager 3 and User 31...39<br />
• Time Delay 4: valid for Manager 4 and User 41...49<br />
4 Duress Time Delays (99 min).<br />
• Duress Time Delay 1: valid for Master, Manager 1<br />
and User 11...19<br />
• Duress Time Delay 2: valid for Manager 2 and User<br />
21...29<br />
• Duress Time Delay 3: valid for Manager 3 and User<br />
31...39<br />
• Duress Time Delay 4: valid for Manager 4 and User<br />
41...49<br />
Note: Duress Time Delay can be changed with AS 284<br />
Programming Software only<br />
Programmable from 1…99 minutes<br />
Once the lock has become closed, it cannot be<br />
opened for the set time period. Programmable from 0<br />
(not active) to 127 minutes with AS 284 Programming<br />
Software.<br />
Automatically: after 6 seconds. Programmable from 6<br />
to 60 seconds with AS 284 Programming Software.<br />
Manually: Upon pressing DEL key. After closing of<br />
boltwork.<br />
4800 lines, protected against manipulation and power<br />
failure.<br />
Master Code can delete, respectively reset all codes,<br />
functions and settings back to factory default values at<br />
once.<br />
KSW3s528.0043 / en 2010.09<br />
Page 74<br />
Operating Manual<br />
Subject to change without prior notice
<strong>Axessor</strong><br />
9.2 <strong>Electronic</strong>s<br />
General<br />
Power supply<br />
Memory<br />
Display<br />
Keypad<br />
Interfaces<br />
Outputs<br />
3 Alkaline or Lithium batteries 1.5 V LR6 (AA, AM3,<br />
E91),<br />
service life approx. 3-4 years (with 1 opening/closing<br />
cycle per working day, no load on lock bolt)<br />
Non-volatile (protected against power failure)<br />
Iconographic LCD with high contrast, display language<br />
user selectable (English, Dutch, French, German,<br />
Hungarian, Italian, Polish, Portuguese, Spanish).<br />
Silicone keys<br />
(10 numeric, 4 function, 2 navigation keys).<br />
2 potential free contacts for alarms (30VDC / 2A,<br />
50VAC / 0.5A with resistive load).<br />
Output 1: Duress Alarm.<br />
Output 2: Bolt or motor open.<br />
Outputs programmable with AS 284 Programming<br />
Software<br />
Input 1 (signal-triggered 12VDC / 20mA):<br />
Remote Disabling.<br />
Input 2 (contact triggered):<br />
not activated<br />
Inputs<br />
USB<br />
<strong>Axessor</strong> bus<br />
Programmable with AS 284 Programming Software:<br />
Input 1: Remote Disabling (standard setting) or<br />
Controlled Disabling.<br />
Input 2: Time Delay Override, or door position contact,<br />
or Time <strong>Lock</strong> interruption or Duress by omission, or<br />
deactivated (standard setting).<br />
Connection to a computer for configuration with AS<br />
284 Programming Software<br />
to connect external power supply or e-B@x<br />
Operating Manual KSW3s528.0043 / en 2010.09<br />
Subject to change without prior notice Page 75
<strong>Axessor</strong><br />
9.3 Mechanics<br />
<strong>Lock</strong><br />
Dimensions<br />
Weight<br />
Mounting<br />
Motor bolt<br />
Relocker<br />
Cycle times<br />
Static resistance force<br />
Moving force<br />
Environmental<br />
conditions<br />
Service life<br />
Input Unit<br />
Dimensions<br />
Weight<br />
Environmental<br />
conditions<br />
85 x 61 x 33 mm<br />
495 g<br />
3 screws M6 (template 67 x 41 mm)<br />
dead bolt (optional: spring bolt)<br />
integrated lock relocker<br />
opening/closing approx. 2 seconds<br />
>1000 N in all directions<br />
max. 5 N both directions<br />
operation: 0…+60°C / storage: -40…+70°C<br />
>50 000 cycles<br />
128 (193) x 90 x 40 mm<br />
660 g (including connection cable and batteries)<br />
operation: 0…+60°C / storage: -40…+70°C / system of<br />
protection: IP53<br />
9.4 Approvals and Certificates<br />
Test marks<br />
CE<br />
Patent No.<br />
US 6,434,987 B1; EP 1 069 264 B1<br />
VdS<br />
(VdS 2396)<br />
<strong>Electronic</strong> high-security lock class 2, approval only valid if<br />
marked on lock<br />
VdS<br />
(VdS 2269 / VdS 2315)<br />
Stroke plate contact for intruder alarm systems of class C<br />
ECB-S (EN 1300) <strong>Electronic</strong> high-security lock level B<br />
Underwriter<br />
Laboratories (UL)<br />
High security electronic lock type 1, approval only valid if<br />
marked on lock<br />
CNPP a2p<br />
Level B/E<br />
IMP Class 2<br />
KSW3s528.0043 / en 2010.09<br />
Page 76<br />
Operating Manual<br />
Subject to change without prior notice
<strong>Axessor</strong><br />
9.5 Factory settings<br />
Function/Setting Factory setting Can be changed with<br />
Input Unit<br />
AS 284<br />
(opt.)<br />
Display language *a) English <br />
Master Code 0 0 1 2 3 4 5 6 <br />
Master Code settings can open – <br />
Manager Codes (max. 4) not activated <br />
Manager Code settings<br />
can open,<br />
can change TD,<br />
can change<br />
CONF,<br />
can act. IMM-TL<br />
– <br />
User Codes (max. 4 groups of 9) not activated <br />
User Code settings<br />
cannot activate<br />
IMM-TL<br />
– <br />
Users 48,49 to disable/enable opening not activated – <br />
Courier Code not activated <br />
Courier Code settings can open – <br />
Duress Code entry not activated <br />
Duress by Omission not activated – <br />
Dual Mode not activated <br />
Dual Mode setting any two codes – <br />
Dual Manager for Programming Mode not activated – <br />
Manager Cross Access User Codes not activated – <br />
Number of wrong codes until penalty 4 – –<br />
Penalty upon wrong code entries 5 minutes – –<br />
Time Delays<br />
0 minutes<br />
(deactivated)<br />
<br />
<br />
Duress Time Delays 99 minutes – <br />
Time Delay and Duress Time Delay<br />
settings<br />
count down – <br />
Confirmation Window 5 minutes <br />
Non Return Time Delay<br />
0 minutes<br />
(deactivated)<br />
– <br />
Weekly <strong>Lock</strong>ing Period not programmed <br />
Holiday <strong>Lock</strong>ing Period / Repeated<br />
Holiday <strong>Lock</strong>ing Period<br />
not programmed <br />
Time lock override by opening period not programmed – <br />
Show next open possibility on – <br />
Date / time 01.01.2008 0:00 <br />
Operating Manual KSW3s528.0043 / en 2010.09<br />
Subject to change without prior notice Page 77
<strong>Axessor</strong><br />
Time format (12/24hrs.) 24 hours <br />
Summer/winter time (Daylight Saving<br />
Time)<br />
n/a<br />
not programmed<br />
– <br />
Remote disabling by Software not activated – <br />
Input 1 *b) (connections 5 and 6)<br />
Input 2 *c) (connections 7 and 8)<br />
Remote<br />
Disabling<br />
not programmed<br />
(door contact,<br />
skip Time Delay,<br />
Time <strong>Lock</strong><br />
interruption,<br />
Duress by<br />
Omission,<br />
ext. Input Event<br />
A – F)<br />
– –<br />
– <br />
Output 1 *d) (connections 3 and 4) Duress alarm – <br />
Output 2 *d) (connections 1 and 2)<br />
bolt or motor<br />
open<br />
– <br />
Remote Disabling not activated <br />
Code format ID+PIN – <br />
Buzzer volume high – <br />
Beep every 30 sec while lock open on – <br />
Beep every 60 sec while<br />
(Duress) Time Delay counts<br />
on – <br />
Beep every 60 sec while<br />
Confirmation Window counts<br />
on – <br />
Remarks: *a) English, Dutch, French, German, Hungarian, Italian, Polish,<br />
Portuguese and Spanish can be selected.<br />
*b) Input 1 is signal-triggered (12V / 13mA).<br />
*c) Input 2 is contact-triggered.<br />
*d) Relay contacts 1 and 2 are working contacts (NO, normally<br />
open) with default factory settings.<br />
KSW3s528.0043 / en 2010.09<br />
Page 78<br />
Operating Manual<br />
Subject to change without prior notice
<strong>Axessor</strong><br />
Declaration of Conformity<br />
according to 2004/108/EC and 2006/95/EC<br />
Manufacturer:<br />
<strong>Kaba</strong> AG<br />
Address: Mühlebühlstrasse 23<br />
P.O. Box<br />
CH-8620 Wetzikon, Switzerland<br />
declares, that the product:<br />
Product names:<br />
<strong>Axessor</strong><br />
Model numbers: – –<br />
Product options:<br />
e-B@x<br />
conforms to the following product specifications:<br />
IEC 61000-6-3: 2006<br />
CISPR 22 (Class B): 2005 / A1: 2005 / A2: 2006<br />
EN 50130-4: 1995 / A1: 1998 / A2: 2003<br />
EN 61000-4-2 1995 / A1: 1998 / A2: 2000<br />
EN 61000-4-3 2006<br />
EN 61000-4-4 2004<br />
EN 61000-4-5 2005<br />
EN 61000-4-6 2003 / A1: 2004 / A2: 2006<br />
Supplementary information:<br />
The product herewith complies with the regulations of the Low Voltage Directive 2006/95/EC<br />
and the EMC Directive 2004/108/EC.<br />
CH-8620 Wetzikon, September 2008<br />
Siegfried Gamma<br />
Business Unit Manager <strong>Safe</strong> <strong>Lock</strong>s<br />
Franz Rüegg<br />
Head of PM <strong>Safe</strong> <strong>Lock</strong>s<br />
Operating Manual KSW3s528.0043 / en 2010.09<br />
Subject to change without prior notice Page 79
<strong>Axessor</strong><br />
Template Input Unit<br />
50 100<br />
1 2 3 4<br />
4 x M4<br />
41.3<br />
1<br />
6<br />
3 6<br />
2<br />
10<br />
10<br />
40<br />
5<br />
55<br />
193<br />
4<br />
mm<br />
inch<br />
0<br />
0<br />
90<br />
KSW3s528.0043 / en 2010.09<br />
Page 80<br />
Operating Manual<br />
Subject to change without prior notice
<strong>Axessor</strong><br />
Template <strong>Lock</strong><br />
max. 1000N<br />
max. 1000N<br />
max. 5N<br />
11.5<br />
max. 1000N<br />
7.9<br />
50 100<br />
1 2 3 4<br />
3 x Ø5<br />
VdS<br />
Certs.<br />
Version<br />
xxxxx.xx 2008<br />
12345678<br />
41.3<br />
Serial No.<br />
XXXXX.XXXXXX/XXX<br />
Part No.<br />
XXXXXXXXXX<br />
Type<br />
SL 52x<br />
66.7<br />
13<br />
2.5<br />
15<br />
2 x M4<br />
mm<br />
inch<br />
0<br />
0<br />
25.2<br />
7.8<br />
Operating Manual KSW3s528.0043 / en 2010.09<br />
Subject to change without prior notice Page 81
<strong>Axessor</strong><br />
Template e-B@x<br />
mm<br />
inch<br />
0<br />
0<br />
50 100<br />
1 2 3 4<br />
93.5<br />
130.5<br />
27<br />
27<br />
KSW3s528.0043 / en 2010.09<br />
Page 82<br />
Operating Manual<br />
Subject to change without prior notice
<strong>Kaba</strong> ® is a registered trademark of <strong>Kaba</strong> AG.<br />
This documentation may not be reproduced or distributed in any way – neither in digital nor in photographic<br />
form – without prior written permission of <strong>Kaba</strong> AG. © by <strong>Kaba</strong> AG, CH-8620 Wetzikon.<br />
Document: KSW3s528.0043 / en 2010.09<br />
Edition: September 2010