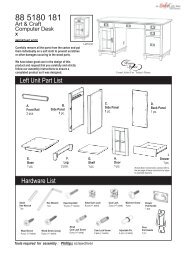
Base Assembly Instructions - Kitchen Source
Base Assembly Instructions - Kitchen Source
Base Assembly Instructions - Kitchen Source

You also want an ePaper? Increase the reach of your titles
YUMPU automatically turns print PDFs into web optimized ePapers that Google loves.
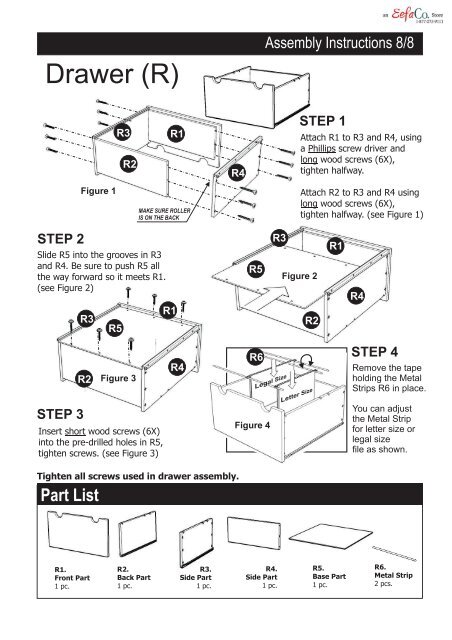
Drawer (R)<br />
<strong>Assembly</strong> <strong>Instructions</strong> 8/8<br />
Figure 1<br />
R3<br />
R2<br />
R1<br />
MAKE SURE ROLLER<br />
IS ON THE BACK<br />
R4<br />
STEP 1<br />
Attach R1 to R3 and R4, using<br />
a Phillips screw driver and<br />
long wood screws (6X),<br />
tighten halfway.<br />
Attach R2 to R3 and R4 using<br />
long wood screws (6X),<br />
tighten halfway. (see Figure 1)<br />
STEP 2<br />
Slide R5 into the grooves in R3<br />
and R4. Be sure to push R5 all<br />
the way forward so it meets R1.<br />
(see Figure 2)<br />
R3<br />
R5<br />
R1<br />
R5<br />
R3<br />
Figure 2<br />
R2<br />
R1<br />
R4<br />
R2<br />
Figure 3<br />
R4<br />
R6<br />
STEP 4<br />
Remove the tape<br />
holding the Metal<br />
Strips R6 in place.<br />
STEP 3<br />
Insert short wood screws (6X)<br />
into the pre-drilled holes in R5,<br />
tighten screws. (see Figure 3)<br />
Figure 4<br />
You can adjust<br />
the Metal Strip<br />
for letter size or<br />
legal size<br />
file as shown.<br />
Tighten all screws used in drawer assembly.<br />
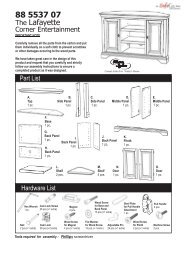
Part List<br />
R1.<br />
Front Part<br />
1 pc.<br />
R2.<br />
Back Part<br />
1 pc.<br />
R3.<br />
Side Part<br />
1 pc.<br />
R4.<br />
Side Part<br />
1 pc.<br />
R5.<br />
<strong>Base</strong> Part<br />
1 pc.<br />
R6.<br />
Metal Strip<br />
2 pcs.