EUROSWITCH - Klemko
EUROSWITCH - Klemko
EUROSWITCH - Klemko
Create successful ePaper yourself
Turn your PDF publications into a flip-book with our unique Google optimized e-Paper software.
Gebruiksaanwijzing en montagevoorschrift<br />
voor type:<br />
<strong>EUROSWITCH</strong> 840013<br />
Installatievoorschrift<br />
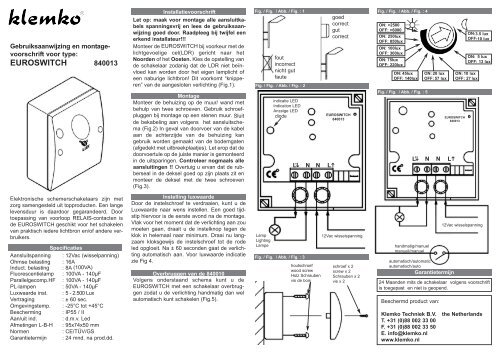
Let op: maak voor montage alle aansluitkabels<br />
spanningsvrij en lees de gebruiksaanwijzing<br />
goed door. Raadpleeg bij twijfel een<br />
erkend installateur!!!<br />
Monteer de <strong>EUROSWITCH</strong> bij voorkeur met de<br />
lichtgevoelige cel(LDR) gericht naar het<br />
Noorden of het Oosten. Kies de opstelling van<br />
de schakelaar zodanig dat de LDR niet beïnvloed<br />
kan worden door het eigen lamplicht of<br />
een naburige lichtbron! Dit voorkomt “knipperen”<br />
van de aangesloten verlichting (Fig.1).<br />
Montage<br />
Monteer de behuizing op de muur/ wand met<br />
behulp van twee schroeven. Gebruik schroefpluggen<br />
bij montage op een stenen muur. Sluit<br />
de bekabeling aan volgens het aansluitschema<br />
(Fig.2) In geval van doorvoer van de kabel<br />
aan de achterzijde van de behuizing kan<br />
gebruik worden gemaakt van de bodemgaten<br />
(afgedekt met uitbreekplaatjes). Let erop dat de<br />
doorvoertule op de juiste manier is gemonteerd<br />
in de uitsparingen. Controleer nogmaals alle<br />
aansluitingen !! Overtuig u ervan dat de rubberseal<br />
in de deksel goed op zijn plaats zit en<br />
monteer de deksel met de twee schroeven<br />
(Fig.3).<br />
Fig. / Fig. / Abb. / Fig. : 1<br />
fout<br />
incorrect<br />
nicht gut<br />
faute<br />
Fig. / Fig. / Abb. / Fig. : 2<br />
indicatie LED<br />
Indication LED<br />
Anzeige LED<br />
diode<br />
L’<br />
N<br />
N L<br />
goed<br />
correct<br />
gut<br />
correct<br />
<strong>EUROSWITCH</strong><br />
840013<br />
Fig. / Fig. / Abb. / Fig. : 4<br />
ON: >2500<br />
OFF: >6000<br />
ON: 250lux<br />
OFF: 850lux<br />
ON: 100lux<br />
OFF: 300lux<br />
ON: 75lux<br />
OFF: 220lux<br />
ON: 45lux<br />
OFF: 140lux<br />
Fig. / Fig. / Abb. / Fig. : 5<br />
L’<br />
ON: 20 lux<br />
OFF: 57 lux<br />
N<br />
ON:3.5 lux<br />
OFF:10 lux<br />
ON: 10 lux<br />
OFF: 27 lux<br />
<strong>EUROSWITCH</strong><br />
840013<br />
N L<br />
ON: 5 lux<br />
OFF: 13 lux<br />
Elektronische schemerschakelaars zijn met<br />
zorg samengesteld uit topproducten. Een lange<br />
levensduur is daardoor gegarandeerd. Door<br />
toepassing van voorloop RELAIS-contacten is<br />
de <strong>EUROSWITCH</strong> geschikt voor het schakelen<br />
van praktisch iedere lichtbron en/of andere verbruikers.<br />
Specificaties<br />
Aansluitspanning : 12Vac (wisselpanning)<br />
Ohmse belasting : 16A<br />
Induct. belasting : 8A (100VA)<br />
Fluorescentielamp : 100VA - 140μF<br />
Parallelgecomp.HF : 100VA - 140μF<br />
PL-lampen : 50VA - 140μF<br />
Luxwaarde inst. : 5 - 2.500 Lux<br />
Vertraging<br />
: ± 60 sec.<br />
Omgevingstemp. : -25°C tot +45°C<br />
Bescherming : IP55 / II<br />
Aan/uit ind. : d.m.v. Led<br />
Afmetingen L-B-H : 95x74x50 mm<br />
Normen<br />
: CE/TÜV/GS<br />
Garantietermijn : 24 mnd. na prod.dd.<br />
Instelling luxwaarde<br />
Door de instelschroef te verdraaien, kunt u de<br />
Luxwaarde naar wens instellen. Een goed tijdstip<br />
hiervoor is de eerste avond na de montage.<br />
Vlak voor het moment dat de verlichting aan zou<br />
moeten gaan, draait u de instelknop tegen de<br />
klok in helemaal naar minimum. Draai nu langzaam<br />
kloksgewijs de instelschroef tot de rode<br />
led opgloeit. Na ± 60 seconden gaat de verlichting<br />
automatisch aan. Voor luxwaarde indicatie<br />
zie Fig 4.<br />
Overbruggen van de 840010<br />
Volgens onderstaand schema kunt u de<br />
<strong>EUROSWITCH</strong> met een schakelaar overbruggen<br />
zodat u de verlichting handmatig dan wel<br />
automatisch kunt schakelen (Fig.5).<br />
Lamp<br />
Lighting<br />
Lampe<br />
Fig. / Fig. / Abb. / Fig. : 3<br />
houtschroef<br />
wood screw<br />
Holz Schrauben<br />
vis de bois<br />
12Vac wisselspanning<br />
schroef x 2<br />
screw x 2<br />
Schrauben x 2<br />
vis x 2<br />
handmatig/manuel<br />
manuell/manuel<br />
automatisch/automatic<br />
automatisch/auto<br />
Garantietermijn<br />
12Vac wisselspanning<br />
24 Maanden mits de schakelaar volgens voorschrift<br />
is toegepast en niet is geopend.<br />
Beschermd product van:<br />
<strong>Klemko</strong> Techniek B.V. the Netherlands<br />
T. +31 (0)88 002 33 00<br />
F. +31 (0)88 002 33 50<br />
E. info@klemko.nl<br />
www.klemko.nl
The <strong>EUROSWITCH</strong> is an automatic<br />
on/off switch for incandescent<br />
and fluorescent lamps.<br />
When the light fades in the evening<br />
the lightning is switched<br />
on as soon as the set light<br />
intensity is reached. In the morning,<br />
when It becomes lighter,<br />
the lighting is switched off<br />
again. A fired delay prevents<br />
the system From switching on<br />
when affected by temporary<br />
influences (e.g. lightening, passing<br />
cars).<br />
Mounting and usage instructions for:<br />
<strong>EUROSWITCH</strong> 840012<br />
Technical data:<br />
Operating voltage : 12Vac<br />
R.LOAD Ohms : 16A<br />
Inductive LOAD : 8A (100VA)<br />
Lux setting range : 5-2.500 Lux<br />
Switching delay : ±60 sec<br />
Operating temp. : -25°C / +45°C<br />
Protection<br />
: IP55 class II<br />
Switching status ind. : LED<br />
Dimensions (LxWxH) : 95x74x50 mm<br />
Relevant standards : CE / TÜV / GS<br />
1.Installation<br />
NOTE: Before mounting, disconnect all connection cables. When in<br />
doubt consult a qualified electrican.<br />
The best position to install the device is on an outside wall facing north<br />
or east. Please ensure that the lightning operated by the device, does<br />
not illuminate the sensor window (Fig.1).<br />
NOTE: The installation must not allow artificial light to activate the 'SUN-<br />
SET SWITCH as lighting may blink 'ON' and 'OFF,<br />
Mounting<br />
Mount the bottom case on the wall. and connect the cable as shown in<br />
(Fig. 2) then fixed cable by clamp. The cover can be mounted with 2 enclosed<br />
screws (Fig.3).<br />
Lux adjustment<br />
Make the adjustment at that time of the day where the daylight has the<br />
strength at which you wish the lighting to switch on. Turn the lux knob<br />
anti clock-wise to minimum lux then turn slowly clock-wise until the LED<br />
is illuminated (Fig.4).<br />
NOTE: The Lighting will switch on approx. 60 sec. after the LED has<br />
switched on.<br />
Automatic / manual operation 840010<br />
The sunset switch may be by-passed for normal 'ON-OFF tight operation<br />
at any time only with additional wiring as shown in Fig.5.<br />
Guarantee<br />
24 months provided the switch is used as specified and not opened.<br />
Protected product from:<br />
<strong>Klemko</strong> Techniek B.V. the Netherlands<br />
T. +31 (0)88 002 33 00<br />
F. +31 (0)88 002 33 50<br />
E. info@klemko.nl<br />
www.klemko.nl<br />
Der elektronische Aufbau<br />
Dämmerungs-schalter: "EURO-<br />
SWITCH", wird hergestellt mit<br />
erstklassig Komponenten.<br />
Einwand-freies gebrauch wird<br />
dadurch ein Garantie. Durch die<br />
Anwendung von Relaiskontakte<br />
schaltet der "<strong>EUROSWITCH</strong>"<br />
fast jeder erwünschte Lichtquele.<br />
Aber der "EURO-<br />
SWITCH" ist natürlich auch verwendungsfähig<br />
für beispielsweise:<br />
eine Pumpe.<br />
Bedienungsanleitung und Montagevorschrift:<br />
<strong>EUROSWITCH</strong> 840012<br />
Technische Daten:<br />
Spannungsversorgung: 12Vac<br />
Ohmsche Kap. : 16A<br />
Induktionskap. : 8A (100VA)<br />
Luxwert Einstellung : 5-2.500 Lux<br />
Verzögerung : ±60 sec<br />
Temperaturbereich : -25°C bis +45°C<br />
Schutzgrad<br />
: IP55 klasse II<br />
Ein- aus Anzeige : Mittels LED<br />
Leughtdiode<br />
Dimension (LxBxH) : 95x74x50 mm<br />
Zertifizierung : CE / TÜV / GS<br />
Montagevorschrift<br />
Achtung: Lesen Sie vor der Montage dieser Bedienungsanleitung und<br />
Montagevor-schrift aufmerksam durch. Und schalten Sie vor der<br />
Installation das Netz ab. Befragen Sie dem Fachmann bei Zweifel.<br />
Montieren Sie vorzugsweise der "<strong>EUROSWITCH</strong>" mit die LDR (lichtempfindlich<br />
Zelle) zum Norden oder Osten. Berücksichtigen das Sie eine Stelle<br />
Bestimmen daß der LDR nicht beeinflußbar wird dürch künstliches Licht<br />
(Bild.1).<br />
Die Montage<br />
Montieren Sie das Gehäuse mit zwei Schrauben an die Wand und schließen<br />
Sie die Verkabelung gemäß die Klemmen-beschreibung an (Bild.2). Wenn<br />
möglich, sollte die Anschlussleitung von unten in das Gerät eingeführt werden.<br />
Kabeleinführung von hinten ist möglich wenn Sie die bestimmte<br />
Löchern ausbrechen. Achten Sie darauf das die Tüllen genau in die<br />
Aussparungen sitzen. Kontrolieren Sie die Gummi Abdichtung, vor Sie der<br />
Deckel verschließen mit die zwei Schrauben (Bild.3).<br />
Einstellen Luxwert<br />
Der Luxwert von das Schaltmoment ist von aussen mit die verstellbare<br />
Schraube richtig zu stellen (Bild.4). Kurz vor das erwünschte Schaltmoment<br />
drehen Sie die verstellbare Schraube linksherum, auf minimal. Drehen Sie<br />
jetzt die Schraube langsam rechtsherum bis die rote LED sich aufhellt. Bei<br />
der Einstellung darf der Sensor nicht verdeckt sein. Nach ±60 Sekunden wird<br />
die Beleuchtung vollautomatisch einschalten. Nachstehend der indizierende<br />
Luxwert-schema.<br />
Temporal der 840010 ausschalten<br />
Gemaß nachstehend Schema können Sie der <strong>EUROSWITCH</strong> mit ein<br />
Schalter überbrücken Bild.5). Hiermit können Sie der Lightguard auf manuell<br />
oder automatsch schalten.<br />
Gewährfrist / Gewährleistung<br />
24 Monate, vorausgesetzt die Schalter werden vorschriftsmäßig benutzt<br />
und nicht geöffnet.<br />
Geschütztes Produkt von:<br />
<strong>Klemko</strong> Techniek B.V. the Netherlands<br />
T. +31 (0)88 002 33 00<br />
F. +31 (0)88 002 33 50<br />
E. info@klemko.nl<br />
www.klemko.nl<br />
Prescriptions d'utilisation et de montage<br />
Interrupteur crépusculaire type:<br />
<strong>EUROSWITCH</strong> 840012<br />
<strong>Klemko</strong> <strong>EUROSWITCH</strong> est Spécifications:<br />
un interrupteur crépusculaire<br />
électronique qui Tension de branchement : 12Vac<br />
active/désactive la lumière,<br />
respectivement en lumière<br />
Charge Ohms<br />
Charge inductive<br />
: 16A<br />
: 8A (100VA)<br />
Réglage valeur Lux : 5 - 2.500 Lux<br />
Délai<br />
: ± 60 sec.<br />
Température ambiante : -25°C-+45°C<br />
Protection<br />
: IP55 / II<br />
Indication marche/arrêt : par diode électroluminescente<br />
Dimension Long x L x H : 95x74x50 mm<br />
crépusculaire/lumière de<br />
jour. Le <strong>EUROSWITCH</strong> convient<br />
â la comniutation de<br />
pratiquement toutes les<br />
sources de lumière... y compris<br />
les lampes d'économie<br />
PL et PLCE et autres. Le<br />
délai de commutation inté-<br />
Normes<br />
: CE/TÜV/GS<br />
gré permet â l'interrupteur d'éviter de réagir aux modifications passagères<br />
de l'environnement, telles que phares de voitures, nuages et/ou éclairs.<br />
Prescriptions d'installation<br />
Veillez, lors du montage, â ce que tous les points de branchements soient<br />
exempts de tension. Montez le <strong>EUROSWITCH</strong> de préférence en orientant<br />
la cellule photo-électrique vers le NORD ou 1'OUEST. Choisissez un montage<br />
tel que l'interrupteur ne puisse pas être influencé par votre propre<br />
lumière artificielle ou par une source de lumière avoisinante : vous éviterez<br />
ainsi que l'éclairage connecté ne clignote (Fig.1).<br />
Montage<br />
Montez le boîtier sur un mur / une paroi en utilisant les deux vis fournies.<br />
Si vous effectuez le montage sur un mur, utilisez des chevilles. Procédez<br />
au branchement du câblage conformément au schéma (Fig. 2). Fixez les<br />
fils dans le boîtier au moyen de la petite pièce de calage. Contrôlez que<br />
la rondelle de caoutchouc est correctement en place dans l'évidement du<br />
couvercle et montez ce dernier au moyen des deux vis (Fig.3).<br />
Réglage valeur-lux<br />
En tournant la vis de réglage, vous pouvez régler la valeur-lux comme<br />
vous le désirez Fig.4). Un moment favorable pour effectuer ce réglage<br />
pourra être la première soirée suivant le montage. Juste avant le moment<br />
où vous désirez que votre éclairage soit commuté, placez le petit bouton<br />
de réglage, en le faisant tourner dans le sens inverse des aiguilles dune<br />
montre, sur la position minimum. Tournez ensuite lentement ce même<br />
bouton, cette fois dans 1e sens des aiguilles d'une montre, jusqu'à ce que<br />
la diode rouge électroluminescente s'allume. Après ± 60 secondes, l'éclairage<br />
s'allume automatiquement. Remontez â présent le couvercle sur le<br />
boîtier.<br />
Contournement du 840010<br />
Conformément au schéma ci-dessous, il vous est possible de contourner<br />
le <strong>EUROSWITCH</strong> avec un interrupteur, de telle sorte qu'il vous soit possible<br />
de commuter l'éclairage de manière automatique ou manuelle (Fig.5).<br />
Durée de la garantie<br />
24 mois, pour autant que le commutateur ait été utilisé conformément<br />
aux prescriptions et n'ait pas été ouvert.<br />
Produit protégé de:<br />
<strong>Klemko</strong> Techniek B.V. Pays-Bas<br />
T. +31 (0)88 002 33 00<br />
F. +31 (0)88 002 33 50<br />
E. info@klemko.nl<br />
www.klemko.nl


