Pitched Roofs - Ceiling Level - Knauf Insulation
Pitched Roofs - Ceiling Level - Knauf Insulation
Pitched Roofs - Ceiling Level - Knauf Insulation

You also want an ePaper? Increase the reach of your titles
YUMPU automatically turns print PDFs into web optimized ePapers that Google loves.
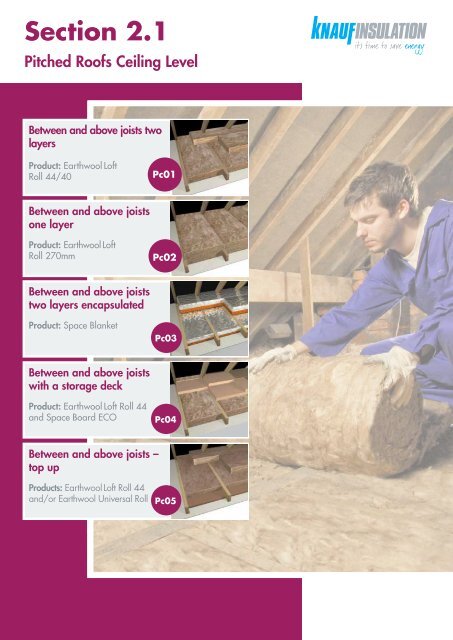
Section 2.1<br />
<strong>Pitched</strong> <strong>Roofs</strong> <strong>Ceiling</strong> <strong>Level</strong><br />
Between and above joists two<br />
layers<br />
Product: Earthwool Loft<br />
Roll 44/40<br />
Pc01<br />
Between and above joists<br />
one layer<br />
Product: Earthwool Loft<br />
Roll 270mm<br />
Pc02<br />
Between and above joists<br />
two layers encapsulated<br />
Product: Space Blanket<br />
Pc03<br />
Between and above joists<br />
with a storage deck<br />
Product: Earthwool Loft Roll 44<br />
and Space Board ECO<br />
Pc04<br />
Between and above joists –<br />
top up<br />
Products: Earthwool Loft Roll 44<br />
and/or Earthwool Universal Roll Pc05
2.1 <strong>Pitched</strong> <strong>Roofs</strong> - <strong>Ceiling</strong> <strong>Level</strong><br />
<strong>Pitched</strong> roofs – ceiling level<br />
<strong>Insulation</strong> at ceiling level design<br />
Introduction<br />
It is possible to achieve very high levels of<br />
insulation in pitched roofs where the insulation is<br />
positioned at ceiling level because the insulation<br />
thickness is largely unrestricted by construction<br />
considerations.<br />
A major factor influencing the design of pitched<br />
roofs with insulation at ceiling level, is the type of<br />
roof tile underlay chosen. Traditionally, roofs with<br />
cold loft spaces were ventilated to allow for the<br />
removal of moisture-laden air from the<br />
roofspace.<br />
The substitution of traditional roof tile underlays<br />
such as 1F sarking felt (which have high water<br />
vapour resistance and require ventilation) with<br />
modern roof tile underlays that have low water<br />
vapour resistance (and require no or low levels<br />
of ventilation), require the designer to<br />
incorporate various design features into the<br />
ceiling and pitched roof which are dictated by<br />
the type of roof tile underlay specified.<br />
Ventilation and<br />
control of condensation<br />
Where insulation is placed in roofs with<br />
insulation at ceiling joist level there is a risk that<br />
condensation will form on surfaces on the cold<br />
side of the insulation in the loft space.<br />
Condensation is most likely to occur where warm<br />
moisture laden air (laden with water vapour) is<br />
able to pass to the cold loft space but is<br />
prevented from dissipating to the atmosphere by<br />
the roof structure.<br />
The key steps that need to be taken to prevent the<br />
formation of condensation are to restrict the<br />
passage of warm air and water vapour through<br />
the structure to the cold loft space and allow for<br />
its removal if it enters the cold loft space. The<br />
former is achieved by ensuring that the ceiling is<br />
well sealed and has a high resistance to the<br />
diffusion of water vapour the latter by either<br />
ventilating the cold side of the insulation or<br />
ensuring that the roof construction will allow<br />
water vapour to disperse through its structure<br />
and dissipate to the atmosphere.<br />
Reference should be made to BS5250: 2011.<br />
BS 5250 : 2011 provides guidance for pitched<br />
roofs with two types of tiling underlay:<br />
• Type HR (high water vapour resistance)<br />
such as traditional sarking felt<br />
• Type LR (low water vapour resistance )<br />
– less than 0.25 MN s/g<br />
Where an LR underlay which has third party<br />
certification by the British Board of Agrément,<br />
(for use as a tiling underlay for a pitched roof<br />
with a cold loft space and insulation at ceiling<br />
joist level) is used, any water vapour that does<br />
pass through the insulation layer can disperse<br />
through the tiling underlay to the outside air. This<br />
is known as a ‘breathing’ roof and is<br />
recommended by <strong>Knauf</strong> <strong>Insulation</strong> for new<br />
dwellings.<br />
Where a HR underlay, such as traditional<br />
bitumen based sarking felt, is used as the tiling<br />
underlay, it is necessary to provide cross<br />
ventilation to the cold side of the insulation to<br />
enable water vapour to dissipate to the<br />
atmosphere and thus prevent condensation<br />
forming in the roof construction.<br />
BS 5250: 2011 places great emphasis on the air<br />
tightness of the ceiling to prevent water vapour<br />
entering the loft space.<br />
A BS 5250 ‘well sealed’ ceiling<br />
In BS 5250, a ‘well sealed’ ceiling requires the<br />
following:<br />
• The design should avoid holes in<br />
the ceiling and constructional gaps,<br />
especially at the junction with dry lined<br />
external walls<br />
• No access door or hatch or downlighters<br />
should be located in rooms where large<br />
amounts of moisture vapour are produced,<br />
such as kitchens or washrooms<br />
• The access hatch should include<br />
draught seals that are compressed when<br />
the hatch is closed and have an air leakage<br />
rate no worse than specified<br />
• Penetrations, such as those for services<br />
and rooflights, should be permanently<br />
sealed with suitable proprietary products<br />
• The ceiling should be sealed to the<br />
external walls to limit any leakage<br />
through cracks<br />
• Recessed light fittings should either<br />
comply with BS EN 60529 and be rated<br />
IP60 to IP65 (depending on room use),<br />
or incorporate an appropriate sealed<br />
hood or box<br />
• The head of any cavity in any wall<br />
or partition should be sealed to prevent<br />
transfer of warm moist air into the<br />
roof space<br />
• A well sealed ceiling is likely to be a<br />
prerequisite of achieving a satisfactory<br />
air leakage rate when a new building<br />
is tested<br />
BS 9250 : 2007 Code of practice for the design<br />
of the airtightmess of ceilings in pitched roofs<br />
gives detailed advice<br />
62 Technical Advice and Support Centre 01744 766666 www.knaufinsulation.co.uk
<strong>Pitched</strong> <strong>Roofs</strong> - <strong>Ceiling</strong> <strong>Level</strong><br />
2.1<br />
BS 5250: 2011, defines LR underlays as having<br />
a water vapour resistance of less than or equal to<br />
0.25 MN.s/g and recommends that only LR<br />
underlays with technical approvals given by<br />
UKAS accredited technical approval bodies (e.g.<br />
BBA) for this type of application are used without<br />
ventilation.<br />
If it is proposed to use a LR underlay without this<br />
type of technical approval then ventilation is<br />
required as set out in Table 1.<br />
Table 1 - Ventilation requirements for LR underlays<br />
Type of ceiling<br />
Size of ventilation openings at:<br />
Eaves<br />
High level<br />
No technical approval Normal 7mm -<br />
No technical approval Well sealed 3mm 5mm<br />
With technical approval Normal See relevant<br />
technical approval<br />
See relevant<br />
technical approval<br />
With technical approval Well sealed As above As above<br />
2.1<br />
Note that if there is likely to be high initial<br />
moisture load in the building due to water<br />
introduced into the building during the<br />
construction phase, or the designer has any<br />
doubts about the viability of constructing a well<br />
sealed ceiling then consideration should be given<br />
to installing 5mm high level ventilation<br />
irrespective of whether the LR underlay has a<br />
technical approval or not.<br />
Where no eaves ventilation is provided, the<br />
ceiling level insulation is usually pushed up tight<br />
against the LR underlay to prevent air leakage<br />
into the loft at eaves level.<br />
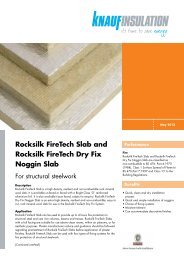
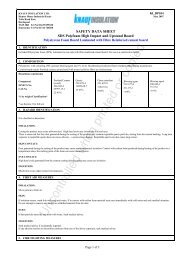
<strong>Ceiling</strong> level insulation with LR underlay<br />
Using LR underlays can obviate the need for ventilation in a pitched roof.<br />
Underlay to drape 10mm between<br />
rafters, or counterbattens to be used<br />
5mm ventilation slot at high level<br />
recommended in BS 5250<br />
Snow and rain driven through<br />
tiling can drain safely to gutter<br />
Continuous diffusion of moisture vapour<br />
Clean, dry, draught free<br />
loft space<br />
Continuous diffusion of moisture vapour<br />
Gaps between tiles and slates<br />
allow water vapour to escape<br />
<strong>Insulation</strong> pushed up tight against<br />
LR underlay<br />
Well sealed ceiling to limit<br />
water vapour entering loft<br />
<strong>Insulation</strong> taken over wall plate<br />
and butted up to wall insulation<br />
to avoid thermal bridge<br />
Technical Advice and Support Centre 01744 766666 www.knaufinsulation.co.uk<br />
63
2.1 <strong>Pitched</strong> <strong>Roofs</strong> - <strong>Ceiling</strong> <strong>Level</strong><br />
<strong>Pitched</strong> roofs – ceiling level<br />
<strong>Insulation</strong> at ceiling level design<br />
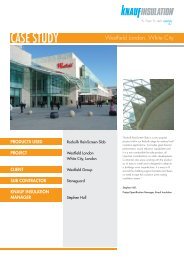
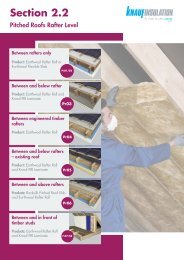
<strong>Ceiling</strong> level insulation with HR underlay<br />
For roofs over 35° pitch, or over 10m span, provide<br />
ridge ventilation equivalent to 5mm continuous gap<br />
Impermeable underlay traps moisture vapour<br />
in loft<br />
Ventilation tray to provide<br />
minimum 25mm air path<br />
above insulation<br />
Cross ventilation of attic<br />
<strong>Insulation</strong> taken over wall plate and<br />
butted up to wall insulation<br />
to avoid thermal bridge<br />
<strong>Ceiling</strong> should be well sealed to prevent<br />
moist air entering loft space<br />
Eaves level opening equal to:<br />
• 10mm continuous opening for roof pitches<br />
over 15º<br />
• 25mm continuous opening for roof pitches<br />
of 15º or less<br />
Ventilated roof design<br />
With a ventilated design, the insulation is<br />
placed at ceiling level and cross ventilation of the<br />
loft space is used to disperse moisture vapour.<br />
It is important to allow a clear, unobstructed<br />
ventilation path at least 25mm wide between the<br />
insulation and the tiling underlay to allow outside<br />
air to enter the loft space and remove the water<br />
vapour.<br />
The ventilation requirements for roofs with a duo<br />
pitch are shown above. Lean-to and mono-pitch<br />
roofs should have a continuous gap equivalent<br />
to 10mm at the eaves and high level or ridge<br />
ventilation equivalent to a continuous gap<br />
of 5mm.<br />
Ventilation openings should prevent the entry<br />
of insects. A 3mm or 4mm mesh across the<br />
ventilation openings should be incorporated.<br />
Gaps and holes in the ceiling should be<br />
sealed to restrict the amount of water vapour that<br />
enters the loft space. Draft seal the loft hatch and<br />
provide catches or bolts to compress the draft<br />
seal and prevent air leakage from wind uplift.<br />
Other precautions for<br />
ceiling level insulation<br />
All tanks and pipes in the loft should be insulated<br />
to prevent freezing.<br />
Refer to BS:5422 or the TIMSA guidance for<br />
achieving compliance with Part L of the Building<br />
Regulations for the type and thicknesses of<br />
insulation required.<br />
Do not insulate directly under cold water tanks<br />
unless they are elevated. The loft hatch<br />
should also be insulated to a minimum depth<br />
of 100mm and draught stripped.<br />
Construction Details<br />
To avoid thermal bridging the roof insulation<br />
should butt up to or lap the wall insulation.<br />
The designer should consider at what stage this<br />
‘linking’ insulation is installed, as this will affect<br />
the detailing of insulation at the eaves.<br />
In cold roofs, one way of achieving this in<br />
practice is to place a short length of insulation<br />
quilt over the wall plate (and cavity closer, where<br />
applicable) immediately before the tiling underlay<br />
is fixed. This avoids having to push the insulation<br />
into place from inside the roof once the roof<br />
covering has been completed.<br />
The gap between gable/separating walls and the<br />
first joist should be insulated to avoid thermal<br />
bridging. In cold roofs, the second layer of<br />
insulation should be butted up against the gable<br />
and separating walls to avoid thermal bridging.<br />
<strong>Knauf</strong> <strong>Insulation</strong> products are supplied in widths<br />
to suit standard joist spacings.<br />
Recessed light fittings<br />
Where recessed light fittings are to be used,<br />
specify LED compact fluorescent or low voltage<br />
tungsten lamps to minimise heat build up. Locate<br />
the fittings in enclosures that provide at least<br />
75mm clearance around the fitting for air to<br />
circulate. Seal the enclosure to prevent air<br />
leakage into the loft and, if necessary, ventilate to<br />
the room.<br />
Loft with storage deck<br />
Where a boarded out storage deck is provided<br />
above the loft insulation, a check should be made<br />
to ensure that the ceiling joists are adequately<br />
sized to support the anticipated loadings.<br />
64 Technical Advice and Support Centre 01744 766666 www.knaufinsulation.co.uk
<strong>Pitched</strong> <strong>Roofs</strong> - <strong>Ceiling</strong> <strong>Level</strong><br />
2.1<br />
Solution optimiser and pathfinder<br />
<strong>Knauf</strong> <strong>Insulation</strong> solution U-values 0.17 0.16 0.15 0.14 0.13 0.12 0.11 0.10 0.09 0.08<br />
2.1<br />
Between and above joists two layers<br />
Product: Earthwool Loft Roll 44/40<br />
See page: 66<br />
Pc01<br />
Between and above joists one layer<br />
Product: Earthwool Loft Roll 270mm<br />
See page: 68<br />
Pc02<br />
Between and above joists two layers<br />
encapsulated<br />
Product: Space Blanket<br />
See page: 70<br />
Pc03<br />
Between and above joists with a<br />
storage deck<br />
Product: Earthwool Loft Roll 44 and<br />
Space Board ECO<br />
See page: 72<br />
Pc04<br />
Between and above joists – top up<br />
Products: Earthwool Loft Roll 44 and/or<br />
Earthwool Universal Roll<br />
See page: 74<br />
Pc05<br />
Key<br />
Thermal insulation achievable by constructions within this document.<br />
Pb01<br />
Find online. Visit knaufinsulation.co.uk and key in construction code to find the<br />
most up to date information on your chosen solution.<br />
Technical Advice and Support Centre 01744 766666 www.knaufinsulation.co.uk<br />
65
2.1<br />
<strong>Pitched</strong> <strong>Roofs</strong> - <strong>Ceiling</strong> <strong>Level</strong><br />
<strong>Pitched</strong> roofs – ceiling level<br />
Between and above joists two layers<br />
Earthwool Loft Roll<br />
• Insulating at ceiling level provides<br />
most cost effective insulation<br />
solution in terms of ratio of cost to<br />
energy saved<br />
Pc01<br />
NEW BUILD<br />
REFURB<br />
• Very low U-values can be easily and<br />
economically achieved<br />
• Products are compression packed to<br />
reduce transport related CO 2<br />
emissions<br />
Earthwool Loft Roll<br />
• Non-combustible with Euroclass A1<br />
reaction to fire rating<br />
• A+ Generic BRE Green Guide Rating<br />
Earthwool Loft Roll between<br />
and above ceiling joists<br />
• Zero Ozone Depletion Potential (ODP)<br />
• Zero Global Warming Potential (GWP)<br />
Roof tile underlay<br />
Products<br />
Earthwool Loft Roll 44 and Earthwool Loft Roll<br />
40 are made from glass mineral wool and<br />
formed into rolls which are lightweight, flexible,<br />
resilient and non-combustible, their manufacture<br />
has a very low impact on the environment.<br />
Typical construction<br />
A pitched roof of timber trussed rafters with tiles<br />
or slates on battens and roof tile underlay<br />
optionally on sarking board. Plasterboard<br />
ceiling below.<br />
Earthwool Loft Roll 44 or 40 is installed in two<br />
layers, the first layer between the joists and the<br />
second layer across the joists. This minimises<br />
thermal bridging through the ceiling joists.<br />
Ventilation requirements<br />
If using an accredited type LR roof tile underlay<br />
with a well sealed ceiling – no ventilation is<br />
required.<br />
In all other circumstances ventilation at eaves<br />
and ridge is required.<br />
Installation<br />
The first layer of Earthwool Loft Roll 44 or 40,<br />
the same depth as the ceiling joists, is laid<br />
between the joists. The insulation should be<br />
taken over the wall plate to link up with the wall<br />
insulation. If the roof requires ventilation this is<br />
most easily done just before the eaves ventilator<br />
is fixed, during installation of the roof tile<br />
underlay.<br />
The second layer of Earthwool Loft Roll 44 or<br />
40 is laid at right angles to the ceiling joists,<br />
with all edges butt jointed. The insulation should<br />
be pushed up tight against the roof tile<br />
underlay, or tight against the eaves ventilator, if<br />
no ventilation is required, take care not to block<br />
the ventilation air path, if ventilation is required.<br />
Electric cables should not be covered with<br />
insulation in case they overheat. Cables should<br />
be lifted up and ideally fixed to the structure<br />
above the insulation or laid on top of the loft<br />
insulation. If in any doubt consult with a suitably<br />
qualified person, such as an electrician.<br />
Performance<br />
Thermal performance<br />
Earthwool Loft Roll 44 has a thermal<br />
conductivity of 0.044 W/mK. Earthwool Loft<br />
Roll 40 has a thermal conductivity of 0.040 W/mK.<br />
Fire performance<br />
Earthwool Loft Roll 44 and Earthwool Loft Roll<br />
40 are classified as Euroclass A1 to BS EN<br />
13501-1.<br />
Airtightness<br />
Where enhanced airtightness performance is<br />
required the designer should consider the<br />
specification of a separate and fully sealed air<br />
leakage barrier to the underside of the ceiling<br />
joists, i.e. a polythene sheet.<br />
66 Technical Advice and Support Centre 01744 766666 www.knaufinsulation.co.uk
<strong>Pitched</strong> <strong>Roofs</strong> - <strong>Ceiling</strong> <strong>Level</strong><br />
2.1<br />
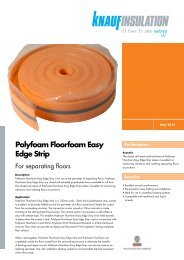
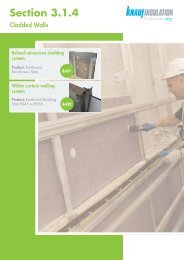
Typical section<br />
Eaves<br />
ventilation<br />
Eaves ventilation tray<br />
Earthwool Loft Roll<br />
above ceiling joists<br />
Typical specification<br />
The whole area of the ceiling to be insulated<br />
with two layers of Earthwool Loft Roll<br />
40*/44* of total thickness ......mm.<br />
(*Delete as appropriate)<br />
Width of first layer of insulation to be<br />
appropriate to the joist space and of a<br />
thickness equal to the joist depth. The<br />
insulation to be laid between the joists and<br />
over wall plate on external walls.<br />
2.1<br />
Earthwool Loft Roll<br />
between ceiling joists<br />
The second layer to be laid at right angles to<br />
the first layer. All joints between the rolls of<br />
insulation to be close butted.<br />
If an HR roof tile underlay is installed<br />
maintain, a 25mm ventilated airspace<br />
between the insulation and the sarking felt/<br />
sarking board at the eaves.<br />
Earthwool Loft Roll<br />
taken down to link<br />
with wall insulation<br />
Do not insulate under cold water tanks unless<br />
they are elevated. Cold water tanks and<br />
pipes to be separately insulated.<br />
Loft hatch to be insulated with a minimum<br />
100mm depth of insulation.<br />
Table 2 - iTypical U-values of pitched roofs with ceiling level insulation<br />
Between<br />
joists*<br />
Thickness (mm)<br />
U-values<br />
Over joists Product (W/m 2 K)<br />
Alternatively, consult the National<br />
Building Specifications, Standard<br />
version clause/clauses…<br />
P10/125 and 135……………<br />
<strong>Knauf</strong> <strong>Insulation</strong> specification clauses can be<br />
downloaded from knaufinsulation.co.uk/nbs<br />
100 400 (2x200)<br />
100 350 (150+200)<br />
100 340 (2X170)<br />
100 300 (2x150)<br />
100 250 (100+150)<br />
100 200<br />
100 170<br />
100 150<br />
Earthwool Loft Roll 40 0.08<br />
Earthwool Loft Roll 44 0.09<br />
Earthwool Loft Roll 40 0.09<br />
Earthwool Loft Roll 44 -<br />
Earthwool Loft Roll 40 0.10<br />
Earthwool Loft Roll 44 0.10<br />
Earthwool Loft Roll 40 0.10<br />
Earthwool Loft Roll 44 0.11<br />
Earthwool Loft Roll 40 0.12<br />
Earthwool Loft Roll 44 0.12<br />
Earthwool Loft Roll 40 0.13<br />
Earthwool Loft Roll 44 0.14<br />
Earthwool Loft Roll 40 -<br />
Earthwool Loft Roll 44 0.16<br />
Earthwool Loft Roll 40 0.16<br />
Earthwool Loft Roll 44 0.17<br />
Note* : Joist sizes assumed to be 100 x 48mm at 600mm centres, 8% bridging plus 1% for cross noggings.<br />
CERTIFICATE CS/1001-2<br />
U Value Competency Scheme<br />
Technical Advice and Support Centre 01744 766666 www.knaufinsulation.co.uk<br />
67
2.1<br />
<strong>Pitched</strong> <strong>Roofs</strong> - <strong>Ceiling</strong> <strong>Level</strong><br />
<strong>Pitched</strong> roofs – ceiling level<br />
Between and above joists one layer<br />
Earthwool Loft Roll 270mm<br />
• Insulating at ceiling level provides<br />
most cost effective insulation<br />
solution in terms of ratio of cost to<br />
energy saved<br />
Pc02<br />
NEW BUILD<br />
REFURB<br />
• One layer application minimises<br />
installation costs and time<br />
• Product is compression packed to<br />
reduce transport related CO 2<br />
emissions<br />
Earthwool Loft Roll 270mm<br />
• Non-combustible with Euroclass A1<br />
reaction to fire rating<br />
• A+ Generic BRE Green Guide Rating<br />
• Zero Ozone Depletion Potential (ODP)<br />
• Zero Global Warming Potential (GWP)<br />
Earthwool Loft Roll 270mm<br />
LR underlay<br />
Products<br />
Earthwool Loft Roll 270mm is made from glass<br />
mineral wool and formed into rolls which are<br />
lightweight, flexible, resilient and noncombustible,<br />
its manufacture has a very low<br />
impact on the environment.<br />
Typical construction<br />
A pitched roof of timber trussed rafters with tiles<br />
or slates on battens and roof tile underlay<br />
optionally on sarking board. Plasterboard<br />
ceiling below.<br />
Earthwool Loft Roll 270mm is installed in one<br />
layer between and overlapping the joists to<br />
minimise thermal bridging through the ceiling<br />
joists.<br />
Ventilation requirements<br />
If using an accredited type LR roof tile underlay<br />
with a well sealed ceiling – no ventilation is<br />
required. In all other circumstances ventilation<br />
at eaves and ridge is required.<br />
Installation<br />
Earthwool Loft Roll 270mm is laid between the<br />
joists. The insulation should be taken over the<br />
wall plate to link up with the wall insulation. All<br />
joints between the insulation to be close butted.<br />
When ventilation of the loft space is not<br />
required Earthwool Loft Roll 44 should be in<br />
intimate contact with the roof tile underlay or<br />
the eaves ventilator, if ventilation of the loft<br />
space is required ensure ventilation paths are<br />
installed in accordance with the<br />
recommendations detailed in BS 5250:2011.<br />
Electric cables should not be covered with<br />
insulation in case they overheat. Cables should<br />
be lifted up and ideally fixed to the structure<br />
above the insulation or laid on top of the loft<br />
insulation. If in any doubt consult with a suitably<br />
qualified person, such as an electrician.<br />
Performance<br />
Thermal performance<br />
Earthwool Loft Roll 270mm has a thermal<br />
conductivity of 0.044 W/mK.<br />
Fire performance<br />
Earthwool Loft Roll 270mm is classified as<br />
Euroclass A1 to BS EN 13501-1.<br />
Airtightness<br />
Where enhanced airtightness performance is<br />
required the designer should consider the<br />
specification of a separate and fully sealed air<br />
leakage barrier to the underside of the ceiling<br />
joists, i.e. a 500 gauge polyethylene sheet.<br />
68 Technical Advice and Support Centre 01744 766666 www.knaufinsulation.co.uk
<strong>Pitched</strong> <strong>Roofs</strong> - <strong>Ceiling</strong> <strong>Level</strong><br />
2.1<br />
Typical section<br />
Typical specification<br />
The whole area of the ceiling to be insulated<br />
with one layer of Earthwool Loft Roll 270mm.<br />
2.1<br />
Earthwool Loft Roll 270mm<br />
pushed tight against the<br />
underlay<br />
LR underlay<br />
Earthwool Loft Roll 270mm<br />
between and above ceiling<br />
joists<br />
Width of insulation to be appropriate to the<br />
joist centres. The insulation to be laid<br />
between the joists and to finish over wall<br />
plate on external walls.<br />
All joints between the rolls of insulation to be<br />
close butted.<br />
If an HR roof tile underlay is installed,<br />
maintain a 25mm ventilated airspace<br />
between the insulation and the sarking felt/<br />
sarking board at the eaves.<br />
Do not insulate under cold water tanks unless<br />
Well sealed ceiling<br />
they are elevated. Cold water tanks and<br />
pipes to be separately insulated.<br />
Earthwool Loft Roll 270mm taken down<br />
to link with wall insulation<br />
Loft hatch to be insulated with a minimum<br />
100mm depth of insulation.<br />
Alternatively, consult the National<br />
Building Specifications, Standard<br />
version clause/clauses…<br />
P10/125 and 135……………<br />
Table 3 - Typical U-values of pitched roofs with ceiling level insulation<br />
<strong>Knauf</strong> <strong>Insulation</strong> specification clauses can be<br />
downloaded from knaufinsulation.co.uk/nbs<br />
Product Thickness (mm) U-value<br />
Between and over<br />
joists<br />
(W/m 2 K)<br />
Earthwool Loft Roll 270mm 270 0.16<br />
CERTIFICATE CS/1001-2<br />
U Value Competency Scheme<br />
Note: Joist sizes assumed to be 100 x 48mm at 600mm centres, 8% bridging plus 1%<br />
for cross noggings.<br />
Technical Advice and Support Centre 01744 766666 www.knaufinsulation.co.uk<br />
69
2.1<br />
<strong>Pitched</strong> <strong>Roofs</strong> - <strong>Ceiling</strong> <strong>Level</strong><br />
<strong>Pitched</strong> roofs – ceiling level<br />
Between and above joists two layers encapsulated<br />
Space Blanket<br />
• Insulating at ceiling level provides<br />
most cost effective insulation solution<br />
in terms of ratio of cost to energy<br />
saved<br />
• Encapsulated product for easier<br />
handling and installation<br />
• Products are compression packed to<br />
reduce transport related CO 2<br />
emissions<br />
Pc03<br />
NEW BUILD<br />
REFURB<br />
Space Blanket (insulation content)<br />
• Non-combustible with Euroclass A1<br />
reaction to fire rating<br />
• A+ Generic BRE Green Guide Rating<br />
• Zero Ozone Depletion Potential (ODP)<br />
• Zero Global Warming Potential (GWP)<br />
Space Blanket over joists<br />
Space Blanket<br />
between ceiling joists<br />
Roof tile underlay<br />
Products<br />
Space Blanket is made from glass mineral wool<br />
and formed into rolls which are encapsulated in<br />
a lightweight part metalised polythene film. It is<br />
lightweight, flexible, resilient and noncombustible,<br />
its manufacture has a very low<br />
impact on the environment.<br />
Typical construction<br />
A pitched roof of timber trussed rafters with tiles<br />
or slates on battens and roof tile underlay<br />
optionally on sarking board. Plasterboard<br />
ceiling below.<br />
Space Blanket is installed in two layers, the first<br />
layer between the joists and the second layer<br />
across the joists. This minimises thermal<br />
bridging through the ceiling joists.<br />
Ventilation requirements<br />
If using an accredited type LR roof tile underlay<br />
with a well sealed ceiling – no ventilation is<br />
required.<br />
In all other circumstances ventilation at eaves<br />
and ridge is required.<br />
Installation<br />
The first layer of Space Blanket, the same depth<br />
as the ceiling joists, is laid silver side up<br />
between the joists. The insulation should be<br />
taken over the wall plate to link up with the wall<br />
insulation. If the roof requires ventilation this is<br />
most easily done just before the eaves ventilator<br />
is fixed, during installation of the roof tile<br />
underlay.<br />
The second layer of Space Blanket is laid at<br />
right angles to the ceiling joists, silver side up,<br />
with all edges butt jointed. The insulation should<br />
be pushed up tight against the roof tile<br />
underlay, or tight against the eaves ventilator, if<br />
no ventilation is required, take care not to block<br />
the ventilation air path, if ventilation is required.<br />
Electric cables should not be covered with<br />
insulation in case they overheat. Cables should<br />
be lifted up and ideally fixed to the structure<br />
above the insulation or laid on top of the loft<br />
insulation. If in any doubt consult with a suitably<br />
qualified person, such as an electrician.<br />
70 Technical Advice and Support Centre 01744 766666 www.knaufinsulation.co.uk
<strong>Pitched</strong> <strong>Roofs</strong> - <strong>Ceiling</strong> <strong>Level</strong><br />
2.1<br />
Typical section<br />
LR underlay<br />
Earthwool Loft Roll to link<br />
ceiling and wall insulation<br />
Space Blanket<br />
Typical specification<br />
The whole area of the ceiling to be insulated<br />
with two layers of Space Blanket of total<br />
thickness ......mm.<br />
Width of first layer of insulation to be<br />
appropriate to the joist space and of a<br />
thickness equal to joist depth, laid between<br />
the joists.<br />
2.1<br />
Performance<br />
Thermal performance<br />
Space Blanket has a thermal conductivity of<br />
0.044 W/mK.<br />
Fire performance<br />
The mineral wool content of Space Blanket is<br />
non-combustible, inorganic glass mineral wool,<br />
and is Euroclass A1 to BS EN 13501-1.<br />
Because the product is encapsulated in<br />
polythene the classification for Space Blanket is<br />
Euroclass F.<br />
Space Blanket<br />
between ceiling joists<br />
Plasterboard<br />
Airtightness<br />
Where enhanced airtightness performance is<br />
required the designer should consider the<br />
specification of a separate and fully sealed air<br />
leakage barrier to the underside of the ceiling<br />
joists, i.e. a 500 gauge polyethylene sheet.<br />
The second layer to be laid at right angles to<br />
the first layer. All joints between the rolls of<br />
insulation to be close butted.<br />
If an HR roof tile underlay is installed<br />
maintain, a 25mm ventilated airspace<br />
between the insulation and the sarking felt/<br />
sarking board at the eaves.<br />
Do not insulate under cold water tanks unless<br />
they are elevated. Cold water tanks and<br />
pipes to be separately insulated.<br />
Loft hatch to be insulated with a minimum<br />
100mm depth of insulation.<br />
Alternatively, consult the National<br />
Building Specifications, Standard<br />
version clause/clauses…<br />
P10/125 and 135……………<br />
<strong>Knauf</strong> <strong>Insulation</strong> specification clauses can be<br />
downloaded from knaufinsulation.co.uk/nbs<br />
Table 4 - Typical U-values of pitched roofs with ceiling level insulation<br />
Product Thickness (mm) U-values<br />
Between joists* Over joists (W/m 2 K)<br />
Space Blanket 100 200 0.14<br />
100 150 0.17<br />
Note*: Joist sizes assumed to be 100 x 48mm at 600mm centres, 8% bridging plus 1% for cross noggings.<br />
CERTIFICATE CS/1001-2<br />
U Value Competency Scheme<br />
Technical Advice and Support Centre 01744 766666 www.knaufinsulation.co.uk<br />
71
2.1<br />
<strong>Pitched</strong> <strong>Roofs</strong> - <strong>Ceiling</strong> <strong>Level</strong><br />
<strong>Pitched</strong> roofs – ceiling level<br />
Between and above joists with a storage deck<br />
Earthwool Loft Roll and Space Board<br />
• Insulating at ceiling level provides<br />
most cost effective insulation solution<br />
in terms of ratio of cost to energy<br />
saved<br />
• Provides storage space and delivers<br />
high level of thermal performance<br />
• Earthwool Loft Roll is compression<br />
packed to reduce transport related<br />
CO 2 emissions<br />
Pc04<br />
NEW BUILD<br />
REFURB<br />
Earthwool Loft Roll<br />
• Non-combustible with Euroclass A1<br />
reaction to fire rating<br />
18mm Chipboard<br />
• A+ Generic BRE Green Guide Rating<br />
Earthwool Loft Roll and Space Board ECO<br />
• Zero Ozone Depletion Potential (ODP)<br />
• Global Warming Potential
<strong>Pitched</strong> <strong>Roofs</strong> - <strong>Ceiling</strong> <strong>Level</strong><br />
2.1<br />
Typical section<br />
LR underlay<br />
Earthwool Loft Roll<br />
to link ceiling and wall insulation<br />
Space Board ECO<br />
and chipboard<br />
Typical specification<br />
The whole area of the ceiling to be insulated<br />
with Earthwool Loft Roll 40*/44*. Width of<br />
Earthwool Loft Roll to be appropriate to the<br />
joist space and of a thickness equal to joist<br />
depth. The insulation to be laid between<br />
the joists and over wall plate on external<br />
walls and pushed up tight to a vapour<br />
permeable membrane.<br />
(*Delete as appropriate)<br />
2.1<br />
Performance<br />
Thermal performance<br />
Space Board ECO has a thermal conductivity<br />
of 0.035 W/mK.<br />
Earthwool Loft Roll 40 has a thermal<br />
conductivity of 0.040 W/mK.<br />
Earthwool Loft Roll 44 has a thermal<br />
conductivity of 0.044 W/mK.<br />
Compression resistance<br />
Whilst ceiling joists are not designed to carry<br />
large loads, Space Board ECO is capable of<br />
withstanding the applied point loading of the<br />
ceiling joists when loaded with storage items.<br />
Moreover, the chipboard is capable of<br />
withstanding the expected loads.<br />
Plasterboard<br />
Earthwool Loft Roll<br />
between ceiling joists<br />
Care should be taken to ensure that additional<br />
loads do not exceed the loading capability of<br />
the ceiling joists. If in doubt, consult a suitably<br />
qualified person.<br />
Space Board ECO is highly resistant to<br />
compression and withstands the long term static<br />
loads imparted in loft storage.<br />
Fire performance<br />
When installed in a roof construction it will not<br />
contribute to the development stages of a fire.<br />
Ensure the boards are not stored or installed<br />
close to open flame or other ignition sources,<br />
also avoiding volatile compounds and<br />
chemicals such as solvents.<br />
Earthwool Loft Roll 40 and 44 are classified as<br />
Euroclass A1 to BS EN 13501-1.<br />
Space Board ECO, thickness ........mm to be<br />
laid over the Earthwool Loft Roll 40/44 long<br />
side transverse to the ceiling joists. Begin by<br />
running a bead of solvent-free adhesive<br />
along the joists and then lay the boards. Lay<br />
second layer of Space Board ECO and glue<br />
all joints.<br />
All joints in the chipboard deck to be glued.<br />
Any gaps between the edge of the Space<br />
Board ECO and the vapour permeable<br />
membrane to be filled with Earthwool Loft<br />
Roll 40/44.<br />
If an HR roof tile underlay is installed<br />
maintain, a 25mm ventilated airspace<br />
between the insulation and the sarking felt/<br />
sarking board at the eaves.<br />
Alternatively, consult the National<br />
Building Specifications, Standard<br />
version clause/clauses…<br />
P10/125 and 135……………<br />
<strong>Knauf</strong> <strong>Insulation</strong> specification clauses can be<br />
downloaded from knaufinsulation.co.uk/nbs<br />
Table 5 - U-value for pitched roofs insulated with Space Board ECO over the joists and Earthwool<br />
Loft Roll 40/44 between joists<br />
Earthwool Loft Roll 40/44<br />
between joists<br />
Space Board ECO<br />
U-value<br />
Thickness (mm) <strong>Insulation</strong>/chipboard thickness (mm) (W/m 2 K)<br />
100 142 (2 x 62 +18) 0.16<br />
Note: Joist sizes assumed to be 100 x 48mm at 600mm centres, 8% bridging plus 1% for cross noggings.<br />
CERTIFICATE CS/1001-2<br />
U Value Competency Scheme<br />
Technical Advice and Support Centre 01744 766666 www.knaufinsulation.co.uk<br />
73
2.1<br />
<strong>Pitched</strong> <strong>Roofs</strong> - <strong>Ceiling</strong> <strong>Level</strong><br />
<strong>Pitched</strong> roofs – ceiling level<br />
Between and above joists – top up<br />
Earthwool Loft Roll and Earthwool Universal Roll<br />
• Insulating at ceiling level provides<br />
most cost effective insulation solution<br />
in terms of ratio of cost to energy saved<br />
Pc05<br />
REFURB<br />
• Flexible solution options to upgrade<br />
thermal performance of existing loft<br />
space<br />
• Products are compression packed to<br />
reduce transport related CO 2<br />
emissions<br />
Earthwool Loft Roll and Earthwool<br />
Universal Roll<br />
• Non-combustible with Euroclass A1<br />
reaction to fire rating<br />
• A+ generic BRE Green Guide Rating<br />
• Zero Ozone Depletion Potential (ODP)<br />
• Zero Global Warming Potential (GWP)<br />
Earthwool Loft Roll<br />
above ceiling joists<br />
Earthwool Universal Roll ‘top up’<br />
between ceiling joists if required<br />
Existing loft insulation<br />
HR underlay<br />
Products<br />
Earthwool Loft Roll 40 and 44 and Earthwool<br />
Universal Roll are made from glass mineral<br />
wool and formed into rolls which are<br />
lightweight, flexible, resilient and noncombustible,<br />
their manufacture has a very low<br />
impact on the environment.<br />
Typical construction<br />
A pitched roof with existing loft insulation and<br />
an HR underlay. Earlier Building Regulation<br />
requirements were achieved with 25, 50, 80,<br />
100 and 150mm thickness of loft insulation.<br />
All these thicknesses may be found in existing<br />
properties.<br />
An overall insulation thickness of at least<br />
270mm is recommended when upgrading the<br />
thermal insulation of an existing roof.<br />
If an HR roof tile underlay is installed maintain,<br />
a 25mm ventilated airspace between the<br />
insulation and the sarking felt/sarking board at<br />
the eaves.<br />
Installation<br />
In most pitched roofs, any existing insulation is<br />
likely to be between the ceiling joists. Where<br />
the existing insulation reaches the top of the<br />
joists, Earthwool Loft Roll 40 and 44 can simply<br />
be laid over the existing joists and insulation.<br />
Where the existing insulation is below the joist<br />
height, top-up the insulation so it reaches the<br />
top of the joists, and then add a further 170,<br />
200 or 300mm thickness over the joists.<br />
Take care not to block the eaves ventilation.<br />
If the new insulation covers the top of the eaves<br />
ventilators, install new extended ventilators<br />
before installing the insulation.<br />
Seal any gaps or holes in the ceiling to the loft<br />
to limit air leakage into the loft from the internal<br />
environment. This is particularly important to the<br />
ceiling above areas where high levels of water<br />
vapour are generated such as bathrooms or<br />
wash rooms. Loft hatches should also have<br />
draught seals fitted.<br />
Electric cables should not be covered with<br />
insulation in case they overheat. Cables should<br />
be lifted up and ideally fixed to the structure<br />
above the insulation or laid on top of the loft<br />
insulation. If in any doubt consult with a suitably<br />
qualified person, such as an electrician.<br />
Performance<br />
Thermal performance<br />
Earthwool Loft Roll 44 and Earthwool Universal<br />
Roll have a thermal conductivity of 0.044 W/mK.<br />
Earthwool Loft Roll 40 has a thermal<br />
conductivity of 0.040 W/mK.<br />
Fire performance<br />
Earthwool Loft Roll 40 and 44 and Earthwool<br />
Universal Roll are classified as Euroclass A1 to<br />
BS EN 13501-1.<br />
74 Technical Advice and Support Centre 01744 766666 www.knaufinsulation.co.uk
<strong>Pitched</strong> <strong>Roofs</strong> - <strong>Ceiling</strong> <strong>Level</strong><br />
2.1<br />
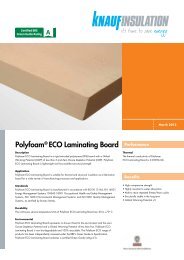
Typical section<br />
HR underlay<br />
Typical specification<br />
The two alternative specifications:<br />
a) Between joists (where applicable)<br />
2.1<br />
The whole area of the existing ceiling to<br />
Eaves ventilation tray<br />
be insulated with Earthwool Loft Roll<br />
Earthwool Loft Roll<br />
above ceiling joists<br />
40*/44*, thickness ......mm. <strong>Insulation</strong><br />
of width appropriate to the joist space to<br />
be laid over the existing loft insulation and<br />
Eaves<br />
ventilation<br />
dressed over wall plate. Existing insulation<br />
to be topped up with Earthwool Universal<br />
Roll, thickness.....mm.<br />
(*Delete as appropriate)<br />
Earthwool Universal Roll ‘top up’<br />
between ceiling joists (if required)<br />
Earthwool Loft Roll or Earthwool Universal<br />
Roll taken down to link with wall insulation,<br />
where practical<br />
Table 6 - Typical U-values for upgrading existing ceiling level insulation<br />
Existing insulation<br />
thickness (mm)<br />
Existing loft insulation<br />
Additional Earthwool Loft Roll 44 insulation U-values (W/m 2 K)<br />
Between joists<br />
thickness (mm)<br />
Over joists thickness<br />
(mm)<br />
With or without<br />
sarking board<br />
25 80* 170 0.16<br />
50 60* 170 0.16<br />
100 none 170 0.16<br />
100 none 200 0.14<br />
100 none 300 (2 x 150) 0.11<br />
b) Across the joists<br />
The whole area of the existing ceiling to<br />
be insulated with Earthwool Loft Roll<br />
40*/44*, thickness ......mm. To be laid<br />
over the joists, with all joints close butted.<br />
(*Delete as appropriate)<br />
For both methods all joints to be close butted.<br />
If an HR roof tile underlay is installed,<br />
maintain a 25mm ventilated airspace<br />
between the insulation and the sarking felt/<br />
sarking board at the eaves.<br />
Do not insulate under cold water tanks.<br />
Cold water tanks and pipes to be separately<br />
insulated.<br />
Loft hatch to be insulated with a minimum<br />
100mm depth of insulation.<br />
Alternatively, consult the National<br />
Building Specifications, Standard<br />
version clause/clauses…<br />
P10/125 and 135……………<br />
<strong>Knauf</strong> <strong>Insulation</strong> specification clauses can be<br />
downloaded from knaufinsulation.co.uk/nbs<br />
CERTIFICATE CS/1001-2<br />
U Value Competency Scheme<br />
Note: Joist sizes assumed to be 100 x 48mm at 600mm centres, 8% bridging plus 1% for cross noggings.<br />
*60mm and 80mm are Earthwool Universal Roll.<br />
Technical Advice and Support Centre 01744 766666 www.knaufinsulation.co.uk<br />
75
<strong>Knauf</strong> <strong>Insulation</strong> Ltd Customer Service (Sales) Technical Advice and Support Centre Literature<br />
PO Box 10 Tel: 0844 800 0135 Tel: 01744 766 666 Tel: 08700 668 660<br />
Stafford Road Fax: 01744 612007 Fax: 01744 766 667 Fax: 0870 400 5797<br />
St Helens Email: sales.uk@knaufinsulation.com Email: technical.uk@knaufinsulation.com Email: info.uk@knaufinsulation.com<br />
Merseyside<br />
www.knaufinsulation.co.uk<br />
WA10 3NS