Stem Installation Instructions - Koga Signature
Stem Installation Instructions - Koga Signature
Stem Installation Instructions - Koga Signature

You also want an ePaper? Increase the reach of your titles
YUMPU automatically turns print PDFs into web optimized ePapers that Google loves.
<strong>Stem</strong> <strong>Installation</strong> <strong>Instructions</strong><br />
Published – Jul, 2010. ZS022.v5 © Full Speed Ahead<br />
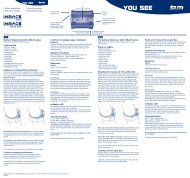
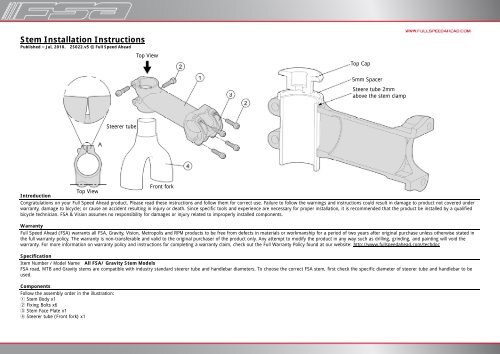
Top View<br />
Top Cap<br />
5mm Spacer<br />
Steere tube 2mm<br />
above the stem clamp<br />
Steerer tube<br />
Front fork<br />
Top View<br />
Introduction<br />
Congratulations on your Full Speed Ahead product. Please read these instructions and follow them for correct use. Failure to follow the warnings and instructions could result in damage to product not covered under<br />
warranty, damage to bicycle; or cause an accident resulting in injury or death. Since specific tools and experience are necessary for proper installation, it is recommended that the product be installed by a qualified<br />
bicycle technician. FSA & Vision assumes no responsibility for damages or injury related to improperly installed components.<br />
Warranty<br />
Full Speed Ahead (FSA) warrants all FSA, Gravity, Vision, Metropolis and RPM products to be free from defects in materials or workmanship for a period of two years after original purchase unless otherwise stated in<br />
the full warranty policy. The warranty is non-transferable and valid to the original purchaser of the product only. Any attempt to modify the product in any way such as drilling, grinding, and painting will void the<br />
warranty. For more information on warranty policy and instructions for completing a warranty claim, check out the Full Warranty Policy found at our website: http://www.fullspeedahead.com/techdoc<br />
Specification<br />
Item Number / Model Name All FSA/ Gravity <strong>Stem</strong> Models<br />
FSA road, MTB and Gravity stems are compatible with industry standard steerer tube and handlebar diameters. To choose the correct FSA stem, first check the specific diameter of steerer tube and handlebar to be<br />
used.<br />
Components<br />
Follow the assembly order in the illustration:<br />
1 <strong>Stem</strong> Body x1<br />
2 Fixing Bolts x6<br />
3 <strong>Stem</strong> Face Plate x1<br />
4 Steerer tube (Front fork) x1
<strong>Stem</strong> <strong>Installation</strong> to Fork Steerer Tube<br />
1. Measure diameter of steerer tube 4 to be certain it is correct size for stem installation. It’s often required that the steerer tube be cut to length. This operation should be performed by a qualified bicycle<br />
technician. Note: Carbon steerer tubes should extend through the stem completely for proper clamp pressure. It is recommended to have minimum 2mm steerer tube extended above the stem and the use of<br />
a minimum 5mm headset spacer between stem and headset cap for ALL carbon steerer tube forkes. Ensure that the steerer tube is clean and free of burrs or chips before installing stem onto steerer tube.<br />
2. Headset should be installed per headset manufacturer’s instructions.<br />
3. Apply small amount of FSA Dynamic installation compound on steerer tube, if it is carbon. Install the stem body 1 onto the steerer tube. Apply grease to stem fixing bolts (ti-prep for titanium bolts). Tighten<br />
the steerer fixing bolts 2 by alternating between bolts 1/4 turn at a time so both bolts reach proper torque simultaneously.<br />
Do not go above maximum torque rating printed on the stem. If two<br />
fixing bolts go over the maximum torque, the stem clamps may touch slightly (As the above drawing A), the stem is fixed onto steerer tube, shall not go further to avoid damage carbon fork craks. Contact<br />
FSA for troubleshooting information.<br />
Handlebar <strong>Installation</strong> to <strong>Stem</strong><br />
1. Apply FSA Dynamic <strong>Installation</strong> Compound on handlebar clamp area. Insert handlebar between stem body and face plate 3 .<br />
2. Apply grease to faceplate bolts (ti-prep for titanium bolts) and tighten the stem steerer fixing bolts 2 1/4 turn at a time in an X-pattern to tighten faceplate evenly on handlebar.<br />
Do not go above maximum torque rating printed on the stem. Check handlebar for slippage before each ride to ensure safe operation. Contact FSA for Troubleshooting information.<br />
Be sure to choose the correct stem to fit the steer tube and handlebar for which it is to be installed. Installing the stem on an incorrect steerer tube, or handlebar clamp diameter may cause damage to product, or<br />
cause an accident resulting in injury or death.<br />
• All FSA and Vision stems are designed to work with 1 1/8” steer tubes.<br />
• The FSA OS-120XT is compatible with 1 1/4” steer tubes and interchangeable with 1 1/8” steerer tubes with the use of shim (included with stem).<br />
• Gravity Series of stems are available for 1 1/8” or 1.5” and are not interchangeable.<br />
• FSA Road and ATB stems are available to fit 31.8mm Handlebar clamp only.<br />
• Vision <strong>Stem</strong>s are available to fit 26.0mm or 31.8mm diameter handlebars and are not interchangeable.<br />
• Gravity Series stems are available to fit 31.8mm diameter handlebars only.<br />
Measure Fork Steerer tube and handlebar clamp area before installing stem. Use an accurate measuring device such as a caliper or micrometer. Installing stem onto an undersized steertube or handlebar can cause<br />
stem or bar to slip causing loss of control of bicycle; resulting in an accident, damage to bicycle, injury or death. Use FSA Dynamic Assembly Paste between stem, steerer tube, and handlebar to reduce chances of<br />
slippage. Consult fork and handlebar manufacturer for exact diameter specification. If manufacturer specifications are unavailable, general guidelines are as follows:<br />
Handlebar Clamp Area Dimensions:<br />
• 31.8mm + 0.15 / -.00mm<br />
• 26.0mm + 0.15 / -.00mm<br />
• 25.4mm + 0.15 / -.00mm<br />
Steerer Tube Dimensions:<br />
• 1 1/8 ” 28.6mm + 0.1 / -.00mm<br />
• 1 1/4 ” 31.8mm + 0.1 / -.00mm<br />
• 1 1/2 ” 38.1mm + 0.1 / -.00mm (refered to as 1.5” )<br />
Headset and Fork must be installed before stem installation. Headset and Fork installation requires specialized knowledge, tools, and experience. General mechanical aptitude may not be sufficient to properly install<br />
these components. It is recommended that the headset and fork be installed by a qualified bicycle technician. Improper installation can result in failure of headset, fork, stem, and cause personal injury or death.