EN591 Drive & Talk Premium Volvo with Premium Sound system.pub
EN591 Drive & Talk Premium Volvo with Premium Sound system.pub
EN591 Drive & Talk Premium Volvo with Premium Sound system.pub

You also want an ePaper? Increase the reach of your titles
YUMPU automatically turns print PDFs into web optimized ePapers that Google loves.
<strong>Drive</strong> & <strong>Talk</strong><br />
<strong>Premium</strong> Mute<br />
<strong>Drive</strong> & <strong>Talk</strong><br />
<strong>Premium</strong> Mute<br />
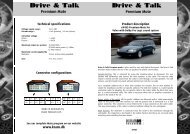
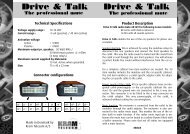
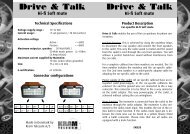
Technical specifications<br />
Voltage supply range : 10-16 VDC<br />
Current usage : +8VDC<br />
Maximum output pr. speaker: 30 Watt RMS /<br />
50 Watt music power @ 4 Ohm<br />
(3 Amp relays)<br />
Maximum current supplied by<br />
Mutewire : 10 mA. Active when grounded.<br />
Size: 75 x 40 x 22 mm<br />
Connector configurations<br />
<strong>Drive</strong> & <strong>Talk</strong> <strong>Premium</strong> Mute is often used for cars <strong>with</strong> Optical line inputs. The <strong>Drive</strong> & <strong>Talk</strong><br />
<strong>Premium</strong> Mute enables the use of the car speakers for phone conversation.<br />
Speaker-function: This is achieved by using the mutebox-relays to disconnect the rear speakers<br />
and subwoofers and connect the front speakers to the carkit. This way the radio sound is<br />
muted and the sound from the carkit is sent through the cars front speakers. You will achieve<br />
a perfect hands free sound <strong>with</strong>out interference from the car radio.<br />
For a complete cableset two item numbers are needed. The 1st item number consists of the<br />
muteboxes and the car-specific cableset and includes a carkit-extension cable if the amplifier<br />
is placed in the boot of the car. The 2nd item number is a carkit-specific adaptor cable for<br />
adapting the car-specific cable to the carkit.<br />
LR - LF - RF - RR -<br />
LR + LF + RF + RR +<br />
+ M M<br />
- SP + SP -<br />
RR - RF - LF - LR -<br />
RR + RF + LF + LR +<br />
Power supply of the carkit: All car-specific cablesets are delivered <strong>with</strong> a build in carkitpowersupply.<br />
The constant 12v, ground wire and the ignition (If available) are connected to<br />
a 6 way connector. This connector is to be fitted to the 6 way connector on the carkit cable.<br />
This way powersupply, of the carkit, is achieved <strong>with</strong>out cutting the cars wiringloom.<br />
Made in Denmark by<br />
Kram Telecom A/S<br />
Mute function: The mutewire is connected from the carkit to the muteboxes through the<br />
carkitcable.<br />
See our complete Mute program on our website<br />
www.kram.dk<br />
<strong>EN591</strong>
<strong>Drive</strong> & <strong>Talk</strong><br />
<strong>Premium</strong> Mute<br />
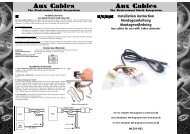
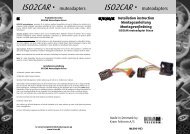
Installation description<br />
68591 <strong>Premium</strong> Mute for<br />
<strong>Volvo</strong> 2002-, With <strong>Premium</strong> <strong>Sound</strong> System<br />
<strong>Drive</strong> & <strong>Talk</strong><br />
<strong>Premium</strong> Mute<br />
Complete cable set<br />
3<br />
Needed items:<br />
A. Car-specific cable <strong>with</strong> muteboxes. B. Carkit-extension cable. (Delivered <strong>with</strong> A)<br />
C. Carkit adaptor. D. Carkit.<br />
4<br />
A<br />
A<br />
2<br />
Identification of <strong>Sound</strong> <strong>system</strong>:<br />
Start by checking if you have the center speaker in the top of the<br />
dashboard. If you do not have the centre speaker in the top of the<br />
dashboard an other cable set is required.<br />
Installation:<br />
The Car-specific cable A is always fitted <strong>with</strong> the Muteboxes and delivered<br />
together <strong>with</strong> the Carkit-extension cable B. Warning: Before<br />
you disconnect any connectors be sure to remove the key form the<br />
ignition barrel. Otherwise you will receive an error message in the<br />
info display which can only be reset by an authorised <strong>Volvo</strong> repair<br />
shop.<br />
1<br />
9<br />
5<br />
B<br />
6<br />
C<br />
7<br />
8<br />
D<br />
10<br />
Pictures of a <strong>Volvo</strong> XC90<br />
1a. V/S series: Start by removing the trim panel in the left side of<br />
the boot. Behind this panel the amplifier should be found.<br />
1b. XC70 & XC90: Start by pushing back the front seat to it's rearmost<br />
position. Under the seat the amplifier will become visible.<br />
1c. C30: Start by removing the interior panel around the bass<br />
speaker to the right of the right back seat. Afterwards remove the<br />
whole speaker module. The amplifier is located behind this speaker<br />
module.<br />
2a. V/S series: Disconnect the amplifier connectors.<br />
2b. XC70 & XC90: The amplifier is hold in place <strong>with</strong> tree bolts.<br />
These bolts will have to be removed and the amplifier and it's connectors<br />
dismounted. Warning: Be careful not to kink or break the<br />
orange optical wires as the are fragile. It is an good idea to disconnect<br />
the connector <strong>with</strong> these wires as one of the first.<br />
2c. C30: Disconnect the amplifier connectors.<br />
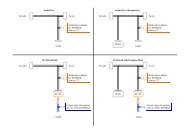
3. Now the car specific cable set A can be connected between<br />
the amplifier and the connectors on the cars wiring loom. Connector 1<br />
& 2 are connected to the amplifiers speaker output connector and the<br />
connector on the cars wiring loom. Afterwards connector 3 & 4 are<br />
connected to the amplifiers power connector and the connector on the<br />
cars wiring loom.<br />
4. Install the Carkit-extension cable. Start by connecting the extension<br />
cable between connector 5 from the car-specific cable A and<br />
connector 6 from Carkit adaptor C. The Carkit-extension cable B has to<br />
be drawn from the amplifier unit and forward to the chosen position<br />
of the carkit D (under the steering wheel is recommended).<br />
5. Install the Carkit. The carkit is unwrapped. The original speaker<br />
and power-supply loom are not used <strong>with</strong> this cableset. Connector 7<br />
from the carkit cable C is connected to the carkit power-supply input<br />
and connector 8 is connected to the carkits speaker output.<br />
6. Connect the Ignition wire. The ignition wire is pre-fitted to most common ignition source. The ignition wire<br />
from the carkit is connected to a blue fly wire 9 <strong>with</strong> a male bullet connector. If no ignition is required the blue fly<br />
wire can be connected to the Constant 12v bullet. The mute wire 10 is not used <strong>with</strong> this cable set.<br />
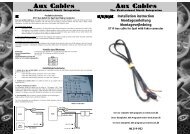
Speaker connector<br />
1. is connected to<br />
the speaker connectors<br />
on the cars<br />
wiring loom.<br />
Pictures of connectors on cable set<br />
Speaker connector<br />
2. is connected to<br />
the speaker output<br />
on the amplifier.<br />
Power connector 3.<br />
is connected to the<br />
power connector<br />
on the cars wiring<br />
loom.<br />
Trouble shooting guide<br />
See our complete Mute program on our website www.kram.dk<br />
Power connector 4.<br />
is connected to the<br />
power connector<br />
on the amplifier.<br />
No power: Remember to connect the blue flywire (see point 5 on previous page). Check for a blown fuse<br />
in the two fuse-holders on the car-specific cable.<br />
No sound: First disconnect the carkit adaptor. Then check if the yellow mute wire on the carkit adaptor<br />
goes low when making a call and high when the telephone is inactive. Second check if there is sound<br />
when connecting the original carkit speaker. If any of these conditions are not met the carkit is defective.<br />
Telephone sound comes out of the center speaker: Please make sure that box 1 is connected to the 8<br />
pin connector <strong>with</strong> the gray, green, violet and white wires. And that the 6 pin HF connector <strong>with</strong> the<br />
white wires is connected to box 1 and not box 2.