CMKF99-7300-ZP8-AC Installation Instructions - Muncie Power ...
CMKF99-7300-ZP8-AC Installation Instructions - Muncie Power ...
CMKF99-7300-ZP8-AC Installation Instructions - Muncie Power ...

You also want an ePaper? Increase the reach of your titles
YUMPU automatically turns print PDFs into web optimized ePapers that Google loves.
<strong>Muncie</strong><br />
<strong>Power</strong><br />
Products<br />
<strong>CMKF99</strong>-<strong>7300</strong>-<strong>ZP8</strong>-<strong>AC</strong><br />
1999-2002 Ford Truck 250-550<br />
7.3 Direct Injected Intercooled Diesel<br />
W-WO/<strong>AC</strong> or Dual Alternator<br />
INSTALLATION NOTES<br />
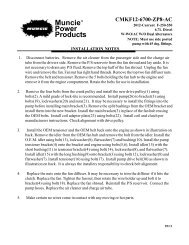
1. Disconnect negative battery terminals. Drain radiator until the coolant level is below the<br />
thermostat. Remove the upper radiator hose. Remove the fan and fan shroud. (Fan nut has<br />
right hand threads).<br />
2. Install drive pulley (1) on the front of the harmonic balancer with bolts (2)<br />
and lockwashers (3).<br />
3. Remove plastic 7.3 cover and it's mounting bracket from the top of engine. Unload belt<br />
tensioner and remove belt. Remove alternator from bracket and lay on top of engine.<br />
4. Use powersteering pulley puller, (Snap-On PN# CJ117, M<strong>AC</strong> PN# PP7185M or it's<br />
equivalent) to remove powersteering pulley. Unbolt the three bolts holding the<br />
powersteering pump to the bracket, do not remove hoses from PS pump. Remove the<br />
four bolts holding the powersteering and alternator bracket to the engine and remove the<br />
bracket.<br />
5. Install the new alternator and pump bracket (4) onto the engine using bolts (9 & 10) with<br />
lockwashers (11). Bolt the powersteering pump onto the new bracket using the O.E.M. bolts.<br />
Install the powersteering pulley onto the powersteering pump using a pulley installation tool,<br />
(Snap On PN# CJ113B, Mac PN# PP7005M or it's equivalent). Install the alternator onto<br />
bracket (4) using O.E.M. bolts. Install O.E.M. serpentine belt.<br />
NOTE: Since the alternator location was altered, the O.E.M. belt may fit slightly tighter.<br />
6. Install pump (21) onto the pump plate (5) using bolts (13), flatwashers (14), lockwashers (15)<br />
and nuts (16). Torque bolts to 35 ft/lbs.. Install the coil adapter plate (24) to the pump plate<br />
with bolts (25). Install the coil and clutch pulley as per manufacturer’s instructions. Install<br />
the pump and plate assembly onto the main bracket (4) using bolts (12), flatwashers (14) and<br />
lockwashers (15).<br />
7. Install spring loaded tensioner (6) onto the tensioner boss (making sure that the line-up pin is<br />
in place) with bolt (7) and lockwasher (8), tighten.<br />
8. Install the serpentine belt over the drive pulley and clutch pump pulley. With a 5/8” wrench,<br />
load the tensioner until it bottoms out. Slide the belt into place and release the tensioner.<br />
9. Rotate the upper radiator hose so the radiator end is to the engine. Cut the hose<br />
approximately 8" from the short 90° bend, splice in the steel bent tube (18) using clamps<br />
(19). Install radiator hose and refill coolant. Use tie strap through hole in the front of the<br />
bracket just under the alternator to secure the radiator hose. Connect battery terminal.<br />
CAUTION: Check all engine compartment vacuum hoses and electrical wiring that may have<br />
been disturbed or re-routed during kit installation to be sure that hoses are not kinked, that<br />
they do not touch any high temperature item, and that they do not interfere with any linkage<br />
components.<br />
2/02
<strong>CMKF99</strong>-<strong>7300</strong>-<strong>ZP8</strong>-<strong>AC</strong><br />
1999-2002 Ford Truck 250-550<br />
7.3 D.I.T. Intercooled Diesel<br />
W-WO/<strong>AC</strong>/Dual Alternator<br />
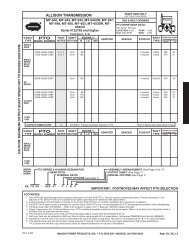
CAUTION: Due to limited space available in the engine<br />
compartment, the pump is mounted directly under the hood light.<br />
Check clearance between the light and the pump before closing<br />
the hood. If there is not enough clearance, relocate the hood light<br />
to provide clearance.<br />
21<br />
16<br />
15<br />
14<br />
16<br />
15<br />
14<br />
15<br />
12<br />
5<br />
O.E.M.<br />
13<br />
13<br />
14<br />
24<br />
25<br />
22<br />
26<br />
23<br />
28<br />
27<br />
1<br />
2<br />
3<br />
11<br />
2 3 2 3<br />
9<br />
10<br />
4<br />
6<br />
11<br />
O.E.M.<br />
Belt Routing<br />
1. FPC 65812 (1)<br />
2. 10mm x 40mm 1.5 (3)<br />
3. 10mm LW (3)<br />
4. FMB 660 (1)<br />
5. FMP 66L (1)<br />
IPKD-668 (items 6-8)<br />
6. Dayco 89202-TIPCS (1)<br />
7. 12mm x 90mm 1.5 (1)<br />
8. 12mm LW (1)<br />
9. 10mm x 140mm 1.5 (3)<br />
10. 10mm x 80mm 1.5 (1)<br />
11. 10mm LW (4)<br />
12. 3/8 x 1 NC (4)<br />
13. 3/8 x 1 1/2 NC (2)<br />
14. 3/8 FW (6)<br />
15. 3/8 LW (6)<br />
16. 3/8 NC Nut (2)<br />
Note: With 6” Clutch-5080685 Belt<br />
PARTS LIST<br />
8 7 17a<br />
9<br />
11<br />
17b<br />
17c<br />
17d<br />
O.E.M.<br />
9<br />
11<br />
GPKDF 66-8 Assembly (items 17a-17d)<br />
17a. FMB662 (1)<br />
17b. IPW 14 Shim (4)<br />
17c. GPCD8P (1)<br />
17d. 5/8 x 2 1/2 NC (1)<br />
18. F66 Rad. Line (Not Shown) (1)<br />
19. #28 Hose Clamp (Not Shown) (2)<br />
20. Belt (Not Shown) (1)<br />
With 5-1/2” Clutch-Dayco # 5080675<br />
21. Pump (Sold Separately)<br />
22. Coil (Sold Separately)<br />
23. Clutch Pulley (Sold Seperately)<br />
24. Clutch Mtg Plate<br />
25. 1/4 X 3/4 NC FHSCS (4)<br />
26. Capscrew-19T34530 (3)(t=8-10 ft/lbs)<br />
27. Capscrew-19T38756 (1)(t=20 ft/lbs)<br />
28. Flat Washer- 21MZ3487 (1)<br />
1/02