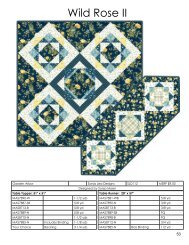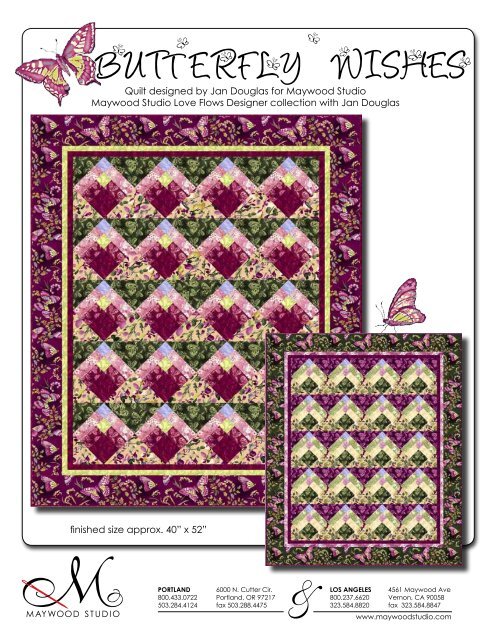
Quilt designed by Jan Douglas for Maywood ... - EE Schenck Co
Quilt designed by Jan Douglas for Maywood ... - EE Schenck Co
Quilt designed by Jan Douglas for Maywood ... - EE Schenck Co

Create successful ePaper yourself
Turn your PDF publications into a flip-book with our unique Google optimized e-Paper software.
<strong>Quilt</strong> <strong>designed</strong> <strong>by</strong> <strong>Jan</strong> <strong>Douglas</strong> <strong>for</strong> <strong>Maywood</strong> Studio<br />
<strong>Maywood</strong> Studio Love Flows Designer collection with <strong>Jan</strong> <strong>Douglas</strong><br />
finished size approx. 40” x 52”<br />
PORTLAND 6000 N. Cutter Cir.<br />
800.433.0722 Portland, OR 97217<br />
503.284.4124 fax 503.288.4475<br />
LOS ANGELES 4561 <strong>Maywood</strong> Ave<br />
800.237.6620 Vernon, CA 90058<br />
323.584.8820 fax 323.584.8847<br />
www.maywoodstudio.com
Cutting<br />
Fabric A (Both Versions)<br />
Cut (3) 4-1/2” x 42” strips.<br />
<strong>Quilt</strong> <strong>designed</strong> <strong>by</strong> <strong>Jan</strong> <strong>Douglas</strong> <strong>for</strong> <strong>Maywood</strong> Studio<br />
<strong>Maywood</strong> Studio Love Flows Designer collection with <strong>Jan</strong> <strong>Douglas</strong><br />
Fabric A (Pink Border Version only)<br />
Cut (6) 1-1/2” x 42” strips <strong>for</strong> Border 1.<br />
Piece the strips together to make:<br />
(2) 1-1/2” x 47-3/4” strips.<br />
(2) 1-1/2” x 57” strips.<br />
Cut (7) 2-1/2” x 42” strips <strong>for</strong> Binding.<br />
Fabric G<br />
Cut (3) 8-7/8” x 42” strips into:<br />
(10) 8-7/8” squares.<br />
Cut (1)12-1/2” square<br />
cut diagonally twice into<br />
(4) quarter square triangles.<br />
Cut (2) 6-1/2” squares<br />
cut diagonally twice into<br />
(4) quarter square triangles.<br />
Fabric B<br />
Cut (3) 2-1/2” x 42” strips.<br />
Cut (2) 4-1/2” x 42” strips.<br />
Fabric C<br />
Cut (2) 2-1/2” x 42”strips.<br />
Cut (6) 1-1/2” strips <strong>for</strong> Border 2.<br />
Piece the strips together to make:<br />
(2) 1-1/2” x 49-3/4” strips.<br />
(2) 1-1/2” x 59” strips.<br />
Fabric D<br />
Cut (2) 6-1/2” x 42” strips.<br />
Cut (4) 2-1/2” x 42” strips into:<br />
(20) 2-1/2” x 6-1/2” rectangles.<br />
Fabric E<br />
Cut (2) 2-1/2” x 42” strips.<br />
Fabric F<br />
Cut (3) 8-7/8” x 42” strips into:<br />
(10) 8-7/8” squares.<br />
Cut(1)12-1/2” square<br />
cut diagonally twice into<br />
(4) quarter square triangles.<br />
Cut (2) 6-1/2” squares<br />
cut diagonally twice into<br />
(4) quarter square triangles.<br />
Fabric H<br />
Cut (2) 6” x 60-3/4” strips lengthwise<br />
<strong>for</strong> Border 3.<br />
Cut (2) 6” x 61” strips lengthwise<br />
<strong>for</strong> Border 3.<br />
Fabric I (Green Border Version only)<br />
Cut (6) 1-1/2” x 42” strips <strong>for</strong> Border 1.<br />
Piece the strips together to make:<br />
(2) 1-1/2” x 47 ¾” strips.<br />
(2) 1-1/2” x 57” strips.<br />
Cut (7) 2-1/2” x 42” strips <strong>for</strong> Binding.<br />
Backing<br />
Cut (2) 72” x 42” strips.<br />
Sew the strips together to make one 72” x 83”<br />
backing piece.<br />
Always use an accurate 1/4” seam allowance.<br />
To test, cut three strips of scrap fabric EXACTLY<br />
2-1/2” x 6-1/2”. Sew the strips together lengthwise<br />
and press all seams to one side. Your<br />
finished piece should measure 6-1/2” x 6-1/2”.<br />
Adjust the width of your 1/4” seam until you<br />
obtain accuracy.
<strong>Co</strong>nstruction<br />
Main Blocks<br />
6. Sew the Step 5 unit to the Step 4 unit. Make 20.<br />
1. Sew a 2-1/2” Fabric B strip to a 4-1/2” Fabric A<br />
strip. Make 3 strip combinations. Cut into (20)<br />
4-1/2” segments.<br />
Alternate Blocks<br />
2. Sew the 2-1/2” Fabric C strip to the 4-1/2” Fabric<br />
B strip. Make 2 strip combinations. Cut into<br />
(20)2-1/2” segments.<br />
7. Using 10 of the 8-7/8” squares, layer a Fabric G<br />
square on top of a Fabric F square. On the back<br />
of the Fabric G square, mark a diagonal line<br />
from corner to corner. Sew 1/4” from each side<br />
of the diagonal line. Cut on drawn line to make<br />
two half square triangle blocks. Press open.<br />
Make 20.<br />
3. Sew the Step 2 unit to the Step 1 unit. Make 20.<br />
4. Sew a 2-1/2” x 6-1/2” Fabric D rectangle to one<br />
side of each Step 3 unit.<br />
5. Sew the Fabric E strip to the 6-1/2” Fabric D strip.<br />
Repeat. Cut into 2-1/2” segments.
Assembly Instructions:<br />
8. Using the main blocks and alternate blocks assemble quilt center in diagonal rows as shown, adding 3<br />
each of Fabric F and Fabric G quarter square triangles along the top and bottom, and the half square<br />
triangles from fabrics F and G into the corners as shown. Trim alternate blocks along sides of quilt top to<br />
1/4” from outside corners of main blocks. See diagrams below.<br />
9. Sew one 1-1/2” x 57” Border 1 strip to each side<br />
of the quilt top. Sew one 1-1/2” x 47 ¾” Border 1<br />
strip to the top and bottom.<br />
10. Sew one 1-1/2” x 59” Border 2 strip to each side<br />
of the quilt top. Sew one 1-1/2” x 49 ¾” Border 2<br />
strip to top and bottom.<br />
11. Sew one 6” x 61” Border 3 strip to each side of<br />
the quilt top. Sew one 6” x 60 ¾” Border 3 strip to<br />
top and bottom.<br />
12. Layer and quilt as desired.<br />
13. Sew the (7) Binding strips together end-to-end<br />
using a diagonal seam to make the binding, fold<br />
in half lengthwise, and attach to quilt.
Fabric<br />
Pink Border Version 1<br />
Fabric A.........1-1/4 yard<br />
Dark Pink Texture<br />
MAS1966-P<br />
Green Border Version 2<br />
Fabric A.........5/8 yard<br />
Green Butterfly Texture<br />
MAS1964-G<br />
Fabric B..........5/8 yard<br />
Dark Pink Butterfly Texture<br />
MAS1964-P<br />
Fabric B..........5/8 yard<br />
Cream Texture<br />
MAS1966-E<br />
Fabric C.........5/8 yard<br />
Light Green Texture<br />
MAS1966-G2<br />
Fabric C.........5/8 yard<br />
Violet Floral Texture<br />
MAS1962-V<br />
7/8 yard<br />
Pink Floral Texture<br />
MAS1962-P<br />
Fabric D.........7/8 yard<br />
Green Floral Texture<br />
MAS1962-G<br />
Fabric E..........3/8 yard<br />
Light Violet Texture<br />
MAS1966-V2<br />
Fabric E..........3/8 yard<br />
Light Violet Texture<br />
MAS1966-V2<br />
Fabric F..........1-1/4 yard<br />
Green Butterfly Texture<br />
MAS1964-G<br />
Fabric F..........1-1/4 yard<br />
Violet Butterfly Texture<br />
MAS1964-V<br />
Fabric G.........1-1-4 yard<br />
Multi Print<br />
MAS1961-P<br />
Fabric G.........1-1/4 yard<br />
Multi Print<br />
MAS1961-G<br />
Fabric H.........2-1/4 yards<br />
Pink Butterflies<br />
MAS1965-V<br />
Fabric H.........2-1/4 yards<br />
Green Butterflies<br />
MAS1965-G<br />
Backing.........4 yards<br />
Recommended<br />
MAS1963-P<br />
Fabric I...........7/8 yard<br />
Dark Violet Texture<br />
MAS1966-V<br />
Backing.........4 yards<br />
Recommended<br />
MAS1964-V