Set Up the Software Connect the Cables Mount the ... - Compro
Set Up the Software Connect the Cables Mount the ... - Compro
Set Up the Software Connect the Cables Mount the ... - Compro

Create successful ePaper yourself
Turn your PDF publications into a flip-book with our unique Google optimized e-Paper software.
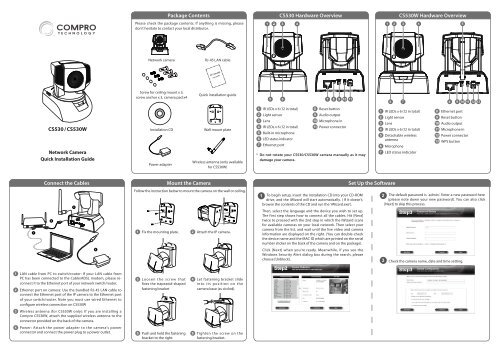
Package Contents CS530 Hardware Overview CS530W Hardware Overview<br />
Please check <strong>the</strong> package contents. If anything is missing, please<br />
don’t hesitate to contact your local distributor.<br />
Network camera<br />
RJ-45 LAN cable<br />
Screw for ceiling mount x 3,<br />
screw anchor x 3, camera pad x4<br />
Quick installation guide<br />
CS530 / CS530W<br />
Network Camera<br />
Quick Installation Guide<br />
Installation CD<br />
Power adapter<br />
Wall mount plate<br />
Wireless antenna (only available<br />
for CS530W)<br />
IR LEDs x 6 (12 in total)<br />
Light sensor<br />
Lens<br />
IR LEDs x 6 (12 in total)<br />
Built-in microphone<br />
LED status indicator<br />
E<strong>the</strong>rnet port<br />
Reset button<br />
Audio output<br />
Microphone in<br />
Power connector<br />
* Do not rotate your CS530/CS530W camera manually as it may<br />
damage your camera.<br />
2x<br />
2x<br />
IR LEDs x 6 (12 in total)<br />
Light sensor<br />
Lens<br />
IR LEDs x 6 (12 in total)<br />
Detachable wireless<br />
antenna<br />
Microphone<br />
LED status indicator<br />
E<strong>the</strong>rnet port<br />
Reset button<br />
Audio output<br />
Microphone in<br />
Power connector<br />
WPS button<br />
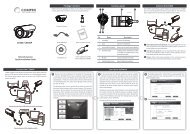
<strong>Connect</strong> <strong>the</strong> <strong>Cables</strong><br />
<strong>Mount</strong> <strong>the</strong> Camera<br />
Follow <strong>the</strong> instruction below to mount <strong>the</strong> camera on <strong>the</strong> wall or ceiling.<br />
Fix <strong>the</strong> mounting plate. Attach <strong>the</strong> IP camera.<br />
To begin setup, insert <strong>the</strong> installation CD into your CD-ROM<br />
drive, and <strong>the</strong> iWizard will start automatically. ( If it doesn’t,<br />
browse <strong>the</strong> contents of <strong>the</strong> CD and run <strong>the</strong> ‘iWizard.exe’).<br />
Then, select <strong>the</strong> language and <strong>the</strong> device you wish to set up.<br />
The first step shows how to connect all <strong>the</strong> cables. Hit [Next]<br />
twice to proceed with <strong>the</strong> 2nd step in which <strong>the</strong> iWizard scans<br />
for available cameras on your local network. Then select your<br />
camera from <strong>the</strong> list, and wait until <strong>the</strong> live video and camera<br />
information are displayed on <strong>the</strong> right. (You can double-check<br />
<strong>the</strong> device name and <strong>the</strong> MAC ID which are printed on <strong>the</strong> serial<br />
number sticker on <strong>the</strong> back of <strong>the</strong> camera and on <strong>the</strong> package).<br />
Click [Next] when you’re ready. Meanwhile, if you see <strong>the</strong><br />
Windows Security Alert dialog box during <strong>the</strong> search, please<br />
choose [Unblock].<br />
<strong>Set</strong> <strong>Up</strong> <strong>the</strong> <strong>Software</strong><br />
The default password is `admin.’ Enter a new password here<br />
(please note down your new password). You can also click<br />
[Next] to skip this process.<br />
Check <strong>the</strong> camera name, date and time setting.<br />
LAN cable from PC to switch/router: If your LAN cable from<br />
PC has been connected to <strong>the</strong> Cable/ADSL modem, please reconnect<br />
it to <strong>the</strong> E<strong>the</strong>rnet port of your network switch/router.<br />
E<strong>the</strong>rnet port on camera: Use <strong>the</strong> bundled RJ-45 LAN cable to<br />
connect <strong>the</strong> E<strong>the</strong>rnet port of <strong>the</strong> IP camera to <strong>the</strong> E<strong>the</strong>rnet port<br />
of your switch/router. Note you must use wired E<strong>the</strong>rnet to<br />
configure wireless connection on CS530W<br />
Wireless antenna (for CS530W only): If you are installing a<br />
<strong>Compro</strong> CS530W, attach <strong>the</strong> supplied wireless antenna to <strong>the</strong><br />
connector provided on <strong>the</strong> back of <strong>the</strong> camera.<br />
Power: Attach <strong>the</strong> power adapter to <strong>the</strong> camera’s power<br />
connector and connect <strong>the</strong> power plug to a power outlet.<br />
Loosen <strong>the</strong> screw that<br />
fixes <strong>the</strong> trapezoid-shaped<br />
fastening bracket<br />
Push and hold <strong>the</strong> fastening<br />
bracket to <strong>the</strong> right.<br />
Let fastening bracket slide<br />
into its position on <strong>the</strong><br />
camera base (as circled).<br />
Tighten <strong>the</strong> screw on <strong>the</strong><br />
fastening bracket.
<strong>Set</strong> <strong>Up</strong> <strong>the</strong> <strong>Software</strong> (Continued)<br />
Choose whe<strong>the</strong>r to use Seedonk service to remotely access your<br />
camera. You may also use a different Seedonk server by clicking on<br />
[Advanced <strong>Set</strong>tings]. (If Seedonk service is enabled, iDDNS service will<br />
not be available for use on <strong>the</strong> camera.)<br />
Select <strong>the</strong> orientation of your IP camera.<br />
Enter <strong>the</strong> correct passphrase, and choose <strong>the</strong> IP address<br />
configuration.<br />
(Skip here if you didn’t enable Seedonk service.) You need to<br />
log in to your Seedonk account. If you don’t have a Seedonk<br />
account yet, choose to create a Seedonk account and continue<br />
with account registration.<br />
Choose to have <strong>the</strong> camera obtain IP address automatically<br />
(DHCP) or manually assign its IP address. Then set <strong>the</strong><br />
connection port and local power line frequency settings (not<br />
available for change when Seedonk service is enabled)<br />
(Skip here if you are not using wireless connection.) If you are<br />
installing <strong>Compro</strong> CS530W, you can choose to use wireless<br />
LAN. Please click [Yes] to connect wirelessly by default. The<br />
wizard will search for available access points. Then select one<br />
access point.<br />
(Skip here if you enabled Seedonk service) If you are using<br />
floating IP, you can use DDNS service and create a hostname<br />
that links to your camera’s IP address. Click [Yes] and input<br />
an address name. Then click [Check Availability] button. For<br />
complete information on <strong>Compro</strong> iDDNS, refer to <strong>the</strong> user<br />
manual in <strong>the</strong> installation CD.<br />
After logging on to your Seedonk account, you may click on<br />
[Download and Install] to install Seedonk Messenger. Or click<br />
on [Next] to do so later manually.<br />
The iWizard starts programming your camera based on your<br />
settings. Please wait patiently and DO NOT interrupt <strong>the</strong><br />
process.<br />
The iWizard performs system diagnosis based on your<br />
network settings and alert you for inappropriate settings<br />
(marked with a question mark icon).<br />
<strong>Set</strong> <strong>Up</strong> <strong>the</strong> <strong>Software</strong> (Continued)<br />
The iWizard indicates <strong>the</strong> setup has completed successfully.<br />
You can click on <strong>the</strong> URL to view <strong>the</strong> live video now. Click [Yes]<br />
if you wish you set up ano<strong>the</strong>r camera from scratch.<br />
View Live Camera Video<br />
Using PC<br />
Follow <strong>the</strong> steps below to access your camera via WebVUer on<br />
Internet Explorer:<br />
1. Open <strong>the</strong> Internet Explorer on your Windows system.<br />
2. Enter <strong>the</strong> camera’s IP address in <strong>the</strong> address bar. (e.g.<br />
192.168.0.100).<br />
3. A dialog box that requests <strong>the</strong> user name and password appears;<br />
enter a valid user name and password, and <strong>the</strong>n press OK. The<br />
default user name and password are both `admin.’<br />
4. Meanwhile, a Windows security warning dialog box may appear.<br />
Please click [Run] to run <strong>the</strong> camera’s application.<br />
5. Now you can start using WebVUer on Internet Explorer to watch<br />
live video and manage your network camera.<br />
Using Smartphone<br />
If you have enabled <strong>the</strong> Seedonk service for your camera, you can log in<br />
to <strong>the</strong> iPhone App Store or Google Play Store on your smartphone and<br />
download <strong>the</strong> Seedonk Camera Viewer app. Then log in to <strong>the</strong> Seedonk<br />
Camera Viewer to view and manage your <strong>Compro</strong> network cameras.<br />
<strong>Compro</strong> Technical Support Information<br />
Before you request technical support, please check <strong>the</strong> troubleshooting<br />
section in <strong>the</strong> user manual. You may fill out <strong>the</strong> online form (www.<br />
comprousa.com/feedback/) or directly email to support@comprousa.com.<br />
<strong>Compro</strong> Technology, Inc.<br />
www.comprosecurity.com | Tel. +886 2 2918 0169 | Fax +886 2 2915 2389<br />
3F, No.12, Alley 6, Lane 45, Pao Shin Road, Hsintien District, New Taipei City 231, Taiwan<br />
© 2012 <strong>Compro</strong> Technology, Inc. All rights reserved.<br />
Trademark<br />
<strong>Compro</strong> Technology is <strong>the</strong> registered logo of <strong>Compro</strong> Technology,<br />
Inc.<br />
Seedonk and Seedonk Messenger are registered trademarks<br />
of Seedonk Inc. All o<strong>the</strong>r company and product names mentioned in this<br />
document are registered trademarks of <strong>the</strong> respective companies.<br />
Restriction & Disclaimer<br />
No part of this document may be copied or reproduced in any form or by any means<br />
without <strong>the</strong> prior written consent of <strong>Compro</strong> Technology, Inc. <strong>Compro</strong> Technology<br />
makes no warranties with respect to this documentation and disclaims any implied<br />
warranties of merchantability, quality, or fitness for any particular purpose. The<br />
information in this document is subject to change without prior notice.<br />
FCC Information<br />
This device complies with Part 15 of <strong>the</strong> FCC Rules. Operation is subject<br />
to <strong>the</strong> following two conditions: (1) This device may not cause harmful<br />
interference, and (2) This device must accept any interference received,<br />
including interference that may cause undesired operation.<br />
<strong>Compro</strong> CS530W FCC ID : HXICS530W<br />
Refer to <strong>the</strong> user's manual on <strong>the</strong> installation CD for detailed information<br />
P/N: 3GA0310786<br />
Pub. 13JUL12