X5-210M User's Manual
X5-210M User's Manual
X5-210M User's Manual

You also want an ePaper? Increase the reach of your titles
YUMPU automatically turns print PDFs into web optimized ePapers that Google loves.
<strong>X5</strong>-<strong>210M</strong> <strong>User's</strong> <strong>Manual</strong>
<strong>X5</strong>-<strong>210M</strong> <strong>User's</strong> <strong>Manual</strong><br />
<strong>X5</strong>-<strong>210M</strong> <strong>User's</strong> <strong>Manual</strong><br />
The <strong>X5</strong>-<strong>210M</strong> <strong>User's</strong> <strong>Manual</strong> was prepared by the technical staff of Innovative Integration on November 29, 2011.<br />
For further assistance contact:<br />
Innovative Integration<br />
2390-A Ward Ave<br />
Simi Valley, California 93065<br />
PH: (805) 578-4260<br />
FAX: (805) 578-4225<br />
email: techsprt@innovative-dsp.com<br />
Website: www.innovative-dsp.com<br />
This document is copyright 2011 by Innovative Integration. All rights are reserved.<br />
VSS \ Distributions \ <strong>X5</strong>-<strong>210M</strong> \ Documentation \ <strong>Manual</strong> \ <strong>X5</strong>-<strong>210M</strong>Master.odm<br />
#XXXXXX<br />
Rev 1.03<br />
<strong>X5</strong>-<strong>210M</strong> <strong>User's</strong> <strong>Manual</strong> 2
Table of Contents<br />
<strong>X5</strong>-<strong>210M</strong> <strong>User's</strong> <strong>Manual</strong><br />
Table of Contents<br />
List of Tables..........................................................................................................................................................7<br />
List of Figures.........................................................................................................................................................8<br />
Introduction............................................................................................................................................................................9<br />
Real Time Solutions!..............................................................................................................................................................9<br />
Vocabulary.............................................................................................................................................................................9<br />
What is <strong>X5</strong>-<strong>210M</strong>? ...............................................................................................................................................10<br />
What is Malibu? ...................................................................................................................................................10<br />
What is C++ Builder?...........................................................................................................................................10<br />
What is DialogBlocks?.........................................................................................................................................10<br />
What is wxWidgets?.............................................................................................................................................11<br />
What is Microsoft MSVC?...................................................................................................................................11<br />
What kinds of applications are possible with Innovative Integration hardware?.................................................11<br />
Why do I need to use Malibu with my Baseboard?..............................................................................................11<br />
Finding detailed information on Malibu...............................................................................................................12<br />
Online Help......................................................................................................................................................................12<br />
Innovative Integration Technical Support........................................................................................................................12<br />
Innovative Integration Web Site......................................................................................................................................12<br />
Typographic Conventions...................................................................................................................................................13<br />
Windows Installation...........................................................................................................................................................14<br />
Host Hardware Requirements............................................................................................................................................14<br />
Software Installation...........................................................................................................................................................14<br />
Starting the Installation ...................................................................................................................................................15<br />
The Installer Program.......................................................................................................................................................16<br />
Tools Registration................................................................................................................................................................18<br />
Bus Master Memory Reservation Applet.............................................................................................................18<br />
Hardware Installation.........................................................................................................................................................19<br />
After Power-up.....................................................................................................................................................................20<br />
Installation on a Deployed System.....................................................................................................................................20<br />
Running MalibuRed.........................................................................................................................................................20<br />
Mem Driver Installation Windows ..................................................................................................................................22<br />
Installation on Linux...........................................................................................................................................................26<br />
Package File Names..............................................................................................................................................26<br />
Prerequisites for Installation..................................................................................................................26<br />
The Redistribution Package Group - MalibuRed.................................................................................26<br />
Malibu.......................................................................................................................................................27<br />
Other Software.........................................................................................................................................27<br />
Baseboard Package Installation Procedure...........................................................................................27<br />
Board Packages........................................................................................................................................28<br />
Unpacking the Package...........................................................................................................................28<br />
<strong>X5</strong>-<strong>210M</strong> <strong>User's</strong> <strong>Manual</strong> 3
Table of Contents<br />
<strong>X5</strong>-<strong>210M</strong> <strong>User's</strong> <strong>Manual</strong><br />
Creating Symbolic Links......................................................................................................................................29<br />
Completing the Board Install..................................................................................................................29<br />
Linux Directory Structure......................................................................................................................29<br />
Applets..................................................................................................................................................................29<br />
Documentation......................................................................................................................................................29<br />
Examples...............................................................................................................................................................29<br />
Hardware...............................................................................................................................................................30<br />
Mem Driver Installation Linux..........................................................................................................................................31<br />
Hardware Installation.........................................................................................................................................................35<br />
Compatible Host Cards.......................................................................................................................................................35<br />
System Requirements..........................................................................................................................................................40<br />
Power Considerations..........................................................................................................................................................40<br />
Mechanical Considerations.................................................................................................................................................41<br />
About the <strong>X5</strong> XMC Modules..............................................................................................................................................42<br />
<strong>X5</strong> XMC Architecture.........................................................................................................................................................42<br />
<strong>X5</strong> Computing Core.............................................................................................................................................................44<br />
<strong>X5</strong> PCI Express Interface...................................................................................................................................................45<br />
Data Buffering and Memory Use.......................................................................................................................................46<br />
Computational SRAM..........................................................................................................................................46<br />
Data Buffer DRAM..............................................................................................................................................46<br />
Serial EEPROM Interface..................................................................................................................................................47<br />
EEPROM..............................................................................................................................................................47<br />
Digital I/O.............................................................................................................................................................................48<br />
Available Bit I/O..............................................................................................................................................................48<br />
Software Support..............................................................................................................................................................48<br />
Digital IO Electrical Characteristics................................................................................................................................50<br />
LVTTL Pins..........................................................................................................................................................50<br />
LVCMOS 2.5 Pins................................................................................................................................................51<br />
Notes on Digital IO Use...................................................................................................................................................51<br />
P16 SERDES I/O..................................................................................................................................................................52<br />
Thermal Protection and Monitoring..................................................................................................................................53<br />
Thermal Failures.................................................................................................................................................................54<br />
Led Indicators......................................................................................................................................................................55<br />
LEDs NOT Lit with FrameWork Logic Installed............................................................................................................55<br />
JTAG Scan Path..................................................................................................................................................................55<br />
FrameWork Logic...............................................................................................................................................................56<br />
Integrating with Host Cards and Systems.........................................................................................................................56<br />
Standalone Operation..........................................................................................................................................................57<br />
Updating the XMC logic Configuration EEPROM..........................................................................................................58<br />
Rescuing the Card When the Logic Image is Bad...........................................................................................................59<br />
Writing Custom Applications.............................................................................................................................................61<br />
The Snap Example...............................................................................................................................................................61<br />
Tools Required.................................................................................................................................................................61<br />
Program Design................................................................................................................................................................62<br />
The Host Application ..........................................................................................................................................................62<br />
User Interface...................................................................................................................................................................62<br />
<strong>X5</strong>-<strong>210M</strong> <strong>User's</strong> <strong>Manual</strong> 4
Table of Contents<br />
<strong>X5</strong>-<strong>210M</strong> <strong>User's</strong> <strong>Manual</strong><br />
Configure Tab.......................................................................................................................................................62<br />
Setup Tab..............................................................................................................................................................63<br />
Stream Tab............................................................................................................................................................64<br />
Host Side Program Organization..........................................................................................................................64<br />
ApplicationIo....................................................................................................................................................................65<br />
Initialization..........................................................................................................................................................65<br />
Starting Data flow.................................................................................................................................................68<br />
Handle Data Available..........................................................................................................................................71<br />
EEProm Access.....................................................................................................................................................73<br />
The Linux Snap Example....................................................................................................................................................75<br />
The ApplicationIo Class.......................................................................................................................................75<br />
User Interface...................................................................................................................................................................75<br />
Configure Tab.......................................................................................................................................................76<br />
Setup Tab..............................................................................................................................................................77<br />
Stream Tab............................................................................................................................................................78<br />
The Wave Example..............................................................................................................................................................78<br />
Stream Initialization..............................................................................................................................................78<br />
Data Required Event Handler...............................................................................................................................81<br />
The Wave Example for Linux............................................................................................................................................82<br />
The ApplicationIo Class.......................................................................................................................................82<br />
User Interface...................................................................................................................................................................82<br />
Developing Host Applications.............................................................................................................................................83<br />
Applets..................................................................................................................................................................................84<br />
Common Applets.................................................................................................................................................................84<br />
Registration Utility (NewUser.exe).................................................................................................................................84<br />
Reserve Memory Applet (ReserveMemDsp.exe)...........................................................................................................84<br />
Data Analysis Applets..........................................................................................................................................................85<br />
Binary File Viewer Utility (BinView.exe).......................................................................................................................85<br />
Applets for the <strong>X5</strong>-<strong>210M</strong> Baseboard..................................................................................................................................86<br />
Logic Update Utility (VsProm.exe).................................................................................................................................86<br />
Finder...............................................................................................................................................................................87<br />
<strong>X5</strong>-<strong>210M</strong> XMC Module.......................................................................................................................................................88<br />
Introduction..........................................................................................................................................................................88<br />
Hardware Features..............................................................................................................................................................90<br />
A/D Converters................................................................................................................................................................90<br />
A/D Front End..................................................................................................................................................................90<br />
Input Range and Conversion Codes.................................................................................................................................91<br />
Driving the A/D Inputs.....................................................................................................................................................92<br />
Overrange Detection........................................................................................................................................................92<br />
Sample Rate Generation and Clocking Controls .............................................................................................................92<br />
Triggering ............................................................................................................................................................................93<br />
Trigger Source..................................................................................................................................................................94<br />
Framed Trigger Mode......................................................................................................................................................95<br />
Decimation.......................................................................................................................................................................95<br />
FrameWork Logic Functionality........................................................................................................................................95<br />
Power Controls and Thermal Design.................................................................................................................................96<br />
System Thermal Design...................................................................................................................................................97<br />
Temperature Sensor and Over Temperature Protection..................................................................................................97<br />
<strong>X5</strong>-<strong>210M</strong> <strong>User's</strong> <strong>Manual</strong> 5
Table of Contents<br />
<strong>X5</strong>-<strong>210M</strong> <strong>User's</strong> <strong>Manual</strong><br />
Alert Log...............................................................................................................................................................................97<br />
Overview..........................................................................................................................................................................97<br />
Types of Alerts.................................................................................................................................................................98<br />
Alert Packet Format.........................................................................................................................................................98<br />
Software Support..............................................................................................................................................................99<br />
Tagging the Data Stream..................................................................................................................................................99<br />
Using the <strong>X5</strong>-<strong>210M</strong>............................................................................................................................................................100<br />
Where to start?...............................................................................................................................................................100<br />
Getting Good Analog Performance................................................................................................................................100<br />
Calibration..........................................................................................................................................................................101<br />
Updating the Calibration Coefficients...........................................................................................................................101<br />
Performance Data..............................................................................................................................................................102<br />
Power Consumption.......................................................................................................................................................102<br />
Environmental................................................................................................................................................................102<br />
Analog Input...................................................................................................................................................................103<br />
Connectors..........................................................................................................................................................................113<br />
RF Connectors J1-J6......................................................................................................................................................113<br />
XMC P15 Connector......................................................................................................................................................114<br />
XMC P16 Connector......................................................................................................................................................117<br />
Xilinx JTAG Connector.................................................................................................................................................120<br />
Mechanicals........................................................................................................................................................................121<br />
<strong>X5</strong>-<strong>210M</strong> <strong>User's</strong> <strong>Manual</strong> 6
Table of Contents<br />
<strong>X5</strong>-<strong>210M</strong> <strong>User's</strong> <strong>Manual</strong><br />
List of Tables<br />
Table 1. X6 XMC Bus Requirements....................................................................................................................................35<br />
Table 2. Required PCIe Resource Allocations......................................................................................................................40<br />
Table 3. XMC Mounting Hardware.......................................................................................................................................41<br />
Table 4. <strong>X5</strong> XMC Family......................................................................................................................................................43<br />
Table 5. <strong>X5</strong> XMC Family Peripherals...................................................................................................................................43<br />
Table 6. <strong>X5</strong> Computing Core Devices...................................................................................................................................44<br />
Table 7. PCI Express Standards Compliance........................................................................................................................45<br />
Table 8. Interfaces from PCI Express to Application Logic..................................................................................................46<br />
Table 9. <strong>X5</strong> Modules Available Bit I/O.................................................................................................................................48<br />
Table 10. IUsesDioPort Class Operations.............................................................................................................................49<br />
Table 11. LVTTL Digital IO Bits Electrical Characteristics.................................................................................................51<br />
Table 12. LVCMOS2.5 Digital IO Bits Electrical Characteristics........................................................................................51<br />
Table 13. <strong>X5</strong> JTAG Scan Path...............................................................................................................................................55<br />
Table 14. XMC Adapters and Hosts......................................................................................................................................57<br />
Table 15. Development Tools for the Windows Snap Example............................................................................................61<br />
Table 16. <strong>X5</strong>-<strong>210M</strong> A/D Features.........................................................................................................................................90<br />
Table 1. A/D Conversion Coding..........................................................................................................................................92<br />
Table 1. Input Clock Electrical Specifications......................................................................................................................93<br />
Table 2. Clock Oscillator Electrical Specifications...............................................................................................................93<br />
Table 3. Table 1: Trigger Modes...........................................................................................................................................94<br />
Table 1. Alert Types..............................................................................................................................................................98<br />
Table 2. Alert Packet Format.................................................................................................................................................99<br />
Table 1. <strong>X5</strong>-<strong>210M</strong> Power Consumption..............................................................................................................................102<br />
Table 2. <strong>X5</strong>-<strong>210M</strong> Environmental Limits...........................................................................................................................103<br />
Table 3. <strong>X5</strong>-<strong>210M</strong> Analog Performance Summary.............................................................................................................103<br />
Table 1. Connectors J1-J6 Functions...................................................................................................................................113<br />
Table 1. <strong>X5</strong>-<strong>210M</strong> XMC Connector P15 Pinout.................................................................................................................115<br />
Table 2. P15 Signal Descriptions.........................................................................................................................................116<br />
Table 1. <strong>X5</strong>-<strong>210M</strong> XMC Secondary Connector P16 Pinout...............................................................................................118<br />
Table 2. P16 Signal Descriptions.........................................................................................................................................119<br />
Table 1. <strong>X5</strong>-<strong>210M</strong> JP3 Xilinx JTAG Connector Pinout......................................................................................................120<br />
<strong>X5</strong>-<strong>210M</strong> <strong>User's</strong> <strong>Manual</strong> 7
Table of Contents<br />
<strong>X5</strong>-<strong>210M</strong> <strong>User's</strong> <strong>Manual</strong><br />
List of Figures<br />
Figure 1. Vista Verification Dialog.......................................................................................................................................15<br />
Figure 2. Innovative Install Program....................................................................................................................................16<br />
Figure 3. Progress is shown for each section.........................................................................................................................17<br />
Figure 4. ToolSet registration form.......................................................................................................................................18<br />
Figure 5. BusMaster configuration........................................................................................................................................19<br />
Figure 6. Installation complete..............................................................................................................................................19<br />
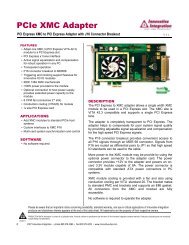
Figure 7. Innovative x8 lane PCIe – XMC.3 adapter card (P/N 80259)................................................................................36<br />
Figure 8. Innovative 3U VPX- XMC.3 adapter card (P/N 80260) .......................................................................................36<br />
Figure 9. Innovative Single lane PCIe – XMC.3 adapter card (P/N 80172).........................................................................37<br />
Figure 10. Innovative PCI 64/66 – XMC.3 (4x lanes) adapter card (P/N 80167-0)............................................................37<br />
Figure 11. Innovative x8 Lane PCI Express – XMC.3 (8x lanes) adapter card (P/N 80173-0)..........................................38<br />
Figure 12. Innovative Compact PCI/PXI – XMC.3 (x4 lanes) adapter card (P/N 80207-0)................................................38<br />
Figure 13. eInstrument Node – cabled PCI Express adapter (x1 lane) for XMC Modules (II P/N 90181)..........................38<br />
Figure 14. eInstrument PC – embedded PC (Windows/Linux) hosts two XMC modules (II P/N 90199)...........................39<br />
Figure 15. VPXI-ePC – 3U OpenVPX embedded PC (Windows/Linux) with four expansion slots (II P/N 90271)...........39<br />
Figure 16. <strong>X5</strong> XMC Family Block Diagram.........................................................................................................................43<br />
Figure 17. DIO Control Register (BAR1+0x14)...................................................................................................................49<br />
Figure 18. Digital IO Port Addresses.....................................................................................................................................50<br />
Figure 19. Virtex-5 Rocket I/O Assignments for P16 signals...............................................................................................53<br />
Figure 20. eInstrument Node Enclosure (P/N 90181) Supports Standalone Operation........................................................58<br />
Figure 21. XMC EEProm Programmer.................................................................................................................................59<br />
Figure 22. <strong>X5</strong>-<strong>210M</strong> Module.................................................................................................................................................88<br />
Figure 23. <strong>X5</strong>-<strong>210M</strong> Block Diagram.....................................................................................................................................89<br />
Figure 1. <strong>X5</strong>-<strong>210M</strong> A/D Channel 0 Front End......................................................................................................................91<br />
Figure 1. Analog Triggering Timing.....................................................................................................................................94<br />
Figure 2. <strong>X5</strong>-<strong>210M</strong> FrameWork Logic Data Flow................................................................................................................96<br />
Figure 1. Frequency Response for 1 MHz to 1 GHz span, 500 mVp-p input.....................................................................105<br />
Figure 2. Frequency Response for 1 MHz to 1 GHz span, 500 mVp-p input.....................................................................105<br />
Figure 3. <strong>X5</strong>-<strong>210M</strong> Ground Noise, Fs = 249 MSPS, input grounded.................................................................................106<br />
Figure 4. <strong>X5</strong>-<strong>210M</strong> Noise Floor, Fs = 249 MSPS, input grounded.....................................................................................107<br />
Figure 5. Signal quality: Fs = 249 MHz Fin = 5 MHz 85%FS............................................................................................108<br />
Figure 6. Signal quality: Fs = 249 MHz, Fin = 70 MHz 85%FS.........................................................................................109<br />
Figure 7. Signal Quality vs Input Amplitude.......................................................................................................................110<br />
Figure 8. Signal Quality vs Input Frequency, Fin = 5 MHz, 85%FS..................................................................................111<br />
Figure 9. Signal Quality vs Input Frequency, Fin = 70 MHz, 85%FS................................................................................112<br />
Figure 1. P15 XMC Connector Orientation.........................................................................................................................114<br />
Figure 1. P16 XMC Connector Orientation.........................................................................................................................117<br />
Figure 1. <strong>X5</strong>-<strong>210M</strong> JP1 Orientation, board face view.........................................................................................................120<br />
Figure 2. <strong>X5</strong>-<strong>210M</strong> JP1 Orientation, board top edge view..................................................................................................120<br />
Figure 1. <strong>X5</strong>-<strong>210M</strong> Mechanicals (Top View) Rev B..........................................................................................................121<br />
Figure 2. <strong>X5</strong>-<strong>210M</strong> Mechanicals (Bottom View) Rev B.....................................................................................................122<br />
<strong>X5</strong>-<strong>210M</strong> <strong>User's</strong> <strong>Manual</strong> 8
Table of Contents<br />
<strong>X5</strong>-<strong>210M</strong> <strong>User's</strong> <strong>Manual</strong><br />
Introduction<br />
Real Time Solutions!<br />
Thank you for choosing Innovative Integration, we appreciate your business! Since 1988, Innovative Integration has grown<br />
to become one of the world's leading suppliers of DSP and data acquisition solutions. Innovative offers a product portfolio<br />
unrivaled in its depth and its range of performance and I/O capabilities .<br />
Whether you are seeking a simple DSP development platform or a complex, multiprocessor, multichannel data acquisition<br />
system, Innovative Integration has the solution. To enhance your productivity, our hardware products are supported by<br />
comprehensive software libraries and device drivers providing optimal performance and maximum portability.<br />
Innovative Integration's products employ the latest digital signal processor technology thereby providing you the competitive<br />
edge so critical in today's global markets. Using our powerful data acquisition and DSP products allows you to incorporate<br />
leading-edge technology into your system without the risk normally associated with advanced product development. Your<br />
efforts are channeled into the area you know best ... your application.<br />
Vocabulary<br />
<strong>X5</strong>-<strong>210M</strong> <strong>User's</strong> <strong>Manual</strong> 9
Table of Contents<br />
<strong>X5</strong>-<strong>210M</strong> <strong>User's</strong> <strong>Manual</strong><br />
What is <strong>X5</strong>-<strong>210M</strong>?<br />
The <strong>X5</strong>- <strong>210M</strong> is a PCI Express XMC IO module featuring four TI ADS5547 provide 210 MSPS, 14-bit A/D data.<br />
A Xilinx Virtex5 SX95T with 512 MByte DDR2 DRAM and 4MB QDR-II memory provide a very high performance DSP<br />
core for demanding applications such as emerging wireless standards. The close integration of the analog IO, memory and<br />
host interface with the FPGA enables real-time signal processing at extremely high rates exceeding 300 GMACs per second.<br />
The <strong>X5</strong> XMC modules couple Innovative's powerful Velocia architecture with a high performance, 8-lane PCI Express<br />
interface that provides over 1 GB/s sustained transfer rates to the host. Private links to host cards with > 1.6 GB/s capacity<br />
using J16 are provided for system integration. The <strong>X5</strong> family can be fully customized using VHDL and MATLAB using the<br />
FrameWork Logic toolset. The MATLAB BSP supports real-time hardware-in-the-loop development using the graphical,<br />
block diagram Simulink environment with Xilinx System Generator.<br />
Software tools for host development include C++ libraries and drivers for Windows and Linux. Application examples<br />
demonstrating the module features and use are provided.<br />
What is Malibu?<br />
Malibu is the Innovative Integration-authored component suite, which combines with the Borland, Microsoft or GNU C++<br />
compilers and IDEs to support programming of Innovative hardware products under Windows and Linux. Malibu supports<br />
both high-speed data streaming plus asynchronous mailbox communications between the DSP and the Host PC, plus a wealth<br />
of Host functions to visualize and post-process data received from or to be sent to the target DSP.<br />
What is C++ Builder?<br />
C++ Builder is a general-purpose code-authoring environment suitable for development of Windows applications of any type.<br />
Armada extends the Builder IDE through the addition of functional blocks (VCL components) specifically tailored to<br />
perform real-time data streaming functions.<br />
What is DialogBlocks?<br />
DialogBlocks is an easy-to-use dialog editor for your wxWidgets applications, generating C++ code and XRC resource files.<br />
Using sizer-based layout, DialogBlocks helps you build dialogs and panels that look great on Windows, Linux or any<br />
supported wxWidgets platform. Add context-sensitive help text, tooltips, images, splitter windows and more.<br />
<strong>X5</strong>-<strong>210M</strong> <strong>User's</strong> <strong>Manual</strong> 10
Table of Contents<br />
<strong>X5</strong>-<strong>210M</strong> <strong>User's</strong> <strong>Manual</strong><br />
What is wxWidgets?<br />
wxWidgets was started in 1992 by Julian Smart at the University of Edinburgh. Initially started as a project for creating<br />
applications portable across Unix and Windows, it has grown to support the Mac platform, WinCE, and many other toolkits<br />
and platforms. The number of developers contributing to the project is now in the dozens and the toolkit has a strong userbase<br />
that includes everyone from open source developers to corporations such as AOL. So what is special about wxWidgets<br />
compared with other cross-platform GUI toolkits?<br />
wxWidgets gives you a single, easy-to-use API for writing GUI applications on multiple platforms that still utilize the native<br />
platform's controls and utilities. Link with the appropriate library for your platform (Windows/Unix/Mac, others coming<br />
shortly) and compiler (almost any popular C++ compiler), and your application will adopt the look and feel appropriate to<br />
that platform. On top of great GUI functionality, wxWidgets gives you: online help, network programming, streams,<br />
clipboard and drag and drop, multithreading, image loading and saving in a variety of popular formats, database support,<br />
HTML viewing and printing, and much more.<br />
What is Microsoft MSVC?<br />
MSVC is a general-purpose code-authoring environment suitable for development of Windows applications of any type.<br />
Armada extends the MSVC IDE through the addition of dynamically created MSVC-compatible C++ classes specifically<br />
tailored to perform real-time data streaming functions.<br />
What kinds of applications are possible with Innovative Integration hardware?<br />
Data acquisition, data logging, stimulus-response and signal processing jobs are easily solved with Innovative Integration<br />
baseboards using the Malibu software. There are a wide selection of peripheral devices available in the Matador DSP<br />
product family, for all types of signals from DC to RF frequency applications, video or audio processing. Additionally,<br />
multiple Innovative Integration baseboards can be used for a large channel or mixed requirement systems and data<br />
acquisition cards from Innovative can be integrated with Innovative's other DSP or data acquisition baseboards for highperformance<br />
signal processing.<br />
Why do I need to use Malibu with my Baseboard?<br />
One of the biggest issues in using the personal computer for data collection, control, and communications applications is the<br />
relatively poor real-time performance associated with the system. Despite the high computational power of the PC, it cannot<br />
reliably respond to real-time events at rates much faster than a few hundred hertz. The PC is really best at processing data,<br />
not collecting it. In fact, most modern operating systems like Windows are simply not focused on real-time performance, but<br />
rather on ease of use and convenience. Word processing and spreadsheets are simply not high-performance real-time tasks.<br />
The solution to this problem is to provide specialized hardware assistance responsible solely for real- time tasks. Much the<br />
same as a dedicated video subsystem is required for adequate display performance, dedicated hardware for real-time data<br />
collection and signal processing is needed. This is precisely the focus of our baseboards – a high performance, state-of-theart,<br />
dedicated digital signal processor coupled with real-time data I/O capable of flowing data via a 64-bit PCI bus interface.<br />
The hardware is really only half the story. The other half is the Malibu software tool set which uses state of the art software<br />
techniques to bring our baseboards to life in the Windows environment. These software tools allow you to create applications<br />
for your baseboard that encompass the whole job - from high speed data acquisition, to the user interface.<br />
<strong>X5</strong>-<strong>210M</strong> <strong>User's</strong> <strong>Manual</strong> 11
Table of Contents<br />
<strong>X5</strong>-<strong>210M</strong> <strong>User's</strong> <strong>Manual</strong><br />
Finding detailed information on Malibu<br />
Information on Malibu is available in a variety of forms:<br />
• Data Sheet (http://www.innovative-dsp.com/products/malibu.htm)<br />
• On-line Help<br />
• Innovative Integration Technical Support<br />
• Innovative Integration Web Site (www.innovative-dsp.com)<br />
Online Help<br />
Help for Malibu is provided in a single file, Malibu.chm which is installed in the Innovative\Documentation folder during the<br />
default installation. It provides detailed information about the components contained in Malibu - their Properties, Methods,<br />
Events, and usage examples. An equivalent version of this help file in HTML help format is also available online at<br />
http://www.innovative-dsp.com/support/onlinehelp/Malibu.<br />
Innovative Integration Technical Support<br />
Innovative includes a variety of technical support facilities as part of the Malibu toolset. Telephone hotline supported is<br />
available via<br />
Hotline (805) 578-4260 8:00AM-5:00 PM PST.<br />
Alternately, you may e-mail your technical questions at any time to:<br />
techsprt@innovative-dsp.com.<br />
Also, feel free to register and browse our product forums at http://forum.iidsp.com/, which are an excellent source of FAQs<br />
and information submitted by Innovative employees and customers.<br />
Innovative Integration Web Site<br />
Additional information on Innovative Integration hardware and the Malibu Toolset is available via the Innovative Integration<br />
website at www.innovative-dsp.com<br />
<strong>X5</strong>-<strong>210M</strong> <strong>User's</strong> <strong>Manual</strong> 12
Table of Contents<br />
<strong>X5</strong>-<strong>210M</strong> <strong>User's</strong> <strong>Manual</strong><br />
Typographic Conventions<br />
This manual uses the typefaces described below to indicate special text.<br />
Typeface<br />
Source Listing<br />
Boldface<br />
Emphasis<br />
Cpp Variable<br />
Cpp Symbol<br />
KEYCAPS<br />
Menu Command<br />
Meaning<br />
Text in this style represents text as it appears onscreen or in code. It<br />
also represents anything you must type.<br />
Text in this style is used to strongly emphasize certain words.<br />
Text in this style is used to emphasize certain words, such as new<br />
terms.<br />
Text in this style represents C++ variables<br />
Text in this style represents C++ identifiers, such as class, function,<br />
or type names.<br />
Text in this style indicates a key on your keyboard. For example,<br />
“Press ESC to exit a menu”.<br />
Text in this style represents menu commands. For example “Click<br />
View | Tools | Customize”<br />
<strong>X5</strong>-<strong>210M</strong> <strong>User's</strong> <strong>Manual</strong> 13
Table of Contents<br />
<strong>X5</strong>-<strong>210M</strong> <strong>User's</strong> <strong>Manual</strong><br />
Windows Installation<br />
This chapter describes the software and hardware installation procedure for the Windows platform (WindowsXP, Vista, and<br />
Windows 7).<br />
Do NOT install the hardware card into your system at this time. This will follow the software<br />
installation.<br />
Host Hardware Requirements<br />
The software development tools require an IBM or 100% compatible Pentium IV - class or higher machine for proper<br />
operation. An Intel-brand processor CPU is strongly recommended, since AMD and other “clone” processors are not<br />
guaranteed to be compatible with the Intel MMX and SIMD instruction-set extensions which the Armada and Malibu Host<br />
libraries utilize extensively to improve processing performance within a number of its components. The host system must<br />
have at least 1 GB of memory (2 GB recommended), 1 GB available hard disk space, and a DVD-ROM drive. Most<br />
versions of Windows released after Win2000 including XP, Vista, or Windows 7 (referred to herein simply as Windows) or<br />
later is required to run the developer’s package software, and are the target operating systems for which host software<br />
development is supported.<br />
Software Installation<br />
The development package installation program will guide you through the installation process.<br />
Note: Before installing the host development libraries (VCL components or MFC classes), you must<br />
have Microsoft MSVC Studio (version 9 or later), CodeGear RAD Studio 2007/2009, Embarcadero Rad<br />
Studio 2010 or QtCreator installed on your system, depending on which of these IDEs you plan to use<br />
for Host development. If you are planning on using these environments, it is imperative that they are<br />
tested and known-operational before proceeding with the library installation. If these items are not<br />
installed prior to running the Innovative Integration install, the installation program will not permit<br />
installation of the associated development libraries. However, drivers and DLLs may be installed to<br />
facilitate field deployment.<br />
<strong>X5</strong>-<strong>210M</strong> <strong>User's</strong> <strong>Manual</strong> 14
Table of Contents<br />
<strong>X5</strong>-<strong>210M</strong> <strong>User's</strong> <strong>Manual</strong><br />
You must have Administrator Privileges to install and run the software/hardware onto your system, refer to the Windows<br />
documentation for details on how to get these privileges.<br />
Starting the Installation<br />
To begin the installation, start Windows. Shut down all running programs and disable anti-virus software. Insert the<br />
installation DVD. If Autostart is enabled on your system, the install program will launch. If the DVD does not Autostart,<br />
click on Start | Run... Enter the path to the Setup.bat program located at the root of your DVD-ROM drive (i.e.<br />
E:\Setup.bat) and click “OK” to launch the setup program.<br />
SETUP.BAT detects if the OS is 64-bit or 32-bit and runs the appropriate installation for each<br />
environment. It is important that this script be run to launch an install.<br />
When installing on a Vista OS, the dialog below may pop up. In each case, select “Install this driver software anyway” to<br />
continue.<br />
Figure 1. Vista Verification Dialog<br />
<strong>X5</strong>-<strong>210M</strong> <strong>User's</strong> <strong>Manual</strong> 15
Table of Contents<br />
<strong>X5</strong>-<strong>210M</strong> <strong>User's</strong> <strong>Manual</strong><br />
The Installer Program<br />
After launching Setup, you will be presented with the following screen.<br />
Figure 2. Innovative Install Program<br />
Using this interface, specify which product to install, and where on your system to install it.<br />
1) Select the appropriate product from the Product Menu.<br />
2) Specify the path where the development package files are to be installed. You may type a path or click “Change” to<br />
browse for, or create, a directory. If left unchanged, the install will use the default location of “C:\Innovative”.<br />
3) Typically, most users will perform a “Full Install” by leaving all items in the “Components to Install” box<br />
checked. If you do not wish to install a particular item, simply uncheck it. The Installer will alert you and<br />
automatically uncheck any item that requires a development environment that is not detected on your system.<br />
4) Click the Install button to begin the installation.<br />
<strong>X5</strong>-<strong>210M</strong> <strong>User's</strong> <strong>Manual</strong> 16
Table of Contents<br />
<strong>X5</strong>-<strong>210M</strong> <strong>User's</strong> <strong>Manual</strong><br />
Note: The default “Product Filter” setting for the installer interface is “Current Only” as indicated by<br />
the combo box located at the top right of the screen. If the install that you require does not appear in the<br />
“Product Selection Box” (1), Change the “Product Filter” to “Current plus Legacy”.<br />
Each item of the checklist in the screen shown above, has a sub-install associated with it and will open a sub-install screen if<br />
checked. For example, the first sub-install for “Quadia - Applets, Examples, Docs, and Pismo libraries” is shown below.<br />
The installation will display a progress window, similar to the one shown below, for each item checked.<br />
Figure 3. Progress is shown for each section.<br />
<strong>X5</strong>-<strong>210M</strong> <strong>User's</strong> <strong>Manual</strong> 17
Table of Contents<br />
<strong>X5</strong>-<strong>210M</strong> <strong>User's</strong> <strong>Manual</strong><br />
Tools Registration<br />
At the end of the installation process you will be prompted to register.<br />
If you decide that you would like to register at a later time, click<br />
“Register Later”.<br />
When you are ready to register, click Start | All Programs | Innovative |<br />
| Applets. Open the New User folder and launch<br />
NewUser.exe to start the registration application. The registration<br />
form to the left will be displayed.<br />
Before beginning DSP and Host software development, you must<br />
register your installation with Innovative Integration. Technical<br />
support will not be provided until registration is successfully<br />
completed. Additionally, some development applets will not operate<br />
until unlocked with a passcode provided during the registration<br />
process.<br />
It is recommend that you completely fill out this form and return it to<br />
Innovative Integration, via email or fax. Upon receipt, Innovative<br />
Integration will provide access codes to enable technical support and<br />
unrestricted access to applets.<br />
Figure 4. ToolSet registration form<br />
Bus Master Memory Reservation Applet.<br />
At the conclusion of the installation process, ReserveMem.exe will run<br />
(except for SBC products). This will allow you to set the memory size<br />
needed for the busmastering to occur properly. This applet may be run from<br />
the start menu later if you need to change the parameters.<br />
For optimum performance, reserve at least 64 MB of memory for each<br />
Innovative board to be used simultaneously within the PC plus 32 MB for<br />
other system use. For example, if using two <strong>X5</strong>-400M modules, reserve 2 *<br />
64 + 32 MB = 160 MB. To reserve this memory, the registry must be<br />
updated using the ReserveMem applet. Simply type the desired size into the<br />
Rsv Region Size (MB) field, click Update and the applet will update the<br />
registry for you. If at any time you change the number of boards in your<br />
system, then you must invoke this applet found in Start | All Programs |<br />
Innovative | | Applets | Reserve Memory.<br />
After updating the system exit the applet by clicking the exit button to<br />
resume the installation process.<br />
<strong>X5</strong>-<strong>210M</strong> <strong>User's</strong> <strong>Manual</strong> 18
Table of Contents<br />
<strong>X5</strong>-<strong>210M</strong> <strong>User's</strong> <strong>Manual</strong><br />
Figure 5. BusMaster configuration<br />
At the end of the install process, the following screen will appear.<br />
Figure 6. Installation complete<br />
Click the “Shutdown Now” button to shut down your computer. Once the shutdown process is complete unplug the system<br />
power cord from the power outlet and proceed to the next section, “Hardware Installation.”<br />
Hardware Installation<br />
Now that the software components of the Development Package have been installed the next step is to configure and install<br />
your hardware. Detailed instructions on board installation are given in the Hardware Installation chapter, following this<br />
chapter.<br />
IMPORTANT: Many of our high speed cards, especially the PMC and XMC Families, require forced<br />
air from a fan on the board for cooling. Operating the board without proper airflow may lead to<br />
improper functioning, poor results, and even permanent physical damage to the board. These boards<br />
also have temperature monitoring features to check the operating temperature. The board may also be<br />
designed to intentionally fail on over-temperature to avoid permanent damage. See the specific<br />
hardware information for airflow requirements.<br />
<strong>X5</strong>-<strong>210M</strong> <strong>User's</strong> <strong>Manual</strong> 19
Table of Contents<br />
<strong>X5</strong>-<strong>210M</strong> <strong>User's</strong> <strong>Manual</strong><br />
After Power-up<br />
After completing the installation, boot your system into Windows.<br />
Innovative Integration boards are plug and play compliant, allowing Windows to detect them and auto-configure at start-up.<br />
Under rare circumstances, Windows will fail to auto-install the device-drivers for the JTAG and baseboards. If this happens,<br />
please refer to the “TroubleShooting” section.<br />
Installation on a Deployed System<br />
The above instructions install the complete development platform onto a system for the development of application software.<br />
Often, however, a developed application needs to be installed on a system that will only be used to run the program. In this<br />
instance, installing the complete library is overkill.<br />
To support this situation, Innovative has a minimal installation program called “MalibuRED”. This is short for Malibu<br />
Redistributable. This install will install the driver software and support DLLs required to run a Malibu application.<br />
Note: Specific applications may have their own, additional requirements that are not covered by<br />
MalibuRED. For example, .NET applications require the .NET libraries to be installed as well.<br />
Installation programs for .NET can be obtained from Microsoft over the Internet.<br />
Running MalibuRed<br />
MalibuRED can be found on the installation CD in the Windows-32\Malibu subdirectory. The name of the installation file is<br />
MalibuRED.exe. Running the program displays the setup screen for the installer:<br />
Using the combo box, select the appropriate baseboard to install support for. In this case, we are installing an X3-A4D4<br />
board. If support for multiple cards is needed, the program must be run to completion once for each type of board. This is<br />
required because parts of the installation, such as baseboard device drivers, may be different for different board types.<br />
After selecting the board, press “Go” to begin installation. The window changes to display the progress of the install.<br />
<strong>X5</strong>-<strong>210M</strong> <strong>User's</strong> <strong>Manual</strong> 20
Table of Contents<br />
<strong>X5</strong>-<strong>210M</strong> <strong>User's</strong> <strong>Manual</strong><br />
After completing the installation, reboot the system to allow Windows to recognize the new drivers. Then proceed with the<br />
Hardware Installation as in the development system installation above.<br />
<strong>X5</strong>-<strong>210M</strong> <strong>User's</strong> <strong>Manual</strong> 21
Table of Contents<br />
<strong>X5</strong>-<strong>210M</strong> <strong>User's</strong> <strong>Manual</strong><br />
Mem Driver Installation Windows<br />
Introduction<br />
This document provide instructions to install and use the Innovative Integration memory allocation driver (MemDriver) and<br />
controller applet (MemDrvControl).<br />
Releases<br />
Release notes are found in the file "README.txt". Peroidic updates can be downloaded from: http://www.innovativedsp.com/ftp/MemDriver/.<br />
System Requirement<br />
Windows 7 (32 or 64-bits)<br />
Malibu Applications<br />
In order to utilize MemDriver, all Malibu based applications must be linked against the current release of Malibu libraries.<br />
Installing MemDriver And Controller<br />
Both MemDriver and controller are automatically installed by the Innovative software installation program (setup.bat).<br />
Should the installation or driver failed, please follow instructions under the "Troubleshoot" section below.<br />
Running The Controller<br />
This applet displays MemDriver statuses and provide various control functions. Please note, any change to the MemDriver<br />
registry settings will require a system reboot.<br />
Running the Applet<br />
1. Go to folder "C:\Innovative\MemDriver - Release\utils\MemDrvControl\Vc9\Release" or "\Release_x64".<br />
2. Execute application "MemDrvControl.exe". Following window will appear.<br />
<strong>X5</strong>-<strong>210M</strong> <strong>User's</strong> <strong>Manual</strong> 22
Table of Contents<br />
<strong>X5</strong>-<strong>210M</strong> <strong>User's</strong> <strong>Manual</strong><br />
Applet Features and Notes<br />
1. If MemDriver failed to reserve desired amount of memory, it will attempt to reserve the largest amount poosible.<br />
However, if it failed to reserve any memory at all, the "Status" field will show "Not Ready". In this case, set the<br />
"Memory To Reserve" value to a smaller value (50% of previous) and reboot. Valid values are between 1 and 4095.<br />
2. To reset memory driver and clear all allocated memory<br />
1. Close all applications.<br />
2. Click "Reset" button<br />
3. To verify driver is operational<br />
1. Close all applications.<br />
2. Click "Test" button<br />
3. The "Test:" field will show the test result. This field shows "Unknown" if no test has been run.<br />
4. Click "Refresh", to update displayed values.<br />
5. Any change to registry setting requires a system reboot to take effect.<br />
6. If driver status failed to start-up properly, the "Test" and "Reset" buttons will be deactivated (greyed out).<br />
Definition of Terms<br />
Memory Pool – area of physical RAM reserved by MemDriver<br />
Max – total size of the memory pool<br />
<strong>X5</strong>-<strong>210M</strong> <strong>User's</strong> <strong>Manual</strong> 23
Table of Contents<br />
<strong>X5</strong>-<strong>210M</strong> <strong>User's</strong> <strong>Manual</strong><br />
Used – portion of memory pool assigned to applications<br />
Free – total memory pool area not yet assigned to applications<br />
LFB – Largest Free Block of contiguous area in the memory pool<br />
Troubleshoot<br />
Before performing any troubleshooting procedure, it is recommended that the user backup all existing data and system files.<br />
Please contact technical support for more detail.<br />
Additional Driver Status<br />
The user can also determine the status of MemDriver with Msinfo32.exe.<br />
1. Click 'Start' and run application "Msinfo32.exe"<br />
2. Goto System Summary->Software Enviornment->System Drivers<br />
3. Look for the "memdrv" entry. It should be in the 'Running' state.<br />
Maually Up-grade MemDriver<br />
Perform the following steps to manually up-grade MemDriver to the latest released version, without reinstalling other<br />
Innovative Integration software.<br />
1. Obtain latest MemDriver release from Innovative Integration.<br />
2. Extract the content into folder "C:\Innovative\MemDriver – Release".<br />
3. Open folder "C:\Windows\System32\drivers" and delete file "memdrv.sys".<br />
4. Copy the driver executable from "C:\Innovative\MemDriver – Release\driver\...".<br />
5. Copy the file "memdrv.sys" to folder "C:\Windows\System32\drivers".<br />
6. Reboot the system.<br />
7. Run the controller app according to instruction in section "Running The Controller" above.<br />
8. Verify the latest version of MemDriver is installed. See file "README.txt".<br />
Registry Settings<br />
MemDriver requires the certain values be set in the system registry. If the driver is not operating properly, perform the<br />
following steps to manually verify the registry setting and correct them.<br />
1. At Start menu, type: regedit<br />
2. Navigate to the MemDriver registry key as shown and compare the settings.<br />
<strong>X5</strong>-<strong>210M</strong> <strong>User's</strong> <strong>Manual</strong> 24
Table of Contents<br />
<strong>X5</strong>-<strong>210M</strong> <strong>User's</strong> <strong>Manual</strong><br />
3. Reboot the system and retest the driver.<br />
4. If test failed, contact technical support.<br />
<strong>X5</strong>-<strong>210M</strong> <strong>User's</strong> <strong>Manual</strong> 25
Table of Contents<br />
<strong>X5</strong>-<strong>210M</strong> <strong>User's</strong> <strong>Manual</strong><br />
Installation on Linux<br />
This chapter contains instruction on the installation of the baseboard software for Linux operating systems.<br />
Software installation on Linux is performed by loading a number of packages. A Package is a special kind of archive file that<br />
contains not only the files that are to be installed, but also installation scripts and dependency information to allow a smooth<br />
fit into the system. This information allows the package to be removed, or patched. Innovative uses RPM packages in its<br />
installs.<br />
Package File Names<br />
A package file name such as Malibu-LinuxPeriphLib-1.1-3.i586.rpm encodes a lot of information.<br />
Package Name Package ID Information Fields<br />
Distribution Subpackage Version Revision Hardware Type Extension<br />
Malibu-Linux PeriphLib 1.1 3 i586 .rpm<br />
Prerequisites for Installation<br />
In order to properly use the baseboard example programs and to develop software using the baseboard, some packages need<br />
to be installed before the actual baseboard package.<br />
The Redistribution Package Group - MalibuRed<br />
This set of packages contain the libraries and drivers needed to run a program using Malibu. This group is called<br />
“MalibuRed” because it contains the packages needed to allow running Malibu based programs on a target, non-development<br />
machine. (Red is short for 'redistributable').<br />
MalibuRed Packages<br />
WinDriver-9.2-1.i586.rpm<br />
MalibuLinux-Red-[ver]-[rel].i586.rpm<br />
Description<br />
Installs WinDriver 9.2 release.<br />
Installs Baseboard Driver Kernel Plugin.<br />
<strong>X5</strong>-<strong>210M</strong> <strong>User's</strong> <strong>Manual</strong> 26
The Redistribution Package Group - MalibuRed<br />
<strong>X5</strong>-<strong>210M</strong> <strong>User's</strong> <strong>Manual</strong><br />
intel-ipp_rti-5.3p.x32.rpm<br />
Installs Intel IPP library redistributable files.<br />
The installation CD, or the web site contains a file called LinuxNotes.pdf giving instructions on how to load these packages<br />
and how to install the drivers onto your Linux machine. This file is also loaded onto the target machine by the the Malibu-<br />
LinuxRed RPM. These procedures need to be completed for every target machine.<br />
Malibu<br />
To develop software for a baseboard the Malibu packages also must be installed.<br />
Malibu Packages<br />
Malibu-LinuxPeriphLib-[ver]-[rel].i586.rpm<br />
Description<br />
Installs Malibu Source, Libraries and Examples.<br />
Other Software<br />
Our examples use the DialogBlocks designer software and wxWidgets GUI library package for user interface code. If you<br />
wish to rebuild the example programs you will have to install this software as well.<br />
Package Company URL<br />
wxWidgets wxWidgets http://www.wxwidgets.org<br />
DialogBlocks Anthemion http://www.anthemion.co.uk.org/dialogblocks<br />
Baseboard Package Installation Procedure<br />
Each baseboard installation for Linux consists of one or more package files containing self-extracting packages of<br />
compressed files, as listed in the table below. Note that package version codes may vary from those listed in the table.<br />
<strong>X5</strong>-<strong>210M</strong> <strong>User's</strong> <strong>Manual</strong> 27
Baseboard Package Installation Procedure<br />
<strong>X5</strong>-<strong>210M</strong> <strong>User's</strong> <strong>Manual</strong><br />
Each of these packages automatically extract files into the /usr/Innovative folder, herein referred to as the Innovative<br />
root folder in the text that follows. For example, the <strong>X5</strong>-400 RPM extracts into /usr/Innovative/<strong>X5</strong>-400-[ver]. A<br />
symbolic link named <strong>X5</strong>-400 is then created pointing to the version directory to allow a single name to apply to any version<br />
that is in use.<br />
Board Packages<br />
Baseboard Packages Description<br />
<strong>X5</strong>-400M Malibu-LinuxPeriphLib-[ver]-[rel].i586.rpm Board files and examples.<br />
<strong>X5</strong>-<strong>210M</strong> <strong>X5</strong>-<strong>210M</strong>-LinuxPeriphLib-[ver]-[rel].i586.rpm Board files and examples.<br />
X3-10M X3-10M-LinuxPeriphLib-[ver]-[rel].i586.rpm Board files and examples.<br />
X3-25M X3-25M-LinuxPeriphLib-[ver]-[rel].i586.rpm Board files and examples.<br />
X3-A4D4 X3-A4D4-LinuxPeriphLib-[ver]-[rel].i586.rpm Board files and examples.<br />
X3-SD X3-SD-LinuxPeriphLib-[ver]-[rel].i586.rpm Board files and examples.<br />
X3-SDF X3-SDF-LinuxPeriphLib-[ver]-[rel].i586.rpm Board files and examples.<br />
X3-Servo X3-Servo-LinuxPeriphLib-[ver]-[rel].i586.rpm Board files and examples.<br />
SBC-ComEx Sbc-ComEx-LinuxPeriphLib-[ver]-[rel].i586.rpm Board files and examples.<br />
Unpacking the Package<br />
As root, type:<br />
rpm -i -h <strong>X5</strong>-400-LinuxPeriphLib-1.1-4.i586.rpm<br />
This extracts the <strong>X5</strong>-400 board files into the Innovative root directory. Use the package for the particular board you are<br />
installing.<br />
<strong>X5</strong>-<strong>210M</strong> <strong>User's</strong> <strong>Manual</strong> 28
Unpacking the Package<br />
<strong>X5</strong>-<strong>210M</strong> <strong>User's</strong> <strong>Manual</strong><br />
Creating Symbolic Links<br />
The example programs assume that the user has created symbolic links for the installed board packages. A script file is<br />
provided to simplify this operation by the Malibu Red package. In the MalibuRed/KerPlug directory, there is a script called<br />
quicklink.<br />
quicklink <strong>X5</strong>-400 1.1<br />
These commands will create a symbolic link <strong>X5</strong>-400 pointing to <strong>X5</strong>-400-1.1.<br />
This script can be moved to the user's bin directory to allow it to be run from any directory.<br />
Completing the Board Install<br />
The normal board install is complete with the installation of the files. The board driver install is already complete with the<br />
loading of the Malibu Red package. If there are any board-specific steps they will be listed at the end of this chapter.<br />
Linux Directory Structure<br />
When a board package is installed, its files are placed under the /usr/Innovative folder. The base directory is named<br />
after the board with a version number attached -- for example, the version 2.0 <strong>X5</strong>-400 RPM extracts into<br />
/usr/Innovative/<strong>X5</strong>-400-2.0.<br />
This allows multiple version of installs to coexist by using a symbolic link to point to a particular version. Changing the<br />
symbolic link changes with version will be used.<br />
Under the main directory there are a number of subdirectories.<br />
Applets<br />
The applets subdirectory contains small application programs that aid in the use of the board. For example, there is a Finder<br />
program that allows the user to flash an LED on the board to determine which board is associated with a target number. See<br />
the Applets chapter for a fuller description of the applets for a board.<br />
Documentation<br />
This directory contains any documentation files for the project. Open the index.html file in the directory with a web browser<br />
to see the available files and a description of the contents.<br />
Examples<br />
This directory and its subdirectories contain the projects, source and example programs for the board.<br />
<strong>X5</strong>-<strong>210M</strong> <strong>User's</strong> <strong>Manual</strong> 29
Linux Directory Structure<br />
<strong>X5</strong>-<strong>210M</strong> <strong>User's</strong> <strong>Manual</strong><br />
Hardware<br />
This directory contains files associated with programming the board Logic and any logic images provided.<br />
<strong>X5</strong>-<strong>210M</strong> <strong>User's</strong> <strong>Manual</strong> 30
Linux Directory Structure<br />
<strong>X5</strong>-<strong>210M</strong> <strong>User's</strong> <strong>Manual</strong><br />
Mem Driver Installation Linux<br />
This document provide instructions to install and use the Innovative Integration memory driver (MemDriver) and controller<br />
applet for Linux.<br />
Releases<br />
See the "README.txt" file.<br />
Tested System Configuration<br />
4 GB<br />
Core2<br />
openSUSE 11.1 (x32 and x64)<br />
Linux Kernel 2.6.27.45<br />
Malibu Applications<br />
In order to utilize MemDriver, all Malibu based applications must be linked against the latest release of Malibu libraries.<br />
Installing MemDriver<br />
The MemDriver for Linux is a boot start driver. In such, this driver must be linked into the Linux kernel and executed during<br />
system boot-up. Perform the following steps to build and link the driver into the kernel.<br />
1. Obtain the source for the Linux kernel listed in section "Minimum System Requirement".<br />
2. Copy the folder /usr/Innovative/MemDriver/memdrv to /drivers.<br />
3. Edit the file /drivers/Kconfig. Add the line: source "drivers/memdrv/Kconfig" (quotes<br />
included) before the line "endmenu". Save the changes.<br />
4. Edit the file /drivers/Makeflie. Add the line "obj-y += memdrv/" to the end of this file. Save.<br />
5. Go to the kernel root folder. Perform the steps listed under the section "Adjusting Memory Pool Size". Be sure a<br />
check mark appears beside the MemDriver module, i.e. it is set to "Y". See image below.<br />
6. Continue to "Adjusting Memory Pool Size" section.<br />
Adjusting Memory Pool Size<br />
In order to adjust the memory pool size, a rebuild of the Linux kernel is required.<br />
1. In a terminal sheel, login as root.<br />
2. Go to the root folder of the new kernel source and type: $make gconfig<br />
3. This window will appear:<br />
<strong>X5</strong>-<strong>210M</strong> <strong>User's</strong> <strong>Manual</strong> 31
Linux Directory Structure<br />
<strong>X5</strong>-<strong>210M</strong> <strong>User's</strong> <strong>Manual</strong><br />
4. Goto section "Device Drivers->Innovative Memory Driver support->Memory Pool Size".<br />
5. Change the value, click save and exit. This value must be 1-4095 for x64 and 1-1000 for x32. Addition information<br />
in section "Applet Features and Notes - #1" below.<br />
6. Rebuild the kernel and reboot.<br />
7. After boot-up, login as root and change the permission: $chmod 666 /dev/memdrv. Aadd this command to the<br />
file /etc/rc.d/boot.local.<br />
Using Controller Applet<br />
This applet displays MemDriver statuses and provide control functions to interact with the driver.<br />
Running the Applet<br />
1. Open folder "/usr/Innovative/MemDriver/controller/mdControl".<br />
2. Run executable "mdControl".<br />
3. If this file is missing or does not execute properly, you may recompile it using Qt project "mdControl.pro".<br />
4. Normally, the following window will appear:<br />
<strong>X5</strong>-<strong>210M</strong> <strong>User's</strong> <strong>Manual</strong> 32
Linux Directory Structure<br />
<strong>X5</strong>-<strong>210M</strong> <strong>User's</strong> <strong>Manual</strong><br />
Applet Features and Notes<br />
1. If the memory driver failed to reserve desired amount of memory, it will attempt to reserve the largest amount<br />
poosible. However, if it failed to reserve any memory at all, the "Status" field will show "Not Ready". In this case,<br />
set the "Memory To Reserve" value to a smaller value (say 50% of previous) and reboot. Valid values are between<br />
1 and 4095 (MB). For 32-bit machines, it is highly recommended to stay below 1000.<br />
2. To reset memory driver and clear all allocated memory<br />
1. Close all applications.<br />
2. Click "Reset" button<br />
3. To verify driver is operational<br />
1. Close all applications.<br />
2. Click "Test" button<br />
3. The "Test:" field will show the test result, Pass or Failed. This field shows "Unknown" if the test has not yet<br />
been executed.<br />
4. Click "Refresh", to update displayed values.<br />
Definition of Terms<br />
Memory Pool – a section of physical RAM reserved by MemDriver<br />
<strong>X5</strong>-<strong>210M</strong> <strong>User's</strong> <strong>Manual</strong> 33
Linux Directory Structure<br />
<strong>X5</strong>-<strong>210M</strong> <strong>User's</strong> <strong>Manual</strong><br />
Max – total size of the memory pool<br />
Used – amount of memory pool allocated to applications<br />
Free – total memory pool area not yet allocated to applications<br />
LFB – Largest Free Block of contiguous memory in the pool<br />
Alternative Driver Status<br />
Alternatively, the user may obtain the status of MemDriver with the following:<br />
1. Open 'bash' terminal<br />
2. $cat /proc/driver/memdrv<br />
3. If the driver is functional, you should see an output with the driver name, version, and build date. For example:<br />
II Memory Driver: v0.0.24, Nov 9 2011, 12:35:43<br />
<strong>X5</strong>-<strong>210M</strong> <strong>User's</strong> <strong>Manual</strong> 34
Linux Directory Structure<br />
<strong>X5</strong>-<strong>210M</strong> <strong>User's</strong> <strong>Manual</strong><br />
Hardware Installation<br />
The X6 XMC cards may be used on a variety of host cards supporting an XMC.3 PCI Express (VITA standard 42.3<br />
compatible) site. XMC P16 is also used for system integration including use as a dedicated data channel.<br />
Compatible Host Cards<br />
X6 XMC cards are compatible with the VITA 42.3 PCI Express mezzanine module sites. The card form factor is IEEE 1386<br />
with XMC connectors P15 and P16. P15 is used for PCI Express, while P16 is used as digital IO unique to the X6 modules.<br />
The X6 modules mount 10mm from the host card and may use standoffs for mechanically securing the module to the host.<br />
PCI Express Bus<br />
Requirement<br />
Standard<br />
Type<br />
PCI Express 1.0a; Gen1 or Gen2<br />
Lanes 8<br />
Bus Speed<br />
Power Supplies<br />
Gen1: 2.5 Gbps per lane per direction<br />
Gen2: 5 Gbps per lane per direction<br />
3.3V and VPWR (+5V or +12V) is required on all XMCs.<br />
Table 1. X6 XMC Bus Requirements<br />
Note: PCI Express interfaces supports Gen1 (2.5 Gbps) or Gen2 (5 Gbps) operation. For Gen2, the host system must support<br />
Gen2 operation in the installed site. For Gen2 x8, the X6 module must be ordered with -2 FPGA speed grade or better.<br />
Adapter cards for XMC modules, shown below, allow X6 XMC modules to be used in a desktop PCs with PCI Express or<br />
PC slots.<br />
To get out of the PC chassis, consider using either the eInstrument Node. The eInstrument node can host one XMC using<br />
cabled PCI Express using a cable as long as 5 meters.<br />
For an intelligent computing node, the VPXI-ePC and eInstrument PC provide an embedded PC running Windows or Linux,<br />
disk drives, and other PC peripherals with two XMC module sites. The VPXI-ePC has integrated timing features<br />
synchronized and coordinated sampling systems.<br />
<strong>X5</strong>-<strong>210M</strong> <strong>User's</strong> <strong>Manual</strong> 35
Linux Directory Structure<br />
<strong>X5</strong>-<strong>210M</strong> <strong>User's</strong> <strong>Manual</strong><br />
Preferred for<br />
X6 Modules<br />
Figure 7. Innovative x8 lane PCIe – XMC.3 adapter card (P/N 80259)<br />
Figure 8. Innovative 3U VPX- XMC.3 adapter card (P/N 80260)<br />
Conduction-cooled or Air-cooled versions are offered.<br />
<strong>X5</strong>-<strong>210M</strong> <strong>User's</strong> <strong>Manual</strong> 36
Linux Directory Structure<br />
<strong>X5</strong>-<strong>210M</strong> <strong>User's</strong> <strong>Manual</strong><br />
Figure 9. Innovative Single lane PCIe – XMC.3 adapter card (P/N 80172)<br />
Figure 10. Innovative PCI 64/66 – XMC.3 (4x lanes) adapter card (P/N 80167-0)<br />
<strong>X5</strong>-<strong>210M</strong> <strong>User's</strong> <strong>Manual</strong> 37
Linux Directory Structure<br />
<strong>X5</strong>-<strong>210M</strong> <strong>User's</strong> <strong>Manual</strong><br />
Figure 11. Innovative x8 Lane PCI Express – XMC.3 (8x lanes) adapter card (P/N 80173-0)<br />
Figure 12. Innovative Compact PCI/PXI – XMC.3 (x4 lanes) adapter card (P/N 80207-0)<br />
Figure 13. eInstrument Node – cabled PCI Express adapter (x1 lane) for XMC Modules (II P/N 90181)<br />
<strong>X5</strong>-<strong>210M</strong> <strong>User's</strong> <strong>Manual</strong> 38
Linux Directory Structure<br />
<strong>X5</strong>-<strong>210M</strong> <strong>User's</strong> <strong>Manual</strong><br />
Figure 14. eInstrument PC – embedded PC (Windows/Linux) hosts two XMC modules (II P/N 90199)<br />
Figure 15. VPXI-ePC – 3U OpenVPX embedded PC (Windows/Linux) with four expansion slots (II P/N 90271)<br />
XMC systems should be be compatible with VITA 42.3 specification for P15.<br />
The P16 interface can only be used when the PCI Express interface is present and active. The XMC P16 interface to the host<br />
may be customized in the Application Logic. Host card support for P16 interfaces varies so this must be verified on a caseby-case<br />
basis to determine compatibility. In the specific description of each module, the P16 connection pinout is provided<br />
in this manual. Innovative's adapter cards provide access to P16 IO for system integration. Contact technical support if you<br />
need any assistance in checking compatibility with the X6 XMC P16 interface.<br />
<strong>X5</strong>-<strong>210M</strong> <strong>User's</strong> <strong>Manual</strong> 39
Linux Directory Structure<br />
<strong>X5</strong>-<strong>210M</strong> <strong>User's</strong> <strong>Manual</strong><br />
System Requirements<br />
The PCI Express slot must be PCI Express 1.0a compatible and be able to map the following resources.<br />
Table 2. Required PCIe Resource Allocations<br />
Required PCIe Resources<br />
BAR0 : 1MB Memory<br />
BAR1 : 64K B Memory<br />
1 Interrupt<br />
When you first plug in the module, it will then be found and the driver should be installed for the module. The standard<br />
driver resides in the \Innovative\drivers directory after software installation.<br />
The XMC module may be used an any PCI Express slot supporting 1 or more lanes. Innovative offers a line of adapters for<br />
use with the X6 series which allow the module to be used in PCI and cPCI environments. These adapters may limit the<br />
number of lanes available to the X6 for host communication, depending on their design.<br />
Power Considerations<br />
Each XMC should be reviewed for its specific power, cooling and any special mechanical considerations. For each module<br />
the power consumption and required power supplies are shown in the specific discussion for that module.<br />
For desktop applications, you MUST provide forced air cooling with 5-10 CFM capability. The air must blow directly<br />
on the Virtex 6 device.<br />
The X6 XMCs are designed to operate over the typical commercial temperature range of 0 to 70 C, but this relies on<br />
sufficient forced air cooling for most installations and modules. At the lower temperatures, it is also required that the<br />
environment be non-condensing for the standard commercial modules. Extended temperature versions of many modules are<br />
available with conformal coating if the environment is more demanding.<br />
During operation, the module temperature should be monitored to prevent unexpected shutdown. If the module temperature<br />
exceeds 85C (L0 rating), the module will deactivate on-board power supplies to avoid overheating. Please refer to the<br />
section on thermal properties for more details.<br />
PCI Express slots are rated for their power capability. Each installation should be reviewed to verify that the host card plus<br />
the module do not exceed the rated power of the slot. The power consumption for each module is provided in the specific<br />
discussion of that module. Most slots support 15W in desktop systems and provide 3.3V and 12V. Some XMC modules<br />
require -12V, which must be provided by the host card.<br />
<strong>X5</strong>-<strong>210M</strong> <strong>User's</strong> <strong>Manual</strong> 40
Linux Directory Structure<br />
<strong>X5</strong>-<strong>210M</strong> <strong>User's</strong> <strong>Manual</strong><br />
Mechanical Considerations<br />
The X6 modules conform to IEEE1386 CMC specification and ANSI/VITA 42.0 specifications, except as specified on<br />
individual modules. These specifications define the size of the module and mounting requirements. In short the modules are<br />
75 x 150 mm and mount 10 mm from the host card. This allows the XMC modules to fit in one slot in desktop PC or compact<br />
PCI systems.<br />
For ruggedness, the modules should be mounted to a host card using the mounting screws and standoffs. The host bracket<br />
should securely hold the XMC front bracket so that the module is snug in the bracket opening. This reduces mechanical strain<br />
on the XMC connectors from the front panel cable attachments.<br />
The card may be secured to the host card with two standoffs and four screws as shown. The Digikey number is provided<br />
(www.digikey.com) for convenience; many suppliers have these standard screw and standoff sizes.<br />
For high vibration applications, screws should be mounted with locking compound such as Loctite 222.<br />
Table 3. XMC Mounting Hardware<br />
Description Quantity Digikey Part Number<br />
Metric pan head screw, M3X6, 3mm x 5mm 5 H742-ND<br />
Threaded Standoff, 10mm with 3mm thread 3 4391K<br />
During the logic and firmware design process, some modules require access to JTAG connectors for use with the<br />
development tools. This may require greater access space than the final installation. A variety of engineering tools are<br />
available to assist the designer during the development process such as PCIe to XMC adapters. A cabled version allows the<br />
module to operate outside the chassis. An open chassis may also be required to get access to the XMC during the<br />
development process so that the cables are easily accessible.<br />
<strong>X5</strong>-<strong>210M</strong> <strong>User's</strong> <strong>Manual</strong> 41
Linux Directory Structure<br />
<strong>X5</strong>-<strong>210M</strong> <strong>User's</strong> <strong>Manual</strong><br />
Chapter 1. About the <strong>X5</strong> XMC Modules<br />
In this chapter, we will discuss the common features of the <strong>X5</strong> module family. Specifics on each module are covered in later<br />
chapters.<br />
<strong>X5</strong> XMC Architecture<br />
The <strong>X5</strong> XMC modules share a common architecture and many features such as the PCI Express interface, data buffering<br />
features, the Application Logic, and other system integration features. This allows the <strong>X5</strong> XMC modules to utilize common<br />
software and logic firmware, while providing unique analog and digital features.<br />
<strong>X5</strong>-<strong>210M</strong> <strong>User's</strong> <strong>Manual</strong> 42
Linux Directory Structure<br />
<strong>X5</strong>-<strong>210M</strong> <strong>User's</strong> <strong>Manual</strong><br />
Figure 16. <strong>X5</strong> XMC Family Block Diagram<br />
The <strong>X5</strong> XMCs have a variety of analog and digital IO front ends suited to many applications.<br />
Table 4. <strong>X5</strong> XMC Family<br />
<strong>X5</strong> XMC Features Applications<br />
<strong>X5</strong>-400M<br />
2 A/D channels, 14 bit, 400MHz; 2 D/A channels, up to<br />
500M updates/sec<br />
Software radio, RADAR, medical imaging<br />
<strong>X5</strong>-<strong>210M</strong> 4 A/D channels, 14 bit, 250 MHz Software radio, RADAR<br />
<strong>X5</strong>-GSPS 2 A/D channels, 8 bit, at 1.5GSPS IF/RF receivers and test, RADAR<br />
<strong>X5</strong>-COM 4 SFP ports at 3.125 Gbps Remote IO, system expansion<br />
<strong>X5</strong>-TX<br />
4 DAC channels, 16-bit, 500 MSPS each or dual channel<br />
1 GSPS, pattern generation mode for DRAM<br />
Arbitrary waveform generation,<br />
communications waveform generation<br />
<strong>X5</strong>-G12 2 A/D channels, 12-bit, at 1GSPS, integrated FFT engine RADAR, communications receivers, pulse<br />
digitizing<br />
<strong>X5</strong>-RX<br />
4 A/D channels, 16bit, 200 MHz, integrated 4 channel<br />
DDC<br />
IF digitizing and receivers.<br />
The <strong>X5</strong> XMCs feature a Xilinx Virtex-5 SX95T or LX155T core for signal processing and control. In addition to the features<br />
in the Virtex-5 logic such as embedded multipliers and memory blocks, the FPGA computing core has one bank of DDR2<br />
DRAM and two banks of QDR2 SRAM for data buffering and computing memory.<br />
There are also a number of support peripherals for IO control and system integration. Each XMC may have additional<br />
application-specific support peripherals.<br />
Table 5. <strong>X5</strong> XMC Family Peripherals<br />
Peripheral<br />
XMC.3 PCI Express<br />
interface<br />
XMC P16<br />
Timing and triggering<br />
Features<br />
The XMC.3 host interface integrates with PCI Express systems using eight lanes operating at 2.5 Gbps<br />
that provides up to 4 GBytes/sec data rate on the bus (full duplex). This interface complies with VITA<br />
standard 42.3 which specifies PCI Express interface for the XMC module format.<br />
The Velocia packet system provides fast and flexible communications with the host using a creditbased<br />
flow control supporting packet transfers with the host. A secondary command channel provides<br />
independent interface for control and status outside of the data channel that is extensible to custom<br />
applications.<br />
Provides a bank of digital IO lines which may be used for general purpose bit I/O or to implement a<br />
private link to cards featuring a parallel data bus. Additionally, eight independent rocket I/O links<br />
(VITA 42.0) are available, each capable of 500 MB/s, full-duplex operation<br />
Flexible clocking and synchronization features for I/O<br />
<strong>X5</strong>-<strong>210M</strong> <strong>User's</strong> <strong>Manual</strong> 43
Linux Directory Structure<br />
<strong>X5</strong>-<strong>210M</strong> <strong>User's</strong> <strong>Manual</strong><br />
Peripheral<br />
Data buffering and<br />
Computational Memory<br />
Alert Log<br />
Features<br />
Two 1Mx16 SRAM devices are used provide data buffering, processor memory and computation<br />
memory for the Application FPGA<br />
Monitors system events and error conditions to help manage the data acqusiton process<br />
<strong>X5</strong> Computing Core<br />
The <strong>X5</strong> XMC module family has an FPGA-based computing core that controls the data acquisition process, provides data<br />
buffing and host communications. The computing core consists of a Xilinx Virtex-5 FPGA, one bank of DDR2 DRAM<br />
(4Gbits in a x64 configuration), and two banks of QDR2 SRAM (32Mbits total in two x32 dual-ported banks). The FPGA<br />
uses the memories for data buffering and computational workspace.<br />
Table 6. <strong>X5</strong> Computing Core Devices<br />
Feature Device Part Number<br />
Application Logic FPGA<br />
Xilinx Virtex-5 SX95T<br />
Xilinx Virtex-5 LX155T<br />
XC5VSX95T-1FFG1136C (some cards use -2)<br />
XC5VLX155T-1FFG1136C (some cards use -2)<br />
Computation memory QDR2 SRAM 2x Cypress CY7C1314BV18-167<br />
Buffer memory DDR2 DRAM 4x Micron MT47H64M16HR-37E<br />
As the focus of the module, the <strong>X5</strong> computing core connects the IO, peripherals, host communications and support features.<br />
Each IO device directly connects to the application FPGA on the <strong>X5</strong> modules providing tight coupling for high performance,<br />
real-time IO. The FPGA logic implements an interface to each device that connects them to the controls and data<br />
communications features on the module. Support features, such as sample triggering and data analysis, are implemented in<br />
the logic to provide precise real-time control over the data acquisition process.<br />
The <strong>X5</strong> module architecture is really defined by the features in the logic that connect the IO devices to Velocia packet<br />
system. For data from IO devices such as A/Ds, the data flows from the IO interface and is then enqueued in the multi-queue<br />
buffer. The packetizer then creates data packets from the data stream that are moved across the data link to the PCIe<br />
interface. Packets to output devices travel in the opposite direction – from the link to the de-framer and into the multi-queue<br />
data buffer. The output IO, such as a DAC, then consumes the data from the queue as required. The Alert Log monitors<br />
error conditions and important events for management of the data acquisition process.<br />
The host interacts with the <strong>X5</strong> computing core using the packet system for high speed data and over the command channel.<br />
The packet system is the main data channel to the card and delivers the high performance, real-time data capability of moving<br />
data to and from the module. Since it uses an efficient DMA system, it is very efficient at moving data which leaves the host<br />
system unburdened by the data flow. The command channel provides the PCIe host direct access to the computing core logic<br />
for status, control and initialization. Since it is outside the packet system, it is less complex to use and provides unimpeded<br />
access to the logic.<br />
The application FPGA image is loaded at power up from onboard flash EEPROM storage.<br />
<strong>X5</strong>-<strong>210M</strong> <strong>User's</strong> <strong>Manual</strong> 44
Linux Directory Structure<br />
<strong>X5</strong>-<strong>210M</strong> <strong>User's</strong> <strong>Manual</strong><br />
Adding New Features to the FPGA<br />
The functionality of the computing core can be modified using the FrameWork Logic tools for the <strong>X5</strong> module family. The<br />
tools support development in either VHDL or MATLAB. Signal processing, data analysis and unique functions can be added<br />
to the <strong>X5</strong> modules to suit application-specific requirements. See the <strong>X5</strong> FrameWork Logic User Guide for further<br />
information.<br />
<strong>X5</strong> PCI Express Interface<br />
The <strong>X5</strong> module family has a PCI Express interface that provides a lane, 2.5 Gbps full duplex link to the host computer. The<br />
interface is compatible with industry standard PCI Express systems and may be used in a variety of host computers. The<br />
following standards govern the PCI Express interface on the <strong>X5</strong> XMC modules.<br />
Table 7. PCI Express Standards Compliance<br />
Standard Describes Standards Group<br />
PCI Express 1.0a<br />
PCI Express electrical and protocol standards.<br />
2.5 Gbps data rate per lane per direction.<br />
PCI SIG ( http://www.picmg.com )<br />
ANSI/VITA 42 XMC module mechanicals and connectors VITA ( www.vita.org )<br />
ANSI VITA 42.3 XMC module with PCI Express Interface. VITA ( www.vita.org )<br />
The major interfaces to the application logic are the data link, command channel and SelectMAP interface. The data link<br />
provides a high performance channel for the application logic to communicate with the host computer while the Command<br />
Channel is a command and control interface from the host computer to the application logic. The SelectMAP interface is the<br />
application FPGA configuration port for loading the logic image.<br />
The data link is the primary data path for the data communications between the application FPGA and host computer. When<br />
data packets are created by the application logic, such as A/D samples, or required by the application logic for output devices,<br />
such as DAC channels, the data flows over the data link as packets. The maximum transfer rate over the data link is 2000<br />
MB/s with a 1200 MB/s sustained rate (half-duplex). The data packets contain a Peripheral Device Number (PDN) that<br />
identifies the peripheral associated with the this data packet. In this way, the packet system is extensible to other devices that<br />
may be added to the logic. For example, an FFT analysis can be added to the logic and its result sent to the host as a new<br />
PDN for display and further analysis while maintaining other data streams from A/D channels.<br />
<strong>X5</strong>-<strong>210M</strong> <strong>User's</strong> <strong>Manual</strong> 45
Linux Directory Structure<br />
<strong>X5</strong>-<strong>210M</strong> <strong>User's</strong> <strong>Manual</strong><br />
Application Logic<br />
Interface<br />
Max Data Rate<br />
Typical Use<br />
Velocia Packet Interface 1000 MB/s sustained to host memory. Velocia packet system interface -<br />
main path for data communications<br />
Wishbone SOC Bus 20 MB/s sustained System-On-Chip bus for command, control and status.<br />
This bus is used to connect logic components in the<br />
FPGA.<br />
Table 8. Interfaces from PCI Express to Application Logic<br />
Data Buffering and Memory Use<br />
There are two sets of memory devices attached to the application FPGA that provide data buffering and computational RAM<br />
for FPGA applications.<br />
Computational SRAM<br />
The <strong>X5</strong> modules have two banks of 2MB QDR SRAM dedicated as FPGA local memory. Applications in the FPGA may<br />
use the SRAM as a local buffer memory if the data buffer is too large to fit in FPGA block RAMs, or as memory for an<br />
embedded processor in the FPGA.<br />
The SRAM devices connected to the FPGA are 4 Mbytes total size, organized as two banks of 16Mbitx32 dual ported<br />
memory. This device is an Cypress CY7C1314 (or equivalent) which is a synchronous QDR2 SRAM and supports clock<br />
rates up to 167 MHz. All SRAM control and data lines pins are directly connected to the FPGA, allowing the SRAM<br />
memory control to be customized to the application.<br />
The Framework Logic provides a simple SRAM interface that can be readily modified for many types of applications.<br />
Detailed explanation of the interface control logic is described in the FrameWork Logic User Guide. The SRAM has high<br />
performance FIFO interface that allows the logic to fully exploit the high data rates to the QDR SRAM by providing support<br />
for posted writes, read address queue and read data queue.<br />
MATLAB developers frequently use the SRAM as the real-time data buffer during development. Since the MATLAB<br />
Simulink tools operate over the FPGA JTAG during development at a low rate, it is necessary to use the SRAM for real-time,<br />
high speed data buffering. The MATLAB Simulink library for each <strong>X5</strong> module demonstrates the use of the SRAM as a data<br />
capture buffer. The SRAM captures real-time, high-speed data that can then be read out into MATLAB for analysis or<br />
display as a snapshot. This allows high-speed, real-time to be captured and brought into MATLAB Simulink over the slow<br />
(10Mb/sec) JTAG link. See the <strong>X5</strong> FrameWork Logic User Guide for more details and examples.<br />
Data Buffer DRAM<br />
The second set of memory provides a 512MByte DDR2 memory pool local to the FPGA. The Framework Logic implements<br />
a data buffer with one or more queues for the A/D and D/A streams as appropriate for the particular <strong>X5</strong> module.<br />
In the Framework logic, the SRAM use is demonstrated as a multiple queue FIFO memory that divides the 2 MB memory<br />
buffer into separate queues (virtual FIFOs) for input and output. The logic component, referred to as Multi-Queue DRAM,<br />
<strong>X5</strong>-<strong>210M</strong> <strong>User's</strong> <strong>Manual</strong> 46
Linux Directory Structure<br />
<strong>X5</strong>-<strong>210M</strong> <strong>User's</strong> <strong>Manual</strong><br />
controls the DRAM to create the FIFO queue functionality. Custom logic applications can use the Multi Queue DRAM<br />
buffer component to add additional queues for new devices.<br />
The <strong>X5</strong>-TX has special support for pattern generation using the DRAM memory bank. The pattern generation mode<br />
provides dynamic pattern generation using DRAM memory bank that is driven by control and data packets from the host.<br />
This allows the DRAM to be used as an arbitrary waveform generator for applications such as communications testing,<br />
RADAR stimulus generation and ultrasonic stimulus.<br />
Serial EEPROM Interface<br />
EEPROM<br />
A serial EEPROM on the <strong>X5</strong> series is used to store configuration and calibration information. The interface to the serial<br />
EEPROM is an I2C bus that is controlled by the PCI logic device. The device is an Atmel AT24C16-10SI, a 16K bit device.<br />
The I2C bus is slow and the calibration is read out of the EEPROM at initialization time by the application software and<br />
written into registers in the application logic for real-time error correction.<br />
The EEPROM also has a write cycle limit of 100K cycles, so it should only be written to when calibration is performed or<br />
configuration information changes. Once the write cycle duration limit is exceeded, the device will not reliably store data any<br />
more.<br />
As delivered from the factory, this EEPROM contains the calibration coefficients used for the A/D and D/A error correction.<br />
Caution: the serial EEPROM contains the calibration coefficients for the analog and is preprogrammed at factory test. Do<br />
not erase these coefficients or calibration will be lost.<br />
Use the baseboard IdRom() method to obtain a reference to the internally-managed IUsesPmcEeprom object, as shown<br />
below:<br />
// Open the module<br />
Innovative::<strong>X5</strong>_400M Module;<br />
Module.Target(0);<br />
Module.Open();<br />
// Create a 50-32-bit-word section at offset zero in ROM user space<br />
PmcIdromSection Section1(Module.IdRom().Rom(), PmcIdrom::waUser, 0, 50);<br />
// Create a 50-32-bit-word section at offset 50 in ROM user space<br />
PmcIdromSection Section2(Module.IdRom().Rom(), PmcIdrom::waUser, 50, 50);<br />
// Write to ROM<br />
for (int i = 0; i < 50; ++i)<br />
Section1.AsInt(i, i*2);<br />
Section1.StoreToRom();<br />
for (int i = 50; i < 100; ++i)<br />
Section2.AsFloat(i, static_cast(i*2));<br />
Section2.StoreToRom();<br />
<strong>X5</strong>-<strong>210M</strong> <strong>User's</strong> <strong>Manual</strong> 47
Linux Directory Structure<br />
<strong>X5</strong>-<strong>210M</strong> <strong>User's</strong> <strong>Manual</strong><br />
// Read from ROM<br />
Section1.LoadFromRom();<br />
for (int i = 0; i < 50; ++i)<br />
int x = Section1.AsInt(i);<br />
Section2.LoadFromRom();<br />
for (int i = 50; i < 100; ++i)<br />
float x = Section2.AsFloat(i);<br />
Digital I/O<br />
The <strong>X5</strong> series has a digital I/O port accessible over the P16 connector that provides bit I/O. These bits are direct connections to<br />
the FPGA and are used in many custom applications for controls, communications and status signals.<br />
The DIO port is presented on P16. See the connectors section of this chapter the connector pin out and information about the<br />
connector. The Framework Logic User Guide details the FPGA pin connections for the bit I/O.<br />
Available Bit I/O<br />
The <strong>X5</strong> modules bit IO on P16 is shown here. For pinouts and IO standards, see the hardware chapter.<br />
Module Number Bit IO Notes<br />
<strong>X5</strong>-400M 33 Mixed 2.5V and 3.3V IO<br />
<strong>X5</strong>-<strong>210M</strong> 16 3.3V IO<br />
<strong>X5</strong>-GSPS 16 3.3V IO<br />
<strong>X5</strong>-TX 16 3.3V IO<br />
<strong>X5</strong>-G12 16 3.3V IO<br />
<strong>X5</strong>-RX 16 3.3V IO<br />
Table 9. <strong>X5</strong> Modules Available Bit I/O<br />
Software Support<br />
The Framework Logic configures these bit I/O connections as a simple port that has programmable bit direction and data by<br />
the host. The port is configured and accessed directly from the PCI Express host.<br />
The digital I/O hardware is controlled by the IUsesDioPort class. Its properties:<br />
<strong>X5</strong>-<strong>210M</strong> <strong>User's</strong> <strong>Manual</strong> 48
Linux Directory Structure<br />
<strong>X5</strong>-<strong>210M</strong> <strong>User's</strong> <strong>Manual</strong><br />
Table 10. IUsesDioPort Class Operations<br />
Function Type Description<br />
DioPortConfig() Property Configures banks of bits for input or output<br />
DioPortData() Property Broadside Read/Write to low-order 32-bits of<br />
DIO.<br />
Typical use of the digital IO port involves first configuring the port using the Config() operator. This sets the byte direction and<br />
the clock mode. The port is then ready for read/write configurations to each port. For instance:<br />
// Open the module<br />
Innovative::<strong>X5</strong>_400M Module;<br />
Module.Target(0);<br />
Module.Open();<br />
// All bits input<br />
Module.Config(0x0);<br />
// Read the state of the port<br />
volatile short x = Module.DioPortData();<br />
// All bits output<br />
Module.Config(0x3);<br />
// Toggle the state of all output bits<br />
while (1)<br />
Module.DioPortData(~Module.DioPortData());<br />
Hardware Implementation<br />
Digital I/O port activity is controlled by the digital I/O configuration control and data register. Port direction is controlled by<br />
the configuration control register. Note that modules have differing number of digital IO bits so not all bits are available on<br />
all modules.<br />
Bit<br />
Function<br />
0 DIO bits 7..0 direction control, 0=input, default<br />
1 DIO bits 15..8 direction control, 0=input, default<br />
2 DIO bits 23..16 direction control, 0=input, default<br />
3 DIO bits 31..24 direction control, 0=input, default<br />
4 DIO bits 39..32 direction control, 0=input, default<br />
31..6 -<br />
Figure 17. DIO Control Register (BAR1+0x14)<br />
<strong>X5</strong>-<strong>210M</strong> <strong>User's</strong> <strong>Manual</strong> 49
Linux Directory Structure<br />
<strong>X5</strong>-<strong>210M</strong> <strong>User's</strong> <strong>Manual</strong><br />
Port<br />
DIO_L<br />
DIO_H<br />
Address<br />
BAR1+0x13<br />
BAR1+0x16<br />
Figure 18. Digital IO Port Addresses<br />
Data may be written to/read from the digital I/O port using the digital I/O port data registers. Data written to ports bits which<br />
are set for output mode will be latched and driven to the corresponding port pins, while data written to input bits will be<br />
ignored. The input DIO may be clocked externally by enabling the external digital clock bit in the appropriate configuration<br />
register. If the internal clock is used, the data is latched at the beginning of any read from the port. Data read from output bits<br />
is equal to the last latched bit values (i.e. the last data written to the port by the host ).<br />
Digital I/O port pins are set to all inputs after logic configuration.<br />
External signals connected to the digital I/O port bits or timer input pins should be limited to a voltage range between 0 and<br />
3.3V referenced to ground on the digital I/O port connector. Exceeding these limits will cause damage to the <strong>X5</strong> hardware.<br />
Digital IO Electrical Characteristics<br />
The digital IO pins 0-15 are LVTTL compatible pins driven by 3.3V logic. The DIO port pins connect to the application<br />
FPGA via 100 ohm series resistors. The <strong>X5</strong>-400M has additional pins that are LVCMOS 2.5V.<br />
LVTTL Pins<br />
Warning: the LVTTL DIO pins are NOT 5V compatible. Input voltage must not exceed 4.05V during normal operation.<br />
Undershoot and overshoot must be limited: see the Xilinx Virtex-5 User Guide for details.<br />
Parameter Value Notes<br />
Input Voltage Max = 4.05V<br />
Min = -0.75V<br />
Output Voltage ''1' > 2.4V<br />
'0' < 0.4V<br />
Exceeding these will damage<br />
the FPGA<br />
For load < +/-12mA<br />
Output Current +/-12mA FPGA can be reconfigured for<br />
custom designs for other drive<br />
currents.<br />
Input Logic<br />
Thresholds<br />
'1' >= 2VDC<br />
'0' < 0.8VDC<br />
<strong>X5</strong>-<strong>210M</strong> <strong>User's</strong> <strong>Manual</strong> 50
Linux Directory Structure<br />
<strong>X5</strong>-<strong>210M</strong> <strong>User's</strong> <strong>Manual</strong><br />
Parameter Value Notes<br />
Input Impedance >1M ohm || 15 pF Excludes cabling<br />
Table 11. LVTTL Digital IO Bits Electrical Characteristics<br />
LVCMOS 2.5 Pins<br />
Warning: the LVCMOS 2.5 DIO pins are NOT 5V compatible. Input voltage must not exceed 4.05V during normal<br />
operation. Undershoot and overshoot must be limited: see the Xilinx Virtex-5 User Guide for details.<br />
Parameter Value Notes<br />
Input Voltage Max = 2.7V<br />
Min = -0.75V<br />
Output Voltage ''1' > 1.3V<br />
'0' < 0.4V<br />
Exceeding these will damage<br />
the FPGA<br />
For load < +/-12mA<br />
Output Current +/-12mA FPGA can be reconfigured for<br />
custom designs for other drive<br />
currents.<br />
Input Logic<br />
Thresholds<br />
'1' >= 1.3VDC<br />
'0' < 0.8VDC<br />
Input Impedance >1M ohm || 15 pF Excludes cabling<br />
Table 12. LVCMOS2.5 Digital IO Bits Electrical Characteristics<br />
Notes on Digital IO Use<br />
The digital I/O on <strong>X5</strong> modules, as supported using the standard FrameWork Logic, is intended for low speed bit I/O controls<br />
and status. The interface is capable of data rates exceeding 75 MHz and custom logic developers can implement much higher<br />
speed and sophisticated interfaces by modifying the logic.<br />
Since the bit I/O is not connected to the high speed data stream, this limits the effective update or read rate to about 1 MHz.<br />
Custom logic implementations can achieve much higher data rates by creating logic for data packets transfers to the Digital<br />
IO.<br />
The <strong>X5</strong> FrameWork Logic user Guide details logic supporting the digital IO port and gives the pin information for<br />
customization.<br />
<strong>X5</strong>-<strong>210M</strong> <strong>User's</strong> <strong>Manual</strong> 51
Linux Directory Structure<br />
<strong>X5</strong>-<strong>210M</strong> <strong>User's</strong> <strong>Manual</strong><br />
P16 SERDES I/O<br />
The <strong>X5</strong> series implements a high speed SERDES communication system on the XMC P16 connector to allow data to be<br />
exchanged with the host outside of the PCI Express bus. P16 connections on the <strong>X5</strong> are compatible with the VITA 42.0<br />
secondary connector specification, and provide eight transmit and receive pairs implemented using Virtex-5 Rocket I/O links.<br />
A clock reference is provided on board for use by the Rocket I/O links.<br />
Pinouts for the P16 connector showing the transmit and receive pair locations are given in the Connectors section. The<br />
following table gives the Rocket I/O pin allocations on the Virtex-5 which connect to each of the P16 signals.<br />
P16 Signal Virtex-5 FG1136 Pin Number Virtex-5 MGT Signal Identifier<br />
TXP0 B6 MGT_124_ TXN1<br />
TXN0 B5 MGT_124_TXP1<br />
RXP0 A7 MGT_124_RXN1<br />
RXN0 A6 MGT_124_RXP1<br />
TXP1 B9 MGT_124_ TXN0<br />
TXN1 B10 MGT_124_TXP0<br />
RXP1 A8 MGT_124_RXN0<br />
RXN1 A9 MGT_124_RXP0<br />
TXP2 D2 MGT_120_ TXN1<br />
TXN2 E2 MGT_120_TXP1<br />
RXP2 C1 MGT_120_RXN1<br />
RXN2 D1 MGT_124_RXP1<br />
TXP3 B3 MGT_120_ TXN0<br />
TXN3 B4 MGT_120_TXP0<br />
RXP3 A2 MGT_120_RXN0<br />
RXN3 A3 MGT_124_RXP0<br />
TXP4 K2 MGT_116_ TXN1<br />
TXN4 L2 MGT_116_TXP1<br />
RXP4 J1 MGT_116_RXN1<br />
RXN4 K1 MGT_116_RXP1<br />
TXP5 G2 MGT_116_ TXN0<br />
TXN5 F2 MGT_116_TXP0<br />
<strong>X5</strong>-<strong>210M</strong> <strong>User's</strong> <strong>Manual</strong> 52
Linux Directory Structure<br />
<strong>X5</strong>-<strong>210M</strong> <strong>User's</strong> <strong>Manual</strong><br />
P16 Signal Virtex-5 FG1136 Pin Number Virtex-5 MGT Signal Identifier<br />
RXP5 H1 MGT_116_RXN0<br />
RXN5 G1 MGT_116_RXP0<br />
TXP6 AN9 MGT_126_ TXN1<br />
TXN6 AN10 MGT_126_TXP1<br />
RXP6 AP8 MGT_126_RXN1<br />
RXN6 AP9 MGT_126_RXP1<br />
TXP7 AN6 MGT_126_ TXN0<br />
TXN7 AN5 MGT_126_TXP0<br />
RXP7 AP7 MGT_126_RXN0<br />
RXN7 AP6 MGT_126_RXP0<br />
Figure 19. Virtex-5 Rocket I/O Assignments for P16 signals<br />
Note that the positive and negative polarities of the individual lanes are reversed between the polarity notation on the P16<br />
connector versus the polarity notation on the Rocket I/O pin pairs. This was done to avoid vias on the PC board and thus<br />
optimize the layout for signal integrity purposes. If needed by the application , strict signal polarity can be reversed in the<br />
Virtex-5 logic design by using the Rocket I/O polarity controls within each MGT tile.<br />
Reference clocks running at 125 MHz are connected to the reference clock input pins of MGT_126 and MGT_120 (pins AL7,<br />
AM7, E4, and D4 respectively). This clock is supplied by an LVPECL oscillator at location Y3. If a different frequency is<br />
required by the user's application, this oscillator can be replaced by any 6 pin 2.5V LVPECL output device compatible with<br />
Pletronics LV7745DEW footprint.<br />
Thermal Protection and Monitoring<br />
The Virtex-5 logic device includes a temperature and voltage monitoring subsystem called System Monitor. The <strong>X5</strong> design<br />
uses the System Monitor to check Virtex-5 device die temperature and control the enable/disable feature on key board power<br />
supplies. This allows logic to disable power on the card in the event of an over-temperature condition within the Virtex-5<br />
device. In the event of an over-temperature condition, the logic, memory interface, and analog power supplies are disabled,<br />
shutting down power to most of the <strong>X5</strong> module. The host system power must be toggled in order to reset the module from<br />
this condition.<br />
The Framework Logic implements this feature as standard. Although it is possible for custom user logic to remove this<br />
feature, it is not recommended as it would expose the hardware to potential damage from over-temperature conditions, should<br />
they occur.<br />
<strong>X5</strong>-<strong>210M</strong> <strong>User's</strong> <strong>Manual</strong> 53
Linux Directory Structure<br />
<strong>X5</strong>-<strong>210M</strong> <strong>User's</strong> <strong>Manual</strong><br />
The power enable signal is on Virtex-5 pin AF13. This pin must be held high to enable power.<br />
Software support tools provide convenient access to the temperature and thermal controls. These should be used in<br />
application programming configure and monitor the temperature, as illustrated below:<br />
// Open the module<br />
Innovative::<strong>X5</strong>_400M Module;<br />
Module.Target(0);<br />
Module.Open();<br />
// Create reference to thermal management object on module<br />
const LogicTemperatureIntf & Temp(Module.Thermal());<br />
// Read current temperature<br />
float t = Module.LogicTemperature();<br />
// Read/write current warning temperature<br />
float t = Module.LogicWarningTemperature();<br />
Module.LogicWarningTemperature(70.0);<br />
// Read current failure temperature<br />
float t = Module.LogicFailureTemperature();<br />
// See if the module is in thermal shutdown<br />
bool state = Module.Failed();<br />
Thermal Failures<br />
The <strong>X5</strong> modules will shut down if the Virtex-5 die temperature exceeds 85 degrees Celsius. This means that something is<br />
wrong either with the module or with the system design. Damage may occur if the module temperature exceeds this limit. If<br />
your software was monitoring the alert packets, you will receive a temperature warning alert prior to failure. Otherwise, the<br />
temperature reading in the application may provide information pointing to overheating.<br />
The most important thing to do is to determine the root cause of the failure. The module could have failed, the system power<br />
is bad, or the environment is too harsh.<br />
The first thing to do is inspect the module. Is anything discolored or do any ICs show evidence of damage? This may be due<br />
to device failure, system power problems, or from overheating. If damage is noticed, the module is suspect and should be<br />
sent for repair. If not, test the module outside the system in a benign environment such as on an adapter card in a desktop PC<br />
with a small fan. It should not overheat. If it does, this module is is now bad.<br />
Now consider what may have caused the failure. A bad module could be the cause, but it could have went bad due to system<br />
failure or overheating. The system power supply could cause a failure by not providing proper power to the module. This<br />
could be too little power resulting in the module failing or power glitches causing the temp sensor to drop out. Did other<br />
cards in the system fail? If so, this may indicate that a system problem must be solved.<br />
If the module did overheat, you should review the thermal design of the system. What was the ambient tmeprature when<br />
failure occurred? Is the air flow adequate? Is air flow blocked to the card? Did a fan fail? If conduction cooling is being<br />
<strong>X5</strong>-<strong>210M</strong> <strong>User's</strong> <strong>Manual</strong> 54
Linux Directory Structure<br />
<strong>X5</strong>-<strong>210M</strong> <strong>User's</strong> <strong>Manual</strong><br />
used, what is the temperature of the surrounding components? The heat must be dissipated either through conduction or<br />
convection for the module to keep from overheating.<br />
You should also review application and be sure that you have taken advantage of any power saving features on the module.<br />
Many of the <strong>X5</strong> modules have power saving features that allow you to turn off unused channels, reduce clock rates or stop<br />
data when the module is not in use.<br />
Led Indicators<br />
The <strong>X5</strong> modules have two LEDs available for use by application logic. By default, the Framework Logic image lights both<br />
LEDs light when the Virtex-5 finishes configuration.<br />
Custom logic designs can use it for any purpose. When using the stock firmware, the state of user logic LEDs can be<br />
controlled using the Innovative::<strong>X5</strong>_400M::Led() property.<br />
LEDs NOT Lit with FrameWork Logic Installed<br />
If the two LEDs do not light up with the FrameWork Logic installed, that means the PCI Express bus did not connect. This is<br />
a bus error. The card cannot communicate with the system . Check installation and contact technical support.<br />
JTAG Scan Path<br />
<strong>X5</strong> modules have a JTAG scan path for the Xilinx devices on the module. This is used for logic development tools such as<br />
Xilinx ChipScope and System Generator, and for initial programming of the PCI FPGA configuration FLASH ROM.<br />
Nominally, there are two devices in the scan chain: the Virtex-5 device and the Coolrunner CPLD used to implement the<br />
configuration support. Optionally, the SRAM devices may be included in the scan chain if JTAG access is needed for<br />
debugging purposes.<br />
Table 13. <strong>X5</strong> JTAG Scan Path<br />
JTAG Device<br />
Number<br />
Device<br />
Function<br />
0 Virtex-5 Application logic<br />
1 Coolrunner-II Configuration control<br />
<strong>X5</strong>-<strong>210M</strong> <strong>User's</strong> <strong>Manual</strong> 55
Linux Directory Structure<br />
<strong>X5</strong>-<strong>210M</strong> <strong>User's</strong> <strong>Manual</strong><br />
FrameWork Logic<br />
Many of the standard <strong>X5</strong> XMC features are implemented in the application logic. This feature set includes a data flow,<br />
triggering features, and application-specific features. In many cases, this logic provides the features needed for a standard<br />
data acquisition function and is supported by software tools for data analysis and logging. In this manual, the FrameWork<br />
Logic features for each card are described in in general to explain the standard hardware functionality.<br />
The <strong>X5</strong> FrameWork Logic User Guide provides developers with the tools and know-how for developing custom logic<br />
applications. See this manual and the supporting source code for more information. The <strong>X5</strong> modules are supported by the<br />
FrameWork Logic Development tools that allow designs to be developed in HDL or MATLAB Simulink. Standard features<br />
are provided as components that may be included in custom applications, or further modified to meet specific design<br />
requirements.<br />
Integrating with Host Cards and Systems<br />
The <strong>X5</strong> XMCs may be directly integrated PCI Express systems that support VITA 42.3 XMC modules. The host card must<br />
be both mechanically and electrically compatible or an adapter card must be used.<br />
The XMC modules conform to IEEE 1386 specification for single width mezzanine cards . This specification is common to<br />
both PMC and XMC modules and specifies the size, mounting, mating card requirements for spacing and clearances.<br />
There are several adapter cards that are used to integrate the XMC modules into other form-factor PCI Express systems, such<br />
as desktop systems.<br />
There are also adapter cards to electrically adapter the PCI Express XMC modules in older PCI systems that use a bridge<br />
device between the two buses. PCI is not electrical<br />
Host Type Bus Mechanical Formfactor<br />
Adapter<br />
Required<br />
Example card<br />
XMC.3 module<br />
slot<br />
PCI Express 1.0a XMC, single width None Kontron CP6012<br />
www.kontron.com<br />
Diversified Technology CPB4712<br />
http://www.diversifiedtechnology.com/p<br />
roducts/cpci/cpb4712.html<br />
<strong>X5</strong>-<strong>210M</strong> <strong>User's</strong> <strong>Manual</strong> 56
Linux Directory Structure<br />
<strong>X5</strong>-<strong>210M</strong> <strong>User's</strong> <strong>Manual</strong><br />
Host Type Bus Mechanical Formfactor<br />
Adapter<br />
Required<br />
Example card<br />
Desktop PC PCI Express 1.0a PCI Express Plug-in<br />
card, x8 lane<br />
PCIe-XMC.3<br />
adapter<br />
Innovative 80173<br />
Desktop PC PCI 2.2 PCI Plug-in card PCI-XMC.3<br />
adapter<br />
Innovative 80167<br />
Compact PCI PCI Express 1.0a 3U CPCI-XMC.3<br />
adapter<br />
Innovative 80207<br />
VPX<br />
VPX with PCI<br />
Express<br />
Slot Profiles:<br />
SLT3-PAY-1D-14.2.6<br />
SLT3-PER-1F-14.3.2<br />
3U VPX<br />
VPX 3U<br />
adapter<br />
Air or<br />
conduction<br />
cooled<br />
Innovative<br />
Air Cooled : 80260-7<br />
Conduction Cooled: 80260-6RC<br />
SLT3-PER-1U-14.3.3<br />
Cabled PCI<br />
Express<br />
PCI Express 1.0a<br />
Cabled PCI Express<br />
to remote IO<br />
Cable PCIe<br />
Adapter and<br />
XMC.3 carrier<br />
Innovative 90181<br />
Embedded PC<br />
Host<br />
PCI Express to local<br />
PC core<br />
~10x7x3 inches None Innovative 90200 or 90201<br />
Table 14. XMC Adapters and Hosts<br />
Standalone Operation<br />
The <strong>X5</strong> modules can be run “standalone” for embedded applications using a carrier card such as Innovative 90181. The host<br />
card provides power to the module and cooling. Custom carrier cards have been created for specific applications that provide<br />
Ethernet ports,<br />
<strong>X5</strong>-<strong>210M</strong> <strong>User's</strong> <strong>Manual</strong> 57
Linux Directory Structure<br />
<strong>X5</strong>-<strong>210M</strong> <strong>User's</strong> <strong>Manual</strong><br />
Figure 20. eInstrument Node Enclosure (P/N 90181) Supports Standalone Operation<br />
The logic must be modified for standalone operation to remove the PCIe host interface and controls and substitute local<br />
controls and logic. Other changes vital to system operation are detailed in the Framework Logic manuals.<br />
Updating the XMC logic Configuration EEPROM<br />
Virtex-5 configuration data is stored in an onboard flash EEPROM which may be updated using software provided by<br />
Innovative. Logic images may come as updates from Innovative, or be generated by a user developing custom functionality.<br />
The applet provided by Innovative, VsProm.exe, programs the FLASH using a .bit or .exo image file generated by the Xilinx<br />
toolset.<br />
<strong>X5</strong>-<strong>210M</strong> <strong>User's</strong> <strong>Manual</strong> 58
Linux Directory Structure<br />
<strong>X5</strong>-<strong>210M</strong> <strong>User's</strong> <strong>Manual</strong><br />
Figure 21. XMC EEProm Programmer<br />
The EEPROM application is straightforward to use: a Target board is selected, then a .BIT file is selected for reprogramming.<br />
The Target number tells the software which XMC module to program. If you have multiple XMC modules in the system,<br />
each has a unique Target number assigned by the software. If you don't know which card is which target, you can use the<br />
Finder program to blink the LED on each Target.<br />
Once you have selected the .BIT file, press the load button to begin programming. The progress bar shows that the<br />
programming is underway and when it is completed. Programming a few minutes due to the size of the configuration<br />
bitstreams used by the Virtex-5 device. DO NOT TURN OFF THE HOST COMPUTER OR RESTART IT UNTIL<br />
PROGRAMMING IS SUCCESSFULLY COMPLETED.<br />
Once the EEPROM is reprogrammed, the <strong>X5</strong> module must be power-cycled for reconfiguration to take place and the new<br />
bitstream loaded into the Virtex-5 device.<br />
Rescuing the Card When the Logic Image is Bad<br />
If an invalid image is programmed into the EEPROM, or the process is interrupted before completion for any reason, the<br />
Virtex-5 may no longer configure properly or may not communicate properly on the PCIe bus. If this occurs, then the card<br />
can be booted from the backup image or can be programmed using a JTAG cable.<br />
The backup image, or “golden” image, may be used to boot the <strong>X5</strong> card by installing a jumper on JP3. This forces the logic<br />
loader to load the <strong>X5</strong> logic with the backup image. The card should boot with the backup image, then allowing the primary<br />
image to be reprogrammed using the EEPROM applet.<br />
<strong>X5</strong>-<strong>210M</strong> <strong>User's</strong> <strong>Manual</strong> 59
Linux Directory Structure<br />
<strong>X5</strong>-<strong>210M</strong> <strong>User's</strong> <strong>Manual</strong><br />
If the backup image is bad or not available, then the card can be programmed with a Xilinx JTAG using a known good<br />
image, followed by a warm-boot of the host system to allow the host OS to recognize the <strong>X5</strong> module on the PCIE bus. Once<br />
this is accomplished, a known-good image may be reprogrammed into the EEPROM using the EEPROM.exe tool.<br />
<strong>X5</strong>-<strong>210M</strong> <strong>User's</strong> <strong>Manual</strong> 60
Linux Directory Structure<br />
<strong>X5</strong>-<strong>210M</strong> <strong>User's</strong> <strong>Manual</strong><br />
Writing Custom Applications<br />
Most scientific and engineering applications require the acquisition and storage of data for analysis after the fact. Even in<br />
cases where most data analysis is done in place, there is usually a requirement that some data be saved to monitor the system.<br />
In many cases a pure data that does no immediate processing is the most common application.<br />
The X3 and <strong>X5</strong> XMC card families are high bandwidth analog capture modules with an advanced architecture that provides<br />
ultimate flexibility and speed for the most advanced hardware-assisted signal processing and ultrasonic signal capture. The<br />
maximum data rate from these module are often above 250 Msamples/s. This means that a simple logger that saves all of the<br />
data to the host disk is not feasible using standard operating system disk I/O calls, as the slower disk writes eventually cause<br />
overflow and data loss in the streaming system.<br />
Some modules support decimation so that long duration samples can be taken without data. Also quick snapshots of analog<br />
data can be taken without loss as long as the amount of data is less than the net capacity of system memory and what the<br />
baseboard holds. The example program provided for nearly all cards is this limited capacity data logger, called the Snap<br />
example<br />
The Snap Example<br />
The Snap example in each software distribution demonstrates this logging functionality. It consists of a host program in<br />
Windows, which works with the logic provided on the board's flash to stream data to the host. It uses the Innovative Malibu<br />
software libraries to accomplish the tasks.<br />
Tools Required<br />
In general, writing applications for the <strong>X5</strong> family requires the development of host program. This requires a development<br />
environment, a debugger, and a set of support libraries from Innovative.<br />
Table 15. Development Tools for the Windows Snap Example<br />
Processor Development Environment Innovativ<br />
e Toolset<br />
Project Directory<br />
Host PC<br />
Codegear Developers Studio C++<br />
Malibu<br />
Examples\Snap\Bcb11<br />
Microsoft Visual Studio 2008<br />
Examples\Snap\VC9<br />
Common Host Code<br />
Examples\Snap\Common<br />
<strong>X5</strong>-<strong>210M</strong> <strong>User's</strong> <strong>Manual</strong> 61
Linux Directory Structure<br />
<strong>X5</strong>-<strong>210M</strong> <strong>User's</strong> <strong>Manual</strong><br />
On the host side, the Malibu library is provided in source form, plus pre-compiled Microsoft, Borland or GCC libraries. The<br />
application code that implements the entirety of the board-specific functionality of example is factored into the<br />
ApplicationIo.cpp/h unit. All User Interface aspects of the program are completely independent from the code in<br />
ApplicationIo, which contains code portable to either compilation environment (i.e., it is common code). While each<br />
compiler implements the GUI differently, each version of the example project uses the same file to interact with the hardware<br />
and acquire data.<br />
Program Design<br />
The Snap example is designed to allow repeated data reception operations on command from the host. As mentioned earlier,<br />
received data can be saved as Host disk files. When using modest sample rates, data can be logged to standard disk files.<br />
However, full bandwidth storage of multiple A/D channels can require up more capacity, so a dedicated RAID0 drive array<br />
partitioned as NTFS for data storage may be required, or data may have to be cached online and stored after stopping data<br />
flow. The example application software is written to perform minimal processing of received data and is a suitable template<br />
for high-bandwidth applications.<br />
The example uses various configuration commands to prepare the module for data flow. Parametric information is obtained<br />
from a Host GUI application, but the code is written to be GUI-agnostic. All board-specific I/O is performed within the<br />
ApplicationIo.cpp/.h unit. Data is transferred from the module to the Host as packets of Buffer class objects.<br />
The Host Application<br />
The picture to the right shows the main window of an <strong>X5</strong> example (for the <strong>X5</strong>-400M). This form is from the designer of the<br />
MSVC 9.0 version of the example, but the Borland version is similar. It shows the layout of the controls of the User<br />
Interface.<br />
User Interface<br />
This application has five tabs. Each tab has its<br />
own significance and usage, though few are<br />
interrelated. All these tabs share a common<br />
area, which displays messages and feedback<br />
throughout the operation of the program.<br />
Configure Tab<br />
As soon as the application is launched, the<br />
Configure tab is displayed. In this tab, a combo<br />
box is available to allow the selection of the<br />
<strong>X5</strong>-<strong>210M</strong> <strong>User's</strong> <strong>Manual</strong> 62
Linux Directory Structure<br />
<strong>X5</strong>-<strong>210M</strong> <strong>User's</strong> <strong>Manual</strong><br />
device from those present in the system. All <strong>X5</strong> family devices of whatever type share a sequence of target number<br />
identifiers. The first board found is Target 0, the second Target 1, and so on.<br />
Click the Open button to open the driver. To change targets, click the Close button to close the driver, select the number of<br />
the desired target using the Target # combo box, then click Open to open communications with the specified target module.<br />
The order of the targets is determined by the location in the PCI bus, so it will remain unchanged from run to run unless the<br />
board is moved to a different slot or another target is installed.<br />
Setup Tab<br />
This tab has a set of controls that hold<br />
the parameters for transmission. These<br />
settings are delivered to the target and<br />
configure the target accordingly. This<br />
tab has several sections.<br />
Clock section offers configurations and<br />
routing of the clock. The clock for the<br />
FPGA can come from an external clock<br />
or from an internal crystal. The selection<br />
can be made at upper right corner of this<br />
section.<br />
The clock rate of the clock source is<br />
specified in the Output field in MHz.<br />
The Communications section controls<br />
the Alert features and the input data<br />
packets size. Checking the box next to<br />
an alert will allow the logic to generate<br />
an alert if the condition occurs. This<br />
alert can then be left in the data stream,<br />
or extracted to notify the application.<br />
In the Channels section, we can specify number of channels to activate. Selecting a channel will flow data from that data<br />
source.<br />
The Trigger selection box controls the way that data streaming is started. It can be started by an external signal or by the<br />
software. Data can also be collected into frames. In this mode a trigger will collect multiple samples before checking the<br />
trigger again. By default trigger source is set to software triggering, though external trigger can be provided once selected.<br />
The Digital I/O field configures the onboard digital I/O. The Data Logging option determines if data streaming stops after<br />
collecting points (a Snapshot of data) or streams forever until manually stopped.<br />
<strong>X5</strong>-<strong>210M</strong> <strong>User's</strong> <strong>Manual</strong> 63
Linux Directory Structure<br />
<strong>X5</strong>-<strong>210M</strong> <strong>User's</strong> <strong>Manual</strong><br />
The module supports a test mode for module debugging and system test. The Test Counter Enable is used to turn on test<br />
mode and substitutes a ramp signal with channel number in the upper byte of the data. The Decimation section sets up the<br />
decimation logic to discard data, reducing the incoming data rate.<br />
Stream Tab<br />
The two buttons in the button bar start and stop data streaming. Press the running man button to start streaming data. Press<br />
the stop button to stop streaming, unless the stream has stopped itself. When streaming, the status bar data is collected and<br />
displayed. This includes a count of the data blocks received, the data rate, the measured temperature of the board logic, and<br />
the digital I/O value.<br />
Host Side Program Organization<br />
The Malibu library is designed to be rebuildable in each of three different host environments: Codegear Developer's Studio<br />
C++ , Microsoft Visual Studio 2008, and on Linux. Because the library has a common interface in all environments, the code<br />
that interacts with Malibu is separated out into a class, ApplicationIo in the files ApplicationIo.cpp and .h. This class acts<br />
identically in all the platforms.<br />
The Main form of the application creates an ApplicationIo to perform the work of the example. The UI can call the methods<br />
of the ApplicationIo to perform the work when, for example, a button is pressed or a control changed.<br />
Sometimes, however, the ApplicationIo object needs to 'call back into' the UI. But since the code here is common, it can't use<br />
a pointer to the main window or form, as this would make ApplicationIo have to know details of Borland or the VC<br />
environment in use.<br />
The standard solution to decouple the ApplicationIo from the form is to use an Interface class to hide the implementation. An<br />
interface class is an abstract class that defines a set of methods that can be called by a client class (here, ApplicationIo). The<br />
other class produces an implementation of the Interface by either multiple inheriting from the interface, or by creating a<br />
separate helper class object that derives from the interface. In either case the implementing class forwards the call to the UI<br />
form class to perform the action. ApplicationIo only has to know how to deal with a pointer to a class that implements the<br />
interface, and all UI dependencies are hidden.<br />
<strong>X5</strong>-<strong>210M</strong> <strong>User's</strong> <strong>Manual</strong> 64
Linux Directory Structure<br />
<strong>X5</strong>-<strong>210M</strong> <strong>User's</strong> <strong>Manual</strong><br />
The predefined IUserInterface interface class is defined in ApplicationIo.h. The constructor of ApplicationIo requires a<br />
pointer to the interface, which is saved and used to perform the actual updates to the UI inside of ApplicationIo's methods.<br />
ApplicationIo<br />
Initialization<br />
The main form creates an ApplicationIo object in its constructor. The object creates a number of Malibu objects at once as<br />
can be seen from this detail from the header ApplicationIo.h.<br />
//<br />
// Member Data<br />
Innovative::<strong>X5</strong>_400M<br />
IUserInterface *<br />
Innovative::PacketStream<br />
IntArray<br />
unsigned int<br />
ii64<br />
bool<br />
bool<br />
bool<br />
Innovative::StopWatch<br />
Innovative::DataLogger<br />
IntArray<br />
Innovative::BinView<br />
Innovative::Scripter<br />
float<br />
std::string<br />
Innovative::AveragedRate<br />
double<br />
std::string<br />
Innovative::SoftwareTimer<br />
...<br />
Module;<br />
UI;<br />
Stream;<br />
_Rx;<br />
Cursor;<br />
BlocksToLog;<br />
Opened;<br />
Stopped;<br />
StreamConnected;<br />
Clock;<br />
Logger;<br />
DataRead;<br />
Graph;<br />
Script;<br />
ActualSampleRate;<br />
Root;<br />
Time;<br />
FBlockRate;<br />
FVersion;<br />
Timer;<br />
In Malibu, objects are defined to represent units of hardware as well as software units. The <strong>X5</strong>_400M object represents the<br />
board. The PacketStream object encapsulates supported, board-specific operations related to I/O Streaming. A Scripter object<br />
can be used to add a simple scripting language to the application, for the purposes of performing hardware initialization<br />
during FPGA firmware development. The Buffer class object is used to access buffer contents.<br />
When the Open button is pressed, the application io object begins the process of setting up the board for a run. The first thing<br />
done is to link Malibu software events to callback functions in the applications by setting the handler functions:<br />
// Hook script event handlers.<br />
Script.OnCommand.SetEvent(this, &ApplicationIo::HandleScriptCommand);<br />
Script.OnMessage.SetEvent(this, &ApplicationIo::HandleScriptMessage);<br />
This code attaches script event handlers to their corresponding events. Malibu has a method where functions can be 'plugged<br />
into' the library to be called at certain times or in response to certain events detected. Events allow a tight integration between<br />
an application and the library. These events are informational messages issued by the scripting and logic loader feature of the<br />
module. They display feedback during the loading of the user logic and when script is used.<br />
<strong>X5</strong>-<strong>210M</strong> <strong>User's</strong> <strong>Manual</strong> 65
Linux Directory Structure<br />
<strong>X5</strong>-<strong>210M</strong> <strong>User's</strong> <strong>Manual</strong><br />
//<br />
// Configure Module Event Handlers<br />
Module.OnBeforeStreamStart.SetEvent(this, &ApplicationIo::HandleBeforeStreamStart);<br />
Module.OnBeforeStreamStart.Synchronize();<br />
Module.OnAfterStreamStart.SetEvent(this, &ApplicationIo::HandleAfterStreamStart);<br />
Module.OnAfterStreamStart.Synchronize();<br />
Module.OnAfterStreamStop.SetEvent(this, &ApplicationIo::HandleAfterStreamStop);<br />
Module.OnAfterStreamStop.Synchronize();<br />
Similarly, HandleBeforeStreamStart, HandleAfterStreamStart and HandleAfterStreamStop handle events issued on before<br />
stream start, after stream start and after stream stop respectively. These handlers could be designed to perform multiple tasks<br />
as event occurs including displaying messages for user. These events are tagged as Synchronized, so Malibu will marshal the<br />
execution of the handlers for these events into the main thread context, allowing the handlers to perform user-interface<br />
operations.<br />
//<br />
// Alerts<br />
Module.Alerts().OnTimeStampRolloverAlert.SetEvent(<br />
this, &ApplicationIo::HandleTimestampRolloverAlert);<br />
Module.Alerts().OnSoftwareAlert.SetEvent(this, &ApplicationIo::HandleSoftwareAlert);<br />
Module.Alerts().OnWarningTemperature.SetEvent(this, &ApplicationIo::HandleWarningTempAlert);<br />
Module.Alerts().OnInputFifoOverrun.SetEvent(this, &ApplicationIo::HandleInputFifoOverrunAlert);<br />
Module.Alerts().OnInputTrigger.SetEvent(this, &ApplicationIo::HandleInputTriggerAlert);<br />
Module.Alerts().OnInputOverrange.SetEvent(this, &ApplicationIo::HandleInputFifoOverrangeAlert);<br />
This code attaches alert processing event handlers to their corresponding events. Alerts are packets that the module generates<br />
and sends to the Host as packets containing out-of-band information concerning the state of the module. For instance, if the<br />
analog inputs were subjected to an input over-range, an alert packet would be sent to the Host, interspersed into the data<br />
stream, indicating the condition. This information can be acted upon immediately, or simply logged along with analog data<br />
for subsequent post-analysis.<br />
//<br />
// Configure Stream Event Handlers<br />
Stream.OnDataAvailable.SetEvent(this, &ApplicationIo::HandleDataAvailable);<br />
The Stream object manages communication between the application and a piece of hardware. Separating the I/O into a<br />
separate class clarifies the distinction between an I/O protocol and the implementing hardware.<br />
In Malibu, high rate data flow is controlled by one of a number of streaming classes. In this example we use the events of the<br />
PacketStream class to alert us when a packet arrives from the target. When a data packet is delivered by the data streaming<br />
system, OnDataAvailable event will be issued to process the incoming data. This event is set to be handled by<br />
HandleDataAvailable. After processing, the data will be discarded unless saved in the handler. Similarly,<br />
“OnDataRequired” event is handled by HandleDataRequired. In such a handler, packets would be filled with data for output<br />
to the baseboard. The Snap application does not generate output, so the event is left unhandled.<br />
Timer.OnElapsed.SetEvent(this, &ApplicationIo::HandleTimer);<br />
Timer.OnElapsed.Thunk();<br />
In this example, a Malibu SoftwareTimer object has been added to the ApplicationIo class to provide periodic status updates<br />
to the user interface. The handler above serves this purpose.<br />
An event is not necessarily called in the same thread as the UI. If it is not, and if you want to call a UI function in the handler<br />
you have to have the event synchronized with the UI thread. A call to Synchronize() directs the event to call the event<br />
<strong>X5</strong>-<strong>210M</strong> <strong>User's</strong> <strong>Manual</strong> 66
Linux Directory Structure<br />
<strong>X5</strong>-<strong>210M</strong> <strong>User's</strong> <strong>Manual</strong><br />
handler in the main UI thread context. This results in a slight performance penalty, but allows us to call UI methods in the<br />
event handler freely. The Timer uses a similar synchronization method, Thunk(). Here the event is called in the main thread<br />
context, but the issuing thread does not wait for the event to be handled before proceeding. This method is useful for<br />
notification events.<br />
Creating a hardware object does not attach it to the hardware. The object has to be explicitly opened. The Open() method of<br />
the baseboard activates the board for use. It opens the device driver for the baseboard and allocates internal resources for<br />
use. The next step is to call Reset() method which performs a board reset to put the board into a known good state. Note that<br />
reset will stop all data streaming through the busmaster interface and it should be called when data taking has been halted.<br />
The size of the busmaster region is changeable by using the BusMasterSize() property before opening the board. Larger<br />
values allow more overlap between the board and application, at the cost of slower allocation at startup time.<br />
//<br />
// Open Devices<br />
FBusmasterSize = 1 Status("Module Device Opened...");<br />
Opened = true;<br />
This code shows how to open the device for streaming. Each baseboard has a unique code given in a PC. For instance, if<br />
there are three boards in a system, they will be targets 0,1 and 2. The order of the targets is determined by the location in the<br />
PCIe bus, so it will remain unchanged from run to run. Moving the board to a different PCIe slot may change the target<br />
identification. The Led() property can be use to associate a target number with a physical board in a configuration.<br />
//<br />
// Connect Stream<br />
Stream.ConnectTo(&Module);<br />
StreamConnected = true;<br />
UI->Status("Stream Connected...");<br />
Once the object is attached to actual physical device, the streaming controller associates with a baseboard by the<br />
ConnectTo() method. Once connected, the object is able to call into the baseboard for board-specific operations during data<br />
streaming. If an objects supports a stream type, this call will be implemented. Unsupported stream types will not compile.<br />
Lastly we capture and display some information to the screen. This includes the logic version, bus informaiton, and the<br />
number of input channels.<br />
FHwPciClk = Module.Debug()->PciClockRate();<br />
FHwBusWidth = Module.Debug()->PciBusWidth();<br />
DisplayLogicVersion();<br />
}<br />
FChannels = Module.Input().Info().Channels().Channels();<br />
Similarly, the Close() method closes the hardware. Inside this method, first we logically detach the streaming subsystem from<br />
its associated baseboard using Disconnect() method. Malibu method Close() is then used to detach the module from the<br />
hardware and release its resources.<br />
//---------------------------------------------------------------------------<br />
// ApplicationIo::Close() -- Close Hardware & set up callbacks<br />
<strong>X5</strong>-<strong>210M</strong> <strong>User's</strong> <strong>Manual</strong> 67
Linux Directory Structure<br />
<strong>X5</strong>-<strong>210M</strong> <strong>User's</strong> <strong>Manual</strong><br />
//---------------------------------------------------------------------------<br />
void ApplicationIo::Close()<br />
{<br />
Stream.Disconnect();<br />
StreamConnected = false;<br />
Opened = false;<br />
}<br />
UI->Status("Stream Disconnected...");<br />
Starting Data flow<br />
After downloading interface logic user can setup clocking and triggering options. The stream button then can be used to start<br />
streaming and thus data flow.<br />
//---------------------------------------------------------------------------<br />
// ApplicationIo::StartStreaming() -- Initiate data flow<br />
//---------------------------------------------------------------------------<br />
void ApplicationIo::StartStreaming()<br />
{<br />
if (!StreamConnected)<br />
{<br />
UI->Log("Stream not connected! -- Open the boards");<br />
return;<br />
}<br />
//<br />
// Make sure packets fit nicely in BM region.<br />
if (FBusmasterSize/16 < (unsigned int)Settings.PacketSize)<br />
{<br />
Log("Error: Packet size is larger than recommended size");<br />
return;<br />
}<br />
//<br />
// Set up Parameters for Data Streaming<br />
// ...First have UI get settings into our settings store<br />
UI->GetSettings();<br />
Before we start streaming, all necessary parameters must be checked and loaded into option object. UI-> GetSettings() loads<br />
the settings information from the UI controls into the Settings structure in the ApplicationIo class.<br />
if (SampleRate() > Module.Input().Info().MaxRate())<br />
{<br />
UI->Log("Sample rate too high.");<br />
StopStreaming();<br />
UI->AfterStreamAutoStop();<br />
return;<br />
}<br />
We insure that the sample rate specified by the GUI is within the capabilities of the module.<br />
if (Settings.Framed)<br />
{<br />
if (Settings.FrameCount < Settings.PacketSize)<br />
{<br />
UI->Log("Error: Frame count must exceed packet size");<br />
UI->AfterStreamAutoStop();<br />
<strong>X5</strong>-<strong>210M</strong> <strong>User's</strong> <strong>Manual</strong> 68
Linux Directory Structure<br />
<strong>X5</strong>-<strong>210M</strong> <strong>User's</strong> <strong>Manual</strong><br />
}<br />
return;<br />
}<br />
The module supports both framed and continuous triggering. In framed mode, each trigger event, whether external or<br />
software initiated, results in the acquisition of a fixed number of samples. In continuous mode, data flow continues whenever<br />
the trigger is active, and pauses while the trigger is inactive. The code above issues a warning if the trigger mode is framed<br />
and ill-formed.<br />
FBlockCount = 0;<br />
FBlockRate = 0;<br />
FTriggered = -1;<br />
The class variables above are used to maintain counts of blocks received, reception rate and whether the module is currently<br />
triggered. These values are initialized prior to each streaming run.<br />
//<br />
// Channel Enables<br />
Module.Output().Info().Channels().DisableAll();<br />
Module.Input().Info().Channels().DisableAll();<br />
for (int i = 0; i < Channels(); ++i)<br />
{<br />
bool active = Settings.ActiveChannels[i] ? true : false;<br />
if (active==true)<br />
Module.Input().Info().Channels().Enabled(i, true);<br />
}<br />
<strong>X5</strong>_400M::IIClockSource src[] = { <strong>X5</strong>_400M::csExternal, <strong>X5</strong>_400M::csInternal };<br />
Module.ClockSource(src[Settings.SampleClockSource]);<br />
int ActiveChannels = Module.Input().Info().Channels().ActiveChannels();<br />
if (!ActiveChannels)<br />
{<br />
UI->Log("Error: Must enable at least one channel");<br />
UI->AfterStreamAutoStop();<br />
return;<br />
}<br />
The module supports up to 2 channels of simultaneous data. The previous call to GetSettings populated the Settings object<br />
with the number of channels to be enabled on this run. That information is used to enable the required channels via the<br />
Channels object within the Module.Input().Info() object. The clock source is also programmed using its property.<br />
// Packets scaled in units of events (samples per each enabled channel)<br />
int SamplesPerWord = 1;<br />
Module.ReturnPacketSize(Settings.PacketSize*ActiveChannels/SamplesPerWord + 2);<br />
The size of the data packets sent from the module to the Host during streaming is programmable. This is helpful during<br />
framed acquisition, since the packet size can be tailored to match a multiple of the frame size, providing application<br />
<strong>X5</strong>-<strong>210M</strong> <strong>User's</strong> <strong>Manual</strong> 69
Linux Directory Structure<br />
<strong>X5</strong>-<strong>210M</strong> <strong>User's</strong> <strong>Manual</strong><br />
notification on each acquired frame. In other applications, such as when an FFT is embedded within the FPGA, the packet<br />
size can be programmed to match the processing block size from the algorithm within the FPGA.<br />
//<br />
// Start Loggers on active channels<br />
if (Settings.PlotEnable)<br />
Graph.Quit();<br />
if (Settings.LoggerEnable || Settings.PlotEnable)<br />
Logger.Start();<br />
BlocksToLog = Settings.SamplesToLog/Settings.PacketSize<br />
+ ((Settings.SamplesToLog%Settings.PacketSize) ? 1 : 0);<br />
Stopped = false;<br />
The example illustrates logging data to a disk file, with post-viewing of the acquired data using BinView. The code fragment<br />
above closes any pending instance of BinView and logger data files.<br />
Module.Dio().DioPortConfig(Settings.DioConfig);<br />
The module supports programmable bit I/O, available on connector JP16. The code fragment above programs the direction<br />
of these DIO bits in accordance with the settings from the GUI.<br />
// Set test mode<br />
Module.Input().TestEnable(Settings.TestCounterEnable);<br />
// Set Decimation Factor<br />
int factor = Settings.DecimationEnable ? Settings.DecimationFactor : 0;<br />
Module.Input().Decimation(factor);<br />
For test purposes, the FPGA firmware supports replacement of analog input samples with ascending ramp data. If the test<br />
counter is enabled in the GUI, it is applied to the hardware using the preceding code fragment.<br />
The logic has a decimation feature, where samples are discarded to reduce the sample rate. If used, all but one of every N<br />
samples are discarded. If no decimation is desired, the default value of 1 should be used.<br />
// All channels trigger together<br />
Module.Input().ExternalTrigger((Settings.ExternalTrigger == 1));<br />
Samples will not be acquired until the channels are triggered. Triggering may be initiated by a software command or via an<br />
external input signal to the Trigger SMA connector. The code fragment above selects the trigger mode.<br />
// Frame count in units of packet elements<br />
if (Settings.Framed)<br />
Module.Input().Framed(Settings.FrameCount);<br />
else<br />
Module.Input().Unframed();<br />
The module supports framed triggering, where a single trigger enables many data samples to be taken before rechecking the<br />
trigger. This code enables framed mode, or disables it depending on the settings.<br />
<strong>X5</strong>-<strong>210M</strong> <strong>User's</strong> <strong>Manual</strong> 70
Linux Directory Structure<br />
<strong>X5</strong>-<strong>210M</strong> <strong>User's</strong> <strong>Manual</strong><br />
enum IUses<strong>X5</strong>Alerts::AlertType Alert[] = {<br />
IUses<strong>X5</strong>Alerts::alertTimeStampRollover, IUses<strong>X5</strong>Alerts::alertSoftware,<br />
IUses<strong>X5</strong>Alerts::alertWarningTemperature,<br />
IUses<strong>X5</strong>Alerts::alertInputFifoOverrun,<br />
IUses<strong>X5</strong>Alerts::alertInputTrigger, IUses<strong>X5</strong>Alerts::alertInputOverrange };<br />
for (unsigned int i = 0; i < Settings.AlertEnable.size(); ++i)<br />
Module.Alerts().AlertEnable(Alert[i], Settings.AlertEnable[i] ? true : false);<br />
The fragment above enables alert generation by the module. The GUI control includes check boxes for each of the types of<br />
alerts of which the module is capable. The enabled state of the check boxes is copied into the Settings.AlertEnable array.<br />
This code fragment applies the state of each bit in that array to the Alerts() sub-object within the module. During streaming,<br />
an alert message will be sent to the Host tagged with a special alert packet ID (PID), to signify the alert condition.<br />
//<br />
// Start Streaming<br />
Stream.Start();<br />
UI->Log("Stream Mode started");<br />
UI->Status("Stream Mode started");<br />
The Stream Start command applies all of the above configuration settings to the module, then enables PCI data flow. The<br />
software timer is then started as well.<br />
}<br />
FTicks = 0;<br />
Timer.Enabled(true);<br />
Handle Data Available<br />
Once streaming is enabled and the module is triggered, data flow will commence. Samples will be accumulated into the<br />
onboard FIFO, then they are bus-mastered to the Host PC into page-locked, driver-allocated memory following a two -word<br />
header (data packets). Upon receipt of a data packet, Malibu signals the Stream.OnDataAvailable event. By hooking this<br />
event, your application can perform processing on each acquired packet. Note, however, that this event is signaled from<br />
within a background thread. So, you must not perform non-reentrant OS system calls (such as GUI updates) from within<br />
your handler unless you marshal said processing into the foreground thread context.<br />
//---------------------------------------------------------------------------<br />
// ApplicationIo::HandleDataAvailable() -- Handle received packet<br />
//---------------------------------------------------------------------------<br />
void ApplicationIo::HandleDataAvailable(PacketStreamDataEvent & Event)<br />
{<br />
if (Stopped)<br />
return;<br />
static Buffer Packet;<br />
//<br />
// Extract the packet from the Incoming Queue...<br />
Event.Sender->Recv(Packet);<br />
IntegerDG Packet_DG(Packet);<br />
PacketBufferHeader PktBufferHdr(Packet);<br />
<strong>X5</strong>-<strong>210M</strong> <strong>User's</strong> <strong>Manual</strong> 71
Linux Directory Structure<br />
<strong>X5</strong>-<strong>210M</strong> <strong>User's</strong> <strong>Manual</strong><br />
When the event is signaled, the data buffer must be copied from the system bus-master pool into an application buffer. The<br />
preceding code copies the packet into the local Buffer called Packet. Since data sent from the hardware can be of arbitrary<br />
type (integers, floats, or even a mix, depending on the board and the source), Buffer objects have no assumed data type and<br />
have no functions to access the data in them. Instead, a second class called a datagram wraps the buffer, providing typed or<br />
specialized access to the data in the buffer.<br />
The above code associates 2 datagram classes with the packet. IntegerDG provides access to the data in the packet as if it<br />
were an array of 32-bit integers. The PacketBufferHeader datagram class provides access to the header of the packet, and<br />
defines access methods to the fields in the header of a Packet Stream buffer.<br />
//<br />
// Process the data packet<br />
int Channel = PktBufferHdr.PeripheralId();<br />
// Discard packets from sources other than analog devices<br />
if (Channel >= Channels())<br />
return;<br />
Each Packet Stream Buffer consists of a header and a body of data. The header contains a field that specifies the source of<br />
the data packet. This can be interrogated to provide different processing for packets from each source. In the fragment above,<br />
packets containing peripheral IDs greater than the number of enabled channels are discarded. Consequently, alert packets are<br />
not retained or processed.<br />
// Calculate transfer rate in KB/s<br />
double Period = Time.Differential();<br />
if (Period)<br />
FBlockRate = Packet_DG.SizeInBytes() / (Period*1.0e6);<br />
The code fragment above calculates the nominal block processing rate. The AveragedRate object, Time, maintains a moving<br />
averaged filtered rate. This rate is stored in FBlockRate for use by display method of the GUI.<br />
if (Settings.LoggerEnable && !Logger.Logged())<br />
{<br />
// Start counter<br />
Clock.Start();<br />
std::stringstream msg;<br />
msg
Linux Directory Structure<br />
<strong>X5</strong>-<strong>210M</strong> <strong>User's</strong> <strong>Manual</strong><br />
//<br />
// Stop streaming when both Channels have passed their limit<br />
if (Settings.AutoStop && IsDataLoggingCompleted() && !Stopped)<br />
{<br />
// Stop counter and display it<br />
double elapsed = Clock.Stop();<br />
StopStreaming();<br />
UI->AfterStreamAutoStop();<br />
UI->Log("Stream Mode Stopped automatically");<br />
UI->Log(std::string("Elasped (S): ") + FloatToString(elapsed));<br />
}<br />
// Auto-analyze and retrigger in framed mode<br />
if (!Settings.Framed)<br />
return;<br />
Packets are processed until a specified amount of data is logged or the GUI Stop button is pressed.<br />
if ((Settings.ExternalTrigger == 0) && Settings.AutoTrigger)<br />
{<br />
__int64 samples = FBlockCount * Settings.PacketSize;<br />
int triggers = static_cast(samples/Settings.FrameCount);<br />
}<br />
if (triggers != FTriggered)<br />
SoftwareTrigger();<br />
}<br />
In the event that were operating in framed trigger mode, the example code re-asserts a software trigger each time a framesworth<br />
of data packets have been received. If we're in continuous mode, no action need be performed to sustain data flow.<br />
EEProm Access<br />
Each PMC module contains an IDROM region that can be used to read or write information associated with the module. In<br />
the next line of code we make a call to Malibu method IdRom(), which returns an object that acts as interface to that region.<br />
We further can query the ROM for its contents. Additional methods can be used to get more specific information.<br />
//---------------------------------------------------------------<br />
// System::Void LoadFromRomButton_Click()<br />
//---------------------------------------------------------------<br />
private: System::Void LoadFromRomButton_Click(System::Object^ sender, System::EventArgs^ e)<br />
{<br />
Io->ReadRom();<br />
// Then test the information.<br />
...<br />
}<br />
//---------------------------------------------------------------------------<br />
// ApplicationIo::ReadRom() -- Read rom using relevant settings<br />
//---------------------------------------------------------------------------<br />
<strong>X5</strong>-<strong>210M</strong> <strong>User's</strong> <strong>Manual</strong> 73
Linux Directory Structure<br />
<strong>X5</strong>-<strong>210M</strong> <strong>User's</strong> <strong>Manual</strong><br />
void ApplicationIo::ReadRom()<br />
{<br />
Module.IdRom().LoadFromRom();<br />
Settings.ModuleName = Module.IdRom().Name();<br />
Settings.ModuleRevision = Module.IdRom().Revision();<br />
for (int ch = 0; ch < Channels(); ++ch)<br />
{<br />
Settings.AdcGain[ch] = Module.Input().Gain(ch);<br />
Settings.AdcOffset[ch] = Module.Input().Offset(ch);<br />
}<br />
}<br />
Settings.Calibrated = Module.Input().Calibrated();<br />
There is also a mechanism to write to the on-board EEPROM.<br />
//---------------------------------------------------------------------------<br />
// ApplicationIo::WriteRom() -- Write rom using relevant settings<br />
//---------------------------------------------------------------------------<br />
void ApplicationIo::WriteRom()<br />
{<br />
Module.IdRom().Name(Settings.ModuleName);<br />
Module.IdRom().Revision(Settings.ModuleRevision);<br />
for (int ch = 0; ch < Channels(); ++ch)<br />
{<br />
Module.Input().Gain(ch, Settings.AdcGain[ch]);<br />
Module.Input().Offset(ch, Settings.AdcOffset[ch]);<br />
}<br />
Module.Input().Calibrated(Settings.Calibrated);<br />
}<br />
Module.IdRom().StoreToRom();<br />
The application code should test for NAN and in general for the validity of the received data. Please see Form1.h for<br />
MSVC .NET 2005 projects or Main.cpp for Borland 10 projects.<br />
//---------------------------------------------------------------<br />
// System::Void LoadFromRomButton_Click()<br />
//---------------------------------------------------------------<br />
private: System::Void LoadFromRomButton_Click(System::Object^ sender, System::EventArgs^ e)<br />
{<br />
Io->ReadRom();<br />
for (int i = 0; i < Io->Channels(); ++i)<br />
{<br />
if (!_isnan(Io->Settings.AdcGain[i]) && _finite(Io->Settings.AdcGain[i]))<br />
{<br />
AdcCoefGrid[0, i]->Value = gcnew String(<br />
Innovative::FloatToString(Io->Settings.AdcGain[i], 4).c_str());<br />
}<br />
else<br />
{<br />
<strong>X5</strong>-<strong>210M</strong> <strong>User's</strong> <strong>Manual</strong> 74
Linux Directory Structure<br />
<strong>X5</strong>-<strong>210M</strong> <strong>User's</strong> <strong>Manual</strong><br />
AdcCoefGrid[0, i]->Value = gcnew String("NAN");<br />
}<br />
if (!_isnan(Io->Settings.AdcOffset[i]) && _finite(Io->Settings.AdcOffset[i]))<br />
{<br />
AdcCoefGrid[1, i]->Value = gcnew String(<br />
Innovative::FloatToString(Io->Settings.AdcOffset[i], 4).c_str());<br />
}<br />
else<br />
{<br />
AdcCoefGrid[1, i]->Value = gcnew String("NAN");<br />
}<br />
}<br />
PllCorrectionEdit->Text = gcnew String(<br />
Innovative::FloatToString(Io->Settings.PllCorrection, 4).c_str());<br />
CalibratedCheckBox->Checked = Io->Settings.Calibrated;<br />
ModuleNameEdit->Text = gcnew String(Io->Settings.ModuleName.c_str());<br />
ModuleRevisionEdit->Text = gcnew String(Io->Settings.ModuleRevision.c_str());<br />
}<br />
The Linux Snap Example<br />
With the release of Linux support for Malibu and for Innovative products, there are versions of the example programs for<br />
this platform. This section discusses the Linux Snap example.<br />
The ApplicationIo Class<br />
Because we designed the original examples to separate Malibu and Baseboard functionality into a portable class, this code<br />
can move to the Linux example unchanged. So the above discussion of the features of the ApplicationIo class is directly<br />
applicable to the Linux example. In fact, the code itself is shared between the platforms.<br />
User Interface<br />
The Linux OS supports a number of different windowing systems. We have chosen WxWidgets and DialogBlocks as an<br />
inexpensive, easy to use library and environment. Again, since the ApplicationIo object holds all the “program logic” for an<br />
application porting to a new environment is relatively straightforward.<br />
This application has five tabs. Each tab has its own significance and usage, though few are interrelated. All these tabs share a<br />
common area, which displays messages and feedback throughout the operation of the program.<br />
<strong>X5</strong>-<strong>210M</strong> <strong>User's</strong> <strong>Manual</strong> 75
Linux Directory Structure<br />
<strong>X5</strong>-<strong>210M</strong> <strong>User's</strong> <strong>Manual</strong><br />
Configure Tab<br />
As soon as the application is launched,<br />
the Configure tab is displayed. In this<br />
tab, a combo box is available to allow<br />
the selection of the device from those<br />
present in the system. All <strong>X5</strong> family<br />
devices of whatever type share a<br />
sequence of target number identifiers.<br />
The first board found is Target 0, the<br />
second Target 1, and so on.<br />
Click the Open button to open the<br />
driver. To change targets, click the<br />
Close button to close the driver, select<br />
the number of the desired target using<br />
the Target # combo box, then click<br />
Open to open communications with the<br />
specified target module. The order of<br />
the targets is determined by the location<br />
in the PCI bus, so it will remain<br />
unchanged from run to run unless the<br />
board is moved to a different slot or<br />
another target is installed.<br />
<strong>X5</strong>-<strong>210M</strong> <strong>User's</strong> <strong>Manual</strong> 76
Linux Directory Structure<br />
<strong>X5</strong>-<strong>210M</strong> <strong>User's</strong> <strong>Manual</strong><br />
Setup Tab<br />
This tab has a set of controls that hold<br />
the parameters for transmission. These<br />
settings are delivered to the target and<br />
configure the target accordingly. This<br />
tab has several sections.<br />
The Clock section offers configurations<br />
and routing of the clock. The clock for<br />
the FPGA can come from an external<br />
clock or from an internal crystal. The<br />
selection can be made at upper right<br />
corner of this section.<br />
The clock rate of the clock source is<br />
specified in the Output field in MHz.<br />
The Communications section controls<br />
the Alert features and the input data<br />
packets size. Checking the box next to<br />
an alert will allow the logic to generate<br />
an alert if the condition occurs. This<br />
alert can then be left in the data stream,<br />
or extracted to notify the application.<br />
In the Channels section, we can specify<br />
number of channels to activate.<br />
Selecting a channel will flow data from<br />
that data source.<br />
The Trigger selection box controls the way that data streaming is started. It can be started by an external signal or by the<br />
software. Data can also be collected into frames. In this mode a trigger will collect multiple samples before checking the trigger<br />
again. By default trigger source is set to software triggering, though external trigger can be provided once selected.<br />
The Digital I/O field configures the onboard digital I/O. The Data Logging option determines if data streaming stops after<br />
collecting points (a Snapshot of data) or streams forever until manually stopped.<br />
The module supports a test mode for module debugging and system test. The Test Counter Enable is used to turn on test mode<br />
and substitutes a ramp signal with channel number in the upper byte of the data. The Decimation section sets up the decimation<br />
logic to discard data, reducing the incoming data rate.<br />
<strong>X5</strong>-<strong>210M</strong> <strong>User's</strong> <strong>Manual</strong> 77
Linux Directory Structure<br />
<strong>X5</strong>-<strong>210M</strong> <strong>User's</strong> <strong>Manual</strong><br />
Stream Tab<br />
The two buttons in the button bar start<br />
and stop data streaming. Press the<br />
running man button to start streaming<br />
data. Press the stop button to stop<br />
streaming, unless the stream has<br />
stopped itself. When streaming, the<br />
status bar data is collected and<br />
displayed. This includes a count of the<br />
data blocks received, the data rate, the<br />
measured temperature of the board<br />
logic, and the digital I/O value.<br />
The Wave Example<br />
The Wave example in the software distribution demonstrates output streaming. It will only be included if the board supports<br />
streaming out to a DAC or similar device or devices.<br />
In many ways the Wave example is similar to the Snap example. Differences are highlighted in this section.<br />
Stream Initialization<br />
Setup of the stream is much like the Snap example. We have similar error checking code and rate guarding.<br />
//---------------------------------------------------------------------------<br />
<strong>X5</strong>-<strong>210M</strong> <strong>User's</strong> <strong>Manual</strong> 78
Linux Directory Structure<br />
<strong>X5</strong>-<strong>210M</strong> <strong>User's</strong> <strong>Manual</strong><br />
// ApplicationIo::StartStreaming()<br />
//---------------------------------------------------------------------------<br />
void ApplicationIo::StartStreaming()<br />
{<br />
if (!FStreamConnected)<br />
{<br />
UI->Log("Stream not connected! -- Open the boards");<br />
return;<br />
}<br />
//<br />
// Make sure packets fit nicely in BM region.<br />
if (FBmSizeWords/8 < (unsigned int)Settings.StreamPacketSize)<br />
{<br />
UI->Log("Error: Packet size is larger than recommended size");<br />
return;<br />
}<br />
//<br />
// Set up Parameters for Data Streaming<br />
// ...First have UI get settings into our settings store<br />
UI->GetSettings();<br />
if (Settings.TestEnable)<br />
{<br />
Module.Output().TestEnable(Settings.TestEnable);<br />
Module.Output().TestMode(Settings.TestMode);<br />
Module.Output().TestFrequency(Settings.TestFrequency);<br />
}<br />
if (SampleRate() > Module->Output().Info().MaxRate())<br />
{<br />
UI->Log("Sample rate too high.");<br />
StopStreaming();<br />
UI->AfterStreamAutoStop();<br />
return;<br />
}<br />
FBlockCount = 0;<br />
FBlockRate = 0;<br />
FTriggered = -1;<br />
The first difference is that we configure the Output() sub-object instead of Input(). The <strong>X5</strong> Family divides the interface<br />
functions for Input and Output devices into separate configuration sub-objects. This allows Input and Output to be<br />
independently configured.<br />
//<br />
// Channel Enables<br />
Module.Output().Info().Channels().DisableAll();<br />
for (int i = 0; i < Channels(); ++i)<br />
if (Settings.ActiveChannels[i]==true)<br />
Module.Output().Info().Channels().Enabled(i, true);<br />
int ActiveChannels = Module->Output().Info().Channels().ActiveChannels();<br />
if (!ActiveChannels)<br />
{<br />
UI->Log("Error: Must enable at least one channel");<br />
UI->AfterStreamAutoStop();<br />
return;<br />
}<br />
<strong>X5</strong>-<strong>210M</strong> <strong>User's</strong> <strong>Manual</strong> 79
Linux Directory Structure<br />
<strong>X5</strong>-<strong>210M</strong> <strong>User's</strong> <strong>Manual</strong><br />
FStreaming = true;<br />
// Set Decimation Factor<br />
int factor = Settings.DecimationEnable ? Settings.DecimationFactor : 0;<br />
Module.Output().Decimation(factor);<br />
// All channels trigger together<br />
Module->Output().ExternalTrigger((Settings.ExternalTrigger == 1));<br />
// Frame count in units of packet elements<br />
if (Settings.Framed)<br />
Module->Output().Framed(Settings.FrameCount);<br />
else<br />
Module->Output().Unframed();<br />
Alerts and starting the Stream are the same as in Input only mode.<br />
enum IUses<strong>X5</strong>Alerts::AlertType Alert[] =<br />
{<br />
IUses<strong>X5</strong>Alerts::alertTimeStampRollover,<br />
IUses<strong>X5</strong>Alerts::alertSoftware,<br />
IUses<strong>X5</strong>Alerts::alertWarningTemperature,<br />
IUses<strong>X5</strong>Alerts::alertOutputFifoUnderrun,<br />
IUses<strong>X5</strong>Alerts::alertOutputTrigger<br />
};<br />
for (unsigned int i = 0; i < Settings.AlertEnable.size(); ++i)<br />
Module->Alerts().AlertEnable(Alert[i], Settings.AlertEnable[i] ? true : false);<br />
// Start Streaming<br />
Stream->Start();<br />
UI->Log("Stream Mode started");<br />
UI->Status("Stream Mode started");<br />
}<br />
FTicks = 0;<br />
Timer.Enabled(true);<br />
//---------------------------------------------------------------------------<br />
// ApplicationIo::StopStreaming()<br />
//---------------------------------------------------------------------------<br />
void ApplicationIo::StopStreaming()<br />
{<br />
if (!FStreaming)<br />
return;<br />
if (!FStreamConnected)<br />
{<br />
UI->Log("Stream not connected! -- Open the boards");<br />
return;<br />
}<br />
}<br />
//<br />
// Stop Streaming<br />
Stream->Stop();<br />
FStreaming = false;<br />
Timer.Enabled(false);<br />
<strong>X5</strong>-<strong>210M</strong> <strong>User's</strong> <strong>Manual</strong> 80
Linux Directory Structure<br />
<strong>X5</strong>-<strong>210M</strong> <strong>User's</strong> <strong>Manual</strong><br />
Data Required Event Handler<br />
When the output stream needs additional data, the Data Required event is signalled. The Wave application uses this call to<br />
generate new blocks for each channel and send them to the output via the SendOneBlock() method.<br />
//---------------------------------------------------------------------------<br />
// ApplicationIo::HandleDataRequired()<br />
//---------------------------------------------------------------------------<br />
void ApplicationIo::HandleDataRequired(PacketStreamDataEvent & Event)<br />
{<br />
SendOneBlock(Event.Sender);<br />
}<br />
//------------------------------------------------------------------------------<br />
// ApplicationIo::SendOneBlock()<br />
//------------------------------------------------------------------------------<br />
const int HeaderTagValuePostPacketizer = 0x00000000;<br />
const int HeaderTagValueOriginal = HeaderTagValuePostPacketizer;<br />
void ApplicationIo::SendOneBlock(PacketStream * PS)<br />
{<br />
static Buffer Packet;<br />
ShortDG Packet_DG(Packet);<br />
if (!FBlockCount)<br />
{<br />
Packet_DG.Resize(Settings.StreamPacketSize);<br />
PacketBufferHeader PktBufferHdr(Packet);<br />
PktBufferHdr.PacketSize(Settings.StreamPacketSize);<br />
PktBufferHdr.PeripheralId(Module.Output().PacketId());<br />
PktBufferHdr[1] = HeaderTagValueOriginal;<br />
//<br />
// Builds a one or 2 channel buffer<br />
BuildWave(Packet, Settings.WaveType);<br />
}<br />
For speed, the packet is created on the first call only. After that, the same data wave is sent to all channels. Note that it is<br />
allowed to send more than one output packet per notification. If no packets are sent, however, it is possible that further<br />
notifications may stop until the application starts sending data again. This decoupling of notification from sending allows<br />
different models of data generation to exist in Malibu. An application may send packets asynchronously and not handle<br />
notifications at all.<br />
// Calculate transfer rate in kB/s<br />
double Period = Time.Differential();<br />
if (Period)<br />
FBlockRate = Packet_DG.SizeInBytes() / (Period*1.0e6);<br />
//<br />
// No matter what channels are enabled, we have one packet type<br />
// to send here<br />
PS->Send(Packet);<br />
++FBlockCount;<br />
<strong>X5</strong>-<strong>210M</strong> <strong>User's</strong> <strong>Manual</strong> 81
Linux Directory Structure<br />
<strong>X5</strong>-<strong>210M</strong> <strong>User's</strong> <strong>Manual</strong><br />
}<br />
The Wave Example for Linux<br />
With the release of Linux support for Malibu and for Innovative products, there are versions of the example programs for<br />
this platform. This section discusses the Linux Wave example.<br />
The ApplicationIo Class<br />
Because we designed the original examples to separate Malibu and Baseboard functionality into a portable class, this code<br />
can move to the Linux example unchanged. So the above discussion of the features of the ApplicationIo class is directly<br />
applicable to the Linux example. In fact, the code itself is shared between the platforms.<br />
User Interface<br />
<strong>X5</strong>-<strong>210M</strong> <strong>User's</strong> <strong>Manual</strong> 82
Linux Directory Structure<br />
<strong>X5</strong>-<strong>210M</strong> <strong>User's</strong> <strong>Manual</strong><br />
Again, much of the Wave example's interface is the same as that of the Snap example described above. An exception is the<br />
“Waveform Data Source” section that configures the output waveform.<br />
There are two potential sources for a waveform. The first is the FPGA can generate a test waveform internally that is either a<br />
ramp or the sum of two sine waves. The FPGA group allows this to be configured. If the Enable box is checked the logic<br />
generator will be used.<br />
Alternatively the software can generate a waveform to be played. This is configured by the “Software” section. The<br />
frequency and amplitude of the wave can be controlled, or the data can be read from a file.<br />
A single block is pre-calculated with this waveform and sent when data is needed. This avoids issues with the speed of<br />
calculation of a buffer when data is required, at the cost of some flexibility.<br />
Developing Host Applications<br />
Developing an application will more than likely involve using an integrated development environment (IDE) , also known as<br />
an integrated design environment or an integrated debugging environment. This is a type of computer software that assists<br />
computer programmers in developing software.<br />
Refer to Chapter 3 “Creating Applications using an IDE” within the Malibu Library Users <strong>Manual</strong> for specific instructions<br />
for each of the supported compilers.<br />
<strong>X5</strong>-<strong>210M</strong> <strong>User's</strong> <strong>Manual</strong> 83
Linux Directory Structure<br />
<strong>X5</strong>-<strong>210M</strong> <strong>User's</strong> <strong>Manual</strong><br />
Applets<br />
The software release for a baseboard contains programs in addition to the example projects. These are collectively called<br />
“applets”. They provide a variety of services ranging from post analysis of acquired data to loading programs and logic to a<br />
full replacement host user interface. The applets provided with this release are described in this chapter.<br />
Shortcuts to these utilities are installed in Windows by the installation. To invoke any of these utilities, go to the Start Menu |<br />
Programs | and double-click the shortcut for the program you are interested in running.<br />
Common Applets<br />
Registration Utility (NewUser.exe)<br />
Some of the Host applets provided in the Developers Package are keyed to<br />
allow Innovative to obtain end-user contact information. These utilities allow<br />
unrestricted use during a 20 day trial period, after which you are required to<br />
register your package with Innovative. After, the trial period operation will be<br />
disallowed until the unlock code provided as part of the registration is entered<br />
into the applet. After using the NewUser.exe applet to provide Innovative<br />
Integration with your registration information, you will receive:<br />
The unlock code necessary for unrestricted use of the Host applets<br />
A WSC (tech-support service code) enabling free software maintenance<br />
downloads of development kit software and telephone technical hot line<br />
support for a one year period.<br />
Reserve Memory Applet (ReserveMemDsp.exe)<br />
<strong>X5</strong>-<strong>210M</strong> <strong>User's</strong> <strong>Manual</strong> 84
Linux Directory Structure<br />
<strong>X5</strong>-<strong>210M</strong> <strong>User's</strong> <strong>Manual</strong><br />
Each Innovative PCI-based DSP baseboard requires 2 to 8 MB of memory to be reserved for<br />
its use, depending on the rates of bus-master transfer traffic which each baseboard will<br />
generate. Applications operating at transfer rates in excess of 20 MB/sec should reserve<br />
additional, contiguous busmaster memory to ensure gap-free data acquisition.<br />
To reserve this memory, the registry must be updated using the ReserveMemDsp applet. If at<br />
any time you change the number of or rearrange the baseboards in your system, then you<br />
must invoke this applet to reserve the proper space for the busmaster region. See the Help<br />
file ReserveMemDsp.hlp, for operational details.<br />
Data Analysis Applets<br />
Binary File Viewer Utility (BinView.exe)<br />
BinView is a data display tool specifically designed to<br />
allow simplified viewing of binary data stored in data<br />
files or a resident in shared DSP memory. Please see the<br />
on-line BinView help file in your Binview installation<br />
directory.<br />
<strong>X5</strong>-<strong>210M</strong> <strong>User's</strong> <strong>Manual</strong> 85
Linux Directory Structure<br />
<strong>X5</strong>-<strong>210M</strong> <strong>User's</strong> <strong>Manual</strong><br />
Applets for the <strong>X5</strong>-<strong>210M</strong> Baseboard<br />
Logic Update Utility (VsProm.exe)<br />
The Logic Update Utility applet is designed to allow fieldupgrades<br />
of the logic firmware on the <strong>210M</strong> module. The<br />
utility permits an embedded firmware logic update file to<br />
reprogrammed into the baseboard Flash ROM, which stores<br />
the "personality" of the board.<br />
Note that this utility should only be used after firmware<br />
development and debugging has been completed. During the<br />
development cycle, it is much more efficient to download<br />
and debug firmware using the Xilinx Bit-Blaster JTAG<br />
cable.<br />
To use the applet, select the instance of the 400M module to<br />
be updated. This will be target zero in single-target<br />
installations.<br />
Then, click the browse button (...) to select the logic bit file<br />
image containing the updated firmware image. Typically,<br />
this is located in the Innovative\<strong>X5</strong>-<br />
<strong>210M</strong>\Hardware\Images folder on your default drive.<br />
Finally, click the Write button to program the firmware into<br />
the on-board FLASH rom. Programming typically takes<br />
about five minutes. After rebooting the PC, the new<br />
firmware will take effect.<br />
<strong>X5</strong>-<strong>210M</strong> <strong>User's</strong> <strong>Manual</strong> 86
Linux Directory Structure<br />
<strong>X5</strong>-<strong>210M</strong> <strong>User's</strong> <strong>Manual</strong><br />
Finder<br />
The Finder is designed to help correlate board target numbers<br />
against PCI slot numbers in systems employing multiple<br />
boards.<br />
Target Number<br />
Select the Target number of the board you wish to identify<br />
using the Target Number combo box.<br />
Blink<br />
Click the Blink button to blink the LED on the board for the<br />
specified target. It will continue blinking until you click<br />
Stop.<br />
On/OFF<br />
Use the On and Off buttons to activate or deactivate<br />
(respectively) the LED on the baseboard for the specified<br />
target. When you exit the application, the board’s LED will<br />
remain in the state programmed by this applet.<br />
<strong>X5</strong>-<strong>210M</strong> <strong>User's</strong> <strong>Manual</strong> 87
Linux Directory Structure<br />
<strong>X5</strong>-<strong>210M</strong> <strong>User's</strong> <strong>Manual</strong><br />
<strong>X5</strong>-<strong>210M</strong> XMC Module<br />
Introduction<br />
The <strong>X5</strong>-<strong>210M</strong> is a member of the <strong>X5</strong> XMC family that has four channels of 14-bit 250 MHz A/D conversion with DC<br />
coupled inputs.<br />
A high performance computing core for signal processing, data buffering and system IO is built around a Virtex-5 FPGA.<br />
Supporting peripherals include 512MBytes of DDR2 DRAM, 4MBytes of QDR2 SRAM, conversion timebase and<br />
triggering circuitry, 16 bits of digital IO, and a PCI Express interface. The module format is a single slot XMC and is<br />
compatible with XMC.3 host sites.<br />
Figure 22. <strong>X5</strong>-<strong>210M</strong> Module<br />
<strong>X5</strong>-<strong>210M</strong> <strong>User's</strong> <strong>Manual</strong> 88
Linux Directory Structure<br />
<strong>X5</strong>-<strong>210M</strong> <strong>User's</strong> <strong>Manual</strong><br />
Custom application logic development for the <strong>X5</strong>-<strong>210M</strong> is supported by the FrameWork Logic system from Innovative using<br />
VHDL and/or MATLAB Simulink. Signal processing, data analysis, and application-specific algorithms may be developed<br />
for use in the <strong>X5</strong>-<strong>210M</strong> logic and integrated with the hardware using the FrameWork Logic.<br />
Software support for the module includes host integration support including device drivers, XMC control and data flow and<br />
support applets.<br />
QDR-II<br />
SRAM<br />
4MB<br />
XMC<br />
42.3<br />
PCI<br />
Express<br />
8 lanes<br />
XMC<br />
P16<br />
DIO/<br />
RIO<br />
PCI<br />
Express<br />
Intf<br />
RapidIO<br />
Intf<br />
SRAM<br />
Controller<br />
App FPGA<br />
Xilinx Virtex5<br />
LX110T/SX95T<br />
A/D<br />
Intf<br />
Clocks<br />
A/D14-bit<br />
250 MSPS<br />
A/D14-bit<br />
250 MSPS<br />
A/D14-bit<br />
250 MSPS<br />
A/D14-bit<br />
250 MSPS<br />
Ext Clk<br />
A/D 0<br />
A/D 1<br />
A/D 2<br />
A/D 3<br />
DRAM<br />
Controller<br />
Trigger<br />
Trigger<br />
Config ROM<br />
DDR2<br />
DRAM<br />
512MB<br />
PWR<br />
Figure 23. <strong>X5</strong>-<strong>210M</strong> Block Diagram<br />
<strong>X5</strong>-<strong>210M</strong> <strong>User's</strong> <strong>Manual</strong> 89
Linux Directory Structure<br />
<strong>X5</strong>-<strong>210M</strong> <strong>User's</strong> <strong>Manual</strong><br />
Hardware Features<br />
A/D Converters<br />
The <strong>X5</strong>-<strong>210M</strong> has four channels of 14-bit A/D sampling at up to 250 MSPS using Texas Instruments ADS6149 converters.<br />
Minimum sample rate is 1 MHz, and the <strong>X5</strong>-<strong>210M</strong> implements a DC-coupled 50 ohm terminated SMA connector-based front<br />
end.<br />
Feature<br />
Description<br />
Inputs 4<br />
Input Range<br />
Input Coupling<br />
Input Impedance<br />
A/D Devices<br />
Output Format<br />
Number of A/D Devices<br />
Sample Rate<br />
Calibration<br />
+1V to -1V single-ended<br />
DC<br />
50 ohm<br />
Texas Instruments ADS6149<br />
2's complement, 14-bit<br />
4 simultaneously sampling<br />
1-250 MSPS<br />
Factory calibrated. Gain and offset errors are<br />
digitally corrected in logic. Non-volatile EEPROM<br />
coefficient memory.<br />
Table 16. <strong>X5</strong>-<strong>210M</strong> A/D Features<br />
Conversion clocking is provided by either a low jitter fixed on board oscillator or an external clock input. The clock<br />
buffering is designed to minimize jitter and maximum acquired signal quality. See the clock discussion for more details.<br />
A/D Front End<br />
Front end circuitry for the A/D converters includes a 50 ohm terminated SMA input connector followed by a differential<br />
amplifier which implements the single-ended to differential conversion and A/D drive functions. The following two figures<br />
show the schematics for each channel.<br />
<strong>X5</strong>-<strong>210M</strong> <strong>User's</strong> <strong>Manual</strong> 90
Linux Directory Structure<br />
<strong>X5</strong>-<strong>210M</strong> <strong>User's</strong> <strong>Manual</strong><br />
Figure 1. <strong>X5</strong>-<strong>210M</strong> A/D Channel 0 Front End<br />
Input bandwidth measurement is shown in the data section of this chapter.<br />
Input Range and Conversion Codes<br />
Each A/D input has a +1V to -1V single-ended input with 50 ohm input impedance. Other input ranges may be custom<br />
ordered.<br />
Data output codes from the A/D system is 2's complement. The following table gives the transfer function.<br />
Input voltage (V+-V-)<br />
Conversion Code (hex)<br />
+1 0x1FFF<br />
+0.5 0x1000<br />
0V<br />
0x0<br />
-0.5 0x3000<br />
-1 0x2000<br />
<strong>X5</strong>-<strong>210M</strong> <strong>User's</strong> <strong>Manual</strong> 91
Linux Directory Structure<br />
<strong>X5</strong>-<strong>210M</strong> <strong>User's</strong> <strong>Manual</strong><br />
Table 1. A/D Conversion Coding<br />
Driving the A/D Inputs<br />
The <strong>X5</strong>-<strong>210M</strong> has single-ended DC-coupled inputs that are 50 ohm terminated. The 50 ohm termination is used to match the<br />
input cable and connector characteristic impedance. The source signal must be able to drive this input impedance to achieve<br />
the best signal quality over the input voltage range.<br />
Overrange Detection<br />
The A/D devices indicate when an overrange occurs on the input. The overrange indicator can be used to trigger an alert in<br />
the logic to notify the application when this error condition has occurred. The alert message shows when the overrange<br />
occurred in system time and which channels overranged.<br />
Custom logic has access to the overrange bits in the A/D interface component. Each data sample indicates when an overrange<br />
occurs as part of its status byte appended to the data. This allows implementation of automatic gain controls for auto-ranging<br />
external front end signal conditioning.<br />
Sample Rate Generation and Clocking Controls<br />
Conversion clock sources on the <strong>X5</strong>-<strong>210M</strong> include an external clock input and provision for an on-board oscillator. Clocks<br />
used to drive the <strong>X5</strong>-<strong>210M</strong> must be extremely low jitter in order to yield good signal to noise ratio, noise floor, and spur<br />
performance.<br />
The source of the clock is hard-wired depending on the application to use either the external clock input connector or the<br />
onboard oscillator. See the <strong>X5</strong>-<strong>210M</strong> datasheet for part numbers for each configuration.<br />
The external clock input at connector J4 is AC coupled and can accept either sine wave or digital clock sources. The<br />
following table gives the electrical requirements for the clock input.<br />
Feature<br />
Input Impedance<br />
Input Coupling<br />
Input Connector<br />
Description<br />
50 ohm<br />
AC<br />
SMA<br />
<strong>X5</strong>-<strong>210M</strong> <strong>User's</strong> <strong>Manual</strong> 92
Linux Directory Structure<br />
<strong>X5</strong>-<strong>210M</strong> <strong>User's</strong> <strong>Manual</strong><br />
Minimum Input Swing<br />
Maximum Input Swing<br />
Maximum Frequency<br />
Jitter<br />
Table 1. Input Clock Electrical Specifications<br />
300mVp-p<br />
3.3Vp-p<br />
Supports converter maximum clock rates<br />
Linux Directory Structure<br />
<strong>X5</strong>-<strong>210M</strong> <strong>User's</strong> <strong>Manual</strong><br />
Trigger Mode Data Collected/Played Back Start Trigger Stop Trigger<br />
Continuous All enabled channel pairs Software or rising edge of<br />
external trigger<br />
Software or falling edge of<br />
external trigger<br />
Framed<br />
N sample points for each of<br />
the enabled channel pairs<br />
Software or rising edge of<br />
external trigger<br />
Stops when N samples are<br />
collected back<br />
Decimation<br />
M points are discarded for<br />
every point kept. May be<br />
used with either trigger<br />
mode.<br />
- -<br />
Table 3. Table 1: Trigger Modes<br />
Fs<br />
Trigger<br />
Analog<br />
Input<br />
Samples are acquired when trigger is true on<br />
rising edges of Fs when trigger is true.<br />
Figure 1. Analog Triggering Timing<br />
As shown in the diagram, samples are captured when the sample clock and the trigger are true. The trigger is true in<br />
continuous mode after a rising edge on the trigger input, software or external, until a falling edge is found. The trigger is timed<br />
against the sample clock and may have a 0 to +1 A/D conversion clock uncertainty for an asynchronous trigger input.<br />
Trigger Source<br />
A software trigger or external trigger can be used by the trigger controls. Software trigger can always be used, but external<br />
triggering must be selected. The trigger source is level-sensitive for the continuous mode or edge-triggered for the framed<br />
mode triggering.<br />
The Malibu software tools provide trigger source configuration and methods for software triggering, retriggering in framed<br />
mode and trigger mode controls.<br />
<strong>X5</strong>-<strong>210M</strong> <strong>User's</strong> <strong>Manual</strong> 94
Linux Directory Structure<br />
<strong>X5</strong>-<strong>210M</strong> <strong>User's</strong> <strong>Manual</strong><br />
Framed Trigger Mode<br />
Framed trigger mode is useful for collecting data sets of a fixed size each time the input trigger is fired. In framed mode, the<br />
trigger goes false once the programmed number of points N have been collected. Start triggers that occur during a frame<br />
trigger are ignored.<br />
The maximum number of points per frame is 16,777,216 (2^24) points, while the minimum number of points is 2.<br />
Data flow to the host is independent of the framed triggering mode. In most cases, packet sizes to the host are selected to be<br />
integer submultiples of the frame size to allow the entire data set to flow to the host. That way, the entire data frame can be<br />
moved immediately to the host without waiting for the next trigger frame.<br />
Decimation<br />
The data may be decimated by a programmed ratio to reduce the data rate. This mode is usually used when the data rate is less<br />
than the minimum master clock rate of the A/D. A/D performance is not specified and will degrade (sometimes with<br />
unpredictable results) if the converter is operated below its minimum sample rate.<br />
The decimation simply discards M points for every point kept – no averaging or filtering is used. When decimation is true, the<br />
number of points captured in the framed mode is the number of decimated points, in other words the discarded points do not<br />
count. Maximum decimation rate is 1/4095.<br />
When decimation is used in the framed trigger mode, the number of points captured is after decimation. The frame count is<br />
always the actual number of points inserted into the FIFO.<br />
FrameWork Logic Functionality<br />
The FrameWork Logic implements a data flow for the <strong>X5</strong>-<strong>210M</strong> that supports standard data acquisition functionality. This<br />
data flow, when used with the supporting software, allows the <strong>X5</strong>-<strong>210M</strong> to act as a data acquisition card with 512MB of data<br />
buffering and high speed data streaming to the host PCI Express. The example software for the <strong>X5</strong>-<strong>210M</strong> demonstrates data<br />
flow control, logic loading and data logging.<br />
<strong>X5</strong>-<strong>210M</strong> <strong>User's</strong> <strong>Manual</strong> 95
Linux Directory Structure<br />
<strong>X5</strong>-<strong>210M</strong> <strong>User's</strong> <strong>Manual</strong><br />
Figure 2. <strong>X5</strong>-<strong>210M</strong> FrameWork Logic Data Flow<br />
The data flow is driven by the data acquisition process . Data flows from the A/D devices into the A/D interface component<br />
in the FPGA as controlled by the triggering. The data is then error corrected and the enabled channels flow to the data buffer.<br />
The data buffer implements a data queue in the DRAM. The packetizer pulls data from the queue, creates data packets of the<br />
programmed size and sends those to the PCIe interface logic or out the host link. From here, the Velocia packet system<br />
controls the flow of data to the host. Data packets flow into host memory for consumption by the host program.<br />
The Board Basics and Host Communications chapters of this manual discuss the use of the packet data system used on the<br />
<strong>X5</strong> module family. The <strong>X5</strong>-<strong>210M</strong> module FrameWork Logic connects the data from A/D interface to the packet system by<br />
forming the data into 32-bit words of consecutive enabled channels. Status indicators for the A/Ds are integrated with the<br />
alert log to provide host notifications of important events for monitoring the data acquisition process, some of which are<br />
unique to the <strong>X5</strong>-<strong>210M</strong>.<br />
The complete description of the FrameWork Logic is provided in the <strong>X5</strong>-<strong>210M</strong> FrameWork Logic User Guide including the<br />
memory mapping, register definitions and functional behavior. This logic is about 30% of the available logic in the<br />
application FPGA (Virtex5 SX95T device). In many custom applications, unused logic functions can be deleted to free up<br />
gates for the new application.<br />
Power Controls and Thermal Design<br />
The <strong>X5</strong>-<strong>210M</strong> module has temperature monitoring and power controls to aid in system integration. Also, the module has<br />
been designed to include conduction cooling to improve heat dissipation from the module. These features can make the<br />
module more reliable in operation and also reduce power consumption.<br />
<strong>X5</strong>-<strong>210M</strong> <strong>User's</strong> <strong>Manual</strong> 96
Linux Directory Structure<br />
<strong>X5</strong>-<strong>210M</strong> <strong>User's</strong> <strong>Manual</strong><br />
System Thermal Design<br />
The <strong>X5</strong>-<strong>210M</strong> can dissipate upwards of 25 watts depending on the features in use and details of the logic design, such as<br />
amount and rate of data processing. Forced air cooling may be required depending on the power dissipation and the ambient<br />
operating temperatures. This requirement is highly application dependent and must be evaluated for each application and<br />
installation.<br />
If forced air cooling is not used, conduction cooling is another method of dissipating the module heat. A thermal plane in the<br />
card is attached to thermal conduction surfaces on each side of the module. The card can then be cooled by mounting the<br />
card on host card that supports conduction cooling per VITA specification 20. The conduction cooling method allows the<br />
module heat to be flowed out to the chassis. The thermal plane has NO electrical connection in the module and cannot be<br />
used as a ground.<br />
Temperature Sensor and Over Temperature Protection<br />
The Virtex-5 System Monitor temperature sensor is described in detail in the Board Basics chapter of this manual. The<br />
temperature sensor is used to monitor the Virtex-5 junction temperature and deactivate board power supplies to protect the<br />
logic device from overheating.<br />
Alert Log<br />
Overview<br />
<strong>X5</strong> modules have an Alert Log that can be used to monitor the data acquisition process and other significant events. Using<br />
alerts, the application can create a time history of the data acquisition process that shows when important events occurred<br />
and mark the data stream to correlate system events to the data.. This provides a precision timed log of all of the important<br />
events that occurred during the acquisition and playback for interpretation and correlation to other system-level events. Alerts<br />
for critical system events such as triggering, data overruns, analog overranges, and thermal warnings provide the host system<br />
with information to manage the module.<br />
The Alert Log creates an alert packet whenever an enabled alert is active. The packet includes information on the alert, when<br />
it occurred in system time, and other status information. The system time is kept in the logic using a 32-bit counter running<br />
at the sample clock rate. Each alert packet is transmitted in the packet stream to the host , marked with a Peripheral Device<br />
Number corresponding to the Alert Log.<br />
The Alter Log allows <strong>X5</strong> modules to provide the host system with time-critical information about the data acquisition to allow<br />
better system performance. System events, such as over-ranges, can be acted on in real-time to improve the data acquisition<br />
<strong>X5</strong>-<strong>210M</strong> <strong>User's</strong> <strong>Manual</strong> 97
Linux Directory Structure<br />
<strong>X5</strong>-<strong>210M</strong> <strong>User's</strong> <strong>Manual</strong><br />
quality. Monitoring functions can be created in custom logic that triggers only when the digitized data shows that something<br />
interesting happened. Alerts make this type of application easier for the host to implement since they don't require host activity<br />
until the event occurs.<br />
Types of Alerts<br />
Alerts can be broadly categorized into system, IO and software alerts.<br />
System alerts include monitoring functions such as temperature, time stamp rollover and PLL lost. These alerts just help keep<br />
the system working properly. The temperature warning should be used increase temperature monitor and to prepare to shut<br />
down if necessary because thermal overload may be coming. Better to shut down than crash in most cases. The temperature<br />
failure alert tells the system that the module actually shut itself down. This usually requires that the module be restarted when<br />
conditions permit.<br />
The data acquisition alerts, including over ranges, overflows and triggering, tell the system that important events occurred in<br />
the data acquisition process. Overflow is particularly bad – data was lost and the system should try to alleviate the system by<br />
unclogging the data pipe, or just start over. If you get an overrange alert, then the data may just be bad for a while but<br />
acquisiton can continue. Modules with programmable input ranges can use this to trigger software range changes.<br />
Software alerts are used to tag the data. Any message can be made into an alert packet so that the data stream logged includes<br />
system information that is time-correlated to the data.<br />
Table 1. Alert Types<br />
Alert<br />
Timestamp rollover<br />
Software Alert<br />
ADC Queue Overflow<br />
ADC Trigger<br />
ADC Overrange<br />
Purpose<br />
The 32-bit timestamp counter rolled over. This can be used to extend the<br />
timestamp counter in software.<br />
The host software can create alerts to tag the data stream.<br />
The ADC data queue overflowed indicating the the host did not consume<br />
the data quickly enough.<br />
The ADC trigger went active.<br />
An ADC channel was overranged.<br />
Alert Packet Format<br />
Alert data packets have a fixed format in the system The Peripheral Device Number (PDN) is programmable in the software<br />
and is included in the packet header, thus identifying the alert data packets in the data stream. The packet shows the<br />
timestamp in system time, what alerts were signaled and a status word for each alert.<br />
<strong>X5</strong>-<strong>210M</strong> <strong>User's</strong> <strong>Manual</strong> 98
Linux Directory Structure<br />
<strong>X5</strong>-<strong>210M</strong> <strong>User's</strong> <strong>Manual</strong><br />
Dword #<br />
Description<br />
0 Header 1: PDN & Total #, N, of Dwords in packet ( e.g. Headers + data payload )<br />
1 Header 2: 0x00000000<br />
2 Alerts Signaled<br />
3 Timestamp<br />
4 0<br />
5 Software Word<br />
10..6 0<br />
12 X"1303000" & "000" & mq_overflow(0);<br />
35..13 unused<br />
Table 2. Alert Packet Format<br />
Since alert packets contain status words such as temperature for each packet, a software alert can essentially be used to read<br />
temperature of the module and so that it can be recorded.<br />
Software Support<br />
Applications have different needs for alert processing. Aside from the bulk movement of data, most applications require some<br />
means of handling special conditions such as post-processing upon receipt of a stop trigger or closing a driver when an<br />
acquisition is completed.<br />
When the alert system is enabled, the module logic continuously monitors the status of the peripheral (usually analog)<br />
hardware present on the baseboard and generates an alert whenever an alert condition is detected. It's also possible for<br />
application software to generate custom alert messages to tag the data stream with system information.<br />
The Malibu software provides support for alert configuration and alert packet processing. See the software manual for usage.<br />
Tagging the Data Stream<br />
The Alert Log can be used to tag the data stream with system information by using software alerts. This helps to provide systemlevel<br />
correlation of events by creating alert packets in the data stream created by the host software. Alert packets are then created by<br />
the <strong>X5</strong> module and are in the stream of data packets from the module. For example it is often interesting when something happens<br />
to the unit under test, such as a change in engine speed or completion of test stimulus.<br />
<strong>X5</strong>-<strong>210M</strong> <strong>User's</strong> <strong>Manual</strong> 99
Linux Directory Structure<br />
<strong>X5</strong>-<strong>210M</strong> <strong>User's</strong> <strong>Manual</strong><br />
Using the <strong>X5</strong>-<strong>210M</strong><br />
Where to start?<br />
The best place to start with the <strong>X5</strong>-<strong>210M</strong> module is to install the module and use the SNAP example to acquire some data.<br />
This program lets you log data from the module and use all the features like triggering, clocks, alerts and calibration ROM.<br />
You can use this program to acquire some data and log it to disk. This should let you verify that the module can acquire the<br />
data you want and give you a quick start on deciding what sample rates to use, how to trigger the data acquisition best for<br />
your application, and just get familiar with using the module.<br />
The program also shows how to use BinView, a data analysis and viewing program by Innovative, that will let you see what<br />
you acquired in detail. Both time domain and frequency domain data can be viewed and analyzed. Data can also be exported<br />
to programs like Excel and MATLAB for further analysis.<br />
Before you begin to write software, taking a look at SNAP will allow you see everything working. You can then look at the<br />
code for SNAP and modify it for your application or grab code from it that is useful.<br />
Getting Good Analog Performance<br />
The <strong>X5</strong>-<strong>210M</strong> is capable of sampling and generating very high frequency signals. To maximize signal to noise ratio and spur<br />
performance, it is important to use do the following<br />
●<br />
●<br />
●<br />
●<br />
●<br />
●<br />
Use only low jitter clock sources. The higher the input/output frequency, the more sensitive the system will be<br />
to clock jitter.<br />
Band limit input signals if possible. This avoids noise contributions and aliasing caused by out-of band energy<br />
in the input signal<br />
Scale your input signals to take advantage of the full scale input ad output ranges of the converters. This will<br />
maximize signal to noise in most cases. Custom input and output ranges can be ordered if necessary.<br />
Use a high quality shielded cable at all times, and terminate all signals to 50 ohms.<br />
Reference input signals to the module ground. Be sure not to introduce ground loops.<br />
Provide sufficient signal strength to drive the input. The <strong>X5</strong>-<strong>210M</strong> terminates its inputs to 50 ohms, so signals<br />
sources must be able to drive the DC termination effectively.<br />
If you decide to test the <strong>X5</strong>-<strong>210M</strong> to verify its performance, be aware that most signal sources are not good enough without<br />
additional filtering and careful use. Most single-ended lab instruments are limited by their distortion to about 90 dB. Postfilter<br />
is necessary to clean them up if you want to test the <strong>X5</strong>-<strong>210M</strong>.<br />
<strong>X5</strong>-<strong>210M</strong> <strong>User's</strong> <strong>Manual</strong> 100
Linux Directory Structure<br />
<strong>X5</strong>-<strong>210M</strong> <strong>User's</strong> <strong>Manual</strong><br />
Calibration<br />
Each <strong>X5</strong>-<strong>210M</strong> is calibrated as part of the production tests performed. The calibration results are provided on the production<br />
test report with each module. The results of the calibration are stored in the on-board EEPROM memory. These calibration<br />
values are used by the logic to correct the analog errors and are loaded into the A/D as part of the initialization by the<br />
software.<br />
The calibration technique used determines the A/D errors by first measuring the output with ground connected, then a 0.9V<br />
source, and a -0.9V source. The measurements are the average of 64K samples at each test voltage. From these three points<br />
across the input range, the gain and offset errors are calculated.<br />
All test voltages are measured as part of the procedure with NIST traceable equipment. Production calibration is performed at<br />
room temperature (~24C) with the module operating temperature at about 65C.<br />
Under normal circumstances, calibration is accurate for one year. For recalibration, the module can be sent to Innovative or<br />
re-calibrated using a similar test procedure.<br />
Updating the Calibration Coefficients<br />
A software applet for writing the calibration coefficients to the EEPROM is provided (EEPROM.exe). New coefficients are<br />
simply typed into the offset and gain field for each channel.<br />
Calibration coefficients for gain should not be outside the range of 0.95 to 1.05, and offset should not be outside the range of<br />
+/-400 counts for the A/Ds . If the calculated coefficients are larger than this, they are either wrong or the channel is<br />
damaged.<br />
<strong>X5</strong>-<strong>210M</strong> <strong>User's</strong> <strong>Manual</strong> 101
Linux Directory Structure<br />
<strong>X5</strong>-<strong>210M</strong> <strong>User's</strong> <strong>Manual</strong><br />
Performance Data<br />
Power Consumption<br />
The <strong>X5</strong>-<strong>210M</strong> requires the following power for typical operation with when using the FrameWork Logic. This typical<br />
number assumes a 250 MHz system clock rate and 125 MSPS A/D data rates for the application logic.<br />
Table 1. <strong>X5</strong>-<strong>210M</strong> Power Consumption<br />
Voltage<br />
Maximum Allowed<br />
Current (A)<br />
Typical Current<br />
Required (A)<br />
Typical<br />
Power (W)<br />
Derived from<br />
Supplies these Devices<br />
3.3V 15 5.1A 16.8 Direct connect to the<br />
PCIe host<br />
12V 4 0.83 9.96 Direct connect to the<br />
PCIe host (VPR pins)<br />
FPGA, clock controls, and<br />
analog power supplies<br />
FPGA<br />
Total<br />
Power<br />
26.8<br />
Surge currents occur initially at power-on and after application logic initialization. The power-on surge current lasts for<br />
about 10 ms at several amperes on both 3.3V and 12V. This surge is due primarily to charging the on-card capacitors and the<br />
startup current of the FPGAs. After initial power-up, the logic configuration will also result in a step change to the current<br />
consumption because the logic will begin to operate. In our testing and measurements, this has not been a surge current as<br />
much as a just a step change in the power consumption.<br />
Power consumption varies and is primarily as a function of the logic design. Logic designs with high utilization and fast<br />
clock rates require higher power. Since calculating power consumption in the logic requires many details to be considered,<br />
Xilinx tools such as XPower are used to get the best estimates.<br />
It is important that any custom logic design have a substantial safety margin for the power consumption. Allowance for<br />
decreased power supply efficiency due to heating can account for 10% derating. Also, dynamic loads should be considered so<br />
that peak power is adequate. In many cases a factor of 2 for derating is recommended.<br />
Environmental<br />
<strong>X5</strong>-<strong>210M</strong> <strong>User's</strong> <strong>Manual</strong> 102
Linux Directory Structure<br />
<strong>X5</strong>-<strong>210M</strong> <strong>User's</strong> <strong>Manual</strong><br />
Table 2. <strong>X5</strong>-<strong>210M</strong> Environmental Limits<br />
Condition<br />
Operating Ambient Temperature<br />
Humidity<br />
Storage Temperature<br />
Forced Air Cooling<br />
Limits<br />
0 to 55 C<br />
5 to 95 %, non condensing<br />
-30 to 85 C<br />
Dependent on application<br />
Vibration, operating ETS 300 019- 1.3 [R3], class 3.3<br />
Vibration, storage ETS 300 019- 1.1 [R1], class 1.2<br />
Vibration, transportation ETS 300 019- 1.2 [R2], class 2.3<br />
except for free-fall: class 2.2<br />
Analog Input<br />
A summary of the analog performance follows for the <strong>X5</strong>-<strong>210M</strong> module.<br />
All tests performed at room temperature, with no forced air cooling unless noted. Test environment was PCIe adapter card in<br />
PC running testbed software using FrameWork Logic.<br />
Table 3. <strong>X5</strong>-<strong>210M</strong> Analog Performance Summary<br />
Test Group Parameter Measured Units Test Conditions<br />
Analog Input Bandwidth -3 dB 320 MHz, 500 mVp-p sine<br />
Impedance 50 Ohms nominal<br />
Input Range 2 Vp-p<br />
differential<br />
Standard on <strong>X5</strong>-<strong>210M</strong>, calibration results may limit input<br />
range to 0.99 of full scale nominal.<br />
Accuracy Offset 500 uV Factory calibration, average of 64K samples<br />
Gain 0.05 % Factory calibration, average of 64K samples<br />
Analog Input Ground Noise 1.95 mVp-p Input Grounded, Fs = 125 MSPS, 320k samples<br />
Ground Noise<br />
Floor<br />
-100 dB Input Grounded, Fs = 125 MSPS, 64K sample FFT, nonaveraged<br />
<strong>X5</strong>-<strong>210M</strong> <strong>User's</strong> <strong>Manual</strong> 103
Linux Directory Structure<br />
<strong>X5</strong>-<strong>210M</strong> <strong>User's</strong> <strong>Manual</strong><br />
Test Group Parameter Measured Units Test Conditions<br />
Analog Input Crosstalk -90 dB Worst case, Fin = 70 MHz, 2V p-p input<br />
Analog Input<br />
Amplitude<br />
Variation<br />
1 dB 0 to 150 MHz, 500 mVp-p sine<br />
<strong>X5</strong>-<strong>210M</strong> <strong>User's</strong> <strong>Manual</strong> 104
Linux Directory Structure<br />
<strong>X5</strong>-<strong>210M</strong> <strong>User's</strong> <strong>Manual</strong><br />
10<br />
<strong>X5</strong>-<strong>210M</strong> Analog Input Bandwidth<br />
0<br />
<strong>X5</strong>-<strong>210M</strong> Analog Input Bandwidth<br />
Normalized Amplitude (dB)<br />
0<br />
-10<br />
-20<br />
-30<br />
-40<br />
-50<br />
1 10 100 1000<br />
A/D delta (dB<br />
normalized to<br />
5MHz) C1 = 6.8pF<br />
Normalized Amplitude (dB)<br />
-2<br />
-4<br />
-6<br />
-8<br />
-10<br />
-12<br />
100 200 300 400 500<br />
A/D delta (dB<br />
normalized to<br />
5MHz) C1 = 6.8pF<br />
Fin (MHz)<br />
Fin (MHz)<br />
Figure 1. Frequency Response for 1 MHz to 1 GHz<br />
span, 500 mVp-p input<br />
Figure 2. Frequency Response for 1 MHz to 1 GHz<br />
span, 500 mVp-p input<br />
<strong>X5</strong>-<strong>210M</strong> <strong>User's</strong> <strong>Manual</strong> 105
Linux Directory Structure<br />
<strong>X5</strong>-<strong>210M</strong> <strong>User's</strong> <strong>Manual</strong><br />
Figure 3. <strong>X5</strong>-<strong>210M</strong> Ground Noise, Fs = 249 MSPS, input grounded<br />
<strong>X5</strong>-<strong>210M</strong> <strong>User's</strong> <strong>Manual</strong> 106
Linux Directory Structure<br />
<strong>X5</strong>-<strong>210M</strong> <strong>User's</strong> <strong>Manual</strong><br />
Figure 4. <strong>X5</strong>-<strong>210M</strong> Noise Floor, Fs = 249 MSPS, input grounded<br />
<strong>X5</strong>-<strong>210M</strong> <strong>User's</strong> <strong>Manual</strong> 107
Linux Directory Structure<br />
<strong>X5</strong>-<strong>210M</strong> <strong>User's</strong> <strong>Manual</strong><br />
Figure 5. Signal quality: Fs = 249 MHz Fin = 5 MHz 85%FS<br />
<strong>X5</strong>-<strong>210M</strong> <strong>User's</strong> <strong>Manual</strong> 108
Linux Directory Structure<br />
<strong>X5</strong>-<strong>210M</strong> <strong>User's</strong> <strong>Manual</strong><br />
Figure 6. Signal quality: Fs = 249 MHz, Fin = 70 MHz 85%FS<br />
<strong>X5</strong>-<strong>210M</strong> <strong>User's</strong> <strong>Manual</strong> 109
Linux Directory Structure<br />
<strong>X5</strong>-<strong>210M</strong> <strong>User's</strong> <strong>Manual</strong><br />
100<br />
Signal Quality vs Input Amplitude<br />
90<br />
80<br />
70<br />
dB<br />
60<br />
50<br />
40<br />
30<br />
S/N (dB)<br />
SINAD (dB)<br />
SFDR (dB)<br />
20<br />
10<br />
0<br />
0 0.2 0.4 0.6 0.8 1 1.2<br />
Input Amplitude (Vp-p)<br />
Channel<br />
Amplitude (Vpp)<br />
SNR<br />
(dB)<br />
SINAD<br />
(dB)<br />
SFDR<br />
(dB)<br />
THD<br />
(%)<br />
ENOB (bits)<br />
0 0.1 41.7 41.5 53.2 0.0260 6.6<br />
0 0.5 55.9 55.7 69.3 0.0055 9<br />
0 1 62.6 62.2 87.3 0.0028 10<br />
1 0.1 42.8 42.4 56.4 0.0346 6.7<br />
1 0.5 56.3 56.1 68.5 0.0040 9<br />
1 1 62.9 62.6 85.1 0.0024 10.1<br />
2 0.1 42.4 42 58.6 0.0321 6.7<br />
2 0.5 54.2 53.9 79.7 0.0067 8.7<br />
2 1 62.4 62.2 84.4 0.0021 10<br />
3 0.1 43 42.7 60.3 0.0198 6.8<br />
3 0.5 56.7 56.2 75.9 0.0092 9<br />
3 1 62.8 62.4 82.9 0.0032 10.1<br />
Figure 7. Signal Quality vs Input Amplitude<br />
<strong>X5</strong>-<strong>210M</strong> <strong>User's</strong> <strong>Manual</strong> 110
Linux Directory Structure<br />
<strong>X5</strong>-<strong>210M</strong> <strong>User's</strong> <strong>Manual</strong><br />
95<br />
Signal Quality versus Sample Rate<br />
0.015<br />
90<br />
0.013<br />
dB<br />
85<br />
80<br />
75<br />
70<br />
65<br />
60<br />
0.011<br />
0.009<br />
0.007<br />
0.005<br />
0.003<br />
SNR (dB)<br />
THD (%)<br />
SFDR (dB)<br />
55<br />
0.001<br />
50<br />
-0.001<br />
0 50 100 150 200 250 300<br />
Sample Rate (MHz)<br />
Channel Fs (MHz) SNR (dB) SFDR (dB) THD<br />
(%)<br />
SINAD (dB)<br />
ENOB (bits)<br />
0 22 66.4 77.8 0.0056 65.5 10.6<br />
1 68.0 83.3 0.0054 66.9 10.8<br />
2 66.7 80.4 0.0047 65.8 10.6<br />
3 62.4 72.3 0.0081 61.5 9.9<br />
0 101 69.9 89.8 0.0027 69.2 11.2<br />
1 69.7 88.7 0.0018 69.2 11.2<br />
2 70.1 89.3 0.0035 69.2 11.2<br />
3 70.2 89.1 0.0054 68.8 11.1<br />
0 249 69.1 89.0 0.0053 67.9 11.0<br />
1 69.4 88.3 0.0047 68.3 11.1<br />
2 69.6 88.4 0.0054 68.3 11.1<br />
3 69.6 87.6 0.0071 67.9 11.0<br />
Figure 8. Signal Quality vs Input Frequency, Fin = 5 MHz, 85%FS<br />
<strong>X5</strong>-<strong>210M</strong> <strong>User's</strong> <strong>Manual</strong> 111
Linux Directory Structure<br />
<strong>X5</strong>-<strong>210M</strong> <strong>User's</strong> <strong>Manual</strong><br />
80<br />
Signal Quality versus Sample Rate<br />
0.1000<br />
70<br />
0.0900<br />
dB<br />
60<br />
50<br />
40<br />
30<br />
20<br />
0.0800<br />
0.0700<br />
0.0600<br />
0.0500<br />
0.0400<br />
0.0300<br />
SNR (dB)<br />
SFDR (dB)<br />
THD (%)<br />
10<br />
0.0200<br />
0<br />
0.0100<br />
0 50 100 150 200 250 300<br />
Sample Rate (MHz)<br />
Channel Fs (MHz) SNR (dB) SFDR (dB) THD<br />
(%)<br />
SINAD (dB)<br />
ENOB (bits)<br />
0 22 52.3 69.7 0.0655 50.2 8.0<br />
1 53.1 69.2 0.0624 50.9 8.2<br />
2 52.8 69.1 0.0627 50.7 8.1<br />
3 52.1 68.3 0.0529 50.4 8.1<br />
0 101 57.4 72.6 0.0221 56.1 9.0<br />
1 59.3 73.0 0.0258 57.4 9.3<br />
2 59.5 71.9 0.0328 57.1 9.2<br />
3 58.3 72.8 0.0204 56.9 9.2<br />
0 249 58.1 66.6 0.0234 56.6 9.1<br />
1 58.9 66.2 0.0286 57.0 9.2<br />
2 59.0 66.2 0.0331 56.8 9.1<br />
3 58.2 66.2 0.0253 56.6 9.1<br />
Figure 9. Signal Quality vs Input Frequency, Fin = 70 MHz, 85%FS<br />
<strong>X5</strong>-<strong>210M</strong> <strong>User's</strong> <strong>Manual</strong> 112
Linux Directory Structure<br />
<strong>X5</strong>-<strong>210M</strong> <strong>User's</strong> <strong>Manual</strong><br />
Connectors<br />
RF Connectors J1-J6<br />
J1-J6connectors are positioned on the front panel and allow input, output, clock and trigger signals to be connected to the<br />
module.<br />
Connector Type:<br />
Number of Connections:<br />
SMA 50 ohm<br />
1 per signal<br />
Connector Part Number Amphenol 901-143<br />
Mating Connector:<br />
Amphenol 901-9511-3 or equivalent<br />
Cable Innovative part number 67048<br />
SMA to BNC cable<br />
Connector<br />
Function<br />
J1 A/D channel 0<br />
J2 A/D channel 1<br />
J3<br />
J4<br />
Trigger input<br />
Clock input<br />
Table 1. Connectors J1-J6 Functions<br />
J5 A/D channel 2<br />
J6 A/D channel 3<br />
<strong>X5</strong>-<strong>210M</strong> <strong>User's</strong> <strong>Manual</strong> 113
Linux Directory Structure<br />
<strong>X5</strong>-<strong>210M</strong> <strong>User's</strong> <strong>Manual</strong><br />
XMC P15 Connector<br />
P15 is the XMC PCI Express connector to the host.<br />
Connector Types:<br />
Number of Connections:<br />
Connector Part Number<br />
Mating Connector:<br />
XMC pin header, 0.05 in pin spacing, vertical mount<br />
114, arranged as 6 rows of 19 pins each<br />
Samtec ASP-105885-01<br />
Samtec ASP-105884-01<br />
Figure 1. P15 XMC Connector Orientation<br />
<strong>X5</strong>-<strong>210M</strong> <strong>User's</strong> <strong>Manual</strong> 114
Linux Directory Structure<br />
<strong>X5</strong>-<strong>210M</strong> <strong>User's</strong> <strong>Manual</strong><br />
Column<br />
Row A B C D E F<br />
1 PET0p0 PET0n0 3.3V PET0p1 PET0n1 VPWR<br />
2 GND GND GND GND MRSTI#<br />
3 PET0p2 PET0n2 3.3V PET0p3 PET0n3 VPWR<br />
4 GND GND GND GND MRSTO#<br />
5 PET0p4 PET0n4 3.3V PET0p5 PET0n5 VPWR<br />
6 GND GND GND GND +12V<br />
7 PET0p6 PET0n6 3.3V PET0p7 PET0n7 VPWR<br />
8 GND GND GND GND -12V<br />
9<br />
10 GND GND GND GND GA0<br />
11 PER0p0 PER0n0 MBIST# PER0p1 PER0n1 VPWR<br />
12 GND GND GA1 GND GND MPRESENT#<br />
13 PER0p2 PER0n2 3.3VAUX PER0p3 PER0n3 VPWR<br />
14 GND GND GA2 GND GND MSDA<br />
15 PER0p4 PER0n4 PER0p5 PER0n5 VPWR<br />
16 GND GND MVMRO GND GND MSCL<br />
17 PER0p6 PER0n6 PER0p7 PER0n7<br />
18 GND GND GND GND<br />
19 PEX REFCLK+ PEX REFCLK- LED_N** WAKE# ROOT# FAN**<br />
Table 1. <strong>X5</strong>-<strong>210M</strong> XMC Connector P15 Pinout<br />
Note: All unlabeled pins are not used by <strong>X5</strong> modules but may defined in VITA42 and VITA42.3 specifications.<br />
**Note:LED_N and FAN are special purpose pins that support Innovative adapter card functions. These are reserved pins on<br />
the VITA42.3 specification.<br />
<strong>X5</strong>-<strong>210M</strong> <strong>User's</strong> <strong>Manual</strong> 115
Linux Directory Structure<br />
<strong>X5</strong>-<strong>210M</strong> <strong>User's</strong> <strong>Manual</strong><br />
Table 2. P15 Signal Descriptions<br />
Signal<br />
Description<br />
PET0px/PET0nx PCI Express Tx +/-<br />
PER0px/PER0nx PCI Express Rx +/-<br />
PEX REFCLK+/- PCI Express reference clock, 100 MHz +/-<br />
MRSTI#<br />
MRSTO#<br />
Master Reset Input, active low<br />
Master Reset Output, active low<br />
GA0 Geographic Address 0<br />
GA1 Geographic Address 1<br />
GA2 Geographic Address 2<br />
MBIST#<br />
MPRESENT#<br />
MSDA<br />
MSCL<br />
MVMRO<br />
WAKE#<br />
ROOT#<br />
Built-in Self Test, active low<br />
Present, active low<br />
PCI Express Serial ROM data<br />
PCI Express Serial ROM clock<br />
PCI Express Serial ROM write enable<br />
Wake indicator to upstream device, active low<br />
Root device, active low<br />
<strong>X5</strong>-<strong>210M</strong> <strong>User's</strong> <strong>Manual</strong> 116
Linux Directory Structure<br />
<strong>X5</strong>-<strong>210M</strong> <strong>User's</strong> <strong>Manual</strong><br />
XMC P16 Connector<br />
P16 is the XMC secondary connector to the host and is used for digital IO, data link and triggering functions.<br />
Connector Types:<br />
Number of Connections:<br />
Connector Part Number<br />
Mating Connector:<br />
XMC pin header, 0.05 in pin spacing, vertical mount<br />
114, arranged as 6 rows of 19 pins each<br />
Samtec ASP-105885-01<br />
Samtec ASP-105884-01<br />
Figure 1. P16 XMC Connector Orientation<br />
<strong>X5</strong>-<strong>210M</strong> <strong>User's</strong> <strong>Manual</strong> 117
Linux Directory Structure<br />
<strong>X5</strong>-<strong>210M</strong> <strong>User's</strong> <strong>Manual</strong><br />
Table 1. <strong>X5</strong>-<strong>210M</strong> XMC Secondary Connector P16 Pinout<br />
Column<br />
Row A B C D E F<br />
1 TXP0 TXN0 TXP1 TXN1<br />
2 DGND DGND DIO0 DGND DGND DIO1<br />
3 TXP2 TXN2 TXP3 TXN3<br />
4 DGND DGND DIO2 DGND DGND DIO3<br />
5 TXP4 TXN4 TXP5 TXN5<br />
6 DGND DGND DIO4 DGND DGND DIO5<br />
7 TCP6 TXN6 TXP7 TXN7<br />
8 DGND DGND DIO6 DGND DGND DIO7<br />
9<br />
10 DGND DGND DIO8 DGND DGND DIO9<br />
11 RXP0 RXN0 RXP1 RXN1<br />
12 DGND DGND DIO10 DGND DGND DIO11<br />
13 RXP2 RXN2 RXP3 RXN3<br />
14 DGND DGND DIO12 DGND DGND DIO13<br />
15 RXP4 RXN4 RXP5 RXN5<br />
16 DGND DGND DIO14 DGND DGND DIO15<br />
17 RXP6 RXN6 RXP7 RXN7<br />
18 DGND DGND DGND DGND<br />
19<br />
Note: All unlabeled pins are not used by <strong>X5</strong> modules but may defined in VITA42 and VITA42.3 specifications.<br />
<strong>X5</strong>-<strong>210M</strong> <strong>User's</strong> <strong>Manual</strong> 118
Linux Directory Structure<br />
<strong>X5</strong>-<strong>210M</strong> <strong>User's</strong> <strong>Manual</strong><br />
Table 2. P16 Signal Descriptions<br />
Signal<br />
Description<br />
DIO0-15 Digital IO 0-15<br />
TXP0-7<br />
TXN0-7<br />
RXP0-7<br />
RXN0-7<br />
SERDES transmit positive<br />
SERDES transmit negative<br />
SERDES receive positive<br />
SERDES receive negative<br />
<strong>X5</strong>-<strong>210M</strong> <strong>User's</strong> <strong>Manual</strong> 119
Linux Directory Structure<br />
<strong>X5</strong>-<strong>210M</strong> <strong>User's</strong> <strong>Manual</strong><br />
Xilinx JTAG Connector<br />
JP1 is used for the Xilinx JTAG chain. It connects directly with Xilinx JTAG cables such as Parallel Cable IV or Platform<br />
USB.<br />
Connector Types:<br />
Number of Connections:<br />
Connector Part Number<br />
Mating Connector:<br />
14-pin dual row male header, 2mm pin spacing, right angle<br />
14, arranged as 2 rows of 7 pins each<br />
Samtec TMM-107-01-L-D-RA or equivalent<br />
AMP 111623-3 or equivalent<br />
Board edge<br />
Board<br />
Pin 13<br />
Pin 14<br />
Pin 1<br />
Pin 2<br />
JP1<br />
Pin 1 end<br />
Figure 1. <strong>X5</strong>-<strong>210M</strong> JP1 Orientation, board face view<br />
Figure 2. <strong>X5</strong>-<strong>210M</strong> JP1 Orientation, board top edge<br />
view<br />
Table 1. <strong>X5</strong>-<strong>210M</strong> JP3 Xilinx JTAG Connector Pinout<br />
Pin Signal Direction<br />
1,3,5,7,9,11,13 Digital Ground Power<br />
2 1.8V Power<br />
4 TMS I<br />
<strong>X5</strong>-<strong>210M</strong> <strong>User's</strong> <strong>Manual</strong> 120
Linux Directory Structure<br />
<strong>X5</strong>-<strong>210M</strong> <strong>User's</strong> <strong>Manual</strong><br />
Pin Signal Direction<br />
6 TCK I<br />
8 TDO O<br />
10 TDI I<br />
12,14 No Connect -<br />
Mechanicals<br />
The following diagrams show the <strong>X5</strong>-<strong>210M</strong> connectors and physical locations. The XMC conforms to IEEE 1386 form<br />
factor, 75mm x 150mm. The spacing to the host card is 10 mm and consumes a single slot in desktop and Compact PCI/PXI<br />
chassis. An EMI shield over the analog section is normally installed.<br />
Detailed drawings for mechanical design work are available through technical support.<br />
Figure 1. <strong>X5</strong>-<strong>210M</strong> Mechanicals (Top View) Rev B<br />
<strong>X5</strong>-<strong>210M</strong> <strong>User's</strong> <strong>Manual</strong> 121
Linux Directory Structure<br />
<strong>X5</strong>-<strong>210M</strong> <strong>User's</strong> <strong>Manual</strong><br />
Figure 2. <strong>X5</strong>-<strong>210M</strong> Mechanicals (Bottom View) Rev B<br />
<strong>X5</strong>-<strong>210M</strong> <strong>User's</strong> <strong>Manual</strong> 122