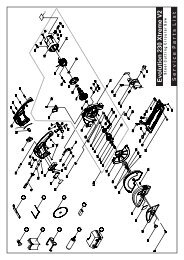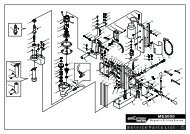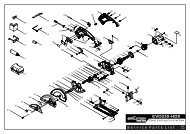
www .evolutionfury.com - Evolution Power Tools Ltd.
www .evolutionfury.com - Evolution Power Tools Ltd.
www .evolutionfury.com - Evolution Power Tools Ltd.

You also want an ePaper? Increase the reach of your titles
YUMPU automatically turns print PDFs into web optimized ePapers that Google loves.
<strong>www</strong>.<strong>evolutionfury</strong>.<strong>com</strong><br />
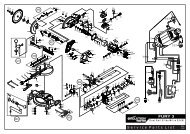
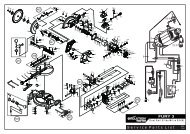
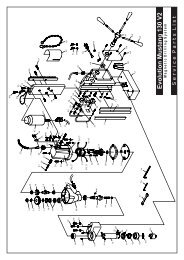
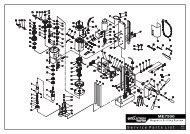
210mm / 8-1/4” MITRE SAW<br />
Instruction<br />
Manual<br />
Read instructions before operating this tool.<br />
BO91000<br />
<strong>www</strong>.<strong>evolutionfury</strong>.<strong>com</strong>
PROJECT ®<br />
EC - DECLARATION OF CONFORMITY<br />
MAINTENANCE<br />
We, <strong>Evolution</strong> <strong>Power</strong> <strong>Tools</strong> Limited,<br />
Venture One, Longacre Close, Sheffield,<br />
S20 3FR as the supplier of the product<br />
listed below:<br />
FURY 210mm TCT Multi Purpose<br />
Compound Mitre Saw<br />
Part Number: FURY3B2102/<br />
FURY3B2102EU<br />
Voltage: 110/230v<br />
<strong>Power</strong>: 1100W<br />
Declare, under our sole responsibility that<br />
the equipment to which this document<br />
relates, is in conformity with the following<br />
standards or other normative documents:-<br />
EN61029-1:2000+A11+A12<br />
EN61029-2-9:2002<br />
EN60825-1:1994+A1+A2<br />
EN55014-1:2006<br />
EN55024-2:1997+A1<br />
EN61000-3-2:2006<br />
EN61000-3-3:1995+A1+A2<br />
and thereby conforms to the protection<br />
requirements of Council Directive 2006/95/<br />
EC relating to the Low Voltage Directive,<br />
Council Directive 98/37/EC relating to the<br />
Machine Directive and Council Directive<br />
2004/108/EC relating to the EMC Directive,<br />
and is <strong>com</strong>pliant with<br />
Council Directive 2002/95/EC in relation to<br />
the Restriction of Hazardous Substances in<br />
electrical & electronic equipment (RoHS).<br />
EU Directive 2002/95/EC restricts the use of<br />
the 6 substances below in the manufacture<br />
of specific types of electrical equipment.<br />
Whilst this restriction does not legally<br />
apply to <strong>com</strong>ponents, it is recognized that<br />
<strong>com</strong>ponent ‘<strong>com</strong>pliance’ is relevant to<br />
many customers. <strong>Evolution</strong> <strong>Power</strong> <strong>Tools</strong>’<br />
definition of RoHS Compliance:<br />
• The product does not contain any<br />
restricted substances in concentrations<br />
and applications banned by the directive<br />
• and for <strong>com</strong>ponents, the product is<br />
capable of being worked at the higher<br />
temperatures required by lead-free<br />
soldering.<br />
The restricted substances and maximum<br />
allowed concentrations in homogenous<br />
materials are, by weight:<br />
Lead – 0.1%<br />
Mercury – 0.1%<br />
PBB (Polybrominated Biphenyis) – 0.1%<br />
PBDE (Polybrominated Diphenyl Ethers) –<br />
0.1%<br />
Hexavalent Chromium – 0.1%<br />
Cadmium – 0.01%<br />
Level of Sound pressure according to<br />
86/188/EEC, 98/37/EC:-<br />
All Relevant technical documentation is<br />
held at<br />
<strong>Evolution</strong> <strong>Power</strong> <strong>Tools</strong><br />
<strong>Ltd</strong>, Sheffield (UK).<br />
Authorised by:<br />
Mr Matthew J Gavins<br />
Managing Director<br />
5th February 2009<br />
CLEANING<br />
Use only mild soap and damp cloth to clean<br />
the tool. Never let any liquid get inside the<br />
tool; never immerse any part of the tool into<br />
a liquid.<br />
Regularly clean the tool’s air vents with<br />
<strong>com</strong>pressed dry air. DO NOT ATTEMPT TO<br />
CLEAN BY INSERTING POINTED OBJECTS<br />
THROUGH OPENINGS.<br />
LUBRICATION<br />
All of the bearings in this tool are lubricated<br />
with a sufficient amount of high grade<br />
lubricant for the life of the unit under normal<br />
operating conditions. Therefore, no further<br />
lubrication is required.<br />
12 MONTHS WARRANTY<br />
12 MONTH LIMITED WARRANTY.<br />
EVOLUTION POWER TOOLS RESERVES<br />
THE RIGHT TO MAKE IMPROVEMENTS<br />
AND MODIFICATIONS TO DESIGN<br />
WITHOUT PRIOR NOTICE.<br />
<strong>Evolution</strong> <strong>Power</strong> <strong>Tools</strong> will, within twelve (12)<br />
months from the original date of purchase,<br />
repair or replace any goods found to be<br />
defective in materials or workmanship,<br />
provided the product warranty registration<br />
card has been returned to <strong>Evolution</strong> <strong>Power</strong><br />
<strong>Tools</strong>. This warranty is void if the tool being<br />
returned has been used to cut materials<br />
beyond the re<strong>com</strong>mendations in the<br />
Instruction Manual or if the saw has been<br />
damaged by accident, neglect, or improper<br />
service. This warranty does not apply to<br />
machines and / or <strong>com</strong>ponents which<br />
have been altered, changed, or modified<br />
in any way, or subjected to use beyond<br />
re<strong>com</strong>mended capacities and specifications.<br />
Electrical <strong>com</strong>ponents are subject to<br />
respective manufacturers’ warranties. All<br />
goods returned defective shall be returned<br />
prepaid freight to <strong>Evolution</strong> <strong>Power</strong> <strong>Tools</strong>.<br />
<strong>Evolution</strong> <strong>Power</strong> <strong>Tools</strong> reserves the right to<br />
optionally repair or replace it with the same<br />
or equivalent item. There<br />
is no warranty – written or verbal – for<br />
saw blades. In no event shall <strong>Evolution</strong><br />
<strong>Power</strong> <strong>Tools</strong> be liable for loss or damage<br />
resulting directly or indirectly from the use or<br />
merchandise or from any other cause.<br />
<strong>Evolution</strong> <strong>Power</strong> <strong>Tools</strong> is not liable for<br />
any costs incurred on such goods or<br />
consequential damages. No officer,<br />
employee or agent of <strong>Evolution</strong> <strong>Power</strong> <strong>Tools</strong><br />
is authorised to make oral representations<br />
of fitness or to waive any of the foregoing<br />
terms of sale and none shall be binding on<br />
<strong>Evolution</strong> <strong>Power</strong> <strong>Tools</strong>. Questions relating<br />
to this limited warranty should be directed<br />
to the <strong>com</strong>pany’s head office, or call the<br />
appropriate Helpline number.<br />
1 <strong>www</strong>.<strong>evolutionfury</strong>.<strong>com</strong><br />
<strong>www</strong>.<strong>evolutionfury</strong>.<strong>com</strong><br />
6
PROJECT ®<br />
OPERATING INSTRUCTIONS<br />
DISCONNECT THE MITRE SAW AND<br />
INSPECT YOUR SAW BEFORE EACH USE.<br />
WARNING:<br />
To reduce the risk of injury, always unplug<br />
the saw before<br />
changing or adjusting anything. Compare<br />
the direction of rotation arrow on<br />
the guard to direction arrow on the blade.<br />
The blade teeth should always<br />
point downward at the front of the saw.<br />
Tighten the arbor screw. Tighten<br />
the cover plate screw.<br />
PREPARING TO MAKE THE CUT<br />
CAUTION:<br />
• Avoid awkward operations and hand<br />
positions where a sudden slip could cause<br />
fingers or hand to move into the blade.<br />
• Cut only one workpiece at a time.<br />
• Clear everything except the workpiece<br />
and related support devices away from<br />
the blade before turning the mitre saw on.<br />
• Ensure workpeice is held securely. Use<br />
additional clamps if required.<br />
Body and Hand Position<br />
1. Never place hands near cutting area<br />
and keep hand away from the path of<br />
blade.<br />
2. Hold workpiece firmly to the fence to<br />
prevent movement toward the blade.<br />
3. Before making a cut. Make a dry run<br />
with the power off so you can see the<br />
path of the blade.<br />
4. Keep hands in position until trigger<br />
has been released and the blade has<br />
<strong>com</strong>pletely stopped.<br />
Cutting<br />
The saw handle is pushed down to cut<br />
through the workpiece.<br />
1. Place the workpiece on table and against<br />
fence and secure.<br />
2. Grasp the saw handle.<br />
3. Turn on saw and allow the saw to reach<br />
full speed.<br />
4. Press the lower guard unlock lever for<br />
saw head release.<br />
5. Push the saw handle down and cut the<br />
workpiece.<br />
6. After cut is <strong>com</strong>plete turn off saw, allow<br />
blade to <strong>com</strong>pletely stop.<br />
5 <strong>www</strong>.<strong>evolutionfury</strong>.<strong>com</strong><br />
Mitre Cut<br />
An angle of up to 45° left or right can be<br />
obtained using the unit.<br />
1. Loosen the mitre angle lock.<br />
2. Pull up the mitre angle set lever.<br />
3. Turn the table unit to the desired angle is<br />
indicated on the mitre angle pointer.<br />
4. Tighten the angle lock knob to hold the<br />
desired angle.<br />
5. Start the saw and allow it to reach full<br />
speed before <strong>com</strong>mencing the cut.<br />
Bevel Cut<br />
1. Loosen the bevel angle lock.<br />
2. Move the blade to the desired bevel<br />
angle.<br />
3. Stand to the left side of the handle to<br />
make the cut.<br />
Compound cut<br />
When a <strong>com</strong>pound cut is required. Select<br />
the desired bevel and mitre positions.<br />
Cutting Bowed Material<br />
Before cutting a workpiece, check to<br />
make sure it is not bowed. If it is bowed,<br />
the workpiece must be positioned and cut<br />
as illustrated. Do not position workpiece<br />
incorrectly or try to cut the workpiece<br />
without the support of the fence. This<br />
will cause pinching of the workpiece on<br />
the blade. The workpiece could suddenly<br />
jump or move and your hand could hit the<br />
blade.<br />
Technical Helpline UK 0870 609 2297<br />
Technical Helpline USA 1-866-EVO-TOOL<br />
Important<br />
Please read these operating and safety<br />
instructions carefully and <strong>com</strong>pletely. For<br />
your own safety, before using this equipment<br />
check that the voltage is correct and that all<br />
handles and parts are firmly secured. If you<br />
are uncertain about any aspect of using this<br />
equipment, please contact our Technical<br />
Helpline.<br />
Fury 3 B Multi Purpose Mitre Saw<br />
Congratulations on your purchase of an<br />
<strong>Evolution</strong> <strong>Power</strong><br />
<strong>Tools</strong> Fury 3 B Mitre Saw. Please <strong>com</strong>plete<br />
and mail<br />
your product registration card. Doing so will<br />
validate your<br />
machine’s warranty period and ensure prompt<br />
service if<br />
needed. We sincerely thank you for selecting<br />
a product<br />
from <strong>Evolution</strong> <strong>Power</strong> <strong>Tools</strong>.<br />
CAUTION: IMPORTANT<br />
SAFETY INSTRUCTIONS<br />
To reduce the risk of electric shock, this<br />
equipment is fitted<br />
with an approved cord and plug for its<br />
intended Country of<br />
use. Do not change the plug or cord in any<br />
way.<br />
Specifications<br />
<strong>www</strong>.<strong>evolutionfury</strong>.<strong>com</strong><br />
Fury 3 B Multi Purpose Mitre Saw<br />
Motor (230v ~ or 110v-115v ~ 50/60 Hz)<br />
(Watts): 1100<br />
RPM No Load (min-1): 4000<br />
Re<strong>com</strong>mended Maximum Duty Cycle<br />
(Minutes): 30<br />
Weight:<br />
6.1Kg<br />
Blade Dimensions<br />
Maximum Diameter: 210mm (8-1/4”)<br />
Bore Diameter: 25.4mm (1”)<br />
Thickness: 2mm (1/16”)<br />
Maximum Wood Cutting Capacity<br />
Mitre Bevel Max Width of Cut Max Depth<br />
of Cut<br />
90º 90° 120mm 50mm<br />
45°L / 45°R 45° 80mm 30mm<br />
Optimum Cutting Thickness (Mild Steel<br />
Plate): 3mm (1/8”)<br />
Standard Equipment Supplied With Unit:<br />
1 MultiBlade, 1 Box Spanner, 1 Operating<br />
Instructions.<br />
2
PROJECT ®<br />
MACHINE SET-UP<br />
MOUNTING THE MITRE SAW<br />
WARNING: To reduce the risk of injury<br />
from unexpected saw movement, place<br />
the saw in the desired location either on<br />
a workbench or other re<strong>com</strong>mended leg<br />
set. The base of the saw has four holes to<br />
mount the mitre saw. If the saw is to be<br />
used in one location, permanently fasten it<br />
to the workbench or leg set.<br />
1. Tighten the mitre and bevel locks.<br />
2. Place the saw so other people cannot<br />
stand behind it. Thrown debris could injure<br />
people in its path.<br />
3. Place the saw on a firm, level surface<br />
where there is plenty of room for handing<br />
and properly supporting the workpiece.<br />
4. Support the saw so the table is level and<br />
the saw does not rock.<br />
5. Bolt or clamp the saw to its support.<br />
INSTALLING OR REMOVING THE BLADE<br />
WARNING: Only use genuine <strong>Evolution</strong><br />
blades which are designed for this machine.<br />
Note: Remove the plug from the power<br />
supply.<br />
1. Ensure cutting head is up.<br />
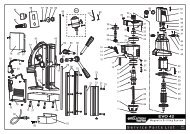
2. Remove the guard retaining screw.(Fig. 1)<br />
3. Press safety lock lever in and lift up the<br />
lower blade guard. (Fig. 2)<br />
4. Press the black lock button to lock the<br />
arbor. (Fig. 3)<br />
5. Using the supplied spanner, release the<br />
arbor screw to remove the blade. (Fig. 4)<br />
6. Install the new 210 mm (8-1/4”) blade.<br />
Make sure the rotation arrow on the blade<br />
matches the clockwise rotation arrow on the<br />
upper guard. The blade teeth should always<br />
point downward at the front of the saw.<br />
7. Install the blade washer and arbor screw.<br />
8. Turn box spanner to secure the blade.<br />
9. Tighten arbor screw using moderate force,<br />
but do not overtighten.<br />
10. Replace the guard retaining screw.<br />
(Fig. 1).<br />
11. Ensure the spanner is removed before<br />
operating the machine.<br />
BEVEL ANGLE:<br />
1. Lock the cutting head down with the<br />
cutting lock knob.<br />
2. Loosen the bevel lock.<br />
3. Adjust angle until the bevel angle point<br />
reaches the desired bevel<br />
angle.<br />
4. Tighten the bevel lock.<br />
CLEARING JAMMED MATERIAL:<br />
1. Turn mitre saw “OFF” by releasing<br />
trigger switch.<br />
2. Wait for all moving parts to stop.<br />
3. Unplug the mitre saw.<br />
4. Remove jammed material from the unit.<br />
fig. 2<br />
fig. 1<br />
fig. 3<br />
SAFETY INSTRUCTIONS<br />
WARNING: For Your Own Safety. Read<br />
Instruction Manual Before Operating Mitre<br />
Saw.<br />
1. KEEP GUARDS IN PLACE and in<br />
working order.<br />
2. REMOVE ADJUSTING KEYS AND<br />
WRENCHES. Form habit of checking to<br />
see that keys and adjusting wrenches are<br />
removed from tool before turning it on.<br />
3. KEEP WORK AREA CLEAN. Cluttered<br />
areas and benches invite accidents.<br />
4. DON’T USE IN DANGEROUS<br />
ENVIRONMENT. Don’t use power tools in<br />
damp or wet locations, or expose them to<br />
rain. Keep work area well lit.<br />
5. KEEP CHILDREN AWAY. All visitors<br />
should be kept a safe distance from work<br />
area.<br />
6. DON’T FORCE TOOL. It will do the job<br />
better and safer at the rate for which it was<br />
designed.<br />
7. USE PROPER EXTENSION CORD.<br />
Make sure your extension cord is in good<br />
condition. When using an extension cord,<br />
be sure to use one heavy enough to carry<br />
the current your product will draw. An<br />
undersized cord will cause a drop in line<br />
voltage resulting in loss of power and<br />
overheating.<br />
8. WEAR PROPER APPAREL. Do not wear<br />
loose clothing, gloves, neckties, rings,<br />
bracelets, or other jewellery which may get<br />
caught in moving parts. Nonslip footwear<br />
re<strong>com</strong>mended. Wear protective hair<br />
covering to contain long hair.<br />
9. ALWAYS USE SAFETY GLASSES. Also<br />
use face or dust mask if cutting operation<br />
is dusty. Everyday eyeglasses only have<br />
impact resistant lenses, they are NOT<br />
safety glasses.<br />
10. SECURE WORK. Use additional clamps<br />
to secure workpeice where possible.<br />
11. DON’T OVERREACH. Keep proper<br />
footing and balance at all times.<br />
12. MAINTAIN TOOLS WITH CARE.<br />
Keep tools sharp and clean for best and<br />
safest performance. Follow instructions for<br />
lubricating and changing accessories.<br />
13. DISCONNECT TOOLS before servicing<br />
and when changing accessories, such as<br />
blades.<br />
14. REDUCE THE RISK OF<br />
UNINTENTIONAL STARTING. Make sure<br />
switch is in off position before plugging in.<br />
15. USE RECOMMENDED ACCESSORIES.<br />
Only use genuine <strong>Evolution</strong> accessories.<br />
16. NEVER STAND ON TOOL. Serious<br />
injury could occur if the tool is tipped or if<br />
the cutting tool is unintentionally contacted.<br />
17. CHECK DAMAGED PARTS. Check<br />
for alignment of moving parts, binding of<br />
moving parts, breakage of parts, mounting,<br />
and any other conditions that may affect<br />
its operation. A guard or other part that is<br />
damaged should be properly repaired or<br />
replaced before further use.<br />
18. Keep hands out of path of saw blade.<br />
19. Never reach around saw blade.<br />
20. Turn off tool and wait for saw blade to<br />
stop before moving workpiece or changing<br />
settings.<br />
21. Disconnect power before changing<br />
blade, servicing or cleaning.<br />
22. To reduce the risk of injury, return<br />
carriage to the full rear position after each<br />
crosscut operation.<br />
SAVE THESE INSTRUCTIONS FOR<br />
FUTURE REFERENCE<br />
ADDITIONAL SAFETY INSTRUCTION<br />
1. Although <strong>com</strong>pact, this saw is heavy.<br />
To reduce the risk of back injury, get help<br />
whenever you have to lift the saw.<br />
2. To reduce the risk of back injury, hold<br />
the tool close to your body when lifting.<br />
Bending your knees so you can lift with<br />
your legs, not your back. Lift by using the<br />
handhold areas at each side of the bottom<br />
of the base.<br />
3. Never carry the mitre saw by the power<br />
cord or the trigger grip of the handle.<br />
Carrying the tool by the power cord could<br />
cause damage to the insulation or the<br />
wire connections resulting in electric<br />
shock or fire.<br />
4. Before moving the saw, tighten the<br />
slide lock knob to guard against sudden<br />
movement.<br />
5. Place the saw on a secure stationary<br />
work surface and check the saw over<br />
carefully.<br />
ADJUSTMENT OF THE CUTTING ANGLES;<br />
MITRE ANGLE:<br />
1. Simply turn the saw unit to desired<br />
angle usienf the main handle.<br />
fig. 4<br />
2. Lock base instruction.<br />
3 <strong>www</strong>.<strong>evolutionfury</strong>.<strong>com</strong><br />
<strong>www</strong>.<strong>evolutionfury</strong>.<strong>com</strong><br />
4