owner's manual inwall speakers - Proficient Audio Systems
owner's manual inwall speakers - Proficient Audio Systems
owner's manual inwall speakers - Proficient Audio Systems

You also want an ePaper? Increase the reach of your titles
YUMPU automatically turns print PDFs into web optimized ePapers that Google loves.
<strong>Audio</strong> <strong>Systems</strong><br />
OWNER’S MANUAL<br />
INWALL SPEAKERS<br />
W665 • W670 • W680 • W690<br />
W800 • W850<br />
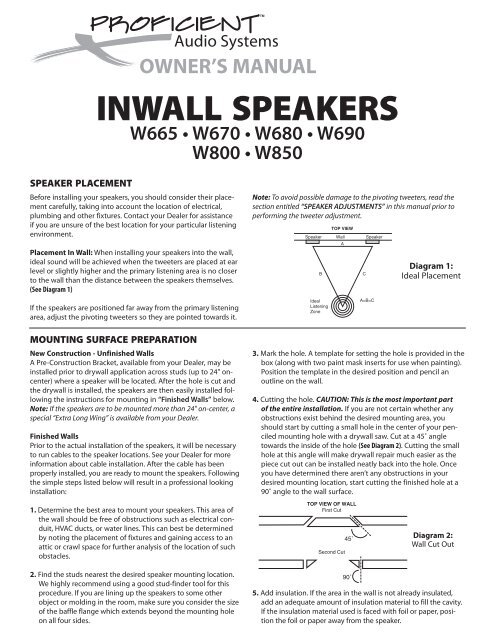
SPEAKER PLACEMENT<br />
Before installing your <strong>speakers</strong>, you should consider their placement<br />
carefully, taking into account the location of electrical,<br />
plumbing and other fixtures. Contact your Dealer for assistance<br />
if you are unsure of the best location for your particular listening<br />
environment.<br />
Placement In Wall: When installing your <strong>speakers</strong> into the wall,<br />
ideal sound will be achieved when the tweeters are placed at ear<br />
level or slightly higher and the primary listening area is no closer<br />
to the wall than the distance between the <strong>speakers</strong> themselves.<br />
(See Diagram 1)<br />
Note: To avoid possible damage to the pivoting tweeters, read the<br />
section entitled “SPEAKER ADJUSTMENTS” in this <strong>manual</strong> prior to<br />
performing the tweeter adjustment.<br />
Diagram 1:<br />
Ideal Placement<br />
If the <strong>speakers</strong> are positioned far away from the primary listening<br />
area, adjust the pivoting tweeters so they are pointed towards it.<br />
MOUNTING SURFACE PREPARATION<br />
New Construction - Unfinished Walls<br />
A Pre-Construction Bracket, available from your Dealer, may be<br />
installed prior to drywall application across studs (up to 24" oncenter)<br />
where a speaker will be located. After the hole is cut and<br />
the drywall is installed, the <strong>speakers</strong> are then easily installed following<br />
the instructions for mounting in “Finished Walls” below.<br />
Note: If the <strong>speakers</strong> are to be mounted more than 24" on-center, a<br />
special “Extra Long Wing” is available from your Dealer.<br />
Finished Walls<br />
Prior to the actual installation of the <strong>speakers</strong>, it will be necessary<br />
to run cables to the speaker locations. See your Dealer for more<br />
information about cable installation. After the cable has been<br />
properly installed, you are ready to mount the <strong>speakers</strong>. Following<br />
the simple steps listed below will result in a professional looking<br />
installation:<br />
1. Determine the best area to mount your <strong>speakers</strong>. This area of<br />
the wall should be free of obstructions such as electrical conduit,<br />
HVAC ducts, or water lines. This can best be determined<br />
by noting the placement of fixtures and gaining access to an<br />
attic or crawl space for further analysis of the location of such<br />
obstacles.<br />
2. Find the studs nearest the desired speaker mounting location.<br />
We highly recommend using a good stud-finder tool for this<br />
procedure. If you are lining up the <strong>speakers</strong> to some other<br />
object or molding in the room, make sure you consider the size<br />
of the baffle flange which extends beyond the mounting hole<br />
on all four sides.<br />
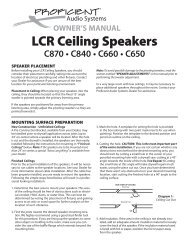
3. Mark the hole. A template for setting the hole is provided in the<br />
box (along with two paint mask inserts for use when painting).<br />
Position the template in the desired position and pencil an<br />
outline on the wall.<br />
4. Cutting the hole. CAUTION: This is the most important part<br />
of the entire installation. If you are not certain whether any<br />
obstructions exist behind the desired mounting area, you<br />
should start by cutting a small hole in the center of your penciled<br />
mounting hole with a drywall saw. Cut at a 45˚ angle<br />
towards the inside of the hole (See Diagram 2). Cutting the small<br />
hole at this angle will make drywall repair much easier as the<br />
piece cut out can be installed neatly back into the hole. Once<br />
you have determined there aren’t any obstructions in your<br />
desired mounting location, start cutting the finished hole at a<br />
90˚ angle to the wall surface.<br />
Diagram 2:<br />
Wall Cut Out<br />
5. Add insulation. If the area in the wall is not already insulated,<br />
add an adequate amount of insulation material to fill the cavity.<br />
If the insulation material used is faced with foil or paper, position<br />
the foil or paper away from the speaker.
SPEAKER ADJUSTMENTS<br />
Your Wall Series <strong>speakers</strong> come from the factory with the tweeter<br />
facing straight out from the baffle. This will result in the overall<br />
smoothest response. However, depending on your particular primary<br />
listening area, room acoustics, ceiling height, or personal<br />
preference, you may find the sound more pleasing by pointing<br />
the tweeters in a particular direction. If additional treble is desired<br />
in the primary listening area, point the tweeter towards that area;<br />
and if less treble is required, point the tweeter away. When used in<br />
a home theater environment as side or rear channel <strong>speakers</strong>, the<br />
best result will be obtained by pointing the tweeters toward an<br />
adjacent wall. Push gently at the edge of the tweeter to point it in<br />
the desired direction. (See Diagram 3)<br />
CAUTION: Avoid touching metal dome tweeters, as damage may<br />
occur (W680, W690, W800 & W850).<br />
Diagram 3:<br />
Tweeter<br />
Tweeter Adjustment (W680, W690, W800 & W850):<br />
The switch labeled TREBLE allows for 3dB of treble adjustment.<br />
Your <strong>speakers</strong> were shipped with the treble switch in the “–”<br />
position, providing the most linear frequency response. If you<br />
desire more treble, move the switch to the “+” position, and the<br />
tweeter will play 3dB higher. To return to the neutral setting, push<br />
the switch back to the “–” position. (See Diagram 4)<br />
Woofer Adjustment (W680, W690, W800 & W850):<br />
The switch labeled BASS allows for 3dB of bass adjustment. Your<br />
<strong>speakers</strong> were shipped with the bass set to “–”. This setting provides<br />
the flattest bass frequency response. If you desire more<br />
bass, push the switch to the “+” position and the bass will play 3dB<br />
higher. To return to the neutral setting, push the switch back to<br />
the “–” position. (See Diagram 4)<br />
Treble Adjustment Switch<br />
Bass Adjustment Switch<br />
SPEAKER INSTALLATION<br />
Push Tweeter Here<br />
The unique integral six-foot mounting system incorporated into<br />
each Wall Series speaker allows for a quick installation by following<br />
these easy steps:<br />
1. Remove the grille. It may be necessary to push one or two of<br />
the mounting screws and its attached foot towards the baffle<br />
and against the inside surface of the grille to force the grille out<br />
of its retaining groove.<br />
2. Attach the speaker cable (observing the proper polarity with<br />
your amplifier, + to + and – to –). Make sure the left channel<br />
of the amplifier is connected to the left speaker, and the right<br />
channel is connected to the right speaker.<br />
3. Make sure the mounting feet are turned inward to clear the<br />
opening, and insert the speaker into the wall. Position the<br />
speaker into the hole.<br />
Diagram 4:<br />
Adjustment Switches<br />
Note: The flange of the speaker is designed to flex and conform to<br />
any small imperfections in the wall’s surface. Tighten the six screws<br />
on the front of the baffle only enough to make the flange become<br />
snug against the wall. As you tighten the screws, the feet will<br />
automatically flip into an outward position (See Diagram 5), thereby<br />
clamping the drywall between the feet and the flange. CAUTION:<br />
Over-tightening may warp the baffle, crack the wall, cause<br />
the flange to distort, and make the grille difficult to install.<br />
4. Push the grille firmly into the slot in the speaker baffle.<br />
Diagram 5:<br />
Mounting Feet<br />
PAINTING THE SPEAKERS<br />
If you plan to paint your <strong>speakers</strong>, we recommend that it be done<br />
prior to installation. If you plan to paint your <strong>speakers</strong> sometime in<br />
the future, it is best to remove them by simply reversing the steps<br />
for “SPEAKER INSTALLATION” above.<br />
If it is necessary to paint the <strong>speakers</strong> when they are in the wall,<br />
the paint masks provided in the carton must be installed between<br />
the grille and flange while they are being painted with the wall.<br />
2<br />
Before painting your <strong>speakers</strong>, remove the material under the<br />
grilles. Once the <strong>speakers</strong> have been painted, return the material<br />
back into place.<br />
Great care should be taken not to clog the holes of the grille, as<br />
this will reduce the sound quality of the <strong>speakers</strong>.<br />
<strong>Proficient</strong> <strong>Audio</strong> <strong>Systems</strong> recommends only light spray painting<br />
using 5 parts thinning agent to 1 part paint.
SPEAKER SPECIFICATIONS<br />
W665 W670 W680<br />
Speaker Type: 2-Way In-Wall 2-Way In-Wall 2-Way In-Wall<br />
Tweeter: 3/4" Soft Dome Pivoting 1" Silk Dome Pivoting 1" Aluminum Dome<br />
Woofer: 61/2" Polypropylene Cone 61/2" Polypropylene Cone 61/2" Graphite Cone<br />
with Rubber Surround with Rubber Surround with Rubber Surround<br />
Impedance: 8 Ω 8 Ω 8 Ω<br />
Sensitivity: 90dB 1W/1m 91dB 1W/1m 92dB 1W/1m<br />
Contour Switches: None None Front-Mounted 2-Position<br />
+3dB Bass & Treble Switches<br />
Frequency Response: 45Hz - 20kHz 36Hz - 20kHz 32Hz - 22kHz<br />
Power Handling: 75 watts 100 watts 125 watts<br />
Dimensions (H x W x D): 121/4" x 83⁄16" x 33⁄16" 121/4" x 83⁄16" x 31⁄8" 121/4" x 83⁄16" x 33⁄16"<br />
Wall Cut Out (H x W): 107⁄8" x 63⁄4" 107⁄8" x 63⁄4" 107⁄8" x 63⁄4"<br />
W690 W800 W850<br />
Speaker Type: 2-Way In-Wall 2-Way In-Wall 2-Way In-Wall<br />
Tweeter: Pivoting 1" Aluminum Dome Pivoting 1" Aluminum Dome Pivoting 1" Aluminum Dome<br />
Woofer: 61/2" Kevlar Cone with Cast 8" Graphite Cone 8" Kevlar Cone with Cast<br />
Magnesium Basket and with Rubber Surround Magnesium Basket and<br />
Rubber Surround<br />
Rubber Surround<br />
Impedance: 8 Ω 8 Ω 8 Ω<br />
Sensitivity: 92dB 1W/1m 92dB 1W/1m 92dB 1W/1m<br />
Contour Switches: Front-Mounted 2-Position Front-Mounted 2-Position Front-Mounted 2-Position<br />
+3dB Bass & Treble Switches +3dB Bass & Treble Switches ±3dB Bass & Treble Switches<br />
Frequency Response: 32Hz - 22kHz 28Hz - 22kHz 28Hz - 22kHz<br />
Power Handling: 150 watts 150 watts 175 watts<br />
Dimensions (H x W x D): 121/4" x 83⁄16" x 33⁄16" 147⁄8" x 101⁄8" x 33/4" 147⁄8" x 101⁄8" x 33/4"<br />
Wall Cut Out (H x W): 107⁄8" x 63⁄4" 135⁄8" x 83/4" 135⁄8" x 83/4"<br />
Features and specifications are subject to change without notice.<br />
3
LIMITED TEN-YEAR WARRANTY<br />
<strong>Proficient</strong> <strong>Audio</strong> <strong>Systems</strong> warrants to the original retail purchaser<br />
only that this product will be free from defects in<br />
materials and workmanship for a period of ten years, provided<br />
the speaker was purchased from a <strong>Proficient</strong> <strong>Audio</strong> <strong>Systems</strong><br />
Authorized Dealer.<br />
Defective products must be shipped, prepaid and insured,<br />
together with proof of purchase, to the <strong>Proficient</strong> <strong>Audio</strong><br />
<strong>Systems</strong> Authorized Dealer from whom they were purchased,<br />
or to <strong>Proficient</strong> <strong>Audio</strong> <strong>Systems</strong> at the address listed on this<br />
installation instruction <strong>manual</strong>. Freight collect shipments will<br />
be refused. It is preferable to ship this product in the original<br />
shipping container to lessen the chance of transit damage. In<br />
any case, the risk of loss or damage in transit is to be borne by<br />
the purchaser.<br />
If, upon examination at the Factory or <strong>Proficient</strong> <strong>Audio</strong> <strong>Systems</strong><br />
Authorized Dealer, it is determined that the unit was defective<br />
in materials or workmanship at any time during this warranty<br />
period, <strong>Proficient</strong> <strong>Audio</strong> <strong>Systems</strong> or the <strong>Proficient</strong> <strong>Audio</strong><br />
<strong>Systems</strong> Authorized Dealer will, at its option, repair or replace<br />
this product at no additional charge, except as set forth below.<br />
If this model is no longer available and can not be repaired<br />
effectively, <strong>Proficient</strong> <strong>Audio</strong> <strong>Systems</strong>, at its sole option, may<br />
replace the unit with a current model of equal or greater value.<br />
In some cases where a new model is substituted, a modification<br />
to the mounting surface may be required. If mounting surface<br />
modification is required, <strong>Proficient</strong> <strong>Audio</strong> <strong>Systems</strong> assumes<br />
no responsibility or liability for such modification. All replaced<br />
parts and product become the property of <strong>Proficient</strong> <strong>Audio</strong><br />
<strong>Systems</strong>. Products replaced or repaired under this Warranty will<br />
be returned to the original retail purchaser, within a reasonable<br />
time, freight prepaid.<br />
This Warranty does not include service or parts to repair damage<br />
caused by accident, disaster, misuse, abuse, negligence,<br />
inadequate packing or shipping procedures, commercial use,<br />
voltage inputs in excess of the rated maximum of the unit, or<br />
service, repair or modification of the product which has not<br />
been authorized or approved by <strong>Proficient</strong> <strong>Audio</strong> <strong>Systems</strong>. This<br />
Warranty also excludes normal cosmetic deterioration caused<br />
by environmental conditions. This warranty will be void if the<br />
Serial Number on the product has been removed, tampered<br />
with or defaced.<br />
This Warranty is in lieu of all other expressed warranties. If<br />
the product is defective in materials or workmanship as warranted<br />
above, the purchaser’s sole remedy shall be repair or<br />
replacement as provided above. In no event will <strong>Proficient</strong><br />
<strong>Audio</strong> <strong>Systems</strong> be liable for any incidental or consequential<br />
damages arising out of the use or inability to use the product,<br />
even if <strong>Proficient</strong> <strong>Audio</strong> <strong>Systems</strong>. or a <strong>Proficient</strong> <strong>Audio</strong> <strong>Systems</strong><br />
Authorized Dealer has been advised of the possibility of such<br />
damages, or for any claim by any other party. Some states do<br />
not allow the exclusion or limitation of consequential damages,<br />
so the above limitation and exclusion may not apply.<br />
All implied warranties on the product are limited to the duration<br />
of this expressed Warranty. Some states do not allow limitation<br />
on the length of an implied warranty. If the original retail purchaser<br />
resides in such a state, this limitation does not apply.<br />
For technical inquiries please call 800.448.0976 or email us at techsupport@proficientaudio.com. We are available to assist you<br />
every weekday, except holidays, between the hours of 7:00 a.m. and 5:00 p.m. PST.<br />
<strong>Audio</strong> <strong>Systems</strong><br />
940 Columbia Avenue, Riverside, CA 92507<br />
800.448.0976 • Fax 951.787.8747 • proficientaudio.com<br />
4<br />
1301-21000 (rev1)