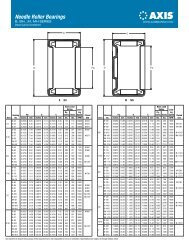
Axis Ball Bearing Catalog (PDF) - McGuire Bearing Company
Axis Ball Bearing Catalog (PDF) - McGuire Bearing Company
Axis Ball Bearing Catalog (PDF) - McGuire Bearing Company

Create successful ePaper yourself
Turn your PDF publications into a flip-book with our unique Google optimized e-Paper software.
Engineering Section<br />
Angular Contact Installation<br />
Proper Tightening<br />
Note: Ring length tolerances can be held so that when the bearings are clamped together, slight<br />
axial play exists. For most applications this is desirable (UA suffix). For some applications, no axial<br />
play is desirable (UO suffix). For applications where extreme shaft rigidity is desired, ring lengths that<br />
preload the assembly can be used.<br />
Tighten the locknut hand-tight. In order to protect the key of the washer from shearing, the lockwasher<br />
should not be used at this time. Make sure that the tapered O.D. portion of the locknut is<br />
toward the bearing. This keeps any deformation of the slots away from the bearing (deformation of<br />
the slots due to improper installation of the locknut can cause the bearing’s ring to become cocked<br />
on the shaft). Once the locknut is hand-tight, wait about a minute for the shaft to pick up heat from<br />
the bearing; then, using a spanner wrench and hammer, drive the locknut tight. “Tight” is defined as a<br />
distinct feel that the inner rings of the bearing are seated together and the locknut will start to distort<br />
if driven tighter. Wait about 10 minutes and re-tighten a second time. While the bearings are cooling,<br />
use clean lint-free rags, or oil paper, to cover and protect the bearings from foreign matter contamination.<br />
Note: Use of steel or brass drifts can cause metal flakes to be dislodged and enter the bearing. Steel<br />
or brass drifts may also lead to further deformation of the slots, which can lead to a cocked/tilted<br />
rings. Use of a proper spanner wrench is strongly recommended.<br />
To check installation, after bearings and shaft are cooled, remove the locknut. Spin the outer rings<br />
of the bearing. Try to rotate one outer ring CW while trying to rotate the other outer ring CCW. This<br />
should be difficult with a normal clearance (UA suffix) designation and not possible with a preloaded<br />
bearing. Depending on the preload, the bearings should now turn, in the same direction, freely, or<br />
with slight resistance. The resistance to turning the bearing should be consistent through 360 degrees<br />
of rotation. Inconsistent resistance to rotation is an indication of an incorrectly mounted bearing,<br />
or a sign of foreign material in the bearing. If you can not get the bearings to spin with consistent<br />
resistance, remove the bearings to investigate. Do not proceed!<br />
If a bearing must be removed from the shaft, it is generally best to replace it. Whenever a bearing<br />
is removed from the shaft, there is a risk of damage to the rolling elements and rings. The cost of a<br />
new bearing is a fraction of the cost of a pump or motor that goes out of service prematurely. If the<br />
installed bearings spin properly, install a new locknut and lock-washer and tighten. Then bend a tang<br />
on the lockwasher into one of the notches on the OD of the locknut.<br />
With cleanliness in mind, hand pack the bearings with appropriate grease if it is grease lubricated<br />
(20-30% fill is typically recommended). If it is oil lubricated, oil the bearing down with the correct<br />
clean oil. Install the housings, covers, seals and slingers to complete rotating element assembly and<br />
protect the bearing.<br />
44<br />
www.<strong>Axis</strong><strong>Bearing</strong>.com