PL-383450 Sony Clie PEG-TJ25/U Battery Installation ... - Batteries
PL-383450 Sony Clie PEG-TJ25/U Battery Installation ... - Batteries
PL-383450 Sony Clie PEG-TJ25/U Battery Installation ... - Batteries

Create successful ePaper yourself
Turn your PDF publications into a flip-book with our unique Google optimized e-Paper software.
<strong>Battery</strong>Ship.com<br />
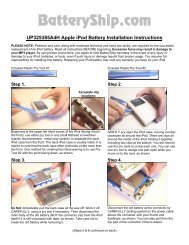
<strong>PL</strong>-<strong>383450</strong> <strong>Sony</strong> <strong>Clie</strong> <strong>PEG</strong>-<strong>TJ25</strong>/U <strong>Battery</strong> <strong>Installation</strong> Instructions<br />
<strong>PL</strong>EASE NOTE: Patience and care, along with moderate technical and hand tool ability, are required for the successful<br />
replacement of a <strong>Clie</strong> battery. Excessive force may result in damage to your PDA. The instructions below come with<br />
no warranty or guarantee. By utilizing these instructions, you agree to hold <strong>Battery</strong>ship.com blameless and unaccountable<br />
for any and all damages, problems, or personal injuries that may or may not arise by your use of these instructions.<br />
Replacing your <strong>Clie</strong> battery may void any warranty you have on your <strong>Clie</strong>. Please read all instructions and back up<br />
your data BEFORE replacing the battery.<br />
If your <strong>Clie</strong> is a different model number, use these instructions as a reference and consult your owner’s manual or a<br />
technician if necessary.<br />
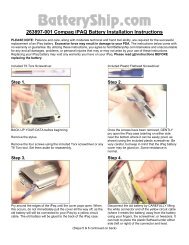
Included Mini Flathead Screwdriver<br />
Included Plastic Flathead Screwdriver<br />
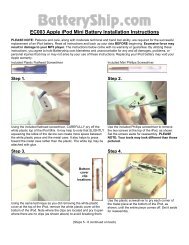
Step 1.<br />
Step 2.<br />
Remove the two “Y Head” three pointed screws below the label on<br />
the back of the device, as shown, using the included mini flathead<br />
screwdriver. (Your tools may look different than the picture shown.)<br />
You can also use a “Y Head” screwdriver if you have one. Set the<br />
screws aside for reassembly.<br />
Step 3.<br />
Remove the two Phillips screws from the upper<br />
sides of the device, as shown, using the same mini<br />
flathead screwdriver or a 000 Phillips screwdriver.<br />
Set the screws aside for reassembly.<br />
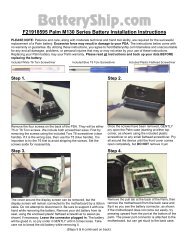
Step 4.<br />
Use the plastic flathead screwdriver or any small flathead<br />
screwdriver (plastic recommended - metal may scratch) to separate<br />
the back case from the front by CAREFULLY prying around the<br />
device. There are clips on all sides of the device holding the front<br />
and back together. Be careful not to break them when prying.<br />
(Steps 5 and 6 Continued on Back)<br />
Lift off the back cover. Remove ONLY the Phillips<br />
screw shown in the picture above, then fold back<br />
the protective copper foil (taking care not to tear or<br />
damage it) so that the battery can be reached.<br />
Set the screw aside for reassembly.
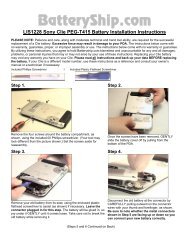
Step 5.<br />
Remove your old battery from its seat, using the enclosed plastic flathead screwdriver to assist (as shown) if necessary.<br />
Leave the connector plugged in for this process. The battery may be taped or glued in, so pry under it GENTLY until it<br />
comes loose. Take care not to break the old battery.<br />
Disconnect the old battery at the connector by CAREFULLY pulling outward on the connector with your thumb and<br />
forefinger. Be very sure that you are pulling outward on only the part of the connector that comes out, as shown. Also,<br />
note whether the metal connectors shown in the picture above are facing up or down so you can connect your new battery<br />
correctly.<br />
Step 6.<br />
Making sure that your battery is facing the right direction (connector towards the bottom of the <strong>Clie</strong>), and that the metal<br />
connectors on the white connector plug (shown in Step 5) are correctly oriented, connect the new battery by pressing the<br />
connector at the end of the ribbon cable into the socket as shown. You may need to use the tip of the screwdriver or<br />
stylus to press the connector in, but DO NOT press too hard or try to force the pieces together. They will fit easily when<br />
correctly aligned. Position the new battery in its seat, placing the protective foil back over the battery and screwing the<br />
single internal screw back in to hold it in place (shown in Step 4).<br />
Replace the back cover and screw the four external screws back in. FULLY CHARGE your new battery before use. (Allow<br />
at least three hours. For quality control, we pre-charge many of our batteries, so yours may require less time.)<br />
<strong>PL</strong>EASE NOTE: Our tools fit the majority of <strong>Clie</strong>’s, but some devices may have different screws installed for<br />
various reasons. If our tools do not fit your device, you may have the appropriate tool in a tool kit you already<br />
own. You can also check your local hardware or electronics store if you do not have the right tool at home.