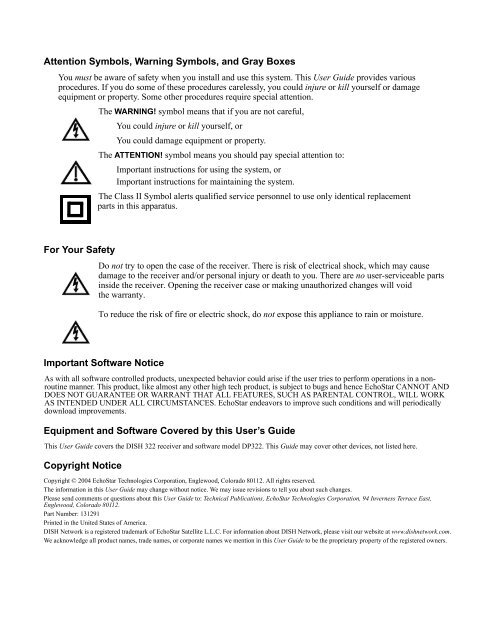
Attention Symbols, Warning Symbols, and Gray Boxes - DISH Network
Attention Symbols, Warning Symbols, and Gray Boxes - DISH Network
Attention Symbols, Warning Symbols, and Gray Boxes - DISH Network

Create successful ePaper yourself
Turn your PDF publications into a flip-book with our unique Google optimized e-Paper software.
<strong>Attention</strong> <strong>Symbols</strong>, <strong>Warning</strong> <strong>Symbols</strong>, <strong>and</strong> <strong>Gray</strong> <strong>Boxes</strong><br />
You must be aware of safety when you install <strong>and</strong> use this system. This User Guide provides various<br />
procedures. If you do some of these procedures carelessly, you could injure or kill yourself or damage<br />
equipment or property. Some other procedures require special attention.<br />
The WARNING! symbol means that if you are not careful,<br />
You could injure or kill yourself, or<br />
You could damage equipment or property.<br />
The ATTENTION! symbol means you should pay special attention to:<br />
Important instructions for using the system, or<br />
Important instructions for maintaining the system.<br />
The Class II Symbol alerts qualified service personnel to use only identical replacement<br />
parts in this apparatus.<br />
For Your Safety<br />
Do not try to open the case of the receiver. There is risk of electrical shock, which may cause<br />
damage to the receiver <strong>and</strong>/or personal injury or death to you. There are no user-serviceable parts<br />
inside the receiver. Opening the receiver case or making unauthorized changes will void<br />
the warranty.<br />
To reduce the risk of fire or electric shock, do not expose this appliance to rain or moisture.<br />
Important Software Notice<br />
As with all software controlled products, unexpected behavior could arise if the user tries to perform operations in a nonroutine<br />
manner. This product, like almost any other high tech product, is subject to bugs <strong>and</strong> hence EchoStar CANNOT AND<br />
DOES NOT GUARANTEE OR WARRANT THAT ALL FEATURES, SUCH AS PARENTAL CONTROL, WILL WORK<br />
AS INTENDED UNDER ALL CIRCUMSTANCES. EchoStar endeavors to improve such conditions <strong>and</strong> will periodically<br />
download improvements.<br />
Equipment <strong>and</strong> Software Covered by this User’s Guide<br />
This User Guide covers the <strong>DISH</strong> 322 receiver <strong>and</strong> software model DP322. This Guide may cover other devices, not listed here.<br />
Copyright Notice<br />
Copyright © 2004 EchoStar Technologies Corporation, Englewood, Colorado 80112. All rights reserved.<br />
The information in this User Guide may change without notice. We may issue revisions to tell you about such changes.<br />
Please send comments or questions about this User Guide to: Technical Publications, EchoStar Technologies Corporation, 94 Inverness Terrace East,<br />
Englewood, Colorado 80112.<br />
Part Number: 131291<br />
Printed in the United States of America.<br />
<strong>DISH</strong> <strong>Network</strong> is a registered trademark of EchoStar Satellite L.L.C. For information about <strong>DISH</strong> <strong>Network</strong>, please visit our website at www.dishnetwork.com.<br />
We acknowledge all product names, trade names, or corporate names we mention in this User Guide to be the proprietary property of the registered owners.
Contents<br />
Safety Instructions ..........................................................................iii<br />
Chapter 1 - Introduction...................................................................1<br />
Welcome to <strong>DISH</strong> <strong>Network</strong> ................................................................... 1<br />
About this Receiver .............................................................................. 1<br />
Overview .............................................................................................. 2<br />
Getting Started ..................................................................................... 4<br />
Quick Tour of Basic Features ............................................................... 5<br />
Quick Tour of the Menus ...................................................................... 7<br />
About Satellite Television ................................................................... 11<br />
Satellite Signal Quality ....................................................................... 11<br />
Chapter 2 - Receiver Description <strong>and</strong> Installation.......................13<br />
Receiver Front Panel .......................................................................... 13<br />
Receiver Back Panel .......................................................................... 14<br />
Remote Controls ................................................................................ 16<br />
Connecting the Receiver to a Nearby TV ........................................... 19<br />
Connecting the Receiver to the TV(s) in Another Room(s) ................ 21<br />
Programming the Recover Button ...................................................... 25<br />
Changing the TV1 <strong>and</strong> TV2 Output Channels .................................... 26<br />
Connecting the Receiver to the Phone Line ....................................... 27<br />
Connecting the Receiver to a Dish Antenna System ......................... 28<br />
Optional - Connecting VCRs to the System ....................................... 31<br />
Optional - Connecting to an Off-Air Antenna or Cable ....................... 32<br />
Optimize Your Remote Controls ......................................................... 32<br />
Setting Up TV1 to Operate in UHF Pro .............................................. 34<br />
Setting Up TV1 to Operate in IR ......................................................... 35<br />
Chapter 3 - Using the System........................................................37<br />
Using the Remote Controls ................................................................ 37<br />
Using the Menus ................................................................................ 42<br />
Changing Channels ............................................................................ 45<br />
Using the Program Guide ................................................................... 45<br />
Displaying Program Information ......................................................... 47<br />
Using Favorites Lists .......................................................................... 49<br />
Using Timers ...................................................................................... 52<br />
Using Themes <strong>and</strong> Search ................................................................. 59<br />
Using Locks ........................................................................................ 62<br />
Personal Identification Number .......................................................... 69<br />
Using Caller ID ................................................................................... 69<br />
Resetting to Factory Default Settings ................................................. 70<br />
Changing Program Languages .......................................................... 71<br />
Control Other Devices with the Remote Controls ............................... 72<br />
Testing the System ............................................................................. 82<br />
System Updates ................................................................................. 83<br />
Page i
Contents<br />
Chapter 4 - Dish Antenna Installation...........................................85<br />
Installing a <strong>DISH</strong> 500 Antenna ............................................................85<br />
Installing a Multiple Dish <strong>DISH</strong> Pro System ........................................91<br />
<strong>DISH</strong> Pro Wiring Diagrams .................................................................94<br />
Running Coaxial Cable .......................................................................99<br />
Chapter 5 - Reference...................................................................101<br />
Troubleshooting Tables ....................................................................101<br />
Device Codes ....................................................................................113<br />
Appendix ......................................................................................109<br />
Limited Warranty ...............................................................................119<br />
Residential Customer Agreement .....................................................121<br />
Staying Legal ....................................................................................127<br />
FCC Compliance ...............................................................................127<br />
Index ..............................................................................................129<br />
Page ii
Safety Instructions<br />
1. Read these instructions.<br />
2. Keep these instructions.<br />
3. Heed all warnings.<br />
4. Follow all instructions.<br />
5. Do not use this apparatus near water.<br />
6. Clean only with a dry cloth.<br />
7. Do not block any ventilation openings. Install in accordance with the<br />
manufacturer’s instructions.<br />
8. Do not install near any heat sources such as radiators, heat registers, stoves, or<br />
other apparatus (including amplifiers) that produce heat.<br />
9. Do not defeat the safety purpose of the polarized or grounding-type plug. A<br />
polarized plug has two blades with one wider than the other. A grounding-type<br />
plug has two blades <strong>and</strong> a third grounding prong. The wide blade or the third<br />
prong are provided for your safety. If the provided plug does not fit into your<br />
outlet, consult an electrician for replacement of the obsolete outlet.<br />
10. Protect the power cord from being walked on or pinched, particularly at plugs,<br />
convenience receptacles, <strong>and</strong> the point where they exit from the apparatus.<br />
11. Use only attachments/accessories specified by the manufacturer.<br />
12. Unplug this apparatus during lightning storms or when unused for long periods<br />
of time.<br />
13. Refer all servicing to qualified service personnel. Servicing is required when the<br />
apparatus has been damaged in any way, such as the power supply cord or plug<br />
is damaged, liquid has been spilled or objects have fallen into the apparatus, the<br />
apparatus has been exposed to rain or moisture, does not operate normally, or<br />
has been dropped.<br />
Apparatus shall not be exposed to dripping or splashing <strong>and</strong> no<br />
objects filled with liquids, such as vases, shall be placed on the<br />
apparatus.<br />
Page iii
Safety<br />
Note to Satellite TV System Installer: This reminder is provided to call the<br />
satellite TV system installer’s attention to Article 820-40 of the National<br />
Electrical Code (NEC) that provides guidelines for proper grounding <strong>and</strong>, in<br />
particular, specifies that the cable ground shall be connected to the grounding<br />
system of the building as close to the point of cable entry as practical.<br />
Satellite Dish<br />
Ground Clamp<br />
Antenna Discharge<br />
Unit<br />
Grounding Conductors<br />
(NEC Section 810-21)<br />
Coaxial Cable<br />
from Satellite Dish<br />
Electric Service Equipment<br />
Ground Clamps<br />
Power Service Grounding<br />
Electrode System<br />
(NEC Art. 250, Part H)<br />
Safety Tips<br />
• Unplug the receiver from the AC power outlet before cleaning.<br />
• The use of accessories or attachments not recommended by the receiver<br />
manufacturer will void the Limited Warranty.<br />
• Do not place the receiver in an enclosure such as a cabinet without proper<br />
ventilation.<br />
• Do not install the receiver in any area where the temperature can be less than<br />
40°F or more than 113°F.<br />
• Do not stack the receiver on top of or below other electronic devices.<br />
• Operate the receiver using only the type of power source indicated on the<br />
marking label. Unplug the receiver power cord by gripping the power plug, not<br />
the cord.<br />
• Do not overload wall outlets or extension cords, as this can result in a risk of<br />
fire or electrical shock.<br />
• Never insert objects of any kind into the receiver through openings, as the<br />
objects may touch dangerous voltage points or short out parts. This could cause<br />
fire or electrical shock.<br />
• Make sure that the outdoor parts of the antenna system are grounded in<br />
accordance with local, state, federal, <strong>and</strong> National Electrical Code (NEC)<br />
requirements.<br />
• Do not locate the antenna near overhead light or power circuits, or where it can<br />
fall into such power lines or circuits. When installing the antenna, take extreme<br />
care to avoid touching such power lines or circuits, as contact with them can be<br />
fatal.<br />
• Do not attempt to service the receiver yourself, as opening or removing covers<br />
may expose you to dangerous voltage, <strong>and</strong> will void the Limited Warranty.<br />
Refer all servicing to authorized service personnel.<br />
• Use an outlet that contains surge suppression or ground fault protection. For<br />
added protection during a lightning storm, or when the receiver is left<br />
unattended <strong>and</strong> unused for long periods of time, unplug the power cord from the<br />
wall outlet, disconnect the lines between the receiver <strong>and</strong> the antenna, <strong>and</strong><br />
disconnect the telephone line. This will provide some protection against<br />
damage caused by lightning or power line surges.<br />
Page iv
Chapter 1<br />
Introduction<br />
Welcome to <strong>DISH</strong> <strong>Network</strong><br />
Congratulations on choosing <strong>DISH</strong> <strong>Network</strong>. You are about to experience<br />
the excitement <strong>and</strong> convenience of Direct Broadcast Satellite (DBS) service,<br />
which delivers the very best picture <strong>and</strong> sound quality. <strong>DISH</strong> <strong>Network</strong><br />
consistently provides state-of-the-art products <strong>and</strong> satellite-delivered<br />
services — with high performance, ease of operation, <strong>and</strong> a wide variety<br />
of entertainment options.<br />
About this Receiver<br />
UHF Pro<br />
Remote Control<br />
2<br />
IR<br />
Remote Control<br />
1<br />
To gain a better underst<strong>and</strong>ing of your <strong>DISH</strong> <strong>Network</strong> satellite receiver, look at<br />
the picture above. This receiver is a two-tuner satellite receiver that allows you<br />
to watch different programs in two locations:<br />
• Nearby TV - Programming from the receiver is delivered to the TV near the<br />
receiver using short audio/video cables.<br />
• Remote TV - Programming from the receiver is delivered to a TV located in<br />
another room using existing in-home coaxial cable.<br />
Page 1
Chapter 1<br />
Introduction<br />
Two remote controls come with your receiver:<br />
• An Infrared (IR) remote to control programming for the nearby TV.<br />
This remote is labeled with a green number 1, which matches similar<br />
markings on the receiver output connections <strong>and</strong> the menus for the<br />
nearby TV.<br />
• An Ultra-High Frequency Pro (UHF Pro) remote to control<br />
programming to a remote TV. This remote is labeled with blue<br />
number 2, which matches the similar markings on the receiver<br />
output connections <strong>and</strong> the menus for the remote TV.<br />
Overview<br />
Tips<br />
Before you use your satellite receiver, you need to install the system or<br />
have it installed by a professional technician. For a professional installation,<br />
please call the Customer Service Center at 1-800-333-<strong>DISH</strong> (3474). If you<br />
install the system yourself, use the instructions in Chapter 2.<br />
A vital part of the installation is to set up the receiver to get the<br />
latest software from the satellite signal. If you are installing a<br />
new system <strong>and</strong> follow the instructions in Chapter 2, your<br />
receiver will automatically get this software.<br />
For information on the receiver <strong>and</strong> its installation, read Chapter 2, Receiver<br />
Description <strong>and</strong> Installation beginning on page 13.<br />
For information on any specific feature or function, read Chapter 3, Using<br />
The System beginning on page 37.<br />
For information on assembling <strong>and</strong> installing a dish antenna, read Chapter 4,<br />
Dish Antenna Installation beginning on page 85.<br />
If you have a problem operating the system or receive an error message, use<br />
the Troubleshooting Tables beginning on page 101.<br />
In the margins of pages throughout this guide are tips <strong>and</strong> other information<br />
to make using your satellite receiver easier.<br />
Conventions<br />
To make it easy for you to use this guide, we use the following conventions.<br />
• The names of remote control buttons are all uppercase.<br />
Example: Press the SAT button.<br />
• Menus <strong>and</strong> options that appear on the TV screen are in bold type.<br />
Example: Open the Program Guide.<br />
• Select means to move the highlight to an on-screen option or choice<br />
in a list <strong>and</strong> press the SELECT button on the remote control.<br />
Example: Select the Locks option.<br />
• Connections on the back of the receiver are in small capital letters.<br />
Example: SAT IN<br />
Page 2
Overview<br />
• Where this guide mentions nearby TV, it refers to the TV near the<br />
receiver. The nearby TV receives TV1 menus <strong>and</strong> programming<br />
from the receiver’s TV1 outputs <strong>and</strong> is connected using short audio/<br />
video cables.<br />
• Where this guide mentions remote TV, it refers to the cable-ready<br />
TV(s) located in rooms away from the receiver. The remote TV<br />
receives TV2 menus <strong>and</strong> programming from the receiver’s TV2<br />
outputs through your in-home cable system.<br />
• Where this guide mentions remote control, it refers to either<br />
Remote Control 1 when viewing the nearby TV or Remote Control<br />
2 when viewing the remote TV(s). If a specific remote control must<br />
be used, this guide will refer directly to Remote Control 1 or<br />
Remote Control 2.<br />
Fixed Images<br />
<strong>DISH</strong> <strong>Network</strong> Logo<br />
On some TVs, the presence of fixed images for extended periods<br />
of time may cause them to be permanently imprinted on the<br />
screen. Consult your TV user guide for information on whether<br />
this is a problem for your TV, what operating/viewing restrictions<br />
apply to avoid this problem, <strong>and</strong> associated TV warranty<br />
coverage.<br />
Whenever the receiver’s outputs are turned off using the<br />
remote control or front panel POWER buttons, you will<br />
see the <strong>DISH</strong> <strong>Network</strong> logo moving around on your TV<br />
screen. This feature is included with your receiver to<br />
assure you that the connections between your receiver <strong>and</strong><br />
TV(s) is not lost. Press the blank POWER or SELECT<br />
button on the remote control to resume watching satellite<br />
TV programming. Make sure you are using the correct<br />
remote (see page 16 for details).<br />
Note: This logo is displayed on all TV1 <strong>and</strong> TV2 outputs except the<br />
CH 3–4 OUT. So if your nearby TV is connected using the CH 3–4 OUT,<br />
this logo will not be displayed.<br />
Page 3
Chapter 1<br />
Introduction<br />
Getting Started<br />
After your system has been installed, order <strong>and</strong> watch your programming<br />
using the following steps:<br />
Step 1: Ordering Your Programming<br />
Tip: Remote<br />
Control 1 is used to<br />
control TV1 menus<br />
on the nearby TV.<br />
Remote Control 2<br />
is used to control<br />
TV2 menus on the<br />
remote TV(s).<br />
1. Using a remote control, press SAT <strong>and</strong> then press the<br />
blank POWER button. Make sure the TV is also on.<br />
Note: If you see the <strong>DISH</strong> <strong>Network</strong> logo displayed on<br />
your TV screen, press the SELECT or blank<br />
POWER button on the remote control to view<br />
satellite TV programming.<br />
2. Press GUIDE.<br />
You will see that some channels in the Program Guide appear<br />
in white. These channels can be viewed immediately. However, many<br />
channels will be in red. You cannot view these channels until you order<br />
programming.<br />
3. Press the SYS INFO button on the remote control to display<br />
the Important System Information screen.<br />
4. Call the Customer Service Center at 1-800-333-<strong>DISH</strong> (3474). A<br />
customer service representative will help you start <strong>DISH</strong> <strong>Network</strong><br />
programming on your system <strong>and</strong> will discuss the various programming<br />
packages available.<br />
5. Choose a package <strong>and</strong> the representative will authorize your<br />
programming.<br />
6. Press SELECT to close the Important System Information screen.<br />
7. Wait a few minutes <strong>and</strong> the channels you purchased will turn from red to<br />
white, <strong>and</strong> can now be viewed.<br />
Page 4
Quick Tour of Basic Features<br />
Step 2: Finding Programs To Watch<br />
1. Press the GUIDE button.<br />
2. When the Program Guide opens, use the UP or<br />
DOWN ARROW to view information on other<br />
channels. The channels for the programming you<br />
ordered should be shown in white <strong>and</strong> are available for<br />
viewing. After you have highlighted a current program<br />
in the Program Guide, press SELECT to watch it.<br />
Quick Tour of Basic Features<br />
Tip: The Program<br />
Guide provides a<br />
complete listing of<br />
all programs<br />
available on all<br />
channels,<br />
including those<br />
that are not in your<br />
subscription<br />
(these channels<br />
have red<br />
backgrounds).<br />
This tour guides you quickly through a number of basic satellite receiver<br />
features accessible directly from the remote control without using menus.<br />
For more detailed information about each feature, see Chapter 3, Using the<br />
System.<br />
1. Make sure the TV is on.<br />
2. Press the UP or DOWN ARROW button to<br />
change channels.<br />
3. Press the RECALL button to go back to the last channel<br />
you watched.<br />
4. Press the THEMES (LEFT ARROW) button to open the<br />
Themes <strong>and</strong> Search menu. This menu allows you to<br />
search for programming by themes (movies, sports, <strong>and</strong><br />
more) or by key words used in the programming<br />
information.<br />
Page 5
Chapter 1<br />
Introduction<br />
5. Select Sports.<br />
6. Press the VIEW TV button to go back to watch a program.<br />
7. Press the INFO button to see information about the program.<br />
8. Press the CANCEL button to go back to watch the program.<br />
9. Press the BROWSE (RIGHT ARROW) button to open the<br />
Browse Banner. The Browse Banner shows information<br />
on a program we’re watching at the top, <strong>and</strong> information on<br />
two other programs at the bottom.<br />
Page 6
Quick Tour of the Menus<br />
10. Press the UP or DOWN ARROW button to<br />
change the channel information you see at the<br />
bottom of the TV screen.<br />
11. Press the RIGHT ARROW button to highlight<br />
the program coming on next at the bottom. Press<br />
the LEFT ARROW button to go back to the<br />
program on now.<br />
12. Press the VIEW TV button to clear the Browse<br />
Banner from the TV screen <strong>and</strong> to go back to watching a<br />
program.<br />
Quick Tour of the Menus<br />
This tour guides you quickly through the basic features available through<br />
the Main Menu. See Chapter 3, Using the System for more information<br />
about these <strong>and</strong> other features.<br />
1. Press the remote control MENU button to open the Main<br />
Menu.<br />
Tip: Remote<br />
Control 1 is used to<br />
control TV1 menus<br />
on the nearby TV.<br />
Remote Control 2<br />
is used to control<br />
TV2 menus on the<br />
remote TV(s).<br />
Page 7
Chapter 1<br />
Introduction<br />
2. Press the 1 button to select the Program Guide option on the<br />
Main Menu. This opens the Program Guide on the TV screen.<br />
You can use the Program Guide to find <strong>and</strong> select a program to watch.<br />
For now, though, go on with this tour.<br />
3. Press the MENU button to go back to the Main Menu.<br />
4. Press the 2 button to select the Themes <strong>and</strong> Search option on<br />
the Main Menu. This menu allows you to search for<br />
programming by themes (movies, sports, etc.) or by key words<br />
used in the program information.<br />
5. Press the MENU button to go back to the Main Menu.<br />
6. Press the 3 button to select the Customer option. This menu<br />
provides convenient access to your <strong>DISH</strong> <strong>Network</strong> account to<br />
review your statement, pay your bill, upgrade programming, <strong>and</strong><br />
more.<br />
Page 8
Quick Tour of the Menus<br />
7. Press the 0 button to go back to the Main Menu.<br />
8. Press the 4 button to select the Dish Home option. You can<br />
order channels, check the news <strong>and</strong> weather, <strong>and</strong> even play<br />
games.<br />
9. Press the 0 button to go back to the Main Menu.<br />
10. Press the 5 button to select the Locks option on the Main<br />
Menu. This menu allows you to apply password-protected<br />
locks on programming based on rating, or even on a channelby-channel<br />
basis.<br />
Page 9
Chapter 1<br />
Introduction<br />
11. Press MENU to go back to the Main Menu.<br />
12. Press the 6 button to select the System Setup option on the<br />
Main Menu. Use this menu to set up the system the way you<br />
want.<br />
13. Press MENU to go back to the Main Menu.<br />
14. Press the 7 button to select the Timers option on the Main<br />
Menu. This menu is used for creating <strong>and</strong> changing timers used<br />
to trigger automatic channel changes, reminders, or VCR<br />
recordings.<br />
Page 10
About Satellite Television<br />
15. Press MENU to go back to the Main Menu.<br />
16. Press the 8 button to open the Favorites menu. This menu<br />
allows you to set up lists of your favorite channels to make<br />
finding what you want to watch more convenient.<br />
17. Press MENU to go back to the Main Menu.<br />
18. Press the VIEW TV button to go back to watching a program.<br />
About Satellite Television<br />
Satellite television uses a satellite in a stationary orbit over the Earth to<br />
deliver television <strong>and</strong> audio programming. This type of orbit enables the<br />
satellite to stay aligned over one place on the surface of the Earth.<br />
Once the satellite dish is aimed at the satellite, the dish does not have to<br />
move to follow it.<br />
Satellite Signal Quality<br />
Rain <strong>and</strong> Snow Fade<br />
Heavy rain, snow, or cloud cover can block the satellite signal, which can<br />
interrupt your programming service. By aiming the satellite dish to get the<br />
strongest signal during installation, you can help prevent rain <strong>and</strong> snow<br />
from interrupting the signal. Your service will return after the weather<br />
condition has passed.<br />
Tip: If you lose<br />
your picture, it’s<br />
most likely due to<br />
heavy rain, snow or<br />
snow build-up on<br />
your dish.<br />
Page 11
Chapter 1<br />
Introduction<br />
Solar Interference<br />
Twice a year, the sun moves to a position behind the <strong>DISH</strong> <strong>Network</strong> satellite<br />
as it orbits the Earth. The exact time of the year that this occurs varies,<br />
depending on the location, but it is near the beginning of spring <strong>and</strong> again<br />
near the beginning of autumn. The period of solar interference lasts for a few<br />
minutes at about the same time everyday for a few days during the spring<br />
<strong>and</strong> autumn, so do not be alarmed when it happens.<br />
This is an unavoidable natural event for all television involving the use of<br />
satellites <strong>and</strong> has an adverse effect on many program providers. During this<br />
period, you will not be able to see programs on <strong>DISH</strong> <strong>Network</strong>. Once the sun<br />
has moved from behind the satellite, the programs will reappear.<br />
Page 12
Chapter 2<br />
Receiver Description <strong>and</strong> Installation<br />
Receiver Front Panel<br />
Smart Card Door<br />
Behind this door is a slot for a future smart card. No smart card is included with<br />
this receiver.<br />
Arrow Buttons<br />
Use the ARROW buttons to change channels on the nearby TV.<br />
Power Button<br />
Press the POWER button to turn the TV1 programming on or off to the nearby<br />
TV.<br />
TV1 <strong>and</strong> TV2 Indicators<br />
• When the green TV1 indicator is on, the receiver is providing programming<br />
to the nearby TV through the TV1 output connections.<br />
• When the blue TV2 indicator is on, the receiver is providing programming<br />
to the remote TVs through the TV2 output connections.<br />
Note: If you see the <strong>DISH</strong> <strong>Network</strong> logo displayed on your TV screen,<br />
press the SELECT or blank POWER button on the remote control to view<br />
satellite TV programming.<br />
IR Sensor <strong>and</strong> IR Blaster<br />
The INFRARED (IR) SENSOR receives IR signals from Remote Control 1.<br />
The IR BLASTER transmits IR signals to control a VCR to perform automated<br />
recordings.<br />
Page 13
Chapter 2<br />
Receiver Description <strong>and</strong> Installation<br />
Receiver Back Panel<br />
Tip: The six coaxial<br />
connections on the<br />
back of your<br />
receiver are color<br />
coded to make the<br />
connectors easy to<br />
identify. Inside the<br />
front cover of this<br />
guide are stickers<br />
that are color<br />
coded the same<br />
way as the coaxial<br />
connections. See<br />
the installation<br />
instructions<br />
starting on page 19<br />
for information on<br />
how to use the<br />
stickers that go on<br />
the coaxial cables.<br />
The receiver connections on the back panel are placed in three groups:<br />
• TV1 Connections - Use these connections with the nearby TV.<br />
• TV2 Connections - Use these connections with the remote TV(s).<br />
• Other Connections - Use these connections with the dish antenna, UHF<br />
antenna, <strong>and</strong> phone line.<br />
TV1 Connections<br />
The following connections provide TV1 menus <strong>and</strong> programming to the<br />
nearby TV.<br />
TV CH 3-4 OUT<br />
The CH 3-4 OUT connection provides good quality video<br />
<strong>and</strong> mono (non-stereo) audio to your nearby TV. Use a<br />
coaxial cable to make the connection. The CH 3–4 OUT<br />
connection is color coded white.<br />
RCA Out<br />
The RCA audio/video outputs provide high quality<br />
picture <strong>and</strong> stereo sound to the nearby TV (if your<br />
TV has these connections). Use an RCA-type cable<br />
assembly to make the connection. If the TV has<br />
only one input for this type of audio, connect it to<br />
the right (R) phono (RCA) audio output on the<br />
receiver.<br />
Page 14
Receiver Back Panel<br />
S-Video Out<br />
The S-VIDEO connection provides the highest quality video<br />
available to your nearby TV (if your TV has this connection).<br />
Use an S-Video cable to make the connection. If you use this<br />
back panel output for video between your receiver <strong>and</strong><br />
nearby TV, you must still connect the audio using the PHONO<br />
(RCA) AUDIO LEFT/RIGHT OUTPUTS <strong>and</strong> Phono (RCA) cables.<br />
TV Antenna/Cable In<br />
The TV ANTENNA/CABLE IN is used if you want the satellite<br />
receiver to connect the tuner of the nearby TV to an off-air<br />
antenna or cable TV system when the satellite receiver is<br />
turned off or when using the TV/VIDEO button on Remote<br />
Control 1. Use a coaxial cable to make this connection to an<br />
off-air antenna or cable TV system. The TV ANTENNA/<br />
CABLE IN connection is color coded black. Your nearby TV<br />
must be connected to the CHANNEL 3-4 output to use this<br />
feature.<br />
TV2 Connections<br />
Tip: If you connect<br />
a cable to the TV<br />
ANTENNA/CABLE IN<br />
port, attach the<br />
black sticker to the<br />
cable near where it<br />
attaches to the<br />
receiver. The<br />
stickers are<br />
located inside the<br />
front cover of this<br />
guide.<br />
The following connections provide TV2 menus <strong>and</strong> programming to the<br />
remote TVs.<br />
Ch 21–69 OUT<br />
The CH 21–69 OUT connection provides good quality video<br />
<strong>and</strong> mono (non-stereo) audio for the remote TV(s).<br />
Use a coaxial cable to make this connection to your home<br />
cable system. Remote TVs connected to the home cable<br />
system can receive programming from this receiver output.<br />
The CH 21–69 OUT connection is color coded yellow.<br />
When connecting to the home distribution (CH 21–69 OUT)<br />
coaxial port, you must meet requirements covered under FCC<br />
Compliance in the Appendix. To meet these requirements, an inline<br />
coaxial attenuator has been included with your receiver <strong>and</strong><br />
may need to be installed using the following guidance:<br />
• If connecting directly to a TV tuner port, you must install the<br />
attenuator in the cable between the CH 21–69 OUT port <strong>and</strong> the<br />
TV tuner.<br />
• If connecting to your in-home cabling system to distribute the<br />
signal to a TV(s) in other rooms, in most cases you will not<br />
have to install the attenuator for most in-home cabling systems.<br />
Page 15
Chapter 2<br />
Receiver Description <strong>and</strong> Installation<br />
RCA Out<br />
The RCA audio/video outputs provide high<br />
picture quality <strong>and</strong> stereo sound to your TV (if<br />
your TV has these connections). These outputs<br />
can be used to provide TV2 menus <strong>and</strong><br />
programming to a wireless audio/video transmitter<br />
or to a second input on a nearby TV. Use an RCAtype<br />
cable assembly to make the connection. If the<br />
TV has only one input for this type of audio,<br />
connect it to the right (R) phono (RCA) audio<br />
output on the receiver.<br />
Other Connections<br />
Satellite In<br />
The SATELLITE IN connections are used to<br />
receive satellite TV signals from the dish<br />
antenna. The connection is made using<br />
RG-6 coaxial cable. The SATELLITE IN<br />
connections are color coded blue.<br />
Remote Antenna<br />
The REMOTE ANTENNA port receives UHF signals from<br />
the Remote Control 2 so that it can control TV2 menus<br />
from another room. Connect the UHF antenna here,<br />
<strong>and</strong> place it so that it does not touch anything. If you<br />
do not connect the antenna, you cannot use Remote<br />
Control 2 to control the receiver for TV2 menus <strong>and</strong><br />
programming. The REMOTE ANTENNA port is color<br />
coded green.<br />
Telephone Jack<br />
The TELEPHONE JACK is used to connect the receiver to an<br />
active telephone line. Use a st<strong>and</strong>ard RJ-11 telephone<br />
cable assembly to make the connection.<br />
Remote Controls<br />
The two remote controls give you easy access to all the features of your<br />
satellite receiver. You can set up each remote to control the satellite receiver<br />
<strong>and</strong> up to three other devices. These devices can be a TV, a VCR or DVD<br />
player, <strong>and</strong> a third device.<br />
Page 16
Remote Controls<br />
Types of Remote Controls<br />
Remote Control 1 uses infrared (IR)<br />
light signals to control TV1 menus for<br />
the nearby TV <strong>and</strong> other devices that<br />
the remote is programmed to control.<br />
IR signals travel only short distances<br />
(40 feet or less), <strong>and</strong> cannot go<br />
through walls or other solid objects.<br />
You must point the remote control<br />
directly at the device, with no objects<br />
blocking the line of sight.<br />
This remote control is identified by<br />
the green number 1 at the bottom of<br />
the remote control.<br />
Remote Control 2 uses UHF Pro<br />
signals to control TV2 menus for the<br />
remote TVs.<br />
UHF Pro signals travel long distances<br />
<strong>and</strong> go through walls <strong>and</strong> other solid<br />
objects.<br />
To use Remote Control 2 to control<br />
the receiver, you must attach the UHF<br />
antenna to the receiver back panel<br />
(see Attach a UHF Antenna on page<br />
18).<br />
Remote Control 2 uses IR signals to<br />
control other devices that the remote<br />
is programmed to control. You must<br />
point the remote control directly at<br />
these devices, with no objects<br />
blocking the line of sight.<br />
This remote control is identified by<br />
the blue number 2 at the bottom of the<br />
remote control.<br />
Page 17
Chapter 2<br />
Receiver Description <strong>and</strong> Installation<br />
Batteries<br />
The remote controls come with AAA batteries, which need to be installed<br />
when you first receive your system. When you replace old batteries, you<br />
should replace all of the batteries. Use batteries of the same kind, for<br />
example alkaline or carbon zinc, <strong>and</strong> don’t mix batteries of different kinds.<br />
Alkaline batteries last longer than carbon zinc.<br />
Installing or Changing the Batteries<br />
1. Press down on the battery cover’s top latch <strong>and</strong> slide the<br />
cover off.<br />
2. If you are changing out batteries, take out all of the old<br />
batteries.<br />
3. Put the new batteries in. Make sure you match the plus<br />
(“+”) ends with the plus markings on the battery case.<br />
4. Slide the cover back into place.<br />
Low Battery <strong>Warning</strong><br />
When you see a low battery warning message below the Program Banner,<br />
the batteries in your remote control are weak <strong>and</strong> need to be replaced.<br />
Attach a UHF Antenna<br />
You need to attach the UHF remote antenna to the<br />
receiver’s back panel REMOTE ANTENNA input so<br />
you can use UHF Pro Remote Control 2.<br />
Note: Be sure to set the antenna straight up so you can use the remote<br />
control from as far away as possible. Don’t let the antenna touch anything.<br />
Page 18
Connecting the Receiver to a Nearby TV<br />
<strong>Attention</strong>: If your UHF Pro Remote Control 2 isn’t working<br />
very well from far away, you may be experiencing<br />
interference from objects near your receiver. To improve your<br />
remote control’s range, try any or all of the following:<br />
• Place the receiver higher than all of the other equipment in<br />
your entertainment center.<br />
• Provide room above the receiver so that the antenna can be<br />
installed straight up. If this is not possible, tilt the UHF<br />
antenna at about a 30° angle.<br />
• Place the UHF antenna outside the entertainment center by<br />
using a coaxial cable to connect the antenna to the receiver.<br />
• Try moving the receiver to other locations.<br />
• Attach a UHF attenuator to the REMOTE ANTENNA port (see<br />
33).<br />
Connecting the Receiver to a Nearby TV<br />
This section describes how to connect receiver TV1 output ports to a nearby<br />
TV. The easiest way to connect the receiver to the TV is using coaxial cable<br />
connections, but you may also use RCA or S-Video outputs.<br />
Tip: Using cable<br />
labels makes it easy<br />
to tell which cables<br />
connect to the<br />
receiver ports.<br />
Inside the front<br />
cover of this guide<br />
are stickers that are<br />
color coded the<br />
same way as the<br />
coaxial<br />
connections.<br />
Coaxial Cable Connections (TV1)<br />
1. Connect a coaxial cable from the CH 3-4 OUT output on the receiver to<br />
the nearby TV’s tuner port.<br />
2. Place the white CH 3-4 OUT sticker on the cable near where the cable<br />
connects to the receiver (see the picture in the margin).<br />
3. Plug in the power cord for the receiver.<br />
4. Turn on the receiver with the front panel power button <strong>and</strong> make sure<br />
the green TV1 indicator is lit.<br />
Page 19
Chapter 2<br />
Receiver Description <strong>and</strong> Installation<br />
Tip: The channel<br />
stickers are located<br />
inside the front<br />
cover of this guide.<br />
5. Turn on the nearby TV.<br />
6. Tune the TV to channel 3.<br />
7. You should see the Point Dish screen.<br />
8. If you do not see the correct screen, tune the TV to channel 4.<br />
Note: If you want to change the channel that the CH 3-4 OUT connection<br />
provides to your TV, see Changing the TV1 <strong>and</strong> TV2 Output Channels<br />
on page 26.<br />
9. If desired to remind you of which TV channel (3 or 4) to tune to watch<br />
satellite programming, place one of the channel stickers (3 or 4) near or<br />
on your TV.<br />
RCA <strong>and</strong> S-Video Connections (TV1)<br />
1. Connect one of the following video cables:<br />
• RCA video cable (yellow) from the receiver TV1 outputs to the<br />
nearby TV’s RCA video input.<br />
• S-VIDEO cable from the receiver TV1 outputs to the nearby TV’s S-<br />
VIDEO input.<br />
2. Connect the RCA audio cables (red <strong>and</strong> white) from the receiver TV1<br />
outputs to the nearby TV’s audio inputs. If the TV has only one input for<br />
this type of audio, connect it to the right (R) phono (RCA) audio output<br />
on the receiver.<br />
3. Make sure your nearby TV is on <strong>and</strong> set to receive TV from the correct<br />
audio <strong>and</strong> video inputs. Refer to the instructions that came with your TV.<br />
4. Plug in the power cord for the receiver.<br />
5. Turn on the receiver with the front panel power button <strong>and</strong> make sure the<br />
green TV1 indicator is lit.<br />
6. You should see the Point Dish screen.<br />
Tip: Remote<br />
Control 1 is used to<br />
control TV1 menus<br />
on the nearby TV.<br />
Remote Control 2<br />
is used to control<br />
TV2 menus on the<br />
remote TV(s).<br />
Confirm Remote Control 1 Operation<br />
After the nearby TV has been connected to a TV1 output using one of the<br />
methods above, do the following to confirm that the IR Remote Control 1<br />
controls the receiver:<br />
1. Make sure that fresh batteries are installed properly in the IR Remote<br />
Control 1.<br />
2. Press the SAT button to put the IR Remote Control 1 in SAT mode to<br />
control the satellite receiver.<br />
3. Use the Remote Control 1 arrow keys to move around the Point Dish<br />
screen. If you are able to move around in the Point Dish screen, you<br />
confirmed that Remote Control 1 is controlling the receiver.<br />
Page 20
Connecting the Receiver to the TV(s) in Another Room(s)<br />
Connecting the Receiver to the TV(s) in Another<br />
Room(s)<br />
This section describes how to connect the receiver CH 21–69 OUT<br />
connection to the cable-ready remote TV located in another room away<br />
from the receiver. This installation uses your in-home cable system. If your<br />
house does not have built-in cabling, it will be necessary to run cables from<br />
the receiver to each remote TV. Due to the difficulty of this installation, you<br />
should consider having this professionally installed. Call <strong>DISH</strong> <strong>Network</strong> at<br />
1-800-333-<strong>DISH</strong> (3474).<br />
Note: When connecting to the home distribution (CH 21–69 OUT) coaxial<br />
port, you must meet the FCC requirements in the Appendix. To meet these<br />
requirements, an in-line coaxial attenuator has been included with your<br />
receiver <strong>and</strong> may need to be installed using the following guidance:<br />
• If connecting to your in-home cabling system to distribute the signal to<br />
a TV(s) in other rooms, in most cases you will not have to install the<br />
attenuator on the CH 21–69 port for typical in-home cabling systems.<br />
• If connecting directly to a TV tuner port, you must install the attenuator<br />
in the cable between the CH 21–69 OUT port <strong>and</strong> the TV tuner.<br />
Receiver Back Panel<br />
Attenuator<br />
If you have an off-air antenna or cable connected to your inhome<br />
cable system, see Optional - Connecting to an Off-<br />
Air Antenna or Cable following this section.<br />
Page 21
Chapter 2<br />
Receiver Description <strong>and</strong> Installation<br />
Make sure you are familiar with how to change channels on<br />
your TV <strong>and</strong> if necessary how to switch your TV between<br />
off-air <strong>and</strong> cable channels. During this procedure, it will be<br />
necessary to change the channels on your TV(s) to tune to<br />
these channels to see the video from the receiver. See your<br />
TV user guide for instructions.<br />
Tip: Using cable<br />
labels makes it<br />
easy to tell which<br />
cables connect to<br />
the receiver ports.<br />
Inside the front<br />
cover of this guide<br />
are stickers that<br />
are color coded the<br />
same way as the<br />
coaxial<br />
connections.<br />
Channel:<br />
Air/Cable:<br />
1. Connect CH 21-69 OUT on the receiver to your existing wall cable outlet<br />
using a coaxial cable.<br />
Note: If you do not have an existing in-home cable system, you<br />
will need to run coaxial cable to each TV in other rooms. If this is<br />
too difficult, you may want to contact a professional to do this<br />
installation.<br />
2. Place the yellow sticker on the CH 21-69 OUT cable near where the cable<br />
attaches to the receiver. See the tip in the margin.<br />
3. Make sure batteries are installed in Remote Control 2 <strong>and</strong> the UHF<br />
antenna is attached to REMOTE ANTENNA port on the receiver.<br />
4. Make sure the receiver's blue TV2 indicator is off. If it is on, turn it off<br />
by doing the following:<br />
a. Press the SAT mode button on Remote Control 2 to put the remote<br />
control in SAT mode.<br />
b. Press the POWER button on Remote Control 2 <strong>and</strong> make sure the<br />
receiver's TV2 blue indicator turns off.<br />
5. Connect the tuner input of the remote TV(s) in other rooms to an<br />
existing wall cable outlet using a coaxial cable.<br />
6. Turn on every remote TV connected to the in-home cabling system.<br />
7. Find three channels next to each other on one of your remote TVs that<br />
do not pick up any signals from off-air or cable broadcasts (they should<br />
show nothing but snow or static). These channels must fall in one of the<br />
two ranges below. For example, if you find that cable channels 75, 76,<br />
<strong>and</strong> 77 do not pickup any broadcasts, pick these channels since they fall<br />
into the range below for cable channels. Make sure these three channels<br />
on other remote TVs also do not pick up broadcasts.<br />
• Air Mode - Select a channel between 21 <strong>and</strong> 69.<br />
• Cable Mode - Select a channel between 73 <strong>and</strong> 125.<br />
Note: The remote TV(s) will have to be set to the same channel mode,<br />
either off-air or cable channel mode for this installation. See your TV<br />
user guide for instructions on how to set your TV to off-air or cable<br />
channel modes.<br />
8. Pick the channel in the middle of the three you selected in step 7. Write<br />
that channel down in the blank provided in the margin. For example, if<br />
the three channels you picked in the preceding step were cable channels<br />
75, 76, <strong>and</strong> 77, pick channel 76 <strong>and</strong> write it in the margin.<br />
Page 22
Connecting the Receiver to the TV(s) in Another Room(s)<br />
9. If your TV is in off-air mode for the channels you picked in step 7, write<br />
“Air” in the blank provided in the margin. If your TV is in cable mode<br />
for the channels you picked in step 8, write “Cable” in the blank<br />
provided in the margin.<br />
10. Set all of your remote TV(s) to the channel mode (Off-Air or Cable)<br />
you wrote in the margin.<br />
11. Tune all of your remote TV(s) to the channel you wrote in the margin.<br />
This is the channel you will use to receive your satellite programming.<br />
12. Turn on the nearby TV (the TV that gets programming from the TV1<br />
outputs).<br />
13. Press the POWER button on Remote Control 1 to turn on the receiver's<br />
green TV1 indicator.<br />
14. You should now be looking at the Point Dish screen on your nearby<br />
TV. Select the Modulator Setup, if shown. If the option is not shown,<br />
press MENU 6-1-5 on Remote Control 1 to get to the Modulator Setup<br />
screen.<br />
15. With the Modulator Setup screen displayed on the nearby TV, use<br />
Remote Control 1 to do the following:<br />
a. Under TV2 Out, select either Air (for off-air channel numbers) or<br />
Cable (for cable channel numbers) based on what you wrote down in<br />
the margin in step 9.<br />
b. Under TV2 Out, use the up <strong>and</strong> down arrow buttons to change the<br />
modulator channel to the one you wrote in the margin in step 8.<br />
c. Select Done to save the changes.<br />
16. Using Remote Control 2, press the POWER button <strong>and</strong> make sure the<br />
receiver's blue TV2 indicator turns on.<br />
17. For some TVs, you must run a channel scan so that the TVs will find<br />
<strong>and</strong> display the selected channel from the receiver. Run channel scan on<br />
all remote TV(s), if available. See your TV user guide for instructions.<br />
18. Confirm that you see a picture from the receiver TV2 output, likely the<br />
Point Dish screen, on your remote TV(s).<br />
• If your picture looks good, go to step 26.<br />
• If your TV(s) do not have a picture or if it is not as clear as you<br />
would like it to be, go to the next step.<br />
Page 23
Chapter 2<br />
Receiver Description <strong>and</strong> Installation<br />
19. You may need to change the cable connection on the splitter that sends<br />
the TV signal throughout your house. The change that needs to be made<br />
is move the cable coming from the receiver CH 21-69 OUT from the<br />
output of the splitter to the input of the splitter using the instructions<br />
below.<br />
The following figure shows an example of what your splitter may look<br />
like. Your splitter may look different. The places where the splitter<br />
indicates OUT refers to all TVs connected to your cable system. The<br />
places where the splitter indicates IN refers to where the signal is fed into<br />
the splitter.<br />
1 Input, 4 Output (4-Way) Splitter<br />
20. Find where the TV signal is distributed throughout your house. It should<br />
be near where the cable TV service enters the house.<br />
21. Disconnect the cable TV service cable or antenna cable from the splitter<br />
input, if necessary. Make sure the disconnected cable is capped or<br />
otherwise protected from the weather.<br />
22. Disconnect the cable coming from the receiver CH 21–69 OUT port from<br />
the splitter. If you do not know which cable this is, go to the next step.<br />
Otherwise, go to step 24.<br />
23. If you have multiple TVs on the cable system, do the following to<br />
determine which cable on the splitter is coming from the receiver:<br />
• If you have at least some picture on your TV(s), turn on all remote<br />
TVs connected to the cable system. Disconnect <strong>and</strong> reconnect each<br />
cable one by one observing what happens to the TV(s). When all<br />
remote TVs lose the signal, you have disconnected the receiver’s<br />
cable. If only some or one TV loses the signal, then you have<br />
disconnected a cable from the TV(s).<br />
• If the above step does not work, disconnect one of the output cables<br />
<strong>and</strong> connect to the splitter input. If you do not see a picture, connect<br />
the cable back to its output. Repeat this step on every connection<br />
until you get a picture on the remote TV(s).<br />
24. Reconnect the receiver’s cable to the input of the splitter.<br />
Page 24
Programming the Recover Button<br />
25. Make sure you have a good picture on your remote TV(s).<br />
26. If desired to remind you of which TV channel your satellite<br />
programming is on, write the channel number you wrote in step 8 on a<br />
blank channel sticker <strong>and</strong> place it on or near your remote TV(s).<br />
Confirming Remote Control 2 Operation<br />
After the remote TV(s) have been connected to the CH 21–69 OUT using inhome<br />
cabling using the proceeding steps, do the following to make sure<br />
Remote Control 2 controls the receiver:<br />
1. Press the SAT button to put Remote Control 2 in SAT mode to control<br />
the satellite receiver.<br />
2. From a remote TV, use the Remote Control 2 arrow keys to move<br />
around the Point Dish screen. If you are able to move around in the<br />
Point Dish screen, you confirmed that Remote Control 2 is controlling<br />
the receiver.<br />
Tip: The channel<br />
stickers are<br />
located inside the<br />
front cover of this<br />
guide.<br />
Tip: Remote<br />
Control 1 is used to<br />
control TV1 menus<br />
on the nearby TV.<br />
Remote Control 2<br />
is used to control<br />
TV2 menus on the<br />
remote TV(s).<br />
Programming the Recover Button<br />
Your remote controls come equipped with a RECOVER button that helps<br />
you if you accidentally change the channel or video input on your remote<br />
TV <strong>and</strong> cannot get the picture back from your satellite receiver. When you<br />
press the RECOVER button as described on page 41, the remote control<br />
sends comm<strong>and</strong>s to your remote TV to change channels or video inputs to<br />
try to get you back to watching satellite programming.<br />
When your Remote Control 2 is shipped from the factory, the RECOVER<br />
button is set up restore satellite TV viewing by tuning your TV to channel 3,<br />
4, <strong>and</strong> other inputs (see page 41 for details). However, to use the<br />
RECOVER button with your remote TV, you need to program the<br />
RECOVER button with the specific channel (for example, channel 60) that<br />
you use to watch TV2 programming. The following instructions describe<br />
how to program the RECOVER button to tune your remote TV back to a<br />
selected channel.<br />
Programming the Recover Button Channel<br />
1. Program Remote Control 2 to control your remote TV using the<br />
instructions in Control Other Devices with the Remote Controls.<br />
2. Press <strong>and</strong> hold the TV mode button until all the other mode<br />
buttons light up, <strong>and</strong> then let go of the button. The TV mode<br />
button flashes.<br />
3. Press the STAR (*) button.<br />
4. Enter the three digits of your channel number. For example, if<br />
your remote TV is set to channel 60, enter 0-6-0.<br />
5. Press the POUND (#) button. The TV mode button flashes three<br />
times.<br />
Page 25
Chapter 2<br />
Receiver Description <strong>and</strong> Installation<br />
Removing the Recover Button Channel Programming<br />
The following instructions describe how to reset the RECOVER button to<br />
the way it was delivered to you from the factory.<br />
1. Press <strong>and</strong> hold the TV mode button until all the other mode<br />
buttons light up, <strong>and</strong> then let go of the button. The TV mode<br />
button flashes.<br />
2. Press the STAR (*) button.<br />
3. Press 0-0-0.<br />
4. Press the POUND (#) button. The TV mode button flashes three<br />
times.<br />
Changing the TV1 <strong>and</strong> TV2 Output Channels<br />
The receiver comes preset to use channel 3 for TV1 <strong>and</strong> off-air channel 60<br />
for TV2. If you are experiencing interference on the channels you are using,<br />
follow these instructions to change the channel that TV1 or TV2 uses.<br />
Make sure you are familiar with how to change channels on<br />
your TV <strong>and</strong> if necessary how to switch your TV between offair<br />
<strong>and</strong> cable channels. When you change these receiver output<br />
channels, you must also change the channels on your TV(s) to<br />
tune to these channels to see the video from the receiver. See<br />
your TV user guide for instructions.<br />
Tip: It’s easier to<br />
set the output<br />
channel from the<br />
opposite TV. For<br />
example, if you are<br />
changing the output<br />
on TV1 (nearby<br />
TV), use TV2<br />
(remote TV) to<br />
make the change.<br />
When you save the<br />
changes, simply<br />
remember to<br />
change the channel<br />
on the nearby<br />
TV.<br />
1. Press MENU-6-1-5 to open the Modulator Setup screen.<br />
2. For TV1 Out, highlight the number under TV1 Out. For TV2 Out skip to<br />
step 4.<br />
3. Use the UP <strong>and</strong> DOWN ARROW buttons to change the modulator<br />
channel either 3 or 4. Continue to the next step to set TV2 Out or skip to<br />
step 7 if you are finished making changes.<br />
Page 26
Connecting the Receiver to the Phone Line<br />
4. For TV2 Out, select either Air (for off-air channel numbers) or Cable<br />
(for cable channel numbers).<br />
5. Highlight the number under TV2 Out.<br />
6. Use the UP <strong>and</strong> DOWN ARROW buttons to change the modulator<br />
channel to one of the following:<br />
• Air Mode - Select a channel between 21 <strong>and</strong> 69.<br />
• Cable Mode - Select a channel between 73 <strong>and</strong> 125.<br />
7. Select Done to save the changes.<br />
8. Change the channel on your TV(s) to match the channel(s) you selected.<br />
9. If desired to remind you of which TV channel to tune to get satellite<br />
programming, place a channel sticker near or on your TV to indicate the<br />
correct channel.<br />
10. If you changed your TV2 Out channel, repeat Programming the<br />
Recover Button for a Remote TV.<br />
Tip: The channel<br />
stickers are located<br />
inside the front<br />
cover of this guide.<br />
Connecting the Receiver to the Phone Line<br />
You must keep the receiver connected to an active telephone line.<br />
Otherwise, you may not be able to order pay per view programs or use all of<br />
the <strong>DISH</strong> Interactive features.<br />
Note: You may be able to use a wireless telephone extender. However, this<br />
may not support all the features of this receiver, such as Caller ID.<br />
Note: If you have a Digital Subscriber Line (DSL), you may have to install<br />
a DSL filter between the receiver’s back panel PHONE JACK <strong>and</strong> the<br />
telephone wall jack to successfully connect with the <strong>DISH</strong> <strong>Network</strong>. You<br />
can obtain a filter from your DSL provider.<br />
Phone Line Connection<br />
Run a telephone cable with a st<strong>and</strong>ard RJ-11 connector from the receiver’s<br />
back panel Phone Jack to an active telephone connection.<br />
Phone System Setup<br />
You must also set up the receiver for your telephone system (touchtone or<br />
rotary/pulse), <strong>and</strong> set a telephone number prefix, if you need a prefix to<br />
make an outside call.<br />
1. Display the Phone System screen by pressing MENU-6-1-4.<br />
Page 27
Chapter 2<br />
Receiver Description <strong>and</strong> Installation<br />
2. Select the Touch Tone or the Rotary/Pulse option in the Phone Type<br />
list.<br />
3. Select either the No Prefix or the Prefix Code option in the Outside<br />
Line Prefix list.<br />
Note: Usually, you need a telephone number prefix only for business<br />
installations. For most residential installations, all you need to do is set<br />
the telephone system type. The default setting of No Prefix will allow<br />
correct dialing. If this is the case, select the Save option to save the<br />
above setting, <strong>and</strong> stop here. If you do need to set a prefix, then instead<br />
of selecting the Save option, go on to step 4.<br />
4. If you selected the No Prefix option, select Save to finish.<br />
5. If you selected the Prefix Code option, the receiver highlights the box<br />
(highlighting the top box) where you must enter the digits. To do this, do<br />
the following:<br />
a) Enter the number of digits required to obtain an outside line in the<br />
top box.<br />
b) Move the highlight to the bottom box.<br />
c) Enter the exact sequence you dial the phone to obtain an outside line<br />
in the bottom box.<br />
6. Select the Save option to save the settings.<br />
Connecting the Receiver to a Dish Antenna System<br />
Note: Before you can begin connecting your receiver to your dish antenna,<br />
you must first complete the preceding sections on connecting your TVs to<br />
the receiver. Then if you are installing a dish antenna system for the first<br />
time, see Chapter 4 - Dish Antenna Installation starting on page 85.<br />
Otherwise, if you already have a dish antenna system installed <strong>and</strong> peaked<br />
for maximum signal strength, complete the following instructions to connect<br />
the dish antenna system to the receiver.<br />
Note: You will need two available receiver connection points on your<br />
installed switch or LNBF to complete this installation. If these ports are not<br />
available, you may need to upgrade your system with different or additional<br />
equipment. See <strong>DISH</strong> Pro Wiring Diagrams in Chapter 4 starting on<br />
page 94.<br />
Page 28
Connecting the Receiver to a Dish Antenna System<br />
Satellite Connections<br />
1<br />
2<br />
1. Connect two RG-6 coaxial cables between the SATELLITE IN 1 <strong>and</strong><br />
SATELLITE IN 2 ports on the receiver’s back panel to two available ports<br />
on either your switch or your LNBF in your existing system. See the<br />
wiring diagrams in Chapter 4 for appropriate receiver connections in<br />
your system.<br />
Note: If you are installing your receiver into a system with <strong>DISH</strong> Pro<br />
LNBFs (<strong>and</strong>/or switches), you can have as much as 200 feet of cable<br />
between the LNBF <strong>and</strong> the receiver. However, you must use only RG-6<br />
coaxial cables rated for 950 to 2150 MHz. Some cables may say "Swept<br />
tested for 2150 MHz." If you have any doubt about this, ask your <strong>DISH</strong><br />
retailer, examine the cable’s outer jacket, or look on the container the<br />
cable came in. Do not use cable company TV cables or cables from<br />
other satellite TV systems not rated for 950-2150 MHz. These other<br />
cables may cause signal loss. Do not use existing cables such as RG-59.<br />
Use waterproof F-connectors outdoors.<br />
2. Peel off the blue stickers <strong>and</strong> affix them to the cables close to where<br />
they connect to the SATELLITE IN 1 <strong>and</strong> SATELLITE IN 2 connections on<br />
the back of the receiver.<br />
3. On Remote Control 1, Press the MENU-6-1-1 to display the Point<br />
Dish/Signal screen on the nearby TV.<br />
4. Select Check Switch. When an attention screen displays, select Test.<br />
5. The receiver begins performing the Check Switch tests. When it is<br />
finished, the Installation Summary screen displays.<br />
Tip: Using cable<br />
labels makes it<br />
easy to tell which<br />
cables connect to<br />
the receiver ports.<br />
Inside the front<br />
cover of this guide<br />
are stickers that<br />
are color coded<br />
the same way as<br />
the coaxial<br />
connections.<br />
Page 29
Chapter 2<br />
Receiver Description <strong>and</strong> Installation<br />
6. Make sure that the information on the Installation Summary screen<br />
identifies your system correctly <strong>and</strong> shows all transponders for all<br />
satellites in your system. Your screen may look different from the<br />
example above depending on the dish antenna system you are using.<br />
7. Select OK to go to the Point Dish/Signal screen.<br />
8. Select Cancel to exit the Point Dish menu. An <strong>Attention</strong> screen will<br />
open asking if the mounting <strong>and</strong> positioning of your dish is complete<br />
with a Locked indication in the Point Dish screen. If the answer is yes,<br />
select Yes.<br />
If the answer is No, you will need to repoint your dish following the<br />
preceding steps until the mounting <strong>and</strong> positioning is complete <strong>and</strong> you<br />
do have the Locked indication.<br />
9. After you select Yes, the receiver will begin taking a software upgrade.<br />
You will see a <strong>Warning</strong> that Vital program information will now be<br />
downloaded into your receiver. You will also see a status bar showing<br />
the progress of this upgrade.<br />
10. Once the software upgrade is complete, you will see a message that your<br />
receiver’s memory is being upgraded.<br />
11. Do not disturb the receiver while the receiver’s memory is being<br />
upgraded.<br />
Note: If you are installing other <strong>DISH</strong> Pro or <strong>DISH</strong> Pro Plus receivers,<br />
be sure to run Check Switch on all of them, <strong>and</strong> allow them to take the<br />
necessary software upgrade.<br />
12. When the memory upgrade is complete, you should be watching TV.<br />
Your dish antenna installation is now complete.<br />
Page 30
Optional - Connecting VCRs to the System<br />
Optional - Connecting VCRs to the System<br />
The diagram below provide example of how to connect VCRs to your<br />
satellite TV system. Your installation may be different.<br />
Connecting a VCR to the Nearby TV<br />
1. Connect a coaxial cable from the CH 3-4 OUT output on the receiver to<br />
the nearby VCR’s tuner port.<br />
2. Connect a coaxial cable from the output on the VCR to the nearby TV’s<br />
tuner port.<br />
3. Plug in <strong>and</strong> turn on the nearby VCR <strong>and</strong> TV.<br />
4. Set the VCR output to Channel 3 or 4 as set on page 26<br />
5. Tune the nearby VCR <strong>and</strong> TV to Channel 3 or 4 as set on page 26.<br />
Connecting a VCR to the Remote TV<br />
1. Connect the tuner input of the remote VCR to an existing wall cable<br />
outlet using a coaxial cable.<br />
2. Connect a coaxial cable from the output on the VCR to the remote TV’s<br />
tuner port.<br />
3. Plug in <strong>and</strong> turn on the remote VCR <strong>and</strong> TV.<br />
4. Tune the remote VCR to the remote TV channel that you use to watch<br />
satellite TV programming (for example, channel 60) as set on page 26.<br />
5. Set the VCR output to channel 3 or 4.<br />
6. Tune the remote TV to the same channel that you set your VCR to in<br />
step 5.<br />
Page 31
Chapter 2<br />
Receiver Description <strong>and</strong> Installation<br />
Optional - Connecting to an Off-Air Antenna or Cable<br />
If you want to receive channels from an off-air antenna or cable in addition<br />
to your satellite receiver programming, connect the off-air antenna/cable into<br />
your TV distribution equipment.<br />
For the nearby TV receiving programming from CH 3–4 OUT, the off-air<br />
antenna cable needs to be connected to the TV ANTENNA/CABLE IN port.<br />
For remote TVs receiving programming from CH 21-69 OUT, the off-air<br />
antenna needs to be connected to your TV distribution equipment. When<br />
adding this connection, the FCC requires that your install appropriate<br />
equipment between the off-air antenna/cable <strong>and</strong> the satellite TV receiver to<br />
prevent you from accidentally retransmitting <strong>DISH</strong> <strong>Network</strong> programming<br />
(see FCC Compliance in the Appendix).<br />
TV distribution equipment devices include coax panels, amplifiers or super<br />
home nodes, <strong>and</strong> are available through many companies.<br />
2<br />
2<br />
Off-Air/CATV<br />
Input<br />
To Dish Antenna<br />
(Dish <strong>and</strong> cabling<br />
omitted for clarity)<br />
To CH.<br />
21-69 Out<br />
TV<br />
Distribution<br />
Equipment<br />
2<br />
To TV Antenna/Cable In<br />
Optimize Your Remote Controls<br />
Tip: You can also<br />
use this procedure<br />
to change the<br />
Primary Remote<br />
Address for<br />
Remote Control 1<br />
on a nearby TV, if<br />
necessary.<br />
Change the Address<br />
When you receive your system, both remote controls <strong>and</strong> the receiver have<br />
been set to communicate on address 1. However, because UHF signals travel<br />
long distances <strong>and</strong> go through walls, a neighbor’s UHF Pro remote could<br />
control your receiver by mistake if they are on the same address. To h<strong>and</strong>le<br />
this problem, you can change address on Remote Control 2 <strong>and</strong> the receiver<br />
as follows:<br />
1. Make sure you turn on the TV.<br />
2. With the receiver off, press CHANNEL UP or CHANNEL DOWN on<br />
the receiver’s front panel to display the System Info screen on a remote<br />
TV.<br />
Page 32
Optimize Your Remote Controls<br />
The System Info screen shows the Secondary Remote Address.<br />
Write down this address:<br />
3. Press <strong>and</strong> hold the SAT button on Remote Control 2 for about<br />
three seconds, until all of the mode buttons light up, <strong>and</strong> then<br />
let go of the SAT button.<br />
4. Use the NUMBER PAD buttons to enter any number between 1 <strong>and</strong> 16,<br />
but not the one you wrote in step 2.<br />
Write down the number you entered:<br />
5. Press the POUND (#) button. If you entered the address<br />
correctly, the SAT mode will flash three times.<br />
6. Press the RECORD button.<br />
7. Make sure the Secondary Remote Address you see on the<br />
System Info screen is the same as the one you entered in step<br />
4. If it isn’t, the remote cannot control the receiver.<br />
8. Press the SELECT button to close the System Info screen.<br />
Check the Remote Control Address<br />
1. Press <strong>and</strong> hold the SAT mode button for three seconds, until<br />
all of the mode buttons light up, <strong>and</strong> then let go of the SAT<br />
button.<br />
2. Press the POUND (#) button twice. The SAT mode button<br />
will flash the same number of times as the address number<br />
(three flashes means address 3).<br />
Attach a UHF Attenuator<br />
Stray UHF signals can block signals from the remote control to the receiver.<br />
To prevent blocks, you can install a 10 dB attenuator (you can buy one from<br />
a consumer electronics parts store).<br />
Note: This will help keep out stray UHF signals, but also cut down how far<br />
away you can use the remote control.<br />
1. Take the UHF antenna off of the<br />
receiver’s back panel UHF Remote<br />
Antenna input.<br />
2. Put a 10 dB attenuator onto the UHF<br />
Remote Antenna input.<br />
Page 33
Chapter 2<br />
Receiver Description <strong>and</strong> Installation<br />
3. Put the UHF antenna onto the attenuator.<br />
Setting Up TV1 to Operate in UHF Pro<br />
You can set your receiver to operate your TV1 using another UHF Pro<br />
remote control (sold separately) by completing the following instructions:<br />
If you set up your <strong>DISH</strong> 322 to operate the side using UHF Pro,<br />
the two UHF Pro remotes for this receiver will interfere with<br />
each other when operated at the same time. This may prevent<br />
the remotes from operating the receiver momentarily.<br />
1. Perform the following using an existing remote control:<br />
a. Open the TV1 UHF Pro Setup screen by pressing MENU-6-1-8 on<br />
the remote control.<br />
b. Select Enable from the TV1 UHF Pro Setup screen.<br />
c. Select System Info to open the System Information screen.<br />
d. Move the highlight to the address for the Primary Remote Address<br />
as shown below. This is important - if you do not do this, your<br />
remote will change the receiver's Secondary Remote Address <strong>and</strong><br />
cause your Remote Control 1 to control the side of your receiver.<br />
Note: Highlight the<br />
Primary Remote<br />
Address.<br />
2. Perform the following using the UHF Pro remote that you are going to<br />
use to control TV1:<br />
a. Press <strong>and</strong> hold the SAT mode button about three seconds, until all<br />
the mode buttons light up, <strong>and</strong> then let go of the SAT button. The<br />
SAT mode button will blink.<br />
b. Use the NUMBER PAD buttons to enter any number from 1 to 16,<br />
except for the number shown by the Secondary Remote Address.<br />
The SAT mode button goes out after you enter each digit, <strong>and</strong> then<br />
lights up again.<br />
Write down the number you entered:<br />
Page 34
Setting Up TV1 to Operate in IR<br />
c. Press the POUND (#) button. If you entered the address correctly,<br />
the SAT mode button will flash three times.<br />
d. Press the RECORD button.<br />
e. Make sure the System Information screen shows that the Primary<br />
Remote Address shows UHF Pro <strong>and</strong> IR <strong>and</strong> that this address<br />
matches the number you entered in step b.<br />
Setting Up TV1 to Operate in IR<br />
The following instructions describe how to set up TV1 to operate in IR only.<br />
1. Perform the following with an existing remote control:<br />
a. Open the TV1 UHF Pro Setup screen by pressing MENU-6-1-8 on<br />
the remote control.<br />
b. Select Disable from the TV1 UHF Pro Setup screen.<br />
c. Select System Info to open the System Information screen.<br />
2. Using an IR remote control, such as a Remote Control 3.0, that you<br />
intend to use to control TV1:<br />
a. Press the RECORD button. The Done button should be<br />
highlighted.<br />
b. Make sure the System Information screen shows that the Primary<br />
Remote Address shows IR.<br />
Page 35
Chapter 2<br />
Receiver Description <strong>and</strong> Installation<br />
Notes<br />
Page 36
Chapter 3<br />
Using the System<br />
Using the Remote Controls<br />
The following section describes how to use the remote controls with your<br />
satellite receiver. The remote control must be in SAT mode for the buttons to<br />
control the satellite receiver. You can also use the remote to control your VCR<br />
<strong>and</strong> other devices. See Control Other Devices with the Remote on page 72.<br />
SAT Mode Button<br />
Press the SAT mode button to set the remote to SAT mode, to control the<br />
receiver. The SAT mode button’s back light turns ON briefly to show that the<br />
remote is set to SAT mode.<br />
Tip: Remote<br />
Control 1 is used to<br />
control TV1 menus<br />
on the nearby TV.<br />
Remote Control 2<br />
is used to control<br />
TV2 menus on the<br />
remote TV(s).<br />
Power Buttons<br />
Press the blank POWER button to turn the TV1 or TV2 (depending on which<br />
remote is being used) ON or OFF. Press the TV POWER button to turn the TV<br />
on or off.<br />
Note: You must program the remote to control your TV for the TV POWER<br />
button to work as described. See page 72 for instructions.<br />
Menu Button<br />
Press the MENU button to open the Main Menu.<br />
Page Up <strong>and</strong> Page Down (Arrow) Buttons<br />
Press the PAGE UP button or the PAGE DOWN button to move, page by<br />
page, through the Program Guide, a Theme list, a Favorites List, an Event<br />
Timers list, or a list of channels.<br />
Page 37
Chapter 3<br />
Using the System<br />
Mute Button<br />
Press the MUTE button to turn off the TV sound. Press it again to restore the<br />
TV sound.<br />
Note: You must program the remote to control your TV for the MUTE<br />
button to work as described. See page 72 for instructions.<br />
Volume Button<br />
Press the minus (-) side of the VOLUME button to lower the TV volume.<br />
Press the plus (+) side of the VOLUME button to raise the TV volume.<br />
Note: You must program the remote to control your TV for the VOLUME<br />
button to work as described. See page 72 for instructions.<br />
Guide Button<br />
Press the GUIDE button to open the Program Guide. When the Program<br />
Guide is open, press this button to switch among Favorites Lists.<br />
Arrow Buttons<br />
• Change channels - Press the UP or DOWN ARROW button to change<br />
channels.<br />
• Open the Browse Banner - Press the RIGHT ARROW button.<br />
• Show Themes - Press the LEFT ARROW button.<br />
• Move around within the Program Guide, menus, <strong>and</strong> Browse Banner -<br />
Press the UP, DOWN, LEFT, <strong>and</strong> RIGHT ARROW buttons.<br />
TV/Video Button<br />
If you connect the receiver using its back panel TV ANTENNA/CABLE IN<br />
<strong>and</strong> CHANNEL 3–4 connections, use this button to switch the receiver<br />
CHANNEL 3–4 output between the satellite programming <strong>and</strong> another<br />
video signal such as cable or broadcast TV antenna connected to the<br />
receiver’s TV ANTENNA/CABLE IN.<br />
Page 38
Using the Remote Controls<br />
Select Button<br />
Press the SELECT button to select the option you highlight in a menu.<br />
Recall Button<br />
Press the RECALL button to go back to the last satellite receiver channel<br />
you were watching. Press it again to switch between the last two satellite<br />
receiver channels you were watching.<br />
Info Button<br />
• Program information - Press the INFO button for more information<br />
when you watch a program, or when you have the Program Guide,<br />
Browse Banner, or Themes list open.<br />
• Help - Press the INFO button to see help information when a Help<br />
button appears in a menu.<br />
View TV Button<br />
Press the VIEW TV button to close all menus <strong>and</strong> go to watching<br />
programming. Press the VIEW TV button to briefly display the Program<br />
Banner while watching a program.<br />
Cancel Button<br />
Press the CANCEL button to cancel <strong>and</strong> go back to the previous menu or to<br />
watch a program.<br />
Sys Info Button<br />
Press the SYS INFO button to display the System Info screen.<br />
Dish Button<br />
Press the <strong>DISH</strong> button to go to Dish Home.<br />
Page 39
Chapter 3<br />
Using the System<br />
Number Pad Buttons<br />
When watching a program or with the Program Guide open, use these<br />
buttons to enter a channel number to change to that channel.<br />
• When the Program Guide is open, you can skip ahead <strong>and</strong> then back a<br />
number of hours. Just enter the number you want to skip ahead (or<br />
back), <strong>and</strong> then press the RIGHT (or LEFT) ARROW button.<br />
• Use these buttons to enter menu option numbers instead of highlighting<br />
the option <strong>and</strong> then pressing the SELECT button.<br />
• Use these buttons to enter numbers in a menu:<br />
• Highlight the place where you want to enter the first number, <strong>and</strong><br />
press the appropriate number buttons on the remote.<br />
• Use the LEFT or RIGHT ARROW button to move the highlight to<br />
the next place where you want to enter a number. When you are<br />
done entering numbers, press SELECT.<br />
• Use the letters above the NUMBER PAD buttons while in the Search<br />
menu. For example, when looking for the channel <strong>and</strong> times to watch<br />
Rudy Fremmel Presents, you press 7 three times for an R, 8 two times<br />
for a U, 3 one time for a D, <strong>and</strong> 9 three times for a Y to spell the word<br />
“Rudy” (see Using Themes <strong>and</strong> Search on page 59).<br />
Star Button<br />
Press the STAR button to back space while using the search function of your<br />
receiver.<br />
Zero Button<br />
Press the ZERO button to forward space while using the search function of<br />
your receiver.<br />
Page 40
Using the Remote Controls<br />
Pound Button<br />
Press the POUND button to display the Search screen. Also, you use this<br />
button in several procedures in this User’s Guide.<br />
Recover Button<br />
Press the RECOVER button if you accidentally change the channel or<br />
video input on your TV <strong>and</strong> cannot get the picture back from your satellite<br />
receiver. When you press the RECOVER button as described below, the<br />
remote control sends comm<strong>and</strong>s to your TV to change channels or video<br />
inputs to try to get you back to watching satellite programming. This<br />
procedure works only if you have accidentally changed the TV channel or<br />
video input. It does not recover lost satellite signal (See Chapter 5 -<br />
Reference for troubleshooting information).<br />
The following setup is required to use the RECOVER button:<br />
• The remote control must be set up to control the TV <strong>and</strong>, if installed, the<br />
VCR (see page 72).<br />
• If a VCR is installed, make sure it is connected as shown on page 31.<br />
• On a remote TV, the RECOVER button must be programmed to tune<br />
your remote TV to the specific channel to receive TV2 programming<br />
(for example, channel 60), using the instructions on page 25.<br />
To use the RECOVER button, complete the following instructions:<br />
1. Press <strong>and</strong> hold the RECOVER button until all four mode buttons light,<br />
<strong>and</strong> then let go of the button. The SAT mode button flashes twice <strong>and</strong><br />
then all four mode buttons flash three times.<br />
2. Press the RECOVER button. Wait for the TV or VCR mode button to<br />
flash once <strong>and</strong> then all four mode buttons to flash once.<br />
3. If you see the System Info screen, press the SELECT button to close<br />
the screen. You have recovered your satellite video.<br />
4. If you do not see the System Info screen, repeat steps 2 <strong>and</strong> 3 until you<br />
have recovered your satellite video.<br />
Note: Press any remote control button other than the RECOVER<br />
button to end this procedure.<br />
Note: If the RECOVER button is not programmed to a specific<br />
channel, the RECOVER button will first try to tune your TV to channel<br />
3, then channel 4, <strong>and</strong> then other video inputs with each press of the<br />
RECOVER button. You may need to press the RECOVER button up<br />
to 30 times to recover your satellite TV video. If the RECOVER button<br />
is programmed to a specific channel (see page 25), the RECOVER<br />
button will tune the TV to the specific channel (for example, channel<br />
60).<br />
Page 41
Chapter 3<br />
Using the System<br />
Tip: Remote<br />
Control 1 is used to<br />
control TV1 menus<br />
on the nearby TV.<br />
Remote Control 2<br />
is used to control<br />
TV2 menus on the<br />
remote TV(s).<br />
Using the Menus<br />
The menus make using the receiver <strong>and</strong> selecting programs quick <strong>and</strong> easy.<br />
Use the menus to control the receiver <strong>and</strong> to use its features, such as setting<br />
locks, choosing a program, or creating a favorites list.<br />
Open <strong>and</strong> Close Menus<br />
You can open the menus in either of two ways:<br />
• Press the MENU button to open the Main Menu, then open any of<br />
the other menus from the Main Menu.<br />
• Use the matching buttons on the remote control:<br />
Open the Program Guide.<br />
Page 42
Using the Menus<br />
• When watching a program, open the Themes <strong>and</strong> Search menu.<br />
• Display the Browse Banner.<br />
• To close a menu <strong>and</strong> return to watching a program, press either the<br />
VIEW TV or CANCEL button.<br />
Note: If you do not do anything in a menu for several minutes, the<br />
menu automatically closes. This will discard any changes you<br />
made, <strong>and</strong> display the program you were watching.<br />
Highlighting Menu Options<br />
To highlight a menu option, use the remote control ARROW buttons to<br />
move the on-screen highlight to the menu option. When you do move the<br />
on-screen highlight, the option becomes amber. The highlight is like the one<br />
that you may have seen on a computer screen.<br />
Page 43
Chapter 3<br />
Using the System<br />
Selecting Menu Options<br />
When you select a menu option, that option takes effect right away. You can<br />
select a menu option in either of two ways:<br />
• If the option has a number next to it, press the<br />
number on the NUMBER PAD button that<br />
matches this number. When you use the<br />
NUMBER PAD button, you do not need to<br />
highlight the option first.<br />
• Move the highlight to the menu option using the remote control<br />
ARROW buttons. Then press the remote control SELECT button.<br />
In the example above, Sports is highlighted.<br />
List of Choices in the Menus<br />
When you make a choice in a list, the receiver does not apply the change<br />
until you select the Save or OK option. If you do not want to save any<br />
changes, select the Cancel option to discard all the changes made in the<br />
menu.<br />
There are two types of lists:<br />
• A single choice list allows you to select only<br />
one choice at a time. If you select another<br />
choice, your previous choice is deselected.<br />
• A multiple choice list allows you to select more<br />
than one choice at one time. If you select<br />
another choice, your previous choice(s) stays<br />
selected.<br />
Highlighting a Choice in a Menu List<br />
Use the remote control ARROW buttons to move the highlight to the desired<br />
item in the list. The black arrows on the list show where you can move the<br />
highlight.<br />
Selecting a Choice in a Menu<br />
To select a choice in a list, highlight the choice <strong>and</strong> then press the remote<br />
control SELECT button. Make sure you select the Save or OK option to<br />
save your choice. Select the Cancel or Done option to discard your choice.<br />
Page 44
Changing Channels<br />
Canceling a Procedure<br />
You can cancel a procedure in any of three ways:<br />
• If you want to return to watching a program, press the<br />
remote control VIEW TV button.<br />
• If you want to return to the previous menu, press the<br />
CANCEL button.<br />
• Wait a few moments <strong>and</strong> the menu will close<br />
automatically, discarding any changes you have made. If<br />
this does not work, you must finish the procedure.<br />
Changing Channels<br />
There are three ways to change channels:<br />
• Press the UP or DOWN ARROW buttons.<br />
• Use the NUMBER PAD buttons.<br />
• Press GUIDE <strong>and</strong> then select the channel from the Program Guide.<br />
• Press BROWSE <strong>and</strong> then select the channel from the Browse<br />
Banner.<br />
Using the Program Guide<br />
The on-screen Program Guide provides a complete listing of the available<br />
channels <strong>and</strong> programs. You can use the Program Guide to change<br />
channels, to see what programs are scheduled, <strong>and</strong> to buy pay per view<br />
programs.<br />
The Program Guide shows which Favorites List is active. If the All Chan<br />
list is active, the Program Guide shows all of the channels available from<br />
<strong>DISH</strong> <strong>Network</strong>. If the All Sub list is active, the Program Guide displays<br />
only the channels in your subscription. When another list is active, the<br />
Program Guide displays only the channels in that list. For more<br />
information, see Using Favorites Lists on page 49. The Program Guide<br />
shows programs that are on now <strong>and</strong> that are scheduled up to two days in<br />
advance. The guide does not show programs that have ended.<br />
Tip: If the program<br />
is on a channel that<br />
is not part of your<br />
subscription, the<br />
channel will be in<br />
red.<br />
Page 45
Chapter 3<br />
Using the System<br />
Tip: When using the<br />
Program Guide, do<br />
you want to know<br />
who is in the movie<br />
you’re about to<br />
watch? Press the<br />
INFO button to find<br />
out. When you’re<br />
finished, press the<br />
CANCEL button to<br />
return to the<br />
Program Guide.<br />
Changing the Channel in the Program Guide<br />
1. Press GUIDE to open the Program Guide.<br />
Tip: Selecting a<br />
program that is<br />
not on yet will<br />
open the Timers<br />
menu. See page 52<br />
for information on<br />
setting timers.<br />
2. Choose a channel using either of the following:<br />
• Use the NUMBER PAD buttons to enter the channel number.<br />
The Program Guide displays a block of channels including the one<br />
that you just entered.<br />
• Use the ARROW buttons to move the highlight to the channel.<br />
3. Press the SELECT button to change to the new channel.<br />
4. Press the CANCEL button to close the Program Guide<br />
without changing the channel.<br />
Scrolling Through the Program Guide<br />
There are two ways to scroll through the Program Guide:<br />
• Scroll by channel - Press the PAGE UP or PAGE<br />
DOWN button to scan, page by page, through the<br />
listing of channels.<br />
• Scroll by time - Enter the number of hours that you<br />
want to skip, using the NUMBER PAD buttons.<br />
Then, press the LEFT or RIGHT ARROW button.<br />
Page 46
Displaying Program Information<br />
Displaying Program Information<br />
The Program Banner<br />
The Program Banner provides information about the program<br />
you are watching. The receiver displays the Program Banner for<br />
a few seconds at the top of the TV screen every time you change<br />
the channel or press the remote control VIEW TV button.<br />
The Browse Banner<br />
You can use the Browse Banner to change channels, or to see what other<br />
programs are available without changing the program that you are watching.<br />
The receiver displays information on the program you are watching at the<br />
top <strong>and</strong> Browse Banner information at the bottom of the TV screen.<br />
Note: If the All Chan Favorite list is active, the Browse Banner displays<br />
all the channels. If the All Sub list is active, the Browse Banner displays<br />
only the channels in your subscription. If a Favorites List is active, the<br />
Browse Banner displays only the channels in that list.<br />
If you have set up the Program Guide to hide adult channels <strong>and</strong> the<br />
receiver is locked, the Browse Banner does not display such channels.<br />
Page 47
Chapter 3<br />
Using the System<br />
Tip: When using the<br />
Browse Banner, do<br />
you want to know<br />
when the movie<br />
you’re about to<br />
watch was made?<br />
Press the INFO<br />
button to find out.<br />
When you’re<br />
finished, press the<br />
CANCEL button to<br />
return to the<br />
Program Guide.<br />
Using the Browse Banner<br />
1. Press the BROWSE (RIGHT ARROW) button to open the<br />
Browse Banner.<br />
2. Change the channel displayed on the Browse Banner by doing one of<br />
the following:<br />
• Enter the channel number for the program that you<br />
want, using the NUMBER PAD buttons.<br />
• Press the UP or DOWN ARROW to display the<br />
next channel.<br />
3. Press the RIGHT ARROW button multiple times to<br />
highlight the next programs. Press the LEFT<br />
ARROW button to return to the current program.<br />
Tip: If you choose<br />
a program that is<br />
on next, you’ll see<br />
a Timers menu.<br />
See page 52 for<br />
more information.<br />
4. Close the Browse Banner by doing one of the<br />
following:<br />
• Press the SELECT button to watch the program.<br />
• Press the VIEW TV or CANCEL button to close<br />
the Browse Banner without changing the channel.<br />
Page 48
Using Favorites Lists<br />
Ordering Pay Per View Programs<br />
1. Highlight the desired pay per view program in the Program Guide <strong>and</strong><br />
press the SELECT button. A message like the following displays:<br />
2. To buy the pay per view program, select the Yes option.<br />
The receiver displays a confirmation menu.<br />
Note: Once you confirm an order for a pay per view program, you<br />
cannot cancel the order <strong>and</strong> you will be billed for it.<br />
Select Yes if you want to confirm your purchase.<br />
If you do not want to purchase the pay per view program, select the No<br />
or Cancel option.<br />
Using Favorites Lists<br />
Favorites Lists are lists of your favorite channels. You can create <strong>and</strong><br />
change the lists yourself, adding <strong>and</strong> removing channels as you wish. You<br />
can have an unlimited number of favorite channels but they must be<br />
grouped into no more than four lists. For example, one Favorites List could<br />
have 100 channels <strong>and</strong> a second list only 10. Or all four lists could have 50<br />
channels each.<br />
• When you make a Favorites List active, the Program Guide<br />
displays only the channels in that list. Also, the receiver skips<br />
channels that are not on the list when you use the remote control<br />
UP or DOWN ARROW button to change channels.<br />
• The All Chan Favorites List contains all the channels. You cannot<br />
make any changes to the All Chan list.<br />
• The All Sub Favorites List contains all the channels in your<br />
subscription. You cannot make any changes to the All Sub list,<br />
except by changing your subscription.<br />
• Each Favorites List has a unique color in the Program Guide. You<br />
can give each list a name. When you first get the receiver, the four<br />
lists are named List 1, List 2, List 3, <strong>and</strong> List 4. The lists are empty<br />
until you add channels to them.<br />
Note: If you choose a program using Theme, the receiver tunes to<br />
the channel for that program whether or not that channel is on the<br />
active Favorites List.<br />
Page 49
Chapter 3<br />
Using the System<br />
Creating or Changing a Favorites List<br />
You can create, add channels to, <strong>and</strong> remove channels from a Favorites List.<br />
1. Press the MENU-8 to open Favorites.<br />
2. Select the Favorites List that you want to create or change.<br />
Note: You cannot modify the All Chan or All Sub lists.<br />
3. Select Modify List.<br />
4. In the Channels list, highlight a channel you want to add to the<br />
Favorites List.<br />
5. Press SELECT to add the highlighted channel to the Favorites List. A<br />
dot appears next to the channel.<br />
6. Repeat steps 5 <strong>and</strong> 6 until you have added all the channels that you want.<br />
7. To delete a channel from the Favorites Lists, select the channel in the<br />
list. The dot next to the channel disappears.<br />
8. Select the Done option to save all changes to the Favorites List.<br />
Note: If you try to save a Favorites List with no channels, you will see<br />
an error message.<br />
Page 50
Using Favorites Lists<br />
Naming a Favorites List<br />
1. Press MENU-8 to open Favorites.<br />
2. Select the Favorites List that you want to change.<br />
3. Select the Edit Name option.<br />
Note: You cannot change the name of the All Chan or All Sub list.<br />
4. Enter the list’s name by doing one of the following:<br />
• Use the virtual keyboard to type the list’s name.<br />
• Use the remote control NUMBER PAD to enter the letters in the<br />
Enter Name box. Numbers 2 through 9 have telephone-style<br />
numbers written above them. To enter an H, for example, press 4<br />
twice because H is the second letter listed above the 4 on the<br />
NUMBER PAD.<br />
• You can enter up to eight characters, including spaces. If needed,<br />
select the space option to insert a space in the name or the Back<br />
option to correct a letter.<br />
Note: A list must have at least one character. Two lists cannot have the<br />
same name. TV1 <strong>and</strong> TV2 can have lists with the same names.<br />
Note: At any time, you can select the Clear Entry option to clear the<br />
name.<br />
5. Select the Done option to save all changes.<br />
Making a Favorites List Active<br />
If the Program Guide is open, press the GUIDE button to select the next<br />
Favorites List. Press the GUIDE button repeatedly to scan through all the<br />
available lists.<br />
Note: This works only if you have added channels to the Favorites List. If<br />
you have not created any Favorites List, pressing the GUIDE button<br />
switches the receiver between the All Chan <strong>and</strong> All Sub.<br />
Page 51
Chapter 3<br />
Using the System<br />
Using Timers<br />
Event timers let you set up the receiver to tune in future programs <strong>and</strong>/or<br />
record them on a VCR (TV1 only). An “event” is a program, sports event,<br />
pay per view movie, or anything else on satellite TV.<br />
• You can set an automatic event timer for a program listed with start<br />
<strong>and</strong> stop times in the Program Guide. This can be a program that<br />
comes on each day or each week.<br />
• A manual event timer lets you set custom start <strong>and</strong> stop times for a<br />
timer.<br />
Note: If you want to have the Event Timer record to a VCR, you<br />
must set up the receiver to control the VCR (see page 57).<br />
Remember: Most TV<br />
programs <strong>and</strong> films<br />
are copyrighted. In<br />
some cases,<br />
copyright law may<br />
apply to private,<br />
in-home recording.<br />
Event Timer Types<br />
Reminder - Reminds you that a program is about to start.<br />
Auto-Tune - Reminds you that a program is about to start <strong>and</strong> tunes the<br />
receiver to the program when it begins.<br />
VCR - Reminds you that a program is about to start, tunes the receiver to the<br />
program when it begins, <strong>and</strong> starts your VCR. This timer is available<br />
through TV1 menus only.<br />
Note: You can record only the program to which the receiver is tuned. If you<br />
open any menu while recording a program on videotape, the menu also will<br />
be recorded. If a program time changes by more than twenty-four hours, the<br />
timer will not operate.<br />
Event Timer Frequency<br />
Once - Applies to a one-time program. If the program time changes, this<br />
timer operates at the new time. The receiver deletes this timer when the<br />
timer operates.<br />
Mon.-Fri. - Applies to a program that is scheduled for Monday through<br />
Friday on the same channel at the same time each day.<br />
Daily - Applies to a program that is scheduled for Monday through Sunday<br />
on the same channel at the same time each day.<br />
Weekly - Applies to a program that is scheduled for once a week on the same<br />
channel at the same time on the same day.<br />
Before an Event Timer Operates<br />
Two minutes before an event timer operates, the receiver displays a small<br />
clock on the TV screen. This clock disappears when the program begins.<br />
While the clock is displayed, you may do either one of the following:<br />
• Press the CANCEL button to clear the symbol from the<br />
TV screen. This does not affect the timer; it will operate.<br />
• Press the INFO button to see more information on the<br />
event timer. If you do this, you will have the following<br />
choices:<br />
Page 52
Using Timers<br />
• Select the OK or Cancel option to continue with the event<br />
timer.<br />
• Select the Stop Timer or No option to stop the event timer.<br />
Note: This stops only this instance of a Mon.-Fri., Daily or<br />
Weekly timer. The timer will operate the next time it is<br />
scheduled. To stop all operations of such a timer, you must<br />
delete the timer. For a Reminder Event Timer, instead of<br />
having the option to stop the timer, you have the option to<br />
tune to the program.<br />
Setting Up an Automatic Event Timer<br />
1. Select a future program using the Browse Banner,<br />
Themes menu or the Program Guide. One of the<br />
following Create Timer screens display:<br />
TV1<br />
TV2<br />
2. Select a Timer Frequency option. Notice that a mark displays in the<br />
box.<br />
3. Select a Timer Type. The Create Timer screen shown on the left is for<br />
TV1 <strong>and</strong> has a VCR Timer Type option. This Timer Type is not<br />
available for TV2 (shown on the right).<br />
4. Select the Create option to save the event timer.<br />
5. The receiver displays a timer symbol in the Program Guide.<br />
Tip: Remote<br />
Control 1 is used to<br />
control TV1 menus<br />
on the nearby TV.<br />
Remote Control 2<br />
is used to control<br />
TV2 menus on the<br />
remote TV(s).<br />
Page 53
Chapter 3<br />
Using the System<br />
Setting Up a Manual Event Timer<br />
1. Press the MENU button.<br />
2. Select the Timers option.<br />
3. Select the Create option. The receiver displays the Create a Manual<br />
Event Timer menu.<br />
4. Select a Timer Type option.<br />
Note: VCR timers are available through TV1 menus only.<br />
5. Select a Timer Frequency option.<br />
6. Select a channel by doing one of the following:<br />
• Highlight a channel using the UP or DOWN ARROW button.<br />
Then, press the SELECT button.<br />
• Enter a channel number using the NUMBER PAD buttons.<br />
7. Select the Edit Time option. The receiver displays the Set Date/Time for<br />
Manual Timer menu.<br />
8. Use the NUMBER PAD buttons to enter the Start Time (this includes<br />
selecting AM or PM) <strong>and</strong> the End Time, (this includes selecting AM or<br />
PM).<br />
9. Use the NUMBER PAD buttons to enter the Date.<br />
10. Select the Create Timer option.<br />
11. To create another event timer, do one of the following:<br />
• Select the Create option again.<br />
• If you do not want to create another event timer, press the CANCEL<br />
button.<br />
Note: You cannot set a manual event timer for a pay per view event.<br />
Overlapping Timers<br />
If you try to create event timers for overlapping programs, the receiver<br />
displays a screen with the dates <strong>and</strong> times of both programs. The receiver<br />
also displays this screen if a program time has changed, causing one timer to<br />
overlap another. You must delete, edit, or skip one of the timers.<br />
Page 54
Using Timers<br />
When the Timer Conflict screen displays, resolve the conflict by doing the<br />
following:<br />
1. Select one of the timers. The Timer Conflict Resolution screen<br />
displays.<br />
2. When the Timer Conflict Resolution displays, select one of the<br />
following choices:<br />
• Delete This Timer - Removes the timer completely.<br />
• Edit This Timer - You can edit the timer to resolve the conflict.<br />
• Skip This Timer Once - Select this option if you are creating a<br />
timer for a special program (Once) <strong>and</strong> have a timer set for a<br />
program you watch regularly (Mon.-Fri, Daily, or Weekly). For<br />
example, you want to set a timer for an awards show (Once), but it<br />
conflicts with the timer for a news program (Mon.-Fri, Daily, or<br />
Weekly). Select the timer for the news program <strong>and</strong> then select<br />
Skip This Timer Once.<br />
3. Select Yes to close the Timer Conflict Resolution screen.<br />
4. Select Done.<br />
Page 55
Chapter 3<br />
Using the System<br />
Maximum Number of Event Timers<br />
You can create a limited number of event timers. If you try to create more,<br />
the receiver displays a menu giving you the option to delete an existing<br />
timer. If you do not delete an existing timer, you will not be able to create<br />
any new ones.<br />
Reviewing <strong>and</strong> Editing Event Timers<br />
You can review <strong>and</strong> edit both automatic <strong>and</strong> manual event timers. If you<br />
need to change an event timer, you can edit almost any feature of an event<br />
timer.<br />
Note: If you edit an automatic timer, it becomes a manual timer. The manual<br />
event timer operates at the times you set, not the actual program times.<br />
1. Press the MENU button.<br />
2. Select the Timers option. The receiver displays the Timers menu.<br />
3. Select the event timer that you want to edit. A mark appears in the box<br />
next to the event timer.<br />
4. Select the Edit option. You may change the Timer Type, Timer<br />
Frequency, or Channel. To do this, select each option that you want.<br />
5. If you want to change the Start Time, the End Time, or the Date, select<br />
the Edit Time option to display the Edit Time for Manual Timer menu.<br />
Otherwise, skip to step 8 of this procedure.<br />
6. Use the number buttons to enter the Start Time (this includes selecting<br />
AM or PM) <strong>and</strong> the End Time (this includes selecting AM or PM), if<br />
applicable.<br />
7. Use the NUMBER PAD buttons to enter the Date.<br />
8. Select the Create Timer option.<br />
Page 56
Using Timers<br />
Deleting an Event Timer<br />
1. Press the MENU button.<br />
2. Select the Timers option. The receiver displays the Timers menu.<br />
3. Select an event timer(s) that you want to delete. A check mark appears<br />
in the box next to the event timer(s).<br />
4. Move the highlight to Delete <strong>and</strong> press SELECT on the remote.<br />
Special Considerations When Using Event Timers<br />
• For Locked Programs - You must enter the receiver password before<br />
you can create an automatic event timer. You can create a manual event<br />
timer for a locked program without entering the password. However, if<br />
you do this, when the event timer operates the receiver may display<br />
only an error or password entry menu. If you have set a VCR Event<br />
Timer, the VCR will record only that menu.<br />
• For Pay Per View Programs - You must order a pay per view program<br />
before you can create a timer for it.<br />
• For Blacked Out Programs - If you set a timer for a program that is<br />
blacked out in your area, when the event timer operates the receiver<br />
may display only an error. If you have set a VCR Event Timer, the VCR<br />
will record only that menu.<br />
Event Timer Performance when the Receiver is Off<br />
If the receiver is OFF at the time an Auto-Tune or VCR Event Timer is<br />
scheduled to operate, the receiver will turn ON. Once the event has ended,<br />
the receiver will turn OFF, unless you pressed any remote control or<br />
receiver front panel buttons during the time that the timer was active.<br />
If the receiver is OFF at the time a Reminder Event Timer is scheduled to<br />
operate, the timer will turn the receiver ON <strong>and</strong> tune it to the channel you<br />
last watched. The receiver will then display the reminder menu. You will<br />
have a few seconds to respond. If you do not respond to the reminder menu,<br />
the receiver will turn OFF.<br />
Setting Up the Receiver to Control a VCR (TV1 Menu Only)<br />
To use VCR Timers, connect the receiver back panel outputs to the audio/<br />
video inputs on the VCR (see your VCR user’s guide for instructions).<br />
Before you can use VCR Timers, you must set up the receiver to control the<br />
VCR. If the receiver cannot control the VCR, use an Auto-Tune Timer to<br />
tune the receiver to the channel you want to record. Use the timers built into<br />
the VCR to start <strong>and</strong> stop the VCR at the right times.<br />
The receiver transmits an IR signal from the front panel to control the VCR.<br />
This signal is much stronger than the signal the remote uses, so it can<br />
bounce off walls or other objects on its way to the VCR. This works in most<br />
home setups. However, shelves or smoked glass doors between the receiver<br />
front <strong>and</strong> the VCR may block the signal. Also, if the signal must cross a<br />
very large room, or bounce off curtains, it may not be strong enough to<br />
control the VCR. Make sure that nothing blocks the signal, <strong>and</strong> that the<br />
signal can bounce off relatively nearby, light-colored, smooth surfaces.<br />
Tip: Remote<br />
Control 1 is used to<br />
control TV1 menus<br />
on the nearby TV.<br />
Remote Control 2<br />
is used to control<br />
TV2 menus on the<br />
remote TV(s).<br />
Page 57
Chapter 3<br />
Using the System<br />
Note: VCR setup is only available through TV1 menus.<br />
To set up TV1 to control a VCR, use Remote Control 1 at the nearby TV <strong>and</strong><br />
do the following:<br />
1. Press the MENU button.<br />
2. Select the System Setup option.<br />
3. Select the Installation option.<br />
4. Select the VCR Setup option.<br />
5. Set the VCR code by doing one of the following:<br />
• Enter the 3-digit VCR code number, from the tables starting on page<br />
114, using the NUMBER PAD buttons.<br />
• Highlight each digit of the VCR code, <strong>and</strong> then press the UP or<br />
DOWN ARROW button until you reach the correct number <strong>and</strong><br />
then press SELECT.<br />
6. Make sure the VCR is connected to one of the TV1 outputs <strong>and</strong> is set to<br />
display from the TV1 output to the nearby TV. Consult your VCR user’s<br />
guide.<br />
7. Make sure the VCR is turned on. Insert a rewound tape on which you<br />
want to record.<br />
Note: The receiver only starts <strong>and</strong> stops the VCR recording, but does not<br />
turn ON the VCR, so you must do this yourself.<br />
8. To test the new code, highlight the Test option. The receiver displays a<br />
message warning you to make sure the VCR is turned ON.<br />
9. Press the SELECT button to start the test. Your VCR records for a few<br />
seconds, stops, <strong>and</strong> then rewinds. The receiver displays a message<br />
saying that your VCR test is complete. Follow the instructions on the<br />
message. If your VCR did not do the test, enter another code from the<br />
table. Repeat step 8 <strong>and</strong> this step.<br />
10. Once you have found the correct VCR code, select the Save option to<br />
save the VCR code you entered <strong>and</strong> return to the Installation <strong>and</strong> Setup<br />
menu.<br />
Page 58
Using Themes <strong>and</strong> Search<br />
Setting Up a VCR for VCR Timers<br />
After you have properly set up the receiver to control the VCR during VCR<br />
timers, complete the following to set up the VCR to operate when you set a<br />
VCR timer.<br />
1. Turn the VCR on. Make sure you keep the VCR on because the receiver<br />
cannot turn the VCR on for you.<br />
2. Insert a tape. A blank, rewound tape makes the best recording.<br />
3. If you need to change the VCR settings (tape length or channel), see the<br />
instructions that came with your VCR.<br />
Using Themes <strong>and</strong> Search<br />
The Themes <strong>and</strong> Search feature of your receiver makes it easy to find<br />
programs to watch. This menu allows you to search for programming by<br />
themes (movies, sports, etc.) or by key words used in the program<br />
information.<br />
Themes<br />
You can list <strong>and</strong> choose programs by the theme of their contents, for<br />
example, just movies or just sports. You can then quickly list programs<br />
based on that theme, <strong>and</strong> choose the program you want.<br />
1. Open the Themes <strong>and</strong> Search menu by doing one of the following:<br />
• While watching a program, press the LEFT ARROW<br />
button.<br />
• Press the MENU button, <strong>and</strong> then select the Themes<br />
option.<br />
2. Select the option for a category.<br />
3. Select the desired program in the program list.<br />
Page 59
Chapter 3<br />
Using the System<br />
Note: If the program you highlighted is on some time in the future, the<br />
receiver will open the Create An Event Timer menu. See Using Timers<br />
on page 52 for more information.<br />
Search<br />
1. Open the Search screen by doing one of the following:<br />
• Press the Pound (#) button on the remote control.<br />
• While watching a program, press the LEFT ARROW<br />
button to display the Themes <strong>and</strong> Search menu. Then<br />
select Search.<br />
• Press the MENU button, <strong>and</strong> then select the Themes<br />
option to display the Themes <strong>and</strong> Search menu. The<br />
select Search.<br />
2. The Search screen displays with a virtual keyboard.<br />
3. You can search for events two ways:<br />
• Select Title to search for the words that appear in the title of a<br />
program.<br />
Tip: Use Search<br />
History instead of<br />
the keyboard if<br />
you’ve searched for<br />
the program or<br />
information before.<br />
• Select Info to search for words that are in the program description.<br />
4. Enter the information in that space provided in one of two ways:<br />
• Use the virtual keyboard to type the information in the space<br />
provided.<br />
• Use the letters above the NUMBER PAD buttons while in the<br />
Search menu. For example, when looking for the channel <strong>and</strong> times<br />
to watch Rudy Fremmel Presents, you press 7 three times for an R, 8<br />
two times for a U, 3 one time for a D, <strong>and</strong> 9 three times for a Y to<br />
spell the word “Rudy.”<br />
Page 60
Using Themes <strong>and</strong> Search<br />
5. Select Search.<br />
6. When the receiver displays the Search Results you have the following<br />
options:<br />
• Use the UP <strong>and</strong> DOWN ARROW buttons to scroll through the<br />
results.<br />
• Use the PAGE UP <strong>and</strong> PAGE DOWN buttons to scroll a page at a<br />
time.<br />
• Select Page Up or Page Down to scroll a page at a time.<br />
7. Select one of the programs to watch, or select Done to close the Search<br />
Results screen.<br />
Note: If you select a program that is on now, the receiver tunes to that<br />
program. If you select a program that is on in the future, you will have<br />
to set a timer. See page 52 for more information on event timers.<br />
Search History<br />
After you have searched for programs or other information, your receiver<br />
builds a history. TV1 <strong>and</strong> TV2 keep separate Search History information.<br />
You can use the Search History instead of typing the information again<br />
with the virtual keyboard.<br />
1. Press the Pound (#) button to open the Search screen.<br />
2. Select History to display the Search History screen.<br />
Page 61
Chapter 3<br />
Using the System<br />
3. At the Search History screen, you have the following options:<br />
• Search - Select one of the items <strong>and</strong> then select Search.<br />
• Edit - Select one of the items <strong>and</strong> then select Edit to make changes.<br />
• Delete - Select one of the items <strong>and</strong> then select Delete.<br />
• Delete All - Select Delete All to clear the Search History.<br />
Using Locks<br />
When you unlock programming delivered by the TV2 outputs<br />
to your in-home cabling system, you are allowing all TVs<br />
connected to your in-home cabling system to have access to<br />
this programming. In this case, you must rely on the V-Chip<br />
technology <strong>and</strong> settings in the individual TVs to prevent<br />
viewing of inappropriate programming. Consult your TV<br />
user’s guides for instructions to set up V-Chip protection.<br />
Note: Locks for programming on the TV1 outputs for the nearby TV are set<br />
using the TV1 menus. Locks for programming on the TV2 outputs to remote<br />
TVs are set using the TV2 menus. The section below applies to locks set by<br />
either TV1 or TV2 menus. Locks set for TV1 programming are separate<br />
from locks set for TV2 programming.<br />
How to Set Locks: A Two Step Process<br />
1. Create the locks that you want.<br />
2. Lock the receiver.<br />
When the receiver is locked, anyone who wants to access locked items must<br />
enter the password.<br />
When You Have Locked the Receiver<br />
• If you try to access a locked item or open the Locks menu, the receiver<br />
displays a message prompting you to enter the password.<br />
• The receiver allows you three tries to enter the correct password. If you<br />
fail to enter the correct password, the receiver does not allow more tries<br />
for several minutes.<br />
• If you enter the correct password, you can access the locked item or<br />
open the Locks menu.<br />
• If you exit a locked item or close the Locks menu, you must enter the<br />
password to access the item.<br />
Page 62
Using Locks<br />
Locking <strong>and</strong> Unlocking the Receiver<br />
You must lock the receiver for any receiver Locks you set to take effect. To<br />
lock the receiver, you must first create a password. If you forget your<br />
password, you will need to speak with a Customer Service Representative.<br />
If you have a Personal Identification Number (PIN), you will need to give it<br />
to the Customer Service Representative. See page 69 for information on<br />
PINs.<br />
1. Press the MENU button to display the Main Menu.<br />
2. Select the Locks option to display the Locks menu.<br />
Note: If the receiver displays a message prompting you to enter a<br />
password, the receiver has already been locked.<br />
3. Select the Lock System or Unlock System option. The receiver<br />
displays a message prompting you to enter a password to lock the<br />
system.<br />
4. Enter <strong>and</strong> verify a password, using the NUMBER PAD buttons. The<br />
receiver continues to display stars (*) as you enter the digits of the<br />
password. As soon as you enter the fourth digit of the password, the<br />
receiver highlights the OK button. Press SELECT.<br />
5. Memorize your password. From now on, you must enter this password<br />
to lock or unlock the receiver.<br />
6. Select the OK option. Confirm the password by re-entering it. All the<br />
locks you have set are now in effect.<br />
Page 63
Chapter 3<br />
Using the System<br />
Creating or Changing Rating (Content) Code Locks<br />
1. Press the MENU button.<br />
2. Select the Locks option.<br />
3. If the receiver is locked, enter the password using the number pad<br />
buttons. The receiver continues to display stars (*) as you enter<br />
the digits of the password. As soon as you enter the fourth digit of the<br />
password, the receiver highlights the OK option. Press the SELECT<br />
button.<br />
4. Select the Ratings Locks option.<br />
5. Highlight the rating that corresponds to the lowest unacceptable<br />
audience age. Press the SELECT button to lock the highlighted rating.<br />
Note: All ratings that are more restrictive than the selected rating are<br />
also selected. For example, if you lock PG-13 rated programs, then all<br />
programs with the R, NC-17, <strong>and</strong> NR/AO ratings are also locked.<br />
6. Select the exp<strong>and</strong>ed rating code(s), if you want to also lock these ratings.<br />
7. To unlock a rating code, highlight the code <strong>and</strong> press SELECT.<br />
8. Select the Done option to save the changes.<br />
9. If the receiver is not locked, you must lock it to put the locks you just<br />
created into effect by selecting Lock System.<br />
Creating or Changing Channel Locks<br />
You can lock any channel, including pay per view channels.<br />
1. Press the MENU button.<br />
2. Select the Locks option.<br />
3. If the receiver is locked, enter the password using the number pad<br />
buttons. The receiver continues to display stars (*) as you enter<br />
the digits of the password. As soon as you enter the fourth digit of the<br />
password, the receiver highlights the OK option. Press the SELECT<br />
button.<br />
Page 64
Using Locks<br />
4. Select the Channel Locks option.<br />
5. Highlight the channel that you want to lock. If necessary, press the UP<br />
or DOWN ARROW button to see the channel. You can also enter each<br />
channel number using the NUMBER PAD buttons.<br />
6. Press the SELECT button to lock or unlock the highlighted channel. If<br />
the box next to the channel has a mark, the channel is locked.<br />
7. Select the Done option to save the changes.<br />
8. If the receiver is not already locked, you must lock it to put the locks<br />
you just created into effect by selecting Lock System.<br />
Locking <strong>and</strong> Unlocking the Receiver Front Panel (TV1 Only)<br />
This keeps anyone from changing the channel, but it does not lock the<br />
remote control buttons. This option is only available on TV1 menus.<br />
1. Press the MENU button.<br />
2. Select the Locks option.<br />
Tip: Remote<br />
Control 1 is used to<br />
control TV1 menus<br />
on the nearby TV.<br />
Remote Control 2<br />
is used to control<br />
TV2 menus on the<br />
remote TV(s).<br />
3. If the receiver is locked, enter the password using the NUMBER PAD<br />
buttons. The receiver continues to display stars (*) as you enter the<br />
digits of the password. As soon as you enter the fourth digit of the<br />
password, the receiver highlights the OK option. Press the SELECT<br />
button.<br />
4. Select the Front Panel Lock option to lock or unlock the front panel.<br />
Page 65
Chapter 3<br />
Using the System<br />
5. Select the Yes option.<br />
6. To activate the front panel lock, you must lock the receiver by selecting<br />
Lock System.<br />
Locking <strong>and</strong> Unlocking Pay Per View Channels<br />
This locks all pay per view channels. You also can lock one or more pay per<br />
view channels by using channel locks or rating locks.<br />
1. Press the MENU button.<br />
2. Select the Locks option.<br />
3. If the receiver is locked, enter the password using the NUMBER PAD<br />
buttons. The receiver continues to display stars (*) as you enter the digits<br />
of the password. As soon as you enter the fourth digit of the password,<br />
the receiver highlights the OK option. Press the SELECT button.<br />
4. Select the Lock PPV or Unlock PPV option.<br />
5. If the receiver is not locked, you must lock it to put the lock you just<br />
created into effect by selecting Lock System.<br />
Page 66
Using Locks<br />
Hiding <strong>and</strong> Showing Adult Channels<br />
When you hide adult channels, you keep the Program Guide, Themes lists,<br />
<strong>and</strong> the Browse Banner from displaying adult channels. It also keeps<br />
anyone from choosing such channels by using the UP or DOWN ARROW<br />
buttons or the remote control NUMBER PAD buttons.<br />
1. Press the MENU button.<br />
2. Select the Locks option.<br />
3. If the receiver is locked, enter the password using the NUMBER PAD<br />
buttons. The receiver continues to display stars (*) as you enter the<br />
digits of the password. As soon as you enter the fourth digit of the<br />
password, the receiver highlights the OK option. Press the SELECT<br />
button.<br />
4. Select the Hide Adult or Show Adult option.<br />
5. If the receiver is not locked, you must lock it to put the lock you just<br />
created into effect by selecting Lock System.<br />
Changing the Receiver Password<br />
1. Press the MENU button.<br />
2. Select the Locks option.<br />
If the receiver is locked, enter the password using the NUMBER PAD<br />
buttons. The receiver continues to display stars (*) as you enter the<br />
digits of the password. As soon as you enter the fourth digit of the<br />
password, the receiver highlights the OK option.<br />
3. Press the SELECT button.<br />
4. Select the Change Password option.<br />
Page 67
Chapter 3<br />
Using the System<br />
5. Enter the current password using the number pad buttons. As soon as<br />
you enter the fourth digit of the password, the receiver highlights the OK<br />
option. Press the SELECT button.<br />
6. Enter the new password using the number pad buttons. As soon as you<br />
enter the fourth digit of the password, the receiver highlights the OK<br />
option. Select the OK option to change the password.<br />
7. Enter the new password again for confirmation, using the NUMBER<br />
PAD buttons. The receiver continues to display stars (*) as you enter the<br />
digits of the password. As soon as you enter the fourth digit of the<br />
password, the receiver highlights the OK option. Press the SELECT<br />
button.<br />
8. Memorize the new password. From now on, you must enter this<br />
password to lock or unlock the receiver.<br />
Page 68
Personal Identification Number<br />
Personal Identification Number<br />
You can set up a Personal Identification Number (PIN) for call-in requests<br />
only. Anyone calling the Customer Service Center must provide this PIN to<br />
make any changes to your account. You may call the Customer Service<br />
Center at any time to set up a PIN.<br />
If you forget your PIN, you will need to speak with a Customer Service<br />
Representative. The representative may ask for more information to make<br />
sure that you are authorized to make changes to your account.<br />
Using Caller ID<br />
Caller ID displays on your TV the names of people as they call you if you<br />
subscribe to Caller ID from your local phone company. To use this feature,<br />
make sure you have a phone line connected to the receiver <strong>and</strong> that the<br />
Caller ID feature is enabled. After you turn on Caller ID, it stays on until<br />
you decide to turn it off.<br />
Caller ID Screens<br />
When you receive a call, you will see a Caller ID popup screen.<br />
You can select OK to eliminate the message. If you do nothing, it will<br />
disappear after 20 seconds.<br />
If you are in a menu when a call comes in, you will see a different Caller ID<br />
popup screen.<br />
Page 69
Chapter 3<br />
Using the System<br />
Turning Caller ID On <strong>and</strong> Off<br />
1. Press MENU on the remote control.<br />
2. Select System Setup.<br />
3. Select Installation.<br />
4. Select Caller ID.<br />
5. Select Enable Caller ID or select Disable Caller ID.<br />
6. Select Done.<br />
Resetting to Factory Default Settings<br />
Note: Resetting the receiver to factory default settings discards all Favorite<br />
Lists except the All Chan <strong>and</strong> All Sub lists.<br />
Note: If you have set any locks on the receiver, <strong>and</strong> the receiver is locked,<br />
these locks will be kept. If the receiver is unlocked, any such locks will be<br />
lost; however, you cannot reset the receiver to factory default settings to<br />
bypass a lock or to discard a password you have forgotten. Call the Customer<br />
Service Center if you have forgotten your password.<br />
Complete the following instructions if you want to reset the receiver to be<br />
the same as when it was shipped from the factory.<br />
1. Press the MENU button.<br />
2. Select the System Setup option.<br />
Page 70
Changing Program Languages<br />
3. Select the Factory Defaults option. When the receiver displays<br />
a <strong>Warning</strong> message, confirm that you want to reset the receiver<br />
to factory default settings.<br />
Changing Program Languages<br />
You may be able to change the language of some programs. An alternate<br />
language may not be available for all programs. Some programs, such as<br />
movies, show at the start whether an alternate language is available. An<br />
alternate language applies only to the audio part of a program <strong>and</strong> does not<br />
change the language used in the menus displayed by the receiver.<br />
1. Press the MENU button.<br />
2. Select the System Setup option.<br />
3. Select the Alternate Audio option.<br />
4. Select the language you want in the Languages list.<br />
5. Select the Done option to save your language choice. The receiver<br />
displays the System Setup menu.<br />
Page 71
Chapter 3<br />
Using the System<br />
Tip: Remote<br />
Control 1 is used to<br />
control TV1 menus<br />
on the nearby TV.<br />
Remote Control 2<br />
is used to control<br />
TV2 menus on the<br />
remote TV(s).<br />
Control Other Devices with the Remote Controls<br />
This section describes how to use Remote Control 1 or Remote Control 2 to<br />
control with a TV, a VCR, or other devices. For information on how to use<br />
the remote to control the receiver, see Using the Remote Controls on page<br />
37. You can set up both remote controls to control the satellite TV receiver<br />
<strong>and</strong> up three other devices each. These devices can be a TV, a VCR or DVD<br />
player, <strong>and</strong> a third device.<br />
Where the word “remote” is used in the following section, it applies to both<br />
Remote Control 1 <strong>and</strong> Remote Control 2.<br />
Remote Control Modes<br />
You can set the remote to four different modes to control the receiver or<br />
other devices. When you get the remote it’s already set up to control the<br />
receiver. You must set up the remote to control a device like a TV or a VCR.<br />
See Set Up the Remote to Control Other Devices, below.<br />
Use the remote control’s mode buttons, SAT (satellite receiver), TV (for a<br />
TV), VCR (for a VCR or a DVD player), <strong>and</strong> AUX (“auxiliary,” for a second<br />
TV, a second VCR, a tuner, or an audio amplifier) to set the remote to the<br />
right mode for the device. To change the mode, press the button for the<br />
device you want the remote to control. The mode button lights for two<br />
seconds to show you’ve set the remote to that mode.<br />
Tip: Limited mode<br />
is not used with<br />
amplifiers.<br />
Limited Mode<br />
You can program your remote control in limited mode to keep from<br />
accidentally changing the channel on your TV or VCR. When you use the<br />
remote to control your TV in limited mode, you will only be able to use the<br />
POWER, MUTE, <strong>and</strong> VOLUME buttons. Also, when you use the remote to<br />
control your VCR in limited mode, you will only be able to use the power<br />
<strong>and</strong> VCR function buttons. The section Setting Up the Remote to Control<br />
Other Devices has a step that tells the remote control to go into limited<br />
mode.<br />
Note: You can use Limited Mode for TV <strong>and</strong> VCR codes programmed in<br />
AUX mode.<br />
Set Up the Remotes to Control Other Devices<br />
Over the next few pages we tell you how to use the remote to control a TV, a<br />
VCR, a DVD player, a tuner, or an amplifier.<br />
To use the remote to control other devices, you must first program it to<br />
control these other devices. You can do this by either following the<br />
instructions in Set Up the Remote Control below, or the Scan for Device<br />
Codes procedure described on page 74.<br />
If you are programming the remote to control a combination device, such as<br />
a TV/VCR or a VCR/DVD, program the remote control in one mode, <strong>and</strong><br />
then repeat the procedure in the other mode. For example, to program the<br />
remote to control a TV/VCR using code 748: Follow the instructions to<br />
program the remote to control the TV using code 748, <strong>and</strong> then repeat the<br />
instructions for the VCR using the same code.<br />
Page 72
Control Other Devices with the Remote Controls<br />
Set Up the Remote Control<br />
1. Turn the device on. Use the device’s front panel buttons<br />
or its remote control.<br />
2. Find the br<strong>and</strong> name of the<br />
device in the tables starting on<br />
page 113.<br />
3. Press <strong>and</strong> hold the mode<br />
button until all the other mode<br />
buttons light up, <strong>and</strong> then let<br />
go of the button.<br />
The mode button flashes.<br />
If you are repeating this<br />
procedure to program a<br />
combination device, be sure to<br />
press the correct mode button<br />
(for example, if you have a<br />
TV/VCR combination <strong>and</strong><br />
you have already programmed<br />
the remote to control the TV,<br />
press <strong>and</strong> hold the VCR mode<br />
button as described above).<br />
4. For AUX mode only:<br />
• Press 0 for a second TV.<br />
• Press 1 for a second VCR<br />
or DVD player.<br />
• Press 2 - for a tuner or<br />
amplifier.<br />
5. Enter one of the three-digit<br />
device codes from the table<br />
using the number buttons.<br />
6. If you want to program<br />
limited mode, press 1. If not,<br />
skip to step 7.<br />
If the br<strong>and</strong> isn’t listed, see Scan for<br />
Device Codes on page 74.<br />
For example, hold the TV mode<br />
button for a TV until all of the other<br />
mode buttons light. When you let<br />
go, the TV mode light will flash.<br />
This step is for programming which<br />
kind of device that should be<br />
programmed in AUX mode. If<br />
you’re not programming in AUX<br />
mode, skip to step 5.<br />
The three-digit device code should<br />
be for the br<strong>and</strong> name of your device<br />
that you found in step 2.<br />
See Limited Mode for more<br />
information.<br />
7. Press the POUND (#) button. If you entered the code correctly, the<br />
mode button flashes three times.<br />
8. Press the blank POWER<br />
button to turn off the device. If<br />
the device does not turn off,<br />
go to step 10.<br />
If the code works, the device should<br />
turn off.<br />
Page 73
Chapter 3<br />
Using the System<br />
9. Turn the device back on <strong>and</strong><br />
try some other appropriate<br />
buttons to make sure they<br />
work. If the code works for<br />
other buttons, stop here.<br />
10. If the code doesn’t work, redo<br />
steps 3 through 9 with another<br />
device code from the tables.<br />
Sometimes the blank POWER<br />
button works when other buttons<br />
don’t.<br />
Try every code listed for you br<strong>and</strong><br />
until one works for your device.<br />
11. If you can’t find a code that<br />
works try Scan for Device<br />
Codes that follows.<br />
Scan for Device Codes<br />
If the code for your device is not listed in the tables starting on page 113, use<br />
this procedure to scan the remote control’s memory for the device code.<br />
1. Turn the device on. Use the device’s front panel buttons<br />
or its remote control.<br />
2. Press <strong>and</strong> hold the mode<br />
button until all the other mode<br />
buttons light up, <strong>and</strong> then let<br />
go of the button.<br />
The mode button flashes.<br />
3. For AUX mode only:<br />
• Press 0 for a second TV.<br />
• Press 1 for a second VCR<br />
or DVD player.<br />
• Press 2 - for a tuner or<br />
amplifier.<br />
4. For AUX mode only: Press the STAR (*) button.<br />
5. Press the blank POWER<br />
button.<br />
6. Press the UP or DOWN<br />
ARROW button repeatedly<br />
until the device turns off.<br />
For example, hold the TV mode<br />
button for a TV until all of the other<br />
mode buttons light. When you let<br />
go, the TV mode light will flash.<br />
This step is for programming which<br />
kind of device that should be<br />
programmed in AUX mode. If<br />
you’re not programming in AUX<br />
mode, skip to step 4.<br />
This puts your remote in the scan<br />
mode.<br />
As you press the UP or DOWN<br />
ARROW button, the remote is<br />
trying each code in the memory to<br />
see if it can turn off your device.<br />
When the device turns off, you have<br />
found a code that might work.<br />
Note: The mode button for the<br />
device will flash rapidly eight times<br />
when you’ve scanned all the codes<br />
for that device.<br />
Page 74
Control Other Devices with the Remote Controls<br />
7. Press the POUND (#) button. This stores the code you found.<br />
8. Turn the device back on <strong>and</strong><br />
try some other appropriate<br />
buttons to make sure they<br />
work.<br />
9. Repeat this procedure until<br />
you’ve tried all the codes.<br />
Press the blank POWER button to<br />
turn the device back on. Try some<br />
other buttons to make sure they<br />
work. Sometimes, the blank<br />
POWER button works when other<br />
buttons don’t.<br />
You may need to repeat the scan to<br />
find the best code for your device.<br />
Check the Device Codes<br />
You can find out what device code you’ve set for each remote control mode.<br />
1. Press <strong>and</strong> hold the mode<br />
button until all the other mode<br />
buttons light up, <strong>and</strong> then let<br />
go of the button.<br />
The mode button flashes.<br />
2. Press the POUND (#) button<br />
twice.<br />
Watch the mode light to<br />
determine your code. The<br />
mode button flashes the<br />
number for each digit of the<br />
device code, with a pause<br />
between the groups of flashes.<br />
A quick flash is for zero.<br />
3. For AUX mode only. The first<br />
group of flashes tells you what<br />
the AUX mode controls. A<br />
quick flash (zero) before the<br />
three-digit code is for a TV;<br />
one regular flash is for a VCR<br />
or DVD player; <strong>and</strong> two<br />
flashes is for a tuner or<br />
amplifier.<br />
For example, hold the TV mode<br />
button for a TV until all of the other<br />
mode buttons light. When you let<br />
go, the TV mode light will flash.<br />
For example, if the code is 570, the<br />
mode button flashes five times,<br />
pauses, flashes seven times, pauses,<br />
<strong>and</strong> flashes once quickly.<br />
For example, if the TV code is 570,<br />
the AUX mode button flashes once<br />
quickly (indicating 0 for TV),<br />
pauses, flashes five times, pauses,<br />
flashes seven times, pauses, <strong>and</strong><br />
flashes once quickly.<br />
Tip: Remote<br />
Control 1 is used to<br />
control TV1 menus<br />
on the nearby TV.<br />
Remote Control 2<br />
is used to control<br />
TV2 menus on the<br />
remote TV(s).<br />
Page 75
Chapter 3<br />
Using the System<br />
Remote Control Buttons<br />
Control the Receiver<br />
When you get the remote it’s already set up to control the receiver. However,<br />
you must set up the remote to control the TV before you can use the MUTE<br />
<strong>and</strong> VOLUME buttons.<br />
For information on the remote buttons that control the receiver, see Using<br />
the Remote Controls on page 37.<br />
Control a TV (or a Second TV)<br />
Only the buttons described here control a TV. Some of the buttons described<br />
here may not control your TV. Please see your TV user’s manual for<br />
information about the TV’s features.<br />
TV Mode Button<br />
You must first set up the remote to control the TV. See Set Up the Remote to<br />
Control Other Devices, beginning on page 72. Then, you must press the TV<br />
mode button to set the remote to TV mode. The TV mode button lights for<br />
two seconds to show you’ve set the remote to TV mode. Make sure you keep<br />
the remote in TV mode to use the buttons described here.<br />
Note: You can set up the remote to control a second TV in AUX mode, the<br />
same way it controls the first TV in TV mode. See Set Up the Remote to<br />
Control Devices beginning on page 72.<br />
TV/Video Button<br />
If the TV has video input options, use this button to switch the TV video<br />
input.<br />
Power Button<br />
Press the TV POWER button to turn the TV on or off.<br />
Mute Button<br />
Press the MUTE button to turn the TV sound on or off.<br />
Volume Button<br />
Press this button to raise (+) or lower (-) the TV sound volume.<br />
Page 76
Control Other Devices with the Remote Controls<br />
Up <strong>and</strong> Down Arrow Buttons<br />
Use the UP <strong>and</strong> DOWN ARROW buttons to change channels on the TV.<br />
Note: These buttons do not change the channels on the TV if the remote<br />
control is in limited mode.<br />
Select Button<br />
The SELECT button works as the ENTER button for a TV.<br />
Recall Button<br />
Press the RECALL button to go back to the last TV channel you watched.<br />
Press it again to switch between the last two TV channels you watched.<br />
Number Buttons<br />
Use the NUMBER buttons to directly enter a different channel.<br />
Note: These buttons do not change the channels on the TV if the remote<br />
control is in limited mode.<br />
Page 77
Chapter 3<br />
Using the System<br />
Control a VCR (or a Second VCR or a DVD Player)<br />
Only the buttons described here control a VCR or DVD player. Some of the<br />
buttons described here may not control your VCR or DVD player. See the<br />
user’s manual that came with your VCR or DVD player for information<br />
about the features.<br />
VCR Mode Button<br />
You must first set up the remote to control the VCR or DVD player. See Set<br />
Up the Remote to Control Devices, beginning on page 72. Then, you must<br />
press the VCR mode button to set the remote to VCR mode. The VCR mode<br />
button lights for two seconds to show you’ve set the remote to VCR mode.<br />
Make sure you keep the remote in VCR mode to use the buttons described<br />
here.<br />
Note: You can set up the remote to control a second VCR or DVD player in<br />
AUX mode, the same way it controls the first VCR or DVD player in VCR<br />
mode. See Set Up the Remote to Control Devices beginning on page 72.<br />
Note: You must set the remote to VCR mode to set it up to control a DVD<br />
player.<br />
TV/Video Button<br />
Use the TV/VIDEO button to switch the VCR between its TV mode <strong>and</strong> its<br />
VCR mode (see your VCR user’s manual for information).<br />
Power Button<br />
Press the blank POWER button to turn the VCR on or off.<br />
Page Up <strong>and</strong> Down Arrow Buttons<br />
Use the PAGE UP <strong>and</strong> DOWN ARROW buttons to change channels on the<br />
VCR.<br />
Note: If you are using the remote control in limited mode, the VCR will not<br />
change channels.<br />
Recall Button<br />
Press the RECALL button to go back to the last VCR channel you used.<br />
Press it again to switch between the last two VCR channels you used.<br />
Page 78
Control Other Devices with the Remote Controls<br />
VCR Buttons<br />
• Press the LEFT ARROW button to rewind a videotape<br />
or DVD.<br />
• Press the DOWN ARROW button to pause a<br />
videotape or DVD. Press this button or the PLAY<br />
button to go back to playing the tape or DVD.<br />
• Press the RIGHT ARROW button to fast forward a<br />
videotape or DVD.<br />
• Press the STOP button to stop playing or recording<br />
on a videotape or DVD.<br />
• Press the RECORD button to record on a videotape.<br />
• Press the SELECT button to play or to go back to playing<br />
a videotape or DVD.<br />
Number Buttons<br />
Use the NUMBER buttons to enter channel numbers.<br />
Note: If you are using the remote control in limited mode, the VCR will not<br />
change channels.<br />
Page 79
Chapter 3<br />
Using the System<br />
Control a Tuner or Amplifier<br />
Only the buttons described here control a tuner or amplifier. Some of the<br />
buttons described here may not control your tuner or amplifier. Please see<br />
the user’s manual that came with your tuner or amplifier for more<br />
information.<br />
AUX Mode Button<br />
You must first set up the remote to control the device. See Set Up the Remote<br />
to Control Devices, beginning on page 72. Then, you must press the AUX<br />
mode button to set the remote to AUX mode. The AUX mode button flashes<br />
once to show you’ve set the remote to AUX mode. Make sure you keep the<br />
remote in AUX mode to use the buttons described here. Refer to TV Mode<br />
Button <strong>and</strong> VCR Mode Button, as appropriate, for the buttons available for<br />
use in AUX mode.<br />
Power Button<br />
Press the blank POWER button to turn the tuner or amplifier on or off.<br />
Mute Button<br />
Press the MUTE button to turn the sound off or on.<br />
Volume Button<br />
Press the VOLUME button to raise (+) or lower (-) the volume.<br />
Up <strong>and</strong> Down Arrow Buttons<br />
Use UP <strong>and</strong> DOWN ARROW buttons to change channels on the tuner or<br />
amplifier.<br />
Select Button<br />
The SELECT button works as the INPUT SELECT button for the tuner or<br />
amplifier.<br />
Page 80
Control Other Devices with the Remote Controls<br />
Other Remote Control Features<br />
Switch Between TV <strong>and</strong> AUX Device Volume Control<br />
When you set up the remote to control a TV, the mute <strong>and</strong> volume buttons<br />
control the TV volume. However, if you want to use the AUX mode to<br />
control a tuner or amplifier <strong>and</strong> the device has a volume setting, you can set<br />
up the remote to control the device’s volume instead of the TV volume.<br />
To set the remote to control the device’s volume:<br />
1. Press <strong>and</strong> hold the AUX mode button for three seconds, <strong>and</strong><br />
then release it. The AUX mode button will blink.<br />
2. Press the POUND (#) button.<br />
3. Press the plus (+) side of the VOLUME button.<br />
4. Press the 0 number button.<br />
5. Press the POUND (#) button.<br />
The AUX mode button flashes three times.<br />
6. Press the SAT mode button.<br />
7. Press the plus (+) <strong>and</strong> minus (-) sides of the<br />
VOLUME button.<br />
The device’s volume changes <strong>and</strong> the AUX mode<br />
button lights instead of the TV mode button.<br />
To set the remote back to control the TV volume:<br />
1. Press <strong>and</strong> hold the TV mode button for three seconds, <strong>and</strong> then<br />
release it. The TV mode button will blink.<br />
2. Press the POUND (#) button.<br />
3. Press the plus (+) side of the VOLUME button.<br />
4. Press the 0 number button.<br />
Page 81
Chapter 3<br />
Using the System<br />
5. Press the POUND (#) button.<br />
The TV mode button flashes three times.<br />
6. Press the SAT mode button.<br />
7. Press the plus (+) <strong>and</strong> minus (-) sides of the<br />
VOLUME button.<br />
The TV’s volume changes <strong>and</strong> the TV mode button<br />
lights instead of the AUX mode button.<br />
Testing the System<br />
Starting a Test<br />
1. Press the MENU button.<br />
2. Select System Setup.<br />
3. Select Diagnostics.<br />
Telephone Connection Test<br />
This test checks that the receiver telephone connection is correct. Select the<br />
Connection option to begin the test. The receiver displays a message asking<br />
you to wait until the test is done.<br />
• If the telephone connection is correct, the receiver displays a Phone<br />
Connection OK message.<br />
• If the receiver highlights the Done option, select the Dial Out option so<br />
the receiver can make a toll-free call to the Customer Service Center.<br />
The receiver displays a message asking you to wait until the call is done.<br />
When the call is done, select the Done option to exit the test menu.<br />
Page 82
System Updates<br />
• If the telephone line is not connected properly, the receiver displays a<br />
failure message. In this case, check the telephone connection <strong>and</strong> then<br />
repeat the test.<br />
Note: If you have the receiver connected to a DSL (Digital Subscriber<br />
Line) phone line, it may cause this test to fail. If so, you will need to<br />
install a DSL filter between the receiver <strong>and</strong> the phone jack on the wall.<br />
You should be able to get a DSL filter from your DSL provider, or your<br />
local electronic parts store.<br />
System Updates<br />
Your receiver includes a feature that allows you to set the time in<br />
which your receiver downloads Program Guide information. When the<br />
Updates feature is enabled, the receiver will shut off every day at the same<br />
time receive a software update. The default time for this feature is 3:00 a.m.<br />
1. Press the MENU button.<br />
2. Select System Setup.<br />
3. Select Installation.<br />
4. Select Updates.<br />
5. Highlight the Activation field.<br />
6. Press the UP or DOWN ARROW button to enable or disable the<br />
automatic update feature.<br />
Note: If you disable this feature, no new Program Guide information<br />
will be available until the you turn off the receiver.<br />
7. Highlight the Time Set field.<br />
8. Use the NUMBER PAD buttons to set the time that you want the<br />
system to update the Program Guide.<br />
9. Highlight the AM/PM field.<br />
10. Press the UP or DOWN ARROW button to set AM or PM.<br />
Page 83
Chapter 3<br />
Using the System<br />
11. When you are finished making changes, select Done to close the screen.<br />
Note: If you do not want to save your changes or if you want to reset the<br />
time the system updates the Program Guide, select Defaults <strong>and</strong> then<br />
select Done.<br />
Page 84
Chapter 4<br />
Dish Antenna Installation<br />
These instructions guide you through the installation of a satellite system which<br />
includes your receiver (included with this manual), <strong>and</strong> a <strong>DISH</strong> Pro <strong>DISH</strong> 500<br />
antenna system that can be identified by the <strong>DISH</strong> Pro logo shown below.<br />
Installing a <strong>DISH</strong> 500 Antenna<br />
The first step in installing your dish antenna is to assemble the satellite dish,<br />
mount it, <strong>and</strong> point it in the general direction of a satellite. To do this, follow<br />
these instructions:<br />
Finding the Satellites<br />
You need to find the satellites in the sky. To do this, you need to know the azimuth<br />
angle (the south, southeast, or southwest direction to the satellites) <strong>and</strong> the elevation<br />
angle (the angle up to the satellites) from your location, <strong>and</strong> the skew angle.<br />
1. Make sure that the batteries are fresh in both remote controls, <strong>and</strong> are installed<br />
properly. If needed, make sure that the remote is in SAT mode to control the<br />
satellite receiver.<br />
2. Make sure your satellite receiver is connected to your TV(s) <strong>and</strong> confirm that<br />
the remote controls are controlling the menus properly using the instructions in<br />
Chapter 2. Turn ON the television <strong>and</strong> receiver.<br />
3. Display the Point Dish menu on the nearby TV by pressing MENU <strong>and</strong> then<br />
6-1-1 using Remote Control 1 (unless your TV already displays this menu).<br />
Tip: Remote<br />
Control 1 is used to<br />
control TV1 menus<br />
on the nearby TV.<br />
Remote Control 2<br />
is used to control<br />
TV2 menus on the<br />
remote TV(s).<br />
4. Enter your ZIP code in the ZIP Code field.<br />
5. Make sure that 500 is shown under Dish System.<br />
Page 85
Chapter 4<br />
Dish Antenna Installation<br />
Azimuth:<br />
6. The menu displays the azimuth, elevation, <strong>and</strong> skew angles. Write down these<br />
numbers in the blanks provided in the margin.<br />
Elevation:<br />
Skew:<br />
Mounting the Dish<br />
1. Using the azimuth <strong>and</strong> elevation angles, find a location for the satellite dish<br />
which can be pointed towards the satellites located at these angles. With a<br />
compass, find the required azimuth angle. Then, use the elevation angle to find<br />
out how high the satellites are in the sky from your location.<br />
Make sure nothing blocks the line of sight between the dish <strong>and</strong> the satellites.<br />
2. Mount the mast to a solid surface so that the dish antenna cannot move or be<br />
bumped out of adjustment. Keep in mind that physical <strong>and</strong> environmental<br />
conditions can block your satellite dish’s ability to receive a clear satellite<br />
signal. The conditions to be aware of are: Eaves <strong>and</strong> overhangs on your building<br />
or house, wind, plant growth, <strong>and</strong> deterioration of the mounting surface. Never<br />
mount to a tree or a public utility pole.<br />
NO<br />
YES<br />
3. Align the top part of the mast so that it is absolutely vertical, as shown below. If<br />
the top part of the mast is off vertical by only a few degrees, it will be difficult or<br />
maybe even impossible for you to find the satellites. Take at least two readings<br />
with a bubble level, on the upper mast, that are 90 degrees apart from one<br />
another.<br />
Top Part<br />
of Mast<br />
Bubble Level<br />
Mast<br />
Page 86
Installing a <strong>DISH</strong> 500 Antenna<br />
4. Assemble the satellite dish as shown below, except do not attach the Y-<br />
bracket or LNBF at this time.<br />
5. Loosen both skew bolts <strong>and</strong> set the skew by rotating the dish mounting<br />
bracket to align the red mark with the required angle on the skew scale<br />
which you wrote down on page 86. Tighten the skew bolts securely to keep<br />
the dish from rotating. Once the skew is set, do not try to fine-tune this<br />
angle when aiming the dish.<br />
Pivot Bolt<br />
Elevation Bracket<br />
Skew Point<br />
(Red Mark)<br />
Skew Bolt<br />
Skew Scale<br />
Mast Clamp Bolts<br />
Red Edge<br />
Elevation Scale<br />
Elevation Bolt<br />
6. Set the elevation by tilting the dish mounting bracket to align the red edge<br />
with the required angle from page 86 on the elevation scale. Tighten the<br />
elevation bolts, but do not tighten the pivot bolt at this time.<br />
7. Slide the dish assembly down onto the mast. Make sure the pivot bolt rests<br />
on the top of the mast. Turn the dish assembly so that it points in the general<br />
direction of the satellites, using the azimuth angle from page 86.<br />
8. Thread two RG-6 coaxial cables through the mast, support arm, <strong>and</strong><br />
the Y-bracket. These cables should be long enough to run from your<br />
receiver to your LNBF.<br />
Note: See Running Coaxial Cables on page 99 for cable installation<br />
guidance.<br />
Page 87
Chapter 4<br />
Dish Antenna Installation<br />
Note: You can have as much as 200 feet of cable between the <strong>DISH</strong> Pro LNBF<br />
<strong>and</strong> the <strong>DISH</strong> Pro receiver. However, you must use only RG-6 coaxial cables<br />
rated for 950 to 2150 MHz. Some cables may say "Swept tested for 2150 MHz."<br />
If you have any doubt about this, ask your <strong>DISH</strong> <strong>Network</strong> retailer, examine the<br />
cable’s outer jacket, or look on the container the cable came in. Do not use cable<br />
company TV cables or cables from other satellite TV systems not rated for 950-<br />
2150 MHz. These other cables may cause signal loss. Do not use existing cables<br />
such as RG-59. Also, be sure that any outdoor connections are made using<br />
waterproof F-connectors.<br />
9. Attach the Y-bracket, using the Y-bracket screw.<br />
10. Connect the RG-6 cables from the two SATELLITE IN connections on the back of<br />
the receiver directly to the two ports of the <strong>DISH</strong> Pro Twin LNBF, as shown<br />
below. Be sure there are no multi-dish switches between the LNBF <strong>and</strong> the<br />
receiver.<br />
Tighten all of the coaxial cable connections only by h<strong>and</strong>. If you use a<br />
wrench, you may over-tighten the connections <strong>and</strong> damage your<br />
equipment. Such damage is not covered by the limited warranty.<br />
11. Attach the LNBF to the Y-bracket using the two LNBF screws.<br />
12. You should see the Point Dish menu on your nearby TV. If not press MENU<br />
<strong>and</strong> then 6-1-1 on Remote Control 1.<br />
13. Select Check Switch. The Check Switch screen will open.<br />
14. Select Retest. The receiver shows you a message that it is checking the system.<br />
Page 88
Installing a <strong>DISH</strong> 500 Antenna<br />
15. When the check switch procedure finishes, you will see an Installation<br />
Summary screen similar to the one below. The information for Satellite<br />
Input 1 <strong>and</strong> Satellite Input 2 should be the same:<br />
• Satellite - Conn twice.<br />
• Transponder - X twice. This is OK <strong>and</strong> does not indicate a problem<br />
with the receiver.<br />
• Device Type - Twin twice. This indicates that your receiver has<br />
confirmed the connection with your <strong>DISH</strong> Pro Twin LNBF is working.<br />
16. Select OK to return to the Point Dish screen.<br />
17. Make sure the screen shows 119 under Satellite. If not, move the highlight<br />
to 119 <strong>and</strong> press either the UP or DOWN ARROW.<br />
Note: The signal strength bar is used to help you aim the dish by showing<br />
the strength of the signal you are receiving. Look at the signal strength bar<br />
while you aim the dish.<br />
Note: Don’t st<strong>and</strong> in front of the dish while you aim it, because your body<br />
will block the satellite signal. After you adjust the aim, let go of the dish so<br />
that you can get a good signal reading after the dish settles back in place by<br />
itself.<br />
18. Turn the dish back <strong>and</strong> forth very slowly, until the signal strength bar turns<br />
green. This shows you’ve found the signal.<br />
Tip: Have one<br />
person aim the dish<br />
while another<br />
watches the signal<br />
strength or listens<br />
to the signal tone.<br />
i o n<br />
le v at<br />
E<br />
Page 89
Chapter 4<br />
Dish Antenna Installation<br />
Note: If you cannot find the signal, turn the dish back to the first azimuth angle.<br />
Then, loosen both elevation bolts just enough so you can tilt the dish. Tilt the<br />
dish elevation up by two degrees, <strong>and</strong> then tighten both bolts. Now, turn the dish<br />
back <strong>and</strong> forth again. If you still can’t find the signal, tilt the dish up again very<br />
slightly <strong>and</strong> turn the dish back <strong>and</strong> forth until you find the signal. Do not change<br />
the skew setting.<br />
19. When the signal strength bar is green, turn the dish back <strong>and</strong> forth just a little, to<br />
where the signal strength bar shows the strongest signal. When you find the<br />
strongest signal, tighten both mast clamp bolts. Then loosen both elevation<br />
bolts, just enough so you can tilt the dish. Tilt the dish up <strong>and</strong> down just a little,<br />
to where the signal strength bar shows the strongest signal. When you find the<br />
strongest signal, tighten all bolts in the dish assembly so the dish cannot be<br />
moved.<br />
20. You are now ready to verify reception from both satellites. Select the Check<br />
Switch option. When the Check Switch menu opens, select Retest. The<br />
receiver shows you a message that it is checking the system. When the<br />
procedure is finished, you will see an Installation Summary screen. This<br />
screen may look different than the one shown below.<br />
• Satellite - 119 in Port 1 <strong>and</strong> 110 in Port 2.<br />
• Transponder - All twice. This is OK <strong>and</strong> does not indicate a problem with<br />
the receiver.<br />
• Device Type - Twin twice. This indicates that your receiver has confirmed<br />
the connection with your <strong>DISH</strong> Pro Twin LNBF is working. Press OK to<br />
exit this menu.”<br />
• Status - Satellite reception verified.<br />
21. If you do not see 110 under Port 2:<br />
• Make sure the skew angle you wrote down on page 86 is exactly the same as<br />
the skew angle you set in step 5 on page 87. If it is not, reset the skew angle<br />
as described on page 87. After you reset the skew angle, go back page 89<br />
<strong>and</strong> start over from step 16.<br />
• If 119 is shown under Port 2, move the dish approximately 9° to the east<br />
<strong>and</strong> restart the procedure at step 12.<br />
22. Look at the Point Dish menu. If you have good signal strength with<br />
119 is indicated by a green signal bar, select 110. If you have good signal<br />
strength on 110, go to step 23.<br />
Page 90
Installing a Multiple Dish <strong>DISH</strong> Pro System<br />
If you do not have good signal strength with 110, go back to step 18, <strong>and</strong><br />
fine-tune the dish but with 110 selected instead of 119. While the 110 <strong>and</strong><br />
119 signals will not be equal, you should be able to fine-tune the dish until<br />
you have the strongest possible signal from both satellites.<br />
23. Select Cancel to exit the Point Dish menu. An <strong>Attention</strong> screen will open<br />
asking the mounting <strong>and</strong> positioning of your dish is complete with a<br />
Locked indication in the Point Dish screen. If the answer is yes, select<br />
Yes.<br />
If the answer is No, you will need to repoint your dish following the<br />
preceding steps until the mounting <strong>and</strong> positioning is complete <strong>and</strong> you do<br />
have the Locked indication.<br />
24. After you select Yes, the receiver will begin taking a software upgrade. You<br />
will see a <strong>Warning</strong> that Vital program information will now be<br />
downloaded into your receiver. You will also see a status bar showing the<br />
progress of this upgrade.<br />
Once the software upgrade is complete, you will see a message that your<br />
receiver’s memory is being upgraded.<br />
Do not disturb the receiver while the receiver’s memory is being upgraded.<br />
25. When the memory upgrade is complete, you should be watching TV. Your<br />
dish antenna installation is now complete.<br />
Note: If you are installing other <strong>DISH</strong> Pro or <strong>DISH</strong> Pro Plus receivers, be<br />
sure to run Check Switch on all of them, <strong>and</strong> allow them to take the<br />
necessary software upgrade.<br />
Installing a Multiple Dish <strong>DISH</strong> Pro System<br />
Note: You cannot use <strong>DISH</strong> Pro LNBFs <strong>and</strong> switches (those marked with the<br />
<strong>DISH</strong> Pro logo) with Legacy switches <strong>and</strong> LNBFs (those without the <strong>DISH</strong> Pro<br />
logo). You must install your <strong>DISH</strong> antenna system with either all <strong>DISH</strong> Pro<br />
LNBFs <strong>and</strong> switches or all Legacy LNBFs <strong>and</strong> switches. If you mix the two, the<br />
system will not work.<br />
Note: You can have as much as 200 feet of cable between the <strong>DISH</strong> Pro LNBF<br />
<strong>and</strong> the <strong>DISH</strong> Pro receiver. However, you must use only RG-6 coaxial cables<br />
rated for 950 to 2150 MHz. Some cables may say "Swept tested for 2150 MHz."<br />
If you have any doubt about this, ask your <strong>DISH</strong> retailer, examine the cable’s<br />
outer jacket, or look on the container the cable came in. Do not use cable<br />
company TV cables or cables from other satellite TV systems not rated for 950-<br />
2150 MHz. These other cables may cause signal loss. Do not use existing cables<br />
such as RG-59. Also, be sure that any outdoor connections are made using<br />
waterproof F-connectors.<br />
Once you have installed the <strong>DISH</strong> 500 with its <strong>DISH</strong> Pro Twin LNBF using the<br />
preceding instructions, you can add a single satellite dish with a <strong>DISH</strong> Pro<br />
LNBF <strong>and</strong> switch as follows:<br />
1. Turn on the television <strong>and</strong> the receiver if they are not already on. You<br />
should see the Point Dish screen. If not, open the Main Menu <strong>and</strong> press 6-<br />
1-1 on the remote.<br />
Page 91
Chapter 4<br />
Dish Antenna Installation<br />
Azimuth:<br />
Elevation:<br />
2. Select the satellite your dish will be pointed toward.<br />
3. Select 300 under the Dish System.<br />
4. Use the number buttons on the remote to enter your ZIP code to get the<br />
necessary azimuth <strong>and</strong> elevation. Write these numbers down in the spaces<br />
provided in the margin.<br />
5. Mount the dish antenna <strong>and</strong> multi-dish switches following the mounting<br />
instructions that came with them <strong>and</strong> the <strong>DISH</strong> Pro Wiring Diagrams starting on<br />
page 94.<br />
6. Connect two RG-6 cables from both SATELLITE IN connections on the receiver<br />
to two available ports on the switch(es).<br />
7. Connect the LNBF on the dish antenna to LNBF port 1 on the switch(es) using<br />
RG-6 cable.<br />
8. Select Check Switch from the Point Dish menu. When the Check Switch<br />
screen opens, select Retest.<br />
9. When Check Switch is complete, you will see an Installation Summary screen<br />
similar to the one shown next. It will show a connection (“Conn” next to<br />
satellite) <strong>and</strong> Single device under 1 (Dish Input). It may also show an X on the<br />
Transponder line. This is okay <strong>and</strong> does not mean there is a problem with the<br />
system.<br />
10. Press CANCEL to exit back to the Point Dish menu.<br />
11. Point the dish for the strongest possible signal, following the instructions that<br />
came with it.<br />
Page 92
Installing a Multiple Dish <strong>DISH</strong> Pro System<br />
12. Connect two RG-6 cables between both ports on your <strong>DISH</strong> Pro Twin<br />
LNBF <strong>and</strong> your switch(es) using the switch instructions <strong>and</strong> the <strong>DISH</strong> Pro<br />
Wiring Diagrams that start on page 94.<br />
13. Select Check Switch from the Point Dish menu. When the Check<br />
Switch menu opens, select Retest. When the procedure completes, you<br />
will see the Installation Summary screen again. This time you should<br />
see confirmation for all satellites your dishes are pointed at, <strong>and</strong> “Satellite<br />
reception verified.” You should also see that the switch(es) in your system<br />
has been correctly identified.<br />
Refer to the <strong>DISH</strong> Pro wiring diagrams for examples of installation<br />
summary screens.<br />
14. Press CANCEL to exit this menu, <strong>and</strong> then Done to exit the Point<br />
Dish screen. If you have any other receivers in your system, make sure you<br />
run Check Switch on each of them, <strong>and</strong> allow each to take the software<br />
upgrade, as needed.<br />
Page 93
Chapter 4<br />
Dish Antenna Installation<br />
<strong>DISH</strong> Pro Wiring Diagrams<br />
<strong>DISH</strong> 500, One <strong>DISH</strong> Pro Twin LNBF<br />
This diagram leaves out grounding to be clear. Make sure<br />
you ground the system per the National Electrical Code<br />
(NEC) <strong>and</strong> all local electrical codes.<br />
Note: Each cable<br />
carries both the 119<br />
<strong>and</strong> 110 signals<br />
after you use each<br />
receiver to check<br />
the setup.<br />
To two <strong>DISH</strong> Pro<br />
Receivers or one <strong>DISH</strong><br />
Pro Plus Receiver<br />
When you set up your system following this diagram <strong>and</strong> run Check Switch the<br />
Installation Summary screen should look similar to the one shown below.<br />
Page 94
<strong>DISH</strong> Pro Wiring Diagrams<br />
<strong>DISH</strong> 500, One <strong>DISH</strong> Pro Quad LNBF<br />
This diagram leaves out grounding to be clear. Make sure<br />
you ground the system per the National Electrical Code<br />
(NEC) <strong>and</strong> all local electrical codes.<br />
Note: Each cable<br />
carries both the 119<br />
<strong>and</strong> 110 signals<br />
after you use each<br />
receiver to check<br />
the setup.<br />
To four <strong>DISH</strong> Pro<br />
Receivers or two <strong>DISH</strong><br />
Pro Plus Receivers<br />
When you set up your system following this diagram <strong>and</strong> run Check Switch<br />
the Installation Summary screen should look similar to the one shown<br />
below.<br />
Page 95
Chapter 4<br />
Dish Antenna Installation<br />
<strong>DISH</strong> 500 with a <strong>DISH</strong> Pro Twin LNBF, One <strong>DISH</strong> 300 with a <strong>DISH</strong><br />
Pro LNBF, DP34 Switch<br />
This diagram leaves out grounding to be clear. Make sure<br />
you ground the system per the National Electrical Code<br />
(NEC) <strong>and</strong> all local electrical codes.<br />
To four <strong>DISH</strong> Pro<br />
Receivers or two <strong>DISH</strong><br />
Pro Plus Receivers<br />
When you set up your system following this diagram <strong>and</strong> run Check Switch the<br />
Installation Summary screen should look similar to the one shown below.<br />
Page 96
<strong>DISH</strong> Pro Wiring Diagrams<br />
<strong>DISH</strong> 500, <strong>DISH</strong> 300, One <strong>DISH</strong> Pro Twin LNBF, One <strong>DISH</strong> Pro<br />
Dual LNBF, Two <strong>DISH</strong> Pro 21 Switches<br />
This diagram leaves out grounding to be clear. Make sure<br />
you ground the system per the National Electrical Code<br />
(NEC) <strong>and</strong> all local electrical codes.<br />
When you set up your system following this diagram <strong>and</strong> run Check Switch<br />
the Installation Summary screen should look similar to the one shown<br />
below.<br />
Page 97
Chapter 4<br />
Dish Antenna Installation<br />
Two <strong>DISH</strong> 300s, Two <strong>DISH</strong> Pro Dual LNBFs, Two <strong>DISH</strong> Pro 21<br />
Switches<br />
This diagram leaves out grounding to be clear. Make sure<br />
you ground the system per the National Electrical Code<br />
(NEC) <strong>and</strong> all local electrical codes.<br />
When you set up your system following this diagram <strong>and</strong> run Check Switch the<br />
Installation Summary screen should look similar to the one shown below.<br />
Page 98
Running Coaxial Cable<br />
Running Coaxial Cable<br />
1. Using the shortest path possible, run the coaxial cable(s) from the ground<br />
block or switch to the satellite receiver(s). Do not kink or pinch any cable.<br />
Cables should be bent only in gentle curves.<br />
Do not use a longer cable between the satellite dish <strong>and</strong> the<br />
receiver than is specified in the <strong>DISH</strong> Pro or Legacy system<br />
installation instructions. If your system requires more cable<br />
than the limit specified in these installation instructions, you<br />
should consider having the system professionally installed.<br />
2. Put a drip loop in each cable at a point before it enters the building. A drip<br />
loop allows moisture to drip from the cable before it runs into the building<br />
or any outside connection (for example, a multi-dish switch).<br />
Before drilling any holes in the wall or roof of your building,<br />
make sure that there are no wires or pipes in the area of the<br />
holes. If you are not comfortable doing this, contact a<br />
professional in your area. Make sure that you follow all safety<br />
instructions <strong>and</strong> building codes.<br />
3. Locate each receiver inside the building, against or near an outside wall.<br />
Then drill a hole through the outer wall to pass a cable inside the building. If<br />
a receiver is located in an interior room, run a cable through the outside<br />
wall, <strong>and</strong> into an attic, basement, or crawl space in order to reach the<br />
receiver.<br />
4. Seal all holes that you drill in the building with silicone or other weatherproof<br />
sealant after installation. Once each cable is inside the building, you<br />
may attach it to a wall receptacle or directly to a receiver.<br />
Tighten the back panel coaxial cable connections only by<br />
h<strong>and</strong>. Using a wrench may over-tighten the connections,<br />
causing damage. Such damage is not covered by the Limited<br />
Warranty in the User Guide that came with the system.<br />
Page 99
Chapter 4<br />
Dish Antenna Installation<br />
Notes<br />
Page 100
Chapter 5<br />
Reference<br />
Troubleshooting Tables<br />
Use these tables if you have problems using the system before calling the<br />
Customer Service Center. Many problems arise from misunderst<strong>and</strong>ings of how<br />
the system works, especially when you are just becoming familiar with it. These<br />
tables cover many problems, usually with a simple solution for each one. To<br />
solve a particular problem, do the following:<br />
1. Review the section in this Guide that relates to the problem.<br />
2. If you cannot find a solution, then find the section in the following tables<br />
that relates to the problem.<br />
• Read the What’s Happening column until you find the problem.<br />
• Read the information in the Possible Reason column.<br />
• Try each of the suggested solutions in the What to Do column.<br />
3. For more information, call the Customer Service Center at 1-800-333-<strong>DISH</strong><br />
(3474), or see www.dishnetwork.com.<br />
Note: Before calling the Customer Service Center, have ready the date of<br />
purchase <strong>and</strong> either your customer account number, the receiver conditional<br />
access number, or the receiver model number. Display the Important System<br />
Information menu to find these numbers (See Ordering Your Programming<br />
on page 4). Also, write down any error messages that the receiver displays<br />
on the television screen.<br />
Page 101
Chapter 5<br />
Reference<br />
On-Screen Messages<br />
This table describes some on-screen messages in the order of their message numbers. Find the<br />
message number in the upper right corner of the message displayed on your TV screen, <strong>and</strong> then<br />
find the matching number in this table.<br />
Message Number Possible Reason What to Do<br />
001<br />
002<br />
003, 004<br />
005<br />
006<br />
008<br />
011, 012<br />
• There may be a problem with the<br />
multi-dish switch.<br />
• Heavy rain, snow, or cloud cover<br />
may be interfering with<br />
transmission of the satellite<br />
signal, or there may be other<br />
interference.<br />
• The wrong type of coaxial cable<br />
may be used in the system, or the<br />
cable run length may be too long.<br />
Or, there may be a problem with<br />
the multi-dish switch.<br />
• The receiver may not yet have<br />
been authorized via the satellite<br />
signal. The satellite dish may<br />
have moved so that it is no longer<br />
picking up the satellite signal.<br />
The cable connections may have<br />
loosened or have moisture inside.<br />
There may be an interruption of<br />
the satellite signal.<br />
• The receiver may not be<br />
connected to an active telephone<br />
line.<br />
• The credit limit may have been<br />
suspended.<br />
• Maybe the receiver is connected<br />
to a DSL (Digital Subscriber<br />
Line) phone line.<br />
• Viewers in specific areas are<br />
prohibited from watching certain<br />
programs. For example, viewers<br />
who live close to a particular<br />
football stadium may be<br />
prohibited from watching<br />
football games that are played in<br />
that stadium.<br />
• Check the coaxial cables <strong>and</strong> their connections to <strong>and</strong> from the<br />
multi-dish switch. Make sure that all required cables are in<br />
place, <strong>and</strong> check that all cable connections are tight <strong>and</strong> dry (for<br />
outdoor cables). If this does not work, call the Customer Service<br />
Center for help.<br />
• Note the local weather conditions. Remove any snow or other<br />
debris which may have collected on the satellite dish.<br />
Make sure that the satellite dish has a clear line of sight to the<br />
satellite. Check whether branches or leaves have grown into the<br />
line of sight.<br />
• Make sure that the satellite dish is aimed at the satellite. Check<br />
the strength of the signal using the Point Dish/Signal menu.<br />
Consult your installer to re-aim the dish, if necessary, to obtain<br />
the strongest possible signal.<br />
• Make sure the system uses RG6 coaxial cable; if not, call your<br />
dealer or installer.<br />
• Check the dish-to-receiver cable run length; if it is over 200 feet,<br />
call your dealer or installer.<br />
• Check the coaxial cables <strong>and</strong> their connections to <strong>and</strong> from the<br />
multi-dish switch. Make sure that all required cables are in<br />
place, <strong>and</strong> check that all cable connections are tight <strong>and</strong> dry (for<br />
outdoor cables). If this does not work, do the Check Switch<br />
test.<br />
• If you have authorized the receiver, wait a few minutes to see if<br />
the message is removed. Make sure that all required cables are<br />
in place, <strong>and</strong> check that all cable connections are tight <strong>and</strong> dry<br />
(for outdoor cables).<br />
• Make sure that the satellite dish has a clear line of sight to the<br />
satellite. Check whether branches or leaves have grown into the<br />
line of sight.<br />
• Check that the Signal Strength bar in the Point Dish/<br />
Signal menu is green <strong>and</strong> displays the word Locked. If not,<br />
contact your installer to re-aim the satellite dish. If you have not<br />
authorized the receiver, call the Customer Service Center for<br />
help.<br />
• You must connect the receiver to an active telephone connection<br />
at all times. If you install two or more receivers, you must<br />
connect each receiver to an active telephone connection at all<br />
times.<br />
• Call the Customer Service Center for help checking the credit<br />
limit, <strong>and</strong>/or to get authorization to make a purchase.<br />
• Install a DSL filter between the receiver <strong>and</strong> the telephone wall<br />
jack. You can obtain the filter from your DSL provider.<br />
• Remember that the program providers specify which programs<br />
are “blacked out” for which viewers, not <strong>DISH</strong> <strong>Network</strong>.<br />
Page 102
Troubleshooting Tables<br />
Message Number Possible Reason What to Do<br />
013, 014<br />
015<br />
018<br />
022<br />
026<br />
028<br />
032<br />
059<br />
060<br />
061<br />
• You may have tried to tune to a<br />
program on a channel which you<br />
have not bought.<br />
• You may have just plugged in the<br />
receiver, <strong>and</strong> it is acquiring the<br />
satellite signal. Or, the receiver<br />
may have temporarily lost the<br />
signal.<br />
• The receiver may not be<br />
connected to an active telephone<br />
line.<br />
• The credit limit may have been<br />
exceeded.<br />
• The receiver may not yet have<br />
been electronically linked with<br />
the via the satellite signal. The<br />
satellite dish may have moved so<br />
that it is no longer picking up the<br />
satellite signal. The cable<br />
connections may have loosened<br />
or have moisture inside. There<br />
may be an interruption of the<br />
satellite signal.<br />
• The receiver may have<br />
temporarily lost the satellite<br />
signal.<br />
• Pay Per View events cannot be<br />
purchased until the receiver has<br />
downloaded new software.<br />
• You may have tried to set a VCR<br />
Event Timer without having set<br />
up the receiver to control the<br />
VCR.<br />
• You may have tried to close an<br />
installation menu without having<br />
done the Check Switch test.<br />
• You may have aimed the satellite<br />
dish at one satellite, but selected<br />
the option for another satellite on<br />
the Point Dish/Signal menu.<br />
• You may have set up the receiver<br />
to accept a transmission (a<br />
“download”) of the latest<br />
operating software via the<br />
satellite signal.<br />
• You must buy a channel before you can tune to a program on<br />
that channel. Call the Customer Service Center to buy the<br />
channel, or if you believe this message was displayed by<br />
mistake.<br />
• Wait a few minutes to see if the message is removed. Make sure<br />
that all required cables are in place, <strong>and</strong> check that all cable<br />
connections are tight <strong>and</strong> dry (for outdoor cables).<br />
Make sure that the satellite dish has a clear line of sight to the<br />
satellite. Check whether branches or leaves have grown into the<br />
line of sight.<br />
• Check that the Signal Strength bar in the Point Dish/<br />
Signal menu is green <strong>and</strong> displays the word Locked. If not,<br />
contact your installer to re-aim the satellite dish.<br />
• You must connect the receiver to an active telephone connection<br />
at all times. If you install two or more receivers, you must<br />
connect each receiver to an active telephone connection at all<br />
times.<br />
• Call the Customer Service Center for help checking the credit<br />
limit, <strong>and</strong>/or to get authorization to make a purchase.<br />
• If you have authorized the receiver, wait a few minutes to see if<br />
the message is removed. Make sure that all required cables are<br />
in place, <strong>and</strong> check that all cable connections are tight <strong>and</strong> dry<br />
(for outdoor cables).<br />
• Make sure that the satellite dish has a clear line of sight to the<br />
satellite. Check whether branches or leaves have grown into the<br />
line of sight.<br />
• Check that the Signal Strength bar in the Point Dish/<br />
Signal menu is green <strong>and</strong> displays the word Locked. If not,<br />
contact your installer to re-aim the satellite dish. If you have not<br />
authorized the receiver, call the Customer Service Center for<br />
help.<br />
• Wait a few minutes to see if the message is removed. Make sure<br />
that all required cables are in place, <strong>and</strong> check that all cable<br />
connections are tight <strong>and</strong> dry (for outdoor cables).<br />
Make sure that the satellite dish has a clear line of sight to the<br />
satellite. Check whether branches or leaves have grown into the<br />
line of sight.<br />
• Check that the Signal Strength bar in the Point Dish/<br />
Signal menu is green <strong>and</strong> displays the word Locked. If not,<br />
contact your installer to re-aim the satellite dish.<br />
• Turn the receiver off via the remote "Power" button <strong>and</strong> do not<br />
disturb for the next 15 minutes. To change channels, press the<br />
"Up" or "Down" arrow button on the remote or use the "Recall"<br />
button to return to the last viewed channel.<br />
• You must set up the receiver to control the VCR before you can<br />
set a VCR Event Timer. See the Using the System for<br />
instructions.<br />
• If your setup includes a multi-dish switch, you must do<br />
the Check Switch test.<br />
• Make sure that you have selected the option for the right satellite<br />
on the Point Dish/Signal menu.<br />
• Make sure that the cable(s) for the satellite you have selected are<br />
connected to the LNBF that receives signals from that satellite.<br />
• It is very important for the receiver to get the latest operating<br />
software, so let the receiver do so. The “download” may take<br />
several minutes. Do not disturb or unplug the receiver during<br />
this time.<br />
Page 103
Chapter 5<br />
Reference<br />
Message Number Possible Reason What to Do<br />
074<br />
093<br />
587, 588<br />
• The receiver gives you three<br />
chances to enter the correct<br />
password. If you fail to do so, the<br />
receiver “times out” <strong>and</strong> will not<br />
allow you to try again for several<br />
minutes.<br />
• You may have set up the receiver<br />
to reset itself back to the “factory<br />
defaults,” that is, the settings it<br />
had when it was shipped from the<br />
factory.<br />
• You may not have connected the<br />
receiver to an active telephone<br />
line. Or, the telephone line may<br />
be defective.<br />
• Maybe the receiver is connected<br />
to a DSL (Digital Subscriber<br />
Line) phone line.<br />
• Wait a few minutes <strong>and</strong> then try again to enter the password.<br />
Note: The “time out” feature is designed to prevent someone<br />
from trying password after password until he or she happens to<br />
guess the right one <strong>and</strong> so gains unauthorized access to the<br />
receiver.<br />
• If you want to reset the receiver to its factory default settings,<br />
select the Yes option. If not, select the No option.<br />
• Connect the receiver to an active telephone line.<br />
Make sure that the telephone line to which you connect the<br />
receiver is working properly.<br />
Note: To be able to order pay per view programs, you must<br />
keep the receiver connected to an active telephone line at all<br />
times. If your setup includes more than one receiver, this applies<br />
to each receiver. The receiver uses the telephone line to make<br />
toll-free calls, usually in the middle of the night, to send<br />
information to the Customer Service Center.<br />
• Install a DSL filter between the receiver <strong>and</strong> the telephone<br />
wall jack.<br />
<strong>DISH</strong> Pro Twin LNBF<br />
What’s Happening What’s Wrong What You Can Do<br />
When you run Check Switch, you do not<br />
see "Twin" identified as a Device or LNBF.<br />
All entries show "X"s.<br />
When you run Check Switch, you see<br />
"Twin" identified as the Device/LNBF <strong>and</strong><br />
Satellite shows "Conn" but you do not see<br />
"Satellite Reception Verified".<br />
When you run Check Switch, you see<br />
"Satellite Reception Verified" but you see<br />
"Feed" instead of "Twin" identified as the<br />
Device/LNBF.<br />
When you run Check Switch, you do not<br />
see "Twin" identified as a Device or LNBF,<br />
but odd transponders are detected only on<br />
one satellite.<br />
• The <strong>DISH</strong> Pro Twin LNBF may not be<br />
properly connected.<br />
• Cables may be too long, over 200 feet.<br />
• Cables may not be rated for 2150 MHz.<br />
• You may have <strong>DISH</strong> Pro Adapter<br />
installed on a <strong>DISH</strong> Pro receiver.<br />
• May have a non-<strong>DISH</strong> Pro switch or<br />
LNBF or incompatible accessory<br />
device* in the system.<br />
• The <strong>DISH</strong> Pro Twin LNBF is connected<br />
but no satellite signal is present.<br />
• The <strong>DISH</strong> Pro Twin is connected but<br />
something in the system may be<br />
blocking the switch comm<strong>and</strong>s.<br />
• You may have <strong>DISH</strong> Pro Adapter<br />
installed on a <strong>DISH</strong> Pro receiver.<br />
• May have a non-<strong>DISH</strong> Pro switch or<br />
LNBF in the system<br />
• Check all cable connections in your<br />
system <strong>and</strong> run Check Switch again.<br />
• Make sure cable length between<br />
receiver <strong>and</strong> <strong>DISH</strong> Pro Twin does not<br />
exceed 200 feet. Rerun check switch.<br />
• Make sure cable is rated for 2150 MHz.<br />
Rerun check switch.<br />
• Remove the <strong>DISH</strong> Pro Adapter; this<br />
device is only for non-<strong>DISH</strong> Pro<br />
receivers. Rerun check switch.<br />
• Remove any non-<strong>DISH</strong> Pro switches/<br />
LNBs or incompatible accessory<br />
devices* from the system. All LNBs<br />
<strong>and</strong> switches must be <strong>DISH</strong> Pro. Rerun<br />
check switch.<br />
• Check the point dish/signal screen to<br />
confirm you have satellite signal. If not,<br />
check your dish antenna to ensure the<br />
<strong>DISH</strong> Pro Twin is installed properly, the<br />
dish is pointed/peaked on the satellite<br />
signal <strong>and</strong> there is nothing blocking the<br />
signal path to the dish. Rerun check<br />
switch.<br />
• Check the cable path between the <strong>DISH</strong><br />
Pro Twin <strong>and</strong> the receiver <strong>and</strong> remove<br />
any incompatible accessory devices*.<br />
Rerun check switch.<br />
• Remove the <strong>DISH</strong> Pro Adapter; this<br />
device is only for non-<strong>DISH</strong> Pro<br />
receivers. Rerun check switch.<br />
• Remove any non-<strong>DISH</strong> Pro switches/<br />
LNBs from the system. All LNBs <strong>and</strong><br />
switches must be <strong>DISH</strong> Pro. Rerun<br />
check switch.<br />
Page 104
Troubleshooting Tables<br />
What’s Happening What’s Wrong What You Can Do<br />
When you run Check Switch, you see<br />
"Twin" identified as the Device/LNBF but<br />
you only have signal confirmed from one<br />
satellite.<br />
• The <strong>DISH</strong> Pro Twin LNBF is connected<br />
but the dish may not be pointed to<br />
receive signal from both 110 <strong>and</strong> 119<br />
satellites.<br />
• If the check switch summary screen<br />
shows "119 W" on Dish Input 2, you<br />
need to point you dish 9 degrees to the<br />
east <strong>and</strong> repeak your dish. Rerun check<br />
switch.<br />
• If the check switch summary screen<br />
shows "110 W" on Dish Input 1, you<br />
need to point you dish 9 degrees to the<br />
west <strong>and</strong> repeak your dish. Rerun check<br />
switch.<br />
• Make sure skew setting is correct for a<br />
Dish 500 installation at your zip code.<br />
Rerun check switch.<br />
When you run Check Switch, you see<br />
"Twin" identified as a Device or LNBF, but<br />
only odd transponders are detected.<br />
• Cables may not be rated for 2150 MHz. • Make sure cable is rated for 2150 MHz<br />
<strong>and</strong> all accessory devices are<br />
compatible. Rerun check switch.<br />
Getting receiver messages that signal is lost<br />
or being acquired<br />
• Check the weather conditions to see if<br />
heavy rain or snow could be temporarily<br />
block the signal.<br />
• Check for any obstructions in way of the<br />
dish like new growth on trees<br />
• Wait for weather to clear up <strong>and</strong> restore<br />
signal.<br />
• Clear obstructions from the signal path.<br />
* Compatible accessory devices must pass 2150 MHz signals, 22 KHz signals both directions (per DiSEqC 2.0<br />
specifications), <strong>and</strong> pass DC power.<br />
Using the Remote Control<br />
What Is Happening Possible Reason What to Do<br />
You cannot find the remote control. • N/A • Use the receiver front panel Control<br />
Buttons to control the receiver until<br />
you find the remote. If the remote<br />
control is permanently lost or too<br />
damaged to use, call the Service Center<br />
to order a replacement.<br />
When you press a button on the remote<br />
control, the receiver does not do what you<br />
expect.<br />
When you press the remote control Power<br />
button to turn the receiver ON, the receiver<br />
front panel Power light does not light up.<br />
• The remote control may be missing<br />
batteries, the batteries may be<br />
incorrectly placed in the remote, or the<br />
batteries may be weak or dead.<br />
• You may be using the wrong remote<br />
control (1 or 2) for the menus (TV1 or<br />
TV2) you are trying to operate.<br />
• Other lights are too bright.<br />
• Remote control not operating properly<br />
or the batteries are weak or dead.<br />
The receiver power cord not plugged<br />
into a power outlet, or there may be a<br />
problem with the power.<br />
• The remote control(s) may not be set to<br />
the address(es) used by the satellite<br />
receiver.<br />
• You may be using the wrong remote<br />
control (1 or 2) for the menus (TV1 or<br />
TV2) you are trying to operate.<br />
• If the batteries are missing or dead,<br />
insert fresh AAA-size batteries.<br />
If the remote has fresh batteries, check<br />
whether they are placed according to the<br />
label diagram. If not, remove them <strong>and</strong><br />
place correctly.<br />
• Make sure you are using Remote<br />
Control 1 (2) to control TV1 (TV2)<br />
menus.<br />
• Try other remote control buttons to see<br />
if the receiver is responding.<br />
• Replace the remote batteries with fresh<br />
ones.<br />
• Check that the receiver power cord is<br />
not damaged, <strong>and</strong> that the plug is<br />
inserted correctly into the outlet.<br />
• Make sure the remote control(s) are set<br />
to the same address(es) used by the<br />
satellite receiver. See page 32 for<br />
information on changing the remote<br />
control address.<br />
• Make sure you are using Remote<br />
Control 1 (2) to control TV1 (TV2)<br />
menus.<br />
Page 105
Chapter 5<br />
Reference<br />
What Is Happening Possible Reason What to Do<br />
You use a pyramid type IR extender (not a<br />
“mouse tail”), <strong>and</strong> it does not seem to work.<br />
Your UHF Pro remote control does not<br />
work well from far away.<br />
• The IR sensor on the extender that<br />
receives the remote control signals may<br />
not be facing the remote control.<br />
The IR cable on the extender that sends<br />
the signal to the receiver may not be<br />
right in front of the IR sensor on the<br />
receiver front panel.<br />
• You are using Remote Control 2 which<br />
does not transmit IR signals.<br />
• You may be experiencing interference<br />
or strong signals from objects near your<br />
receiver antenna.<br />
• Make sure that the extender that<br />
receives the signal from the remote<br />
control is facing the right way, so that<br />
the IR sensor can receive the remote<br />
control signals.<br />
• Make sure that the IR cable on the<br />
extender that sends the signal to the<br />
receiver is right in front of the IR sensor<br />
on the receiver front panel, so that the<br />
receiver IR sensor can receive the<br />
signals.<br />
• If doing the above does not solve the<br />
problem, contact the manufacturer of<br />
the extenders for assistance.<br />
• Use a pyramid-type IR extender only<br />
with Remote Control 1 which uses IR<br />
signals.<br />
• Make sure the UHF antenna is<br />
connected to the receiver <strong>and</strong> not<br />
touching anything else.<br />
• Vary the tilt angle of the receiver's UHF<br />
antenna. Locate the UHF antenna tip<br />
away from other electronics equipment<br />
or metal surfaces, even if separated by<br />
wooden shelving.<br />
• Move the receiver to different locations.<br />
For best results, place the receiver as<br />
high as possible, above all other<br />
equipment in your entertainment center.<br />
• Place the UHF antenna outside the<br />
entertainment center by using a coaxial<br />
cable to connect it to the receiver.<br />
• Move any nearby off-air antenna away<br />
from the UHF remote antenna. Do not<br />
place an off-air antenna on your<br />
receiver.<br />
• Use a 15dB attenuator provided in the<br />
installation kit. Connect the attenuator<br />
between the REMOTE ANTENNA<br />
connection <strong>and</strong> the antenna. It may help<br />
to use the attenuator with a coaxial cable<br />
extension, as well.<br />
Hearing A Program<br />
What Is<br />
Happening<br />
The receiver front panel<br />
TV1 <strong>and</strong> TV2 lights are on<br />
<strong>and</strong> there is a good picture<br />
on the TV set, but you do<br />
not hear any sound.<br />
You hear a foreign<br />
language with a program.<br />
Possible Reason<br />
• You may have muted the sound,<br />
or set the volume so low that you<br />
cannot hear it.<br />
• The audio connections may not<br />
be properly connected.<br />
• You may have set the receiver to<br />
an alternate audio language.<br />
What to Do<br />
• Check the volume level on the TV or audio device. Turn off the<br />
mute or turn up the volume, as required.<br />
• Check the audio connectors <strong>and</strong> cables from the receiver to the<br />
TV or the sound system.<br />
• Check the TV speakers or the sound system.<br />
• Use the Alternate Audio Language menu to select the<br />
language that you prefer.<br />
Page 106
Troubleshooting Tables<br />
Using the Menus<br />
What Is<br />
Happening<br />
Possible Reason<br />
What to Do<br />
You were using a menu,<br />
<strong>and</strong> it suddenly closed.<br />
You cannot access <strong>DISH</strong><br />
Home or Customer<br />
Support.<br />
• The receiver has a time-out<br />
feature that closes any menu after<br />
several minutes of no activity.<br />
This will discard any changes<br />
you have made, but otherwise<br />
does no harm to the receiver.<br />
• Someone is using <strong>DISH</strong> Home or<br />
Customer Support on the other<br />
TV (nearby or remote). You can<br />
only access <strong>DISH</strong> Home <strong>and</strong><br />
Customer Support on one TV<br />
(nearby or remote) at a time.<br />
• You do not have the receiver<br />
connected to an active phone<br />
line.<br />
• Start over again.<br />
• Exit from <strong>DISH</strong> Home or Customer Support on the other TV<br />
(nearby or remote).<br />
• Make sure the receiver is connected to an active phone line.<br />
Using Locks<br />
What Is<br />
Happening<br />
You set a lock (for<br />
example, a lock on<br />
programs by ratings), but<br />
the lock does not take<br />
effect.<br />
You forgot the password,<br />
so that you are unable to<br />
unlock the receiver.<br />
Possible Reason<br />
• You may not have locked the<br />
receiver.<br />
• You may not have written down<br />
the password, to keep it in a safe<br />
place.<br />
What to Do<br />
• You must lock the receiver to apply any lock that you have set.<br />
• Call the Customer Service Center. You must provide account<br />
information to the Customer Service Representative. If you<br />
have set up a PIN, you will need to provide that, as well.<br />
Page 107
Chapter 5<br />
Reference<br />
Watching A Program<br />
What Is<br />
Happening<br />
Possible Reason<br />
What to Do<br />
The receiver front panel<br />
TV1 <strong>and</strong> TV2 lights are<br />
on, but the TV image:<br />
is black (no picture),<br />
is frozen,<br />
has break-ups,<br />
has “snow,” or<br />
shows small squares of<br />
various colors.<br />
The receiver front panel<br />
Power light is on, <strong>and</strong><br />
there is a picture on the<br />
TV screen, but the picture:<br />
has sparkles or is grainy,<br />
has a herringbone pattern,<br />
lacks color or vertical<br />
hold, or wobbles, or<br />
looks “washed out” or<br />
fuzzy.<br />
A “black box” fills almost<br />
all of the TV screen.<br />
The TV screen is<br />
displaying a <strong>DISH</strong><br />
<strong>Network</strong> logo.<br />
• The TV set may not be working<br />
properly.<br />
• If the TV <strong>and</strong> the receiver are<br />
working properly, there may be<br />
interference with the satellite<br />
signal. The TV may be wired to<br />
the wrong input.<br />
• The TV may not be on the correct<br />
channel.<br />
• The TV may not be set to display<br />
from the correct input.<br />
• The TV set may not be working<br />
properly.<br />
If the receiver is connected to the<br />
TV using only the RF or VHF<br />
connections, there may be a<br />
strong local broadcast on the<br />
same channel, or a channel<br />
adjacent to the one to which the<br />
TV is tuned.<br />
There may be interference from<br />
other nearby electrical devices<br />
(such as cellular telephones,<br />
computers, microwave ovens,<br />
radios, stereos, or TVs).<br />
• You may have turned on the<br />
Closed Captioned feature on the<br />
TV, <strong>and</strong> put that feature into Text<br />
mode.<br />
• Your TV1 or TV2 outputs are not<br />
on.<br />
• Make sure that the TV set is plugged into an electrical outlet.<br />
Make sure the outlet has electrical power.<br />
• Make sure that the TV is turned on.<br />
• If the receiver is connected to the TV using only the CH 3-4<br />
connections, make sure that the TV is tuned to channel 3 or 4<br />
(whichever works best in your area) <strong>and</strong> that the receiver is set<br />
to the same channel as the TV using the Modulator Setup<br />
screen.<br />
• If the TV is receiving the signal through the in-home cabling<br />
system from the CH 21-69 output on the receiver, make sure the<br />
TV is tuned to the same channel as indicated in the receiver<br />
Modulator Setup screen.<br />
• Make sure that the TV brightness <strong>and</strong> contrast are adjusted<br />
correctly.<br />
• Make sure that the TV is connected properly to the receiver.<br />
Make sure that the TV’s text mode <strong>and</strong> closed captioned<br />
features are turned off.<br />
• If the TV is connected to the receiver using the RCA-type or S-<br />
Video connections, make sure the TV is set up to display from<br />
the connected outputs.<br />
• Check that the system has been installed correctly. Make sure<br />
that all required coaxial cables are in place, <strong>and</strong> check that all<br />
cable connectors are tight <strong>and</strong> dry (for outdoor cables).<br />
Make sure that the satellite dish has a clear line of sight to the<br />
satellite. Check whether branches or leaves have grown into the<br />
line of sight.<br />
• Make sure that the satellite dish is aimed at the satellite. Check<br />
the strength of the signal using the Point Dish <strong>and</strong> Signal<br />
Strength menu. Consult your installer to re-aim the dish, if<br />
necessary, to obtain the maximum possible signal strength.<br />
Note the local weather conditions. Heavy rain, snow, or cloud<br />
cover may be interfering with transmission of the satellite<br />
signal. Remove any snow or other debris which may have<br />
collected on the satellite dish.<br />
• Make sure that the TV brightness <strong>and</strong> contrast are adjusted<br />
correctly, <strong>and</strong> that the TV is working properly.<br />
Make sure that the TV is connected properly to the receiver.<br />
Check other nearby electrical devices as possible sources of<br />
interference. Check that all required coaxial cables are in place.<br />
Check for moisture or water leaking into all connections. Dry<br />
them out if needed, then seal them with coaxial cable sealant.<br />
Check the dish-to-receiver cable run length; if it is over 100 feet,<br />
call your dealer or installer.<br />
• Using the TV remote control <strong>and</strong>/or menus displayed by the TV<br />
(not the receiver remote control or the menus displayed by the<br />
receiver), turn off the closed captioned feature.<br />
• Press the SELECT or blank POWER button on the remote<br />
control.<br />
The TV screen is all blue. • You may have connected the<br />
receiver to an input on the TV<br />
that is incorrect for the signal<br />
output from the receiver.<br />
• Check your TV owner’s manual for the correct TV input to use<br />
for the signal output from the receiver.<br />
Page 108
Troubleshooting Tables<br />
Using the Program Guide or the Browse Banner<br />
What Is<br />
Happening<br />
In the Program Guide,<br />
some channels have a red<br />
background.<br />
You try to display future<br />
programs in the Program<br />
Guide or Browse<br />
Banner, but find you<br />
cannot.<br />
You try to display<br />
programs that have ended<br />
in the Program Guide or<br />
Browse Banner, but<br />
find you cannot.<br />
When you are using the<br />
Program Guide or<br />
Browse Banner, some<br />
channels are missing.<br />
Possible Reason<br />
• Red means that you have not<br />
bought the program. You must<br />
buy a channel before you can<br />
tune the receiver to it.<br />
• The Program Guide <strong>and</strong><br />
Browse Banner can display<br />
programs scheduled for an<br />
extended, but not unlimited time<br />
beyond the present.<br />
• The Program Guide <strong>and</strong><br />
Browse Banner can display<br />
only programs that have not yet<br />
ended. These features cannot<br />
display a time earlier than the<br />
present.<br />
• You may have applied a Favorite<br />
List other than the list named All<br />
Chan.<br />
• You may have set up the locks to<br />
hide certain programming.<br />
• If your setup includes a multidish<br />
switch, you may need to do<br />
the Check Switch procedure.<br />
What to Do<br />
• If you want to buy a channel, call the Customer Service Center<br />
at 1-800-333-<strong>DISH</strong> (3474).<br />
• Try displaying the Program Guide again later. By that time,<br />
it may show programs for the time <strong>and</strong> date you want.<br />
• Turn the receiver off for about ten minutes. This will allow the<br />
Program Guide to be updated.<br />
• Contact the program providers for details on past programs.<br />
• You can change the applied Favorite List while using the<br />
Program Guide, by pressing the remote control Guide button<br />
repeatedly. You can choose another custom Favorite List, the<br />
All Chan list, which includes all of the channels, or the All<br />
Sub list, which includes all subscribed channels.<br />
• Unlock the receiver for the Program Guide to display hidden<br />
channels.<br />
• Do the Check Switch procedure (see the installation<br />
instructions<br />
for details).<br />
Changing Channels<br />
What Is<br />
Happening<br />
Possible Reason<br />
What to Do<br />
You enter a desired<br />
channel number. The<br />
channel changes, but the<br />
new channel is not exactly<br />
the channel you entered.<br />
You are scanning up or<br />
down through the<br />
channels, <strong>and</strong> the receiver<br />
is skipping channels that<br />
you know you have<br />
bought.<br />
• You may have made a mistake<br />
entering the channel number, or<br />
the channel number you entered<br />
may be invalid. If so, the channel<br />
displayed is the closest possible<br />
to the channel you entered. If you<br />
entered the number for a channel<br />
that you have not bought, the<br />
receiver will change to the<br />
channel <strong>and</strong> allow you to buy the<br />
channel or display a message.<br />
• If a Favorite List other than All<br />
Chan is applied, the receiver<br />
will skip channels that are not on<br />
the applied list.<br />
• If you have set up the locks to<br />
hide adult channels <strong>and</strong> the<br />
receiver is locked, the receiver<br />
will skip such channels.<br />
• Carefully retry entering the channel number you want. Press the<br />
remote control RECALL button to return to the previous<br />
channel number.<br />
• Select All Chan as the active Favorite List by pressing the<br />
GUIDE button repeatedly. Unlock the receiver so that it does<br />
not skip adult channels.<br />
• If you want to buy a channel, call the Customer Service Center.<br />
Page 109
Chapter 5<br />
Reference<br />
Using Favorites Lists<br />
What Is<br />
Happening<br />
Possible Reason<br />
What to Do<br />
You press the remote<br />
Guide button while the<br />
Program Guide is<br />
displayed. You find that<br />
you can apply only the All<br />
Chan list or the All Sub<br />
list.<br />
You try to change the<br />
All Chan list or the All<br />
Sub list. The receiver<br />
displays an ERROR<br />
message.<br />
You try to apply an empty<br />
Favorite List. The receiver<br />
displays an ERROR<br />
message.<br />
A Favorite List does not<br />
show channels that you<br />
know you have added to it.<br />
• If you have not added channels to<br />
any custom Favorite List, you<br />
will be able to apply only the All<br />
Chan list or the All Sub list.<br />
• The receiver will not allow you<br />
to change the All Chan list or the<br />
All Sub list.<br />
• The receiver will not allow you<br />
to apply an empty list.<br />
• If you have set up the locks to<br />
hide adult channels <strong>and</strong> the<br />
receiver is locked, the Favorite<br />
List will not show such channels.<br />
• You must add channels to a custom Favorite List before you can<br />
apply it.<br />
• Choose another list to change.<br />
Note: You can only change the All Sub list by changing what<br />
channels<br />
you buy.<br />
• Choose another list to apply, or add at least one channel to the<br />
empty list.<br />
• Unlock the receiver for the list to show adult channels.<br />
Buying a Pay Per View Program<br />
What Is<br />
Happening<br />
Someone orders a pay per<br />
view program without<br />
your permission.<br />
You find that you are not<br />
able to order a pay per<br />
view program.<br />
You find that you are not<br />
able to cancel a pay per<br />
view program.<br />
Your setup includes more<br />
than one receiver. You<br />
order a pay per view<br />
program, but it does not<br />
appear via all of the<br />
receivers.<br />
Possible Reason<br />
• You may have been away from<br />
the receiver, <strong>and</strong> someone else<br />
used it.<br />
• The receiver may not be<br />
connected to an active telephone<br />
line.<br />
• The credit limit may have been<br />
exceeded.<br />
• You ordered a pay per view<br />
program, <strong>and</strong> then decided not to<br />
watch it.<br />
• You ordered a pay per view<br />
program, <strong>and</strong> want it to be<br />
available via all the receivers in<br />
your setup.<br />
What to Do<br />
• Lock the purchase of pay per view programs. Remember that<br />
you are responsible for all pay per view purchases, whether or<br />
not you authorize such purchases. If you lock pay per view<br />
purchases, then anyone who wants to order a pay per view<br />
program must enter the password.<br />
• You must connect the receiver to an active telephone connection<br />
at all times. If you install two or more receivers, you must<br />
connect each receiver to an active telephone connection at all<br />
times.<br />
• Review your pay per view purchases to check the credit limit.<br />
• You cannot cancel an order for a pay per view program, whether<br />
it was just ordered or ordered earlier.<br />
• If you want to watch a pay per view program on TVs connected<br />
to up to six receivers, you must order the program for each<br />
receiver but you only pay for the program once.<br />
Page 110
Troubleshooting Tables<br />
Using the Telephone for Voice/Data/FAX<br />
What Is Happening Possible Reason What to Do<br />
While you are making a<br />
telephone call, you hear<br />
“clicks.”<br />
The receiver cannot connect<br />
to <strong>DISH</strong> <strong>Network</strong>.<br />
You pick up the telephone to<br />
make a call, but you do not<br />
hear a dial tone.<br />
Your computer or facsimile<br />
(FAX) machine tries to send<br />
a FAX or modem<br />
transmission, but fails.<br />
Your computer or FAX<br />
machine was receiving a<br />
FAX or modem<br />
transmission, but an error<br />
occurred.<br />
• The receiver may have tried to call<br />
the Customer Service Center to<br />
send pay per view purchase<br />
information. When the receiver<br />
found that the telephone was busy,<br />
it automatically disconnected.<br />
• Maybe the receiver is connected to<br />
a DSL (Digital Subscriber Line)<br />
phone line.<br />
• The receiver was calling the<br />
Customer Service Center to send<br />
pay per view information. When<br />
the receiver found that the<br />
telephone was busy, it<br />
automatically disconnected.<br />
• The receiver was calling the<br />
Customer Service Center to send<br />
pay per view information. When<br />
the receiver found that the<br />
telephone was busy, it<br />
automatically disconnected. The<br />
FAX or modem found that there<br />
was no dial tone, <strong>and</strong> cancelled the<br />
transmission.<br />
• The receiver may have tried to call<br />
the Customer Service Center to<br />
send pay per view purchase<br />
information during the FAX or<br />
mode call. When the receiver<br />
found that the telephone was busy,<br />
it automatically disconnected. This<br />
generated “clicks” that caused an<br />
error in the FAX or modem<br />
transmission.<br />
• You do not have to do anything. You can always use your<br />
telephone line, because the receiver automatically hangs up if it<br />
finds the line is busy.<br />
• Install a DSL filter between the receiver <strong>and</strong> the telephone wall<br />
jack.<br />
• Hang up, <strong>and</strong> then pick up the telephone again to get a dial tone.<br />
• Resend the FAX or modem transmission.<br />
• Have the sender resend the FAX or modem transmission.<br />
Using Event Timers<br />
What Is Happening Possible Reason What to Do<br />
You try to set up an event<br />
timer <strong>and</strong> the receiver<br />
displays a message noting<br />
that the program is locked.<br />
You try to set up an event<br />
timer <strong>and</strong> the receiver<br />
displays a message noting<br />
that the program is a pay per<br />
view event.<br />
You try to set up an event<br />
timer, but the receiver<br />
displays an Error message<br />
giving you the option to<br />
delete an event timer that<br />
was set up earlier.<br />
You set up an event timer,<br />
but the receiver does not<br />
tune to the channel of the<br />
program, or does not record<br />
the program.<br />
You set up an event timer<br />
for a program that is<br />
repeated (such as a regularly<br />
scheduled program), but the<br />
timer does not operate for a<br />
showing of the program.<br />
• You must enter the password<br />
before you can create an event<br />
timer for a locked program.<br />
• You must order a pay per view<br />
event before you can create an<br />
event timer for it.<br />
• You already have set up the<br />
maximum number of event timers.<br />
• You may have set up a Reminder<br />
Event Timer but what you should<br />
have set up is an Auto-Tune Event<br />
Timer, or a VCR Event Timer.<br />
• You may have set up a timer with<br />
an incorrect frequency.<br />
• To be able to set up an event timer for the program, first enter the<br />
password.<br />
• To be able to set up an event timer for the event, first order it.<br />
• To be able to set up a new event timer, delete one of the event<br />
timers you set up earlier.<br />
• Remember that a Reminder Event Timer just reminds you that the<br />
program is about to start. An Auto-Tune Event Timer reminds you<br />
<strong>and</strong> tunes the receiver to the channel of the program. A VCR Event<br />
Timer reminds you, tunes the receiver, <strong>and</strong> starts the VCR.<br />
• Remember that a Once event timer operates just one time. A<br />
Mon.-Fri. event timer operates Monday through Friday on the<br />
same channel at the same time. A Daily event timer does the same,<br />
Monday through Sunday. A Weekly event timer operates once a<br />
week on the same channel at the same time.<br />
Page 111
Chapter 5<br />
Reference<br />
What Is Happening Possible Reason What to Do<br />
You set up an event timer,<br />
but the timer does not<br />
operate at all.<br />
You set up a Once event<br />
timer, but the timer operates<br />
at a time different from what<br />
you expect.<br />
You stop the operation of an<br />
event timer for one showing<br />
of a program that is repeated<br />
(such as a regularly<br />
scheduled program), but the<br />
timer operates for the next<br />
showing.<br />
You are testing a VCR code<br />
to see if the receiver controls<br />
a VCR. The VCR does not<br />
do the test.<br />
• The program time may have<br />
changed so that the event timer<br />
overlapped another event timer.<br />
The program time may have<br />
changed by more than twenty-four<br />
hours.<br />
• If the receiver is ON <strong>and</strong> finds an event timer overlap, it will<br />
display the Event Timer Scheduling Conflict menu. You<br />
must edit or delete one of the overlapping event timers.<br />
No event timer will operate if the program time changes by more<br />
than twenty-four hours.<br />
• The program time changed. • A Once event timer always operates at the actual time of the<br />
program.<br />
• Stopping the event timer applies<br />
only to the current showing of the<br />
program.<br />
• The VCR may not be turned ON,<br />
there may not be a tape inserted,<br />
the tape may not be rewound, or the<br />
write-protect tab on the tape may<br />
have been removed.<br />
The code you are testing may not<br />
be valid for the VCR.<br />
• To stop all operations of a repeated event timer, you must delete<br />
the event timer.<br />
Note: The receiver deletes a Once event timer when it operates.<br />
• Make sure the VCR is turned ON, with a blank tape inserted on<br />
which you want to record, that the tape is rewound, <strong>and</strong> that the<br />
write-protect tab on the tape is intact.<br />
Try another VCR code from the VCR Codes table.<br />
Page 112
Device Codes<br />
These tables contain the manufacturer codes for programming the remote to control your TV, a VCR,<br />
DVD player, or audio amplifier. Every attempt has been made to include all codes. If your device br<strong>and</strong><br />
is not listed or if the codes do not work, the remote may not control your device. In some cases, codes<br />
may operate some but not all buttons shown in this guide.<br />
TV Codes<br />
Programming in AUX mode:<br />
Press 0 before entering the TV<br />
code.<br />
TV<br />
Codes<br />
A Mark 670<br />
Action 662<br />
Admiral 514, 521, 605, 668,<br />
669, 675<br />
Aiko 727<br />
Aiwa 751<br />
Akai 570, 573, 659, 660,<br />
A-Mark 620<br />
Amtron 657<br />
Anam National 509, 541, 620, 651,<br />
657, 661, 663, 698<br />
AOC 505, 506, 519, 520,<br />
573, 620, 627, 652,<br />
653, 654, 659, 664,<br />
665, 670, 672<br />
Apex 743, 744, 745<br />
Archer 620<br />
Audiovox 620, 657, 662, 672<br />
Bell & Howell 590, 669, 675<br />
Broksonic 752, 659, 661, 748<br />
Capehart 519, 627<br />
Citizen 506, 516, 523, 524,<br />
525, 526, 590, 652,<br />
654, 657, 658, 680, 727<br />
Classic 659<br />
Colortyme 573, 627, 652, 654,<br />
660, 667, 668, 671,<br />
674, 679, 681<br />
Contec/Cony 541, 655, 657, 661,<br />
662, 726<br />
Craig 536, 541, 657, 661,<br />
662, 666, 667, 694<br />
Crown 526, 536, 657, 666, 670<br />
Curtis Mathes 506, 516, 526, 573,<br />
590, 641, 645, 650,<br />
652, 654, 658, 659,<br />
660, 664, 665, 667,<br />
668, 670, 674, 680,<br />
703, 708<br />
TV<br />
Codes<br />
Daewoo 505, 524, 526, 529,<br />
530, 531, 573, 652,<br />
653, 654, 658, 659,<br />
663, 664, 665, 670,<br />
672, 674, 684, 698,<br />
719, 727<br />
Daytron 526, 627, 652, 654,<br />
658, 665, 670, 672<br />
Dimensia 645, 650<br />
<strong>DISH</strong> <strong>Network</strong> 742<br />
Dixi 566, 620<br />
Dumont 501, 627, 652<br />
Echostar 722<br />
Electrohome 526, 573, 651, 652,<br />
654, 656, 659, 660,<br />
665, 670, 709, 728<br />
Emerson 526, 534, 535, 536,<br />
537, 538, 539, 541,<br />
573, 590, 627, 636,<br />
642, 648, 652, 654,<br />
655, 657, 658, 659,<br />
660, 661, 662, 665,<br />
666, 667, 669, 670,<br />
677, 679, 682, 692,<br />
696, 699, 720<br />
Envision 506, 573, 652, 654,<br />
660, 664<br />
Fisher 542, 590, 683<br />
Fujitsu 534, 682, 694<br />
Funai 534, 541, 657, 661,<br />
662, 677, 682, 694<br />
GE 508, 509, 543, 544,<br />
630, 645, 646, 650,<br />
651, 652, 654, 659,<br />
661, 663, 665, 667,<br />
668, 670, 673, 676,<br />
681, 690, 691, 698,<br />
701, 715, 716, 725,<br />
728, 742<br />
Goldstar 505, 523, 526, 545,<br />
546, 566, 573, 652,<br />
653, 654, 655, 656,<br />
658, 659, 660, 664,<br />
665, 670, 671, 678,<br />
693, 730, 747<br />
Gradiente 660, 671<br />
Granada 627, 670, 671<br />
Grundig 670, 673<br />
Hallmark 627, 652, 654, 659<br />
Harmon/Kardon 561, 659<br />
Hinari 534<br />
TV<br />
Codes<br />
Hitachi 523, 526, 548, 549,<br />
553, 554, 555, 585,<br />
597, 626, 636, 638,<br />
643, 648, 652, 654,<br />
655, 665, 668, 669,<br />
670, 672, 673, 702,<br />
718, 726<br />
Infinity 566, 671<br />
JBL 566, 671<br />
JC Penney 505, 506, 516, 525,<br />
526, 543, 546, 631,<br />
645, 646, 650, 652,<br />
653, 654, 658, 659,<br />
664, 667, 668, 670,<br />
673, 676, 678, 680,<br />
690, 691, 701, 725,<br />
726, 728, 730<br />
Jensen 556, 573, 652, 654, 660<br />
JVC 508, 557, 559, 642,<br />
649, 655, 667, 673,<br />
676, 726, 735, 736, 737<br />
Kawasho 548, 561, 573, 652,<br />
654, 664<br />
Kenwood 506, 573, 652, 654,<br />
656, 659, 660, 664,<br />
679, 681<br />
Kloss Novabeam 657, 663, 698, 723, 724<br />
Konka 753<br />
KTV 526, 539, 541, 573,<br />
657, 658, 661, 662,<br />
664, 665, 670, 696<br />
Lloyds 627, 679<br />
Loewe 566<br />
Logik 675<br />
Luxman 523, 652, 654<br />
LXI 563, 566, 590, 595,<br />
667, 631, 635, 645,<br />
646, 650, 654, 659,<br />
668, 678, 683, 691,<br />
701, 725<br />
Magnasonic 573, 659, 660, 669,<br />
672, 677<br />
Magnavox 506, 520, 525, 536,<br />
566, 567, 568, 573,<br />
610, 652, 654, 656,<br />
659, 660, 664, 665,<br />
666, 669, 671, 673,<br />
674, 677, 723, 724, 729<br />
Majestic 675<br />
Marantz 506, 566, 573, 652,<br />
654, 660, 664, 665,<br />
671, 678, 681<br />
Megatron 627, 654<br />
Page 113
Chapter 5<br />
Reference<br />
TV<br />
Codes<br />
TV<br />
Codes<br />
TV<br />
Codes<br />
Memorex 590, 627, 653, 654,<br />
659, 675, 678, 720<br />
MGA 504, 505, 506, 542,<br />
571, 573, 627, 652,<br />
653, 654, 656, 660, 728<br />
Mitsubishi 504, 505, 542, 570,<br />
571, 572, 573, 597,<br />
623, 627, 652, 653,<br />
654, 656, 659, 660,<br />
664, 665, 670, 671,<br />
705, 728<br />
Montgomery Ward 675<br />
Motorola 521, 605, 651<br />
MTC 505, 506, 516, 523,<br />
573, 627, 652, 653,<br />
654, 659, 664, 667,<br />
672, 680<br />
Multitech 657<br />
NAD 502, 617, 627, 631,<br />
635, 637, 654<br />
National 509<br />
NEC 505, 506, 507, 517,<br />
523, 573, 627, 651,<br />
652, 653, 654, 660,<br />
664, 665, 679, 681,<br />
731, 732<br />
Nikkai 612<br />
Nikko 654, 672, 727<br />
Onwa 541, 657, 661<br />
Optimus 637<br />
Optonica 521, 605, 607<br />
Orion 694<br />
Osaki 612<br />
Panasonic 508, 509, 510, 512,<br />
566, 644, 651, 662,<br />
663, 668, 672, 673,<br />
676, 685, 689, 698,<br />
700, 716, 234, 247<br />
Philco 505, 506, 525, 536,<br />
568, 573, 610, 651,<br />
652, 653, 654, 655,<br />
656, 659, 660, 664,<br />
665, 666, 669, 671,<br />
672, 674, 677, 723,<br />
724, 729<br />
Philips 525, 566, 651, 652,<br />
655, 656, 671, 690,<br />
723, 724, 729<br />
Pioneer 502, 548, 576, 636,<br />
637, 648, 652, 654,<br />
663, 665, 681, 708<br />
Portl<strong>and</strong> 505, 526, 573, 652,<br />
654, 658, 659, 664,<br />
665, 670, 727<br />
Price Club 680<br />
Prism 676<br />
Proscan 645, 646, 650, 668,<br />
691, 725, 742<br />
Proton 513, 519, 526, 536,<br />
585, 627, 652, 654,<br />
655, 659, 660, 665,<br />
666, 668, 670, 678<br />
Quasar 508, 509, 651, 663,<br />
673, 676, 698, 700, 747<br />
Radio Shack/Realistic 526, 541, 590, 607,<br />
612, 645, 650, 652,<br />
654, 655, 657, 658,<br />
661, 662, 663, 668,<br />
670, 683, 698, 730<br />
RCA 503, 505, 548, 586,<br />
630, 633, 634, 636,<br />
641, 645, 646, 648,<br />
650, 651, 652, 653,<br />
654, 656, 661, 663,<br />
665, 667, 668, 670,<br />
681, 691, 698, 701,<br />
708, 715, 716, 725,<br />
742, 749<br />
Realistic 590, 645<br />
Runco 501<br />
Sampo 506, 519, 652, 654,<br />
658, 663, 664, 665,<br />
698, 730, 746<br />
Samsung 505, 506, 516, 523,<br />
526, 566, 573, 612,<br />
627, 647, 652, 653,<br />
654, 655, 656, 658,<br />
659, 664, 665, 667,<br />
669, 670, 679, 680,<br />
704, 717, 730, 738<br />
Sansui 754<br />
Sanyo 542, 590, 652, 683<br />
SBR 566<br />
Schneider 566<br />
Scott 526, 534, 537, 541,<br />
600, 652, 654, 655,<br />
657, 661, 662, 665,<br />
670, 677, 682, 696, 701<br />
Sears 523, 534, 542, 563,<br />
590, 595, 601, 604,<br />
617, 627, 631, 635,<br />
645, 646, 650, 652,<br />
654, 656, 659, 661,<br />
668, 670, 682, 683,<br />
688, 691, 703, 725, 726<br />
Sharp 521, 526, 585, 605,<br />
607, 628, 629, 652,<br />
654, 655, 658, 669,<br />
670, 674, 679, 739,<br />
740, 741<br />
Signature 675<br />
Solavox 612<br />
Sony 500, 578, 640, 670, 690<br />
Soundesign 525, 536, 541, 627,<br />
652, 654, 657, 659,<br />
661, 665, 666, 682<br />
Starlite 657<br />
Supra 523<br />
Sylvania 506, 525, 536, 566,<br />
568, 569, 573, 600,<br />
610, 652, 654, 656,<br />
659, 660, 664, 665,<br />
666, 671, 672, 674,<br />
677, 723, 724, 729, 733<br />
Symphonic 632, 657, 662, 677,<br />
692, 694<br />
T<strong>and</strong>y 521, 605<br />
Tatung 509, 651, 663, 698<br />
Technics 508, 673, 676<br />
Techwood 523, 573, 652, 654,<br />
660, 676<br />
Teknika 504, 505, 512, 516,<br />
523, 524, 525, 526,<br />
534, 536, 541, 573,<br />
644, 652, 653, 654,<br />
655, 657, 658, 661,<br />
662, 664, 665, 666,<br />
670, 672, 675, 680,<br />
681, 682, 685, 726, 727<br />
Telefunken 679<br />
Toshiba 516, 590, 617, 631,<br />
635, 667, 678, 680,<br />
683, 688, 750<br />
Totevision 526, 658, 668<br />
Ultra 672<br />
Universal 543, 690<br />
Vector, Research 506<br />
Video Concepts 570, 661<br />
Wards 536, 573, 607, 645,<br />
650, 652, 653, 654,<br />
656, 659, 664, 665,<br />
666, 667, 668, 669,<br />
674, 675, 677, 678,<br />
682, 690, 715, 723,<br />
724, 729<br />
White, Westinghouse 659, 664, 670, 672, 674<br />
Yamaha 505, 506, 573, 652,<br />
653, 654, 656, 664,<br />
666, 672, 679<br />
VCR Codes<br />
Programming in AUX mode:<br />
Press 1 before entering the<br />
VCR code.<br />
VCR<br />
CODES<br />
Aiwa 588, 622, 623<br />
Akai 513, 514, 515, 516,<br />
517, 518, 520, 568, 682<br />
Alba 546<br />
Amstrad 588<br />
ASA 556<br />
Audiovox 676<br />
Bell & Howell 581<br />
Broksonic 559, 748<br />
Bush 589<br />
Calix 676<br />
Canon 554, 678, 679<br />
Capehart 546<br />
CCE 681<br />
Page 114
Device Codes<br />
VCR<br />
CODES<br />
VCR<br />
CODES<br />
VCR<br />
CODES<br />
Citizen 534, 591, 592, 594,<br />
675, 676, 677, 684<br />
Colortyme 592,<br />
Craig 591, 658, 675, 676,<br />
681, 685, 687, 688<br />
Curtis Mathes 554, 592, 594, 605,<br />
607, 675, 677, 678,<br />
679, 683, 684<br />
Daewoo 506, 534, 546, 547,<br />
559, 588, 684<br />
Daytron 546<br />
Denon 686<br />
Dimensia 607<br />
Dumont 549<br />
Electrohome 512, 676, 687<br />
Emerson 505, 506, 508, 509,<br />
511, 512, 534, 559,<br />
568, 588, 590, 618,<br />
676, 678, 684, 687<br />
Finl<strong>and</strong>ia 549<br />
Finlux 549, 556, 588<br />
Fisher 548, 549, 581, 584,<br />
588, 608, 610, 684, 688<br />
Fuji 678<br />
Funai 588<br />
Garrard 588<br />
GE 550, 551, 552, 554,<br />
572, 591, 605, 607,<br />
675, 678, 679<br />
Go Video 557, 558, 620, 685<br />
Goldstar 592, 594, 676, 687, 747<br />
Goodmans 585, 589<br />
Gradiente 588, 687<br />
Granada 549, 581<br />
Grundig 556<br />
Harmon/Kardon 568, 592<br />
Harwood 681<br />
Hinari 589<br />
Hitachi 536, 538, 539, 540,<br />
588, 595, 597, 680,<br />
682, 686<br />
ITT 518<br />
JC Penney 554, 581, 591, 592,<br />
594, 595, 600, 674,<br />
675, 676, 678, 679,<br />
680, 681, 685, 686, 687<br />
Jensen 595, 680, 682<br />
JVC 561, 562, 563, 581,<br />
592, 594, 600, 674,<br />
682, 686<br />
Kenwood 562, 581, 592, 594,<br />
600, 674, 677, 682, 683<br />
KLH 681<br />
Kodak 676, 678<br />
Lloyds 683, 688<br />
Logik 589, 681, 685<br />
Luxor 518<br />
LXI 676<br />
Magnasonic 685, 687<br />
Magnavox 527, 533, 554, 556,<br />
678, 679, 684, 685<br />
Marantz 554, 556, 581, 585,<br />
592, 594, 600, 602,<br />
674, 677, 678, 683<br />
Matsushita 678<br />
Memorex 507, 533, 549, 554,<br />
566, 581, 585, 588,<br />
608, 675, 676, 678,<br />
686, 687, 688<br />
MGA 512, 567, 568<br />
Minolta 595, 680, 686<br />
Mitsubishi 512, 562, 567, 568,<br />
570, 571, 595, 680, 687<br />
Motorola 678<br />
MTC 544, 588, 675, 685<br />
Multitech 579, 588, 675, 677, 681<br />
NAD 573<br />
NEC 562, 581, 592, 594,<br />
600, 602, 674, 677,<br />
682, 683<br />
Nikko 676<br />
Noblex 675<br />
Olympus 678<br />
Optimus 676, 687<br />
Optonica 585<br />
Orion 506, 684, 687<br />
Panasonic 523, 554, 598, 614,<br />
628, 633, 678, 679,<br />
684, 685, 688, 747<br />
Pentax 592, 595, 677, 680,<br />
683, 686<br />
Pentex Research 594<br />
Perdio 588<br />
Philco 554, 678, 679, 686<br />
Philips 554, 556, 585, 678, 684<br />
Pioneer 562, 573, 574, 575,<br />
576, 600, 674, 680,<br />
Portl<strong>and</strong> 546, 677<br />
Proscan 605, 607,<br />
Proton 685<br />
Quasar 554, 678, 679, 747,<br />
Radio Shack 512, 607, 608, 610, 687<br />
Radio Shack/Realistic 581, 584, 588, 608,<br />
675, 676, 678, 679<br />
Radix 676<br />
RCA 518, 525, 527, 528,<br />
591, 595, 605, 607,<br />
615, 631, 649, 675,<br />
678, 680, 686<br />
Realistic 534, 549, 554, 581,<br />
584, 585, 588, 608,<br />
675, 678, 679, 687, 688<br />
Ricoh 502<br />
Runco 533<br />
Saisho 506<br />
Salora 567, 581<br />
Samsung 515, 517, 534, 579,<br />
591, 675<br />
Sansui 544, 562, 600, 674,<br />
682, 685<br />
Sanyo 549, 581, 582, 583,<br />
608, 675, 688<br />
SBR 556<br />
Schneider 589<br />
Scott 508, 534, 559, 590,<br />
684, 687<br />
Sears 548, 549, 581, 584,<br />
595, 608, 610, 676,<br />
678, 680, 683, 684,<br />
686, 687, 688<br />
Sentra 546<br />
Sharp 512, 585, 607, 625<br />
Shintom 589, 595, 681, 685<br />
Singer 678, 681, 685<br />
Sony 500, 501, 502, 504<br />
STS 678<br />
Sylvania 554, 556, 567, 588,<br />
678, 679<br />
Symphonic 588, 594, 683, 688<br />
T<strong>and</strong>y 581, 588<br />
Tashiko 588, 676<br />
Tatung 594, 682,<br />
Teac 588, 594, 682<br />
Technics 554, 633, 678,<br />
Teknika 554, 588, 676, 678, 687<br />
Toshiba 534, 535, 567, 584,<br />
590, 680, 684, 688<br />
Totevision 591, 675, 676, 687<br />
Unitech 675,<br />
Vector Research 534, 592, 600, 674,<br />
677, 683<br />
Video Concepts 534, 568, 592, 600,<br />
674, 677, 683,<br />
Wards 534, 588, 595, 608,<br />
675, 676, 678, 680,<br />
681, 684, 687, 688<br />
XR-1000 588, 678, 681<br />
Yamaha 581, 592, 594, 600,<br />
674, 682, 683<br />
Zenith 500, 501, 533, 747<br />
Page 115
Chapter 5<br />
Reference<br />
TV/VCR Combo<br />
Programming for<br />
combination devices: Program<br />
the remote control in TV mode<br />
<strong>and</strong> then in VCR mode.<br />
DVD Players<br />
Mintek 710<br />
Mitsubishi 629<br />
NAD 701<br />
Codes<br />
Tuner/Amplifier<br />
Carver 653<br />
Citizen 709<br />
Curtis Mathes 734<br />
Codes<br />
TV/VCR<br />
Broksonic 748<br />
Goldstar 747<br />
Panasonic 747<br />
Quasar 747<br />
Zenith 747<br />
DVD Player Codes<br />
Codes<br />
Programming in AUX mode:<br />
Press 1 before entering the<br />
DVD code.<br />
DVD Players<br />
Codes<br />
Aiwa 634, 694, 751<br />
Alpine 653<br />
Apex 654, 655, 743, 744<br />
Broksonic 656, 752<br />
Clarion, 696<br />
Classic 695<br />
Daewoo 657<br />
Denon 697, 698, 699, 700<br />
Emerson 658, 701<br />
Fisher 659<br />
Funai 658<br />
GE 702, 703<br />
Go Video 692, 693<br />
GPX 704<br />
Hitachi 632, 635, 660, 705,<br />
706, 707<br />
JVC 636, 689, 708, 711<br />
Konka 637, 638, 753<br />
Koss 745<br />
Magnavox 626, 661<br />
Memorex 709<br />
Norcent 762<br />
Onkyo 713<br />
Oritron 723<br />
Panasonic 639, 662, 663, 714,<br />
715, 716, 717, 734<br />
Philips 640, 641<br />
Pioneer 665, 718, 719<br />
Proscan 720<br />
Qwestar 721, 723<br />
RCA 627, 650, 666, 690,<br />
742, 749<br />
Sampo 724<br />
Samsung 651, 652, 667, 668,<br />
691, 740, 741<br />
Sansui 725, 754<br />
Sanyo 643, 726<br />
Sharp 669, 727, 746<br />
Sherwood 728<br />
Sony 617, 644, 645, 670,<br />
671, 729, 730, 731<br />
Sylvania 658<br />
Teac 732<br />
Technics 733<br />
Techwood 664<br />
Toshiba 616, 646, 647, 672,<br />
735, 736, 750,<br />
Yamaha 737, 738, 739<br />
Zenith 648, 673<br />
Tuner/Amplifier Codes<br />
Programming in AUX mode:<br />
Press 2 before entering the<br />
tuner/amplifier code.<br />
Tuner/Amplifier<br />
Codes<br />
Aiwa 636, 641, 656, 687,<br />
718, 720, 724, 775,<br />
726<br />
Denon 647, 674<br />
Fisher 653, 741<br />
GE 711<br />
Goldstar 677, 690<br />
Harmon/Kardon 640, 672, 751<br />
Hitachi 717, 754<br />
JBL 640<br />
JVC 637, 683, 703, 725<br />
Kenwood 649, 676, 691, 726,<br />
728, 745<br />
Luxman 752<br />
Magnavox 654, 705, 740<br />
Marantz 651, 740, 742, 743<br />
NAD 739<br />
Nakamichi 671, 748, 750<br />
NEC 716, 739<br />
Onkyo 642, 660, 662, 678<br />
Optimus 648, 664, 734, 744,<br />
749<br />
Panasonic 643, 644, 652, 742,<br />
746<br />
Pioneer 658, 667, 668, 679,<br />
702, 734<br />
Proton 654, 705<br />
Quasar 652, 742, 746<br />
Radio Shack 744<br />
RCA 635, 638, 704, 727<br />
Sansui 753<br />
Sanyo 741<br />
Sharp 712, 713, 714, 715,<br />
749<br />
Sherwood 646, 670, 736, 738,<br />
744<br />
Sony 639, 645, 650, 687,<br />
728, 729, 730<br />
Teac 684, 737<br />
Page 116
Chapter 5<br />
Reference<br />
Tuner/Amplifier<br />
Codes<br />
Technics 643, 644, 652, 742,<br />
746<br />
Toshiba 710<br />
Yamaha 663, 730, 731, 732,<br />
733, 745, 747<br />
DVD/VCR Combo<br />
DVD/VCR<br />
Codes<br />
Go Video 692,693<br />
JVC 689<br />
RCA 690<br />
Samsung 667,691<br />
TV/DVD Combo Codes<br />
Programming for<br />
combination devices: Program<br />
the remote control in TV mode<br />
<strong>and</strong> then in VCR (or AUX -<br />
press 1 before entering the DVD<br />
code) mode.<br />
TV/DVD<br />
Codes<br />
Aiwa 751<br />
Broksonic 752<br />
Konka 753<br />
Panasonic 734<br />
RCA 749<br />
Sansui 754<br />
Toshiba 750<br />
Page 117
Chapter 5<br />
Reference<br />
Notes<br />
Page 118
Appendix<br />
Limited Warranty<br />
This Limited Warranty is a legal document. Keep it in a safe place. Remember to<br />
retain your Bill of Sale for warranty service! Any items returned without a copy of<br />
the Proof of Purchase will be considered out of warranty.<br />
What the Warranty Covers<br />
This warranty extends only to the original user of the equipment <strong>and</strong> is limited to the<br />
purchase price of each part. EchoStar Technologies Corporation <strong>and</strong> its affiliated companies<br />
("EchoStar") warrant this system against defects in materials or workmanship as follows:<br />
• Labor: For a period of one (1) year from the original date of purchase, if EchoStar<br />
determines that the equipment is defective subject to the limitations of this warranty, it<br />
will be replaced at no charge for labor. EchoStar warrants any such work done against<br />
defects in materials or workmanship for the remaining portion of the original warranty<br />
period.<br />
• Parts: For a period of one (1) year from the original date of purchase, EchoStar will<br />
supply, at no charge, new or re-manufactured parts in exchange for parts determined to<br />
be defective subject to the limitations of this warranty. EchoStar warrants any such<br />
replacement parts against defects in materials or workmanship for the remaining part of<br />
the original warranty period.<br />
Note: "Parts" means items included in this package, which may include the satellite<br />
dish assembly, receiver, LNBF, remote control, or dish mounting hardware. It does not<br />
include other parts purchased separately.<br />
What the Warranty Does Not Cover<br />
• This warranty does not cover installation of the system. If applicable, such installation<br />
will be warranted under a separate installation agreement.<br />
• This warranty does not cover consumer instruction, physical setup or adjustment of any<br />
consumer electronic devices, remote control batteries, signal reception problems, loss<br />
of use of the system, or unused programming charges due to system malfunction.<br />
• This warranty does not cover cosmetic damage, damage due to lightning, electrical or<br />
telephone line surges, battery leakage, fire, flood, or other acts of Nature, accident,<br />
misuse, abuse, repair or alteration by other than authorized factory service, use of<br />
accessories not recommended by the receiver manufacturer, negligence, commercial or<br />
institutional use, or improper or neglected maintenance.<br />
• This warranty does not cover equipment sold AS IS or WITH ALL FAULTS, shipping<br />
<strong>and</strong> h<strong>and</strong>ling, removal or reinstallation, shipping damage if the equipment was not<br />
packed <strong>and</strong> shipped in the manner prescribed, nor equipment purchased, serviced, or<br />
operated outside the continental United States of America.<br />
Page 119
Appendix<br />
Legal Limitations<br />
REPLACEMENT AS PROVIDED UNDER THIS WARRANTY IS YOUR EXCLUSIVE REMEDY.<br />
ECHOSTAR SHALL NOT BE HELD LIABLE FOR ANY INCIDENTAL OR CONSEQUENTIAL<br />
DAMAGES FOR BREACH OF ANY EXPRESSED OR IMPLIED WARRANTY ON THIS SYSTEM,<br />
NOR FOR ANY INCIDENTAL OR CONSEQUENTIAL DAMAGES RESULTING FROM THE USE<br />
OF, OR INABILITY TO USE, THIS SYSTEM. UNDER NO CIRCUMSTANCES SHALL<br />
ECHOSTAR'S LIABILITY, IF ANY, EXCEED THE PURCHASE PRICE PAID FOR THIS SYSTEM.<br />
EXCEPT TO THE EXTENT PROHIBITED BY APPLICABLE LAW, ANY IMPLIED WARRANTY<br />
OF MERCHANTABILITY OR FITNESS FOR A PARTICULAR PURPOSE ON THIS SYSTEM IS<br />
LIMITED IN DURATION TO THE PERIOD OF THIS WARRANTY. ECHOSTAR RESERVES THE<br />
RIGHT TO REFUSE TO HONOR THIS WARRANTY IF ECHOSTAR DETERMINES ANY OF THE<br />
ABOVE EXCEPTIONS TO HAVE CAUSED THIS SYSTEM NOT TO HAVE PERFORMED<br />
PROPERLY. THIS WARRANTY SHALL BE VOID IF ANY FACTORY-APPLIED<br />
IDENTIFICATION MARK, INCLUDING BUT NOT LIMITED TO SERIAL OR CONDITIONAL<br />
ACCESS NUMBERS, HAS BEEN ALTERED OR REMOVED. THIS WARRANTY SHALL ALSO BE<br />
VOID IF THE RECEIVER HAS BEEN OPENED BY AN UNAUTHORIZED PERSON.<br />
If You Need Assistance<br />
1. Call the Customer Service Center at 1-800-333-<strong>DISH</strong> (3474). Have the date of purchase <strong>and</strong><br />
either your customer account number, the receiver conditional access number, or the<br />
receiver model number ready. Display the Important System Information menu to find these<br />
numbers.<br />
2. A Customer Service Representative will assist you.<br />
3. If the Representative determines you should return any equipment, you will be directed to<br />
call a Return Authorization representative. Before shipping any equipment, you must talk to<br />
a Return Authorization representative <strong>and</strong> must obtain a Return Authorization (RA) number.<br />
4. You will be given the appropriate address for which to return your equipment. Whether<br />
under warranty or not, you will be responsible for the cost of shipping back the defective<br />
equipment. For faster service, see the Advance Exchange Program below.<br />
5. Returned equipment must be packaged properly, using either the original shipping materials<br />
or the packaging in which the replacement equipment is shipped. Include a copy of the Bill<br />
of Sale. Any items returned without a copy of the Proof of Purchase will be considered out<br />
of warranty. Follow the instructions given to you by the Customer Service Representative.<br />
6. Write the RA number in large, clearly visible characters on the outside of the shipping box<br />
that you use to return the equipment. To avoid confusion <strong>and</strong> misunderst<strong>and</strong>ings, shipments<br />
without an RA number clearly visible on the outside of the box will be returned to you at<br />
your expense.<br />
Advance Exchange Program<br />
The Advance Exchange Program allows you to have replacement equipment shipped<br />
immediately to you (depending upon where you live, it could take three to five business days).<br />
Along with replacement equipment, you will receive a prepaid shipping label <strong>and</strong> instructions on<br />
how to return the defective equipment.<br />
The shipping charge, for receiving replacement equipment <strong>and</strong> returning the defective<br />
equipment, is a one-time fee based on EchoStar's competitive bulk shipping rates (additional<br />
charges may apply outside of the continental US). This fee will be charged to your billing<br />
account or your valid credit card.<br />
If you do not ship the defective equipment to EchoStar within ten days after receiving the<br />
replacement, your billing account or credit card will be charged the market price of the<br />
replacement. If you return the defective equipment after ten days, you will receive a full refund<br />
less an administrative fee.<br />
If your equipment is out of warranty <strong>and</strong> can be repaired your billing account or credit card will<br />
be charged the st<strong>and</strong>ard repair fee for the replacement. If damage to the defective equipment is<br />
found, which EchoStar in its sole discretion determines has voided the warranty, or makes the<br />
equipment unrepairable, billing account or credit card will be charged the market price of the<br />
replacement.<br />
Page 120
Residential Customer Agreement<br />
Post Receipt Exchange Program<br />
You may choose to ship the equipment to us at your cost. To provide faster service, upon receipt<br />
of your equipment you will be shipped a replacement. Your original equipment will not be<br />
available for return.<br />
The equipment you return will be checked to verify whether it is covered under this warranty. If<br />
the defective equipment is covered under this warranty, it will be replaced <strong>and</strong> shipped back to<br />
you at no additional cost (additional charges may apply outside of the continental US).<br />
If your equipment is out of warranty <strong>and</strong> can be repaired your billing account or credit card will<br />
be charged the st<strong>and</strong>ard repair fee for the replacement. If damage to the defective equipment is<br />
found, which EchoStar in its sole discretion determines has voided the warranty, or makes the<br />
equipment unrepairable, your billing account or credit card will be charged the market price of<br />
the replacement.<br />
Accessory Warranty<br />
An accessory is any <strong>DISH</strong> <strong>Network</strong> br<strong>and</strong>ed equipment, displaying the <strong>DISH</strong> <strong>Network</strong> logo,<br />
excluding the receiver, cables <strong>and</strong> hookups, <strong>and</strong> non-mechanical components. A one-year<br />
warranty becomes effective upon the activation of the <strong>DISH</strong> system or date of purchase, if bought<br />
separately. A proof of purchase is required to verify the purchase date. If an accessory has an<br />
expired warranty, no exchange will be issued. You may purchase replacement accessories from<br />
<strong>DISH</strong> <strong>Network</strong> or your local retailer.<br />
Residential Customer Agreement<br />
THIS RESIDENTIAL CUSTOMER AGREEMENT IS EFFECTIVE UNTIL REPLACED. THIS<br />
DOCUMENT DESCRIBES THE TERMS AND CONDITIONS UNDER WHICH <strong>DISH</strong><br />
NETWORK WILL PROVIDE ITS SERVICE TO YOU. IF YOU DO NOT ACCEPT THESE<br />
TERMS AND CONDITIONS, PLEASE NOTIFY US IMMEDIATELY AND WE WILL<br />
CANCEL YOUR SERVICE. IF YOU ARE A NEW <strong>DISH</strong> NETWORK CUSTOMER, YOUR<br />
ACTIVATION OF A <strong>DISH</strong> NETWORK ACCOUNT AND RECEIPT OF <strong>DISH</strong> NETWORK<br />
SERVICES SHALL CONSTITUTE YOUR ACCEPTANCE OF THIS AGREEMENT AND ITS<br />
TERMS AND CONDITIONS WILL BE LEGALLY BINDING UPON YOU.<br />
IF YOU ARE AN EXISTING <strong>DISH</strong> NETWORK CUSTOMER, YOUR CONTINUED RECEIPT<br />
OF <strong>DISH</strong> NETWORK SERVICES FOLLOWING RECEIPT OR PUBLICATION BY <strong>DISH</strong><br />
NETWORK ON ITS WEB SITE OF THIS AGREEMENT SHALL CONSTITUTE YOUR<br />
ACCEPTANCE OF ITS TERMS AND CONDITIONS, AND, ACCORDINGLY, THEY WILL<br />
BE LEGALLY BINDING ON YOU.<br />
Thank you for choosing <strong>DISH</strong> <strong>Network</strong> for your television service provider.<br />
<strong>DISH</strong> <strong>Network</strong> is happy to answer any questions you may have <strong>and</strong> to provide you with technical<br />
<strong>and</strong> other customer support through the following toll-free number <strong>and</strong> email address<br />
or you may write to:<br />
1-800-333-<strong>DISH</strong> (3474)<br />
feedback@echostar.com<br />
<strong>DISH</strong> <strong>Network</strong><br />
Customer Service Center<br />
P.O. Box 33577<br />
Northglenn, CO 80233<br />
<strong>and</strong>, for general knowledge, try our website at www.dishnetwork.com.<br />
"<strong>DISH</strong> <strong>Network</strong>" is a trademark of EchoStar Satellite L.L.C.<br />
Page 121
Appendix<br />
1. THE <strong>DISH</strong> NETWORK SERVICE<br />
A. Services Defined. <strong>DISH</strong> <strong>Network</strong> offers a wide variety of video <strong>and</strong> audio programming<br />
<strong>and</strong> other services <strong>and</strong> we are constantly striving to add new services to our lineup. For purposes<br />
of this Agreement the term "Services" shall mean the programming available on <strong>DISH</strong> <strong>Network</strong><br />
(whether subscription based or pay per view based) <strong>and</strong> any other services that we may provide to<br />
consumers either now or in the future. For purposes of this Agreement the terms "You" or "Your"<br />
refer to you, the <strong>DISH</strong> <strong>Network</strong> subscriber.<br />
B. Programming Changes. Except as otherwise set forth in this Agreement, you may change<br />
your programming selection at any time by notifying us. A fee may apply to such changes<br />
(Change of Service Fee). In addition, you may be charged a fee (Service Access Fee) if you fail to<br />
subscribe to one of <strong>DISH</strong> <strong>Network</strong>'s basic programming packages which include America's Top<br />
60, America's Top 120, America's Top 180, <strong>DISH</strong> Latino or <strong>DISH</strong> Latino Max.<br />
C. Programming Availability. Certain Services transmitted by us, including but not limited to<br />
some subscription Services, sporting events <strong>and</strong> broadcast network Services, may be blacked out<br />
in your area of reception. If you circumvent or attempt to circumvent any of these blackouts, you<br />
may be subject to legal action. You must be at least 18 years of age, or the applicable age of<br />
majority where you reside, in order to receive adult-oriented programming services.<br />
D. Ordering Pay Per View. You may order <strong>DISH</strong> <strong>Network</strong> pay-per-view Services by using<br />
your on-screen Program Guide <strong>and</strong> remote control unit to select the movies <strong>and</strong> other events we<br />
offer. To order <strong>DISH</strong> <strong>Network</strong> pay-per-view Services, your <strong>DISH</strong> <strong>Network</strong> DBS digital receiver<br />
must be connected to a telephone outlet. You may also order <strong>DISH</strong> <strong>Network</strong> special events <strong>and</strong><br />
pay-per-view Services over the telephone by calling the Customer Service Center or by using our<br />
automated system through the following toll-free number:<br />
1-877-<strong>DISH</strong>-PPV (347-4778) for ordering movies<br />
A fee will apply for use of the automated system (Pay-Per-View Automated Fee) or the<br />
Customer Service Center (Pay-Per-View Fee).<br />
E. Private Viewing. <strong>DISH</strong> <strong>Network</strong> provides Services to you for your private home viewing,<br />
use <strong>and</strong> enjoyment. You agree that the Services provided will not be viewed outside of your<br />
private residence. You are permitted to exhibit the Services solely in your private residence <strong>and</strong><br />
not in any other areas. The Services may not be rebroadcast, transmitted, recorded or performed,<br />
nor may admission be charged for listening to or viewing any Services provided by us. If we later<br />
determine that you utilized your <strong>DISH</strong> <strong>Network</strong> Equipment (including any additional <strong>DISH</strong><br />
<strong>Network</strong> receivers) or sold, leased or otherwise gave possession of the same to a third party who<br />
you knew or reasonably should have known intended to use it to permit the viewing of the<br />
Services in a commercial establishment or any other area open to the public, we may terminate the<br />
Services <strong>and</strong> in addition to all other applicable fees, you agree to pay us the difference between<br />
the price actually paid for the Services <strong>and</strong> the full commercial rate for such Services, regardless<br />
of whether we have or had the commercial rights to distribute such Services in a commercial<br />
establishment. The payment of that amount <strong>and</strong>/or the termination of Services shall not prejudice<br />
our ability to exercise any other rights <strong>and</strong> remedies we may have under this Agreement, at law, in<br />
equity, or otherwise.<br />
F. Additional Receivers. <strong>DISH</strong> <strong>Network</strong> will allow you to place up to five additional<br />
receivers on your account. Each additional receiver would be authorized to receive the same<br />
Services as your initial receiver. Unless your receiver is rented from <strong>DISH</strong> <strong>Network</strong> in which case<br />
a monthly rental fee will apply, <strong>DISH</strong> <strong>Network</strong> will charge you a monthly Additional Outlet<br />
Programming Access Fee for each additional receiver added to your account. This option is only<br />
available if your initial <strong>DISH</strong> <strong>Network</strong> receiver <strong>and</strong> all additional receiver(s) are located at the<br />
same residence <strong>and</strong> are continuously connected to the same telephone line. If you desire to receive<br />
Services at two different locations, you must open a separate account for each location. You agree<br />
that you will not directly or indirectly use a single account for the purpose of authorizing Services<br />
for multiple <strong>DISH</strong> <strong>Network</strong> receivers that are not all located in the same residence <strong>and</strong> connected<br />
to the same phone line. If we later determine that you did, we may terminate your Services <strong>and</strong>, in<br />
addition to all other applicable fees, you agree to pay us the difference between the amounts<br />
actually received by us <strong>and</strong> the full retail price for the Services authorized for each <strong>DISH</strong> <strong>Network</strong><br />
Page 122
Residential Customer Agreement<br />
DBS receiver on the account, whether owned by you or not. The payment of that amount <strong>and</strong>/or<br />
the termination of Services shall be in addition to any other rights <strong>and</strong> remedies we may have<br />
under this Agreement, at law, in equity, or otherwise.<br />
G. Changes in Services offered. <strong>DISH</strong> <strong>Network</strong> reserves the right to change the Services that<br />
we offer, <strong>and</strong> our prices or fees related to such Services at any time. If the change affects you, we<br />
will provide you notice of the change <strong>and</strong> its effective date. The notice may be provided on your<br />
billing statement or by other communication permitted under Section 9B. In the event of a change<br />
in the contents of any programming, programming packages or other Services, you underst<strong>and</strong><br />
<strong>and</strong> agree that we have no obligation to replace or supplement the programming, programming<br />
packages or other Services previously offered that have been deleted, rearranged or otherwise<br />
changed. You further underst<strong>and</strong> <strong>and</strong> agree you will not be entitled to any refund because of a<br />
change in the contents of any programming, programming packages, or other Services previously<br />
offered.<br />
H. Multi-Month Subscriptions. For multi-month subscriptions, you may downgrade the<br />
Services only at the time of renewal. You may not downgrade the Services during the term of the<br />
multi-month subscription.<br />
I. Fees for Receivers that Independently Support Multiple Televisions. Additional fees may<br />
apply for a receiver which supports independent viewing of programming on multiple televisions.<br />
2. BILLING POLICIES AND PAYMENTS FOR SERVICES<br />
A. You agree to pay all amounts billed for Services <strong>and</strong> to pay all taxes, fees <strong>and</strong> other<br />
charges, if any, which are now or may in the future be assessed on the Services you receive from<br />
us. Unless you prepay for a multi-month subscription to Services, we will bill you each month, in<br />
advance, for Services ordered by you or anyone who uses your <strong>DISH</strong> <strong>Network</strong> Equipment,<br />
whether with or without your permission, until you cancel the Services. The bills you receive will<br />
show the total amount due, the payment due date, payments, credits, purchases <strong>and</strong> other charges<br />
to your account.<br />
B. You agree to pay us in full monthly by the payment due date for the Services <strong>and</strong> for any<br />
other charges due us, including any fees set forth in this Section 2. Payment of your bill after the<br />
due date will result in you paying us a Late Payment Fee. Other fees <strong>and</strong> charges may also be<br />
assessed. If partial payments are made, they will be applied first to the oldest outst<strong>and</strong>ing bill. If<br />
you send checks or money orders marked "payment in full," we can accept them without losing<br />
any of our rights to collect any other amounts owed by you, notwithst<strong>and</strong>ing your characterization<br />
of the payment. <strong>DISH</strong> <strong>Network</strong> does not extend credit to our customers, <strong>and</strong> the Late Payment Fee<br />
is not interest, a credit service charge or a finance charge. You underst<strong>and</strong> <strong>and</strong> agree that in the<br />
case of late payment or nonpayment for any Services ordered by you or for any of the charges<br />
stated below, we may report such late payment or nonpayment to credit reporting agencies. If you<br />
do not pay your bill by the due date, we have the right to disconnect your Services at any time<br />
thereafter, in our sole discretion. <strong>DISH</strong> <strong>Network</strong> may require you to pay all past due charges, a<br />
Reconnect Fee, a deposit equal to a minimum of one month's advance charges <strong>and</strong> all outst<strong>and</strong>ing<br />
balances accrued through the date of deactivation, before we reconnect your Services. Deposits<br />
will not be held segregated from other funds <strong>and</strong> shall not earn or accrue interest.<br />
C. If you at any time fail, neglect, or refuse to make timely payments hereunder, or if a<br />
petition in bankruptcy shall be filed on your behalf or against you, or if you take advantage of any<br />
insolvency law or become insolvent or make an assignment for the benefit of creditors, or if a<br />
receiver, liquidator, or trustee is appointed for your property or affairs, we shall be wholly relieved<br />
from our obligations hereunder.<br />
D. If you paid for an annual or other multi-month subscription to any Services <strong>and</strong> your<br />
account is past due for any amounts owed to us, at our option we may suspend any or all Service<br />
until payment is received, <strong>and</strong>/or convert your annual or other multi-month subscription to a<br />
monthly subscription. If we convert your multi-month subscription to a monthly subscription, we<br />
will first apply the amount you paid for your multi-month subscription to any past due amounts<br />
<strong>and</strong> then any remaining amounts to future obligations. If we elect to offset the amount paid for the<br />
remaining portion of a multi-month subscription against amounts past due, you agree to pay, in<br />
Page 123
Appendix<br />
addition to all other applicable fees, the Offset Fee set forth below for each month <strong>and</strong> partial<br />
month that the multi-month subscription was previously received.<br />
E. If we use a collection agency or attorney to collect money you owe us or to assert any<br />
other right which we may have against you, you agree to pay the reasonable costs of collection or<br />
other action. These costs might include, but are not limited to, the costs of a collection agency,<br />
reasonable attorney's fees <strong>and</strong> court costs. If there are billing errors or other requests for credit,<br />
you can contact our Customer Service Center by telephone or in writing. You must contact us<br />
within sixty (60) days of the time you receive the billing statement for which you are seeking<br />
corrections. Failure to timely notify us of a dispute shall constitute acceptance of the bill.<br />
Undisputed portions of the billing statement must be paid before the next billing statement is<br />
issued to avoid an administrative fee for late payment. All payments for Services must be made<br />
directly by you to us. <strong>DISH</strong> <strong>Network</strong> shall have no obligation to provide Services for which<br />
payment is made by you to a third party.<br />
F. In addition to the amounts due for Services, you agree to pay the fees referenced below<br />
("Fees") when applicable. <strong>DISH</strong> <strong>Network</strong> reserves the right to increase these Fees or add<br />
additional Fees in the future, in our sole discretion:<br />
Smart Card Replacement Fee $50.00<br />
Additional Outlet Programming Access Fee<br />
(monthly, per receiver) $4.99<br />
Late Payment Fee $5.00<br />
Change of Service Fee $5.00<br />
Duplicate Billing Statement Fee $2.00<br />
Overnight Delivery Fee $18.00<br />
Restart Fee $25.00<br />
Returned Payment Fee $25.00<br />
Service Access Fee (monthly) $5.00<br />
Offset Fee $2.00<br />
Ledger Request Fee $5.00<br />
Pay-Per-View Automated Fee $1.00<br />
Pay-Per-View Fee $5.00<br />
3. CANCELLATION OF SERVICE<br />
A. Your Service will continue until cancelled as provided for herein. Your subscription will<br />
be automatically renewed unless you contact us to cancel as provided for in the next paragraph.<br />
B. You have the right to cancel your Service for any reason at any time by notifying us via<br />
telephone or in writing at the phone number or address set forth on page 1, above. Please be aware<br />
that certain promotional offers have a minimum subscription commitment (usually 12 months)<br />
<strong>and</strong> if you cancel your service prior to the expiration of that commitment, certain early<br />
termination fees may apply.<br />
C. <strong>DISH</strong> <strong>Network</strong> has the right to terminate your Services at any time without providing<br />
notice to you if: (i) you fail to pay your bill when it is due; (ii) we receive confirmation that you<br />
have received the Services, or any part of the Services without paying for them; or (iii) you<br />
otherwise violate the terms of this Agreement.<br />
D. If your Service is cancelled for any reason, you are still responsible for payment of all<br />
outst<strong>and</strong>ing balances accrued, including any applicable Fees.<br />
E. You underst<strong>and</strong> that charges for Services, once charged to your account, are<br />
nonrefundable. For monthly subscriptions, the cancellation will be effective at the end of the<br />
period covered by the last monthly bill. No refunds or credits will be provided in connection with<br />
the cancellation of monthly subscriptions. For annual or other multi-month subscriptions, the<br />
cancellation will be effective as of the date the multi-month subscription expires. Because you are<br />
receiving a discounted price in exchange for your agreement to pay for your services on an annual<br />
or other multi-month basis, in the event you cancel the Services prior to expiration of your multi-<br />
Page 124
Residential Customer Agreement<br />
month subscription, you underst<strong>and</strong> <strong>and</strong> agree that you are not entitled to any refund or credit for<br />
the unused portions of the multi-month subscription <strong>and</strong> that we have the right to retain any<br />
prepaid monies as liquidated damages.<br />
4. EQUIPMENT<br />
A. In order to receive the Services it will be necessary for you to purchase or lease certain<br />
reception equipment consisting primarily of a <strong>DISH</strong> <strong>Network</strong> compatible satellite receiver, <strong>and</strong><br />
remote control ("Equipment"). You may also be provided with a conditional access card ("Smart<br />
Card") that is inserted into your satellite receiver. The Smart Card remains the property of<br />
EchoStar Satellite L.L.C. Any tampering or other unauthorized modification to the Smart Card is<br />
strictly prohibited <strong>and</strong> may result in, <strong>and</strong> subject you to, legal action. You agree to return the<br />
Smart Card to us upon request.<br />
B. Smart Cards are nontransferable. Your Smart Card will only work in the <strong>DISH</strong> <strong>Network</strong><br />
receiver to which it was assigned by <strong>DISH</strong> <strong>Network</strong>. If you report to the Customer Service Center<br />
that your Smart Card was lost, damaged, defective or stolen we will replace it, as long as there is<br />
no evidence of unauthorized tampering or modification. A replacement fee will apply. In addition,<br />
in order to minimize downtime for your Equipment, <strong>DISH</strong> <strong>Network</strong> will, upon your request,<br />
deliver a replacement Smart Card to you via overnight delivery. Our Overnight Delivery Fee will<br />
apply.<br />
C. <strong>DISH</strong> <strong>Network</strong> reserves the right to alter software in your <strong>DISH</strong> <strong>Network</strong> receiver, <strong>and</strong><br />
provide content to DVR products, through periodic downloads. <strong>DISH</strong> <strong>Network</strong> will use<br />
commercially reasonable efforts to schedule these downloads to minimize interference with or<br />
interruption to your Service.<br />
D. Your <strong>DISH</strong> <strong>Network</strong> receiver contains certain components <strong>and</strong> software which are<br />
proprietary to <strong>DISH</strong> <strong>Network</strong>. You agree that you will not try to reverse-engineer, decompile or<br />
disassemble any software or hardware contained within your receiver or our Smart Card. Such<br />
actions are strictly prohibited <strong>and</strong> may result in the termination of your Services <strong>and</strong>/or legal<br />
action.<br />
E. For proper operation of your Equipment, <strong>DISH</strong> <strong>Network</strong> requires that you connect each<br />
<strong>DISH</strong> <strong>Network</strong> receiver on your account to a telephone line. For accounts containing multiple<br />
receivers, each receiver must be connected to the same telephone line. Failure to comply with this<br />
requirement may result in interruption of service.<br />
F. If your <strong>DISH</strong> <strong>Network</strong> Equipment is stolen or otherwise removed from your premises<br />
without your authorization, you must notify our Customer Service Center immediately, but in any<br />
event not more than three (3) business days after such removal to avoid liability for payment for<br />
unauthorized use of the <strong>DISH</strong> <strong>Network</strong> Equipment. You will not be liable for unauthorized use<br />
after we have received your timely notification.<br />
5. LEASED EQUIPMENT<br />
A. If you decide to lease your Equipment from <strong>DISH</strong> <strong>Network</strong>, the terms <strong>and</strong> conditions of<br />
the lease agreement shall apply, in addition to the terms <strong>and</strong> conditions of this Agreement. Such<br />
Equipment shall at all times remain the sole <strong>and</strong> exclusive property of <strong>DISH</strong> <strong>Network</strong> <strong>and</strong> we will<br />
have the right, at our discretion, to replace it with new or reconditioned equipment <strong>and</strong> to remove,<br />
or require the return of, the equipment upon termination of Services. None of the equipment shall<br />
be deemed fixtures or part of your realty. Our ownership of the equipment may be displayed by<br />
notice contained on the equipment. You shall have no right to pledge, sell, mortgage, give away or<br />
remove, relocate, alter or tamper with the equipment (or any notice of our ownership thereon) at<br />
any time. Any reinstallation, return of or change in location of the equipment shall be performed<br />
by us at the service rates in effect at the time of service. You shall not attach any electrical or other<br />
devices to or otherwise alter the equipment without our prior written consent. <strong>DISH</strong> <strong>Network</strong><br />
shall have the right to make such filings as are necessary to evidence our ownership rights in the<br />
equipment, <strong>and</strong> you agree to execute any <strong>and</strong> all documents as are necessary for us to make such<br />
filings. Upon termination of Services, you must notify our Customer Service Center to schedule<br />
the return the Equipment.<br />
Page 125
Appendix<br />
B. You shall notify us promptly of any defect in, damage to, or accident involving the<br />
equipment. All maintenance <strong>and</strong> repair of the equipment shall be performed by us or our<br />
designees. <strong>DISH</strong> <strong>Network</strong> may charge you for any repairs that are necessitated by any damage to,<br />
or misuse of, the Equipment.<br />
6. TRANSFER OF ACCOUNT, SERVICES OR EQUIPMENT<br />
<strong>DISH</strong> <strong>Network</strong> may sell, assign or transfer your account to a third party without notice to<br />
you. You may not assign or transfer your Services without our written consent which will not be<br />
unreasonably withheld. We may, however, refuse to allow you to assign or transfer your Services<br />
if you lease your Equipment or if your account has an outst<strong>and</strong>ing balance.<br />
7. LIMITATION OF OUR LIABILITY<br />
A. WE WILL NOT BE LIABLE FOR ANY INTERRUPTIONS IN SERVICE OR LIABLE<br />
FOR ANY DELAY OR FAILURE TO PERFORM, IF SUCH DELAY OR<br />
NONPERFORMANCE ARISES IN CONNECTION WITH THE TERMINATION OF ALL OR<br />
A PORTION OF THE SERVICES, THE RELOCATION OF ALL OR A PORTION OF THE<br />
SERVICES TO DIFFERENT SATELLITE(S), A CHANGE IN THE FEATURES AVAILABLE<br />
WITH YOUR <strong>DISH</strong> NETWORK DBS EQUIPMENT OR ANY ACTS OF GOD, FIRES,<br />
EARTHQUAKES, FLOODS, POWER OR TECHNICAL FAILURE, ACTS OF ANY<br />
GOVERNMENTAL BODY OR ANY OTHER CAUSE BEYOND OUR CONTROL. WE WILL<br />
NOT BE LIABLE FOR ANY DAMAGE RESULTING FROM LOSS OF RECORDED<br />
MATERIAL OR THE PREVENTION OF RECORDING DUE TO ANY FAULT, FAILURE,<br />
DEFICIENCY OR DEFECT IN SERVICES OR EQUIPMENT. WE MAKE NO WARRANTY,<br />
EITHER EXPRESSED OR IMPLIED, REGARDING THE <strong>DISH</strong> NETWORK DBS<br />
EQUIPMENT OR ANY SERVICES FURNISHED TO YOU. ALL SUCH WARRANTIES ARE<br />
EXPRESSLY EXCLUDED. IN NO EVENT SHALL WE HAVE ANY LIABILITY FOR<br />
SPECIAL, INDIRECT, INCIDENTAL OR CONSEQUENTIAL DAMAGES RELATING TO<br />
THE DBS EQUIPMENT OR RESULTING FROM OUR FURNISHING OR FAILURE TO<br />
FURNISH ANY SERVICES OR EQUIPMENT TO YOU, OR FROM ANY FAULT, FAILURE,<br />
DEFICIENCY OR DEFECT IN SERVICES OR EQUIPMENT FURNISHED TO YOU.<br />
B. It is your responsibility to impose any restrictions on viewing by you, other members of<br />
your household, or guests, <strong>and</strong> we shall have no liability to anyone due to or based on the content<br />
of any of the Services furnished to you.<br />
8. WARNING AGAINST PIRACY<br />
It is a violation of several U.S. federal <strong>and</strong> state laws to receive any Services, or any portion<br />
of such Services, without paying for them. The penalties for violating such laws can range from<br />
imprisonment to civil damage awards of up to $110,000 per violation.<br />
9. MISCELLANEOUS<br />
A. Physical Address/Change of Address. When setting up your <strong>DISH</strong> <strong>Network</strong> account, you<br />
agree to provide us with the physical street address where the Equipment will be located. A post<br />
office box does not constitute a physical address <strong>and</strong> is not sufficient to meet this requirement.<br />
You agree to give us prompt notice of your change of name, mailing address, physical address<br />
where the Equipment is located or telephone number. You may do this by notifying our Customer<br />
Service Center by telephone or in writing.<br />
B. Notice. If we send you notice, it will be considered given when deposited in the U.S. Mail,<br />
addressed to you at your billing address or h<strong>and</strong>-delivered to you. Our notice to you will also be<br />
effective if provided on your billing statement or by telephone. If you give notice to us, it will be<br />
deemed given when received by us at the address listed on the first page of this Agreement.<br />
C. Applicable Law. This Agreement, including all matters relating to its validity,<br />
construction, performance <strong>and</strong> enforcement, shall be governed by applicable federal law, the rules<br />
<strong>and</strong> regulations of the Federal Communications Commission, <strong>and</strong> the laws <strong>and</strong> regulations of the<br />
Page 126
Staying Legal<br />
state <strong>and</strong> local area where Service is provided. These terms <strong>and</strong> conditions are subject to<br />
amendment, modification or termination if required by such regulations or laws. If any provision<br />
in this Agreement is declared to be illegal or in conflict with any law or regulation, that provision<br />
may be deleted or modified, without affecting the validity of the other provision.<br />
D. Other. This Agreement is in addition to any other written agreement between You <strong>and</strong><br />
<strong>DISH</strong> <strong>Network</strong>, including without limitation an installation agreement, lease agreement or<br />
promotional agreement. Any <strong>and</strong> all prior oral or written representations or agreements are<br />
superseded by this Agreement <strong>and</strong> such other written agreements. No salesperson, installer,<br />
customer service representative, authorized retailer, or other similarly situated individual is<br />
authorized to change the terms <strong>and</strong> conditions set forth herein. <strong>DISH</strong> <strong>Network</strong> may, however,<br />
change the terms <strong>and</strong> conditions of this Agreement in the future <strong>and</strong> will notify you if that occurs.<br />
The terms of this Agreement, which either are expressly stated to survive or by their nature would<br />
logically be expected to survive termination, shall continue thereafter until fully performed.<br />
Staying Legal<br />
Title 47, Section 605(e)4, United States Code (U.S.C.) makes it a federal crime to modify<br />
this receiver to enable it to receive encrypted (scrambled) television programming without<br />
payment of required subscriptions. Conviction can result in a fine of up to $500,000 <strong>and</strong><br />
imprisonment for five years, or both. Any owner of this receiver who procures or willfully causes<br />
its modification is an accessory to that offense <strong>and</strong> may be punishable in the same manner.<br />
Investigative authority for violations lies with the Federal Bureau of Investigation (FBI).<br />
This product may incorporate copyright protection technology that is protected by U.S.<br />
patents <strong>and</strong> other intellectual property rights. Use of such copyright protection technology must<br />
be authorized by Macrovision, <strong>and</strong> is intended for home <strong>and</strong> other limited pay-per-view uses only<br />
unless otherwise authorized by Macrovision. Reverse engineering or disassembly is prohibited.<br />
U.S. Patent No’s 4631603, 4577216, 4819098 are licensed for limited pay per view only.<br />
FCC Compliance<br />
The following text is extracted from Federal Communications Commission (FCC)<br />
regulations, as of the publication date of this Guide. Contact the FCC (see following)<br />
or your library for the complete text of the regulations.<br />
Telephone Communication<br />
This equipment complies with Part 68 of the FCC rules <strong>and</strong> the requirements adopted by the<br />
ACTA. On the back panel of this equipment is a label that contains, among other information, a<br />
product identifier in the format US:AAAEQ##TXXXX. If requested, this number must be<br />
provided to the telephone company.<br />
The REN is used to determine the number of devices that may be connected to a telephone<br />
line. Excessive RENs on a telephone line may result in the devices not ringing in response to an<br />
incoming call. In most but not all areas, the sum of RENs should not exceed five (5.0). To be<br />
certain of the number of devices that may be connected to a line, as determined by the total RENs,<br />
contact the local telephone company. For products approved after July 23, 2001, the REN for this<br />
product is part of the product identifier that has the format US:AAAEQ##TXXXX. The digits<br />
represented by ## are the REN without a decimal point (e.g., 03 is a REN of 0.3). For earlier<br />
products, the REN is separately shown on the label.<br />
This equipment uses the following Universal Service Order Code (USOC) jacks: RJ-11C. A<br />
plug <strong>and</strong> jack used to connect this equipment to the premises wiring <strong>and</strong> telephone network must<br />
comply with the applicable FCC Part 68 rules <strong>and</strong> requirements adopted by the ACTA. A<br />
compliant telephone cord <strong>and</strong> modular plug is provided with this product. It is designed to be<br />
connected to a compatible modular jack that is also compliant. See installation instructions for<br />
details.<br />
Page 127
Appendix<br />
Radio Interference<br />
This device complies with Part 15 of the FCC Rules. Operation is subject to the<br />
following two conditions:<br />
1.this device may not cause harmful interference, <strong>and</strong><br />
2.this device must accept any interference received, including interference that may<br />
cause undesired operation.<br />
Modifying this receiver may void your authority to use the equipment. This equipment<br />
has been tested <strong>and</strong> found to comply with the limits for a Class B digital device,<br />
pursuant to Part 15 of the FCC Rules. These limits are designed to provide reasonable<br />
protection against harmful interference in a residential installation. This equipment<br />
generates, uses <strong>and</strong> can radiate radio frequency energy <strong>and</strong>, if not installed <strong>and</strong> used in<br />
accordance with the instructions, may cause harmful interference to radio<br />
communications. However, there is no guarantee that interference will not occur in a<br />
particular installation. If this equipment does cause harmful interference to radio or<br />
television reception, which can be determined by turning the equipment off <strong>and</strong> on, the<br />
user is encouraged to try to correct the interference by one or more of the following<br />
measures:<br />
• Reorient or relocate the receiving antenna.<br />
• Increase the separation between the equipment <strong>and</strong> receiver.<br />
• Connect the equipment into an outlet on a circuit different from that to which the<br />
receiver is connected.<br />
• Consult the dealer or an experienced radio/TV technician for help.<br />
Refer to Troubleshooting in Chapter 5 for a detailed description of recommended customer<br />
actions.<br />
If none of the remedies on the previous page stops the radio interference, you should<br />
contact a licensed radio/television technician, your satellite dealer, or call the Customer<br />
Service Center at 1-800-333-3474, for assistance.<br />
Signal Strength Present at the Television<br />
The attenuator provided with the satellite receiver will limit the signal present at your<br />
television set to below the FCC signal strength limit of 75.6dBuV. If you choose not to<br />
install the provided attenuator, you must ensure that the signal strength present at the<br />
TV set does not exceed 75.6dBuV.<br />
Connecting to an Off-Air Antenna<br />
In order to receive local broadcast channels, you may wish to install an off-air antenna<br />
into your TV distribution equipment. When installing the off-air antenna, you must be<br />
careful to meet certain FCC regulations.<br />
There are many devices that allow you to connect your antenna to your in-home<br />
distribution system such as splitters, <strong>and</strong> amplifiers. The FCC requires that the isolation<br />
between the antenna port <strong>and</strong> the network port of your system meet the following:<br />
• 80dB from 54 MHz to 216 MHz, at least<br />
• 60dB from 216 MHz to 550 MHz <strong>and</strong> at least<br />
• 55dB from 550 MHz to 806 MHz<br />
Measuring the isolation of a device requires specialized equipment. In most cases, it is<br />
easier to purchase a splitter or amplifier with the correctly specified isolation from your<br />
local satellite television retailer. The above requirements are extracted from<br />
47CFR15.115. For the complete text please visit WWW.FCC.GOV.<br />
Page 128
Index<br />
A<br />
B<br />
C<br />
Alternate Audio 71<br />
Attach a UHF Attenuator 33<br />
Attenuator 15, 21<br />
Back Panel<br />
CH 21–69 Out 15<br />
Channel 3–4 14<br />
Other Connections 16<br />
RCA Out 14<br />
Remote Antenna 16<br />
Satellite In 16<br />
S-Video Out 15<br />
Telephone Jack 16<br />
TV 1 Connections 14<br />
TV Antenna/Cable In 15<br />
TV1 Connections 14<br />
TV2 Connections 15<br />
Batteries 18<br />
Before an Event Timer Operates 52<br />
Browse Banner 43<br />
Displaying Program Information 47<br />
Ordering Pay Per View Programs 49<br />
Using 48<br />
Caller ID 69<br />
Canceling a Procedure 45<br />
CH 21–69 Out 15, 21<br />
Changing a Favorites List 50<br />
Changing Channel Locks 64<br />
Changing Channels 45<br />
Changing Content Locks 64<br />
Changing Program Languages 71<br />
Changing the Receiver Password 67<br />
Changing the TV1 <strong>and</strong> TV2 Output<br />
Channels 26<br />
Channel Locks 64<br />
Check the Device Codes 75<br />
Checking the Remote Control Address<br />
33<br />
Connecting the Receiver to a Dish<br />
Antenna System 28<br />
Connecting the Receiver to a Nearby TV<br />
19<br />
Connecting the Receiver to the Phone<br />
Line 27<br />
Connecting the Receiver to the TV(s) in<br />
D<br />
E<br />
F<br />
Another Room(s) 21<br />
Connecting to an Off-Air Antenna or<br />
Cable 32<br />
Control a Tuner or Amplifier 80<br />
Control a TV 76<br />
Control a VCR 78<br />
Control Other Devices 72<br />
Control Other Devices with the Remote<br />
Controls 72<br />
Conventions 2<br />
Creating a Favorites List 50<br />
Creating Channel Locks 64<br />
Creating or Changing Channel Locks 64<br />
Creating or Changing Rating (Content)<br />
Code Locks 64<br />
Creating Rating Locks 64<br />
Customer 8<br />
Deleting Event Timers 57<br />
Device Codes 113<br />
Tuner/Amplifier 116<br />
TV 113<br />
TV/DVD Combo 117<br />
VCR 114<br />
Dish Antenna 85<br />
<strong>DISH</strong> Pro Wiring Diagrams 94<br />
Displaying Program Information 47<br />
Browse Banner 47<br />
Program Banner 47<br />
Editing Event Timers 56<br />
Event Timer Performance when the<br />
Receiver is Off 57<br />
Favorites List 45<br />
Activate 51<br />
Creating 50<br />
Naming 51<br />
Favorites Lists<br />
Changing 50<br />
Using 49<br />
FCC 127<br />
Federal Communications Commission<br />
(FCC) Compliance<br />
Radio Interference 128<br />
Page 129
Index<br />
G<br />
H<br />
I<br />
L<br />
M<br />
Telephone Communication 127<br />
Front Panel<br />
Arrow Buttons 13<br />
IR Sensor <strong>and</strong> IR Blaster 13<br />
Locking <strong>and</strong> Unlocking 65<br />
Power Button 13<br />
Smart Card Door 13<br />
TV1 <strong>and</strong> TV2 Indicators 13<br />
Getting Started<br />
Finding Programs To Watch 5<br />
Ordering Your Programming 4<br />
Hiding <strong>and</strong> Showing Adult Channels 67<br />
Highlighting a Choice in a Menu List 44<br />
Highlighting Menu Options 43<br />
IR Sensor <strong>and</strong> IR Blaster 13<br />
Legal Notices 127<br />
List of Choices in the Menus 44<br />
Locking <strong>and</strong> Unlocking Pay Per View<br />
Channels 66<br />
Locking <strong>and</strong> Unlocking the Receiver 63<br />
Locking the Receiver Front Panel 65<br />
Locks 9, 62<br />
Locking <strong>and</strong> Unlocking the Reciever<br />
63<br />
Main Menu 7, 42<br />
Making a Favorites List Active 51<br />
Maximum Number of Event Timers 56<br />
Menu<br />
Caller ID 69<br />
Menus 7<br />
Alternate Audio 71<br />
Browse Banner 43<br />
Cancel Procedure 45<br />
Dish Home 9<br />
Favorites 11<br />
Highlighting Choices 44<br />
Highlighting Menu Options 43<br />
List of Choices 44<br />
Locks 62<br />
Main Menu 7, 42<br />
Open <strong>and</strong> Close 42<br />
Program Guide 8, 42<br />
Selecting Choices 44<br />
N<br />
O<br />
P<br />
R<br />
Selecting Menu Options 44<br />
System Setup 10<br />
Themes <strong>and</strong> Search 8, 43, 52, 59<br />
Timers 10, 52<br />
Modulator Setup 26<br />
Naming a Favorites List 51<br />
Nearby TV 1<br />
Remote Control 1 2<br />
On-Screen Messages 102<br />
Open <strong>and</strong> Close Menus 42<br />
Optimize Your Remote Controls 32<br />
Ordering Pay Per View Programs 49<br />
Ordering Your Programming 4<br />
Other Connections 16<br />
Remote Antenna 16<br />
Satellite In 16<br />
Telephone Jack 16<br />
Other Remote Control Features 81<br />
Overlapping Timers 54<br />
Overview 2<br />
Conventions 2<br />
Tips 2<br />
Password 67<br />
Pay Per View<br />
Locking <strong>and</strong> Unlocking 66<br />
Stay Legal 127<br />
Pay Per View Programs 49<br />
Personal Identification Number 69<br />
Power Button 13<br />
Problems <strong>and</strong> Solutions Tables<br />
Using the Remote Control 105<br />
Program Banner<br />
Displaying Program Information 47<br />
Program Guide 42, 45<br />
Program Languages 71<br />
Radio Interference 128<br />
Rain <strong>and</strong> Snow Fade 11<br />
RCA Out 14, 20<br />
Receiver<br />
Radio Interference 128<br />
Telephone Communication 127<br />
Receiver Back Panel 14<br />
Receiver Front Panel 13<br />
Recover Button 41<br />
Remote Antenna 16<br />
Remote Control<br />
Page 130
Index<br />
S<br />
Other Features 81<br />
Switch Between TV <strong>and</strong> Device<br />
Volume Control 81<br />
Using the Remote Control 105<br />
Remote Control 1 20<br />
Remote Control 2 2, 25<br />
Remote Control Buttons 76<br />
Control a Tuner or Amplifier 80<br />
Remote Controls 16, 72<br />
Attach a UHF Attenuator 33<br />
Batteries 18<br />
Buttons 76<br />
Check the Address 33<br />
Check the Device Codes 75<br />
Control Other Devices 72<br />
Low Battery <strong>Warning</strong><br />
Low Battery <strong>Warning</strong> 18<br />
Optimize 32<br />
Remote Control 1 20<br />
Remote Control 2 25<br />
Scan for Device Codes 74<br />
Tuner or Amplifier 80<br />
TV 76<br />
TV <strong>and</strong> AUX Device Volume<br />
Control 81<br />
UHF 2<br />
UHF Antenna 18<br />
Using 37<br />
VCR 78<br />
Remote TV 1<br />
REN 127<br />
Resetting the Receiver 70<br />
Residential Customer Agreement 121<br />
Reviewing <strong>and</strong> Editing Event Timers<br />
56<br />
Reviewing Event Timers 56<br />
Ringer Equivalence Number (REN)<br />
127<br />
Satellite In 16<br />
Satellite Signal Quality 11<br />
Rain <strong>and</strong> Snow Fade 11<br />
Solar Interference 12<br />
Scan for Device Codes 74<br />
Search 60<br />
History 61<br />
Selecting a Choice in a Menu 44<br />
Selecting Menu Options 44<br />
Set Up the Remotes to Control Other<br />
Devices 72<br />
Setting Up a Manual Event Timer 54<br />
Setting Up an Automatic Event Timer<br />
53<br />
Setting Up the Receiver to Control a<br />
VCR (TV1 Menu Only) 57<br />
Signal Quality, Satellite 11<br />
Smart Card Door 13<br />
Solar Interference 12<br />
Special Considerations When Using<br />
T<br />
U<br />
Event Timers 57<br />
Staying Legal 127<br />
S-Video Out 15, 20<br />
Telephone Jack 16<br />
Testing the System 82<br />
Themes 59<br />
Themes <strong>and</strong> Search 43, 52, 59<br />
Timer Frequency 52<br />
Timer Types 52<br />
Timers 52<br />
Tips 2<br />
Troubleshooting Tables<br />
Buying a Pay Per View Program<br />
110<br />
Changing Channels 109<br />
On-Screen Messages 102<br />
Using Event Timers 111<br />
Using Favorite Lists 110<br />
Using Locks 107<br />
Using the Menus 107<br />
Using the Program Guide or the<br />
Browse Banner 109<br />
Using the Telephone for Voice/<br />
Data/FAX 111<br />
Tuner/Amplifier Codes 116<br />
Turning Caller ID On <strong>and</strong> Off 70<br />
TV <strong>and</strong> AUX Device Volume Control<br />
81<br />
TV Antenna/Cable In 15<br />
TV Codes 113<br />
TV/DVD Combo Codes 117<br />
TV1 <strong>and</strong> TV2 Indicators 13<br />
TV1 Connections 14, 19<br />
RCA Out 14, 20<br />
S-Video Out 15, 20<br />
TV Antenna/Cable In 15<br />
TV2 Connections 15<br />
CH 21–69 Out 15, 21<br />
UHF Antenna 18<br />
Unlocking the Receiver Front Panel<br />
65<br />
Using Caller ID 69<br />
Using Favorites Lists 49<br />
Using Locks 62<br />
Adult Channels 67<br />
Creating or Changing Channel<br />
Locks 64<br />
Creating or Changing Rating<br />
(Content) Code Locks 64<br />
Locking <strong>and</strong> Locking the Receiver<br />
Front Panel 65<br />
Password 67<br />
Pay Per View 66<br />
Using the Menus 42<br />
Page 131
Index<br />
Using the Remote Control 105<br />
Using the Remote Controls 37<br />
Using Themes <strong>and</strong> Search 52, 59<br />
Using Timers<br />
Automatic Timer 53<br />
Deleting 57<br />
Editing 56<br />
Frequency 52<br />
Manual Timer 54<br />
Maximum Number 56<br />
Overlapping 54<br />
Receiver Off 57<br />
Reviewing 56<br />
Special Considerations 57<br />
Types 52<br />
VCR Control (TV1 Menu Only) 57<br />
UsingTimers 52<br />
V<br />
VCR Codes 114<br />
W<br />
Warranty 119<br />
Wiring Diagrams 94<br />
Page 132
Write the following information in the spaces provided below. You may need to provide this information if you call<br />
the Service Center. To get the Conditional Access Numbers, display the Important System Information menu<br />
(see Ordering Your Program Packages on page 4).<br />
Purchase Location Name:<br />
Purchase Location Telephone Number:<br />
Receiver Serial Number:<br />
Receiver Conditional Access Number<br />
Smart Card Conditional Access Number:<br />
.<br />
Remote Control 1 Remote Control 2<br />
Remote Address (SAT Mode)<br />
Television Code (TV Mode)<br />
VCR Code (VCR Mode)<br />
Auxiliary Code (AUX Mode)<br />
TV1 (Channel 3 or 4)<br />
TV2<br />
Remote Address (SAT Mode)<br />
131291
List: John<br />
3:25pm Tue 12/27<br />
JoJo’s Circus<br />
Tue 1/22<br />
6:30 pm<br />
Info Not Available<br />
Info Not Available<br />
Info Not Available<br />
Info Not Available<br />
Info Not Available<br />
TM<br />
TM<br />
1<br />
Acquiring<br />
Satellite Signal<br />
Please Wait<br />
120<br />
HIST<br />
118<br />
A&E<br />
116<br />
MOMAX<br />
114<br />
ESPN<br />
112<br />
HGTV<br />
PHONE<br />
POWER<br />
Quick Help <strong>and</strong> Tips<br />
What should I do if I<br />
have a snowy picture (or<br />
a blue or black screen)?<br />
What should I do if my<br />
remote control doesn't<br />
seem to operate my<br />
satellite receiver?<br />
What would affect my<br />
satellite signal?<br />
What are the benefits of<br />
my satellite receiver<br />
being connected to a<br />
telephone line?<br />
Why don't all of my<br />
channels show up on<br />
the Program Guide or<br />
when I browse?<br />
Why does the Program<br />
Guide display programs<br />
as "Info Not Available"?<br />
Check to make sure your TV (<strong>and</strong> if connected, your<br />
VCR) is tuned to the correct channel. Refer to the<br />
"How to Watch TV on TV1" section in this guide for<br />
correct channel setup.<br />
Try pressing the SAT Mode button.<br />
Check to make sure you are using the correct<br />
remote (TV1 or TV2) for the desired location.<br />
Your remote control batteries may need to be<br />
replaced (alkaline batteries are recommended).<br />
Check the remote address (see User's Guide).<br />
There may be obstructions in front of your satellite<br />
dish. Sometimes new tree or plant growth can<br />
obstruct the signal between the satellite <strong>and</strong> the dish.<br />
If you are experiencing frequent signal interruptions,<br />
leave your TV on <strong>and</strong> press the SYS INFO button<br />
on the remote. Contact Technical Assistance using<br />
the phone number shown on the System Information<br />
screen.<br />
Keeping your phone line connected to the receiver<br />
enables you to take advantage of interactive TV<br />
services, Customer Support, or Caller ID. It will also<br />
allow you to use your remote control to order Pay-<br />
Per-View events or movies. And, you will not be<br />
charged a Programming Access Fee.<br />
You may have a Favorites List active that does not<br />
include those channels. Repeatedly press the GUIDE<br />
button <strong>and</strong> cycle through the Favorites Lists until you<br />
find a list that contains those channels. Also check to<br />
see if those channels are locked (see User's Guide).<br />
Your receiver needs to take a download each night<br />
to get current program information. Press the POWER<br />
button on both remotes to turn the receiver off <strong>and</strong><br />
wait about 5 minutes for the download to occur.<br />
Tip: To ensure your receiver has the latest program guide information<br />
<strong>and</strong> the latest software updates, press the POWER button on both<br />
remote controls to turn your receiver off when not in use.<br />
Tip: Some receiver problems can be resolved by pressing <strong>and</strong> holding<br />
the POWER button on the front of the receiver until the front panel lights<br />
go out <strong>and</strong> come back on. After releasing the POWER button, the<br />
receiver will return to normal operation within a few minutes.<br />
Tune to <strong>DISH</strong> <strong>Network</strong><br />
FYI Channel 101<br />
Enhance Your TV Experience<br />
dishnetwork.com<br />
Press <strong>DISH</strong> button<br />
<strong>and</strong> select Service<br />
Using the Recover Button<br />
1<br />
See the<br />
User's Guide<br />
User's<br />
Guide<br />
Two-TV Satellite Receiver<br />
Keep this<br />
guide in your<br />
main TV<br />
viewing area<br />
A&E<br />
ABC Family<br />
AMC<br />
America’s Preview Channel<br />
Angel One<br />
Animal Planet<br />
BBC America<br />
Beauty & Fashion Channel<br />
BET<br />
Biography Channel, The<br />
Bloomberg Television<br />
Boomerang <br />
Bravo<br />
BYUTV<br />
Cartoon <strong>Network</strong> <br />
CCTV-9 1<br />
CCTV-E&F 1<br />
CMT<br />
CNBC<br />
CNBC World<br />
CNN<br />
CNN Headline News<br />
CoLours TV<br />
Comedy Central<br />
Court TV<br />
C-SPAN<br />
C-SPAN2<br />
CSTV<br />
Daystar<br />
Discovery Channel<br />
Discovery Health<br />
Discovery Home<br />
Discovery Kids<br />
Discovery Times<br />
Disney Channel (East)<br />
Disney Channel (West)<br />
DIY<br />
Documentary Channel<br />
E! Entertainment Television<br />
Encore (West) <br />
Encore Action<br />
Encore Drama<br />
Encore Love<br />
Encore Mystery<br />
Encore Wam<br />
Encore Westerns<br />
ESPN<br />
ESPN2<br />
ESPN Classic<br />
ESPNEWS<br />
ESPNU<br />
EWTN <br />
Fine Living<br />
Food <strong>Network</strong><br />
Fox Movie Channel<br />
Look inside for important tips<br />
to operate your satellite receiver<br />
118<br />
180<br />
130<br />
221<br />
262<br />
184<br />
135<br />
225<br />
124<br />
119<br />
203<br />
175<br />
129<br />
9403<br />
176<br />
265<br />
884<br />
166<br />
208<br />
207<br />
200<br />
202<br />
9407<br />
107<br />
204<br />
210<br />
212<br />
152<br />
263<br />
182<br />
189<br />
194<br />
179<br />
192<br />
172<br />
173<br />
111<br />
197<br />
114<br />
341<br />
343<br />
345<br />
346<br />
344<br />
347<br />
342<br />
140<br />
144<br />
143<br />
142<br />
148<br />
261<br />
113<br />
110<br />
133<br />
Channel Directory<br />
Note: All programming subject to change without notice. Go to dishnetwork.com for a current directory.<br />
FOX News Channel<br />
Fox Reality<br />
Fox Soccer<br />
Free Speech TV<br />
Fuse<br />
FX <br />
G4<br />
Galavisión<br />
GoITV<br />
Golf Channel, The<br />
Great American Country (GAC)<br />
GSN<br />
Hallmark Channel<br />
Hallmark Movie Channel<br />
Healthy Living Channel<br />
HGTV<br />
History Channel, The<br />
History International<br />
HITN<br />
HorseRacing TV<br />
HSN<br />
iDrive TV<br />
Independent Film Channel (IFC)<br />
International Music Feed<br />
iShop<br />
Jewelry Television<br />
KBS World 1<br />
Kid Tunes (Audio only)<br />
Lifetime<br />
Lifetime Movie <strong>Network</strong><br />
Linkmedia<br />
LIME<br />
Men's Channel, The<br />
Military Channel<br />
MSNBC<br />
MTV<br />
MTV2<br />
mun2<br />
NASA<br />
National Geographic Channel<br />
NFL <strong>Network</strong><br />
Nickelodeon Games & Sports<br />
Nickelodeon/Nick at Nite (East)<br />
Nickelodeon/Nick at Nite (West)<br />
Nicktoons <strong>Network</strong><br />
NOGGIN/The N<br />
Northern Arizona University<br />
OLN<br />
Outdoor Channel, The<br />
Oxygen<br />
PAX TV<br />
QVC<br />
Research TV<br />
Resort & Residence Channel<br />
RFD-TV<br />
SCI FI Channel<br />
Science Channel, The<br />
ShopNBC<br />
Sí TV<br />
Sleuth<br />
SOAPnet<br />
SPEED<br />
Spike TV<br />
Style<br />
TBN<br />
TBS <br />
TeleFutura (East) 2<br />
TeleFutura (West) 2<br />
Tennis Channel, The<br />
The Movie Channel (West) <br />
The Movie Channel xtra (West) <br />
TLC<br />
TNT <br />
Toon Disney <br />
Travel Channel<br />
Turner Classic Movies<br />
Turner South 3<br />
TV Guide Channel<br />
TV L<strong>and</strong><br />
TV Outlet Mall<br />
TVG<br />
University of California TV<br />
University of Washington TV<br />
Univision (East)<br />
Univision (West)<br />
USA <strong>Network</strong><br />
VH1<br />
VH1 Classic<br />
WE: Women's Entertainment<br />
Weather Channel, The<br />
WGN<br />
ADDITIONAL CHANNELS<br />
Audio Music Channels<br />
BabyFirstTV<br />
<strong>DISH</strong> <strong>Network</strong> Pay-Per-View<br />
Local Channels<br />
Regional Sports <strong>Network</strong>s<br />
SIRIUS Music Channels<br />
923-981<br />
126<br />
455-539<br />
8000-9318<br />
409-438<br />
6001-6116<br />
DishFAMILY Entertainment Package<br />
AMERICA’S TOP 60 Entertainment Package<br />
AMERICA’S TOP 120 Entertainment Package<br />
AMERICA’S TOP 180 Entertainment Package<br />
FREE Spanish audio feed. Audio disponible en español.<br />
1 = Available at no cost to all <strong>DISH</strong> <strong>Network</strong> customers. CCTV channels require a single-dish antenna configuration. KBS World requires a <strong>DISH</strong> 500+ or <strong>DISH</strong> 1000+ antenna <strong>and</strong> subscription to qualifying<br />
programming. Additional fees may apply for existing <strong>DISH</strong> <strong>Network</strong> customers to upgrade their dish antenna. 2 = TeleFutura East is available to subscribers in the Eastern <strong>and</strong> Central time zones.<br />
TeleFutura West is available to subscribers in the Mountain <strong>and</strong> Pacific time zones. 3 = Available in: Georgia, Mississippi, S. Carolina, Tennessee <strong>and</strong> sections of N. Carolina.<br />
America’s “Everything” Pak includes America’s Top 180 package plus all four premium movie packages <strong>and</strong> NBA TV (channel 402).<br />
205<br />
190<br />
149<br />
9415<br />
158<br />
137<br />
191<br />
833<br />
407<br />
401<br />
167<br />
116<br />
185<br />
187<br />
223<br />
112<br />
120<br />
121<br />
843<br />
404<br />
222<br />
217<br />
131<br />
157<br />
229<br />
227<br />
9850<br />
976<br />
108<br />
109<br />
9410<br />
264<br />
218<br />
195<br />
209<br />
160<br />
161<br />
838<br />
213<br />
186<br />
154<br />
177<br />
170<br />
171<br />
178<br />
169<br />
9411<br />
151<br />
153<br />
127<br />
181<br />
226<br />
9400<br />
216<br />
9409<br />
1<br />
1<br />
122<br />
193<br />
228<br />
159<br />
198<br />
188<br />
150<br />
168<br />
115<br />
260<br />
139<br />
830<br />
831<br />
400<br />
329<br />
330<br />
183<br />
138<br />
174<br />
215<br />
132<br />
437<br />
102<br />
106<br />
219<br />
405<br />
9412<br />
9404<br />
827<br />
828<br />
105<br />
162<br />
163<br />
128<br />
214<br />
239<br />
Use the Recover button to get back to watching satellite programming<br />
if you accidentally change channels or inputs on your TV<br />
1 2 3 4<br />
Press<br />
<strong>and</strong> hold<br />
the RECOVER<br />
button until<br />
all mode<br />
buttons<br />
light up.<br />
If you see this<br />
System Information<br />
screen, proceed to<br />
step 4. Otherwise,<br />
continue to step 3.<br />
Press the RECOVER<br />
button again & wait until the<br />
mode lights stop flashing.<br />
If you see the System<br />
Information screen, go<br />
to step 4. If not, repeat<br />
this step until you do.<br />
SAT<br />
TV<br />
VCR<br />
AUX<br />
Press the<br />
SELECT button<br />
to resume<br />
watching TV.<br />
148018<br />
HBO<br />
HBO (East) <br />
HBO (West) <br />
HBO2 (East) <br />
HBO2 (West) <br />
HBO Comedy <br />
HBO Family <br />
HBO Latino<br />
HBO Signature <br />
HBO HD**<br />
STARZ!<br />
Starz InBlack <br />
Encore (East) <br />
300<br />
303<br />
301<br />
304<br />
307<br />
305<br />
309<br />
302<br />
9456<br />
355<br />
340<br />
Starz (East) <br />
Starz (West) <br />
Starz Cinema (East) <br />
Starz Comedy <br />
Starz Kids & Family <br />
Starz Edge <br />
Starz HDTV**<br />
CINEMAX<br />
5StarMAX <br />
ActionMAX <br />
Cinemax (East) <br />
Cinemax (West) <br />
MoreMAX <br />
Movie Packages<br />
350<br />
351<br />
353<br />
354<br />
356<br />
352<br />
9435<br />
314<br />
313<br />
310<br />
311<br />
312<br />
SHOWTIME UNLIMITED<br />
FLIX<br />
The Movie Channel (East) <br />
The Movie Channel xtra (East) <br />
Showtime Too <br />
Showtime (East) <br />
Showtime (West) <br />
Showtime Beyond <br />
Showtime Extreme <br />
Showtime Showcase <br />
Sundance Channel<br />
Showtime HD**<br />
333<br />
327<br />
328<br />
320<br />
318<br />
319<br />
323<br />
322<br />
321<br />
332<br />
9460<br />
FREE Spanish audio feed available. Audio disponible en español.<br />
**Requires HD television <strong>and</strong> receiver.
1<br />
Features of Your Remote Control 1<br />
To use the features described in this section, make<br />
sure you are in SAT mode by pressing the SAT Mode button<br />
Note: To control a TV, VCR, or other available component, the remote must be programmed.<br />
See the User's Guide for details.<br />
SAT Mode<br />
Press to control your<br />
satellite receiver,<br />
TV power, volume<br />
<strong>and</strong> mute<br />
Receiver Power<br />
& TV Power<br />
Left button turns the<br />
receiver on/off,<br />
right button turns the<br />
TV on/off<br />
Menu<br />
Access receiver<br />
features <strong>and</strong> settings<br />
Themes<br />
Search for programs<br />
using Themes<br />
Recall<br />
Go back to last<br />
channel viewed<br />
Info<br />
Display program<br />
information<br />
<strong>DISH</strong><br />
Explore interactive<br />
TV features<br />
Number Buttons<br />
Enter a channel<br />
number or select<br />
menu items<br />
Recover<br />
Recovers satellite programming<br />
if your TV input or channel<br />
has changed<br />
TV Mode<br />
Press to control<br />
your TV<br />
VCR Mode<br />
Press to control<br />
your VCR<br />
AUX Mode<br />
Press to control other<br />
components such<br />
as a DVD player<br />
Page Buttons<br />
Page up/down in menus<br />
<strong>and</strong> program guide<br />
Program Guide<br />
Display current <strong>and</strong><br />
future satellite program<br />
listings<br />
Arrows/Select<br />
Buttons<br />
Channel up/down,<br />
navigate through<br />
menus/guides <strong>and</strong><br />
select an option<br />
Browse<br />
See what is on other<br />
channels while<br />
watching TV<br />
View Satellite<br />
Program<br />
Exit any menu/guide<br />
<strong>and</strong> go back to<br />
viewing a program<br />
1<br />
1<br />
How to Watch TV on TV1<br />
TV1 viewing location is identified with a green key<br />
on your remote <strong>and</strong> the green TV1 logo on the TV screen<br />
To watch satellite TV or if you lose video:<br />
Set TV to _______<br />
(Channel/Input)<br />
Watching Your Satellite Programs<br />
To operate your<br />
satellite receiver you<br />
must be in SAT mode<br />
by pressing the<br />
SAT Mode button<br />
Set VCR to _______<br />
(Channel/Input)<br />
Easy Ways to Find a Program<br />
1<br />
Turns the Satellite<br />
Receiver On or Off<br />
Turns the TV<br />
On or Off<br />
Select a program from the<br />
Program Guide<br />
OR<br />
Channel Up/Down<br />
one program at a<br />
time<br />
OR<br />
Enter a channel<br />
number from the<br />
Channel Directory<br />
1<br />
Remote Key<br />
Green number 1 indicates TV1<br />
Blue number 2 indicates TV2<br />
1<br />
Search<br />
Search for a program<br />
Interactive TV<br />
Watch video from popular<br />
news, entertainment, <strong>and</strong><br />
sports networks all on one<br />
screen.<br />
Device Codes:<br />
TV: VCR: AUX:<br />
Press<br />
My remote is programmed<br />
in Limited Mode (check box):<br />
Tip: Using the Limited Mode option helps prevent you from accidentally tuning to<br />
a TV or VCR channel (or input) that does not display satellite TV programming.<br />
Select an icon for customer support, news,<br />
shopping, sports, games <strong>and</strong> entertainment.
UHF<br />
PRO<br />
UHF<br />
PRO<br />
List: John<br />
3:25pm Tue 12/27<br />
JoJo’s Circus<br />
Tue 1/22<br />
6:30 pm<br />
Info Not Available<br />
Info Not Available<br />
Info Not Available<br />
Info Not Available<br />
Info Not Available<br />
TM<br />
TM<br />
UHF<br />
PRO<br />
Acquiring<br />
Satellite Signal<br />
Please Wait<br />
120<br />
HIST<br />
118<br />
A&E<br />
116<br />
MOMAX<br />
114<br />
ESPN<br />
112<br />
HGTV<br />
POWER<br />
Quick Help <strong>and</strong> Tips<br />
Tip: To ensure your receiver has the latest program guide information<br />
<strong>and</strong> the latest software updates, press the POWER button on both<br />
remote controls to turn your receiver off when not in use.<br />
Tip: Some receiver problems can be resolved by pressing <strong>and</strong> holding<br />
the POWER button on the front of the receiver until the front panel lights<br />
go out <strong>and</strong> come back on. After releasing the POWER button, the<br />
receiver will return to normal operation within a few minutes.<br />
Tune to <strong>DISH</strong> <strong>Network</strong><br />
FYI Channel 101<br />
What should I do if I<br />
have a snowy picture (or<br />
a blue or black screen)?<br />
What should I do if my<br />
remote control doesn't<br />
seem to operate my<br />
satellite receiver?<br />
Why does my receiver<br />
change channels <strong>and</strong><br />
do things on its own?<br />
What would affect my<br />
satellite signal?<br />
Why don't all of my<br />
channels show up on<br />
the Program Guide or<br />
when I browse?<br />
Why does the Program<br />
Guide display programs<br />
as "Info Not Available"?<br />
Check to make sure your TV (<strong>and</strong> if connected, your<br />
VCR) is tuned to the correct channel. Refer to the<br />
"How to Watch TV on TV2" section in this guide for<br />
correct channel setup or use the RECOVER<br />
button on the remote control (see below).<br />
Try pressing the SAT Mode button.<br />
Check to make sure you are using the correct<br />
remote (TV1 or TV2) for the desired location.<br />
Make sure the remote UHF antenna is attached<br />
to the back of the receiver.<br />
Your remote control batteries may need to be<br />
replaced (alkaline batteries are recommended).<br />
Check the remote address (see User's Guide).<br />
You may have a neighbor that also has a UHF<br />
remote <strong>and</strong> their remote may be controlling your<br />
receiver. This is easily corrected by changing your<br />
remote control address. See your User's Guide for<br />
instructions.<br />
There may be obstructions in front of your satellite<br />
dish. Sometimes new tree or plant growth can<br />
obstruct the signal between the satellite <strong>and</strong> the dish.<br />
If you are experiencing frequent signal interruptions,<br />
leave your TV on <strong>and</strong> press the SYS INFO button<br />
on the remote. Contact Technical Assistance using<br />
the phone number shown on the System Information<br />
screen.<br />
You may have a Favorites List active that does not<br />
include those channels. Repeatedly press the GUIDE<br />
button <strong>and</strong> cycle through the Favorites Lists until you<br />
find a list that contains those channels. Also check to<br />
see if those channels are locked (see User's Guide).<br />
Your receiver needs to take a download each night<br />
to get current program information. Press the POWER<br />
button on both remotes to turn the receiver off <strong>and</strong><br />
wait about 5 minutes for the download to occur.<br />
Enhance Your TV Experience<br />
dishnetwork.com<br />
Press <strong>DISH</strong> button<br />
<strong>and</strong> select Service<br />
Using the Recover Button<br />
2<br />
See the<br />
User's Guide<br />
User's<br />
Guide<br />
Two-TV Satellite Receiver<br />
Keep this<br />
guide in your<br />
TV2 viewing<br />
area<br />
A&E<br />
ABC Family<br />
AMC<br />
America’s Preview Channel<br />
Angel One<br />
Animal Planet<br />
BBC America<br />
Beauty & Fashion Channel<br />
BET<br />
Biography Channel, The<br />
Bloomberg Television<br />
Boomerang <br />
Bravo<br />
BYUTV<br />
Cartoon <strong>Network</strong> <br />
CCTV-9 1<br />
CCTV-E&F 1<br />
CMT<br />
CNBC<br />
CNBC World<br />
CNN<br />
CNN Headline News<br />
CoLours TV<br />
Comedy Central<br />
Court TV<br />
C-SPAN<br />
C-SPAN2<br />
CSTV<br />
Daystar<br />
Discovery Channel<br />
Discovery Health<br />
Discovery Home<br />
Discovery Kids<br />
Discovery Times<br />
Disney Channel (East)<br />
Disney Channel (West)<br />
DIY<br />
Documentary Channel<br />
E! Entertainment Television<br />
Encore (West) <br />
Encore Action<br />
Encore Drama<br />
Encore Love<br />
Encore Mystery<br />
Encore Wam<br />
Encore Westerns<br />
ESPN<br />
ESPN2<br />
ESPN Classic<br />
ESPNEWS<br />
ESPNU<br />
EWTN <br />
Fine Living<br />
Food <strong>Network</strong><br />
Fox Movie Channel<br />
Look inside for important tips<br />
to operate your satellite receiver<br />
118<br />
180<br />
130<br />
221<br />
262<br />
184<br />
135<br />
225<br />
124<br />
119<br />
203<br />
175<br />
129<br />
9403<br />
176<br />
265<br />
884<br />
166<br />
208<br />
207<br />
200<br />
202<br />
9407<br />
107<br />
204<br />
210<br />
212<br />
152<br />
263<br />
182<br />
189<br />
194<br />
179<br />
192<br />
172<br />
173<br />
111<br />
197<br />
114<br />
341<br />
343<br />
345<br />
346<br />
344<br />
347<br />
342<br />
140<br />
144<br />
143<br />
142<br />
148<br />
261<br />
113<br />
110<br />
133<br />
Channel Directory<br />
Note: All programming subject to change without notice. Go to dishnetwork.com for a current directory.<br />
FOX News Channel<br />
Fox Reality<br />
Fox Soccer<br />
Free Speech TV<br />
Fuse<br />
FX <br />
G4<br />
Galavisión<br />
GoITV<br />
Golf Channel, The<br />
Great American Country (GAC)<br />
GSN<br />
Hallmark Channel<br />
Hallmark Movie Channel<br />
Healthy Living Channel<br />
HGTV<br />
History Channel, The<br />
History International<br />
HITN<br />
HorseRacing TV<br />
HSN<br />
iDrive TV<br />
Independent Film Channel (IFC)<br />
International Music Feed<br />
iShop<br />
Jewelry Television<br />
KBS World 1<br />
Kid Tunes (Audio only)<br />
Lifetime<br />
Lifetime Movie <strong>Network</strong><br />
Linkmedia<br />
LIME<br />
Men's Channel, The<br />
Military Channel<br />
MSNBC<br />
MTV<br />
MTV2<br />
mun2<br />
NASA<br />
National Geographic Channel<br />
NFL <strong>Network</strong><br />
Nickelodeon Games & Sports<br />
Nickelodeon/Nick at Nite (East)<br />
Nickelodeon/Nick at Nite (West)<br />
Nicktoons <strong>Network</strong><br />
NOGGIN/The N<br />
Northern Arizona University<br />
OLN<br />
Outdoor Channel, The<br />
Oxygen<br />
PAX TV<br />
QVC<br />
Research TV<br />
Resort & Residence Channel<br />
RFD-TV<br />
SCI FI Channel<br />
Science Channel, The<br />
ShopNBC<br />
Sí TV<br />
Sleuth<br />
SOAPnet<br />
SPEED<br />
Spike TV<br />
Style<br />
TBN<br />
TBS <br />
TeleFutura (East) 2<br />
TeleFutura (West) 2<br />
Tennis Channel, The<br />
The Movie Channel (West) <br />
The Movie Channel xtra (West) <br />
TLC<br />
TNT <br />
Toon Disney <br />
Travel Channel<br />
Turner Classic Movies<br />
Turner South 3<br />
TV Guide Channel<br />
TV L<strong>and</strong><br />
TV Outlet Mall<br />
TVG<br />
University of California TV<br />
University of Washington TV<br />
Univision (East)<br />
Univision (West)<br />
USA <strong>Network</strong><br />
VH1<br />
VH1 Classic<br />
WE: Women's Entertainment<br />
Weather Channel, The<br />
WGN<br />
ADDITIONAL CHANNELS<br />
Audio Music Channels<br />
BabyFirstTV<br />
<strong>DISH</strong> <strong>Network</strong> Pay-Per-View<br />
Local Channels<br />
Regional Sports <strong>Network</strong>s<br />
SIRIUS Music Channels<br />
923-981<br />
126<br />
455-539<br />
8000-9318<br />
409-438<br />
6001-6116<br />
DishFAMILY Entertainment Package<br />
AMERICA’S TOP 60 Entertainment Package<br />
AMERICA’S TOP 120 Entertainment Package<br />
AMERICA’S TOP 180 Entertainment Package<br />
FREE Spanish audio feed. Audio disponible en español.<br />
1 = Available at no cost to all <strong>DISH</strong> <strong>Network</strong> customers. CCTV channels require a single-dish antenna configuration. KBS World requires a <strong>DISH</strong> 500+ or <strong>DISH</strong> 1000+ antenna <strong>and</strong> subscription to qualifying<br />
programming. Additional fees may apply for existing <strong>DISH</strong> <strong>Network</strong> customers to upgrade their dish antenna. 2 = TeleFutura East is available to subscribers in the Eastern <strong>and</strong> Central time zones.<br />
TeleFutura West is available to subscribers in the Mountain <strong>and</strong> Pacific time zones. 3 = Available in: Georgia, Mississippi, S. Carolina, Tennessee <strong>and</strong> sections of N. Carolina.<br />
America’s “Everything” Pak includes America’s Top 180 package plus all four premium movie packages <strong>and</strong> NBA TV (channel 402).<br />
205<br />
190<br />
149<br />
9415<br />
158<br />
137<br />
191<br />
833<br />
407<br />
401<br />
167<br />
116<br />
185<br />
187<br />
223<br />
112<br />
120<br />
121<br />
843<br />
404<br />
222<br />
217<br />
131<br />
157<br />
229<br />
227<br />
9850<br />
976<br />
108<br />
109<br />
9410<br />
264<br />
218<br />
195<br />
209<br />
160<br />
161<br />
838<br />
213<br />
186<br />
154<br />
177<br />
170<br />
171<br />
178<br />
169<br />
9411<br />
151<br />
153<br />
127<br />
181<br />
226<br />
9400<br />
216<br />
9409<br />
2<br />
122<br />
193<br />
228<br />
159<br />
198<br />
188<br />
150<br />
168<br />
115<br />
260<br />
139<br />
830<br />
831<br />
400<br />
329<br />
330<br />
183<br />
138<br />
174<br />
215<br />
132<br />
437<br />
102<br />
106<br />
219<br />
405<br />
9412<br />
9404<br />
827<br />
828<br />
105<br />
162<br />
163<br />
128<br />
214<br />
239<br />
Use the Recover button to get back to watching satellite programming<br />
if you accidentally change channels or inputs on your TV<br />
1 2 3 4<br />
Press<br />
<strong>and</strong> hold<br />
the RECOVER<br />
button until<br />
all mode<br />
buttons<br />
light up.<br />
If you see this<br />
System Information<br />
screen, proceed to<br />
step 4. Otherwise,<br />
continue to step 3.<br />
Press the RECOVER<br />
button again & wait until the<br />
mode lights stop flashing.<br />
If you see the System<br />
Information screen, go<br />
to step 4. If not, repeat<br />
this step until you do.<br />
SAT<br />
TV<br />
VCR<br />
AUX<br />
Press the<br />
SELECT button<br />
to resume<br />
watching TV.<br />
HBO<br />
HBO (East) <br />
HBO (West) <br />
HBO2 (East) <br />
HBO2 (West) <br />
HBO Comedy <br />
HBO Family <br />
HBO Latino<br />
HBO Signature <br />
HBO HD**<br />
STARZ!<br />
Starz InBlack <br />
Encore (East) <br />
300<br />
303<br />
301<br />
304<br />
307<br />
305<br />
309<br />
302<br />
9456<br />
355<br />
340<br />
Starz (East) <br />
Starz (West) <br />
Starz Cinema (East) <br />
Starz Comedy <br />
Starz Kids & Family <br />
Starz Edge <br />
Starz HDTV**<br />
CINEMAX<br />
5StarMAX <br />
ActionMAX <br />
Cinemax (East) <br />
Cinemax (West) <br />
MoreMAX <br />
Movie Packages<br />
350<br />
351<br />
353<br />
354<br />
356<br />
352<br />
9435<br />
314<br />
313<br />
310<br />
311<br />
312<br />
SHOWTIME UNLIMITED<br />
FLIX<br />
The Movie Channel (East) <br />
The Movie Channel xtra (East) <br />
Showtime Too <br />
Showtime (East) <br />
Showtime (West) <br />
Showtime Beyond <br />
Showtime Extreme <br />
Showtime Showcase <br />
Sundance Channel<br />
Showtime HD**<br />
333<br />
327<br />
328<br />
320<br />
318<br />
319<br />
323<br />
322<br />
321<br />
332<br />
9460<br />
FREE Spanish audio feed available. Audio disponible en español.<br />
**Requires HD television <strong>and</strong> receiver.<br />
148019
UHF<br />
PRO<br />
UHF<br />
UHF<br />
PRO<br />
PRO<br />
Features of Your Remote Control 2<br />
To use the features described in this section, make<br />
sure you are in SAT mode by pressing the SAT Mode button<br />
Note: To control a TV, VCR, or other available component, the remote must be programmed.<br />
See the User's Guide for details.<br />
SAT Mode<br />
Press to control your<br />
satellite receiver,<br />
TV power, volume<br />
<strong>and</strong> mute<br />
Receiver Power<br />
& TV Power<br />
Left button turns the<br />
receiver on/off,<br />
right button turns the<br />
TV on/off<br />
Menu<br />
Access receiver<br />
features <strong>and</strong> settings<br />
Themes<br />
Search for programs<br />
using Themes<br />
Recall<br />
Go back to last<br />
channel viewed<br />
Info<br />
Display program<br />
information<br />
<strong>DISH</strong><br />
Explore interactive<br />
TV features<br />
Number Buttons<br />
Enter a channel<br />
number or select<br />
menu items<br />
Recover<br />
Recovers satellite programming<br />
if your TV input or channel<br />
has changed<br />
TV Mode<br />
Press to control<br />
your TV<br />
VCR Mode<br />
Press to control<br />
your VCR<br />
AUX Mode<br />
Press to control other<br />
components such<br />
as a DVD player<br />
Page Buttons<br />
Page up/down in menus<br />
<strong>and</strong> program guide<br />
Program Guide<br />
Display current <strong>and</strong><br />
future satellite program<br />
listings<br />
Arrows/Select<br />
Buttons<br />
Channel up/down,<br />
navigate through<br />
menus/guides <strong>and</strong><br />
select an option<br />
Browse<br />
See what is on other<br />
channels while<br />
watching TV<br />
View Satellite<br />
Program<br />
Exit any menu/guide<br />
<strong>and</strong> go back to<br />
viewing a program<br />
UHF PRO<br />
How to Watch TV on TV2<br />
TV2 viewing locations are identified with a blue key<br />
on your remote <strong>and</strong> the blue TV2 logo on the TV screen<br />
2<br />
To watch satellite TV or if you lose video:<br />
Set VCR to _______ VCR must be ______<br />
Watching Your Satellite Programs<br />
To operate your<br />
satellite receiver you<br />
must be in SAT mode<br />
by pressing the<br />
SAT Mode button<br />
Set TV to _______<br />
(Channel/Input)<br />
(Channel/Input)<br />
Turns the Satellite<br />
Receiver On or Off<br />
Turns the TV<br />
On or Off<br />
Easy Ways to Find a Program<br />
Select a program from the<br />
Program Guide<br />
OR<br />
Channel Up/Down<br />
one program at a<br />
time<br />
OR<br />
(On/Off)<br />
Enter a channel<br />
number from the<br />
Channel Directory<br />
2<br />
UHF PRO<br />
Search<br />
Search for a program<br />
Interactive TV<br />
Remote Key<br />
Green number 1 indicates TV1<br />
Blue number 2 indicates TV2<br />
Watch video from popular<br />
news, entertainment, <strong>and</strong><br />
sports networks all on one<br />
screen.<br />
Device Codes:<br />
TV: VCR: AUX:<br />
My remote is programmed<br />
in Limited Mode (check box):<br />
Tip: Using the Limited Mode option helps prevent you from accidentally tuning to<br />
a TV or VCR channel (or input) that does not display satellite TV programming.<br />
Select an icon for customer support, news,<br />
shopping, sports, games <strong>and</strong> entertainment.<br />
Press