PANOLUX 150 - KAMERA WERK DRESDEN GmbH
PANOLUX 150 - KAMERA WERK DRESDEN GmbH
PANOLUX 150 - KAMERA WERK DRESDEN GmbH

Create successful ePaper yourself
Turn your PDF publications into a flip-book with our unique Google optimized e-Paper software.
<strong>PANOLUX</strong> <strong>150</strong><br />
The <strong>PANOLUX</strong> <strong>150</strong><br />
The <strong>PANOLUX</strong> <strong>150</strong> is an exposure metering and control module<br />
which you can purchase in addition to your NOBLEX <strong>150</strong>/175.<br />
The <strong>PANOLUX</strong> automatically controls the exposure time of<br />
your camera. There are two measuring methods for this:<br />
reflective metering (light metering in direction of the subject),<br />
and metering of incident light. The incident light metering<br />
offers two different methods of measuring: pure metering of<br />
incident light (metering of the light falling on the subject and/or<br />
the white diffuser independent of the reflection qualities of the<br />
subject) and subject-oriented metering of incident light<br />
(simultaneous reading with the front detector cell and the<br />
diffuser which means that the reflections of the subject are<br />
taken into consideration). When working in reflective metering<br />
or subject-oriented metering of incident light it is also possible<br />
to enter correction factors into the <strong>PANOLUX</strong> which influence<br />
the drum rotation speed during the exposure process.<br />
According to the correction factor set on the <strong>PANOLUX</strong>, the<br />
lens drum moves slower or faster in the corresponding parts<br />
of the exposure and different exposure times are produced<br />
during one drum rotation. Typically, a slower rotation will<br />
‚brighten‘ that area. Conversely, a faster rotation will ‚darken‘<br />
that portion of the photograph.<br />
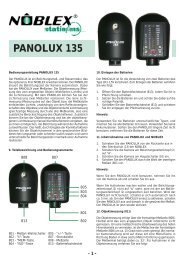
9. Designation of Parts and Operating Elements<br />
808 807<br />
10. Inserting the Batteries<br />
The <strong>PANOLUX</strong> requires 2 batteries LR 1, 1.5V. To insert the<br />
batteries please follow these instructions:<br />
1. Open the battery compartment cover (813) by sliding<br />
the cover in the direction of the arrow.<br />
2. Insert the batteries. Pay attention to the right polarity.<br />
3. Close the battery compartment cover (813) by<br />
sliding it against the arrow marking.<br />
Please note<br />
Never use batteries of different types and do not mix old<br />
batteries with new ones. Do not use rechargable batteries. If<br />
you do not use your <strong>PANOLUX</strong> for an extended time, remove<br />
the batteries.<br />
11. Getting <strong>PANOLUX</strong> and NOBLEX started<br />
1. Slide the <strong>PANOLUX</strong> onto the accessory shoe (13)<br />
on the NOBLEX viewfinder from the back. Put the<br />
spiral cable of your <strong>PANOLUX</strong> in the socket (12)<br />
on the camera.<br />
2. Turn the shutter speed setting knob (2) of your<br />
camera to “A”.<br />
3. Turn the camera on at the ON/OFF switch (10).<br />
4. Turn the <strong>PANOLUX</strong> on by chosing the measuring<br />
mode (801) desired.<br />
Please note<br />
Whenever you do not use the <strong>PANOLUX</strong> take if off the camera<br />
and switch it off.<br />
805<br />
803<br />
804<br />
When taking photographs and the shutter speed setting knob<br />
(2) is not in the “A” mode, the camera works with the exposure<br />
time set at the shutter speed setting knob. If you do not use<br />
your <strong>PANOLUX</strong>, the <strong>PANOLUX</strong> switches itself off after approx.<br />
5min. Switch the <strong>PANOLUX</strong> off and afterwards to the measuring<br />
method desired. The <strong>PANOLUX</strong> is now active again.<br />
813<br />
801 - measuring mode<br />
802 - button "k"<br />
803 - button "MEM"<br />
804 - button "ISO"<br />
801<br />
802<br />
805 - button "+/-"<br />
807 - white diffuser<br />
808 - front detector cell<br />
813 - battery compartment cover<br />
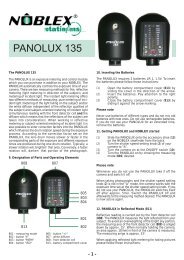
12. <strong>PANOLUX</strong> in Reflected Mode (811)<br />
Reflective reading is carried out by the front detector cell (808).<br />
The <strong>PANOLUX</strong> measures the light reflected from your subject.<br />
To avoid an overweighting of the bright sky portion, the<br />
measuring axis of the front detector cell (808) is anlged down<br />
by approx. 15 . When normally holding the camera, an area<br />
approx. 18 feet in front of the camera is measured. The<br />
measuring anlge is approx. 33 .<br />
- 1 -
When applying reflected light metering for taking pictures<br />
please follow these instructions:<br />
1. Start the <strong>PANOLUX</strong> as described in chapter 11.<br />
(switch (801) is in position reflected mode (811))<br />
2. Press button “k” (802) to get to the aperture setting<br />
mode. Now the indicator will blink red/green in the<br />
last aperture set.<br />
3. Set the aperture desired by pressing the buttons<br />
marked with the respective arrows. When pressing<br />
button (805) or (802) a lower aperture is set. When<br />
pressing button (803) or (804) a higher aperture is<br />
set. Begin this operation within 3 seconds after<br />
pressing button “k” (see 2.). Otherwise the<br />
<strong>PANOLUX</strong> automatically leaves the setting mode.<br />
4. When the aperture desired lights up, wait for approx.<br />
3 seconds. The <strong>PANOLUX</strong> automatically saves the<br />
set aperture.<br />
5. Press button “ISO” (804) to get to the ISO setting<br />
mode. Now the indicator will blink red/green in the<br />
last ISO measurement set.<br />
6. Set the ISO measurement by pressing the buttons<br />
marked with the respective arrows. When pressing<br />
button (805) or (802) a lower ISO measurement is<br />
set. When pressing button (803) or (804) a higher<br />
ISO measurement is set. Begin this operation within<br />
3 seconds after pressing button “ISO” (see 5.).<br />
Otherwise the <strong>PANOLUX</strong> automatically leaves the<br />
setting mode.<br />
7. When the ISO measurement desired lights up, wait<br />
for approx. 3 seconds. The <strong>PANOLUX</strong> automatically<br />
saves the ISO measurement.<br />
8. Now, the <strong>PANOLUX</strong> will automatically control the<br />
exposure speed. To take a picture simply advance<br />
the winding disk (5) in the direction of the arrow<br />
until it stops and press the shutter release button<br />
(4).<br />
Please note<br />
812 - incident mode<br />
811 - reflected mode<br />
Pay attention to the fact that the aperture set on the <strong>PANOLUX</strong><br />
is the same as the aperture chosen on the aperture selector<br />
wheel (1). Otherwise inaccurate exposures are possible.<br />
If the <strong>PANOLUX</strong> gives an exposure time in the slow speed<br />
range (LED indicator shows red), the slow speed range must<br />
be set on the control ring (702) of the long time exposure<br />
module. If the <strong>PANOLUX</strong> afterwards shows an exposure time<br />
in the fast speed range again (LED indicator shows green),<br />
the fast speed range must be set with the control ring (702)<br />
as well. The LED indicators on <strong>PANOLUX</strong> and camera must<br />
show the same color. Otherwise inaccurate exposures are<br />
possible. During the exposure process, the indicator blinks<br />
with the exposure time selected by the <strong>PANOLUX</strong>. Should it<br />
be too bright for an accurate exposure, the speed indicator<br />
blinks at the shortest exposure time. Use either a higher<br />
aperture or a less sensitive film. Should it be too dark for an<br />
accurate exposure the speed indicator will blink in the slowest<br />
exposure time. Use either a lower aperture or a more sensitive<br />
film.<br />
13. Reflective metering with exposure correction (811)<br />
It is possible to influence the exposure time measured by<br />
reflective metering by entering correction factors. This results<br />
in a dynamic change of the shutter speed rotation during the<br />
exposure. That means when using correction factors the lens<br />
drum moves slower or faster in the corresponding parts of<br />
the exposure and different exposure times are produced during<br />
one drum rotation. When taking pictures in the reflected mode<br />
with exposure correction please follow these instructions:<br />
1. Start camera and <strong>PANOLUX</strong> as described in chapter<br />
12.<br />
2. Press button “+/-“ to get to the correction mode.<br />
Now the indicator will blink red/green in the correction<br />
factor +/- 0.<br />
3. Set the correction factor desired by pressing the<br />
buttons marked with the respective arrows. When<br />
pressing button (805) or (802) a negative correction<br />
factor is set. When pressing button (803) or (804)<br />
a positive correction factor is set. Begin this operation<br />
within 3 seconds after pressing button “+/-“ (see<br />
2.). Otherwise the <strong>PANOLUX</strong> automatically leaves<br />
the setting mode.<br />
4. When the correction factor desired lights up, wait<br />
for approx. 3 seconds. The <strong>PANOLUX</strong> automatically<br />
saves the correction factor.<br />
5. To take a picture simply advance the winding disk<br />
(5) in the direction of the arrow until it stops and<br />
press the shutter release button (4).<br />
Examples<br />
#<br />
measurement t<br />
correction<br />
factor +/-<br />
1 1/60 s 0<br />
(standard)<br />
left portion<br />
of the picture<br />
centre part<br />
right portion<br />
of the picture<br />
1/60 s 1/60 s 1/60 s<br />
2 1/60 s +2 1/30 s 1/60 s 1/125 s<br />
3 1/60 s -1 1/250 s - 1/60 s<br />
(intermediate value)<br />
250<br />
125<br />
60<br />
30<br />
15<br />
left centre right<br />
1/60 s 1/60 s - 1/30 s<br />
(intermediate value)<br />
As you can see from the table the middle part of the picture<br />
is always exposed with the shutter speed measured by the<br />
front detector cell (808). According to the correction factor<br />
set, the exposure time changes from the right to the left or<br />
vice versa. The direction is determined by the sign of the<br />
correction factor:<br />
+ means that the left part is overexposed (+ = more<br />
light); the left portion of the picture is brighter (the<br />
lens drum moves slower in the left part of the exposure)<br />
- means that the left part is underexposed (- = less<br />
light); the left portion of the picture is darker (the<br />
lens drum moves faster in the left part of the<br />
exposure)<br />
The correction factor affects the entire exposure. That means<br />
a factor of +2 produces a correction of 2 shutter speeds over<br />
the whole picture beginning brighter in the left part.<br />
# 2<br />
# 1<br />
# 3<br />
- 2 -
Please note<br />
When switching the <strong>PANOLUX</strong> on as well as after every single<br />
exposure the correction factor is automatically set to +/- 0.<br />
There is no exposure compensation. The film is exposed by<br />
a single constant shutter speed. We recommend for a first<br />
estimation of possible correction factors the following: Switch<br />
camera and <strong>PANOLUX</strong> on, set the aperture desired as well as<br />
the ISO measurement and pan camera and <strong>PANOLUX</strong> over<br />
your subject. Pay attention to the exposure time indicator of<br />
your <strong>PANOLUX</strong>. This procedure will give you the necessary<br />
information needed for a first subjective estimation (see also<br />
chapter 17).<br />
14. <strong>PANOLUX</strong> in Incident Mode (812)<br />
When working with the pure metering of incident light the light<br />
falling on your subject (respectively on the white diffuser (807))<br />
is measured. The measurement does not take into account<br />
any reflected light. The incident light is measured by two light<br />
sensors oriented to the back right and to the back left under<br />
the white diffuser (807). When measuring the incident light the<br />
average value between both light sensors is determined. This<br />
average exposure time is basis for the complete exposure.<br />
When applying pure metering of incident light measurement<br />
please follow these instructions:<br />
1. Start the <strong>PANOLUX</strong> as described in chapter 11.<br />
(switch (801) in position of incident mode (812))<br />
2. Press button “k” (802) to get to the aperture setting<br />
mode. Now the indicator will blink red/green in the<br />
last aperture set.<br />
3. Set the aperture desired by pressing the buttons<br />
marked with the respective arrows. When pressing<br />
button (805) or (802) a lower aperture is set. When<br />
pressing button (803) or (804) a higher aperture is<br />
set. Begin this operation within 3 seconds after<br />
pressing button “k” (see 2.). Otherwise the<br />
<strong>PANOLUX</strong> automatically leaves the setting mode.<br />
4. When the aperture desired lights up, wait for approx.<br />
3 seconds. The <strong>PANOLUX</strong> automatically saves the<br />
aperture.<br />
5. Press button “ISO” (804) to get to the ISO setting<br />
mode. Now the indicator will blink red/green in the<br />
last ISO measurement set.<br />
6. Set the ISO measurement by pressing the buttons<br />
marked with the respective arrows. When pressing<br />
button (805) or (802) a lower ISO measurement is<br />
set. When pressing button (803) or (804) a higher<br />
ISO measurement is set. Begin this operation within<br />
3 seconds after pressing button “ISO” (see 5.).<br />
Otherwise the <strong>PANOLUX</strong> automatically leaves the<br />
setting mode.<br />
7. When the ISO measurement desired lights up, wait<br />
for approx. 3 seconds. The <strong>PANOLUX</strong> automatically<br />
saves the ISO measurement.<br />
8. Press button “+/-“ to get to the correction mode.<br />
Now the indicator will blink at the correction factor<br />
+1.<br />
9. Set the correction factor to +/- 0 by pressing button<br />
(805) or (802). Begin this operation within 3 seconds<br />
after pressing button “+/-“ (see 8.). Otherwise the<br />
<strong>PANOLUX</strong> automatically leaves the setting mode.<br />
10. When the correction factor +/- 0 lights, wait for<br />
approx. 3 seconds. The <strong>PANOLUX</strong> automatically<br />
saves the correction factor.<br />
11. Now, the <strong>PANOLUX</strong> will automatically control the<br />
exposure speed. To take a picture simply advance<br />
the winding disk (5) in the direction of the arrow<br />
until it stops and press the shutter release button<br />
(4).<br />
Please note<br />
When working with the pure metering of incident light the<br />
correction factor +/- 0 must be set always.<br />
The pure metering of incident light and the reflective metering<br />
produce comparable exposures only when the light falls on<br />
the subject from the back or from the side (measuring range<br />
of the white diffuser (807)) and when the subject has an<br />
average remission degree of p=0.17 (bright grey). As these<br />
requirements are not given always the subject-oriented<br />
metering of incident light is described in the following.<br />
15. Subject-oriented Metering of Incident Light (812)<br />
When working with the subject-oriented metering of incident<br />
light all three light sensors (807 and 808) are active. This kind<br />
of metering results in an automatic exposure compen-sation<br />
by different drum speeds during the exposure process. The<br />
compensation is intensified when entering positive correction<br />
factors or can be reversed when entering negative correction<br />
factors (verticals). Here an example: Sunlight falls from the<br />
back over your right shoulder on the subject. Consequently,<br />
the left part of your subject is brighter (too bright) and the<br />
right part of the subject is darker (too dark). The different<br />
measurements of the two light sensors under the white diffuser<br />
(807) result in a faster rotation of the lens drum in the left part<br />
of your subject and in a slower rotation of the lens drum in<br />
the right part of your subject. An exposure compensation<br />
takes place during the lens rotation. The exposure time for<br />
the middle part of the subject is measured by the front detector<br />
cell (808).<br />
When applying subject-oriented metering of incident light for<br />
taking pictures please follow these instructions:<br />
1. Start the <strong>PANOLUX</strong> as described in chapter 11.<br />
(switch (801) is in position incident mode (812)).<br />
2. Press button “k” (802) to get to the aperture setting<br />
mode. Now the indicator will blink red/green in the<br />
last aperture set.<br />
3. Set the aperture desired by pressing the buttons<br />
marked with the respective arrows. When pressing<br />
button (805) or (802) a lower aperture is set. When<br />
pressing button (803) or (804) a higher aperture is<br />
set. Begin this operation within 3 seconds after<br />
pressing button "k” (see 2.). Otherwise the<br />
<strong>PANOLUX</strong> automatically leaves the setting mode.<br />
4. When the aperture desired lights, wait for approx.<br />
3 seconds. The <strong>PANOLUX</strong> automatically saves the<br />
aperture.<br />
5. Press button “ISO” (804) to get to the ISO setting<br />
mode. Now the indicator will blink red/green in the<br />
last ISO measurement set.<br />
6. Set the ISO measurement by pressing the buttons<br />
marked with the respective arrows. When pressing<br />
button (805) or (802) a lower ISO measurement is<br />
set. When pressing button (803) or (804) a higher<br />
ISO measurement is set. Begin this operation within<br />
3 seconds after pressing button “ISO” (see 5.).<br />
Otherwise the <strong>PANOLUX</strong> automatically leaves the<br />
setting mode.<br />
7. When the ISO measurement desired lights, wait<br />
for approx. 3 seconds. The <strong>PANOLUX</strong> automatically<br />
saves the ISO measurement.<br />
8. Press button “+/-“ to get to the correction mode.<br />
Now the indicator will blink at the correction factor<br />
+1.<br />
9. In case you would like to chose another correction<br />
factor (see table), set the factor by pressing button<br />
(805)/(802) or (803)/(804). Begin within 3 seconds<br />
after pressing button “+/-“ (see 8.). Otherwise the<br />
<strong>PANOLUX</strong> automatically leaves the setting mode.<br />
- 3 -
10. When the correction factor desired lights, wait for<br />
approx. 3 seconds. The <strong>PANOLUX</strong> automatically<br />
saves the correction factor.<br />
11. Now, the <strong>PANOLUX</strong> will automatically control the<br />
exposure speed. To take a picture simply advance<br />
the winding disk (5) in the direction of the arrow<br />
until it stops and press the shutter release button<br />
(4).<br />
Subject-oriented Metering of Incident Light<br />
(Examples for NOBLEX <strong>150</strong>)<br />
of exposure times offered by the camera only. In case the<br />
measurements of the <strong>PANOLUX</strong> are beyond the range of<br />
shutter speeds offered by your camera, the shutter speeds<br />
will be automatically restricted. Whenever you would like to<br />
work with a large range of shutter speeds we recommend to<br />
set the aperture so that your <strong>PANOLUX</strong> shows the middle<br />
exposure time.<br />
Automatic Restriction of Exposure Times<br />
(Examples for NOBLEX <strong>150</strong> in reflected mode)<br />
measurements<br />
exposure of the picture<br />
measurement<br />
of left light<br />
sensor<br />
measurement<br />
of front detector<br />
cell<br />
measurement<br />
of right light<br />
sensor<br />
weighting<br />
factor +/-<br />
left portion<br />
of the picture<br />
centre part<br />
right portion<br />
of the picture<br />
#<br />
measurement<br />
of reflective<br />
metering<br />
correction<br />
factor +/-<br />
left portion<br />
of the picture<br />
centre part<br />
right portion<br />
of the picture<br />
1/30 s 1/60 s 1/125 s +1<br />
(standard)<br />
1/125 s 1/60 s 1/30 s<br />
1 1/30 s +4 1/15 s - restricted 1/30 s 1/125 s<br />
1/30 s 1/60 s 1/125 s -1 1/30 s 1/60 s 1/125 s<br />
1/30 s - 1/125 s 0* 1/60 s 1/60 s 1/60 s<br />
2 1/125 s +4 1/30 s 1/125 s 1/250 s - restricted<br />
3 1/125 s -5 1/250 s - restricted 1/125 s 1/30 s - 1/15 s<br />
1/30 s 1/60 s 1/125 s +2 1/250 s 1/60 s 1/15 s<br />
1/60 s 1/60 s 1/250 s +1 1/125 s 1/60 s 1/30 s<br />
* pure metering of incident light<br />
Please note<br />
When the two light sensors under the white diffuser (807)<br />
measure a contrast the exposure time is matched around the<br />
measurement of the front detector cell (808) for the middle<br />
part of the picture. The <strong>PANOLUX</strong> uses half of the difference<br />
measured by both light sensors (807) for this. An exposure<br />
compensation requires a measurable difference between both<br />
light sensors. If there is no difference, the film is exposed by<br />
the constant shutter speed measured by the front detector<br />
cell (808). As the correction factors only intensify existing<br />
differences the setting of any factor does not lead to a change<br />
in this situation.<br />
The correction factor is set to +1 after switching the <strong>PANOLUX</strong><br />
on and after every single exposure (see also chapter 17.).<br />
500<br />
250<br />
125<br />
60<br />
30<br />
left centre right<br />
18. The Memory Function – MEM<br />
By pressing the memory button “MEM” (803), the measurement<br />
is saved for the next exposure. This function works with all<br />
measuring methods of your <strong>PANOLUX</strong>. After taking the picture,<br />
the saved measurement is automatically deleted. In case the<br />
indicator of shutter speeds alternates between the short and<br />
slow speed range, the speed range desired can be fixed by<br />
pressing the button “MEM” (803).<br />
# 2<br />
# 1<br />
# 3<br />
16. Verticals<br />
When taking verticals with automatic contrast compensation,<br />
it is always necessary to set a negative correction factor. Here<br />
is the explanation: Camera and <strong>PANOLUX</strong> are in a vertical<br />
position. The light sensor which points to the sky measures<br />
a brighter value, the light sensor which points to the ground<br />
measures a darker value. According to the logic used for the<br />
exposure compensation the <strong>PANOLUX</strong> electronics would<br />
interpret the brighter part of the subject at ground level (see<br />
example in chapter 15.). The contrast between sky and ground<br />
would be infensified. However, when using negative correction<br />
factors this effect is reversed. The <strong>PANOLUX</strong> has an effect of<br />
a graduated filter. The sky becomes darker and the ground<br />
brighter (see also chapter 17).<br />
17. Automatic Restriction of Exposure Times<br />
The exposure compensation in the reflected mode as well as<br />
in the subject-oriented incident mode takes place in the range<br />
®<br />
<strong>KAMERA</strong> <strong>WERK</strong> <strong>DRESDEN</strong><br />
G E R M A N Y<br />
<strong>KAMERA</strong> <strong>WERK</strong> <strong>DRESDEN</strong> <strong>GmbH</strong><br />
Bismarckstraße 56 · 01257 Dresden<br />
Tel. +49(0)351 · 2 80 60 · Fax 2 80 63 92<br />
http//: www.kamera-werk-dresden.de<br />
http//: www.noblex.com<br />
- 4 -