Carrera DIGITAL 124 PC-Unit (Item No. 30349
Carrera DIGITAL 124 PC-Unit (Item No. 30349
Carrera DIGITAL 124 PC-Unit (Item No. 30349

Create successful ePaper yourself
Turn your PDF publications into a flip-book with our unique Google optimized e-Paper software.
<strong>PC</strong> UNIT<br />
Version 1.0<br />
Bitte wählen Sie Ihre Sprache · Please select a language · Veuillez choisir votre langue<br />
Por favor seleccione el idioma · Por favor, seleccione o seu idioma<br />
Scegliere la lingua · Kies uw taal · Välj språk · Пожалуйста, выберите Ваш язык<br />
请选择适合您的语言<br />
Technische und designbedingte Änderungen vorbehalten · Subject to technical and design-related changes · Sous réserve de modifications techniques ou de design<br />
Se reserva el derecho de efectuar modificaciones técnicas y relacionadas con el diseño · Reservados os direitos de alterações técnicas e no design<br />
Con riserva di modifiche tecniche e di design · Technische en designgeboden afwijkingen voorbehouden · Med reservation för tekniska och designrelaterade ändringar<br />
Возможны технические и обусловленные дизайном изменения · 保留因技术和外观设计需要进行更改的权利<br />
Stadlbauer Marketing + Vertrieb Ges.m.b.H.<br />
Magazinstraße 4 · 5027 Salzburg · Austria<br />
www.carrera-toys.com · www.carreraclub.com<br />
<strong>30349</strong><br />
7.81.12.05.00 · 08/2008
1<br />
2<br />
3<br />
4<br />
5<br />
6<br />
7<br />
8<br />
9<br />
10<br />
Subject to technical and design-related changes.<br />
<strong>PC</strong> UNIT<br />
Version 1.0<br />
OPERATING INSTRUCTIONS<br />
Welcome / Contents of package ........................................................ 2<br />
System requirements ........................................................................... 3<br />
Setup X-Lap.........................................................................................3 - 5<br />
Connecting <strong>PC</strong> UNIT to the computer .............................................. 6<br />
Starting X-Lap ........................................................................................ 7<br />
How to prepare the start .............................................................. 8 - 16<br />
Lap race ........................................................................................... 17 - 18<br />
Time Race ........................................................................................ 19 - 20<br />
Race statistics / Settings ........................................................... 21 - 24<br />
Trouble shooting .................................................................................. 24<br />
Stadlbauer Marketing + Vertrieb Ges.m.b.H. · Magazinstraße 4 · 5027 Salzburg · Austria<br />
www.carrera-toys.com · www.carreraclub.com<br />
7.81.12.05.00 · 08/2008<br />
<strong>30349</strong>
Welcome to the Team <strong>Carrera</strong>!<br />
The operating instructions contain important information<br />
on how to assemble and operate the <strong>Carrera</strong><br />
<strong>DIGITAL</strong> <strong>124</strong> / <strong>DIGITAL</strong> 132 <strong>PC</strong> UNIT. Please read<br />
them carefully and keep them for future reference.<br />
If you have any queries please contact your retailer<br />
or the <strong>Carrera</strong> Service hotline:<br />
+49 911 7099-145 or visit our websites:<br />
www.carrera-toys.com · www.carreraclub.com<br />
As soon as modifications are being made with<br />
regard to the software these can be downloaded<br />
free of charge at www.carrera-toys.com.<br />
Welcome<br />
Please take note that the <strong>Carrera</strong> <strong>PC</strong> UNIT is only<br />
functioning in combination with item 30344 Black<br />
Box <strong>Carrera</strong> <strong>DIGITAL</strong> <strong>124</strong> / <strong>DIGITAL</strong> 132 and item<br />
30342 <strong>Carrera</strong> lap counter <strong>DIGITAL</strong> <strong>124</strong> / <strong>DIGITAL</strong><br />
132.<br />
Should you need any information on the use of<br />
item 30344 <strong>Carrera</strong> Black Box and item 30342<br />
<strong>Carrera</strong> lap counter please refer to the respective<br />
operating instructions.<br />
We wish you a lot of fun with your new <strong>Carrera</strong><br />
<strong>DIGITAL</strong> <strong>124</strong> / <strong>DIGITAL</strong> 132 <strong>PC</strong> UNIT.<br />
1. Contents of package<br />
1. Software for racing coordination (X-Lap):<br />
· Racing software including driver and car<br />
data base<br />
· Time recording for up to 8 vehicles accurate<br />
to 1/1000 sec.<br />
· Including possibility of saving and printing<br />
2. Operating instructions on CD<br />
3. <strong>PC</strong> UNIT with <strong>PC</strong> connection cable<br />
Please check the contents for completeness and<br />
possible transport damage. The packaging itself<br />
contains important information which should also<br />
be kept.<br />
- 2 -<br />
1 x<br />
1 x<br />
HOME
· Windows 98, XP, 2000 (Vista suitable)<br />
· 50 MB free space on hard drive<br />
· 125 MB RAM<br />
· CPU Pentium or higher<br />
· Resolution min. 800 x 600<br />
ATTENTION: When installing X-Lap the<br />
<strong>PC</strong> UNIT must not yet be connected!<br />
2. System requirements<br />
Insert CD into the CD ROM drive of your computer.<br />
Open the programme via:<br />
„Start/Workstation/CD-ROM drive“.<br />
Fig. 1<br />
Click „Setup.exe“.<br />
Fig. 2<br />
Setup window opens.<br />
To continue click on „Next“.<br />
Fig. 3<br />
Enter the desired setup path e.g. „C:\Program<br />
Files\X-Lap“ and press „Install“.<br />
3. Setup X-Lap<br />
- 3 -<br />
· CD-ROM drive<br />
· USB port<br />
· Language English<br />
· <strong>PC</strong> / notebook / mouse / keyboard<br />
1<br />
2<br />
3<br />
HOME
Fig. 4<br />
Setup starts.<br />
Fig. 5<br />
Setup of X-Lap is completed.<br />
Close window by clicking „Close“.<br />
Fig. 6<br />
The window „Microsoft Data Access“ automatically<br />
opens. To start the setup click on „Yes“.<br />
ATTENTION: this component must be installed<br />
as otherwise X-Lap is not fully functional.<br />
3. Setup X-Lap<br />
- 4 -<br />
4<br />
5<br />
6<br />
HOME
Fig. 7<br />
To continue the setup click „Continue“.<br />
Fig. 8<br />
In order to avoid any errors select the complete<br />
setup by clicking the icon „Complete“.<br />
Fig. 9<br />
Setup has successfully been completed.<br />
Confirm with „Ok“.<br />
3. Setup X-Lap<br />
- 5 -<br />
7<br />
8<br />
9<br />
HOME
1<br />
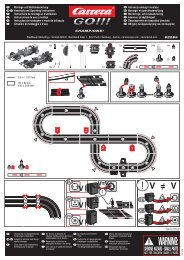
4. Connecting <strong>PC</strong> UNIT to the computer<br />
Fig. 1<br />
Please integrate the <strong>Carrera</strong> lap counter A into<br />
your track layout as described here:<br />
A B<br />
First connect the <strong>PC</strong> UNIT to the <strong>Carrera</strong> lap<br />
counter (Fig. 2 ) and then to the computer (USB<br />
port).<br />
Switch on the <strong>Carrera</strong> Black Box (Fig. 1 B ), a<br />
pop-up saying „new hardware found“ will be<br />
displayed. Having followed the instructions for<br />
confirming the USB driver installation.<br />
All installations are completed and the system can<br />
be used. During installation the related drivers will<br />
be copied into the installation directory chosen by<br />
you.<br />
In case Windows does not find these drivers automatically,<br />
enter the path „C:\Program Files\X-<br />
Lap\USB-Drivers“ in the corresponding window<br />
when installing the driver.<br />
- 6 -<br />
2<br />
HOME
Fig. 1<br />
Before starting please always switch on the<br />
<strong>Carrera</strong> Black Box and click on the X-Lap icon<br />
on your desktop.<br />
Fig. 2<br />
X-Lap automatically verifies the connection<br />
between computer and lap counter.<br />
Fig. 3<br />
„<strong>PC</strong> Access“ needs to be displayed on your<br />
<strong>Carrera</strong> lap counter after successfully connecting<br />
to the <strong>PC</strong>.<br />
Fig. 4<br />
Explanation of the bottom toolbar:<br />
A „Connected to: Com…“ = Com interface connected<br />
via USB<br />
B „green“ = connected, „red“ = no connection,<br />
demo mode<br />
C permanent verification of the connection,<br />
shown by alternating slash<br />
D „Software version“ = up-to-date X-Lap version<br />
E „Hardware Id“ = System-ID necessary for<br />
service<br />
F „Software version hardware“ = up-to-date<br />
software version of the <strong>Carrera</strong> lap counter<br />
G <strong>No</strong>te: The tick G needs to be kept. Otherwise<br />
connecting to the <strong>PC</strong> UNIT will not be possible.<br />
4<br />
5. Starting X-Lap<br />
A B C D E F<br />
- 7 -<br />
1<br />
2<br />
3<br />
G<br />
HOME
4<br />
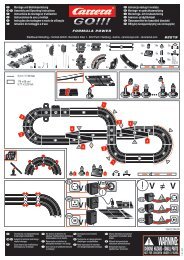
A B<br />
6. How to prepare the start<br />
6.1 General explanations<br />
ATTENTION:<br />
With the <strong>PC</strong> UNIT being connected, driving/training<br />
is possible at any time. Based on the connection<br />
to the programme X-Lap, the <strong>Carrera</strong> lap<br />
counter starts counting only after having activated<br />
a lap-/ time race.<br />
Fig. 1<br />
To quit the programme click on „Quit X-Lap“.<br />
6.2 Race Monitor<br />
Fig. 2<br />
Select Race Monitor via menu bar.<br />
Fig. 3<br />
The Race Monitor opens. When first using X-Lap<br />
this may be dragged to a desired size. Settings<br />
are automatically saved and maintained when<br />
opened again.<br />
Fig. 4<br />
A Driver´s / car´s position (up to 6 drivers plus 1<br />
Autonomous Car and 1 Pace Car)<br />
ATTENTION: In case several Autonomous Cars<br />
are being run simultaneously these will be commonly<br />
counted on position 7 and all Pace Cars<br />
are commonly counted on position 8.<br />
B Driver´s / car´s name<br />
C Picture of drivers / cars (see 6.4)<br />
D Best lap time<br />
E Lap time last driven<br />
F Laps driven<br />
C<br />
- 8 -<br />
1<br />
2<br />
3<br />
D E F<br />
HOME
Fig. 5<br />
5<br />
6<br />
6. How to prepare the start<br />
G Access to driver- and car databases<br />
„Setup race“<br />
H Lap races<br />
6.3 Setup Race<br />
Fig. 6<br />
G<br />
H<br />
I K<br />
A Entering driver´s and car´s names or selecting<br />
from database B and E<br />
B Overview of the chosen driver database<br />
(see 6.4)<br />
C Path to above mentioned database<br />
D Path to race results<br />
E Overview of the chosen car database<br />
A B<br />
G H I<br />
- 9 -<br />
I Time races<br />
J Resetting Race Monitor<br />
K Closing Race Monitor<br />
F Path to above mentioned car database<br />
G Resetting all entered data relating to driver<br />
and car<br />
H Click „Ok“ to apply settings<br />
I Click „Cancel“ to abort. Driver´s and car´s<br />
name entered will not be saved.<br />
J Select which picture shall be displayed in the<br />
Race Monitor (for creating driver and car data<br />
please refer to 6.4 )<br />
E<br />
J<br />
C<br />
D<br />
J<br />
F<br />
J<br />
HOME
8<br />
6. How to prepare the start<br />
6.4 Creating driver and car data<br />
Fig. 7<br />
To edit the driver/car database click on „Edit driver<br />
database“ A or „Edit car database“ B .<br />
Fig. 8<br />
„Car and drivers database“ opens.<br />
Choose between „Driver database“ and „Car<br />
database“ A .<br />
To create a new driver or a new car please click<br />
on „Add driver“ or „Add car“ B .<br />
From now on the „Driver“ is going to explain<br />
further steps of programming in the screenshots.<br />
A<br />
B<br />
7<br />
- 10 -<br />
A<br />
B<br />
HOME
6. How to prepare the start<br />
Fig. 9<br />
Enter all desired data relating to the driver or car.<br />
Select a driver picture or car picture via button<br />
„Select driver picture file“ or „Select car picture<br />
file“ A . If you don´t have any adequate picture<br />
of the driver or car please leave in blank.<br />
Fig. 10<br />
All driver pictures must be saved as „C:\Program<br />
Files\X-Lap\DriverData“ and all car pictures as<br />
„C:\Program Files\X-Lap\CarData“. Mark the<br />
desired picture and apply with „Open“.<br />
Fig. 11<br />
Save your entries with „Enter new driver data“<br />
or „Enter new car data“.<br />
9<br />
10<br />
11<br />
- 11 -<br />
A<br />
HOME
14<br />
6. How to prepare the start<br />
6.5 Edit driver or car data<br />
Fig. 12<br />
Mark the desired line for opening A .<br />
Click on „Driver edit“ or „Edit car“.<br />
Fig. 13<br />
Change / delete desired data with „Enter new<br />
driver data“ or save with „Enter new car data“.<br />
Fig. 14<br />
Mark the desired line for deleting A , and click on<br />
„Delete driver“ or „Delete car“ B . Please click<br />
„Yes“ for the following security question C .<br />
A<br />
C<br />
12<br />
A<br />
13<br />
- 12 -<br />
B<br />
HOME
6.6 Create databases<br />
(drivers and cars)<br />
17<br />
6. How to prepare the start<br />
Fig. 15<br />
To create a new driver or car database, click on<br />
„Create new driver database“ or „Create new<br />
car database“.<br />
Fig. 16<br />
Enter the desired database name under „File<br />
name“ and confirm with „Save“. (our example<br />
„monday-race“)<br />
ATTENTION:<br />
To access the database all driver databases have<br />
to be saved as „C:\Program Files\X-Lap\DriverData“<br />
and all car databases as „C:\Program<br />
Files\X-Lap\CarData“.<br />
Fig. 17<br />
Afterwards the desired data for the drivers or cars<br />
(see 6.4) can be entered.<br />
Please confirm with „Ok“.<br />
15<br />
16<br />
- 13 -<br />
HOME
6. How to prepare the start<br />
6.7 Selecting a database<br />
Fig. 18<br />
For selecting a database other than shown, click<br />
on „Select driver database“ or „Select car database“.<br />
Fig. 19<br />
Select the desired database and confirm with<br />
„Open“.<br />
(our example „monday-race“)<br />
18<br />
19<br />
- 14 -<br />
HOME
20<br />
6. How to prepare the start<br />
6.8 Selection driver or car<br />
Fig. 20<br />
Please select the desired driver name A or car type<br />
B by clicking the left mouse button and drag it<br />
to the desired „Driver/Car Position“ C .<br />
The driver´s or car´s name can also be entered directly<br />
via the keyboard.<br />
C<br />
- 15 -<br />
A<br />
B<br />
HOME
21<br />
6. How to prepare the start<br />
6.9 Creating or selecting database<br />
for race results<br />
Fig. 21<br />
For creating a new result database please click<br />
„Create new result file“ A .<br />
Fig. 22<br />
Enter the desired database name under<br />
„File name“ and confirm with „Save“.<br />
Our example „monday-race.res“.<br />
Fig. 21<br />
For selecting another database please click<br />
„Select result file“ B .<br />
Fig. 23<br />
Our example „monday-race.res“.<br />
B<br />
22<br />
23<br />
- 16 -<br />
A<br />
HOME
Fig. 1<br />
To start the lap race click on „Lap race“.<br />
Fig. 2<br />
It is possible to enter a desired number of laps.<br />
A number of 5 laps is preset. The number of<br />
laps changed will be applied for further races<br />
until being changed again. Confirm lap entry<br />
with „Ok“.<br />
Fig. 3<br />
Window „Prepare for start“ opens.<br />
Please proceed as follows:<br />
· Place the pre-coded car/s on the connecting<br />
track<br />
· Push the start button of the Black Box once<br />
· All 5 LEDs flash permanently<br />
· Push start button again<br />
· The start sequence runs<br />
· LEDs flash and signal will be audible, race can<br />
be started<br />
Once the starting light procedure has been finished,<br />
the window „Prepare for start“ closes automatically.<br />
Having passed the <strong>Carrera</strong> lap counter for the<br />
first time the display turns to „0.000“ under „Last<br />
lap“.<br />
7. Lap race<br />
1<br />
2<br />
3<br />
- 17 -<br />
HOME
Fig. 4<br />
As soon as all drivers have completed the number<br />
of laps indicated, the window „Results of last race“<br />
will open and show the results of the race.<br />
These can be printed out with „Print results“ A .<br />
By means of the button „Proceed“ B the window<br />
will be closed and data will be saved as „C:\Program<br />
Files\X-Lap\Results\“.<br />
4<br />
7. Lap race<br />
A B<br />
A B<br />
- 18 -<br />
HOME
Fig. 1<br />
To start the time race click on „Time race“.<br />
Fig. 2<br />
It is possible to enter the desired time. A period of<br />
3 minutes is preset. The time changed will be applied<br />
for further races until being changed again.<br />
Confirm time entry with „Ok“.<br />
Fig. 3<br />
Window „Prepare for start“ opens.<br />
Gehen Sie wie folgt vor:<br />
· Place the pre-coded car/s on the connecting<br />
track<br />
· Push the start button of the Black Box once<br />
· All 5 LEDs flash permanently<br />
· Push start button again<br />
· The start sequence runs<br />
· LEDs flash and signal will be audible, race can<br />
be started<br />
Once the starting light procedure has been finished,<br />
the window „Prepare for start“ closes automatically.<br />
Having passed the <strong>Carrera</strong> lap counter for the first<br />
time the display turns to „0.000“ under<br />
„Last lap“.<br />
8. Time Race<br />
1<br />
2<br />
3<br />
- 19 -<br />
HOME
Fig. 4<br />
As soon as all drivers have completed the time<br />
indicated, the window „Results of last race“ will<br />
open and show the results of the race.<br />
These can be printed out with „Print results“ A .<br />
By means of the button „Proceed“ B the window<br />
will be closed and the data will be saved as<br />
„C:\Program Files\X-Lap\Results\“.<br />
4<br />
8. Time Race<br />
A B<br />
A B<br />
- 20 -<br />
HOME
9. Race statistics / Settings<br />
Fig. 1<br />
By selecting the menu item „Extras“ you have the<br />
choice between „Settings“, „Race results“ and<br />
„Databases“.<br />
9.1 Settings<br />
Fig. 2<br />
„Connection“: Allocation of Com interface.<br />
The tick needs to be kept to ensure X-Lap<br />
automatically searching for the connection!<br />
Fig. 3<br />
„Properties“: Laps completed below the indicated<br />
minimum lap time are not counted by the lap<br />
counter.<br />
Fig. 4<br />
„Race monitor“: Having ticked „Load race monitor<br />
immediately“ the Race Monitor will automatically<br />
be activated when starting X-Lap. Via<br />
the button „Set default size“ the size of the Race<br />
Monitor´s window will be reset.<br />
1<br />
2<br />
3<br />
4<br />
- 21 -<br />
HOME
9. Race statistics / Settings<br />
Fig. 5<br />
„Color settings“: Selection of colors for driver /<br />
car positions in Race Monitor.<br />
Fig. 6<br />
In order to change the color settings please click<br />
on the color you want to change, select a color<br />
from the range of colors and confirm with „Ok“.<br />
All above mentioned settings will be saved by selecting<br />
„Save new settings“ and will be kept until<br />
being changed again.<br />
9.2 Race Results<br />
Fig. 7<br />
„Race results“: The database for race results will<br />
open. All race results of a database will be shown<br />
at a glance.<br />
5<br />
6<br />
7<br />
- 22 -<br />
HOME
8<br />
Fig. 8<br />
A<br />
B<br />
C<br />
D<br />
E<br />
9. Race statistics / Settings<br />
A For closing the window click „Ok“.<br />
B „Race statistics“ Fig. 9 : Indicates the ranking<br />
of all drivers of a database. This can be printed<br />
out via „Print list“. When selecting „Ok“ the<br />
window will close.<br />
C „Delete single race“: To delete a race you have<br />
to mark the corresponding line. Following<br />
click „Delete single race“.<br />
D „Delete all races“: By clicking „Delete all<br />
races“ all races will be deleted.<br />
E „Print results“: For printing out the result list<br />
click on „Print results“.<br />
F „Select race result file“: To select a different<br />
database please click on “Select race result file”<br />
and select the database desired.<br />
F<br />
9<br />
- 23 -<br />
HOME
9.3 Databases<br />
11<br />
9. Race statistics / Settings<br />
Fig. 10<br />
„Car and drivers Database“: By selecting this<br />
menu item you can access the databases at any<br />
time. Fig. 11<br />
Switch off the <strong>Carrera</strong> Black Box, close X-Lap and<br />
check the connection of the <strong>Carrera</strong> <strong>PC</strong> UNIT to<br />
the computer and the <strong>Carrera</strong> lap counter. Switch<br />
on the <strong>Carrera</strong> Black Box again and open X-Lap.<br />
10. Trouble shooting<br />
10<br />
- 24 -<br />
HOME