- Page 1 and 2:
E-MANUAL imagine the possibilities
- Page 3 and 4:
❑ Using the INFO button (Now & Ne
- Page 5 and 6:
All: Shows all currently available
- Page 7 and 8:
How to use Schedule Viewing in Chan
- Page 9 and 10:
Programme View: Displays the progra
- Page 11 and 12:
Edit Channel Number: Edit the numbe
- Page 13 and 14:
Edit Favourites: Set the selected c
- Page 15 and 16:
1 a Red (Sche. Mgr): Moves to the r
- Page 17 and 18:
■ Schedule Manager You can set a
- Page 19 and 20:
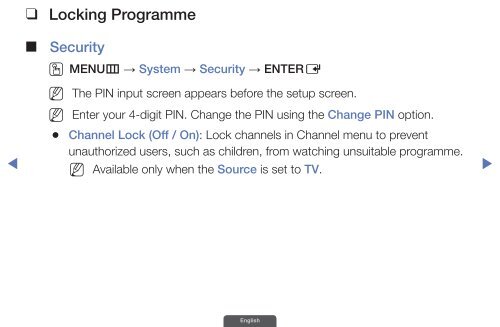
❑ Retuning Channels ■ Country (
- Page 21 and 22:
■ Manual Tuning O MENUm Channel
- Page 23 and 24:
■ Guide Type (Australia only) O M
- Page 25 and 26:
■ Fine Tune (analogue channels on
- Page 27 and 28:
❑ Changing the Preset Picture Mod
- Page 29 and 30:
■ Backlight for LED TV / Cell Lig
- Page 31 and 32:
4:3: Sets the picture to basic (4:3
- Page 33 and 34:
Depending on the input source, the
- Page 35 and 36:
■ Auto Adjustment t for LED 4 ser
- Page 37 and 38:
❑ Changing the Picture Options
- Page 39 and 40:
Colour Space (Auto / Native / Custo
- Page 41 and 42:
Expert Pattern (Off / Pattern1 / Pa
- Page 43 and 44:
■ Picture Options O MENUm Pictur
- Page 45 and 46:
MPEG Noise Filter (Off / Low / Medi
- Page 47 and 48:
Blur Reduction: Adjusts the blur re
- Page 49 and 50:
❑ Changing the Preset Sound Mode
- Page 51 and 52: SRS TruDialog (Off / On) (standard
- Page 53 and 54: Audio Description (not available in
- Page 55 and 56: SPDIF Output for LED, PDP TV : SPDI
- Page 57 and 58: ■ Speaker Settings O MENUm Soun
- Page 59 and 60: ■ Reset Sound (Yes / No) O MENUm
- Page 61 and 62: ❑ Connecting to the Network for P
- Page 63 and 64: You can attach your TV to your LAN
- Page 65 and 66: If your network requires a Dynamic
- Page 67 and 68: Samsung’s Wireless LAN adapter is
- Page 69 and 70: If HIGH PURE THROUGHPUT (Greenfield
- Page 71 and 72: Notice The picture may appear corru
- Page 73 and 74: ■ Network Settings O MENUm Netwo
- Page 75 and 76: The check list for wired network co
- Page 77 and 78: The check list for wireless network
- Page 79 and 80: ❑ Setting the Wired Network for P
- Page 81 and 82: ■ Wired Network Setup (Manual) Us
- Page 83 and 84: ❑ Setting the Wireless Network fo
- Page 85 and 86: 5. If the Security screen pop-up ap
- Page 87 and 88: How to set up manually To set up yo
- Page 89 and 90: If Your TV Fails to Connect to the
- Page 91 and 92: How to connect the device to your T
- Page 93 and 94: ■ Device Name O MENUm Network D
- Page 95 and 96: ❑ Setting the Time ■ Time O ME
- Page 97 and 98: ❑ Using the Sleep Timer O MENUm
- Page 99 and 100: - Source: Select TV or USB content
- Page 101: Off Timer 1 / Off Timer 2 / Off Tim
- Page 105 and 106: PIP settings Main picture Component
- Page 107 and 108: Eco Sensor (Off / On) for LED 5 ser
- Page 109 and 110: ❑ Other Features ■ Language O M
- Page 111 and 112: ■ Digital Text (Disable / Enable)
- Page 113 and 114: ■ Screen Burn Protection for PDP
- Page 115 and 116: N The after-image removal function
- Page 117 and 118: Game Mode is not available in TV mo
- Page 119 and 120: ❑ Support Menu ■ e-Manual O ME
- Page 121 and 122: Signal Information: (digital channe
- Page 123 and 124: By Online for PDP 490 series : Upgr
- Page 125 and 126: ■ Contact Samsung O MENUm Suppor
- Page 127 and 128: ❑ Using the 3D function for PDP 4
- Page 129 and 130: A responsible adult should frequent
- Page 131 and 132: N Some file format may not be suppo
- Page 133 and 134: Component & DTV Source Resolution F
- Page 135 and 136: Method 2 1. Press the W button. and
- Page 137 and 138: The 3D Active Glasses may not work
- Page 139 and 140: ❑ Connecting a USB Device 1. Turn
- Page 141 and 142: For unsupported or corrupted files,
- Page 143 and 144: Disconnecting a USB Device Method
- Page 145 and 146: ❑ Connecting to the PC through ne
- Page 147 and 148: N When you use AllShare Play mode t
- Page 149 and 150: ■ Videos Playing Video 1. Press
- Page 151 and 152: Supported Video Formats File Extent
- Page 153 and 154:
Video decoder Supports up to H.264
- Page 155 and 156:
Supported Photo Formats File Extens
- Page 157 and 158:
N Using the playback menu - Press t
- Page 159 and 160:
❑ Media Contents - Additional Fun
- Page 161 and 162:
Category Operation Videos Photos Mu
- Page 163 and 164:
Category Operation Videos Photos Mu
- Page 165 and 166:
N By connecting your Samsung TV to
- Page 167 and 168:
Using the AllShare Play function, p
- Page 169 and 170:
Using the AllShare Settings functio
- Page 171 and 172:
1 (sub-page): Displays the availabl
- Page 173 and 174:
The Teletext pages are organized ac
- Page 175 and 176:
2. Slide the end of the cable with
- Page 177 and 178:
Issues The TV image does not look a
- Page 179 and 180:
Issues Solutions and Explanations T
- Page 181 and 182:
Issues The picture is good but ther
- Page 183 and 184:
Issues The TV turns off automatical
- Page 185 and 186:
Issues RF(Cable/Antenna) Connection
- Page 187 and 188:
Issues Solutions and Explanations P
- Page 189 and 190:
Issues Solutions and Explanations T
- Page 191 and 192:
Issues You see small particles when
- Page 193 and 194:
❑ Licence TheaterSound, SRS and s