The Spread Multiple West Coast Offense - FootballXOs.com
The Spread Multiple West Coast Offense - FootballXOs.com
The Spread Multiple West Coast Offense - FootballXOs.com

You also want an ePaper? Increase the reach of your titles
YUMPU automatically turns print PDFs into web optimized ePapers that Google loves.
<strong>The</strong> <strong>Spread</strong> <strong>Multiple</strong><br />
<strong>West</strong> <strong>Coast</strong> <strong>Offense</strong><br />
www.TopGunQBacademy.<strong>com</strong>
Complete set of Clinic Notes from<br />
all lectures and PowerPoints<br />
can be downloaded at<br />
www.TopGunQBacademy.<strong>com</strong>
<strong>Multiple</strong> <strong>West</strong> <strong>Coast</strong><br />
<strong>Spread</strong> <strong>Offense</strong><br />
• Derived from Urban Meyer, although most of the<br />
terminology is from Sid Gilman / Joe Gibbs / Colorado<br />
State University (Sonny Lubick)<br />
• Passing offense: Single-side receiver across – backs<br />
routes are called – protection is called<br />
• Run game is set up with Series Number based on<br />
number of backs and position of backs – helps the line<br />
with line-calls and blocking schemes<br />
• Formations are called with descriptive one-syllable<br />
names for easy learning and repeating<br />
• Everyone is told what to do in the play call (no<br />
memorizing)<br />
• Each ‘motion’ receiver / back is given a ‘tag’ call to go in<br />
motion – we motion into the called formation
Overview<br />
• Introduction<br />
• Philosophy of the system<br />
• Play-calling Philosophy<br />
• How the run game is set up<br />
• How the passing game is set up<br />
• Basic “<strong>Spread</strong>” pass protection<br />
• Incorporating two separate sets of<br />
progressions<br />
• <strong>The</strong> formations system<br />
• How motions are called<br />
• How shifts are called<br />
• How the play-calls are made<br />
• Practice / Installation Philosophy<br />
• How the call sheet is set up and used
Introduction<br />
• As a teaching philosophy, this is a <strong>com</strong>plete<br />
offensive system that is very logical and simple<br />
to <strong>com</strong>prehend by both players and coaches<br />
• This system allows you to spend quality time<br />
teaching fundamentals, because you don’t have<br />
to spend an inordinate amount of time running<br />
plays to teach the system as well as specific<br />
plays to the players<br />
• Once the language of the system is learned and<br />
installed, the possible play-calls and formations<br />
are virtually endless
Introduction (cont)<br />
• Easy to understand and easy for players and<br />
coaches to learn<br />
• Simple to install in a short period of time<br />
• Allows a team to make adjustments at<br />
anytime during a game<br />
• Extremely flexible<br />
Note of Interest – It turns out that this is very<br />
close variation of Sid Gilman’s system. Joe<br />
Gibbs (New Redskins Head Coach) runs a<br />
similar system – Extremely flexible for shifts,<br />
motions and multiple formations!
Philosophy of the System<br />
Philosophy of the System<br />
• Use a system where a coach can teach efficiently with<br />
high quality instruction – teaching be<strong>com</strong>es a priority<br />
• Create a precision-timed passing game with explosive<br />
capabilities, i.e. vertically push the ball downfield<br />
– We also have to go into any given season being able<br />
to beat the bump & run defender consistently – we<br />
use our own innovative techniques<br />
• Be able to physically run the ball effectively by doubleteaming<br />
at the point of attack (the inside and outside<br />
zones are also included)<br />
• Have the capability to make immediate adjustments<br />
during a game<br />
• Create an offense that is hard to prepare for because it<br />
is so multifaceted<br />
• Use multiple formations and a multitude of plays<br />
• Take what the defense gives us most all of the time<br />
• Spend quality time teaching individual technique every<br />
practice
Play Calling Philosophy<br />
• Make sure the players are fundamentally sound<br />
• <strong>Spread</strong> the ball around to many players<br />
• Call plays that get the players in a position to<br />
succeed – if they make big plays, it’s a plus<br />
• Put the ball where the defense is vulnerable<br />
• Only audible when absolutely necessary<br />
• Do everything we can to put the defense on their<br />
heels<br />
• Keep the ball from the defense if necessary (a ballcontrol<br />
offense)<br />
• Push the ball downfield and score points (if you<br />
decide you have to get into a shootout)
How the Run System Is Set Up<br />
• Basic line splits<br />
• <strong>The</strong> hole numbering<br />
• NOTE: <strong>The</strong> Guard’s and Tackle’s hands<br />
are even with the Center’s shoelaces.
THE RUNNING GAME<br />
BASIC LINE SPLITS<br />
12”<br />
12”<br />
12” 12” 12” 12”<br />
QB<br />
HOLE NUMBERING<br />
9 7 5 3 10<br />
2 4 6 8<br />
QB
How the Run System Is Set Up<br />
• <strong>The</strong> master calls<br />
• <strong>The</strong> line calls<br />
• NOTE: <strong>The</strong> run game is very similar to<br />
Alex Gibbs Tight-zone / Wide-zone<br />
concepts, with isolation / power plays<br />
and draws added to the mix.
Run System Calls<br />
• Blocking Scheme<br />
Master Calls<br />
– 46 / 57 “Stretch”<br />
– 42 / 53 “Zone”<br />
– 45 / 54 “Dart”<br />
– 40 / 51 “Trap”
How the Run System Is Set Up<br />
• Single – Fullback type plays<br />
• 40 series<br />
– Back lines up on the weak-side<br />
• 30 series<br />
– Back lines directly behind QB<br />
• 50 series<br />
– Back lines up on the Strong-side
40 Series (Back on left-side)<br />
46 Stretch
Outside Zone (Stretch)<br />
• <strong>The</strong> ball carrier has two reads; a point of attack<br />
read, and a secondary read in certain cases.<br />
• Your 1st read is the first down-lineman from the<br />
outside, in. Linebackers are not down linemen.<br />
• You go to your second read if that man (your 1st<br />
read) goes outside your blocker. Ask yourself “is<br />
your read’s helmet inside or outside your<br />
blocker?”<br />
• If you go to your secondary read, that read<br />
be<strong>com</strong>es the next down-lineman in, which will be<br />
double-teamed.<br />
• You only get to make one cut; then you must<br />
push the ball vertically up-field.<br />
• Whether you are wrong or right on your read, you<br />
make a choice and then must push the ball upfield.
Goal: To make the End show us right now exactly where the<br />
football is going.<br />
Right Tackle<br />
1.) You must stretch his outside while grabbing his inside<br />
with your inside hand. You are doing this so he does not<br />
stretch you wide, and then throw you wide and then slide up<br />
inside.<br />
a. This must be drilled constantly!<br />
2.) You must control his inside with your inside arm and make<br />
him make a decision on going inside or going outside right<br />
now. We don’t want the defender just standing there – we<br />
have got to move him one direction or the other.
Goal: To double team the back’s number 2 read which in this case is the<br />
Tackle (DT) so that we can control him should the End go outside.<br />
Predominantly, the defensive tackle will be a better athlete / football player<br />
than the offensive guard. We will double the DT as long as he doesn’t move.<br />
We need to help our guard with the center. Now the backside Guard will<br />
attack the Nose.<br />
Right Guard<br />
1.) Your target area is the outside half of the DT. You will have help on the<br />
inside with your Center (DEN call). You will block the outside half of the DT<br />
and knock him off the ball. You are not worried about him <strong>com</strong>ing inside at<br />
all.<br />
Center<br />
1.) Your target area is the tackle’s (DT) helmet. You will drive him until he<br />
disappears and /or then look for the backer plugging.
40 Series (Back on Left-side)<br />
42 Read
Tight Zone (Read)<br />
1) You must give the ball carrier a clean read every time.<br />
2) If you have a <strong>com</strong>bination block and are the inside lineman, your<br />
aiming point is to put your helmet on the defender’s helmet.<br />
3) If you have a <strong>com</strong>bination block and are the inside lineman and<br />
have not made contact with the down lineman after your first<br />
step, its now time to climb to the second level – the ball is now<br />
rolling back behind you.<br />
4) If you have a <strong>com</strong>bination block and are the outside lineman,<br />
you have the outside have of the defender. If he goes outside, you<br />
now must lock you backside hand because your help is climbing and<br />
the ball is rolling back behind you.
M<br />
Ball Carrier’s<br />
#1 Read<br />
DT<br />
Ball Carrier’s<br />
#2 Read<br />
DE<br />
S<br />
C<br />
RG<br />
RT<br />
Y
M<br />
Ball Carrier’s<br />
#1 Read<br />
N<br />
Ball Carrier’s<br />
#2 Read<br />
DE<br />
S<br />
C<br />
RG<br />
RT<br />
Y
50 Series (Back on Right-side)<br />
54 Dart
How the Run System Is Set Up<br />
• Quarterback movement
Single-digit Series (QB running the ball)<br />
6 Speed Option
Single – Digit<br />
QB series – “Zero Draw” / “1 Draw”
Single – Digit<br />
QB series “2 Lead Draw”
Play-side Line Calls
Play-side Line Calls<br />
Playside Guard and Tackle <strong>com</strong>bination block<br />
Cub<br />
DE<br />
Playside Guard and Tackle <strong>com</strong>bination block<br />
Cub<br />
DE<br />
RG<br />
RT<br />
LT<br />
LG<br />
Playside Tackle and Tight-end <strong>com</strong>bination block<br />
Bear<br />
DE<br />
Playside Tackle and Tight-end <strong>com</strong>bination block<br />
Bear<br />
DE<br />
RT<br />
Y<br />
Y<br />
LT
Play-side Line Calls
Backside Line Calls
How the Passing System Is Set<br />
Up<br />
• Receiver routes are called single-side<br />
receiver across
PASS PLAY CALLING SYSTEM<br />
SPLIT RIGHT 628 QUEEN
SLOT RIGHT 628 QUEEN
<strong>The</strong> Wide Receiver Route Tree
9<br />
7<br />
3<br />
5<br />
8 Skinny<br />
6 (Dig)<br />
6 (Square-in)<br />
8<br />
2 4<br />
1<br />
DRAG (non quick 2)<br />
0<br />
QB
Tight-end<br />
Inside Receiver Route Tree
TIGHT-END / INSIDE RECEIVER<br />
PASS ROUTES<br />
7<br />
9<br />
8<br />
5<br />
6<br />
2<br />
4<br />
3<br />
1<br />
0<br />
STICK<br />
QB
Running Back’s s Route Tree
CALLED PASS ROUTES<br />
FOR RUNNING BACKS<br />
WHEEL<br />
UP<br />
POST<br />
CORNER<br />
CREASE<br />
"M"<br />
STAB<br />
CUT<br />
QB<br />
"V"<br />
SNEAK<br />
STOP<br />
FLAT<br />
SHOOT<br />
SWING
Quarterback Drops
Drops from Shotgun<br />
1 – step<br />
1 – step<br />
3 – tap<br />
3 – tap<br />
3 – quick<br />
3 – roll<br />
3 – big, (hold)<br />
5 – quick<br />
5 – roll<br />
5 – hitch<br />
5 – big, hitch<br />
7 – quick<br />
7 – quick, hitch<br />
7 – big, hitch<br />
Sprint action<br />
Must be under center<br />
Must be under center<br />
Catch, punch-step, throw<br />
Catch, punch-step, throw<br />
Catch, punch-step, throw<br />
Catch, punch-step, throw<br />
Catch, punch-step, hold, throw<br />
Catch, punch-step, 3 – quick<br />
Catch, punch-step, 3 – roll<br />
Catch, punch-step, 3 – hitch<br />
Catch, punch-step, 3 – big, hitch<br />
Catch, punch-step, 5 – quick<br />
Catch, punch-step, 5 – quick, hitch<br />
Catch, punch-step, 5 – big, hitch<br />
9 yards minimum<br />
Bubble screen<br />
≤ 5 yard goal line Fade<br />
Quick Flat<br />
Quick Slant (dbl. slant)<br />
Quick Hitch, Slant – Flat Key<br />
Quick Speed-out by WR<br />
Stick<br />
Spot<br />
Speed-out by WR<br />
Curls, corners by inside rec.<br />
7 – step <strong>com</strong>eback by WR<br />
Drags, Smashes<br />
Digs, square-ins<br />
Post-corners by the WR<br />
Sprint Option<br />
Play action 9 yards minimum Add 5 yards to normal route depth
Drops from Shotgun<br />
Examples<br />
Line of Scrimmage<br />
QB Toes @ 4.5 yards<br />
Q<br />
LOS<br />
1<br />
2<br />
3<br />
4<br />
5<br />
6<br />
7<br />
8<br />
9
Special Situation<br />
Throwing from a balanced<br />
four or five-wide receiver set
Special Situation:<br />
Throwing From a Balanced<br />
Four or Five-receiver Set<br />
• When we get into a balanced, four or fivereceiver<br />
set such as Dallas, Houston, or our<br />
Island Package, and we are running “mirrored<br />
routes”, we will call the routes as if they are a<br />
strong-side route <strong>com</strong>bination call (the inside<br />
receiver’s route will be called first, followed by<br />
the outside receiver’s route).<br />
• An example of this type of play-call would be<br />
“Dallas Right, 39 F Stab Queen”. <strong>The</strong><br />
protection call (Queen) will alert the linemen<br />
that the play called is a pass play, and not a<br />
thirty-series run play.
“Dallas Right, 39 F Stab Queen”
Tagging Mirrored Routes<br />
•When we are in a balanced set<br />
running mirrored routes and we<br />
want to change one of the<br />
receiver’s routes in the pattern,<br />
we “tag” it.
Stab<br />
X<br />
H<br />
Queen<br />
Protection<br />
Y<br />
Z<br />
Q<br />
F<br />
“Dallas Right, 39 H Post - F Stab Queen”
Special Situation:<br />
Throwing From a Balanced<br />
Four or Five-receiver Set (Cont.)<br />
• Another example would be “Maui Right,<br />
Rub - Dart, F Juke Gone”. <strong>The</strong> protection<br />
call “Gone” tells the line to block away<br />
from the call side “Right”.
Gone Protection<br />
X<br />
Dart<br />
H<br />
Rub<br />
QB<br />
F<br />
Juke<br />
Y<br />
Rub<br />
Z<br />
Dart<br />
“Maui Right, Rub - Dart, F Juke Gone”
• “Fiji Right, 826 Flat Hitch Gone”. <strong>The</strong><br />
protection call “Gone” tells the line to<br />
block away from the call side “Right”.
“Bali Right, 826 Flat - Hitch Gone”
Switch Passes<br />
(with Mirrored Routes)<br />
• We’ll call Dallas Right Switch Left (or<br />
Right) Quick 22<br />
– <strong>The</strong> “left-side” receivers will run the ‘switch’<br />
quick-2’s, and the other side receivers will<br />
run the regular quick-2 routes.
Example: Dallas Right, Switch Left, Quick 22, Queen
• We’ll call<br />
Switch Passes<br />
(with Complimentary Routes)<br />
Perhaps when going no-huddle<br />
• “Dallas Right Switch Right 88-Dig, Jack”<br />
– Now the “right-side” receivers will run the<br />
‘Switch’ 8-routes, and the other side<br />
receivers will run the regular Square-in / Dig<br />
routes.<br />
• You’re going to do this in no-huddle type<br />
situations when you don’t want to “flip”<br />
the formation.
15 yards<br />
15 yards<br />
10 yards 10 yards<br />
Example: Dallas Right, Switch Right, 88 Dig, Queen
• We’ll call<br />
Switch Passes<br />
(on both sides)<br />
• “Dallas Right Switch Spot – 7 F Choice<br />
Jack”<br />
– Both sides will run “Switch” releases and run<br />
their respective routes. <strong>The</strong> outside receivers<br />
are always HOT and peak into the backfield as<br />
they run their routes.<br />
– We call the pattern exactly like we would if we<br />
were in a mirrored route situation where we go<br />
inside out with the numbers.
Example: Dallas Right, Switch, Spot – 7 F Choice Jack
Horse (hay)(<br />
) Passes<br />
(H and Y Switch)<br />
• We’ll call<br />
• “Press Right Hay (Horse) 826 H Chase Jack”<br />
– Everyone does their route called except now the H<br />
and the Y are “Switching”.
15 yards<br />
7-steps<br />
5 yards<br />
5 yards<br />
Example: Press Right Hay (Horse) 826 H Chase Jack
Hazee Passes<br />
(H and Z Switch)<br />
• We’ll call<br />
• “Press Right Haze 863 H Shoot Jack<br />
– Everyone does their route called except not<br />
the H and the Z are “Switching”.
Example: Press Right Haze 863 H Shoot Jack
• We’ll call<br />
Seam Releases<br />
• “Dbl. Stack Right Seam 787 H Dig Jack<br />
– Seam tells the X and the Z to run Seam<br />
Releases.<br />
– Everyone does their route called and now the<br />
X and the Z use Seam Releases, while the H<br />
and the Y use Burst Releases.
Example: Dbl. Stack Right Seam 787 H Dig Jack
• We’ll call<br />
Burst Releases<br />
• “Dbl. Stack Right Burst 45 F Choice Jack<br />
– Seam tells the X and the Z to run Burst<br />
Releases.<br />
– Everyone does their route called and now the<br />
X and the Z use Burst Releases, while the H<br />
and the Y use Seam Releases.
Pass Protection
Max – Oh<br />
Stay<br />
Max<br />
OH<br />
Queen<br />
Jack<br />
Gone<br />
Pass Protections<br />
Man – 8 man protection scheme<br />
Man – 7 man protections scheme<br />
Man – 7 man protection that can get all 5<br />
receivers out<br />
Turn back – 6 / 7 man protection that can<br />
get 6 / 7 into the pattern<br />
Turn back – 6 man protection that can get<br />
all 5 receivers out<br />
Turn back – 6 man protection that can get<br />
all 5 receivers out<br />
Turn back – 5 man protection that can get<br />
all 5 receivers out (Queen with built-in HOT<br />
routes)
Base / Solo<br />
Lou / Roc<br />
Liz / Rip<br />
Lion / Ram<br />
Laser / Rifle<br />
Loco /<br />
Recon<br />
Pass Pro Line Calls<br />
Man<br />
3 – man turn back protection 3 on 3 – back<br />
double reads<br />
3 – man turn back protection 3 on 4 – back<br />
single reads<br />
4 – man turn back protection 4 on 4 – back<br />
double reads<br />
4 – man turn back protection 4 on 5 – back<br />
single reads<br />
5 – man turn back protection – backside<br />
tackle starts the slide to wash down<br />
everything and the back is responsible for<br />
the backside now
Basic pass protection<br />
“Jack” and “Queen” calls – if we want<br />
to get both backs out and still<br />
employ a six-man protection scheme.
Direction of release by the backs<br />
• <strong>The</strong> pass protection calls tell the backs which<br />
side the release from<br />
• This allows for a great deal of diversity in the<br />
offense<br />
• Examples<br />
– Trex 839 F – V Queen: <strong>The</strong> back will line to the strong<br />
side and release to the strong side due to the<br />
protection call<br />
– Crush 526 H Chase Jack: <strong>The</strong> back will line up to the<br />
quick side and release to the quick side due to the<br />
protection call
Example: Trex Right 839 F – V Queen
Example: Crush Right 526 H Chase Jack
Jack<br />
• A “Jack” call free releases the Back<br />
on the Strong-side.<br />
– <strong>The</strong> other back will check release to the<br />
“Quick-side.”<br />
• <strong>The</strong> Center, Strong-side Guard, and<br />
Tackle will block to the strong-side.<br />
• <strong>The</strong> Quick-side Guard and Tackle will<br />
block to the Quick-side, and the back<br />
will check release to the Quick-side.
Queen<br />
• A “Queen” call free releases the Back<br />
on the Quick-side.<br />
– <strong>The</strong> other back will check release to the<br />
“Strong-side.”<br />
• <strong>The</strong> Center, Quick-side Guard, and<br />
Tackle will block to the Quick-side.<br />
• <strong>The</strong> Strong-side Guard and Tackle<br />
will block to the Strong-side, and the<br />
back will check release to the Strongside.
Other protections<br />
“Gone” gets both backs out of the<br />
backfield using a five-man protection<br />
scheme. You need to build in HOT<br />
routes to one side of the formation,<br />
while blocking three to the other side.<br />
“Gone” is just “Queen” Protection for<br />
the linemen
Pass Play Examples<br />
• SPLIT RIGHT 414 F- V QUEEN<br />
• FLANK RIGHT 17 – F CHOICE JACK<br />
• HULA RIGHT DRIFT – 6 F SMASH GONE
SPLIT RIGHT 414 F "V" QUEEN
11 yards<br />
11 yards<br />
5 yards<br />
3 yards<br />
3 yards<br />
7-quick, hitch<br />
FLANK RIGHT 17 F CHOICE (UP) JACK
15 yards<br />
15 yards<br />
6 yards<br />
6 yards<br />
5-quick, hitch<br />
HULA RIGHT DRIFT – 6 F SMASH GONE
Incorporating Two Separate Sets<br />
of Progressions<br />
• Similar to having two separate pass<br />
plays in one play-call<br />
– <strong>The</strong> QB <strong>com</strong>es to the line and decides which<br />
two - three progression read to go with<br />
• Examples:<br />
– Split Right 414 Swing / “V” Queen<br />
– Trey Right 680 Corner / Cut Jack
1<br />
FS<br />
1<br />
C<br />
W<br />
OUTLET<br />
p M<br />
T N T S<br />
SS<br />
2<br />
C<br />
2<br />
QB<br />
SPLIT RIGHT 414 F - "V" QUEEN<br />
5 BIG HITCH
C<br />
1<br />
FS<br />
ALERT<br />
1<br />
W<br />
2<br />
P M<br />
T N T<br />
S<br />
SS<br />
C<br />
2<br />
QB<br />
TREY RIGHT 680 CORNER / CUT JACK<br />
7 QUICK (HITCH)
<strong>The</strong> Formation System<br />
• When counting both right and left<br />
formations, we have over 100 distinct<br />
formations that we can run plays from.<br />
– But because we are telling each player (X, Y,<br />
Z, H, and F) specifically what to do, we can<br />
move players to any of 5 different positions,<br />
giving us the illusion of over 500 different<br />
formations.
• This gives us the ability to take advantage of<br />
specific match-ups.<br />
• EXAMPLE:<br />
– We can move our X receiver to the F position, and<br />
have one of our best receivers <strong>com</strong>ing out of the<br />
backfield matched up with a linebacker.<br />
– We can move our F back to the X position, giving us<br />
a good blocker on the perimeter matched up<br />
against a cornerback.
Scripting Our Formations<br />
• We will script the first 15-plays with 15<br />
different formations / (motions)<br />
• We can tell what formations they have<br />
not had time to prepared for, and then<br />
attack them with those formations<br />
• Because of our stable terminology, we<br />
can run the same play out of a multitude<br />
of different formations giving us a<br />
distinct advantage over our opponents
Personnel Groups & Formations<br />
Island (Zero)<br />
City (10)<br />
Posse (11)<br />
Flank (12)<br />
<strong>Spread</strong> (20)<br />
Regular (21)<br />
Tank (23)<br />
MAUI<br />
DALLAS<br />
ACE<br />
QUAD<br />
SPREAD<br />
I<br />
I<br />
FIJI<br />
HOUSTON<br />
STUD<br />
FLANK<br />
FLEX<br />
SPLIT<br />
SPLIT<br />
BALI<br />
DENVER<br />
TREY<br />
GROOVE<br />
STACK<br />
NEAR<br />
NEAR<br />
BAJA<br />
BOSTON<br />
TRICK<br />
FAR<br />
FAR<br />
STONE<br />
TAMPA<br />
TREX<br />
STRONG<br />
STRONG<br />
CRUSH<br />
TRUNK<br />
WEAK<br />
WEAK<br />
PRESS<br />
TRIPS<br />
WING<br />
DANCE<br />
DBL. STACK<br />
BUNCH<br />
SLOT<br />
POWER I<br />
3-STACK<br />
DUAL<br />
TWIN<br />
SMOOSH<br />
DEUCE<br />
HUG<br />
HANG<br />
FIB<br />
FOB<br />
(TRADE)
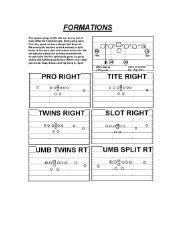
<strong>The</strong> Formation System
X<br />
Y<br />
Z<br />
H<br />
Q<br />
F<br />
SPLIT RIGHT<br />
Z<br />
Y<br />
X<br />
F<br />
Q<br />
H<br />
SPLIT LEFT
PISTOL TYPE OFFENSE<br />
NEAR RIGHT<br />
Z<br />
Y<br />
X<br />
F<br />
Q<br />
H<br />
NEAR LEFT
ACE RIGHT<br />
ACE LEFT
DALLAS RIGHT<br />
DALLAS LEFT
MAUI RIGHT<br />
MAUI LEFT
2’s RIGHT<br />
2’s LEFT
3’s RIGHT<br />
WEAK LEFT
TACKLE OVER FORMATION<br />
TOM RIGHT<br />
TOM LEFT
Shifting<br />
• Shifting is a tactic used to either confuse the<br />
opposition, or force them to run a “base”<br />
defense, by showing a particular offensive set,<br />
and then radically changing that set before the<br />
snap of the ball.
Shifting (Cont.) 2<br />
• We will call a predetermined shift by calling the<br />
formation that we want to shift from first,<br />
followed by the formation we will be shifting to,<br />
second. An example would be “Tank, Trey Right”.<br />
In this case, the term “Tank” would tell the<br />
players to line up in a “Tank Left” formation,<br />
and then shift to a “Trey Right” formation when<br />
the QB yells “Go”.
Tank, Trey Right<br />
X<br />
Y<br />
QB<br />
Z<br />
H<br />
F<br />
X<br />
QB<br />
Y<br />
H<br />
Z<br />
F
Shifting (Cont.) 3<br />
• Another example would be in the play-call<br />
“Dance – Maui Right”. In this case, the<br />
eligible receivers will line up in a “Dance<br />
Left” formation, and then sprint to a<br />
“Maui Right” formation when the QB yells<br />
“Go”.
Dance, Maui Right<br />
Y<br />
QB<br />
Z<br />
X<br />
H<br />
F<br />
X<br />
H<br />
QB<br />
F<br />
Y<br />
Z
Motions<br />
Position<br />
Go across<br />
formation<br />
X<br />
EXIT<br />
Z<br />
ZOOM<br />
Y<br />
JET<br />
F<br />
FLY<br />
H<br />
HUM<br />
Go into<br />
formation<br />
ENTER<br />
ZIP<br />
JAM<br />
FLEW<br />
HIP<br />
Start 1-way,<br />
then <strong>com</strong>e<br />
back<br />
Start in<br />
backfield and<br />
go out<br />
EASY<br />
ESCAPE<br />
ZIG<br />
ZAP<br />
JEL<br />
JAZZ<br />
FLIP<br />
FLOAT<br />
HACK<br />
HOP
How to Call Motions<br />
• Every eligible receiver has a specific<br />
“tag”call.<br />
• <strong>The</strong> “tag” occurs at the beginning of the<br />
play call to alert the specific player.<br />
• We motion to the called formation.
Z Receiver Motion<br />
• ZOOM: “Z” goes in motion across the<br />
formation.<br />
• ZIP: “Z” goes in short motion into the<br />
formation.
Zoom, Houston Right<br />
X<br />
H<br />
Y<br />
Z<br />
Q<br />
F<br />
Zip, Houston Right
X Receiver Motion<br />
• EXIT: “X” goes in motion across the<br />
formation.<br />
• ENTER: “X” goes in short motion into the<br />
formation.
Z<br />
Y<br />
H<br />
Q<br />
X<br />
F<br />
Exit, Bunch Right<br />
X<br />
Z<br />
H<br />
Q<br />
Y<br />
F<br />
Enter, Bunch Right
(Y) Tight-end Motion<br />
• JET: “Y” goes in motion across the<br />
formation.<br />
• JAM: “Y” goes in short motion into the<br />
formation.
Jet, Dallas Right<br />
X<br />
H<br />
Z<br />
Y<br />
Jam, Dallas Right<br />
Q<br />
F
H Back Motion<br />
• HUM: “H” goes in motion across the<br />
formation.<br />
• HIP: “H” goes in short motion into the<br />
formation.
Hop, Crush Right<br />
Hip, <strong>Spread</strong> Right
F Back Motion<br />
• FLY: “F” goes in motion across the<br />
formation.<br />
• FLEW: “F” goes in short motion into the<br />
formation.
Fly, Near Right<br />
Flew, Far Right
How the Play Is Called<br />
• Shift (possible)<br />
• Motion (possible)<br />
• Formation<br />
• Play-call<br />
– Blocking (master call in run game)<br />
– Pass pattern (in passing game)<br />
– Protection (in passing game)<br />
• Snap count<br />
– Red (on one), white (on two), blue (on three)
What the Call Would Sound Like If<br />
It Were a Run Play<br />
• Hum – Dallas Left – 53 Read – on white, on white –<br />
ready break.<br />
– “Hum” would be the motion.<br />
– “Dallas” would be the formation we want to end up in.<br />
– “54 Read” tells the back to line up on the right side (5)<br />
and to run to the 3 hole and the blocking scheme is<br />
“Read”.<br />
– “On white” tells everyone the snap count is on two.<br />
• If a player forgot the snap count at the line of scrimmage, he<br />
would say “check – check” and he would be told “white”.
S<br />
M<br />
W<br />
E<br />
T<br />
N<br />
E<br />
Z<br />
Y<br />
H<br />
RT RG C LG LR<br />
X<br />
QB<br />
F<br />
Hum Dallas Left 53 Read
What the Call Would Sound Like If<br />
It Were a Pass Play<br />
• Zoom – Dallas right – 866 H Post Queen, on<br />
blue, on blue – ready break.<br />
– Zoom tells the Z receiver to go in motion across the<br />
formation.<br />
– Dallas right is the formation.<br />
– 866 tells the single receiver (X) to run a post route,<br />
the inside receiver on the two-receiver side (Y) to<br />
run a square-in route, and the outside receiver on<br />
the two-receiver side to run a square-in route.
What the Call Would Sound Like If<br />
It Were a Pass Play (cont.)<br />
– H post tells the H receiver to run a post route.<br />
– Because the F did not hear a route called for him,<br />
he will automatically run a Swing route.<br />
– Queen tells the line to zone the quick-side and man<br />
the strong-side. This will release the back on the<br />
quick-side into the pattern right away. <strong>The</strong><br />
remaining back on the strong side will check release<br />
into the pattern.<br />
– “On blue” tells everyone the snap count is on three.<br />
• If we wanted to audible to a different play, blue is the live<br />
color since we called the count on blue.
X<br />
H<br />
Z<br />
Y<br />
Q<br />
F<br />
Zoom Houston Right 866 H Post Queen
Play-action action System<br />
• Names of animals / reptiles will be used to tell<br />
the offense what “action” is to be performed in<br />
the play-action passing game.<br />
– Shark 6 / 7 = <strong>Spread</strong> Stretch Action<br />
– Dragon 6 / 7 = <strong>Spread</strong> Read Action<br />
– FOX 2 / 3 = Lead (ISO) action<br />
– COUGAR = Counter action with Waggle action by<br />
the quarterback<br />
– ZEBRA = Outside Zone action with boot action by<br />
the quarterback<br />
– SPRINT = Move the pocket<br />
– NOTE: <strong>The</strong> corresponding numbers after the Name<br />
will tell the offense the aiming point of the fake
Example: Dallas Right Dragon 6 (Slide to 6 hole)<br />
Example: Dallas Right Dragon 7 (Slide to 7 hole)
Example: Near Right Fox 2 - 628
Example: Far Right Fox 3 – 786 Chow
Example: Far Right Cougar 6 – 528 F Flat
Example: Far Right Zebra 6 – 526 F Flat
Example: Near Right Sprint Right Option
Practice / Installation Philosophy<br />
• Teach incrementally rather than solely using a holistic<br />
approach.<br />
– Teach each player individual mechanics and techniques.<br />
• QB – Drops, WR – Routes, RB – Paths and Routes, Line –<br />
Run block / Pass protections.<br />
• Once each player knows exactly what to do, bring groups<br />
together – then the entire offense together.<br />
• This saves a great deal of time down the road and leads<br />
to better execution of the offense.<br />
– Start with 40 minutes of individual teaching time, which can<br />
be reduced to 15 minutes as the season progresses.
Practice / Installation<br />
Philosophy<br />
• This is the foundation of this offense.<br />
• Once each player knows exactly where to be and what to<br />
do based on what he is told in the play-call, the play will<br />
be executed as it was intended every time.<br />
– Using only the holistic approach (just running plays and<br />
coaching “on the run”) will lead to individual player breakdowns,<br />
and the offense will never be precise.<br />
• For example, a receiver will run the same route at different<br />
depths, or the QB will take different drops for the same<br />
pass.<br />
• This will cut down drastically on the productivity of the<br />
offense.
<strong>The</strong> Call-sheet (Side One)<br />
• No huddle offense<br />
– Kill the clock<br />
– Last three plays<br />
• Base plays<br />
– Run game<br />
– Quick passes<br />
– Base passes<br />
• Play action<br />
• Screens and Draws<br />
• Four minute offense<br />
• Check list for Timeouts
<strong>The</strong> Call-sheet (Side Two)<br />
• Openers<br />
• Situation offense<br />
– Open field situations<br />
– Long yardage<br />
• Backed up plays<br />
• Rhythm plays<br />
– Just for the<br />
quarterback<br />
• Situation offense<br />
• Special coverage<br />
section<br />
• Protections<br />
• Red zone offense<br />
– Red zone field<br />
position<br />
– Two point plays<br />
– Two-point chart<br />
• Personnel groups
How the Call-sheet Works<br />
• How the call sheet works<br />
– <strong>The</strong> importance of the hash marks<br />
– Area for motions<br />
– Play-calls<br />
– Formations<br />
– Protections
A Working Version<br />
of the Call Sheet<br />
Example #1
A Working Version<br />
of the Call Sheet<br />
Example #2
No Huddle Wrist Band
<strong>The</strong> <strong>Multiple</strong><br />
<strong>West</strong> <strong>Coast</strong> <strong>Offense</strong><br />
www.TopGunQBacademy.<strong>com</strong>