

IM280 | IS-280 iMeter™ Postage Meter - Replacement Part Guide
IM280 | IS-280 iMeter™ Postage Meter - Replacement Part Guide
IM280 | IS-280 iMeter™ Postage Meter - Replacement Part Guide

Create successful ePaper yourself
Turn your PDF publications into a flip-book with our unique Google optimized e-Paper software.
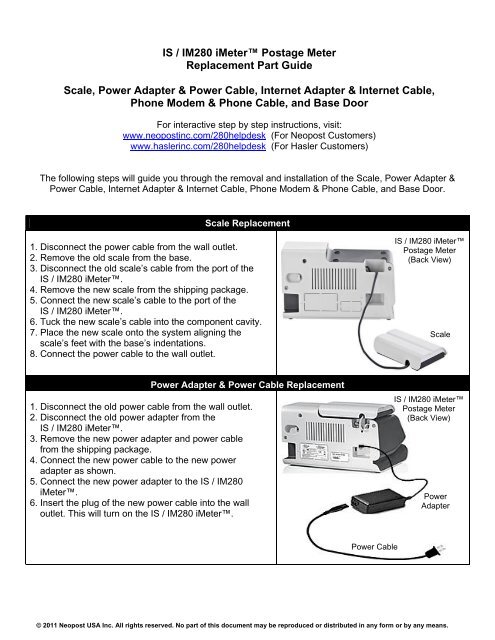
<strong>IS</strong> / <strong>IM<strong>280</strong></strong> i<strong>Meter</strong> <strong>Postage</strong> <strong>Meter</strong><br />
<strong>Replacement</strong> <strong>Part</strong> <strong>Guide</strong><br />
Scale, Power Adapter & Power Cable, Internet Adapter & Internet Cable,<br />
Phone Modem & Phone Cable, and Base Door<br />
For interactive step by step instructions, visit:<br />
www.neopostinc.com/<strong>280</strong>helpdesk (For Neopost Customers)<br />
www.haslerinc.com/<strong>280</strong>helpdesk (For Hasler Customers)<br />
The following steps will guide you through the removal and installation of the Scale, Power Adapter &<br />
Power Cable, Internet Adapter & Internet Cable, Phone Modem & Phone Cable, and Base Door.<br />
Scale <strong>Replacement</strong><br />
1. Disconnect the power cable from the wall outlet.<br />
2. Remove the old scale from the base.<br />
3. Disconnect the old scale’s cable from the port of the<br />
<strong>IS</strong> / <strong>IM<strong>280</strong></strong> i<strong>Meter</strong>.<br />
4. Remove the new scale from the shipping package.<br />
5. Connect the new scale’s cable to the port of the<br />
<strong>IS</strong> / <strong>IM<strong>280</strong></strong> i<strong>Meter</strong>.<br />
6. Tuck the new scale’s cable into the component cavity.<br />
7. Place the new scale onto the system aligning the<br />
scale’s feet with the base’s indentations.<br />
8. Connect the power cable to the wall outlet.<br />
<strong>IS</strong> / <strong>IM<strong>280</strong></strong> i<strong>Meter</strong><br />
<strong>Postage</strong> <strong>Meter</strong><br />
(Back View)<br />
Scale<br />
Power Adapter & Power Cable <strong>Replacement</strong><br />
1. Disconnect the old power cable from the wall outlet.<br />
2. Disconnect the old power adapter from the<br />
<strong>IS</strong> / <strong>IM<strong>280</strong></strong> i<strong>Meter</strong>.<br />
3. Remove the new power adapter and power cable<br />
from the shipping package.<br />
4. Connect the new power cable to the new power<br />
adapter as shown.<br />
5. Connect the new power adapter to the <strong>IS</strong> / <strong>IM<strong>280</strong></strong><br />
i<strong>Meter</strong>.<br />
6. Insert the plug of the new power cable into the wall<br />
outlet. This will turn on the <strong>IS</strong> / <strong>IM<strong>280</strong></strong> i<strong>Meter</strong>.<br />
<strong>IS</strong> / <strong>IM<strong>280</strong></strong> i<strong>Meter</strong><br />
<strong>Postage</strong> <strong>Meter</strong><br />
(Back View)<br />
Power<br />
Adapter<br />
Power Cable<br />
© 2011 Neopost USA Inc. All rights reserved. No part of this document may be reproduced or distributed in any form or by any means.
Internet Adapter & Internet Cable <strong>Replacement</strong><br />
1. Disconnect the power cable from the wall outlet.<br />
2. Disconnect the old internet cable from the internet wall<br />
outlet or router.<br />
3. Disconnect the USB cable on the old internet adapter<br />
from the <strong>IS</strong> / <strong>IM<strong>280</strong></strong> i<strong>Meter</strong>.<br />
4. Remove the new internet adapter and internet cable<br />
from the shipping package.<br />
5. Connect the USB cable on the new internet adapter to<br />
the USB port of the <strong>IS</strong> / <strong>IM<strong>280</strong></strong> i<strong>Meter</strong>.<br />
6. Connect one end of the internet cable to the open port<br />
on the new internet adapter.<br />
7. Connect the other end of the new internet cable to the<br />
wall outlet or router.<br />
8. Connect the power cable to the wall outlet.<br />
<strong>IS</strong> / <strong>IM<strong>280</strong></strong> i<strong>Meter</strong><br />
<strong>Postage</strong> <strong>Meter</strong><br />
(Back View)<br />
Internet<br />
Adapter<br />
Internet<br />
Cable<br />
Phone Modem & Phone Cable <strong>Replacement</strong><br />
Internet Wall Outlet<br />
OR<br />
Router<br />
1. Disconnect the power cable from the wall outlet.<br />
2. Disconnect the old phone cable from the wall phone<br />
jack.<br />
3. Disconnect the USB cable on the old phone modem<br />
from the <strong>IS</strong> / <strong>IM<strong>280</strong></strong> i<strong>Meter</strong>.<br />
4. Remove the new phone modem & cable from the<br />
shipping package.<br />
5. Connect the USB cable on the new phone modem to the<br />
USB port of the <strong>IS</strong> / <strong>IM<strong>280</strong></strong> i<strong>Meter</strong>.<br />
6. Connect one end of the new phone cable to the new<br />
phone modem.<br />
7. Connect the other end of the new phone cable to the<br />
wall phone jack.<br />
8. Connect the power cable to the wall outlet.<br />
<strong>IS</strong> / <strong>IM<strong>280</strong></strong> i<strong>Meter</strong><br />
<strong>Postage</strong> <strong>Meter</strong><br />
(Back View)<br />
Phone<br />
Modem<br />
Phone<br />
Cable<br />
Wall<br />
Phone<br />
Jack<br />
Base Door <strong>Replacement</strong><br />
1. Disconnect the power cable from the wall outlet.<br />
2. Using both hands, pull the door open.<br />
3. Gently push down on the base door until it is removed<br />
from the hinges.<br />
4. Carefully place the new base door on the base hinges<br />
until it clicks into position.<br />
<strong>IS</strong> / <strong>IM<strong>280</strong></strong> i<strong>Meter</strong><br />
<strong>Postage</strong> <strong>Meter</strong><br />
(Front View)<br />
Base<br />
Door<br />
For questions, please call: 1-800-NEOPOST (1-800-636-7678).<br />
A0000940/A<br />
© 2011 Neopost USA Inc. All rights reserved. No part of this document may be reproduced or distributed in any form or by any means.


