kuryakyn's super deluxe wolo bad boy air horn kit ... - Kuryakyn USA
kuryakyn's super deluxe wolo bad boy air horn kit ... - Kuryakyn USA
kuryakyn's super deluxe wolo bad boy air horn kit ... - Kuryakyn USA

Create successful ePaper yourself
Turn your PDF publications into a flip-book with our unique Google optimized e-Paper software.
STEP 5<br />
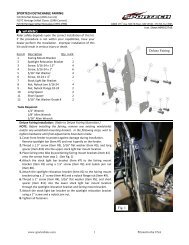
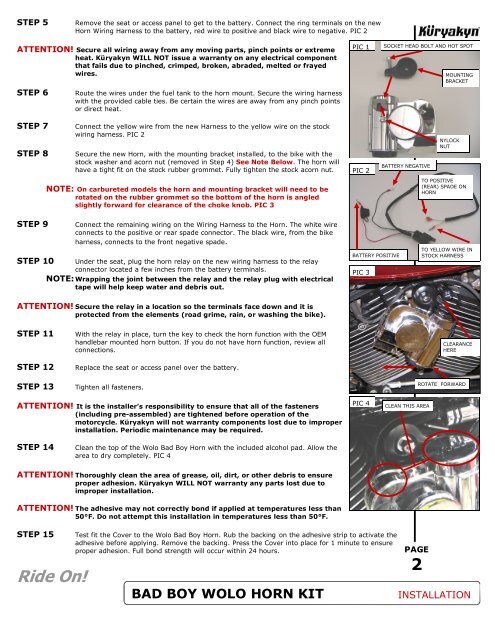
Remove the seat or access panel to get to the battery. Connect the ring terminals on the new<br />
Horn Wiring Harness to the battery, red wire to positive and black wire to negative. PIC 2<br />
ATTENTION! Secure all wiring away from any moving parts, pinch points or extreme<br />
heat. Küryakyn WILL NOT issue a warranty on any electrical component<br />
that fails due to pinched, crimped, broken, abraded, melted or frayed<br />
wires.<br />
STEP 6<br />
STEP 7<br />
STEP 8<br />
Route the wires under the fuel tank to the <strong>horn</strong> mount. Secure the wiring harness<br />
with the provided cable ties. Be certain the wires are away from any pinch points<br />
or direct heat.<br />
Connect the yellow wire from the new Harness to the yellow wire on the stock<br />
wiring harness. PIC 2<br />
Secure the new Horn, with the mounting bracket installed, to the bike with the<br />
stock washer and acorn nut (removed in Step 4) See Note Below. The <strong>horn</strong> will<br />
have a tight fit on the stock rubber grommet. Fully tighten the stock acorn nut.<br />
NOTE: On carbureted models the <strong>horn</strong> and mounting bracket will need to be<br />
rotated on the rubber grommet so the bottom of the <strong>horn</strong> is angled<br />
slightly forward for clearance of the choke knob. PIC 3<br />
PIC 1<br />
PIC 2<br />
SOCKET HEAD BOLT AND HOT SPOT<br />
BATTERY NEGATIVE<br />
MOUNTING<br />
BRACKET<br />
NYLOCK<br />
NUT<br />
TO POSITIVE<br />
(REAR) SPADE ON<br />
HORN<br />
STEP 9<br />
STEP 10<br />
Connect the remaining wiring on the Wiring Harness to the Horn. The white wire<br />
connects to the positive or rear spade connector. The black wire, from the bike<br />
harness, connects to the front negative spade.<br />
Under the seat, plug the <strong>horn</strong> relay on the new wiring harness to the relay<br />
connector located a few inches from the battery terminals.<br />
NOTE: Wrapping the joint between the relay and the relay plug with electrical<br />
tape will help keep water and debris out.<br />
BATTERY POSITIVE<br />
PIC 3<br />
TO YELLOW WIRE IN<br />
STOCK HARNESS<br />
ATTENTION! Secure the relay in a location so the terminals face down and it is<br />
protected from the elements (road grime, rain, or washing the bike).<br />
STEP 11<br />
STEP 12<br />
STEP 13<br />
With the relay in place, turn the key to check the <strong>horn</strong> function with the OEM<br />
handlebar mounted <strong>horn</strong> button. If you do not have <strong>horn</strong> function, review all<br />
connections.<br />
Replace the seat or access panel over the battery.<br />
Tighten all fasteners.<br />
CLEARANCE<br />
HERE<br />
ROTATE FORWARD<br />
ATTENTION! It is the installer’s responsibility to ensure that all of the fasteners<br />
(including pre-assembled) are tightened before operation of the<br />
motorcycle. Küryakyn will not warranty components lost due to improper<br />
installation. Periodic maintenance may be required.<br />
PIC 4<br />
CLEAN THIS AREA<br />
STEP 14<br />
Clean the top of the Wolo Bad Boy Horn with the included alcohol pad. Allow the<br />
area to dry completely. PIC 4<br />
ATTENTION! Thoroughly clean the area of grease, oil, dirt, or other debris to ensure<br />
proper adhesion. Küryakyn WILL NOT warranty any parts lost due to<br />
improper installation.<br />
ATTENTION! The adhesive may not correctly bond if applied at temperatures less than<br />
50°F. Do not attempt this installation in temperatures less than 50°F.<br />
STEP 15<br />
Ride On!<br />
Test fit the Cover to the Wolo Bad Boy Horn. Rub the backing on the adhesive strip to activate the<br />
adhesive before applying. Remove the backing. Press the Cover into place for 1 minute to ensure<br />
proper adhesion. Full bond strength will occur within 24 hours.<br />
BAD BOY WOLO HORN KIT<br />
PAGE<br />
2<br />
INSTALLATION