Microsoft Publisher Assignment
Microsoft Publisher Assignment
Microsoft Publisher Assignment

You also want an ePaper? Increase the reach of your titles
YUMPU automatically turns print PDFs into web optimized ePapers that Google loves.
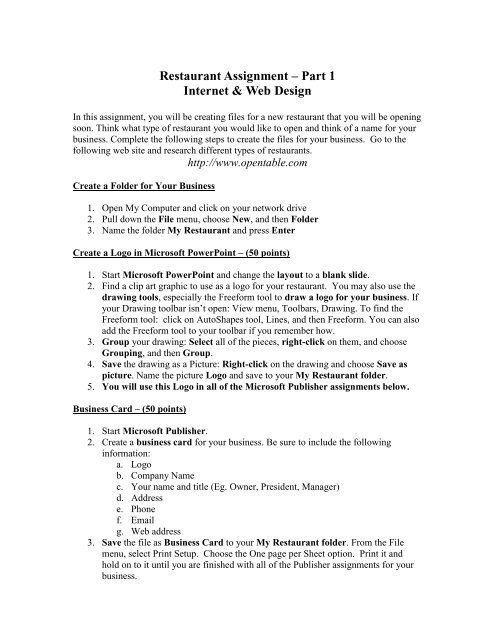
Restaurant <strong>Assignment</strong> – Part 1<br />
Internet & Web Design<br />
In this assignment, you will be creating files for a new restaurant that you will be opening<br />
soon. Think what type of restaurant you would like to open and think of a name for your<br />
business. Complete the following steps to create the files for your business. Go to the<br />
following web site and research different types of restaurants.<br />
http://www.opentable.com<br />
Create a Folder for Your Business<br />
1. Open My Computer and click on your network drive<br />
2. Pull down the File menu, choose New, and then Folder<br />
3. Name the folder My Restaurant and press Enter<br />
Create a Logo in <strong>Microsoft</strong> PowerPoint – (50 points)<br />
1. Start <strong>Microsoft</strong> PowerPoint and change the layout to a blank slide.<br />
2. Find a clip art graphic to use as a logo for your restaurant. You may also use the<br />
drawing tools, especially the Freeform tool to draw a logo for your business. If<br />
your Drawing toolbar isn’t open: View menu, Toolbars, Drawing. To find the<br />
Freeform tool: click on AutoShapes tool, Lines, and then Freeform. You can also<br />
add the Freeform tool to your toolbar if you remember how.<br />
3. Group your drawing: Select all of the pieces, right-click on them, and choose<br />
Grouping, and then Group.<br />
4. Save the drawing as a Picture: Right-click on the drawing and choose Save as<br />
picture. Name the picture Logo and save to your My Restaurant folder.<br />
5. You will use this Logo in all of the <strong>Microsoft</strong> <strong>Publisher</strong> assignments below.<br />
Business Card – (50 points)<br />
1. Start <strong>Microsoft</strong> <strong>Publisher</strong>.<br />
2. Create a business card for your business. Be sure to include the following<br />
information:<br />
a. Logo<br />
b. Company Name<br />
c. Your name and title (Eg. Owner, President, Manager)<br />
d. Address<br />
e. Phone<br />
f. Email<br />
g. Web address<br />
3. Save the file as Business Card to your My Restaurant folder. From the File<br />
menu, select Print Setup. Choose the One page per Sheet option. Print it and<br />
hold on to it until you are finished with all of the <strong>Publisher</strong> assignments for your<br />
business.
Letterhead – (50 points)<br />
1. In <strong>Microsoft</strong> <strong>Publisher</strong> create a Letterhead for your business. Be sure to include<br />
the following information:<br />
a. Logo<br />
b. Company Name<br />
c. Address<br />
d. Phone<br />
e. Email<br />
f. Web address<br />
2. Save the file as Letterhead to your My Restaurant folder. Print it (portrait view)<br />
and hold on to it until you are finished with all of the <strong>Publisher</strong> assignments for<br />
your business.<br />
Flyer – (50 points)<br />
You decide to have an Open House party to introduce your business to the surrounding<br />
neighborhoods. Use <strong>Publisher</strong> to create a Flyer about the Open House to post around the<br />
area.<br />
1. In <strong>Microsoft</strong> <strong>Publisher</strong> create a Flyer for the Open House. Be sure to include the<br />
following information:<br />
a. Logo<br />
b. Company Name<br />
c. Address<br />
d. Open House<br />
e. Date and Time of the Open House<br />
f. A little information about what your company does, if it isn’t obvious<br />
g. Promise some kind of food (Eg. Cookies and punch, hors d'oeuvres, cake)<br />
h. Door prizes<br />
2. Insert phone tear-offs at the bottom by doing the following:<br />
a. Insert menu, Design Gallery Object<br />
b. Choose Phone Tear-off<br />
c. Click on Insert Object button and click Yes<br />
d. Click on the first tear-off and press F9 function key to zoom in on it.<br />
e. Type the following:<br />
i. Company Name<br />
ii. Phone number<br />
iii. Web address<br />
f. Click in the second tear-off and you’ll notice that the information you<br />
typed in the first tear-off is automatically copied to the other tear-offs.<br />
3. Save the file as Flyer to your My Business folder. Print it and hold on to it until<br />
you are finished with all of the <strong>Publisher</strong> assignments for your business.
Thank You Notes (Greeting Card)<br />
You want to send thank you notes to the people who attended your open house. Use the<br />
steps below to create them.<br />
1. In <strong>Microsoft</strong> <strong>Publisher</strong> choose the Greeting Cards design and then choose<br />
Thank You.<br />
2. On Page 3, do the following:<br />
a. Select the current text box and delete it.<br />
b. Insert a coupon by doing the following:<br />
i. Insert menu, Design Gallery Object<br />
ii. Click on Coupon<br />
iii. Click on Insert Object button and click Yes<br />
iv. Insert your desired information on the coupon.<br />
3. Look at the other pages in the card. Be sure to include the following items in your<br />
card:<br />
a. Thank You for Attending the Open House<br />
b. Logo<br />
c. Company Name<br />
d. Address<br />
e. Phone<br />
f. Email<br />
g. Web address<br />
4. Save the file as Thank You Note to your My Business folder. Select the File<br />
menu and Print setup. Select the Side Fold, Quarter Page option. Print Preview it<br />
to make sure that all pages will be printing to one sheet. Print it and hold on to it<br />
until you are finished with all of the <strong>Publisher</strong> assignments for your business.<br />
Hand In Printed Items<br />
1. Arrange your printed files as follows:<br />
a. Business Card (50 points)<br />
b. Letterhead (50 points)<br />
c. Flyer (50 points)<br />
d. Thank You note (50 points)<br />
2. Using <strong>Microsoft</strong> PowerPoint, create a cover sheet for your assignment with your<br />
name, your restaurant name and Web Design written on it. Print it in portrait view.<br />
(50 points)<br />
3. Logo will also be graded – 50 points<br />
4. Staple them and hand them in.