Chapter 2 Specimen Collection and Preservation - National Wildlife ...
Chapter 2 Specimen Collection and Preservation - National Wildlife ...
Chapter 2 Specimen Collection and Preservation - National Wildlife ...

You also want an ePaper? Increase the reach of your titles
YUMPU automatically turns print PDFs into web optimized ePapers that Google loves.
<strong>Chapter</strong> 2<br />
<strong>Specimen</strong> <strong>Collection</strong> <strong>and</strong> <strong>Preservation</strong><br />
<strong>Specimen</strong>s are used to provide supporting information leading<br />
to the diagnosis of a cause of disease or death. A specimen<br />
may be an intact carcass, tissues removed from carcasses,<br />
parasites, ingested food, feces, or environmental samples.<br />
The specimen should be as fresh <strong>and</strong> undamaged as possible.<br />
A<br />
Choosing a <strong>Specimen</strong><br />
An entire, fresh carcass is the best specimen to submit to<br />
the laboratory for diagnosis. This allows the diagnostician<br />
to assess all of the organ systems <strong>and</strong> to use appropriate organs<br />
for different diagnostic tests. Obtain the best specimens<br />
possible for necropsy; decomposed or scavenged carcasses<br />
are usually of limited diagnostic value. A combination of<br />
sick animals, animals that were euthanized after clinical signs<br />
were observed <strong>and</strong> recorded, <strong>and</strong> some of the freshest available<br />
carcasses compose an ideal specimen collection. The<br />
method of euthanasia should not compromise the diagnostic<br />
value of the specimen (see <strong>Chapter</strong> 5, Euthanasia). More than<br />
one disease may be affecting the population simultaneously,<br />
<strong>and</strong> the chances of detecting multiple diseases will be maximized<br />
if both sick <strong>and</strong> dead animals are collected. <strong>Specimen</strong>s<br />
submitted should be representative of the species involved.<br />
If more than one species is affected, collect several<br />
specimens of each species; try to obtain a minimum of five<br />
specimens per species.<br />
Tissue <strong>Collection</strong><br />
The primary consideration when collecting carcasses or<br />
tissues for diagnosis should be personal safety. Some wildlife<br />
diseases are transmissible to humans, <strong>and</strong> every carcass<br />
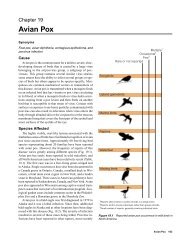
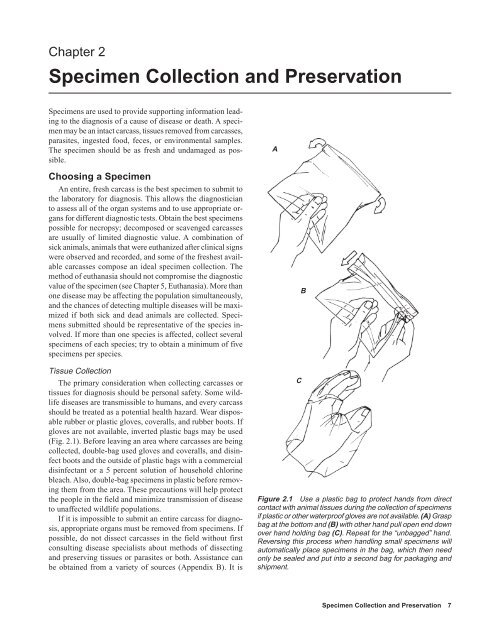
should be treated as a potential health hazard. Wear disposable<br />
rubber or plastic gloves, coveralls, <strong>and</strong> rubber boots. If<br />
gloves are not available, inverted plastic bags may be used<br />
(Fig. 2.1). Before leaving an area where carcasses are being<br />
collected, double-bag used gloves <strong>and</strong> coveralls, <strong>and</strong> disinfect<br />
boots <strong>and</strong> the outside of plastic bags with a commercial<br />
disinfectant or a 5 percent solution of household chlorine<br />
bleach. Also, double-bag specimens in plastic before removing<br />
them from the area. These precautions will help protect<br />
the people in the field <strong>and</strong> minimize transmission of disease<br />
to unaffected wildlife populations.<br />
If it is impossible to submit an entire carcass for diagnosis,<br />
appropriate organs must be removed from specimens. If<br />
possible, do not dissect carcasses in the field without first<br />
consulting disease specialists about methods of dissecting<br />
<strong>and</strong> preserving tissues or parasites or both. Assistance can<br />
be obtained from a variety of sources (Appendix B). It is<br />
B<br />
C<br />
Figure 2.1 Use a plastic bag to protect h<strong>and</strong>s from direct<br />
contact with animal tissues during the collection of specimens<br />
if plastic or other waterproof gloves are not available. (A) Grasp<br />
bag at the bottom <strong>and</strong> (B) with other h<strong>and</strong> pull open end down<br />
over h<strong>and</strong> holding bag (C). Repeat for the “unbagged” h<strong>and</strong>.<br />
Reversing this process when h<strong>and</strong>ling small specimens will<br />
automatically place specimens in the bag, which then need<br />
only be sealed <strong>and</strong> put into a second bag for packaging <strong>and</strong><br />
shipment.<br />
<strong>Specimen</strong> <strong>Collection</strong> <strong>and</strong> <strong>Preservation</strong> 7
est to become familiar with these sources <strong>and</strong> their ability<br />
to provide specific types of assistance before an emergency<br />
arises. The basic supplies <strong>and</strong> equipment that should be included<br />
in a field kit for specimen collection will vary with<br />
the species being sampled <strong>and</strong> the types of analyses that will<br />
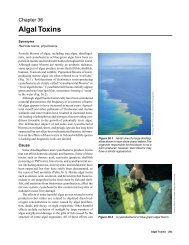
be conducted. Keep a small kit packed in a day pack for ready<br />
use (Fig. 2.2). Sources of supplies used for collecting, preserving,<br />
labeling, <strong>and</strong> shipping specimens are listed in<br />
Appendix C.<br />
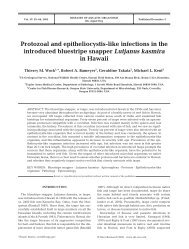
Whirl-Pak ® bags are very effective containers for tissue<br />
specimens. These bags have a sterile interior, are easy to carry<br />
in the field, <strong>and</strong> can be used to hold a variety of samples<br />
(Fig. 2.3). <strong>Specimen</strong> identification should be written directly<br />
on the bag with an indelible marker.<br />
If lesions are noted, collect separate tissue samples for<br />
microscopic examination, microbiology, toxicology, <strong>and</strong><br />
other analyses. With a sharp knife or scalpel cut a thin (l/8–<br />
1/4 inch, 3–6 millimeter) section of tissue that includes all<br />
or portions of the lesion <strong>and</strong> adjacent apparently healthy tissue<br />
(Fig. 2.4). Take care not to crush tissue in or around the<br />
lesion. Place the tissue sample in a volume of l0 percent buffered<br />
formalin solution equal to at least 10 times the tissue<br />
volume to ensure adequate preservation. Formalin is classified<br />
as hazardous; take appropriate measures to prevent skin<br />
contact or vapor inhalation. Jars, such as pint or quart can-<br />
ning jars, are convenient containers for preservation of tissues,<br />
but wide-mouth plastic bottles (Fig. 2.5) eliminate the<br />
potential breakage problems. After 2 or 3 days in 10 percent<br />
formalin, tissues can be transferred to Whirl-Pak ® bags that<br />
contain enough formalin to keep the tissues wet. Write the<br />
specimen identification with indelible marker or pencil on a<br />
piece of index card, place the card inside the bag, <strong>and</strong> write<br />
the information directly on the bag with indelible marker.<br />
Pack the bags for shipping so as to prevent tissues from being<br />
crushed. Check with the courier regarding current requirements<br />
or restrictions for shipment of formalin.<br />
If it is necessary to collect a blood sample from a live bird<br />
(if, for example, botulism is suspected), <strong>and</strong> syringes <strong>and</strong><br />
needles are not available, sever the bird’s head from its neck<br />
<strong>and</strong> collect the blood in a wide-mouth plastic jar.<br />
Photographing external <strong>and</strong> internal lesions provides a<br />
record of the color, location, <strong>and</strong> appearance of lesions when<br />
appropriate camera equipment is available. Use a macro lens,<br />
high speed film, <strong>and</strong> a fast shutter speed to achieve maximum<br />
depth of field <strong>and</strong> sharply focused photographs with a<br />
h<strong>and</strong>-held camera. Include in the photograph for scale a coin<br />
or another readily recognized indicator of actual size. Explain<br />
on the history form submitted with the specimens what<br />
photographs were taken.<br />
Photo by James Runningen<br />
Figure 2.2 A basic necropsy kit that can be packed into a small day pack. Clockwise,<br />
from top of photo: Data recording: field notebook, tags, pencils, markers. Protective<br />
apparel: rubber gloves, disposable shoe covers <strong>and</strong> coveralls, mask. Necropsy equipment:<br />
disinfectant for cleaning instruments, scrub brush, heavy shears, forceps, scissors,<br />
scalpel h<strong>and</strong>le <strong>and</strong> blades. Measuring equipment: hanging scale <strong>and</strong> ruler. Sampling<br />
materials: microscope slides, syringes <strong>and</strong> needles, swabs, blood tubes, aluminum<br />
foil, Whirl Pak ® bags, plastic bags, wide mouth plastic jars. Preservatives: ethanol for<br />
parasites, formalin for tissue samples.<br />
8 Field Manual of <strong>Wildlife</strong> Diseases: Birds
A<br />
Figure 2.3 Using Whirl-Pak ® bag for specimen collection.<br />
(A) Remove top at perforation. (B) Open bag by simultaneously<br />
pushing the protruding wire-reinforced tabs toward the center<br />
to insert the specimen <strong>and</strong> any appropriate preservative.<br />
(C) Close bag by pulling on tabs <strong>and</strong> then twirling bag while<br />
holding tabs. (D) Secure the closure by folding tabs around<br />
bags <strong>and</strong> label bag with type of specimen, date, <strong>and</strong> any identifying<br />
numbers.<br />
B<br />
C<br />
A<br />
B<br />
D<br />
C<br />
Figure 2.5 Plastic bottles used for tissue<br />
specimens. Regardless of size or shape,<br />
specimen bottles should have a wide mouth<br />
<strong>and</strong> threaded caps for secure closure.<br />
Figure 2.4 Tissue sample collection for microscopic examination.<br />
(A) Tissue sample should include lesion, such as spots<br />
in liver, plus some apparently healthy tissue. The sample must<br />
be no thicker than 1/4 inch to ensure adequate chemical fixation<br />
by preservative. Use as sharp an instrument as possible<br />
(scalpel, knife, razor) for a clean cut. (B) Place tissue sample<br />
into container of 10 percent buffered formalin or other suitable<br />
fixative or preservative. The volume of formalin in the container<br />
should be about 10 times the amount of tissue sample.<br />
(C) Complete the process by securing the lid <strong>and</strong> properly<br />
labeling the container.<br />
<strong>Specimen</strong> <strong>Collection</strong> <strong>and</strong> <strong>Preservation</strong> 9
A<br />
Incision<br />
line<br />
B<br />
Reflected<br />
skin<br />
F<br />
Remove heart<br />
Esophagus<br />
C<br />
Abdominal<br />
transverse<br />
cut<br />
Trachea<br />
Syrinx<br />
Heart<br />
Liver<br />
Gizzard<br />
D<br />
Vent to bill<br />
incision<br />
E<br />
Remove<br />
breast plate<br />
G<br />
Remove liver<br />
Figure 2.6 Dissecting a duck carcass: (A) incision line; (B) reflect the skin to expose the underlying anatomy; (C) make a<br />
transverse abdominal cut below the breast muscle; (D) extend cut through the ribs <strong>and</strong> wishbone; (E) remove breast plate; (F)<br />
dissect out heart; (G) remove liver; <strong>and</strong> (H) tie off <strong>and</strong> remove the gastrointestinal tract.<br />
10 Field Manual of <strong>Wildlife</strong> Diseases: Birds
Trachea<br />
Esophagus<br />
Crop<br />
Lung<br />
Heart<br />
Liver<br />
Gall bladder<br />
Proventriculus<br />
Spleen<br />
Gizzard<br />
Pancreas<br />
Small intestine<br />
Large intestine<br />
Cecum<br />
Cloaca<br />
Vent<br />
Ovary<br />
Kidney<br />
Oviduct<br />
Avian Dissection<br />
When dissecting a bird, it is always advisable to<br />
wear protective clothing, particularly disposable<br />
gloves. To begin, insert a scalpel or a knife to make a<br />
midline incision through the skin of the breast (Fig<br />
2.6 A). Take care not to penetrate the body cavity,<br />
particularly in the abdominal region. Continue the<br />
skin incision to the vent <strong>and</strong> to the base of the bill.<br />
Reflect the skin away from the neck, breast, <strong>and</strong> abdominal<br />
areas. (B) Use the thumb <strong>and</strong> the first finger<br />
of each h<strong>and</strong> to reflect the skin to expose the<br />
underlying tissues. It is easiest to place the thumb<br />
<strong>and</strong> the first finger of each h<strong>and</strong> along the incision<br />
line in the breast area <strong>and</strong> then push <strong>and</strong> gently pull<br />
the skin to the side. When an opening in the skin has<br />
been established, work towards the bill <strong>and</strong> then the<br />
vent. (C) With a sharp blade, make a shallow transverse<br />
incision just below the breast muscles <strong>and</strong> sternum.<br />
(D) Insert the thumb of one gloved h<strong>and</strong> into<br />
the incision along the midpoint of the sternum <strong>and</strong><br />
apply a slight pressure upwards. With a scissors in<br />
the other gloved h<strong>and</strong>, carefully cut through the ribs<br />
extending the cut on each side of the breast through<br />
the area of the wishbone. (E) Gently separate the<br />
breastplate from the carcass; use a scissors or other<br />
instrument to sever any connections <strong>and</strong> push aside<br />
the air sacs. (F) Dissect out the heart without cutting<br />
into other tissues. (G) Gently remove the liver <strong>and</strong><br />
carefully cut away its area of connection with other<br />
tissues. (H) Tie off the gastrointestinal tract near the<br />
throat area, cut the esophagus above the tied-off area,<br />
<strong>and</strong> gently remove the entire gastrointestinal area.<br />
H<br />
Remove<br />
gastrointestinal<br />
tract<br />
Cut<br />
Tie off to<br />
prevent<br />
contents from<br />
leaking out,<br />
<strong>and</strong> separate<br />
from body<br />
above the<br />
tied-off<br />
area<br />
Avian Anatomy<br />
Figure 2.6 illustrates organs <strong>and</strong> tissues that may<br />
exhibit various lesions <strong>and</strong> that may be sampled for<br />
the diagnosis of disease agents described in this<br />
Manual. Species variation may result in<br />
some differences in the appearance <strong>and</strong><br />
relative size of particular organs <strong>and</strong><br />
tissues, but their location will be<br />
similar among species. Notable differences<br />
between the types of species<br />
illustrated are the small flat<br />
spleen in normal ducks <strong>and</strong> the<br />
larger oval spleen in pheasants.<br />
Also, pheasants have a crop <strong>and</strong><br />
ducks do not; instead, the area<br />
just forward of the gizzard (the<br />
proventriculus) is more prominant<br />
in waterfowl.<br />
Intestinal<br />
tract<br />
<strong>Specimen</strong> <strong>Collection</strong> <strong>and</strong> <strong>Preservation</strong> 11
Labeling <strong>Specimen</strong>s<br />
Proper labeling, maintaining label readability, <strong>and</strong> preventing<br />
label separation from specimens are as critical as<br />
proper specimen selection <strong>and</strong> preservation. The label should<br />
be as close to the specimen as possible; for example, a label<br />
should be attached to a carcass, attached to a tube of blood,<br />
or placed within the vial of preservative with a parasite.<br />
Double labeling, or placing a label on the outside of a plastic<br />
bag holding the specimen whenever practical, is worth the<br />
effort. The double labeling prevents confusion <strong>and</strong> potential<br />
Figure 2.7 Proper tagging of specimen. History of the specimen<br />
(see text for details) should be placed on back of tag.<br />
errors in specimen records at the diagnostic laboratory when<br />
specimens are received from multiple carcasses. Manila tags<br />
can be used, but take care to prevent their exposure to large<br />
amounts of fluids that may destroy the tag; tag destruction<br />
can be reduced by using tags with high rag content or even<br />
linen tags. Use soft lead pencil or waterproof ink on these<br />
tags; do not use ballpoint pen, nonpermanent ink, or hard<br />
lead pencil. The most durable tag is made of soft metal, such<br />
as copper or aluminum, <strong>and</strong> can be inscribed with ballpoint<br />
pen, pencil, or another instrument that leaves an impression<br />
on the tag.<br />
Tissues <strong>and</strong> Organs<br />
When a specimen is in a plastic bottle, jar, or tube, wrap a<br />
piece of adhesive or masking tape entirely around the container<br />
<strong>and</strong> use an indelible marker to write on the tape. List<br />
the type of animal from which the sample was taken, the<br />
kind of tissue, <strong>and</strong> the date the sample was taken. When plastic<br />
bags are used as the first containers for tissues, they should<br />
be labeled with the same information directly on the bag. Do<br />
not insert tags inside containers with tissues <strong>and</strong> organs collected<br />
for microbiological or chemical analyses because the<br />
tag or the ink on it may contaminate the specimen. When<br />
chemically resistant tags are available, insert the tags into<br />
containers with preservatives such as formalin or alcohol.<br />
<strong>Specimen</strong> <strong>Preservation</strong><br />
Chill or freeze all specimens, depending on how long it<br />
will take to ship to a diagnostic laboratory. Freezing reduces<br />
the diagnostic usefulness of carcasses <strong>and</strong> tissues, but if specimens<br />
must be held for 2 or more days, freezing the specimens<br />
as soon as possible after collecting them minimizes<br />
their decomposition. Formalin-fixed tissues should not be<br />
frozen. See <strong>Chapter</strong> 3, <strong>Specimen</strong> Shipment, for detailed instructions<br />
for packing <strong>and</strong> shipping specimens.<br />
J. Christian Franson<br />
(All illustrations in this chapter are by R<strong>and</strong>y Stothard Kampen, with the exception of<br />
Figure 2.6)<br />
Supplementary Reading<br />
Roffe, T.J., Friend, M., <strong>and</strong> Locke, L.N., 1994, Evaluation of<br />
causes of wildlife mortality, in Bookhout, T.A., ed., Research<br />
<strong>and</strong> Management Techniques for <strong>Wildlife</strong> <strong>and</strong> Habitats (5):<br />
Bethesda, Md., The <strong>Wildlife</strong> Society, p. 324–348.<br />
Wobeser, G.A., 1997, Necropsy <strong>and</strong> sample preservation techniques,<br />
in Diseases of wild waterfowl (2nd ed): New York,<br />
N.Y., Plenum Press, p. 237–248.<br />
Carcass<br />
Identify each carcass with a tag fastened with wire to a<br />
leg (Fig. 2.7). If tags are not available, use a 3- by 5-inch<br />
card placed inside a plastic bag within the bag holding the<br />
carcass. Information on the tag should include the name, address,<br />
<strong>and</strong> telephone number of the submitter, collection site,<br />
species; whether the animal was found dead or was euthanized<br />
(indicate method); <strong>and</strong> a brief summary of any clinical<br />
signs. Place each tagged carcass in a separate plastic bag<br />
<strong>and</strong> seal the bag.<br />
12 Field Manual of <strong>Wildlife</strong> Diseases: Birds