A Variable Volume Socket for Below-knee Prostheses
A Variable Volume Socket for Below-knee Prostheses
A Variable Volume Socket for Below-knee Prostheses

You also want an ePaper? Increase the reach of your titles
YUMPU automatically turns print PDFs into web optimized ePapers that Google loves.
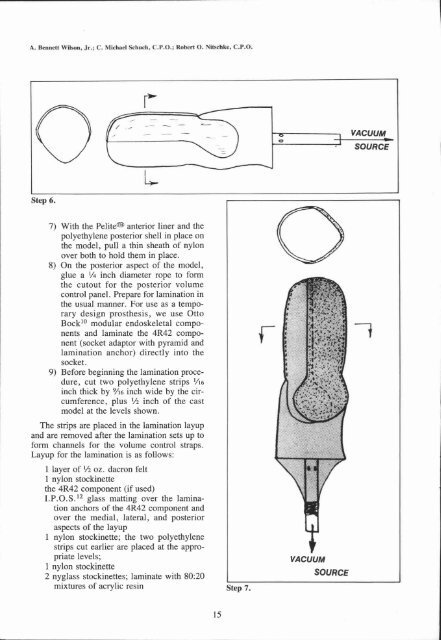
Step 6.<br />
7) With the Pelite® anterior liner and the<br />
polyethylene posterior shell in place on<br />
the model, pull a thin sheath of nylon<br />
over both to hold them in place.<br />
8) On the posterior aspect of the model,<br />
glue a 1/4 inch diameter rope to <strong>for</strong>m<br />
the cutout <strong>for</strong> the posterior volume<br />
control panel. Prepare <strong>for</strong> lamination in<br />
the usual manner. For use as a temporary<br />
design prosthesis, we use Otto<br />
Bock 10<br />
modular endoskeletal components<br />
and laminate the 4R42 component<br />
(socket adaptor with pyramid and<br />
lamination anchor) directly into the<br />
socket.<br />
9) Be<strong>for</strong>e beginning the lamination procedure,<br />
cut two polyethylene strips 1/16<br />
inch thick by 9 /16 inch wide by the circumference,<br />
plus 1/2 inch of the cast<br />
model at the levels shown.<br />
The strips are placed in the lamination layup<br />
and are removed after the lamination sets up to<br />
<strong>for</strong>m channels <strong>for</strong> the volume control straps.<br />
Layup <strong>for</strong> the lamination is as follows:<br />
1 layer of 1/2 oz. dacron felt<br />
1 nylon stockinette<br />
the 4R42 component (if used)<br />
I.P.O.S. 12<br />
glass matting over the lamination<br />
anchors of the 4R42 component and<br />
over the medial, lateral, and posterior<br />
aspects of the layup<br />
1 nylon stockinette; the two polyethylene<br />
strips cut earlier are placed at the appropriate<br />
levels;<br />
1 nylon stockinette<br />
2 nyglass stockinettes; laminate with 80:20<br />
mixtures of acrylic resin<br />
Step 7.