Orion 180mm Maksutov-Cassegrain Telescope Manual - Oceanside ...
Orion 180mm Maksutov-Cassegrain Telescope Manual - Oceanside ...
Orion 180mm Maksutov-Cassegrain Telescope Manual - Oceanside ...

Create successful ePaper yourself
Turn your PDF publications into a flip-book with our unique Google optimized e-Paper software.
instruction <strong>Manual</strong><br />
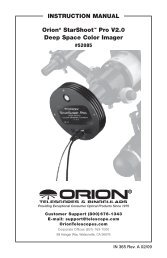
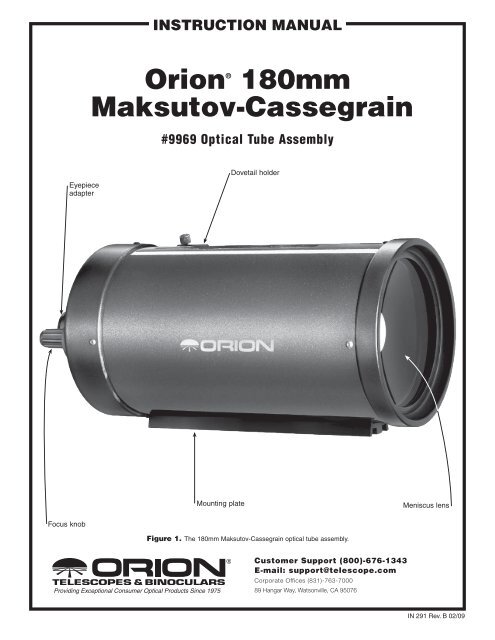
<strong>Orion</strong> ® <strong>180mm</strong><br />
<strong>Maksutov</strong>-<strong>Cassegrain</strong><br />
#9969 Optical Tube Assembly<br />
Eyepiece<br />
adapter<br />
Dovetail holder<br />
Mounting plate<br />
Meniscus lens<br />
Focus knob<br />
Figure 1. The <strong>180mm</strong> <strong>Maksutov</strong>-<strong>Cassegrain</strong> optical tube assembly.<br />
Providing Exceptional Consumer Optical Products Since 1975<br />
Customer Support (800)‐676-1343<br />
E-mail: support@telescope.com<br />
Corporate Offices (831)‐763-7000<br />
89 Hangar Way, Watsonville, CA 95076<br />
IN 291 Rev. B 02/09
Welcome to a new world of adventure! Your new <strong>180mm</strong> <strong>Maksutov</strong>-<strong>Cassegrain</strong> (Mak-Cass) telescope is<br />
a fine-quality instrument designed for both daytime terrestrial viewing and nighttime stargazing. Compact,<br />
portable, but with plenty of aperture, and easy to use, this versatile scope will provide many hours of<br />
enjoyment for the whole family.<br />
These instructions will help you set up and properly use and care for your telescope. Please read them<br />
over thoroughly before getting started.<br />
Getting Started<br />
Your telescope comes fully assembled from the factory. The<br />
optics have been installed and collimated, so you should not<br />
have to make any adjustments to them. Keep the dust covers<br />
on the telescope when it is not in use.<br />
Please keep the original shipping box. In the unlikely event<br />
you should need to ship the telescope back to <strong>Orion</strong> for warranty<br />
repair service, you should use the original packaging.<br />
The box also makes a very good container for storing the telescope.<br />
Mounting the <strong>Telescope</strong><br />
The dovetail mounting plate on the <strong>180mm</strong> <strong>Maksutov</strong>-<br />
<strong>Cassegrain</strong> is specifically designed to couple directly to the<br />
SkyView Pro equatorial mount, which is an excellent mount<br />
choice. Other equatorial and altazimuth mounts may require<br />
removing the mounting plate so the tube can be attached with<br />
tube rings.<br />
Alternatively, the <strong>180mm</strong> Mak-Cass optical tube assembly<br />
can be mounted onto any standard camera tripod or mount<br />
that has a 1/4"-20 mounting stud. The stud threads into one<br />
of the holes on the underside of the mounting plate. There are<br />
several threaded holes in the mounting plate; use the one that<br />
will best balance the telescope on the tripod or mount.<br />
Camera tripods or altazimuth mounts are desirable for terrestrial<br />
(land) viewing because they allow simple vertical and<br />
horizontal movement of the telescope. An equatorial mount<br />
is desirable for astronomical viewing because it allows easy<br />
tracking of celestial objects as the Earth rotates. Also, the<br />
setting circles on the equatorial mount enable you to locate<br />
objects by their celestial coordinates (right ascension and<br />
declination), which can be found in many observing books<br />
and star atlases.<br />
Use of Optional<br />
Accessories<br />
Your telescope does not come with any accessories so as to<br />
offer the greatest flexibility in configuring it to your needs. If<br />
you do not already own a 1.25" diagonal, a 1.25" eyepiece,<br />
and a finder scope with dovetail bracket, you will need to purchase<br />
these items separately. Consult the <strong>Orion</strong> catalog or<br />
www.<strong>Orion</strong><strong>Telescope</strong>s.com for these optional accessories.<br />
The <strong>180mm</strong> <strong>Maksutov</strong>-<strong>Cassegrain</strong> can use almost any<br />
1.25" diagonal or eyepiece. To install a diagonal, unthread<br />
the thumbscrews on the eyepiece adapter at the rear of the<br />
tube and insert the diagonal. Secure it with the thumbscrews.<br />
Then insert an eyepiece into the diagonal and secure it with<br />
the thumbscrew(s) on the diagonal. The diagonal provides a<br />
comfortable viewing angle and image orientation, while the<br />
eyepiece is what actually magnifies the image produced by<br />
the optical tube.<br />
A finder scope is also required for easy aiming of the telescope.<br />
The finder scope makes it easier to locate the subject<br />
you want to observe in the telescope, because the finder<br />
scope has a much wider field of view. The dovetail holder on<br />
the telescope’s tube is for a finder scope bracket. Any optional<br />
<strong>Orion</strong> finder scope will come with a bracket that has a dovetail<br />
base. The dovetail base goes into the dovetail holder, and is<br />
secured with the thumbscrew on the holder.<br />
Focusing<br />
Point the telescope so the front end is aimed in the general<br />
direction of an object you wish to view. When you first look in<br />
the eyepiece, the image you see may be fuzzy, or out of focus.<br />
If so, gently turn the focus knob with your fingers until the<br />
image becomes sharp. Go a little bit beyond sharp focus until<br />
the image just starts to blur again, then reverse the rotation<br />
of the knob, just to make sure you’ve hit the exact focus point.<br />
You will have to readjust the focus when aiming at subjects of<br />
varying distances, or after changing eyepieces.<br />
If you have trouble focusing, rotate the focus knob counterclockwise<br />
as far as it will go. Now look through the eyepiece<br />
while slowly rotating the focus knob clockwise. You should<br />
soon see the point at which focus is reached.<br />
Do You Wear Eyeglasses?<br />
If you wear eyeglasses, you may be able to keep them on<br />
while you observe, if your eyepieces have enough “eye relief”<br />
to allow you to see the whole field of view. You can find out by<br />
looking through the eyepiece first with your glasses on and<br />
then with them off, and see if the glasses restrict the view<br />
to only a portion of the full field. If they do, you can easily<br />
observe with your glasses off by just refocusing the telescope<br />
the needed amount.<br />
Warning: Never look directly at the Sun through<br />
your telescope—even for an instant—without a<br />
professionally made solar filter that completely<br />
covers the front of the instrument, or permanent<br />
eye damage could result. Young children should use<br />
this telescope only with adult supervision.<br />
2
If your eyes are astigmatic, however, images will probably<br />
appear the best with glasses on. This is because a telescope’s<br />
focuser can accommodate for nearsightedness or farsightedness,<br />
but not astigmatism. If you have to wear your glasses<br />
while observing and cannot see the entire field of view, you<br />
may want to purchase additional eyepieces that have longer<br />
eye relief.<br />
Calculating Magnification<br />
To calculate the magnification, or power, of a telescope with<br />
an eyepiece, simply divide the focal length of the telescope by<br />
the focal length of the eyepiece:<br />
<strong>Telescope</strong> Focal Length (mm) = Magnification<br />
Eyepiece Focal Length (mm)<br />
For example, the <strong>180mm</strong> <strong>Maksutov</strong>-<strong>Cassegrain</strong>, which has a<br />
focal length of 2700mm, used in combination with a 25mm<br />
eyepiece, yields a magnification of:<br />
2700 mm = 108x<br />
25 mm<br />
It is desirable to have a range of eyepieces of different focal<br />
lengths to allow viewing over a range of magnifications. It is<br />
not uncommon for an observer to own five or more eyepieces.<br />
<strong>Orion</strong> offers many different eyepieces of varying focal lengths,<br />
so check the catalog or www.<strong>Orion</strong><strong>Telescope</strong>s.com for a wide<br />
selection of additional eyepieces to choose from.<br />
Every telescope has a useful limit of power of about 2x per<br />
millimeter of aperture (i.e. 360x for the <strong>180mm</strong> Mak-Cass).<br />
Claims of higher power by some telescope manufacturers are<br />
a misleading advertising gimmick and should be dismissed.<br />
Keep in mind that at higher powers, an image will always be<br />
dimmer and less sharp (this is a fundamental law of optics).<br />
The steadiness of the air (the “seeing”) can also limit how<br />
much magnification an image can tolerate.<br />
Always start viewing with your lowest-power (longest focal<br />
length) eyepiece in the telescope. It’s best to begin observing<br />
with the lowest-power eyepiece, because it will typically provide<br />
the widest true field of view, which will make finding and<br />
centering objects much easier. After you have located and<br />
centered an object, you can try switching to a higher-power<br />
eyepiece to ferret out more detail, if atmospheric conditions<br />
permit. If the image you see is not crisp and steady, reduce<br />
the magnification by switching to a longer focal length eyepiece.<br />
As a general rule, a small but well-resolved image will<br />
show more detail and provide a more enjoyable view than a<br />
dim and fuzzy, over-magnified image.<br />
Terrestrial Viewing<br />
For land viewing, it’s best to stick with low power eyepieces<br />
that yield a magnification under 100x. At higher powers,<br />
images rapidly lose sharpness and clarity due to “heat waves”<br />
caused by Sun-heated air.<br />
Remember to aim well clear of the Sun, unless the front of the<br />
telescope is fitted with a professionally made solar filter and<br />
the finder scope is covered with a completely opaque material<br />
or removed altogether<br />
<strong>Maksutov</strong>-<strong>Cassegrain</strong> telescopes are capable of focusing on<br />
objects that are quite close, so you can view fine details of<br />
objects that are nearby. Try focusing on a flower or insect at<br />
close distance to enter a normally unseen microscopic world.<br />
Astronomical Viewing<br />
When choosing a location for nighttime stargazing, make it<br />
as far away from city lights as possible. Light-polluted skies<br />
greatly reduce what can be seen with the telescope. Also, give<br />
your eyes at least 20 minutes to dark-adapt to the night sky.<br />
You’ll be surprised at how many more stars you will see! Use<br />
a red flashlight, to see what you’re doing at the telescope, or<br />
to read star charts. Red light will not spoil your dark-adapted<br />
night vision as readily as white light will.<br />
To find celestial objects with your telescope, you first need<br />
to become reasonably familiar with the night sky. Unless you<br />
know how to recognize the constellation <strong>Orion</strong>, for instance,<br />
you won’t have much luck locating the <strong>Orion</strong> Nebula. A simple<br />
planisphere, or star wheel, can be a valuable tool for learning<br />
the constellations and seeing which ones are visible in the<br />
sky on a given night. A good star chart or atlas, like the <strong>Orion</strong><br />
DeepMap 600, can come in handy for helping locate interesting<br />
objects among the dizzying multitude of stars overhead.<br />
Except for the Moon and the brighter planets, it is pretty timeconsuming<br />
and frustrating to hunt for objects randomly, without<br />
knowing where to look. It is best to have specific targets in<br />
mind before you begin looking through the eyepiece.<br />
Photography<br />
When coupled to a 35mm single-lens reflex camera (or digital<br />
equivalent), the <strong>180mm</strong> Mak-Cass becomes a telephoto lens.<br />
For terrestrial or astronomical photography, you need only<br />
a T-ring for your specific camera model. The T-ring attaches<br />
to your camera and threads onto the telescope’s eyepiece<br />
adapter (see Figure 2).<br />
Use the camera’s viewfinder to frame the picture. Use the<br />
telescope’s focuser to focus the image. You may want to consider<br />
using a remote shutter release instead of the shutter<br />
release on the camera; touching the camera can vibrate the<br />
system and blur the resulting photographic image. Also, be<br />
sure to use a solid tripod.<br />
Care & Maintenance<br />
If you give your telescope reasonable care, it will last a lifetime.<br />
When not in use, keep the dust cover on the front of the<br />
tube and the dust cap on the eyepiece adapter. Store it in a<br />
clean, dry, dust-free place, safe from rapid changes in temperature<br />
and humidity. Do not store the telescope outdoors,<br />
although storage in a garage or shed is OK.<br />
Your telescope requires very little mechanical maintenance.<br />
The optical tube is aluminum and has a smooth<br />
3
Eyepiece<br />
adapter<br />
Figure 2.<br />
A T-ring is all<br />
that is needed to<br />
connect a 35mm<br />
SLR camera to<br />
the telescope; it<br />
threads onto the<br />
eyepiece adapter<br />
with eyepiece and<br />
diagonal removed.<br />
T-ring<br />
painted finish that is fairly scratch-resistant. If a scratch does<br />
appear on the tube, it will not harm the telescope. If you wish,<br />
you may apply some auto touch-up paint to the scratch.<br />
Smudges on the tube can be wiped off with a soft cloth and<br />
household cleaning fluid.<br />
Any quality optical lens cleaning tissue and optical lens cleaning<br />
fluid specifically designed for multi-coated optics can be<br />
used to clean the front meniscus lens of the telescope. Never<br />
use regular glass cleaner or cleaning fluid designed for eyeglasses.<br />
Before cleaning with fluid and tissue, however, blow<br />
any loose particles off the lens with a blower bulb or compressed<br />
air. Then apply some cleaning fluid to a tissue, never<br />
directly on the optics. Wipe the lens gently, then remove any<br />
excess fluid with a fresh lens tissue. Oily fingerprints and<br />
smudges may be removed using this method. Use caution;<br />
rubbing too hard may scratch the lens. For the large surface of<br />
the meniscus lens, clean only a small area at a time, using a<br />
fresh lens tissue on each area. Never reuse tissues.<br />
Specifications<br />
#9969 <strong>180mm</strong> <strong>Maksutov</strong>-<strong>Cassegrain</strong> OTA<br />
Optical design: <strong>Maksutov</strong>-<strong>Cassegrain</strong><br />
Aperture: <strong>180mm</strong><br />
Effective focal length: 2700mm<br />
Focal ratio: f/15.0<br />
Central obstruction diameter: 41mm<br />
Primary mirror coating: Aluminum with SiO2 overcoat<br />
Meniscus lens coating: Anti-reflection multi-coatings on both<br />
sides of lens<br />
Eyepiece adapter: Accepts 1.25" format accessories, camera<br />
t-threads<br />
Optical tube mounting plate: Fits all <strong>Orion</strong> EQ mounts equipped<br />
with a dovetail tube mounting, and standard photo-style tripods<br />
Weight: 15.9 lbs<br />
Appendix: Collimating<br />
Collimating is the process of aligning a telescope’s optics. Your<br />
<strong>Maksutov</strong>-<strong>Cassegrain</strong>'s primary mirror was aligned at the factory<br />
and should not need adjustment unless the telescope is<br />
handled roughly. This manual contains information on how to<br />
test the collimation of your telescope and instructions for proper<br />
alignment should that be needed.<br />
Star-Testing the <strong>Telescope</strong><br />
Before you start adjusting the primary mirror of your telescope,<br />
make certain that it is actually out of collimation by performing<br />
a star test.<br />
Take your telescope out at dusk and let it acclimate to the outside<br />
temperature; this usually takes 30-60 minutes. When it is<br />
dark, point the telescope upwards at a bright star and accurately<br />
center it in the eyepiece’s field of view. Slowly de-focus<br />
the image with the focusing knob. If the telescope is correctly<br />
collimated, the expanding disk should be a circle (Figure 3).<br />
If the image is unsymmetrical, the scope is out of collimation.<br />
Also, the dark shadow cast by the secondary mirror should<br />
appear in the very center of the out-of-focus circle, like the<br />
hole in a donut. If the “hole” appears off-center, the telescope<br />
is out of collimation.<br />
Out of collimation<br />
Collimated<br />
Figure 3. A star test will determine if a telescope’s optics are<br />
properly collimated. An unfocused view of a bright star through the<br />
eyepiece should appear as illustrated on right if optics are perfectly<br />
collimated. If circle is unsymmetrical, as in illustration on left, scope<br />
needs collimation.<br />
If you try the star test but the bright star you have selected is<br />
not accurately centered in the eyepiece, the optics will always<br />
appear out of collimation, even though they may be perfectly<br />
aligned. It is critical to keep the star centered, so over time you<br />
will need to make slight corrections to the telescope’s position<br />
in order to account for the sky’s apparent motion.<br />
4
Front of<br />
telescope<br />
Secondary<br />
mirror<br />
Reflection of<br />
your eye in<br />
secondary<br />
mirror<br />
Front of<br />
telescope<br />
Secondary<br />
mirror<br />
Reflection of<br />
your eye in<br />
secondary<br />
mirror<br />
Secondary<br />
reflection of<br />
inside of tube<br />
Figure 4a<br />
Reflection of<br />
inside of tube<br />
(misalignment)<br />
Figure 4b<br />
Figure 4a. If the telescope’s optics are out of alignment the view<br />
through the rear opening of the telescope will resemble Figure‐4a.<br />
Figure 4b. With the optics properly aligned the view through the<br />
rear opening of the telescope will resemble Figure 4b.<br />
Collimating<br />
To collimate your telescope, remove the diagonal and eyepiece<br />
and look into the rear opening of the tube (also remove<br />
the dust cover from the front of the tube). This should be done<br />
indoors, with the telescope pointed at a white wall in a welllit<br />
room. Try to keep your eye centered with respect to the<br />
rear opening of the tube as best as possible. Using an <strong>Orion</strong><br />
Collimating Eyepiece will aid greatly in keeping your eye centered<br />
and is strongly recommended.<br />
Alternatively, you can make a crude collimating tool out of an<br />
empty, black plastic 35mm film canister. It will not have crosshairs,<br />
so it won’t be as precise, but it will be better than nothing.<br />
Cut 1⁄2" from the top lip of the canister and put a 1/16" to 1/8"<br />
diameter hole in the center of the canister’s bottom surface.<br />
Insert the film canister collimating tool into the focuser like you<br />
would an eyepiece with the bottom surface outward.<br />
Once you are ready to collimate, look into the rear opening of<br />
the tube. If your telescope is out of collimation, it will resemble<br />
Figure 4a. You will see a reflection of the inside of the optical<br />
tube resembling a black crescent. A properly collimated scope<br />
will resemble Figure 4b. The direction of misalignment in your<br />
telescope may differ from Figure 4a, but the diagram will give<br />
you a general idea of how things will look.<br />
Note there are three pairs of collimation screws on the back<br />
of the optical tube (Figure 5). The tilt of the primary mirror is<br />
adjusted with the three pairs of collimation screws. You will<br />
need a 4mm and 2.5mm hex key to turn these screws.<br />
Each pair of collimation screws work together to adjust the tilt<br />
of the primary mirror. One screw pushes the mirror cell forward,<br />
while the other screw pulls the mirror cell back. One<br />
must be loosened and the other tightened by equal amounts<br />
in order to adjust the tilt. Look into the rear opening of the tube<br />
and locate the black crescent that indicates the optics are out<br />
of collimation. Note which way the front of the telescope would<br />
need to move in order to “fill” that black crescent and resemble<br />
Figure 4b. Then look at the back end of the telescope and<br />
locate the pair of collimation screws that are in the direction<br />
that the front of the telescope needs to move. Tighten one of<br />
these screws by one turn, and loosen the other screw of the<br />
pair by one turn. Look into the rear opening of the tube and<br />
determine if the black crescent has reduced in size, increased<br />
in size, or been “filled.” If the crescent has reduced in size,<br />
continue adjusting the pair of collimation screws in the same<br />
manner until the crescent has been completely “filled.” If the<br />
crescent has increased in size, the optics have been moved<br />
further out of alignment. To correct this, loosen and tighten the<br />
same pair of collimation screws by one turn to undo the previous<br />
adjustment. Then adjust the other two pairs of collimation<br />
screws until the black crescent is “filled.”<br />
Collimation<br />
screw pairs<br />
Figure 5. The <strong>180mm</strong> <strong>Maksutov</strong>-<strong>Cassegrain</strong> screws<br />
Rear<br />
opening<br />
5
It will take a little trial and error to get a feel for how to tilt<br />
the mirror using the collimation screw pairs. Again, collimation<br />
should only be attempted if you have confirmed the telescope<br />
is actually out of collimation by performing a star test.<br />
Finishing Collimation<br />
Once you have finished adjusting your telescope, you will<br />
need to perform another star test (described earlier) to check<br />
the collimation. If your telescope appears collimated after star<br />
testing, it should not need adjustment again unless it is roughly<br />
handled.<br />
If you have gone through this process and your telescope is<br />
still out of collimation, please contact <strong>Orion</strong> customer support.<br />
You may need to return the telescope for repair (covered on<br />
warranty for 1 year after purchase).<br />
One-Year Limited Warranty<br />
This <strong>Orion</strong> <strong>180mm</strong> <strong>Maksutov</strong>-<strong>Cassegrain</strong> <strong>Telescope</strong> is warranted against defects in materials or workmanship<br />
for a period of one year from the date of purchase. This warranty is for the benefit of the original<br />
retail purchaser only. During this warranty period <strong>Orion</strong> <strong>Telescope</strong>s & Binoculars will repair or replace, at<br />
<strong>Orion</strong>’s option, any warranted instrument that proves to be defective, provided it is returned postage paid<br />
to: <strong>Orion</strong> Warranty Repair, 89 Hangar Way, Watsonville, CA 95076. If the product is not registered, proof<br />
of purchase (such as a copy of the original invoice) is required.<br />
This warranty does not apply if, in <strong>Orion</strong>’s judgment, the instrument has been abused, mishandled, or<br />
modified, nor does it apply to normal wear and tear. This warranty gives you specific legal rights, and<br />
you may also have other rights, which vary from state to state. For further warranty service information,<br />
contact: Customer Service Department, <strong>Orion</strong> <strong>Telescope</strong>s & Binoculars, 89 Hangar Way, Watsonville, CA<br />
95076; (800)‐676-1343.<br />
<strong>Orion</strong> <strong>Telescope</strong>s & Binoculars<br />
89 Hangar Way, Watsonville, CA 95076<br />
Customer Support Help Line (800)‐676-1343 • Day or Evening<br />
6