KeyFit Manual - Chicco
KeyFit Manual - Chicco
KeyFit Manual - Chicco

You also want an ePaper? Increase the reach of your titles
YUMPU automatically turns print PDFs into web optimized ePapers that Google loves.
TABLE OF CONTENTS<br />
Safe Use Checklist.........................................................4<br />
Registration & Recall....................................................5<br />
Assistance......................................................................5<br />
Warnings.........................................................................6<br />
Base Features<br />
Base Overview...........................................................12<br />
Storage Compartment...............................................13<br />
Recline Adjustment....................................................13<br />
LATCH Removal & Storage.......................................14<br />
Shoulder Belt Lockoff.................................................15<br />
Carrier Features<br />
Carrier Overview.........................................................16<br />
Harness Buckle...........................................................18<br />
Chest Clip...................................................................18<br />
Harness Adjuster.......................................................18<br />
Handle........................................................................19<br />
Canopy.......................................................................20<br />
Newborn Insert..........................................................21<br />
Head Support.............................................................22<br />
Carrier/Base Attachment...........................................23<br />
Securing Child In Carrier<br />
Child Requirements...................................................24<br />
Changing Harness Height.........................................25<br />
Securing Child in Carrier............................................26<br />
Safety Tips for Securing Child...................................28<br />
Secure Child Checklist...............................................29<br />
Vehicle Information<br />
Unsafe Vehicle Belts..................................................30<br />
Installation Positions..................................................31<br />
Installation with Base<br />
LATCH or Vehicle Belt?..............................................32<br />
Installation Using Vehicle Belt.....................................32<br />
Installation Using LATCH...........................................34<br />
Uninstalling Base..................................................33, 36<br />
Installation without Base............................................37<br />
Installation in Aircraft..................................................38<br />
Cleaning and Maintenance.........................................39<br />
Replacement Parts......................................................40
SAFE USE CHECKLIST<br />
YOUR CHILD’S SAFETY DEPENDS ON YOU!<br />
You MUST follow the detailed instructions in this User Guide to<br />
ensure the steps below are performed correctly!<br />
1 Install Child Restraint Rear-Facing<br />
forward facing vehicle seats only<br />
child faces towards rear of vehicle<br />
2 Install in Safe Location in Vehicle<br />
position with NO frontal airbag<br />
compatible vehicle belts<br />
3 Ensure Child is in Size Range<br />
weight – 4-22 lbs<br />
height – 30 inches or less<br />
4 Secure Child Properly in Carrier<br />
correct shoulder strap height<br />
harness snug and chest clip correct<br />
5 Secure Restraint Properly in Vehicle<br />
vehicle belts tight and restraint secure<br />
Carrier securely attached to Base<br />
6 Verify that Recline Angle is Correct<br />
Bubble between arrows<br />
Level Line on Carrier is level with ground.<br />
1<br />
2<br />
3 4<br />
5<br />
6<br />
REGISTRATION & RECALL<br />
Please complete the Registration Card that came with your<br />
Child Restraint and mail it promptly.<br />
Child Restraints could be recalled for safety reasons. You must<br />
register this restraint to be reached in a recall. Send your name,<br />
address, and the restraint’s model number and manufacturing<br />
date to:<br />
<strong>Chicco</strong> USA Inc.<br />
1842 William Penn Way<br />
Lancaster, PA 17601<br />
or call 877-424-4226<br />
For recall information, call the U.S. Government’s Auto Safety Hotline<br />
at 1-800-424-9393 (202-366-0123 in D.C. area).<br />
NEED HELP?<br />
If you have any problems with your <strong>Chicco</strong> Child Restraint,<br />
or any questions regarding installation or use, please call:<br />
<strong>Chicco</strong> USA Customer Service<br />
1-877-424-4226<br />
Please have Model Number available when you call
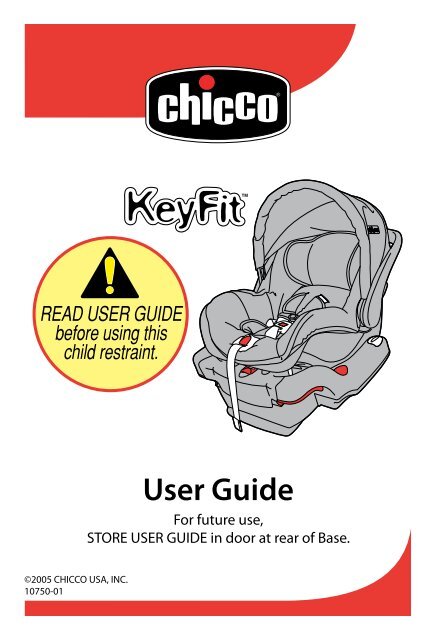
WARNING<br />
Take Time to Read This User Guide<br />
Carefully read and understand all instructions and warnings in<br />
this User Guide. Your child’s safety depends on you knowing how to<br />
setup, install and use this child restraint properly.<br />
Before installing this restraint in a vehicle, be sure to also check the<br />
vehicle owner’s manual for information on child restraint installation.<br />
NEVER allow others to use this Child Restraint until they have<br />
read and understood all instructions in this User Guide. For future<br />
reference, keep this User Guide in storage door at rear of Base.<br />
Make Sure Child Fits This Restraint<br />
ONLY USE this Child Restraint with children who weigh between<br />
4 and 22 pounds (2 and 10 kg) and whose height is 30 inches<br />
(76 cm) or less.<br />
DO NOT use this child restraint if top of child’s head is less than 1<br />
inch from top of restraint.<br />
ONLY USE the Newborn Insert for infants who weigh between 4<br />
and 11 pounds (2 and 5 kg).<br />
DO NOT use Newborn Insert if child weighs more than 11 pounds.<br />
WARNING<br />
Secure Child Properly<br />
Snugly adjust the harness around your child. A loose harness<br />
could cause the child to be ejected in a sudden stop or crash,<br />
resulting in serious injury or death.<br />
A snug strap should not allow any slack. It lies in a relatively straight line<br />
without sagging. It does not press on the child’s flesh or push the child’s<br />
body into an unnatural position.<br />
NEVER use clothing or blankets that interfere with fastening or<br />
tightening the harness. An unsecured child could be ejected in a<br />
sudden stop or crash!<br />
To keep child warm, place a blanket over child and restraint AFTER you<br />
have properly secured child in harness.<br />
ALWAYS check to make sure buckle is securely latched. If buckle<br />
separates, child could be killed or seriously injured.<br />
NEVER leave child unattended.<br />
ALWAYS keep child properly secured in harness whenever child<br />
is in carrier.
WARNING<br />
Install Restraint Correctly<br />
NEVER place this Child Restraint in a<br />
vehicle position that has a front airbag.<br />
An infant in a rear-facing child restraint could<br />
be killed by an airbag. Refer to vehicle<br />
owner’s manual before installing this restraint<br />
in a seating position with side airbags.<br />
ALWAYS install rear-facing when using this Child Restraint in a<br />
vehicle. Your child could be killed or seriously injured if you install this<br />
restraint forward facing.<br />
Install this Child Restraint in a rear vehicle seat if possible.<br />
According to accident statistics, children are safer when properly<br />
restrained in the rear seating positions rather than in the front seating<br />
positions.<br />
ONLY install this child restraint in forward facing vehicle seats.<br />
NEVER install in rear facing or side facing vehicle seats.<br />
NEVER use restraint in a vehicle seating position where it can not<br />
be secured tightly. A loosely installed child restraint will not protect<br />
your child in a crash.<br />
WARNING<br />
Install Restraint Correctly<br />
ALWAYS secure this Child Restraint with the vehicle’s child<br />
restraint anchorage system (LATCH) if available or with a vehicle belt.<br />
To ensure a correct installation of Child Restraint, you must follow<br />
the step by step instructions in this User Guide.<br />
BEFORE each use, ALWAYS check to make sure restraint is<br />
tightly secured in the vehicle seat.<br />
ALWAYS check for secure<br />
attachment of carrier each time<br />
you use this restraint. After latching<br />
Carrier into Base, lift up on Carrier<br />
to make sure that it is securely<br />
attached to Base. Child could be<br />
killed or seriously injured if Carrier<br />
is not securely latched to Base.<br />
NEVER travel with this Child Restraint unsecured in a vehicle,<br />
even when it is unoccupied. An unsecured child restraint could injure<br />
other occupants in a sudden stop or crash.
WARNING<br />
Ensure Child’s Safety When Using Carrier<br />
NEVER Leave Child Unattended!<br />
Suffocation Hazard: Infant carrier can roll over on soft surfaces<br />
and suffocate child. NEVER place carrier on beds, sofas or other<br />
soft surfaces.<br />
Strangulation Hazard: Child can strangle in loose restraint<br />
straps. ALWAYS use harness. NEVER leave child in carrier when<br />
straps are lose or undone.<br />
Fall Hazard: Child’s movements can slide carrier. NEVER place<br />
carrier near edges of counter tops, tables, or other elevated surfaces.<br />
Child and carrier might fall.<br />
BE SURE handle is locked in the “carry position” before lifting<br />
carrier by handle. An unlocked handle could move unexpectedly,<br />
causing injury to child.<br />
NEVER place carrier in top of shopping cart.<br />
Carrier will not be secure and could fall causing injury to child.<br />
ALWAYS check buckle and other parts for hot surfaces. A hot<br />
surface could burn child! Cover unoccupied carrier with blanket when<br />
leaving in a vehicle exposed to sunlight.<br />
WARNING<br />
Check Condition of Restraint<br />
DO NOT use this Child Restraint if any of the Harness or LATCH<br />
straps are cut, frayed or damaged in any way.<br />
DO NOT use infant carrier if it is damaged or broken. Call 1-877-<br />
424-4226 to find out if the damaged part or parts can be replaced.<br />
NEVER modify or disassemble this Child Restraint except as<br />
instructed to in this User Guide.<br />
DO NOT use any accessories, pads or products supplied by<br />
other manufacturers with this Child Restraint. Items not tested with<br />
this restraint could injure your child.<br />
DO NOT use this Child Restraint if it is more than 6 years old.<br />
Check manufacturer’s label on underside of Carrier and in recess of<br />
Base for the “Do Not Use After” date.<br />
YOU MUST replace this Child Restraint if it has been involved in<br />
a crash, even if you cannot see visible damage. A damaged child<br />
restraint may not protect your child in a future crash.<br />
10 11
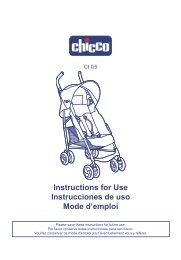
BASE OVERVIEW<br />
a Recline Foot<br />
b Recline Button<br />
c Recline Indicator<br />
d LATCH Connector<br />
e LATCH Release Lever<br />
f LATCH Pull Strap<br />
g Shoulder Belt Lockoff<br />
h Carrier Attachment Hook<br />
i Pull Strap Storage Pocket<br />
j Storage & User Guide<br />
BASE FEATURES<br />
Storage Compartment<br />
The Storage Compartment is at<br />
the rear of the Base. The User<br />
Guide is stored in the Door.<br />
DO NOT place heavy or<br />
sharp items in the Storage<br />
Compartment. They could fly<br />
out during a sudden stop or<br />
crash, and cause serious injury.<br />
j<br />
i<br />
c<br />
h<br />
f<br />
Recline Adjustment<br />
1 Recline angle may be adjusted<br />
by pushing Recline Buttons while<br />
lifting Base.<br />
1<br />
b<br />
e<br />
2 Angle is correct when entire<br />
Bubble is between arrows.<br />
Vehicle MUST be on a level surface<br />
for the Bubble to indicate correctly.<br />
2<br />
g<br />
a<br />
d<br />
12 13
LATCH REMOVAL & STORAGE<br />
This Child Restraint can be safely installed using vehicle<br />
belts or LATCH. LATCH is a Child Restraint attachment<br />
system that is standard in most vehicles manufactured<br />
after September 1, 2002. Refer to your vehicle owner’s<br />
manual for details regarding LATCH use in your vehicle.<br />
Removing LATCH<br />
Pull LATCH Connectors out of<br />
storage pockets while lifting up on<br />
LATCH Release Lever.<br />
Storing LATCH:<br />
1 Insert LATCH Connectors into<br />
storage pockets.<br />
1<br />
SHOULDER BELT LOCKOFF<br />
The Shoulder Belt Lockoff is used when installing the Base using<br />
your vehicle belts. It locks the vehicle shoulder belt in place,<br />
ensuring a stable, secure Base installation.<br />
1 With vehicle belt tight, position<br />
belt under Shoulder Belt Lockoff.<br />
2 Firmly slide vehicle belt under<br />
Shoulder Belt Lockoff<br />
Refer to “Installation Using<br />
Vehicle Belt” on page 32 for<br />
detailed installation instructions.<br />
1<br />
2<br />
2 Pull LATCH Pull Strap to<br />
secure LATCH Connectors.<br />
3 Roll LATCH Pull Strap and<br />
store in Pull Strap Storage Pocket.<br />
2<br />
3<br />
When not using LATCH, the LATCH Connectors and Pull<br />
Strap MUST be stored properly to allow Carrier to attach<br />
securely to Base.<br />
14 15
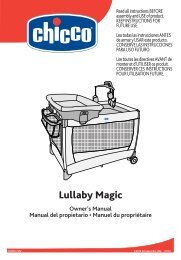
CARRIER OVERVIEW<br />
CARRIER OVERVIEW<br />
a Release Handle<br />
b Harness Strap<br />
c Splitter<br />
d Side Hook<br />
e Harness Adjuster Strap<br />
f Lower Slots<br />
f<br />
g Middle Slots<br />
h Upper Slots<br />
i Head Support Fastener Tabs<br />
g<br />
h<br />
a<br />
a Carry Handle<br />
b Canopy<br />
c Handle Button<br />
d Neck Pads<br />
e Harness Straps<br />
f Seat Pad<br />
g Adjuster Cover<br />
h Head Support<br />
i Harness Slots<br />
j Chest Clip<br />
k Adjuster Strap<br />
l Adjuster Button<br />
m Buckle<br />
n Newborn Insert<br />
o Canopy Mount<br />
a<br />
h<br />
i<br />
b<br />
c<br />
b<br />
c<br />
f<br />
d<br />
e<br />
i<br />
n<br />
o<br />
d<br />
j<br />
e<br />
g<br />
k<br />
l<br />
m<br />
16 17
CARRIER HARNESS FEATURES<br />
Harness Buckle<br />
To release buckle tongues, firmly<br />
press red button on buckle. To<br />
fasten, insert each tongue into<br />
buckle, listen for a click and then<br />
tug to verify that it is latched.<br />
Check that buckle functions<br />
properly and is kept free of<br />
dirt. For cleaning instructions,<br />
see page 40.<br />
HANDLE<br />
Handle has 3 LOCKED positions.<br />
To rotate to a new position, press<br />
both buttons near pivot.<br />
BE SURE handle is<br />
LOCKED in “CARRY” position<br />
before lifting carrier by handle.<br />
An unlocked handle could<br />
move unexpectedly, causing<br />
injury to child.”<br />
Carry<br />
Chest Clip<br />
To separate chest clip, push center<br />
button and pull apart. To fasten,<br />
push together until locked.<br />
Position chest clip at center of<br />
child’s chest, level with armpits.<br />
a<br />
ALWAYS place handle in<br />
one of the LOCKED positions<br />
when using Child Restraint in<br />
vehicle.<br />
Store<br />
Harness Adjuster<br />
a To loosen harness, firmly<br />
press button while pulling out on<br />
both shoulder straps.<br />
b To tighten harness, slowly pull<br />
adjuster strap until harness is snug<br />
around child.<br />
Keep adjuster area clean and free of dirt. DO NOT attempt to<br />
remove adjuster cover or button.<br />
b<br />
NEVER hang toys or other objects from handle when using<br />
child restraint in vehicle. They could seriously injure a child<br />
in a sudden stop or crash.<br />
18 19<br />
Stand
CANOPY<br />
NEWBORN INSERT<br />
To Adjust Canopy, grab bow on<br />
both sides and rotate. Detach<br />
fastener tabs when rotating toward<br />
front of carrier.<br />
Use Newborn Insert to provide<br />
additional support and ensure<br />
a secure harness fit for smaller<br />
infants.<br />
1<br />
a To Remove Canopy Fabric,<br />
pull fabric away from Canopy<br />
Mount to expose button. Press<br />
button on canopy mount to release<br />
end of bow. Slide canopy fabric off<br />
bow and detach canopy from rear<br />
of pad.<br />
a<br />
The harness height may<br />
have to be changed to fit your<br />
child. Before using insert, read<br />
the instructions on “Changing<br />
Harness Height” and “Securing<br />
Child in Carrier”<br />
To Install Insert in Carrier<br />
2<br />
Release bow from canopy mount<br />
on opposite side of carrier if using<br />
carrier without canopy.<br />
To replace canopy, reverse<br />
previous steps.<br />
1 Pull End of Buckle through<br />
center slot in insert.<br />
2 Pull Both Harness Straps<br />
over and around side panels. Push<br />
insert firmly into bottom of carrier.<br />
3<br />
Top of insert should always be<br />
BELOW the lower harness slots.<br />
3 When properly installed,<br />
the Newborn Insert and harness<br />
should look like drawing.<br />
ONLY USE Insert with infants who weigh between 4 and 11<br />
lbs. NEVER USE Insert if child weighs more than 11 lbs!<br />
20 21
HEAD SUPPORT<br />
CARRIER/BASE ATTACHMENT<br />
Use head support to provide<br />
additional support for a young<br />
infants head.<br />
a<br />
1 To secure carrier to base,<br />
align carrier with base and push<br />
firmly into base. Listen for a click.<br />
1<br />
a Head support can be used<br />
with or without newborn insert.<br />
Pull up on Carrier to verify that<br />
it is securely latched.<br />
b To Install Head Support, pull<br />
Fastener Tabs through slots and<br />
then attach together on underside<br />
of carrier.<br />
Fastener Tabs must always<br />
connect through slots ABOVE<br />
the slots used for harness.<br />
b<br />
2 To release carrier from base,<br />
pull release handle while lifting<br />
carrier out of base.<br />
Be sure to hold carrier securely<br />
with both hands when removing.<br />
2<br />
NEVER use head support with harness in upper slots.<br />
Head support could interfere with harness adjustment.<br />
22 23
CHILD REQUIREMENTS<br />
CHANGING HARNESS HEIGHT<br />
Child Requirements<br />
Children should ride in a REAR-FACING Child Restraint until<br />
they’re at least 1 year old AND weigh at least 20 lbs.<br />
1 ONLY use this child restraint<br />
if the child meets all of the following<br />
requirements:<br />
Weight between 4 and 22 pounds<br />
. . (2 and 10 kg).<br />
Height is less than 30 inches<br />
. . (76 cm).<br />
Top of head is at least 1 inch<br />
. . below top of carrier.<br />
2 Use Newborn Insert for infants<br />
who weigh between 4 and 11<br />
pounds (2 and 5 kg.)<br />
1<br />
2<br />
1 With child firmly seated in<br />
carrier, identify correct slots for<br />
harness. Select closest slots AT or<br />
BELOW child’s shoulders.<br />
2 With child removed and harness<br />
loosened, turn carrier over to<br />
expose splitter. Unhook one strap<br />
from splitter.<br />
3 Pull end of loose strap out of<br />
pad and return it back through<br />
correct slot. Do not twist strap.<br />
4 Re-attach strap to splitter.<br />
Connection to splitter should look<br />
like illustration.<br />
5 Repeat for other strap. Straps<br />
must be free of twists and securely<br />
fastened to splitter.<br />
6 Check that Harness is secure<br />
and working properly.<br />
1<br />
2<br />
3<br />
4<br />
For premature infants, you must consult the infant’s doctor<br />
before using this Child Restraint. A premature infant may have<br />
difficulty breathing or have other medical problems when<br />
placed in a seated position.<br />
NEVER remove Harness or harness components from Carrier.<br />
DO NOT USE Child Restraint if any part of harness is damaged.<br />
Call 1-877-424-4226 to order a replacement harness.<br />
24 25
SECURING CHILD IN CARRIER<br />
SECURING CHILD IN CARRIER<br />
1 Loosen harness by firmly<br />
pressing adjuster button and<br />
pulling forward on both straps.<br />
2 Press button on buckle to<br />
release buckle tongues.<br />
1<br />
2<br />
5 Insert buckle tongues into<br />
buckle. Listen for a click.<br />
Tug on tongues to verify that they<br />
are latched.<br />
Pull excess strap up through buckle<br />
tongues so that harness is snug<br />
around child’s thighs.<br />
5<br />
3 Separate chest clip and spread<br />
straps apart. Place child in carrier<br />
in seated position.<br />
Child must be resting against back and<br />
bottom of carrier.<br />
4 Pull harness straps over child’s<br />
shoulders and around their waist.<br />
Make sure that harness slots are AT or<br />
BELOW top of child’s shoulders.<br />
If harness straps are<br />
not AT or BELOW child’s<br />
shoulders, you must move<br />
harness to proper slots. See<br />
“Changing Harness Height”<br />
on page 25.<br />
3<br />
4<br />
6 Snap chest clip together and<br />
slide away from child’s neck before<br />
tightening harness.<br />
7 Tighten harness by pulling<br />
slowly on adjuster strap until<br />
harness is snug around child.<br />
8 Make sure child is properly<br />
secured.<br />
a Harness must be snug. If you<br />
can pinch a fold in strap, harness<br />
is too loose.<br />
b Chest Clip must be positioned<br />
at center of child’s chest, level<br />
with armpits.<br />
c Straps must be laying flat,<br />
free of twists and on top of<br />
child’s shoulders.<br />
6<br />
7<br />
8<br />
CLICK!<br />
Read the “Safety Tips<br />
for Securing Child” and the<br />
“Secure Child Checklist”<br />
26 27
SAFETY TIPS FOR SECURING CHILD<br />
SECURE CHILD CHECKLIST<br />
1 NEVER secure child in carrier<br />
with child dressed in bulky<br />
garments or heavy clothing.<br />
Heavy clothing can prevent harness from<br />
being properly tightened around child.<br />
If harness is not snug<br />
around your child, child could<br />
be ejected in a sudden stop<br />
or crash resulting in serious<br />
injury or death!<br />
2 To keep child warm, place a<br />
blanket over child AFTER you have<br />
properly secured and tightened<br />
harness around your child.<br />
3 To ensure a better fit for smaller<br />
infants, use the Newborn Insert<br />
and Head Support provided with<br />
this Child Restraint.<br />
1<br />
2<br />
3<br />
1 Check Height of Harness Slots<br />
Harness straps should always<br />
. . be AT or BELOW child’s shoulders.<br />
2 Check Position of Chest Clip<br />
Chest clip should be in center<br />
. . of child’s chest, level with armpits.<br />
3 Check Tightness of Harness<br />
Harness must be snug.<br />
Harness is snug when you cannot<br />
pinch a fold in the harness material.<br />
If you do not secure child<br />
properly, child could be<br />
ejected in a sudden stop or<br />
crash, resulting in serious<br />
injury or death.<br />
1<br />
2<br />
3<br />
NEVER use Insert if child<br />
weighs more than 11 pounds!<br />
NEVER place extra padding under or behind the child.<br />
NEVER leave child unattended. ALWAYS keep child properly<br />
secured in harness whenever child is in carrier.<br />
28 29
VEHICLE INFORMATION<br />
This Child Restraint can be securely<br />
installed in most vehicles using the vehicle<br />
seat belts or LATCH. BUT, there are some<br />
vehicle belts and installation positions that<br />
are UNSAFE for use with this Restraint.<br />
Refer to your Vehicle Owner’s<br />
<strong>Manual</strong> for detailed information about<br />
vehicle belts, LATCH, and preferred<br />
Restraint installation positions.<br />
UNSAFE Vehicle Belts<br />
The following types of vehicle belts MUST<br />
NOT be used to install this Child Restraint:<br />
1 Motorized (automatic) vehicle belts.<br />
2 Door mounted vehicle belts.<br />
1<br />
2<br />
3<br />
INSTALLATION POSITIONS<br />
Accident statistics indicate that<br />
children are safer when properly<br />
restrained in rear seating positions<br />
than in front seating positions.<br />
Children 12 and under should ride<br />
in rear seating positions.<br />
The BEST POSITION is one that:<br />
• Is Recommended by Vehicle Owner’s <strong>Manual</strong>.<br />
• Results in Secure Installation of Restraint.<br />
ONLY install Child Restraint in forward facing vehicle seats.<br />
NEVER install in rear or side facing seats.<br />
3 Lap/Shoulder Belts with 2 retractors,<br />
(unless Lap Belt has a “Lock Mode”).<br />
1 retractor tensions the Lap Belt and<br />
1 tensions the Shoulder Belt.<br />
4<br />
4 Non-Locking (ELR) Lap Belts.<br />
(Emergency Locking Retractors)<br />
These belts remain loose after<br />
installation and only lock during<br />
a sudden stop or crash.<br />
AIRBAG WARNING:<br />
NEVER install Child Restraint in a seat with a<br />
Frontal Airbag. DEATH or SERIOUS INJURY<br />
may occur. Refer to your Vehicle Owner’s<br />
<strong>Manual</strong> for Side Airbag warnings and information.<br />
30 31
INSTALLATION USING VEHICLE BELT<br />
INSTALLATION USING VEHICLE BELT<br />
LATCH or Vehicle Belt? This Child Restraint can<br />
be safely installed using Vehicle Belts or LATCH.<br />
Use the method that results in the MOST<br />
SECURE installation in your vehicle.<br />
1 Position Base in forward facing<br />
vehicle seat with Recline Foot<br />
against seat back.<br />
2 Adjust Base Angle by pushing<br />
Recline Buttons while lifting Base.<br />
Angle is correct when Bubble is<br />
between arrows.<br />
Vehicle must be on a level surface for<br />
the Bubble to indicate correctly.<br />
3 Route Vehicle Belt through<br />
openings in Base and buckle the<br />
vehicle belt.<br />
4 Tighten Vehicle Belt while<br />
pushing Base firmly into vehicle<br />
seat.<br />
5 Secure Vehicle Shoulder Belt<br />
firmly under Shoulder Belt Lockoff,<br />
while keeping tension on Belt.<br />
1<br />
2<br />
3<br />
4<br />
5<br />
If using Vehicle Lap Belt only<br />
(no Shoulder Belt), make sure<br />
that Lap Belt is LOCKED, and<br />
that free end of Lap Belt is<br />
neatly stored so it DOES NOT<br />
INTERFERE with attachment<br />
of Carrier to Base.<br />
6 CHECK Installation:<br />
a Belts MUST be TIGHT.<br />
b Base MUST be STABLE.<br />
c Bubble MUST be<br />
. . between arrows.<br />
d Belts & Buckles MUST NOT<br />
. . INTERFERE with attachment<br />
. . of Carrier to Base.<br />
7 Attach Carrier To Base after<br />
properly securing child in Carrier.<br />
Lift up on Carrier to verify it is<br />
properly attached to the Base.<br />
Uninstalling Base:<br />
Remove Carrier from Base,<br />
unbuckle Vehicle Belt, and remove<br />
Base from vehicle.<br />
NEVER travel with Child Restraint unsecured in vehicle.<br />
Passengers may be injured during a sudden stop or crash.<br />
32 33<br />
6<br />
7
INSTALLATION USING LATCH<br />
INSTALLATION USING LATCH<br />
LATCH or Vehicle Belt? This Child Restraint can<br />
be safely installed using Vehicle Belts or LATCH.<br />
Use the method that results in the MOST<br />
SECURE installation in your vehicle.<br />
1 Remove LATCH Connectors<br />
from storage pockets while lifting<br />
up on LATCH Release Lever.<br />
1<br />
5 Tighten LATCH Belts by<br />
pulling up firmly on LATCH Pull<br />
Strap while pressing Base firmly<br />
into vehicle seat.<br />
6 Store LATCH Pull Strap neatly<br />
in Pull Strap Storage Pocket.<br />
5<br />
6<br />
2 Position Base in forward facing<br />
vehicle seat with Recline Foot<br />
against seat back.<br />
2<br />
7 Check Installation<br />
a LATCH belts MUST be.. .<br />
. . TIGHT<br />
b Base MUST be STABLE<br />
7<br />
3 Adjust Base Angle by pushing<br />
Recline Buttons while lifting Base.<br />
Angle is correct when Bubble is<br />
between arrows.<br />
Vehicle must be on a level surface for<br />
the Bubble to indicate correctly.<br />
3<br />
c Bubble MUST be<br />
. . between arrows<br />
d LATCH Pull Strap MUST<br />
. . NOT interfere with<br />
. . attachment of Carrier<br />
. . to Base.<br />
4 Attach LATCH Connectors by<br />
pushing them firmly onto vehicle<br />
LATCH Anchor Bars. Verify<br />
connection is secure by pulling<br />
firmly on LATCH straps.<br />
4<br />
CLICK!<br />
8 Attach Carrier to Base after<br />
properly securing child in Carrier.<br />
Lift up on Carrier to verify it is<br />
properly attached to the Base.<br />
8<br />
REFER TO VEHICLE OWNER’S MANUAL for information<br />
about LATCH and child restraint installation positions.<br />
34 35
INSTALLATION USING LATCH<br />
Uninstalling Base<br />
Remove Carrier from Base<br />
1 Loosen LATCH by lifting the<br />
LATCH Release Lever and pulling<br />
Base away from vehicle seat back.<br />
2 Detach LATCH Connectors<br />
by pressing the red button on each<br />
LATCH Connector, and remove<br />
Base from vehicle.<br />
Storing LATCH<br />
Insert LATCH Connectors into<br />
storage pockets. a<br />
1 Pull LATCH Pull Strap to<br />
secure LATCH Connectors.<br />
2 Roll LATCH Pull Strap and<br />
store in Pull Strap Storage Pocket.<br />
NEVER travel with CHILD RESTRAINT unsecured in vehicle.<br />
Passengers may be injured during a sudden stop or crash.<br />
When not using LATCH, the LATCH Connectors and Pull Strap<br />
MUST be stored properly.<br />
1<br />
2<br />
1<br />
2<br />
a<br />
a<br />
INSTALLATION WITHOUT BASE<br />
1 Position Carrier rear facing on<br />
vehicle seat, with child properly<br />
secured in Carrier.<br />
2 Move Carrier Seat Pad to<br />
expose Belt Guides.<br />
3 Route Vehicle Belt under<br />
both Belt Guides, and buckle the<br />
vehicle belt.<br />
4 Tighten Vehicle Belt while<br />
pushing Carrier firmly into<br />
vehicle seat.<br />
A tightly rolled towel may be used<br />
under the front edge of the Carrier if<br />
needed for stable, secure installation.<br />
5 Check Installation:<br />
a Level Line on Carrier MUST<br />
. . be LEVEL with ground.<br />
b Vehicle belt MUST be TIGHT.<br />
c Carrier MUST be STABLE<br />
. . and secure.<br />
2 3<br />
4 5<br />
NEVER install CARRIER without Base using a non-locking<br />
ELR vehicle belt. The installation will NOT be secure. Refer to<br />
your vehicle owner’s manual for detailed vehicle belt information.<br />
a<br />
b<br />
36 37
INSTALLATION IN AIRCRAFT<br />
This Child Restraint is certified for use in commercial aircraft.<br />
Be sure to contact your airline prior to travel, to discuss their<br />
Child Restraint policy.<br />
CLEANING & MAINTENANCE<br />
Fabrics may be spot-cleaned with mild soap and water, or<br />
machine washed in cold water on delicate cycle using mild<br />
detergent. Hang to dry. DO NOT USE BLEACH.<br />
1 Position Carrier rear facing<br />
in aircraft seat, with child properly<br />
secured in Carrier.<br />
2 Move Carrier Seat Pad to<br />
expose Belt Guides.<br />
3 Route Aircraft Lap Belt under<br />
both Belt Guides, and fasten the<br />
aircraft belt.<br />
4 Tighten Aircraft Lap Belt<br />
while pushing Carrier firmly into<br />
aircraft seat.<br />
A tightly rolled airline blanket may be<br />
used under the front edge of the Carrier<br />
if needed for stable, secure installation.<br />
5 Check Installation:<br />
a Level Line on Carrier MUST<br />
. . be LEVEL with ground.<br />
b Aircraft belt MUST be TIGHT.<br />
c Carrier MUST be STABLE<br />
. . and secure.<br />
2 3<br />
4 5<br />
a<br />
b<br />
Removing the Seat Pad<br />
Remove Harness Straps from<br />
Harness Slots as described in<br />
“Changing Harness Height.”<br />
1 Unhook elastic band attached<br />
around handle pivots, and<br />
disconnect chest clip and buckle.<br />
2 Carefully pull seat pad from<br />
under Adjuster Cover. ADJUSTER<br />
COVER MUST REMAIN IN PLACE.<br />
Guide harness assembly through<br />
slots in bottom of seat pad, while<br />
removing from Carrier.<br />
Installing the Seat Pad<br />
Reverse the removal instructions to<br />
reinstall the Seat Pad.<br />
Carefully follow instructions in<br />
“Changing Harness Height” to ensure<br />
the harness is properly routed and<br />
adjusted.<br />
1<br />
2<br />
NEVER use Carrier<br />
without the Seat Pad.<br />
38 39
CLEANING & MAINTENANCE<br />
NEVER remove Harness or harness components from Carrier.<br />
If harness is extremely soiled or damaged, Call <strong>Chicco</strong> USA to<br />
order a replacement.<br />
Cleaning Plastics<br />
Sponge clean using warm water<br />
and mild soap. Towel dry.<br />
DO NOT USE BLEACH,<br />
solvents, or household cleaners, as<br />
they may weaken the plastics.<br />
Cleaning Harness<br />
and LATCH Straps<br />
Sponge clean using warm water<br />
and mild soap. Air dry.<br />
DO NOT USE BLEACH,<br />
solvents, or household cleaners, as<br />
they may weaken the straps.<br />
Replacement Parts<br />
Many replacement<br />
parts are available for<br />
your Child Restraint.<br />
To order replacement<br />
parts, call:<br />
<strong>Chicco</strong> USA<br />
Customer Service<br />
1-877-424-4226<br />
Please have the<br />
Restraint model<br />
and serial numbers<br />
available to expedite<br />
service.<br />
Cleaning Buckle<br />
and LATCH Hardware<br />
Sponge clean, or rinse in cup of<br />
warm water.<br />
DO NOT USE ANY SOAPS OR<br />
LUBRICANTS on Buckle or LATCH<br />
Hardware. It may cause them to<br />
malfunction.<br />
40