

Sunglow™ Large Underwater Pool Lights - Pentair
Sunglow™ Large Underwater Pool Lights - Pentair
Sunglow™ Large Underwater Pool Lights - Pentair

You also want an ePaper? Increase the reach of your titles
YUMPU automatically turns print PDFs into web optimized ePapers that Google loves.
INSTALLATION<br />
Lamp Housing Installation<br />
Glass breakage hazard. Do not push off<br />
from the poolside against the light.<br />
Installation of a 12 Volt transformer is required when<br />
installing the 12 Volt model of this light. The transformer<br />
must be located:<br />
• at least 10’ from the pool wall,<br />
• installed near a grounded, 3-prong, 120V, GFCI protected<br />
outlet. If you do not have a GFCI protected outlet,<br />
have a qualified electrician install one.<br />
Do not use a 3-prong adapter. The adapter voids the<br />
grounding of the system.<br />
Do not cut the grounding pin.<br />
Do not use an extension cord! Purchase a light with a<br />
longer cord.<br />
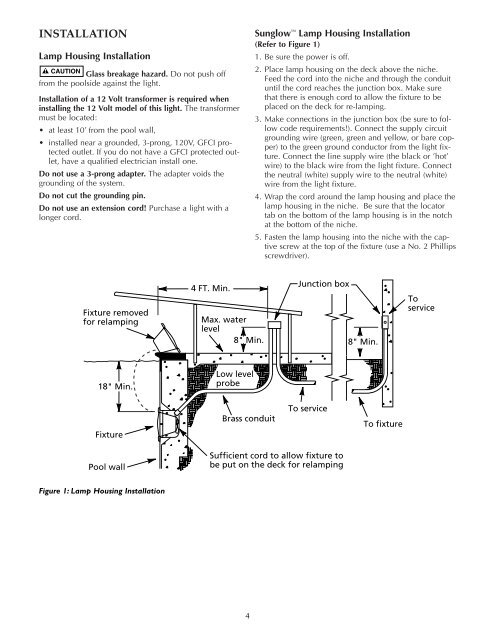
Sunglow Lamp Housing Installation<br />
(Refer to Figure 1)<br />
1. Be sure the power is off.<br />
2. Place lamp housing on the deck above the niche.<br />
Feed the cord into the niche and through the conduit<br />
until the cord reaches the junction box. Make sure<br />
that there is enough cord to allow the fixture to be<br />
placed on the deck for re-lamping.<br />
3. Make connections in the junction box (be sure to follow<br />
code requirements!). Connect the supply circuit<br />
grounding wire (green, green and yellow, or bare copper)<br />
to the green ground conductor from the light fixture.<br />
Connect the line supply wire (the black or ’hot’<br />
wire) to the black wire from the light fixture. Connect<br />
the neutral (white) supply wire to the neutral (white)<br />
wire from the light fixture.<br />
4. Wrap the cord around the lamp housing and place the<br />
lamp housing in the niche. Be sure that the locator<br />
tab on the bottom of the lamp housing is in the notch<br />
at the bottom of the niche.<br />
5. Fasten the lamp housing into the niche with the captive<br />
screw at the top of the fixture (use a No. 2 Phillips<br />
screwdriver).<br />
Fixture removed<br />
for relamping<br />
4 FT. Min.<br />
Max. water<br />
level<br />
8" Min.<br />
Junction box<br />
8" Min.<br />
To<br />
service<br />
18" Min.<br />
Low level<br />
probe<br />
Fixture<br />
Brass conduit<br />
To service<br />
To fixture<br />
<strong>Pool</strong> wall<br />
Sufficient cord to allow fixture to<br />
be put on the deck for relamping<br />
Figure 1: Lamp Housing Installation<br />
4


