

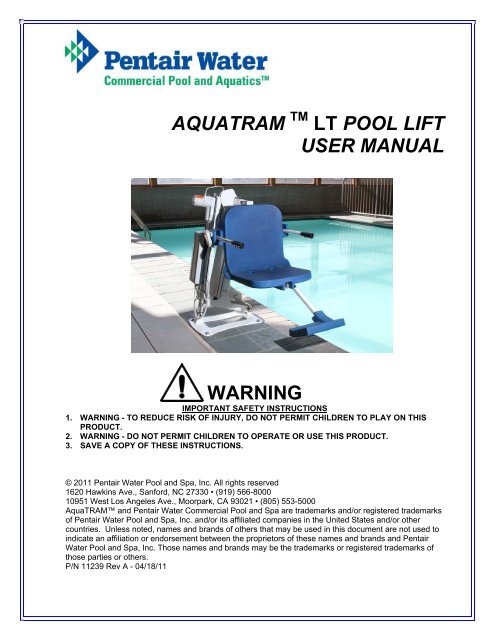
AQUATRAM LT POOL LIFT USER MANUAL WARNING - Pentair
AQUATRAM LT POOL LIFT USER MANUAL WARNING - Pentair
AQUATRAM LT POOL LIFT USER MANUAL WARNING - Pentair

Create successful ePaper yourself
Turn your PDF publications into a flip-book with our unique Google optimized e-Paper software.
<strong>AQUATRAM</strong> TM <strong>LT</strong> <strong>POOL</strong> <strong>LIFT</strong><br />
<strong>USER</strong> <strong>MANUAL</strong><br />
<strong>WARNING</strong><br />
IMPORTANT SAFETY INSTRUCTIONS<br />
1. <strong>WARNING</strong> - TO REDUCE RISK OF INJURY, DO NOT PERMIT CHILDREN TO PLAY ON THIS<br />
PRODUCT.<br />
2. <strong>WARNING</strong> - DO NOT PERMIT CHILDREN TO OPERATE OR USE THIS PRODUCT.<br />
3. SAVE A COPY OF THESE INSTRUCTIONS.<br />
© 2011 <strong>Pentair</strong> Water Pool and Spa, Inc. All rights reserved<br />
1620 Hawkins Ave., Sanford, NC 27330 • (919) 566-8000<br />
10951 West Los Angeles Ave., Moorpark, CA 93021 • (805) 553-5000<br />
AquaTRAM and <strong>Pentair</strong> Water Commercial Pool and Spa are trademarks and/or registered trademarks<br />
of <strong>Pentair</strong> Water Pool and Spa, Inc. and/or its affiliated companies in the United States and/or other<br />
countries. Unless noted, names and brands of others that may be used in this document are not used to<br />
indicate an affiliation or endorsement between the proprietors of these names and brands and <strong>Pentair</strong><br />
Water Pool and Spa, Inc. Those names and brands may be the trademarks or registered trademarks of<br />
those parties or others.<br />
P/N 11239 Rev A - 04/18/11
<strong>AQUATRAM</strong> TM <strong>LT</strong> <strong>POOL</strong> <strong>LIFT</strong><br />
300 LB. [136 kg] MAXIMUM CAPACITY<br />
MANDATORY – LEAVE THIS <strong>MANUAL</strong> WITH <strong>LIFT</strong> OWNER<br />
- READ CAREFULLY-<br />
Check entire box and inside all packing materials for parts. Before beginning<br />
assembly, read the instructions and identify parts using the figures and parts listed in<br />
this document. It is critical that all parts be carefully inspected by the installer prior to<br />
installation to ensure that no damage occurred in transit and that a damaged part is<br />
not used. If any damage occurred in transit, <strong>Pentair</strong> Water Commercial Pool and<br />
Aquatics (“<strong>Pentair</strong>”) must be notified within three days of receipt of unit. Proper<br />
installation cannot be overstressed, as an improper installation voids <strong>Pentair</strong>’s<br />
warranty and may affect the safety of the user.<br />
<strong>WARNING</strong><br />
IMPORTANT SAFETY INSTRUCTIONS<br />
1. READ AND FOLLOW ALL INSTRUCTIONS. <strong>LIFT</strong> SAFETY CAN ONLY BE ENSURED IF THE <strong>LIFT</strong> IS<br />
INSTALLED AND OPERATED PROPERLY – ACCORDING TO THESE INSTRUCTIONS.<br />
2. <strong>WARNING</strong>- TO REDUCE RISK OF INJURY, DO NOT PERMIT CHILDREN TO USE OR OPERATE<br />
THIS PRODUCT.<br />
3. <strong>WARNING</strong>- DO NOT PERMIT CHILDREN TO PLAY ON THIS PRODUCT.<br />
4. <strong>WARNING</strong>- NEVER APPLY DIRECT WATER PRESSURE TO ELECTRONIC COMPONENTS.<br />
5. DO NOT USE THE <strong>AQUATRAM</strong> TM <strong>LT</strong> <strong>LIFT</strong> FOR WATER-DRAFTS OVER 9” (DECK<br />
TO WATERLINE).<br />
6. NEVER OPERATE THIS <strong>LIFT</strong> UNDER LOAD WITH NO WATER (DRY <strong>POOL</strong>).<br />
7. SAVE A COPY OF THESE INSTRUCTIONS.<br />
<strong>WARNING</strong><br />
MAKE SURE THE AREA AROUND THE <strong>LIFT</strong> IS CLEAR BEFORE OPERATING. NEVER<br />
OPERATE THE <strong>LIFT</strong> WITH ANY PERSON WITHIN THE OPERATING RANGE OF THE <strong>LIFT</strong>,<br />
INCLUDING ON THE DECK OR IN THE WATER. NEVER MOVE THE <strong>LIFT</strong> DOWN WHILE<br />
OVER THE DECK. IF THE <strong>LIFT</strong> COMES INTO CONTACT WITH THE DECK OR A WALL,<br />
RELEASE THE BUTTON IMMEDIATELY OR PRESS THE EMERGENCY STOP BUTTON.<br />
DO NOT ALLOW CHILDREN TO OPERATE THE <strong>LIFT</strong> WITHOUT SUPERVISION.<br />
CHECK ALL NUTS AND BO<strong>LT</strong>S FOR TIGHTNESS AND FOR WORN PARTS BEFORE<br />
EACH USE.<br />
AquaTRAM TM <strong>LT</strong> Technical Support<br />
Contact Technical Support at:<br />
Sanford, North Carolina (8 A.M. to 5 P.M.)<br />
Phone: (800) 831-7133<br />
Fax: (919) 566-8920<br />
Web sites: visit www.pentaircommercial.com<br />
2
<strong>AQUATRAM</strong> TM <strong>LT</strong> <strong>POOL</strong> <strong>LIFT</strong><br />
TABLE OF CONTENTS<br />
PAGE<br />
DESCRIPTION<br />
5 PACKING LIST<br />
6 SITE AND <strong>POOL</strong> DECK REQUIREMENTS<br />
7-8 CORE-DRILL RETROFIT INSTRUCTIONS<br />
9 SAW-CUT RETROFIT INSTRUCTIONS<br />
10 NEW-CONSTRUCTION INSTRUCTIONS<br />
11 <strong>AQUATRAM</strong> TM <strong>LT</strong> <strong>LIFT</strong> ASSEMBLY INSTRUCTIONS<br />
12 24V BATTERY OP & INSTALL INSTRUCTIONS<br />
13 BATTERY MAINTENANCE<br />
14 <strong>AQUATRAM</strong> TM <strong>LT</strong> <strong>LIFT</strong> OPERATING INSTRUCTIONS<br />
15-16 SAFETY & CARE FOR YOUR <strong>LIFT</strong><br />
17-19 TROUBLESHOOTING GUIDE<br />
20 <strong>AQUATRAM</strong> TM <strong>LT</strong> PARTS LIST<br />
21 SEAT ASSEMBLY PARTS LIST<br />
22 OPTIONS<br />
23 WARRANTY<br />
3
THE <strong>AQUATRAM</strong> TM<br />
<strong>LT</strong> <strong>POOL</strong> <strong>LIFT</strong><br />
1. <strong>AQUATRAM</strong> TM <strong>LT</strong> <strong>POOL</strong> <strong>LIFT</strong> W/ FOOTREST (P/N 11230)<br />
2. 24V BATTERY (P/N 11211)<br />
3. BATTERY CHARGER W/ MOUNTING PLATE (P/N 11277)<br />
4. SAFETY BE<strong>LT</strong> (P/N 11215)<br />
NOTE: The AquaTRAM TM <strong>LT</strong> pool lift requires a concrete anchor system (P/N 11231).<br />
4
SITE & <strong>POOL</strong> DECK REQUIREMENTS<br />
This lift is designed for commercial or residential use on in ground pools and spas. This lift is<br />
not designed to clear a wall or obstacle. The lift should be installed on the pool deck where a<br />
straight linear section of the pool wall is at least six (6) feet long. The lift should be installed at a<br />
pool depth (pool deck to pool floor) of no less than 42” but not more than 48 inches. If the edge<br />
of the pool deck curves the anchor system will need to be anchored differently than what these<br />
instructions outline; contact <strong>Pentair</strong> Water Commercial Pool and Aquatics for assistance in this<br />
case. The front anchors of the lift need to be mounted a maximum of 14 inches and no closer<br />
than 4 inches from the inside pool wall. If your pool or spa has hand rails or other extensions on<br />
the inside of the pool wall, the set back distance must take these into account. Contact <strong>Pentair</strong><br />
Water Commercial Pool and Aquatics for assistance in these types of applications.<br />
In order to properly install this anchor system into an existing pool deck, your pool deck MUST<br />
be at least 3 feet long, by three feet wide and 6 inches thick. It must also be reinforced with #4<br />
rebar on 10 inch centers in both directions. There may be instances where your existing pool<br />
deck may not be structurally sound enough or does not meet the minimum requirements<br />
outlined above for the safe installation of this anchor system. In those circumstances it is<br />
recommended that you follow the Saw Cutting Retro-fit Instructions on page 9. If you are<br />
installing this lift in a new application where the pool deck has not been poured yet, then go to<br />
the New Construction instructions on page 10.<br />
FIGURE 1<br />
5
CORE DRILLING RETRO-FIT INSTRUCTIONS<br />
Required Materials & Tools:<br />
• Core drill and 1 ¼” core drill bit<br />
• Tape Measure<br />
• Marking Pen suitable for writing on concrete<br />
• Hammer<br />
• Cold Chisel<br />
• Torpedo Level<br />
• High Strength 2 part construction epoxy*<br />
• Black electrical tape (Optional)<br />
• Masking tape<br />
*<strong>Pentair</strong> recommends either Hilti Brand HIT HY-150 or Simpson brand ET22 Strong Tie or<br />
equivalent<br />
1) Locate the anchor plate, four (4) anchor inserts with nuts and mounting hardware. (Sold<br />
separatelyP/N 11231 - See picture).<br />
2) Using the larger holes in the anchor plate as a template, mark the four hole locations<br />
with a marking pen on the pool deck. Verify that the CENTER LINE of the front anchors<br />
are no more than 14 inches from the pools edge. See FIGURE 1, page 6.<br />
3) Using the core drill and the 1 ¼” core drill bit, drill out the four hole locations marked on<br />
the pool deck to a depth of about 4 ½”.<br />
a. NOTE: You can use black electrical tape on the end of the drill bit as a visual<br />
marker to indicate the proper depth that you need to drill to.<br />
b. NOTE: Depending on your local grounding requirements,<br />
you may need to drill one hole larger than the others so that<br />
you can ground at least one of the anchor inserts. In some<br />
cases saw cutting a portion of the deck out completely<br />
might be required. In this case, follow the “Saw Cutting<br />
Retro-Fit Instructions”.<br />
4) Remove the core from the holes using a hammer and chisel.<br />
The holes should be completely dry and clear of any debris<br />
before installing the anchors into them.<br />
5) Remove the nuts from the threaded anchor inserts and the<br />
black protective cover from the end of the anchor insert<br />
exposing the internal threads that will accept the mounting<br />
hardware.<br />
6) Using the smaller holes in the anchor plate, thread the<br />
mounting hardware through the anchor plate holes and into the<br />
ends of the four anchor inserts so that the tops of the inserts<br />
are flush with the BOTTOM of the plate (see diagram on left).<br />
IMPORTANT: Use the enclosed packet of anti seize on the<br />
threads of the hardware to prevent the hardware from seizing<br />
in the anchor inserts.<br />
a. NOTE: It is recommended that you apply tape to the<br />
bottom of the anchor plate around the holes so that when<br />
and if the two part epoxy oozes out of the holes that it does<br />
not secure the anchor plate to the pool deck.<br />
6
7) Allow for a way to ground at least one of the anchor inserts according to your local code<br />
requirements.<br />
8) Before putting epoxy into the holes and setting the anchor inserts, you will want to test fit<br />
the anchor inserts in the pre-drilled holes first to make sure they line up properly. You<br />
can do this by picking up the anchor plate with the four (4) anchor inserts attached to the<br />
underside and carefully place them into the four holes drilled in the deck. Using a<br />
torpedo level on the plate, verify that you can level up the anchor system. If they do not<br />
line up you may have to enlarge your holes.<br />
9) After verifying that the anchor inserts line up with the holes properly and you can level<br />
the anchor assembly, remove the anchor assembly and fill each hole in the pool deck at<br />
least half full of two part construction epoxy (not included). <strong>Pentair</strong> recommends either<br />
Hilti Brand HIT HY-150 or Simpson brand ET22 Strong Tie or equivalent.<br />
10) Pick up the anchor assembly with the four (4) anchor inserts attached to the underside<br />
and carefully place them into the four holes drilled in the deck. As you place the anchor<br />
inserts that are attached to the anchor plate, wiggle the anchor system a little to make<br />
sure the epoxy gets on all sides of the anchor inserts.<br />
11) Once the anchor inserts are placed into the holes, use a small torpedo level on the<br />
anchor plate to make sure you are level and plumb.<br />
12) Allow the epoxy to set up according to the manufacturers recommendations and remove<br />
the hardware and the anchor plate. You can now safely mount the lift to the anchor<br />
system using the same hardware you used to mount the anchor inserts to the underside<br />
of the anchor plate. The anchor plate can be recycled or used for installing a second set<br />
of anchors in another location.<br />
7
SAW-CUTTING RETRO-FIT INSTRUCTIONS<br />
Required Materials & Tools:<br />
• Concrete saw with Diamond blade<br />
• Tape Measure<br />
• 4’ long Straight edge or chalk line<br />
• Sledge Hammer<br />
• Cold Chisel<br />
• Torpedo Level<br />
• Sting line<br />
• Concrete & Concrete tools<br />
• #4 Rebar<br />
1) Locate the anchor plate, four (4) anchor inserts with nuts and<br />
mounting hardware). (Sold separately from lift, P/N 11231 -<br />
See picture).<br />
2) Mark out a section of the pool deck that you are removing<br />
using a chalk line or straight edge and a marker. You should<br />
plan on removing at least a Three foot by three foot section.<br />
3) Using the saw with the diamond blade, make your cuts along<br />
the lines that you marked.<br />
4) Using the sledge hammer, break up the concrete within the<br />
area that you cut and remove the pieces.<br />
5) After you have removed the portion of the deck, verify that<br />
your new deck will be able to be at least 6 inches deep.<br />
6) Remove ONE of the nuts from each of the anchor inserts and<br />
place the anchor inserts through the larger holes in the anchor<br />
plate. Thread the nut back on the other side of the anchor<br />
insert so that the anchor plate is sandwiched between the<br />
nuts. (See diagram on left).<br />
7) Install rebar in the open area of the deck. Tie the rebar into<br />
the existing deck if possible.<br />
8) Set the anchor system in place making sure that the center<br />
line of the front anchor inserts are no more than 14 inches<br />
away from the pools edge.<br />
9) Using the string line or a straight edge, make sure the top of<br />
each anchor body is level and flush with the FINISHED deck<br />
surface. Each anchor body can be adjusted individually by<br />
turning the nuts with a large wrench.<br />
10) Ground the anchor system using the grounding lug on the<br />
anchor plate according to your local code requirements.<br />
11) Pour your concrete and finish the pool deck surface.<br />
12) Once the concrete has cured, install the lift by aligning the<br />
holes in the lifts base with the anchors installed in the deck.<br />
Secure the lift to the deck using the stainless steel hardware<br />
that comes with it. (See drawing below)<br />
a. NOTE: Use Anti Seize on the hardware to prevent<br />
the hardware from seizing in the anchor inserts.<br />
8
ANCHOR INSTALLATION: NEW CONSTRUCTION<br />
For installations where a new deck is being poured, or where a dedicated pad is being poured<br />
just for the pool lift, the concrete must satisfy the requirements outlined on page 6. For<br />
convenience here are the requirements again;<br />
YOUR <strong>POOL</strong> DECK MUST BE AT LEAST 3-FEET LONG BY 3-FEET WIDE BY 6-<br />
INCHES THICK. IT MUST BE REINFORCED WITH #4 REBAR ON 10-INCH CENTERS<br />
IN BOTH DIRECTIONS.<br />
Obviously you may make the deck larger than this – which is almost always the case when<br />
putting in a deck that surrounds the pool. Note that the entire deck does not need to be 6” thick,<br />
but that the area around the installed lift, 3’ by 3’, should be 6” thick at a minimum. The rest of<br />
the deck may be thinner – 4” is typical – as long as it is 6” thick around the lift.<br />
The entire deck should be reinforced with #4 rebar on 10” centers in both directions, which is<br />
also common for this type of structure. Our minimum requirement is that the 3’ by 3’ section be<br />
reinforced accordingly, but it is good practice to extend the rebar grid over the entire deck.<br />
Commonly, the rebar grid is used for grounding/bonding also. Grounding of the lift can usually<br />
be accomplished with a length of bare, solid, copper wire, 14 or 16GA, wrapped tightly around a<br />
piece of the rebar and then connected to the grounding lug on the anchor plate. Note that this is<br />
only effective when the rebar grid itself has been grounded.<br />
CHECK YOUR LOCAL ELECTRICAL CODE: GROUNDING REQUIREMENTS FOR <strong>POOL</strong><br />
EQUIPMENT. ALWAYS GROUND THE UNIT PER LOCAL ELECTRICAL CODES.<br />
9
<strong>AQUATRAM</strong> TM <strong>LT</strong> <strong>POOL</strong> <strong>LIFT</strong> - ASSEMBLY INSTRUCTIONS<br />
1. Attach seat belt as shown in FIGURE 7.<br />
2. Install the AquaTRAM TM <strong>LT</strong> pool lift onto the<br />
four (4) anchors using 1/2 x 1-1/2” stainless<br />
steel hex-head bolts and 1/2" stainless steel<br />
flat washers. Make sure all bolts are tight<br />
before using the lift. (FIGURE 9)<br />
3. Plug the handset cable into the large handset<br />
socket on the bottom of the control box. Be<br />
sure you press the cord end firmly into the<br />
socket until you are sure it is all of the way<br />
into the socket. Failure to fully push the<br />
remote cord into the socket may result in<br />
faulty or interrupted operation. (FIG. 8)<br />
4. Before installing the battery, put it on the<br />
charging unit and let it charge for 24 hours. Make sure the orange “charge” light illuminates<br />
when the battery is being charged.<br />
5. Remove the fully-charged battery from the charger and install it on top of the Control Box as<br />
shown in FIGURE 9. The battery will line up square with the control box, and will ‘click’ when<br />
it locks in place properly. The lift will only operate when the battery is mounted properly.<br />
WHEN <strong>LIFT</strong> IS NOT IN USE STORE THE BATTERY ON THE CHARGER.<br />
DO NOT LEAVE THE BATTERY ON THE <strong>LIFT</strong> WHEN NOT IN USE!<br />
10
24-VO<strong>LT</strong> BATTERY SYSTEM OPERATING<br />
AND INSTALLATION INSTRUCTIONS<br />
The <strong>AQUATRAM</strong> TM <strong>LT</strong> Pool Lift comes with a 24v sealed rechargeable battery, wall mount<br />
charging unit (with mounting bracket), control box, and a waterproof handset controller. The<br />
control box is mounted to the <strong>AQUATRAM</strong> TM <strong>LT</strong> Pool Lift and has a plug-in socket for both the<br />
actuator and the handheld controller. The battery mounts directly above the control box with a<br />
quick-release clip.<br />
To operate the <strong>AQUATRAM</strong> TM <strong>LT</strong> Pool Lift, plug in the handset controller to the control box and<br />
push the corresponding button to either lower or raise the unit. The lift should be able to<br />
complete approximately 10-20 full cycles before the low battery indicator tone will sound. The<br />
low battery tone indicates that there is approximately 20% battery life remaining. At this point,<br />
DO NOT ATTEMPT TO OPERATE THE <strong>LIFT</strong>, remove the battery from the unit and recharge on<br />
the wall mounted charging unit.<br />
To recharge the battery, simply grip the top of the battery and depress the clip on the back of<br />
the battery. This will unclip the battery from the control box bracket and the battery can then be<br />
clipped into the wall mount charger. When the charger is plugged in the green ON light will<br />
illuminate. When the battery is correctly mounted to the charger, the orange CHARGE light will<br />
illuminate. When the battery is fully charged, the CHARGE light will GO OFF and the battery is<br />
ready for use.<br />
WHEN THE BATTERY IS NOT BEING USED IT SHOULD BE STORED ON THE CHARGER<br />
AND NEVER ON THE <strong>LIFT</strong>.<br />
11
BATTERY MAINTENANCE<br />
1. WHEN <strong>LIFT</strong> IS NOT IN USE STORE BATTERY ON CHARGER. The battery power unit<br />
is a sealed lead acid battery pack. Frequent recharges will prolong the battery life and<br />
maintain a high cold amperage capacity. THE BATTERY CAN BE STORED ON THE<br />
CHARGER WHEN NOT IN USE.<br />
2. Do NOT expose the battery to freezing temperatures.<br />
3. Do NOT expose the battery to prolonged periods of extreme heat or severe cold<br />
temperatures.<br />
4. Do NOT expose the battery to long periods of direct sunlight. Heat will shorten your<br />
battery life. Optimum operating temperature is below 68 degrees F (20 degrees C).<br />
5. Never drop or bump the battery pack. This may result in loose or damaged internal<br />
connections, and may bend the battery terminals.<br />
6. Keep battery terminals clean and free from dirt and corrosion to ensure good contact.<br />
The terminals may be cleaned using a Scotch Brite pad or any similar product. Clean off<br />
any corrosion or discoloration on the very top surfaces of the battery contacts and then<br />
apply dielectric grease (supplied with lift) as shown in the figure below.<br />
12
<strong>AQUATRAM</strong> TM<br />
<strong>LT</strong> <strong>POOL</strong> <strong>LIFT</strong> OPERATING INSTRUCTIONS:<br />
NOTE: CHECK ALL NUTS & BO<strong>LT</strong>S FOR<br />
TIGHTNESS AND FOR WORN PARTS BEFORE<br />
EACH USE. NEVER OPERATE THE <strong>LIFT</strong> WITH<br />
THE ARMRESTS FLIPPED UP.<br />
LOADING FROM A WHEELCHAIR:<br />
The <strong>AQUATRAM</strong> TM <strong>LT</strong> Pool Lift should always be<br />
in the fully upright position when transferring into<br />
the chair. Before transferring, check to make sure<br />
the lift is operating by making a short test run: move<br />
the chair at least part way in and out of the pool.<br />
The armrest on either side will flip up to allow for<br />
easier lateral transfers. Transfer into the chair and<br />
then lower the flip-up armrest back into its normal<br />
position. Secure the adjustable lap belt around the<br />
waist so that the belt is snug, but not uncomfortably<br />
tight.<br />
OPERATING THE <strong>AQUATRAM</strong> TM <strong>LT</strong> <strong>POOL</strong> <strong>LIFT</strong>:<br />
The HANDSET CONTROL is used to raise and<br />
lower the lift during operation. To lower the chair<br />
into the pool, press and hold the ▼ “MOVE DOWN”<br />
button (see diagram to the left). The lift will move<br />
“DOWN” towards the water as long as the ▼<br />
“MOVE DOWN” button is pressed. To stop moving,<br />
simply release the button. To “MOVE UP” back to<br />
the fully upright position, press and hold the ▲<br />
“MOVE UP” button. Again, the lift will move only as<br />
long as the button is pressed and held.<br />
When you are sufficiently submerged into the water,<br />
release the ▼ “MOVE DOWN” button. Now remove<br />
the lap belt by grasping the end of the belt that is<br />
protruding above the lap belt and tugging gently. To<br />
create more room in front of the chair, the footrest<br />
may be flipped inwards, under the chair. Exit the<br />
chair by sliding straight forward until you are clear of<br />
the seat and the footrest.<br />
When you are ready to return to the lift, make sure<br />
that the chair is lowered (submerged) sufficiently to<br />
allow you to easily slide into the chair. Next, resecure<br />
the adjustable lap belt snugly around your<br />
waist. Raise the chair out of the pool by pressing<br />
and holding the ▲ “MOVE UP” button, until the lift is<br />
once again fully upright.<br />
13
SAFETY & MAINTENANCE INSTRUCTIONS<br />
DO NOT PLAY ON OR AROUND THIS <strong>LIFT</strong><br />
1. Check the AquaTRAM TM Series Pool Lifts before each use to assure there are no<br />
worn parts and that all hardware is properly tightened. If there are any worn<br />
parts, replace them BEFORE using the AquaTRAM TM Series Pool Lifts. You can<br />
call our customer service at 1-888-687-3552 to order any parts.<br />
2. <strong>Pentair</strong> Water Commercial Pool and Aquatics lifts shall be grounded per local<br />
codes.<br />
3. At least ONCE A WEEK, the AquaTRAM TM Series Pool Lifts must be cleaned<br />
with fresh water. Do not spray the AquaTRAM TM Series Pool Lifts 24v battery<br />
unit directly with any pressure. Wipe all surfaces clean with a damp, nonabrasive<br />
cloth. When cleaning the AquaTRAM TM Series Pool Lifts, use nonabrasive<br />
soap and water. Avoid harsh chemicals and disinfectants.<br />
4. Always read the label instructions on any cleaner carefully before applying it to a<br />
surface.<br />
5. The <strong>WARNING</strong> & INTENDED USE labels on the AquaTRAM TM Series Pool Lifts<br />
must be maintained in readable fashion. If they become unreadable or faded,<br />
please replace the label immediately. Replacement labels are available from<br />
<strong>Pentair</strong> Water Commercial Pool and Aquatics. 1-800-831-7133.<br />
CARE OF YOUR <strong>LIFT</strong><br />
Routine cleaning is an absolute necessity to ensure the integrity of the lift. Note that the<br />
AquaTRAM TM <strong>LT</strong> Pool Lift should not be stored in a pump room or in a storage room where<br />
pool chemicals are kept. Storing the lift near pool chemicals may cause rusting and other<br />
damage to occur. Your AquaTRAM TM <strong>LT</strong> stainless steel lift is powder coated to protect the<br />
stainless steel from rusting. Most rusting will occur at weld points, crevices, under gaskets,<br />
rivets or bolt heads.<br />
The choice of a proper cleaning product is up to the consumer and there are many to choose<br />
from. Depending on the type of cleaning and the degree of contamination (rusting), some<br />
products are better than others. For routine cleaning the products most recommended are<br />
gentle soaps or detergents or dilute mixtures of ammonia. For stubborn spots and stains try<br />
using soft scrub with some brisk rubbing.<br />
DO NOT USE <strong>POOL</strong> WATER TO CLEAN USE ONLY FRESH WATER<br />
If the lift is used DAILY make sure to wash the lift at the end of the day. Wash the lift off using a<br />
mild soap and a soft cloth. Make sure to pay special attention to weld points and crevices. Do<br />
not use a bristled brush or steel wool to clean the lift. Check that the lift is working properly and<br />
then place the battery on the charger. It is recommended that the battery be charged after every<br />
day of use.<br />
If the lift is used WEEKLY follow the same steps as above. Also be sure to check all of the<br />
contact points (terminals) for damage or corrosion. If you notice corrosion gently clean the<br />
terminals. To clean corrosion from the terminals use a Q-tip and some rubbing alcohol. If the<br />
corrosion is particularly stubborn try using a 3M scotch brite pad, but be careful not to damage<br />
the terminals. Apply dielectric grease to the terminals after cleaning them. This will help to<br />
prevent further corrosion. Do not leave the battery on the lift. Always store the battery on the<br />
charger whenever the lift is not being used.<br />
14
If the lift is used MONTHLY follow the same steps as above. Also check the nuts and bolts to<br />
make sure they are securely fastened (this is always a good idea, no matter how often or<br />
infrequently the lift is used). Also make sure to store the battery on the charger and not on the<br />
lift. Leaving the battery on the lift for extended periods will significantly shorten the battery’s<br />
lifespan.<br />
If the lift is being STORED for an extended period of time follow all of the steps above. Check<br />
for rusting at all crevice and weld points. If you notice rusting spray some WD-40 on the<br />
affected area and take a 3M scotch brite pad and rub briskly. Afterwards be sure to wash and<br />
rinse the lift again with soap and water. When storing the lift make sure it is in a dry area and<br />
covered. DO NOT STORE in or around pool chemicals.<br />
15
TROUBLESHOOTING GUIDE<br />
Before troubleshooting make sure the battery is fully charged.<br />
If the lift doesn’t move when the handset button is pressed:<br />
When you can’t get the lift to move check the following things:<br />
1. Make sure the battery is fully charged:<br />
A. Before charging the battery first make sure the green light on the front of the<br />
charger is illuminated (this means that the charger is on). Then check to<br />
make sure the silver contact points on the battery and charger are not<br />
damaged or corroded, and that they are clean. Then place the battery on the<br />
charger and look for the orange charge light to illuminate on the front of the<br />
charger. When the orange light goes off the battery is fully charged.<br />
B.<br />
The top green light will always<br />
be illuminated indicating that it<br />
has power. When charging the<br />
battery the bottom orange light<br />
will illuminate, until fully<br />
charged.<br />
C. When the battery is correctly installed on the charger or control box<br />
you should hear a “click” indicating the battery is properly seated on<br />
the unit. Also note that when the battery is properly seated there<br />
should not be any gaps between the battery and the control<br />
box/charger.<br />
Not attached properly. Note<br />
the white bracket is in front of<br />
silver clip, which will not allow<br />
for an electrical connection.<br />
Properly Attached.<br />
Note that the white bracket is<br />
behind the silver clip. Not allowing<br />
movement.<br />
16
If the battery is fully charged and the lift is not moving then:<br />
2. Check all cords:<br />
A. Check that the cords are properly plugged in. Start by unplugging the remote<br />
and the actuator cord from the control box. Once these cords are removed<br />
check the ends for corrosion or damage. Plug the remote cord back in by<br />
lining up the raised tab on the plug to the grooved line on the control box<br />
outlet. Note that these cords require some force to plug them in fully. You<br />
will know they a correctly inserted when you here a “popping sound”. The<br />
cords will be recessed into the outlet. If they are flush with the outside of the<br />
outlet they are not plugged in fully and the lift will not function. Make sure you<br />
do this for both cords.<br />
NOT inserted fully.<br />
Fully inserted.<br />
If you have checked all the cords and the lift still doesn’t move:<br />
3. Check the contact points:<br />
A. After you have fully charged the battery and checked the cords to make sure<br />
they are properly plugged in, check to make sure the contact points are not<br />
corroded or bent. If the contact points are corroded take some rubbing<br />
alcohol and a q-tip and clean off the points. After cleaning the contact points<br />
it is recommended to put some dielectric grease on the contact points<br />
(terminals) to help ensure good electrical contact and prevent corrosion.<br />
Then reinstall the battery on top of the control box. Make sure you hear a<br />
“click”, which indicates that the battery is correctly seated. The lift will not<br />
work if the battery is not seated correctly.<br />
Silver tabs are the contact<br />
(terminal) points.<br />
17
If the lift stops moving over the water and is stuck:<br />
4. Then try pushing the emergency button:<br />
A. If the lift gets stuck out over the water use a pen or pencil tip and stick it into<br />
the emergency button on the front of the control box to retract the lift. Note the<br />
lift will not retract if the battery is not fully charged or if the control box is not<br />
working. The emergency button only overrides the remote in case it has gone<br />
bad. If this does not retract the lift then chances are the remote is fine and you<br />
either have a problem with the battery, the control box, or the cords are damaged<br />
or not plugged in properly.<br />
Use a pen or pencil tip<br />
to push in the small<br />
black circle located next<br />
to the word emergency,<br />
on the front of the<br />
control box.<br />
USING THE “EMERGENCY BUTTON” on the AquaTRAM TM<br />
<strong>LT</strong> Pool Lift Control Box<br />
On the front side of the control box is a small recessed<br />
button marked “emergency”. Take a pen or pencil or<br />
other pointed object and depress the “emergency”<br />
button. This will bypass the remote control and send a<br />
signal directly to the actuator to raise the seat out of<br />
the pool and back to the deck or up position.<br />
NOTE: This function will only work if there is<br />
sufficient power in the battery, the battery is<br />
properly attached to the control box, and the<br />
control box must be operating properly.<br />
18
<strong>AQUATRAM</strong> <strong>LT</strong> <strong>POOL</strong> <strong>LIFT</strong> PARTS LIST<br />
19
SEAT ASSEMBLY: PARTS LIST<br />
ITEM # QTY DESCRIPTION<br />
1 1 SEAT BODY<br />
2 2 SEAT ARMREST TUBE<br />
3 2 SEAT ARMREST HANDGRIP<br />
4 2 1/4"-20 x 3" HEX BO<strong>LT</strong>, S.S.<br />
5 2 1/4" FLAT WASHER, S.S.<br />
6 1 1/4" QUICK RELEASE PIN, S.S.<br />
7 1 LANYARD FOR QRP<br />
8 1 SHEET METAL SCREW, S.S.<br />
20
Options for AquaTRAM <strong>LT</strong>:<br />
Adjustable Head Rest (P/N 11205)<br />
Includes:<br />
• Padded head rest mounted to adjustable bracket with mounting<br />
hardware<br />
Adjustable Chest Strap (P/N 11206)<br />
Includes:<br />
• Adjustable hook and loop style chest strap and mounting hardware<br />
Pullout Leg Rest (P/N 11208)<br />
Includes:<br />
• Pullout leg rest (to be factory installed)<br />
Cycle Attachment (P/N 11207)<br />
Includes:<br />
• Pedal attachment and mounting hardware (cannot be used<br />
on lifts equipped with Pullout Leg Rest 11208)<br />
• 90° up turned hand<br />
grips for better support<br />
Protective Cover<br />
(P/N 11204)<br />
Transport Cart (P/N 11232)<br />
21
AquaTram <strong>LT</strong> Swimming Pool Lift<br />
TWO (2) YEAR LIMITED WARRANTY<br />
A Division of <strong>Pentair</strong> Water Pool and Spa, Inc.<br />
AquaTram <strong>LT</strong> Lift has a Limited TWO-YEAR Warranty on the frames, not including the powder coat finish.<br />
<strong>Pentair</strong> Water Pool and Spa, Inc. (“<strong>Pentair</strong>”) also warrants to the original end user purchaser that the AquaTram <strong>LT</strong> Lift (“Lift”),<br />
when properly installed in accordance with assembly and installation instructions, and properly used and maintained, shall be free<br />
from defects in material and workmanship for a period of two (2) years from the date of original purchase, provided that <strong>Pentair</strong><br />
receives prompt notice in writing of any claim and satisfactory proof thereof.<br />
This warranty specifically excludes reimbursement for labor to remove, repair, replace or install the Lift or component part thereof<br />
and any return freight charges.<br />
These warranties do not cover any damages due to accident, misuse, abuse, negligence or failure to properly maintain any Lift or<br />
component part thereof, or normal wear and tear from day to day operations. In the event that any Lift or component part thereof are<br />
altered, repaired, or improperly installed or improperly used by anyone without the prior written approval by <strong>Pentair</strong>, all warranties<br />
are void. IMPORTANT: AMOUNT OF WEIGHT PLACED ON <strong>LIFT</strong> SHALL NOT EXCEED THE RATED <strong>LIFT</strong> CAPACITY<br />
OF 300 POUNDS (136 KG).<br />
To initiate a warranty claim, the owner of an AquaTram Lift must provide the place of purchase, in writing, with a full<br />
description of the Lift, its serial number, the dates of purchase and installation, and the exact nature of the claim. Within thirty (30)<br />
days after receipt of a written warranty claim by <strong>Pentair</strong>, and barring any unforeseen delays, the place of purchase will be notified of<br />
<strong>Pentair</strong>’s decision regarding the claim.<br />
If requested by <strong>Pentair</strong>, any Lift or component part thereof must be returned, freight prepaid, to <strong>Pentair</strong>’s designated factory location<br />
or duly appointed distributor for inspection and/or repair or replacement. <strong>Pentair</strong> will, at its option, refund the purchase price, or<br />
repair or replace the Lift or component part thereof, and deliver the repaired Lift or component part thereof or replacement to the<br />
buyer of the Lift, freight prepaid to the destination provided for in the original order. Lift or component part thereof returned to<br />
<strong>Pentair</strong> for which <strong>Pentair</strong> provides replacement under this limited warranty shall become the property of <strong>Pentair</strong>.<br />
A new warranty period shall NOT be established for the repaired or replaced Lift or component part thereof. Such Lift or<br />
component part thereof shall remain under warranty only for the remainder of the original warranty period on the original Lift<br />
purchased.<br />
This written limited warranty constitutes the final, complete and exclusive statement of warranty terms. No person or organization is<br />
authorized to make any other specific or implied warranties or representations on behalf of <strong>Pentair</strong>.<br />
THE WARRANTIES SET FORTH HEREIN ARE IN LIEU OF ALL OTHER WARRANTIES, EXPRESSED OR IMPLIED,<br />
WHICH ARE HEREBY DISCLAIMED AND EXCLUDED, INCLUDING WITHOUT LIMITATION ANY WARRANTY OF<br />
MERCHANTABILITY OR FITNESS FOR A PARTICULAR PURPOSE OR USE.<br />
THE SOLE AND EXCLUSIVE REMEDIES FOR BREACH OF ANY AND ALL WARRANTIES WITH RESPECT TO THE<br />
<strong>LIFT</strong> OR COMPONENT PART THEREOFSHALL BE LIMITED TO REPAIR OR REPLACEMENT AT PENTAIR’S<br />
DESIGNATED FACTORY LOCATION, OR DULY APPOINTED DISTRIBUTOR, OR SUCH OTHER PLACE AT PENTAIR’S<br />
SOLE OPTION. IN NO EVENT SHALL PENTAIR’S LIABILITY EXCEED THE ENTIRE AMOUNT PAID TO PENTAIR BY<br />
THE ORIGINAL PURCHASER FOR THE <strong>LIFT</strong> OR COMPONENT PART THEREOF.<br />
IN NO EVENT SHALL PENTAIR BE LIABLE FOR ANY INCIDENTAL, CONSEQUENTIAL, SPECIAL, INDIRECT,<br />
PUNITIVE OR EXEMPLARY DAMAGES OR LOST PROFITS FROM ANY BREACH OF THIS LIMITED WARRANTY OR<br />
OTHERWISE.<br />
<strong>Pentair</strong> Water Commercial Pool and Aquatics, A Division of <strong>Pentair</strong> Water Pool and Spa, Inc.<br />
1620 Hawkins Ave., Sanford, NC 27330<br />
1351 Route 55, LaGrangeville, NY 12540<br />
22
PENTAIR WATER <strong>POOL</strong> AND SPA, INC.<br />
1620 Hawkins Ave. Sanford, NC 27330 - 10951 W. Los Angeles Ave. Moorpark, CA 93021<br />
- Phone 800-831-7133<br />
- Fax 800-284-4151<br />
P/N 11239 Rev A<br />
23


