

how to fabricate and install a sugar glider e-collar - Sugar Gliders
how to fabricate and install a sugar glider e-collar - Sugar Gliders
how to fabricate and install a sugar glider e-collar - Sugar Gliders

You also want an ePaper? Increase the reach of your titles
YUMPU automatically turns print PDFs into web optimized ePapers that Google loves.
HOW TO FABRICATE<br />
AND INSTALL A<br />
SUGAR GLIDER E-COLLAR<br />
The following are step-by-step instructions detailing the correct<br />
fabrication <strong>and</strong> <strong>install</strong>ation of an e-<strong>collar</strong>. This design has proven <strong>to</strong><br />
be very effective, <strong>and</strong> nearly 100% successful when <strong>install</strong>ed<br />
correctly. If you do not have all the supplies listed below in your<br />
clinic, they can easily be obtained at any WalMart, Target, or even<br />
many large grocery s<strong>to</strong>res.<br />
When attempting this for the first time, it can often take a couple of<br />
tries <strong>to</strong> get it right. Therefore, it is strongly suggested <strong>to</strong> get a doublesupply<br />
of everything you need. All <strong>to</strong>taled, it should only cost about<br />
$5-9 for everything.<br />
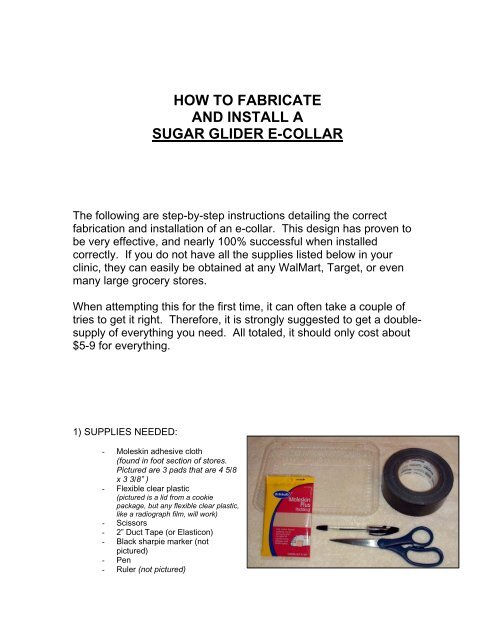
1) SUPPLIES NEEDED:<br />
- Moleskin adhesive cloth<br />
(found in foot section of s<strong>to</strong>res.<br />
Pictured are 3 pads that are 4 5/8<br />
x 3 3/8” )<br />
- Flexible clear plastic<br />
(pictured is a lid from a cookie<br />
package, but any flexible clear plastic,<br />
like a radiograph film, will work)<br />
- Scissors<br />
- 2” Duct Tape (or Elasticon)<br />
- Black sharpie marker (not<br />
pictured)<br />
- Pen<br />
- Ruler (not pictured)
2) Trace this template on<strong>to</strong> the clear plastic using a dark permanent marker. NOTE: This<br />
template is designed for an adult animal. If you are dealing with a baby, you will still use this<br />
template, but you may have <strong>to</strong> reduce the extent of the padding in step 5 around the inside of the<br />
<strong>collar</strong> so it will close more tightly.<br />
Outer edge<br />
Inner edge<br />
It should look something like this….
3) Cut 2 strips from the moleskin pad.<br />
They should be ¼” wide, cut along the<br />
long edge of the pad (4 5/8”).<br />
4) Remove one adhesive<br />
backing <strong>and</strong> apply that strip<br />
directly on <strong>to</strong>p of the other.<br />
Leave the other adhesive strip<br />
in place. Make sure <strong>to</strong> press<br />
<strong>to</strong>gether tightly.<br />
5) Cut ¾” off the mole skin<br />
strips, remove remaining<br />
backing, <strong>and</strong> adhere <strong>to</strong> the<br />
clear plastic as s<strong>how</strong>n. Be<br />
sure <strong>to</strong> start exactly at the<br />
edge of the plastic.
6) Cut a 1 3/8” strip of moleskin along<br />
the long edge of the pad (4 5/8”).<br />
1 3/8”<br />
7) Cut slits in this strip that<br />
are ½” deep <strong>and</strong> spaced at<br />
½” intervals along the long<br />
side of the strip.<br />
8) Flip <strong>collar</strong> over so the<br />
moleside is down. Remove<br />
adhesive backing from<br />
notched strip. Affix about<br />
¼” <strong>to</strong> inside edge of <strong>collar</strong><br />
as s<strong>how</strong>n.
9) Wrap the notched strip back around the <strong>collar</strong>, maintaining con<strong>to</strong>urs. Adhere notched side –<br />
starting in the middle <strong>and</strong> working your way <strong>to</strong> the edges. Trim off any excess. Make sure <strong>to</strong><br />
press down tightly as the notched strip covers the 1 st ¼” strip so that it follows the con<strong>to</strong>urs as<br />
s<strong>how</strong>n.<br />
CONTOUR<br />
10) Cut a ½” strip of the moleskin, <strong>and</strong><br />
attach it over the notches as s<strong>how</strong>n.<br />
Make sure <strong>to</strong> position strip directly<br />
along the con<strong>to</strong>ur, starting on the right<br />
edge.<br />
11) Cut a ¾” x 1 ½” piece of moleskin. Position it in the con<strong>to</strong>ur along the right edge, <strong>and</strong> wrap it<br />
around as s<strong>how</strong>n.
12) Apply a small amount of duct tape as<br />
s<strong>how</strong>n. Fold over a small amount along the<br />
end <strong>to</strong> make a tab for easy removal.<br />
13) When folded in place, one edge should fit nicely inside the “notch”. When duct tape is<br />
applied, it should create a somewhat “even” inner edge as s<strong>how</strong>n.
INSTALLING THE E COLLAR<br />
ON A SUGAR GLIDER WHICH IS NOT Sedated…<br />
In most cases, it is advisable <strong>to</strong> <strong>install</strong> the E <strong>collar</strong> while the animal is sedated. This will make it<br />
very simple <strong>to</strong> <strong>install</strong> <strong>and</strong> adjust the <strong>collar</strong> so it is tight <strong>and</strong> cannot be removed. Practitioners can<br />
then also safely trim the outer edge of the <strong>collar</strong> <strong>to</strong> the precise depth needed without risk of injury<br />
<strong>to</strong> the patient.<br />
In the event that sedation is not possible, the following is the best way <strong>to</strong> <strong>install</strong> the <strong>collar</strong> on an<br />
alert animal.<br />
The “Taco Wrap”…<br />
1) Place the <strong>glider</strong> feet down on<strong>to</strong> the<br />
corner of a <strong>to</strong>wel. This allows the<br />
patient’s nails <strong>to</strong> naturally grip the <strong>to</strong>wel<br />
<strong>and</strong> immobilizes it as they are being<br />
rolled up. Make sure the edge of the<br />
<strong>to</strong>wel is almost covering the animal’s<br />
face so they can’t work their arms up<br />
<strong>and</strong> out of the cloth.<br />
2) Roll the patient very tightly in<strong>to</strong> the cloth so it cannot move. Once it is tightly secured, roll<br />
the edge back so the neck is exposed.
3) Insert E <strong>collar</strong> fully under chin. Wrap snuggly around base of neck, making sure it is very<br />
tight ON TOP of the shoulders. Moni<strong>to</strong>r breathing <strong>and</strong> color of the patient’s nose for the<br />
first 5-10 minutes after <strong>install</strong>ation. If nose begins <strong>to</strong> turn blue or purple, loosen slightly.<br />
4) Once <strong>install</strong>ed, trim back the outer edge so that the patient can still feed itself. In many<br />
cases, clients will still need <strong>to</strong> h<strong>and</strong>-feed the patient in order ensure adequate nutritional<br />
intake. Due <strong>to</strong> the overall design <strong>and</strong> resilience of the duct tape, this <strong>collar</strong> can also be<br />
temporarily removed for supervised feeding sessions, but continual <strong>install</strong>ation/removal of<br />
the <strong>collar</strong> can be stressful on the patient.
5) Clients should be advised that the patient will not like the E <strong>collar</strong> in the beginning.<br />
However, over time they will adjust <strong>to</strong> it. Clients should be strongly encouraged <strong>to</strong> give it<br />
plenty of attention <strong>and</strong> affection while recovering <strong>to</strong> avoid depression <strong>and</strong> minimize<br />
stress.


