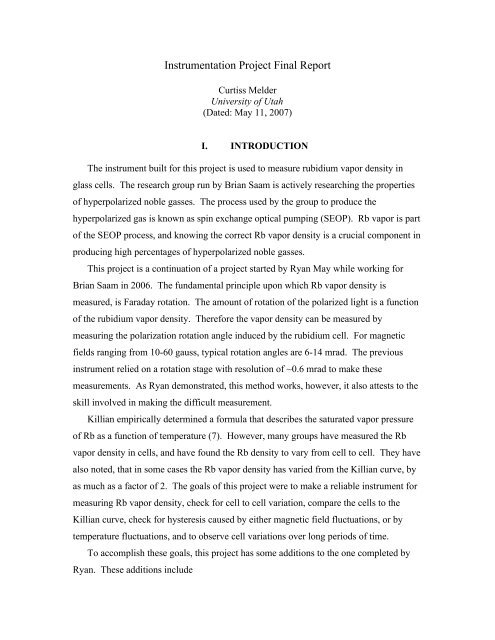
Instrumentation Project Final Report - Department of Physics ...
Instrumentation Project Final Report - Department of Physics ...
Instrumentation Project Final Report - Department of Physics ...

Create successful ePaper yourself
Turn your PDF publications into a flip-book with our unique Google optimized e-Paper software.
<strong>Instrumentation</strong> <strong>Project</strong> <strong>Final</strong> <strong>Report</strong><br />
Curtiss Melder<br />
University <strong>of</strong> Utah<br />
(Dated: May 11, 2007)<br />
I. INTRODUCTION<br />
The instrument built for this project is used to measure rubidium vapor density in<br />
glass cells. The research group run by Brian Saam is actively researching the properties<br />
<strong>of</strong> hyperpolarized noble gasses. The process used by the group to produce the<br />
hyperpolarized gas is known as spin exchange optical pumping (SEOP). Rb vapor is part<br />
<strong>of</strong> the SEOP process, and knowing the correct Rb vapor density is a crucial component in<br />
producing high percentages <strong>of</strong> hyperpolarized noble gasses.<br />
This project is a continuation <strong>of</strong> a project started by Ryan May while working for<br />
Brian Saam in 2006. The fundamental principle upon which Rb vapor density is<br />
measured, is Faraday rotation. The amount <strong>of</strong> rotation <strong>of</strong> the polarized light is a function<br />
<strong>of</strong> the rubidium vapor density. Therefore the vapor density can be measured by<br />
measuring the polarization rotation angle induced by the rubidium cell. For magnetic<br />
fields ranging from 10-60 gauss, typical rotation angles are 6-14 mrad. The previous<br />
instrument relied on a rotation stage with resolution <strong>of</strong> ~0.6 mrad to make these<br />
measurements. As Ryan demonstrated, this method works, however, it also attests to the<br />
skill involved in making the difficult measurement.<br />
Killian empirically determined a formula that describes the saturated vapor pressure<br />
<strong>of</strong> Rb as a function <strong>of</strong> temperature (7). However, many groups have measured the Rb<br />
vapor density in cells, and have found the Rb density to vary from cell to cell. They have<br />
also noted, that in some cases the Rb vapor density has varied from the Killian curve, by<br />
as much as a factor <strong>of</strong> 2. The goals <strong>of</strong> this project were to make a reliable instrument for<br />
measuring Rb vapor density, check for cell to cell variation, compare the cells to the<br />
Killian curve, check for hysteresis caused by either magnetic field fluctuations, or by<br />
temperature fluctuations, and to observe cell variations over long periods <strong>of</strong> time.<br />
To accomplish these goals, this project has some additions to the one completed by<br />
Ryan. These additions include
2<br />
• A photoelastic modulator (PEM).<br />
− Additional optics used with the PEM.<br />
− Lock-in amplifier.<br />
• A summing Circuit.<br />
• A power supply for the photodiode detectors.<br />
• Additional shim coils for 3 rd axis.<br />
• Instrument rigidification.<br />
Section II <strong>of</strong> this report will cover Faraday rotation and how it is related to the Rb<br />
vapor density. Section III will give a detailed description <strong>of</strong> the instrument. It will also<br />
discuss the polarization states <strong>of</strong> the light, and how the PEM significantly increases the<br />
signal to noise ratio <strong>of</strong> the system. Section IV will show data and results, and compare<br />
them to the expected values from the Killian vapor density curve. Section V is the<br />
conclusion.<br />
II.<br />
FARADAY ROTATION AND Rb VAPOR DENSITY<br />
A. Faraday Rotation<br />
Faraday rotation was first observed by Michael Faraday in 1845. What he observed,<br />
was that as light propagated in a dielectric material, collinear to a magnetic field, the<br />
plane <strong>of</strong> vibration <strong>of</strong> the electric field rotated [1]. The rotation is described by equation 1,<br />
θ = VBl<br />
eq. (1)<br />
where θ is the rotation angle <strong>of</strong> the E-field, B is the magnetic field strength, l is the<br />
length traversed by the light, and V is the Verdet constant. The Verdet constant is<br />
particular to the material the light is propagating through.<br />
The following description uses classical mechanics to describe the cause <strong>of</strong> Faraday<br />
rotation. As the oscillating E-field <strong>of</strong> linear polarized light propagates through a medium,<br />
it causes the electrons to oscillate in the same plane as the E-field. When this is done in<br />
the presence <strong>of</strong> a magnetic field that is collinear with the light, the electrons vibrate in a<br />
direction perpendicular to the B-field. Because the electrons are vibrating in a direction<br />
perpendicular to the magnetic field, they experience a force known as the Lorentz force.<br />
This force is described by equation 2 (3).
3<br />
F = qE + qv × B<br />
eq. (2)<br />
The cross product term <strong>of</strong> the Lorentz force is felt by the electron in a direction<br />
perpendicular to both the propagation <strong>of</strong> light, and the direction <strong>of</strong> vibration. The result<br />
is, the polarization angle <strong>of</strong> the light is rotated as it passes through a medium collinear<br />
with a magnetic field.<br />
B. Rb Vapor Density<br />
As discussed earlier, Rb vapor can be used as a medium for inducing Faraday<br />
rotation. The relationship between the amount <strong>of</strong> rotation and the Rb vapor density is<br />
described by equation 3, and table 1 is a listing <strong>of</strong> the constants and units used in equation<br />
3 (8).<br />
2 ⎛<br />
⎞<br />
le µ<br />
B<br />
B ⎜ 4 7 2 ⎟<br />
θ = [ Rb]<br />
⎜<br />
+ −<br />
2 2<br />
∆ ∆ ∆ ∆<br />
⎟<br />
eq. (3)<br />
18mhc<br />
1 3 3 1<br />
⎝ 2 2 2 2 ⎠<br />
Parameter/Constant Value Units<br />
θ Measured Radians<br />
[Rb] Solved for<br />
− 1<br />
cm<br />
length l Measured cm<br />
electron charge e 4.802e-10 esu<br />
− 1<br />
Bohr magneton µ 9.274e-21<br />
B<br />
erg * gauss<br />
magnetic field B Measured gauss<br />
electron mass m 9.1095e-28 g<br />
Planks constant h 6.6262e-27 erg * sec<br />
speed <strong>of</strong> light c 2.998e10<br />
1<br />
cm * s<br />
−<br />
Detuning from D1 resonance ∆<br />
1<br />
2<br />
Measured Hz<br />
Detuning from D2 resonance ∆<br />
3<br />
2<br />
Measured Hz<br />
Table 1 Table <strong>of</strong> values used to solve the rubidium vapor density.<br />
The D1 resonance corresponds to electrons transitioning from the 5P1 / 2<br />
→ 5S1/<br />
2 state.<br />
The D2 resonance corresponds to electrons transitioning from the 5P3 / 2<br />
→ 5S1/<br />
2 state.<br />
The D1 and D2 resonance lines for Rb occur at 795 nm and 780 nm respectively.<br />
Equation 3 shows that at D1 and D2, the rotation goes to infinity, and that far away from<br />
either <strong>of</strong> the two resonance lines, results in very little rotation. The laser for this<br />
instrument was tuned to 779.5 nm, or in other words<br />
∆<br />
3<br />
≈<br />
2<br />
2.47e11Hz<br />
. After measuring
4<br />
θ , l , B , ∆<br />
1 , and ∆<br />
3<br />
2<br />
2<br />
solved for.<br />
, the only unknown is the rubidium vapor density [Rb], which is<br />
III.<br />
INSTRUMENT DESCRIPTION<br />
The instrument can be divided into three main parts, the probe beam optics, the<br />
magnetic coil and oven assembly, and the detection optics as shown in Figure 1.<br />
Probe Beam Optics Magnetic Coil and Detection Optics<br />
Oven Assembly<br />
Figure 1 Setup <strong>of</strong> the entire instrument.<br />
A. Probe Beam Optics<br />
The probe beam optics consists <strong>of</strong> a temperature controlled extended cavity diode laser<br />
(ECDL), glass plate, Ocean Optics spectrometer, quarter waveplate, and a photoelastic<br />
modulator as shown in Figure 2.
Laser<br />
Ocean Optics<br />
Spectrometer<br />
Detector<br />
Quarter<br />
Waveplate<br />
Photoelastic<br />
Modulator<br />
(PEM)<br />
5<br />
Glass Pick<strong>of</strong>f<br />
Plate<br />
Figure 2 Optical components on the probe beam optics table.<br />
The ECDL and the temperature controller was built by Ryan May. The front and top<br />
views <strong>of</strong> the laser are shown in Figures 3 and 4.<br />
Spacers Added<br />
Figure 3 Front View ECDL (modified from (2)) Figure 4 Top View ECDL (2)<br />
The extended cavity is composed <strong>of</strong> a diffraction grating and a mirror. The details <strong>of</strong><br />
the grating equation and how the ECDL works is covered in Ryans report, and will not be<br />
covered here. However, it is important to note that the ECDL accomplishes two things,<br />
first, it narrows the line width to about 0.1nm, and second, it provides a mechanism to<br />
adjust the lasing frequency. The ECDL can do this because the grating can be rotated<br />
independent <strong>of</strong> the laser about two axes. It can be rotated about a vertical axis, and about
6<br />
a horizontal axis that is perpendicular to the laser beam. Rotation about the horizontal<br />
axis allows for proper alignment <strong>of</strong> the reflected 1 st order beam back into the laser. This<br />
adjustment is made by adjusting the top knob shown in Figure 3. If the laser is unstable,<br />
this knob may need slight adjustment. Adjustment <strong>of</strong> the knob on the lower end <strong>of</strong> the<br />
“L” in figure 3 causes the diffraction grating to rotate about a vertical axis. This<br />
adjustment causes the lasing line to shift, thus enabling the laser to be tuned to 779.5 nm.<br />
One <strong>of</strong> the goals <strong>of</strong> the project was to rigidify the setup. With that in mind, there<br />
were some additions or modifications made to the laser assembly. As shown in Figure 3,<br />
spacers that fit around the attachment screws and between the mounting plate and base<br />
block were added. Without these spacers it was impossible to securely fasten the laser to<br />
the base block without causing the mounting plate to bow over the TEC. If the mounting<br />
plate were allowed to bow over the TEC, then it would not maintain good thermal<br />
contact, and temperature control <strong>of</strong> the laser would be compromised. Also, an additional<br />
screw was added to the bracket holding the output mirror <strong>of</strong> the ECDL. Using two<br />
screws ensured that the bracket could not wobble or pivot.<br />
Another modification was made to the base block. Previously, the shear size and<br />
mass <strong>of</strong> the base block was used to keep it in one place. It sat flat on the optic table<br />
without being fastened down in anyway. In the current setup it was necessary to raise the<br />
level <strong>of</strong> the laser. Brackets were designed to raise the level <strong>of</strong> the laser, to rigidly hold<br />
the laser block, and to provide for adjustment both vertically, and horizontally side to<br />
side. This assembly is shown in Figure 5.<br />
Quarter<br />
Waveplate<br />
Figure 5 Laser mount and bracket assembly ensure rigid structure<br />
for improved laser stability while maintaining<br />
adjustability.
7<br />
One more change to the laser assembly was the addition <strong>of</strong> a cover shown in Figure 2.<br />
Without the cover, small air currents in the room, or even standing near the laser caused<br />
the temperature to fluctuate ~ ±0.06º C. These small fluctuations caused the output<br />
power <strong>of</strong> the laser to fluctuate as well. With the cover, the laser temperature fluctuates a<br />
maximum <strong>of</strong> ±0.01º C, which is also the maximum temperature resolution <strong>of</strong> the<br />
controller.<br />
The glass plate is used to pick <strong>of</strong>f a small portion <strong>of</strong> the beam, and reflect it back into<br />
the Ocean Optics spectrometer. The Ocean Optics spectrometer provides real time<br />
information about the emitted wavelength <strong>of</strong> laser light. This is useful both for adjusting<br />
the extended cavity, and while making measurements to ensure the laser line is where it is<br />
expected to be.<br />
The 780 nm multiorder quarter waveplate shown in Figure 5 converts the vertical<br />
linear polarized light emitted from the laser into circular polarized light. To accomplish<br />
this, the fast and slow axes <strong>of</strong> the quarter waveplate are oriented at +45º for one axis, and<br />
-45º for the other axis relative to the vertical polarized laser light. Using the setup below<br />
in Figure 6, the circular polarized light was analyzed to determine how circular it was.<br />
Calcite<br />
Polarizer<br />
P1<br />
Quarter<br />
Waveplate<br />
Calcite<br />
Polarizer<br />
P2<br />
Laser<br />
Photodiode<br />
Detector<br />
Figure 6 Analyzer setup used to ensure good circular polarization after the<br />
quarter waveplate.<br />
The best results gave ~20%-25% variation in intensity as the calcite polarizer was<br />
rotated. A significant portion <strong>of</strong> this variation was caused by the error inherent in the 780<br />
nm multiorder quarter waveplate. To compensate for this error, the quarter waveplate<br />
was mounted on a post at a 45º angle as shown in Figure 5. Next, the waveplate was<br />
rotated about the mounting post. This effectively lengthens the optical path length <strong>of</strong> the
8<br />
axis that is positioned perpendicular to the axis <strong>of</strong> rotation. This slight rotation can be<br />
seen in Figure 2. With P1, the variations were reduced to 1.7%, and without P1, the<br />
variations were reduced to 14%.<br />
The last component on the probe beam optics table is the photoelastic modulator<br />
(PEM). This PEM is a series I/FS50 and was purchased from Hinds Instruments. It has a<br />
nominal operating frequency <strong>of</strong> 50 kHz, and a useful aperture <strong>of</strong> 16 mm. This PEM head<br />
has the noninterference option (NIO) as well as the magnetic field compatibility option<br />
(MFC). The optical head is a resonant device composed <strong>of</strong> two components, the optical<br />
element, and the transducer, as shown in Figure 7.<br />
Figure 7 Optical Head For PEM (4)<br />
The optical element is composed <strong>of</strong> birefrigent fused silica. The amount <strong>of</strong><br />
birefringence, or in other words, the amount <strong>of</strong> retardation between the slow and fast axes<br />
is a function strain, either in compression or tension. The transducer produces this strain<br />
in the fused silica sinusoidally on resonance at 50 kHz. The result is a retardation that<br />
can be described by equation 4, where β is the depth <strong>of</strong> retardation.<br />
( ω t )<br />
δ = β * sin<br />
eq. (4)<br />
The PEM is set up on this instrument with the fast or slow axes, oriented either<br />
vertically or horizontally. For circular polarized light incident on the PEM, the resulting<br />
transmitted light is elliptically polarized with the semimajor axis oscillating between<br />
±45º. Equation 5 shows that α always equals 45º regardless <strong>of</strong> the retardation δ, as long<br />
as<br />
E<br />
ox<br />
= Eoy<br />
, where ox<br />
E and E<br />
oy are the amplitudes <strong>of</strong> the electric field in their<br />
respective directions. Also, in the special case where<br />
E = E , the angle α changes<br />
ox<br />
oy<br />
instantaneously from positive to negative as the polarization passes through circular.<br />
Changing the retardation only affects the eccentricity <strong>of</strong> the ellipse with the two extreme
9<br />
cases being a circle or a line. This is the dynamic polarization state <strong>of</strong> the light as it<br />
enters the magnetic coil and oven assembly.<br />
2EoxEoy<br />
cosδ<br />
tan 2α =<br />
Eq. 5 (1)<br />
E − E<br />
2<br />
ox<br />
2<br />
oy<br />
Figure 8 Orientation <strong>of</strong> semimajor axis.<br />
Refer to Equation 5 (5).<br />
B. Magnetic Coil and Oven Assembly<br />
The coil assembly consists <strong>of</strong> three sets <strong>of</strong> coils, the main field coils, and a horizontal<br />
and vertical set <strong>of</strong> shim coils as shown in Figure 9.<br />
Vertical Shim<br />
Coils<br />
Horizontal<br />
Shim Coils<br />
Oven<br />
Main Field<br />
Coils<br />
Selector<br />
Switch<br />
Figure 9 The 3D magnetic field coil assembly gives precision control<br />
over the field conditions inside the oven.
10<br />
The main coils are rigidly supported by brackets as shown in Figure 9. The shim coils<br />
are nested inside <strong>of</strong> each other while maintaining the Helmholtz coil configuration. Each<br />
smaller set <strong>of</strong> coils is rigidly fastened to the directly bigger set <strong>of</strong> coils using<br />
interconnecting brackets. Therefore in this configuration, all three sets <strong>of</strong> coils are all<br />
fastened together into one integral unit.<br />
The shim coils are used to shim out the Earth’s magnetic field. They are positioned<br />
vertically and horizontally to compensate for both the vertical and horizontal components<br />
<strong>of</strong> the Earth’s field. The instrument is set up with the main field oriented in an east-west<br />
direction. There is essentially no component <strong>of</strong> the Earth’s field in this direction.<br />
Therefore in theory, zero magnetic field is attainable in the center <strong>of</strong> the oven.<br />
Each set <strong>of</strong> coils has its own power supply. The shim coils are wired in series, and<br />
the main field coils are wired in parallel. The only reason the main fields are wired in<br />
parallel, is because that is the only configuration our power supplies could accommodate.<br />
The main field coils required two power supplies. They are connected together in a<br />
master-slave configuration. Therefore, to make current adjustments, it is necessary to<br />
turn only one knob on the master power supply. The current for each set <strong>of</strong> coils runs<br />
through a power resistor located near the selector switch shown in Figure 9. Because the<br />
voltage across the resistor is proportional to the current running through it, and because<br />
the current running through the coil is directly proportional to the magnetic field<br />
produced by the coil, the voltage across the resistor is also proportional to the magnetic<br />
field. The relationship <strong>of</strong> magnetic field and voltage across the resistor is shown for each<br />
<strong>of</strong> the coils in Figure 10.<br />
The field <strong>of</strong> each coil was measured in the center <strong>of</strong> the oven, where the Rb cell sits,<br />
using a F.W. Bell model 5070 Gauss/Teslameter Hall effect probe. The voltage across<br />
each power resistor was measured using a digital multimeter. Each coil can be selected<br />
individually using the selector switch shown in Figure 9. Using the plots in Figure 10,<br />
the shim coils were adjusted to compensate for the Earth’s magnetic field.
11<br />
Magnetic Field (gauss)<br />
70<br />
60<br />
50<br />
40<br />
30<br />
20<br />
10<br />
Main Field B Vs Voltage<br />
y = 34.814x + 0.0809<br />
R 2 = 1<br />
0<br />
0 0.5 1 1.5 2<br />
(Volts)<br />
Magnetic Field (gauss)<br />
5<br />
4<br />
3<br />
2<br />
1<br />
0<br />
-1<br />
Vertical Shim Coil B Vs Voltage<br />
y = 4.0329x - 0.1847<br />
R 2 = 0.9995<br />
0 0.2 0.4 0.6 0.8 1 1.2<br />
(volts)<br />
Magnetic Field (gauss)<br />
3.5<br />
3<br />
2.5<br />
2<br />
1.5<br />
1<br />
0.5<br />
-1<br />
Horizontal Shim Coil B Vs Voltage<br />
y = 3.2487x - 0.3775<br />
R 2 = 0.9993<br />
0<br />
0<br />
-0.5<br />
0.2 0.4 0.6 0.8 1 1.2<br />
(volts)<br />
Figure 10 Relationship <strong>of</strong> magnetic field and voltage across a power resistor for each<br />
set <strong>of</strong> magnetic field coils. The equation for the main field line was use in calculating<br />
the magnetic field strength during the Rb vapor density measurements.<br />
The oven assembly is essentially the same as what Ryan previously used with a few<br />
modifications. The air inlet was modified to fit this particular coil arrangement. Two<br />
vent holes were added to the top, and an extra window was added for the option <strong>of</strong> using<br />
a transverse probe beam for polarimetry experiments. The Rb cell sits in the oven as<br />
shown in Figure 11.<br />
Rb Cell<br />
Laser Beam<br />
Figure 11 Rb cell shown sitting in the oven without the oven cover.
12<br />
C. Detection Optics<br />
The detection optics consists <strong>of</strong> a 780 nm multiorder half waveplate, a polarizing<br />
beam splitting cube, and two photodiode detectors as indicated in Figure 12.<br />
Photodiode<br />
Detectors<br />
780 nm Half<br />
Waveplate<br />
Polarizing Beam<br />
Splitting Cube<br />
Figure 12 Detection optics consist <strong>of</strong> a half waveplate, a polarizing<br />
beam splitting cube, and two photodiode detectors.<br />
The half waveplate is used to rotate the polarization <strong>of</strong> the laser beam. This can be<br />
used to “zero” the system before taking a measurement. The polarizing beam splitting<br />
cube (pbc) reflects the vertical polarization and transmits the horizontal polarization. The<br />
photodiode detectors can then be used to individually analyze the vertical and horizontal<br />
polarization states. Previously there was a lens positioned before the half waveplate that<br />
was used to focus the beam onto the photodiode detectors. However, it was discovered<br />
that because <strong>of</strong> inhomogeneities in the photodiode, a broader beam gives a better<br />
response than a pinpoint beam.<br />
D. Theory <strong>of</strong> Operation<br />
This portion <strong>of</strong> the report will discuss in detail the polarization state <strong>of</strong> the light as it<br />
propagates through the system, and it will look at how the signal is interpreted and<br />
processed. Refer to the block diagram in Figure 13.
13<br />
Ocean Optics<br />
Spectrometer<br />
λ/4<br />
Plate<br />
Computer<br />
Rb Cell<br />
Photodetector B<br />
Photodetector A<br />
Laser<br />
Glass Plate<br />
λ/2 plate P.B.C.<br />
Ref. Signal<br />
Lock-in<br />
Amplifier<br />
Oscilliscope<br />
Summer/Power<br />
Supply<br />
PEM<br />
Driver<br />
Electrical head<br />
Optical Head<br />
Figure 13 Block Diagram <strong>of</strong> Instrument (top view).<br />
As previously discussed, the initial polarization <strong>of</strong> the laser beam is linear and<br />
oriented vertically. The quarter waveplate is oriented such that it converts the linear<br />
polarized light into circular polarized light. After exiting the PEM the light is elliptically<br />
polarized with the semimajor axis oscillating sinusoidally between ±45º. If the oven and<br />
cell were removed from the system, then the light would propagate, without being<br />
rotated, through the half waveplate and into the polarizing beam splitting cube p.b.c. The<br />
p.b.c then separates the vertical and horizontal polarization components sending them<br />
into photodetector B (PDB) and photodetector A (PDA) respectively. In the case where<br />
there is no rotation, e.g. the oven and cell are not present, and the half waveplate is<br />
properly oriented, the difference <strong>of</strong> PDA and PDB is equal to zero. This can be seen by<br />
inspection in Figure 14, that when α=45º, and θ=0º, then there are equal E-field<br />
components in the X and Y directions. However, with the magnetic field turned on, and<br />
the Rb cell and oven in place, the Rb vapor causes the polarization <strong>of</strong> the light to rotate<br />
according to equation 3. It is important to note, that this rotation does not change the<br />
angle α, rather the whole reference frame is rotated by θ. This is shown in Figure 14.
14<br />
Y’<br />
Y<br />
X’<br />
α<br />
α<br />
θ<br />
X<br />
Figure 14 Ellipse rotation diagram illustrating the effect <strong>of</strong> rotation.<br />
When θ = 0, there are equal components <strong>of</strong> the E-field in the<br />
X and Y directions. However, when θ ≠ 0, then the E-field<br />
seen in the X and Y directions oscillates at the PEM<br />
frequency.<br />
The PEM causes the polarization to morph from an ellipse with some maximum<br />
eccentricity with the major axis at 45º, into a circle, and then back into an ellipse with the<br />
major axis at -45º. This is still the case after the polarization has been rotated, except<br />
that now the major axis is rotated at ±45º relative to the X’ axis. This results in a<br />
oscillating signal seen by the two photo detectors that are still in the initial X-Y reference<br />
plane. The oscillating signal from PDA and PDB is sent to the lock-in amplifier. The<br />
lock-in takes the difference <strong>of</strong> the two signals, and multiplies it with the reference signal<br />
from the PEM driver. This results in a DC signal with an extremely high signal to noise<br />
ratio that corresponds to the polarization rotation induced by the cell. It can be shown<br />
that the relation between the output <strong>of</strong> the lock-in and θ is given by equation 6 (6).<br />
θ<br />
=<br />
sin<br />
− 1<br />
⎛<br />
⎜<br />
⎝<br />
2V<br />
2<br />
Vfr<br />
DC<br />
J<br />
1<br />
( β )<br />
⎞<br />
⎟<br />
⎠<br />
eq. (6)
15<br />
Where Vfr is the output from the lock-in amplifier, β is the depth <strong>of</strong> retardation in<br />
radians, and V DC is the summed output from the two photo detectors. The validity <strong>of</strong><br />
equation 6 was verified by changing β, which resulted in no change in θ. Because the<br />
Bessel function is nonlinear, this is fairly conclusive evidence that this is an accurate<br />
relationship between θ and Vfr.<br />
After solving equation 3 for [Rb], it takes the form shown in equation 7 with the ratio<br />
<strong>of</strong> rotation versus magnetic field. This ratio was obtained by measuring the slope <strong>of</strong> the<br />
line from a plot <strong>of</strong> θ versus B.<br />
[ Rb]<br />
=<br />
⎛<br />
18θ<br />
mhc ⎜<br />
2<br />
Ble µ<br />
⎜<br />
B<br />
⎝<br />
4∆<br />
2<br />
3<br />
2<br />
+<br />
∆<br />
7∆<br />
∆<br />
2 2<br />
1 3<br />
2 2<br />
2<br />
1<br />
2<br />
− 2∆<br />
1<br />
2<br />
∆<br />
3<br />
2<br />
⎞<br />
⎟<br />
⎟<br />
⎠<br />
eq. (7)<br />
IV.<br />
DATA AND RESULTS<br />
As mentioned previously, the goals <strong>of</strong> this project were to measure the Rb vapor<br />
density, compare cell to cell variations, compare the Rb vapor densities against the<br />
Killian curve, and to check for long term changes. These measurements were made on<br />
the same three cells used by Ryan. These cells are listed in table 2. The lengths <strong>of</strong> the<br />
cells used in these measurements were slightly different than those used by Ryan. The<br />
overall lengths <strong>of</strong> the cells were measured with a digital caliper. The length <strong>of</strong> the inside<br />
<strong>of</strong> each cell was then estimated by subtracting <strong>of</strong>f 1/8” for the thickness <strong>of</strong> each end cap.<br />
Cell Name Contents Gas Pressure (mbar) Length (cm)<br />
120A 3<br />
He + N 2 , Rb 399 9.65<br />
120B 3<br />
He + N 2 , Rb 750 9.47<br />
120C<br />
129<br />
Xe + N 2 , Rb 722 9.53<br />
Table 2 Rb cells Used for Making Measurements.<br />
The measurements were made by entering both the voltage across the main field<br />
resistor, and the voltage from the lock-in amplifier into an excel spreadsheet. Excel<br />
calculated the magnetic field strength by plugging this voltage into the main field slope<br />
equation in Figure 10. Excel then calculated the rotation by plugging the lock-in voltage
16<br />
into equation 6. Rotation was plotted against magnetic field, and the slope was plugged<br />
into equation 7 resulting in a rubidium vapor density for a given temperature.<br />
To check for hysteresis due to both B-field and temperature fluctuations, the field was<br />
ramped up and down at each temperature, and the temperature was ramped up and down<br />
for each cell.<br />
The empirical formula developed by Killian for measuring the Rb vapor density is<br />
shown as equation 8 (2).<br />
4132<br />
log10 N = 26.41 − − log10<br />
T<br />
eq (8)<br />
T<br />
Where N is the Rb vapor density per cm -3 , and T is the absolute temperature. The<br />
measured vapor densities <strong>of</strong> cells 120A, 120B and 120C were compared to the Killian<br />
curve produced by equation 8.<br />
At low fields, below approximately 10 gauss, the slope <strong>of</strong> rotation versus B-field is<br />
much steeper than that measured between 10 and 60 gauss. It is not clear what causes<br />
this dual slope behavior. However, because the slope obtained between 10 and 60 gauss<br />
was the one needed to make the calculation, all the data reported here was taken from that<br />
range. One other peculiarity was that the different cells absorbed different amounts <strong>of</strong><br />
light. The same laser power was used on all the cells, however, the summed photo<br />
detector voltages were different for all the cells. This is shown in Figure 15.<br />
Vdc Vs Temperature<br />
Total Photo Detector<br />
Voltage<br />
3<br />
2.5<br />
2<br />
1.5<br />
1<br />
0.5<br />
0<br />
140 150 160 170 180 190 200<br />
Temperature (degrees C)<br />
Cell 120A Vdc<br />
Cell 120B Vdc<br />
Cell 120C Vdc<br />
Figure 15 Shows the relationship between the total summed signal from the two<br />
photo detectors, and temperature. The plot indicates that different<br />
cells absorb different amounts <strong>of</strong> light, and that they all absorb more<br />
light with increased temperature.
17<br />
0.008<br />
0.007<br />
0.006<br />
Rotation Vs Mag Field<br />
y = 8.101E-05x + 1.504E-03<br />
R 2 = 9.969E-01<br />
y = 8.555E-05x + 1.276E-03<br />
R 2 = 9.986E-01<br />
Rotation (rad)<br />
0.005<br />
0.004<br />
0.003<br />
0.002<br />
0.001<br />
Up<br />
Down<br />
Linear (Up)<br />
Linear (Down)<br />
0<br />
0 10 20 30 40 50 60 70<br />
Mag Field (gauss)<br />
Figure 16 50707 Temp 150C Temp Up Cell 120A<br />
0.003<br />
0.0025<br />
Rotation Vs Mag Field<br />
y = 3.114E-05x + 3.290E-04<br />
R 2 = 9.991E-01<br />
y = 2.753E-05x + 5.477E-04<br />
R 2 = 9.941E-01<br />
Rotation (rad)<br />
0.002<br />
0.0015<br />
0.001<br />
Up<br />
Down<br />
Linear (Up)<br />
Linear (Down)<br />
0.0005<br />
0<br />
0 10 20 30 40 50 60 70<br />
Mag Field (gauss)<br />
Figure 17 50707 Temp 160C Temp Up Cell 120A
18<br />
0.016<br />
0.014<br />
0.012<br />
Rotation Vs Mag Field<br />
y = 1.879E-04x + 1.414E-03<br />
R 2 = 9.963E-01<br />
y = 1.621E-04x + 2.959E-03<br />
R 2 = 9.912E-01<br />
Rotation (rad)<br />
0.01<br />
0.008<br />
0.006<br />
0.004<br />
0.002<br />
Up<br />
Down<br />
Linear (Up)<br />
Linear (Down)<br />
0<br />
0 10 20 30 40 50 60 70<br />
Mag Field (gauss)<br />
Figure 18 50707 Temp 170C Temp Up Cell 120A<br />
Rotation (rad)<br />
0.02<br />
0.018<br />
0.016<br />
0.014<br />
0.012<br />
0.01<br />
0.008<br />
0.006<br />
0.004<br />
0.002<br />
0<br />
Rotation Vs Mag Field<br />
0 10 20 30 40 50 60 70<br />
Mag Field (gauss)<br />
y = 2.557E-04x + 1.464E-03<br />
R 2 = 9.944E-01<br />
y = 2.531E-04x + 1.736E-03<br />
R 2 = 9.981E-01<br />
Up<br />
Down<br />
Linear (Up)<br />
Linear (Down)<br />
Figure 19 50707 Temp 180C Temp Up Cell 120A
19<br />
0.03<br />
0.025<br />
Rotation Vs Mag Field<br />
y = 3.876E-04x + 1.140E-03<br />
R 2 = 9.992E-01<br />
y = 3.785E-04x + 1.699E-03<br />
R 2 = 9.992E-01<br />
Rotation (rad)<br />
0.02<br />
0.015<br />
0.01<br />
Up<br />
Down<br />
Linear (Up)<br />
Linear (Down)<br />
0.005<br />
0<br />
0 10 20 30 40 50 60 70<br />
Mag Field (gauss)<br />
Figure 20 50707 Temp 190C Temp Up Cell 120A<br />
0.02<br />
0.018<br />
0.016<br />
Rotation Vs Mag Field<br />
y = 2.655E-04x + 1.645E-03<br />
R 2 = 9.992E-01<br />
y = 2.590E-04x + 2.069E-03<br />
R 2 = 9.996E-01<br />
Rotation (rad)<br />
0.014<br />
0.012<br />
0.01<br />
0.008<br />
0.006<br />
0.004<br />
0.002<br />
Up<br />
Down<br />
Linear (Up)<br />
Linear (Down)<br />
0<br />
0 10 20 30 40 50 60 70<br />
Mag Field (gauss)<br />
Figure 21 50707 Temp 180C Temp Down Cell 120A
20<br />
0.014<br />
0.012<br />
Rotation Vs Mag Field<br />
y = 1.792E-04x + 1.599E-03<br />
R 2 = 9.991E-01<br />
y = 1.732E-04x + 2.027E-03<br />
R 2 = 9.991E-01<br />
Rotation (rad)<br />
0.01<br />
0.008<br />
0.006<br />
0.004<br />
0.002<br />
Up<br />
Down<br />
Linear (Up)<br />
Linear (Down)<br />
0<br />
0 10 20 30 40 50 60 70<br />
Mag Field (gauss)<br />
Figure 22 50707 Temp 170C Temp Down Cell 120A<br />
0.01<br />
0.009<br />
0.008<br />
Rotation Vs Mag Field<br />
y = 1.214E-04x + 1.364E-03<br />
R 2 = 9.979E-01<br />
y = 1.171E-04x + 1.753E-03<br />
R 2 = 9.993E-01<br />
Rotation (rad)<br />
0.007<br />
0.006<br />
0.005<br />
0.004<br />
0.003<br />
0.002<br />
0.001<br />
Up<br />
Down<br />
Linear (Up)<br />
Linear (Down)<br />
0<br />
0 10 20 30 40 50 60 70<br />
Mag Field (gauss)<br />
Figure 23 50707 Temp 160C Temp Down Cell 120A
21<br />
0.01<br />
0.009<br />
0.008<br />
Rotation Vs Mag Field<br />
y = 6.991E-05x + 4.590E-03<br />
R 2 = 9.893E-01<br />
y = 7.868E-05x + 4.427E-03<br />
R 2 = 9.935E-01<br />
Rotation (rad)<br />
0.007<br />
0.006<br />
0.005<br />
0.004<br />
0.003<br />
0.002<br />
0.001<br />
Up<br />
Down<br />
Linear (Up)<br />
Linear (Down)<br />
0<br />
0 10 20 30 40 50 60 70<br />
Mag Field (gauss)<br />
Figure 24 51107 Temp 150C Temp Up Cell 120B<br />
0.014<br />
Rotation Vs Mag Field<br />
y = 1.325E-04x + 3.630E-03<br />
R 2 = 9.821E-01<br />
y = 1.148E-04x + 3.959E-03<br />
R 2 = 9.929E-01<br />
0.012<br />
Rotation (rad)<br />
0.01<br />
0.008<br />
0.006<br />
0.004<br />
Up<br />
Down<br />
Linear (Up)<br />
Linear (Down)<br />
0.002<br />
0<br />
0 10 20 30 40 50 60 70<br />
Mag Field (gauss)<br />
Figure 25 51107 Temp 160C Temp Up Cell 120B
22<br />
0.016<br />
0.014<br />
0.012<br />
Rotation Vs Mag Field<br />
y = 1.644E-04x + 3.452E-03<br />
R 2 = 9.974E-01<br />
y = 1.621E-04x + 3.349E-03<br />
R 2 = 9.939E-01<br />
Rotation (rad)<br />
0.01<br />
0.008<br />
0.006<br />
0.004<br />
0.002<br />
Up<br />
Down<br />
Linear (Up)<br />
Linear (Down)<br />
0<br />
0 10 20 30 40 50 60 70<br />
Mag Field (gauss)<br />
Figure 26 51107 Temp 170C Temp Up Cell 120B<br />
Rotation (rad)<br />
0.02<br />
0.018<br />
0.016<br />
0.014<br />
0.012<br />
0.01<br />
0.008<br />
0.006<br />
0.004<br />
0.002<br />
0<br />
Rotation Vs Mag Field<br />
0 10 20 30 40 50 60 70<br />
Mag Field (gauss)<br />
y = 2.487E-04x + 2.329E-03<br />
R 2 = 9.984E-01<br />
y = 2.575E-04x + 2.393E-03<br />
R 2 = 9.948E-01<br />
Up<br />
Down<br />
Linear (Up)<br />
Linear (Down)<br />
Figure 27 51107 Temp 180C Temp Up Cell 120B
23<br />
0.025<br />
Rotation Vs Mag Field<br />
y = 3.205E-04x - 9.394E-04<br />
R 2 = 9.954E-01<br />
y = 3.056E-04x + 4.469E-04<br />
R 2 = 9.968E-01<br />
0.02<br />
Rotation (rad)<br />
0.015<br />
0.01<br />
Up<br />
Down<br />
Linear (Up)<br />
Linear (Down)<br />
0.005<br />
0<br />
0 10 20 30 40 50 60 70<br />
Mag Field (gauss)<br />
Figure 28 51107 Temp 190C Temp Up Cell 120B<br />
0.02<br />
0.018<br />
0.016<br />
Rotation Vs Mag Field<br />
y = 2.651E-04x + 1.016E-03<br />
R 2 = 9.945E-01<br />
y = 2.607E-04x + 1.592E-03<br />
R 2 = 9.998E-01<br />
Rotation (rad)<br />
0.014<br />
0.012<br />
0.01<br />
0.008<br />
0.006<br />
0.004<br />
0.002<br />
Up<br />
Down<br />
Linear (Up)<br />
Linear (Down)<br />
0<br />
0 10 20 30 40 50 60 70<br />
Mag Field (gauss)<br />
Figure 29 51107 Temp 180C Temp Down Cell 120B
24<br />
0.018<br />
0.016<br />
0.014<br />
Rotation Vs Mag Field<br />
y = 1.920E-04x + 3.151E-03<br />
R 2 = 9.993E-01<br />
y = 1.868E-04x + 3.213E-03<br />
R 2 = 9.980E-01<br />
Rotation (rad)<br />
0.012<br />
0.01<br />
0.008<br />
0.006<br />
0.004<br />
0.002<br />
Up<br />
Down<br />
Linear (Up)<br />
Linear (Down)<br />
0<br />
0 10 20 30 40 50 60 70<br />
Mag Field (gauss)<br />
Figure 30 51107 Temp 170C Temp Down Cell 120B<br />
0.012<br />
0.01<br />
Rotation Vs Mag Field<br />
y = 1.069E-04x + 3.959E-03<br />
R 2 = 9.995E-01<br />
y = 1.078E-04x + 3.947E-03<br />
R 2 = 9.995E-01<br />
Rotation (rad)<br />
0.008<br />
0.006<br />
0.004<br />
Up<br />
Down<br />
Linear (Up)<br />
Linear (Down)<br />
0.002<br />
0<br />
0 10 20 30 40 50 60 70<br />
Mag Field (gauss)<br />
Figure 31 51107 Temp 160C Temp Down Cell 120B
25<br />
0.009<br />
0.008<br />
0.007<br />
Rotation Vs Mag Field<br />
y = 7.067E-05x + 3.643E-03<br />
R 2 = 9.977E-01<br />
y = 7.025E-05x + 3.640E-03<br />
R 2 = 9.993E-01<br />
Rotation (rad)<br />
0.006<br />
0.005<br />
0.004<br />
0.003<br />
0.002<br />
0.001<br />
0<br />
0 10 20 30 40 50 60 70<br />
Mag Field (gauss)<br />
Up<br />
Down<br />
Linear (Up)<br />
Linear (Down)<br />
Figure 32 51107 Temp 150C Temp Down Cell 120B<br />
0.005<br />
0.0045<br />
0.004<br />
Rotation Vs Mag Field<br />
y = 6.869E-05x + 3.613E-06<br />
R 2 = 9.994E-01<br />
y = 6.838E-05x + 2.136E-05<br />
R 2 = 9.997E-01<br />
Rotation (rad)<br />
0.0035<br />
0.003<br />
0.0025<br />
0.002<br />
0.0015<br />
0.001<br />
0.0005<br />
Up<br />
Down<br />
Linear (Up)<br />
Linear (Down)<br />
0<br />
0 10 20 30 40 50 60 70<br />
Mag Field (gauss)<br />
Figure 33 51407 Temp 150C Temp Up Cell 120C
26<br />
0.008<br />
0.007<br />
0.006<br />
Rotation Vs Mag Field<br />
y = 1.070E-04x - 4.286E-05<br />
R 2 = 9.998E-01<br />
y = 1.068E-04x - 5.316E-05<br />
R 2 = 9.997E-01<br />
Rotation (rad)<br />
0.005<br />
0.004<br />
0.003<br />
0.002<br />
0.001<br />
Up<br />
Down<br />
Linear (Up)<br />
Linear (Down)<br />
0<br />
0 10 20 30 40 50 60 70<br />
Mag Field (gauss)<br />
Figure 34 51407 Temp 160C Temp Up Cell 120C<br />
0.012<br />
0.01<br />
Rotation Vs Mag Field<br />
y = 1.609E-04x + 9.284E-05<br />
R 2 = 9.999E-01<br />
y = 1.607E-04x + 1.342E-04<br />
R 2 = 9.999E-01<br />
Rotation (rad)<br />
0.008<br />
0.006<br />
0.004<br />
Up<br />
Down<br />
Linear (Up)<br />
Linear (Down)<br />
0.002<br />
0<br />
0 10 20 30 40 50 60 70<br />
Mag Field (gauss)<br />
Figure 35 51407 Temp 170C Temp Up Cell 120C
27<br />
0.018<br />
0.016<br />
0.014<br />
Rotation Vs Mag Field<br />
y = 2.425E-04x + 2.160E-04<br />
R 2 = 9.998E-01<br />
y = 2.423E-04x + 1.959E-04<br />
R 2 = 9.999E-01<br />
Rotation (rad)<br />
0.012<br />
0.01<br />
0.008<br />
0.006<br />
0.004<br />
0.002<br />
Up<br />
Down<br />
Linear (Up)<br />
Linear (Down)<br />
0<br />
0 10 20 30 40 50 60 70<br />
Mag Field (gauss)<br />
Figure 36 51407 Temp 180C Temp Up Cell 120C<br />
0.025<br />
Rotation Vs Mag Field<br />
y = 3.547E-04x + 5.002E-04<br />
R 2 = 9.999E-01<br />
y = 3.541E-04x + 5.642E-04<br />
R 2 = 9.993E-01<br />
0.02<br />
Rotation (rad)<br />
0.015<br />
0.01<br />
Up<br />
Down<br />
Linear (Up)<br />
Linear (Down)<br />
0.005<br />
0<br />
0 10 20 30 40 50 60 70<br />
Mag Field (gauss)<br />
Figure 37 51407 Temp 190C Temp Up Cell 120C
28<br />
0.018<br />
0.016<br />
0.014<br />
Rotation Vs Mag Field<br />
y = 2.398E-04x + 2.510E-04<br />
R 2 = 9.998E-01<br />
y = 2.391E-04x + 3.385E-04<br />
R 2 = 9.999E-01<br />
Rotation (rad)<br />
0.012<br />
0.01<br />
0.008<br />
0.006<br />
0.004<br />
0.002<br />
Up<br />
Down<br />
Linear (Up)<br />
Linear (Down)<br />
0<br />
0 10 20 30 40 50 60 70<br />
Mag Field (gauss)<br />
Figure 38 51407 Temp 180C Temp Down Cell 120C<br />
0.014<br />
0.012<br />
Rotation Vs Mag Field<br />
y = 1.760E-04x + 2.985E-04<br />
R 2 = 9.998E-01<br />
y = 1.782E-04x + 1.518E-04<br />
R 2 = 9.997E-01<br />
Rotation (rad)<br />
0.01<br />
0.008<br />
0.006<br />
0.004<br />
Up<br />
Down<br />
Linear (Up)<br />
Linear (Down)<br />
0.002<br />
0<br />
0 10 20 30 40 50 60 70<br />
Mag Field (gauss)<br />
Figure 39 51407 Temp 170C Temp Down Cell 120C
29<br />
0.008<br />
0.007<br />
0.006<br />
Rotation Vs Mag Field<br />
y = 1.041E-04x + 6.479E-05<br />
R 2 = 9.996E-01<br />
y = 1.024E-04x + 1.530E-04<br />
R 2 = 9.997E-01<br />
Rotation (rad)<br />
0.005<br />
0.004<br />
0.003<br />
0.002<br />
0.001<br />
Up<br />
Down<br />
Linear (Up)<br />
Linear (Down)<br />
0<br />
0 10 20 30 40 50 60 70<br />
Mag Field (gauss)<br />
Figure 40 51407 Temp 160C Temp Down Cell 120C<br />
0.0045<br />
0.004<br />
0.0035<br />
Rotation Vs Mag Field<br />
y = 6.548E-05x - 8.825E-05<br />
R 2 = 9.998E-01<br />
y = 6.450E-05x - 3.642E-05<br />
R 2 = 9.995E-01<br />
Rotation (rad)<br />
0.003<br />
0.0025<br />
0.002<br />
0.0015<br />
0.001<br />
0.0005<br />
0<br />
0 10 20 30 40 50 60 70<br />
Mag Field (gauss)<br />
Up<br />
Down<br />
Linear (Up)<br />
Linear (Down)<br />
Figure 41 51407 Temp 150C Temp Down Cell 120C
30<br />
Cells 120A and 120B show some signs <strong>of</strong> hysteresis do to changes in magnetic field.<br />
These cells were the first to be measured, and the frailties <strong>of</strong> the system were not<br />
completely understood at this point. It is believed that this apparent hysteresis may have<br />
been a result <strong>of</strong> laser power fluctuations causing the lasing line to vary slightly. The laser<br />
was believed to be more stable while measuring cell 120C which showed no sign <strong>of</strong><br />
hysteresis. It has been determined through error analysis that for most <strong>of</strong> the<br />
measurements in this report, the error is dominated by frequency shifting, and not slope<br />
variations. However, the contributions to error from the frequency detuning, and the<br />
slope variations are both included in the error bars on the final [Rb] plots. Further tests<br />
are required to verify that there indeed was no hysteresis in cells 120A and 120B.<br />
A comparison <strong>of</strong> the measured Rb vapor density and the Killian curve was made for<br />
each <strong>of</strong> the cells. These are shown in the following three figures. Each temperature has<br />
four data points. The four data points correspond to ramping the magnetic field up,<br />
ramping the magnetic field down, ramping the temperature up, and ramping the<br />
temperature down.<br />
Rb Vapor Density Vs Temperature Cell 120A<br />
1.2E+15<br />
Rb Vapor Density<br />
1E+15<br />
8E+14<br />
6E+14<br />
4E+14<br />
2E+14<br />
Killian Curve<br />
Temp Up, Mag Field Up<br />
Temp Up, Mag Field Down<br />
Temp Down, Mag Field Up<br />
Temp Down, Mag Field<br />
Down<br />
0<br />
130 150 170 190 210<br />
Temp (C)<br />
Figure 42 50707 Rb Vapor Density Cell 120A
31<br />
Rb Vapor Density Vs Temperature Cell 120B<br />
1.2E+15<br />
Rb Vapor Density<br />
1E+15<br />
8E+14<br />
6E+14<br />
4E+14<br />
2E+14<br />
Killian Curve<br />
Temp Up, Mag Field Up<br />
Temp Up, Mag Field Down<br />
Temp Down, Mag Field Up<br />
Temp Down, Mag Field<br />
Down<br />
0<br />
130 150 170 190 210<br />
Temp (C)<br />
Figure 43 51107 Rb Vapor Density Cell 120B<br />
Rb Vapor Density Vs Temperature Cell 120C<br />
1.2E+15<br />
Rb Vapor Density<br />
1E+15<br />
8E+14<br />
6E+14<br />
4E+14<br />
2E+14<br />
Killian Curve<br />
Temp Up, Mag Field Up<br />
Temp Up, Mag Field Down<br />
Temp Down, Mag Field Up<br />
Temp Down, Mag Field<br />
Down<br />
0<br />
130 150 170 190 210<br />
Temp (C)<br />
Figure 44 51407 Rb Vapor Density Cell 120C<br />
All three cells showed the same trend <strong>of</strong> starting at the Killian curve for lower<br />
temperatures, and then deviating from the curve for higher temperatures. All three cells<br />
also deviated to the lower side <strong>of</strong> the Killian curve with cell 120B deviating the most at
32<br />
190º C. Cell 120B was also the cell that absorbed the most light, therefore the increased<br />
deviation from the Killian curve may have been partially caused by low laser power.<br />
A plot from Ryan’s report is included in Figure 45 to show the improvement the PEM<br />
made for measuring the slope <strong>of</strong> rotation versus magnetic field.<br />
Figure 45 Plot from old instrument illustrating variance in the slope.<br />
The plot shows much more deviation in the data points than those taken using the PEM.<br />
It is important to note that there are three points <strong>of</strong> introduction <strong>of</strong> error into the final<br />
[Rb] equation, the slope, the length <strong>of</strong> the cell, and the detuning. In this study, the length<br />
<strong>of</strong> the cell was not found to contribute a significant portion <strong>of</strong> the error and was not<br />
included in the analysis. Ryan reported a final error <strong>of</strong> ~10%. However, he also used a<br />
detuning variance <strong>of</strong> 0.01nm which results in ~4% error. This indicates from equation 9<br />
that ~9% <strong>of</strong> his error came from the slope. Where the S term is the percent <strong>of</strong> slope error,<br />
and the q term is the percent <strong>of</strong> detuning error.<br />
δ N<br />
N<br />
=<br />
⎛<br />
⎜<br />
⎝<br />
δ S<br />
S<br />
⎞<br />
⎟<br />
⎠<br />
2<br />
+<br />
⎛<br />
⎜<br />
⎝<br />
2<br />
δ q ⎞<br />
⎟<br />
q ⎠<br />
eq. 9<br />
Being that the cursor resolution on the spectrometer is 0.04 nm, it is in my opinion that<br />
0.01 nm is not a sufficient detuning variance. Therefore 0.02 nm or 8% error was chosen<br />
for the detuning variance for this error analysis. In this report, typical total errors for the
33<br />
rubidium vapor density were ~8% to 9%. This is not much better than 10%, however,<br />
very little portion <strong>of</strong> the total error came from the slope measurements. Most <strong>of</strong> the total<br />
error comes from detuning which is estimated to be higher in this report than in Ryan’s.<br />
This shows that the error coming from the slope has been significantly reduced by adding<br />
a PEM and lock-in amplifier to the instrument.<br />
For all the measurements made in this report, a polarizer was placed directly after the<br />
laser. This was to ensure that all the laser light was vertically polarized. After the series<br />
<strong>of</strong> measurements was taken for this report, the polarizer was removed. Taking additional<br />
measurements showed that the error introduced by not having the polarizer in the setup<br />
was small compared to the error from the laser detuning. In fact, most <strong>of</strong> the error comes<br />
from laser instability. Laser instability is particularly noticeable when making the<br />
summed photo detector measurement. The voltage would change by about 10% very<br />
erratically. This can be fixed by ensuring the photo detectors are properly aligned, by<br />
adjusting the current on the laser power supply, and by adjusting the top knob on the<br />
ECDL shown in figure 3. To keep from damaging the polarizer used in the set up, a<br />
relatively modest laser current <strong>of</strong> about 38.7 mA was used. It might be advantageous to<br />
increase the laser power, especially in the case <strong>of</strong> cell 120B where so much <strong>of</strong> the light<br />
was absorbed.<br />
IV.<br />
CONCLUSION<br />
Rubidium vapor density measurements were successfully made using the photoelastic<br />
modulator and lock-in amplifier. The strong linearity <strong>of</strong> rotation as a function <strong>of</strong><br />
magnetic field, especially for cell 120C, indicate that the employment <strong>of</strong> the PEM and<br />
lock-in amplifier have significantly increased the sensitivity, and reduced the error when<br />
compared to the previous setup. When compared to the Killian curve, the measured Rb<br />
vapor densities tend to follow the general form <strong>of</strong> the curve, with increasing deviation for<br />
higher temperatures. Unfortunately, because <strong>of</strong> time constraints, long term<br />
measurements were not feasible for this study.<br />
Comparing the cells against each other indicate some variation from each other. Cell<br />
120C deviated from the curve faster than the other two. Cell 120C also absorbed the<br />
least amount <strong>of</strong> light which may be correlated to the increased deviation. The variation in
34<br />
cells indicates the necessity to be able to character each cell individually instead <strong>of</strong><br />
relying on the Killian formula.<br />
There was some slight hysteresis observed for cells 120A and 120B for variations in<br />
the magnetic field. Because cells 120A and 120B were the first to be measured, it is not<br />
clear if some <strong>of</strong> the apparent hysteresis was due more to inexperience in running the<br />
instrument, or was characteristic <strong>of</strong> the actual cells themselves. Further testing is<br />
recommended to verify this. Except in the most extreme cases, the error in the slope is<br />
dominated by detuning error. Therefore hysteresis due to changing magnetic fields, have<br />
negligible impact on the final Rb vapor density measurement. Hysteresis due to varying<br />
the temperature also appears to be negligible. Except for some outliers, the cause <strong>of</strong><br />
which is believed not to be hysteresis, all the points for a given temperature agree with<br />
each other within experimental error.
35<br />
APPENDIX A:<br />
OPERATIONS MANUAL<br />
This operations manual does not cover the operations <strong>of</strong> the entire instrument.<br />
Rather, it only covers the operations <strong>of</strong> additions made to the instrument that Ryan May<br />
already made. For operations regarding the ECDL and the temperature controller for the<br />
ECDL refer to Ryan May’s project report.<br />
1. Using the Quarter Waveplate<br />
With only the components shown in Figure 46, confirmation <strong>of</strong> best circular polarized<br />
light can be obtained by following the procedures listed below.<br />
PDB<br />
Glass Pick<strong>of</strong>f<br />
Plate<br />
Half Wave<br />
Plate<br />
Laser<br />
PDA<br />
Quarter Wave<br />
Plate<br />
PBC<br />
Figure 46 Setup used for producing best circular polarized light.<br />
1. Rotate the quarter waveplate, so both the fast and slow axis are oriented 45º with<br />
respect to the laser beam polarization. Either the fast or slow axis on the quarter<br />
waveplate corresponds very closely to zero degrees on the rotation stage.<br />
2. The quarter waveplate should be mounted on a post that is inline with either the<br />
fast or slow axis.<br />
3. Plug the outputs <strong>of</strong> PDA and PDB into an oscilloscope. Make sure both channels<br />
are on the same scale.<br />
4. With the laser on, adjust the position <strong>of</strong> the photodiode detectors PDA and PDB<br />
so their signal is maximized.<br />
5. Rotate the half waveplate and observe the fluctuations in the two signals on the<br />
scope.<br />
6. Adjust the quarter waveplate to minimize these fluctuations as the half waveplate<br />
is rotated.
36<br />
7. Now, minimize fluctuations more by making slight rotations <strong>of</strong> the quarter<br />
waveplate about the post that it is mounted on. This causes the optical path length<br />
<strong>of</strong> either the fast or slow axis that is perpendicular to the post to be lengthened,<br />
while not affecting the other axis that is inline with the post. If the fluctuations<br />
only get worse, try rotating the quarter waveplate by 90º so the fast and slow axis<br />
have swapped positions, and repeat the above procedure.<br />
8. Continue to make slight adjustments to the rotation <strong>of</strong> the quarter waveplate about<br />
the laser beam, and about the mounting post until the fluctuations <strong>of</strong> the signals as<br />
a function <strong>of</strong> half waveplate being rotated have been minimized. The system is<br />
now adjusted to produce the best circular polarized light. Most <strong>of</strong> the remaining<br />
signal fluctuation is due to error in the half waveplate.<br />
2. Using the PEM<br />
Introduce the PEM into the system immediately after the quarter waveplate. The<br />
PEM causes the laser beam to be shifted vertically by about 1 cm. Therefore<br />
readjustment <strong>of</strong> the downstream optics is necessary.<br />
Figure 47 The PEM driver, electrical head, and the optical head.<br />
Operation <strong>of</strong> the PEM<br />
1. Warning, do not turn on the PEM unless the optical head and the<br />
electrical head are connect with the interconnect cable. Serious damage<br />
may result.<br />
2. Turn the power on with the power button located on the front bottom left<br />
corner <strong>of</strong> the PEM controller.<br />
3. The wavelength adjustment (WAV) is automatically highlighted. To highlight<br />
the depth <strong>of</strong> retardation adjustment (RTD), simply push the blue down button<br />
located on the right front face <strong>of</strong> the PEM controller.<br />
4. With WAV highlighted, the wavelength can be adjusted by pressing enter.
37<br />
5. Now that the number is highlighted. Simply enter in the desired wavelength<br />
using the numbered keys followed by enter.<br />
6. To adjust the depth <strong>of</strong> retardation, follow the same procedure.<br />
3. Using the Lock-in Amplifier<br />
The lock-in amplifier used was a Princeton Applied Research model 186A Synchro-<br />
Het lock-in amplifier. With the input A-B option selected, the lock-in amplifier takes the<br />
difference <strong>of</strong> the two input signals, and then multiplies that signal with the reference<br />
signal. The output is a DC signal that corresponds to the amplitude <strong>of</strong> the difference <strong>of</strong><br />
the two input signals.<br />
Figure 48 Lock-in amplifier used on this instrument.<br />
Because the input signal is oscillating at 50 kHz, the input lowpass filter is set to max<br />
which is 100 kHz. Because the reference signal out <strong>of</strong> the PEM is 1f, the 1f reference<br />
signal mode is selected on the lock-in amplifier. The correct sensitivity was chosen<br />
by choosing one that used the biggest portion <strong>of</strong> the scale, without pegging the<br />
needle, for a Faraday rotation measurement. There are three scales the needle can be<br />
read from, depending on the sensitivity setting used. A typical sensitivity setting used<br />
was 20 mV. For this setting, the scale that goes up to 2 was used. The output time<br />
constant determines how much the needle fluctuates. Lower time constants allow the<br />
needle to fluctuate more rapidly. Typical time constants used were 0.3 and 1 second<br />
time constants. The phase adjusts the phase between the input and reference signals.<br />
It can be adjusted by 90º increments using the buttons, or continuously by turning the
38<br />
phase knob. The output <strong>of</strong>fset can be useful if you wish to adjust the starting point<br />
for the output needle. Be aware that the phase can only be checked with the output<br />
<strong>of</strong>fset turned <strong>of</strong>f. The dynamic reserve used was always 3k.<br />
4. Magnetic Coils<br />
The magnetic coils were each individually calibrated by measuring the magnetic field<br />
with a Hall effect probe, and comparing that to a voltage measured across a power<br />
resistor through which all <strong>of</strong> the coil current ran. Attached to the front <strong>of</strong> the cart where<br />
all the power supplies are located are three equations that relate magnetic field to the<br />
voltage measured across a power resistor for each set <strong>of</strong> coils. The shim coils use a dual<br />
power supply indicated in Figure 49.<br />
Three equations relating<br />
field and voltage.<br />
Dual power supply<br />
used by shim coils.<br />
Main field power supplies.<br />
Figure 49 Power supplies used by magnetic field coils. Also shown is the laser<br />
temperature controller.<br />
To properly adjust the shim coils for zero field, simply solve the appropriate equation<br />
for V(0). Then connect the magnetic field output voltage to the DVM located on the<br />
instrument cart as shown in Figure 50. Switch the selector switch to the correct coil, and<br />
adjust the current on the correct power supply until a voltage output is displayed that<br />
corresponds to zero field for that coil. Do this for each <strong>of</strong> the shim coils.
39<br />
DVM<br />
Magnetic Field<br />
Output Voltage<br />
Figure 50 DVM and coil selector switch used to measure the magnetic field<br />
contribution for each <strong>of</strong> the three coils.<br />
Adjusting the main field coils is the same as adjusting the shim coils except that there are<br />
two power supplies involved. The two power supplies are connected in a master/slave<br />
configuration with the master on top. To adjust the main field, turn both power supplies<br />
on. All the knobs on the slave power supply should be turned completely clockwise so<br />
both the voltage and current settings are maximum. The voltage knobs on the master<br />
power supply should also be set to their maximum position. The current control knob on<br />
the master power supply is then used to adjust the current output <strong>of</strong> both power supplies.<br />
When zero magnetic field is required, it is necessary to completely turn <strong>of</strong>f both <strong>of</strong> the<br />
power supplies used for the main field coils. When the power supply is left on with the<br />
current turned all the way down, there is still a small current that results in Faraday<br />
rotation.<br />
5. Making Measurements<br />
Measurements can be made by following the list <strong>of</strong> instructions below.<br />
1. Set the oven to the desired temperature and let it stabilize. Once it is stable, it<br />
should fluctuate by only ±0.3º C.<br />
2. Turn on the shim coils, and verify with the DVM that they are adjusted to<br />
result in zero field in the oven space.<br />
3. Turn the laser on.<br />
4. Use the Ocean Optics spectrometer to measure the real time lasing<br />
wavelength. Adjust the ECDL if necessary.<br />
5. Plug the output from photodetectors into the oscilloscope.
6. After all the optical elements are in place, including the oven and cell, adjust<br />
the photodetector positions to produce a maximum signal.<br />
7. Turn on the PEM.<br />
8. Plug the output from the photodetectors into the lock-in amplifier.<br />
9. Switch between 0º and 90º, and adjust the phase knob so one <strong>of</strong> the positions<br />
(either 0º or 90º) gives zero signal. This means that the entire signal is on the<br />
other position or channel. Go to the channel with the entire signal.<br />
10. With the main field power supplies turned <strong>of</strong>f, rotate the half waveplate until<br />
the signal on the lock-in amplifier reads zero.<br />
11. Open up the Excel file labeled RbDensityTemplate3.xls, and select the tab<br />
that corresponds to the correct temperature.<br />
12. All the columns with bold inputs require user input, all the other columns are<br />
either constants or outputs, and do not need to be changed.<br />
13. Plug the output from the photodiode detectors into the summer and plug the<br />
output from the summer into the oscilloscope.<br />
14. Enter the summed voltage into the Vdc column overwriting the existing data.<br />
15. Plug the photodetector outputs back into the lock-in amplifier.<br />
16. Set the magnetic field selector switch to observe the main field.<br />
17. Turn the main field power supplies on and adjust the current so the DVM<br />
reads ~400 mV. Input the exact voltage into the VB column.<br />
18. Read <strong>of</strong>f the voltage on the lock-in amplifier, and input this value into the<br />
column labeled Vfr.<br />
19. Repeat steps 17 and 18, incrementing the magnetic field voltage by 200 mV<br />
each time, until a maximum <strong>of</strong> 1.800 V is reached.<br />
20. When finished, Excel will output a [Rb] vapor density point.<br />
21. Columns “B” and “V” are uncertainties or variance in the signal from the<br />
lock-in amplifier, and the Ocean Optics spectrometer respectively. They are<br />
used in the error calculations.<br />
22. Repeat steps 1-21 for each temperature.<br />
40
41<br />
REFERENCES<br />
[1] E. Hecht. Optics, 4 th ed. Addison-Wesley, Reading, MA, 2002.<br />
[2] R. May, <strong>Instrumentation</strong> <strong>Project</strong> <strong>Final</strong> <strong>Report</strong>, University <strong>of</strong> Utah, Utah, 2006.<br />
[3] R. A. Serway, J. W. Jewett, <strong>Physics</strong> for Scientists and Engineers, 6 th ed. Thomson<br />
Brooks/Cole, 2004<br />
[4] PEM100 User’s Manual, Hinds Instruments, 2006.<br />
[5] K. C. Hewitt, <strong>Department</strong> <strong>of</strong> <strong>Physics</strong> and Atmospheric Science, Phys3540 Lecture,<br />
Dalhousie University, Halifax, Nova Scotia 2002.<br />
[6] I. A. Nelson, Thesis, University <strong>of</strong> Wisconsin-Madison, 2001.<br />
[7] T. J. Killian. Thermionic phenomena caused by vapors <strong>of</strong> rubidium and potassium.<br />
Physical Review, 27:578-587, 1926.<br />
[8] B. Chann, E. Babcock, L. W. Anderson, T. G. Walker. Measurements <strong>of</strong> 3 He spinexchange<br />
rates. Physical Review A, 66:032703, 2002.