KPL Keypad - Russound
KPL Keypad - Russound
KPL Keypad - Russound

Create successful ePaper yourself
Turn your PDF publications into a flip-book with our unique Google optimized e-Paper software.
Press<br />
Volume Up<br />
or Down<br />
buttons to<br />
adjust<br />
setting<br />
Source<br />
Press and<br />
hold Source<br />
button to<br />
enter or exit<br />
User Options<br />
Menu<br />
<strong>KPL</strong> Diagnostics Menu<br />
The Diagnostics Menu allows the installer to run a diagnostic<br />
check on the <strong>KPL</strong> and to verify the firmware version.<br />
To access the Diagnostics Menu, press and hold the Setup<br />
button on the right side of the keypad until “Diags” appears<br />
Press and<br />
Hold<br />
Setup Button<br />
DIAGNOSTICS<br />
SOURCE<br />
CONTROLLR<br />
ID<br />
on the display. The menus are outlined in the diagram<br />
below.<br />
When finished, press and release the Setup button again.<br />
<strong>KPL</strong> Diagnostics Menu<br />
PORT ID<br />
KEYPAD ID<br />
SOURCE SOURCE SOURCE<br />
VERSION<br />
SOURCE<br />
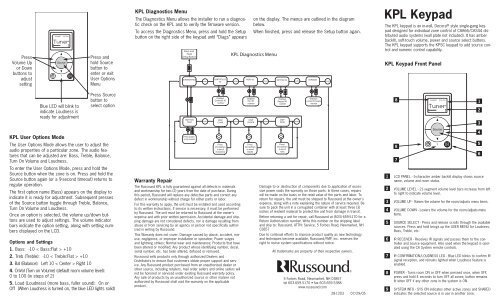
<strong>KPL</strong> <strong>Keypad</strong><br />
The <strong>KPL</strong> keypad is an in-wall, Decora ® style single-gang keypad<br />
designed for individual zone control of CAA66/CAS44 distributed<br />
audio systems (wall plate not included). It has amber<br />
backlit, soft-touch volume, power and source select buttons.<br />
The <strong>KPL</strong> keypad supports the KPSC keypad to add source control<br />
and numeric control capability.<br />
<strong>KPL</strong> <strong>Keypad</strong> Front Panel<br />
Blue LED will blink to<br />
indicate Loudness is<br />
ready for adjustment<br />
Press Source<br />
button to<br />
select option<br />
BUTTON<br />
TEST<br />
SOURCE<br />
Displays<br />
Controller ID<br />
number<br />
DISP<br />
CHAR<br />
SOURCE<br />
Displays<br />
Port ID<br />
number<br />
DISP<br />
BLOCK<br />
SOURCE<br />
Displays<br />
<strong>Keypad</strong> ID<br />
number<br />
DISP<br />
ROW<br />
SOURCE<br />
Displays<br />
current firmware<br />
version<br />
8<br />
1<br />
2<br />
3<br />
<strong>KPL</strong> User Options Mode<br />
The User Options Mode allows the user to adjust the<br />
audio properties of a particular zone. The audio features<br />
that can be adjusted are: Bass, Treble, Balance,<br />
Turn On Volume and Loudness.<br />
To enter the User Options Mode, press and hold the<br />
Source button when the zone is on. Press and hold the<br />
Source button again (or a 9-second timeout) returns to<br />
regular operation.<br />
The first option name (Bass) appears on the display to<br />
indicate it is ready for adjustment. Subsequent presses<br />
of the Source button toggle through Treble, Balance,<br />
Turn On Volume and Loudness.<br />
Once an option is selected, the volume up/down buttons<br />
are used to adjust settings. The volume indicator<br />
bars indicate the option setting, along with setting numbers<br />
displayed on the LCD.<br />
Options and Settings<br />
1. Bass: -10 < Bass:Flat > +10<br />
2. Treb (Treble): -10 < Treble:Flat > +10<br />
3. Bal (Balance): Left 10 < Center > Right 10<br />
4. OnVol (Turn on Volume) (default room volume level):<br />
0 to 100 (in steps of 2)<br />
5. Loud (Loudness) (more bass, fuller sound): On or<br />
Off (When Loudness is turned on, the blue LED lights solid)<br />
Warranty Repair<br />
Press button<br />
to be tested<br />
Press<br />
Vol Up/Dwn<br />
to scroll<br />
characters<br />
The <strong>Russound</strong> <strong>KPL</strong> is fully guaranteed against all defects in materials<br />
and workmanship for two (2) years from the date of purchase. During<br />
this period, <strong>Russound</strong> will replace any defective parts and correct any<br />
defect in workmanship without charge for either parts or labor.<br />
For this warranty to apply, the unit must be installed and used according<br />
to its written instructions. If service is necessary, it must be performed<br />
by <strong>Russound</strong>. The unit must be returned to <strong>Russound</strong> at the owner's<br />
expense and with prior written permission. Accidental damage and shipping<br />
damage are not considered defects, nor is damage resulting from<br />
abuse or from servicing by an agency or person not specifically authorized<br />
in writing by <strong>Russound</strong>.<br />
This Warranty does not cover: Damage caused by abuse, accident, misuse,<br />
negligence, or improper installation or operation; Power surges<br />
and lightning strikes; Normal wear and maintenance; Products that have<br />
been altered or modified; Any product whose identifying number, decal,<br />
serial number, etc. has been altered, defaced or removed.<br />
<strong>Russound</strong> sells products only through authorized Dealers and<br />
Distributors to ensure that customers obtain proper support and service.<br />
Any <strong>Russound</strong> product purchased from an unauthorized dealer or<br />
other source, including retailers, mail order sellers and online sellers will<br />
not be honored or serviced under existing <strong>Russound</strong> warranty policy.<br />
Any sale of products by an unauthorized source or other manner not<br />
authorized by <strong>Russound</strong> shall void the warranty on the applicable<br />
product.<br />
Press<br />
Vol Up/Dwn<br />
to scroll<br />
blocks<br />
Press<br />
Vol Up/Dwn<br />
to scroll<br />
rows<br />
Damage to or destruction of components due to application of excessive<br />
power voids the warranty on those parts. In these cases, repairs<br />
will be made on the basis or the retail value of the parts and labor. To<br />
return for repairs, the unit must be shipped to <strong>Russound</strong> at the owner's<br />
expense, along with a note explaining the nature of service required. Be<br />
sure to pack the unit in a corrugated container with at least three (3)<br />
inches of resilient material to protect the unit from damage in transit.<br />
Before returning a unit for repair, call <strong>Russound</strong> at (603) 659-5170 for a<br />
Return Authorization number. Write this number on the shipping label<br />
and ship to: <strong>Russound</strong>, ATTN: Service, 5 Forbes Road, Newmarket, NH<br />
03857<br />
Due to continual efforts to improve product quality as new technology<br />
and techniques become available, <strong>Russound</strong>/FMP, Inc. reserves the<br />
right to revise system specifications without notice.<br />
All trademarks are property of their respective owners.<br />
5 Forbes Road, Newmarket, NH 03857<br />
tel 603.659.5170 • fax 603.659.5388<br />
www.russound.com<br />
28-1203 07/29/05<br />
1<br />
2<br />
3<br />
4<br />
5<br />
6<br />
7<br />
8<br />
9<br />
8<br />
7<br />
Source<br />
LCD PANEL - 5-character amber backlit display shows source<br />
name, volume and room status.<br />
VOLUME LEVEL - 21-segment volume level bars increase from left<br />
to right to indicate volume level.<br />
VOLUME UP - Raises the volume for the room/adjusts menu items.<br />
VOLUME DOWN - Lowers the volume for the room/adjusts menu<br />
items.<br />
SOURCE SELECT - Press and release scrolls through the available<br />
sources. Press and hold brings up the USER MENU for Loudness,<br />
Bass, Treble, etc.<br />
IR RECEIVER - Receives IR signals and passes them to the controller<br />
and source equipment. Also used when the keypad is operated<br />
using the CA System remote controls.<br />
IR CONFIRMATION/LOUDNESS LED - Blue LED blinks to confirm IR<br />
signal reception, and remains lighted when Loudness feature is<br />
enabled.<br />
POWER - Turns room ON or OFF when pressed once, when OFF,<br />
press and hold 4 seconds to turn OFF all zones; button remains<br />
lit when OFF if any other zone in the system is ON.<br />
SYSTEM INFO - SYS ON indicates other active zones and SHARED<br />
indicates the selected source is in use in another zone.<br />
4<br />
5<br />
6
<strong>KPL</strong> Side Panel<br />
<strong>KPL</strong> Back Panel<br />
<strong>KPL</strong> <strong>Keypad</strong> to CA Controller Connection<br />
Safety Instructions<br />
The <strong>KPL</strong> setup button and KPSC 12-pin header are located on<br />
the right side of the keypad (when facing front). These are<br />
covered when a trim plate is installed.<br />
1<br />
2<br />
3<br />
OS UPDATE/RUN JUMPER -The pins are jumpered only<br />
when performing an OS update on the keypad, and<br />
removed during normal operation.<br />
SETUP BUTTON - Activates information and update menus<br />
for the keypad.<br />
KPSC PORT - 12-pin header for connecting to KPSC keypad.<br />
4<br />
Source<br />
<strong>KPL</strong> Front View<br />
1<br />
2<br />
3<br />
The <strong>KPL</strong> keypad uses a 110-<br />
punchdown terminal on the<br />
back panel to provide a simple<br />
installation and strong connection<br />
for CAT-5 cable’s eight conductors.<br />
Punchdown terminals<br />
require the use of a punchdown<br />
tool. Attach the CAT-5 cable to<br />
the 110-punchdown terminal on<br />
the <strong>KPL</strong> keypad as shown,<br />
matching the conductor colors<br />
to the connection color guide.<br />
The keypad will not operate<br />
properly if the terminations<br />
deviate from the required connection<br />
order.<br />
Take care when using an impact<br />
110 punchdown tool, as this may<br />
overspread the contact points.<br />
Be sure to use the lowest setting.<br />
Use of the impact tool may propel<br />
stray bits of wire and jacket<br />
into the keypad’s chassis and<br />
possibly cause a short in the circuitry.<br />
Gently shake or blow air<br />
through the keypad chassis to<br />
remove stray wire before the keypad<br />
is installed in the junction box.<br />
<strong>Keypad</strong> Installation<br />
CAT-5 to <strong>KPL</strong><br />
Connection<br />
1. Check whether or not you can route the wire to the location<br />
you have chosen.<br />
2. To install a single-gang keypad, you will need to use a<br />
UL/CSA approved plastic single-gang (18 ci) electrical box.<br />
3. Route CAT-5 wire to the junction box from the CA system<br />
controller.<br />
4. Use a 110 punchdown tool to connect each wire to its<br />
corresponding color labeled on the punchdown terminal.<br />
5. Mount the keypad in the electrical box and attach the trim<br />
plate.<br />
Each keypad connects to a <strong>Keypad</strong> Port on the back of the<br />
controller (CAA66 controller shown below). Connections are<br />
made using CAT-5 cable with an RJ45 connector (wiring<br />
scheme shown below).<br />
An SA-ZX3 <strong>Keypad</strong> Splitter can be used to add additional<br />
keypads to each zone.<br />
CAT-5 Cable<br />
CAT-5 Cable<br />
Source<br />
SA-ZX3<br />
Source<br />
<strong>KPL</strong><br />
Source<br />
<strong>KPL</strong><br />
Source<br />
<strong>KPL</strong><br />
1. Read Instructions - All the safety and operating instructions should be<br />
read before the appliance is operated.<br />
2. Retain Instructions - The safety and operating instructions should be<br />
retained for future reference.<br />
3. Heed Warnings - All warnings on the appliance in the operating<br />
instructions should be adhered to.<br />
4. Follow Instructions - All operating and user instructions should be followed.<br />
5. Water and Moisture - The appliance should not be used near water;<br />
for example, near a bathtub, washbowl, kitchen sink, laundry tub, in a<br />
wet basement, or near a swimming pool.<br />
6. Wall Mounting - The appliance should be mounted to a wall only as<br />
recommended by the manufacturer.<br />
7. Ventilation - The appliance should be situated so that its location or<br />
position does not interfere with its proper ventilation. For example,<br />
the appliance should not be situated on a bed, sofa, rug, or similar<br />
surface that may block the ventilation openings, or placed in a built-in<br />
installation, such as a bookcase or cabinet that may impede the flow<br />
of air through the ventilation openings.<br />
8. Heat - The appliance should be situated away from heat sources such<br />
as radiators, heat registers, stoves, or other appliances (including<br />
amplifiers) that produce heat.<br />
9. Power Sources - The appliance should be connected to a power supply<br />
only of the type described in the operating instructions or as<br />
marked on the appliance.<br />
10.Grounding or Polarization - Precaution should be taken so that the<br />
grounding or polarization means of an appliance is not defeated.<br />
11.Object and Liquid Entry - Care should be taken so that objects do not<br />
fall and liquids are not spilled into the enclosure through the openings.<br />
12.Damage Requiring Service - The appliance should be serviced by<br />
qualified service personnel when:<br />
A. Objects have fallen, liquid has been spilled into the appliance;<br />
or<br />
B. The appliance has been exposed to rain; or<br />
C. The appliance does not appear to operate normally; or<br />
4<br />
<strong>KPL</strong><br />
D. The appliance has been dropped or the enclosure is damaged.<br />
13.Servicing - The user should not attempt to service the appliance<br />
beyond that described in the operating instructions. All other servicing<br />
should be referred to qualified service personnel.<br />
4<br />
<strong>KPL</strong> Top View<br />
OS UPDATE PORT - Used to update the <strong>KPL</strong> keypad<br />
operating system firmware. If an update is released, it<br />
will be available online through the Document Center on<br />
www.russound.com. Look in the “Firmware and<br />
Downloads” section under Multi-Zone product type. The<br />
Advanced Programming Cable is available from<br />
<strong>Russound</strong>, Part #2500-521065.<br />
Source<br />
Technical Specifications<br />
Dimensions: 1.875"W x 2.7"D x 1.47"H<br />
(4.7 x 6.9 x 3.7 cm)<br />
Fits 1 Gang UL/CSA Approved 18 ci<br />
Junction Box<br />
Weight: 4.5 oz. (127.6 g)<br />
Power Requirements: 12 VDC 180mA<br />
CAT-5 Connection:<br />
110 punchdown<br />
Precautions:<br />
1. Power – WARNING: BEFORE TURNING ON THE POWER FOR THE<br />
FIRST TIME, READ THE FOLLOWING SECTION CAREFULLY.<br />
2. Do Not Touch The Unit With Wet Hands – Do not handle the unit when<br />
your hands are wet or damp. If water or any other liquid enters the<br />
unit’s cabinet, take it to a qualified service person for inspection.<br />
3. Care – From time to time you should wipe off the front panel of the<br />
cabinet with a soft cloth. Do not use rough material, thinners, alcohol<br />
or other chemical solvents or cloths since this may damage the finish<br />
or remove the panel lettering.<br />
Electrical Box <strong>KPL</strong> <strong>Keypad</strong> Back Plate Trim Plate