
You also want an ePaper? Increase the reach of your titles
YUMPU automatically turns print PDFs into web optimized ePapers that Google loves.
18<br />
:: Tuning Tips<br />
Tips for Beginners:<br />
Before making any changes to the standard setup, make sure you can get around the track without crashing. Changes<br />
to your vehicle will not be beneficial if you can’t stay on the track. Your goal is consistent laps.<br />
Once you can get around the track consistently, start tuning your vehicle. Make only ONE adjustment at a time, testing<br />
it before making another change. If the result of your adjustment is a faster lap, mark the change on the included setup<br />
sheet (make adddtional copies of the sheet before writing on it). If your adjustment results in a slower lap, revert back to<br />
the previous setup and try another change.<br />
When you are satisfied with your vehicle, fill in the setup sheet thoroughly and file it away. Use this as a guide for future<br />
track days or conditions.<br />
Peridicaly check all moving suspension parts. Suspension components must be kept clean and move freely without<br />
binding to prevent poor and/or inconsistent handling.<br />
Motor Gearing:<br />
Proper motor gearing will result in maximum performance and run time while reducing the chance of overheating and<br />
premature motor failure. The gear ratio chart lists recommended starting gear ratios for the most widely used motor<br />
types. Gear ratios will vary depending upon motor brand, wind, and electronic speed control. Consult your motor and<br />
electronic speed control manufacturers for more information. Team Associated is not responsible for motor damage<br />
due to improper gearing. * These gearings are for use with advanced timing speed control settings!<br />
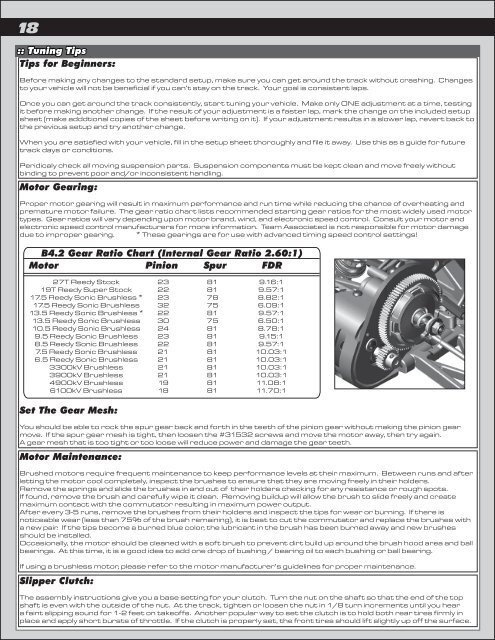
B4.2 Gear Ratio Chart (Internal Gear Ratio 2.60:1)<br />
Motor Pinion Spur FDR<br />
27T Reedy Stock<br />
19T Reedy Super Stock<br />
17.5 Reedy Sonic Brushless *<br />
17.5 Reedy Sonic Brushless<br />
13.5 Reedy Sonic Brushless *<br />
13.5 Reedy Sonic Brushless<br />
10.5 Reedy Sonic Brushless<br />
9.5 Reedy Sonic Brushless<br />
8.5 Reedy Sonic Brushless<br />
7.5 Reedy Sonic Brushless<br />
6.5 Reedy Sonic Brushless<br />
3300kV Brushless<br />
3900kV Brushless<br />
4900kV Brushless<br />
6100kV Brushless<br />
23<br />
22<br />
23<br />
32<br />
22<br />
30<br />
24<br />
23<br />
22<br />
21<br />
21<br />
21<br />
21<br />
19<br />
18<br />
81<br />
81<br />
78<br />
75<br />
81<br />
75<br />
81<br />
81<br />
81<br />
81<br />
81<br />
81<br />
81<br />
81<br />
81<br />
9.16:1<br />
9.57:1<br />
8.82:1<br />
6.09:1<br />
9.57:1<br />
6.50:1<br />
8.78:1<br />
9.15:1<br />
9.57:1<br />
10.03:1<br />
10.03:1<br />
10.03:1<br />
10.03:1<br />
11.08:1<br />
11.70:1<br />
Set The Gear Mesh:<br />
You should be able to rock the spur gear back and forth in the teeth of the pinion gear without making the pinion gear<br />
move. If the spur gear mesh is tight, then loosen the #31532 screws and move the motor away, then try again.<br />
A gear mesh that is too tight or too loose will reduce power and damage the gear teeth.<br />
Motor Maintenance:<br />
Brushed motors require frequent maintenance to keep performance levels at their maximum. Between runs and after<br />
letting the motor cool completely, inspect the brushes to ensure that they are moving freely in their holders.<br />
Remove the springs and slide the brushes in and out of their holders checking for any resistance or rough spots.<br />
If found, remove the brush and carefully wipe it clean. Removing buildup will allow the brush to slide freely and create<br />
maximum contact with the commutator resulting in maximum power output.<br />
After every 3-5 runs, remove the brushes from their holders and inspect the tips for wear or burning. If there is<br />
noticeable wear (less than 75% of the brush remaining), it is best to cut the commutator and replace the brushes with<br />
a new pair. If the tips become a burned blue color, the lubricant in the brush has been burned away and new brushes<br />
should be installed.<br />
Occasionally, the motor should be cleaned with a soft brush to prevent dirt build up around the brush hood area and ball<br />
bearings. At this time, it is a good idea to add one drop of bushing / bearing oil to each bushing or ball bearing.<br />
If using a brushless motor, please refer to the motor manufacturer’s guidelines for proper maintenance.<br />
Slipper Clutch:<br />
The assembly instructions give you a base setting for your clutch. Turn the nut on the shaft so that the end of the top<br />
shaft is even with the outside of the nut. At the track, tighten or loosen the nut in 1/8 turn increments until you hear<br />
a faint slipping sound for 1-2 feet on takeoffs. Another popular way to set the clutch is to hold both rear tires firmly in<br />
place and apply short bursts of throttle. If the clutch is properly set, the front tires should lift slightly up off the surface.