Create successful ePaper yourself
Turn your PDF publications into a flip-book with our unique Google optimized e-Paper software.
<strong>Primare</strong> V10 DVD Player User Guide<br />
i
Preface<br />
COPYRIGHT AND ACKNOWLEDGMENTS<br />
Copyright © 2000 <strong>Primare</strong> Systems AB. All rights reserved.<br />
<strong>Primare</strong> Systems AB<br />
Idavägen 17D<br />
SE-352 46 Växjö<br />
Sweden<br />
The information in this guide is believed to be correct as of the date of<br />
publication. However, our policy is one of continuous development and so the<br />
information is subject to change without notice, and does not represent a<br />
commitment on the part of <strong>Primare</strong> Systems AB.<br />
<strong>Primare</strong> is a trademark of <strong>Primare</strong> Systems AB. Manufactured under license<br />
from Dolby Laboratories Dolby, Pro Logic, and the double-D symbol are<br />
trademarks of Dolby Laboratories. Confidential Unpublished Works. Copyright<br />
1992-1997 Dolby Laboratories, Inc. All rights reserved. All other product<br />
names are trademarks or registered trademarks of their respective owners.<br />
This product incorporates copyright protection technology that is protected by<br />
method claims of certain US patents and other intellectual property rights<br />
owned by Macrovision Corporation and other rights owners. Use of this<br />
copyright protection technology must be authorized by Macrovision<br />
Corporation, and is intended for home and other limited viewing uses only<br />
unless authorized by Macrovision Corporation. Reverse engineering or<br />
disassembly is prohibited.<br />
Class 1 Laser Product<br />
The DVD player is classified as a CLASS 1 LASER product. Use of control<br />
adjustments or Performance of procedures other than those specified herein<br />
may result in hazardous radiation.<br />
CAUTION – INVISIBLE LASER RADIATION WHEN OPEN AND INTERFLOCK<br />
DEFEATED. AVOID EXPOSURE TO BEAM.<br />
FCC Warning: This equipment generates and can radiate radio frequency<br />
energy and if not installed and used correctly in accordance with our<br />
instructions may cause interference to radio communications or radio and<br />
television reception. It has been type-tested and complies with the limits set out<br />
in Subpart J, Part 15 of FCC rules for a Class B computing device. These limits<br />
are intended to provide reasonable protection against such interference in<br />
home installations.<br />
EEC: This product has been designed and type-tested to comply with the limits<br />
set out in EN55013 and EN55020.<br />
This guide was produced by Human-Computer Interface Ltd,<br />
http://www.interface.co.uk<br />
ii
Contents<br />
Introduction<br />
WELCOME TO THE V10 DVD PLAYER ............. (1<br />
USING THE V10 WITH OTHER PRIMARE<br />
PRODUCTS................................................................ (2<br />
TECHNICAL SPECIFICATION............................. (2<br />
Using the V10 DVD Player<br />
FRONT PANEL CONTROLS.................................. (3<br />
FRONT PANEL DISPLAY......................................... (4<br />
SWITCHING ON AND OFF................................ (4<br />
PLAYING A DISC .................................................... (4<br />
LOCATING A POSITION ON THE DISC........ (6<br />
Advanced use<br />
FAST FORWARD AND REVERSE PLAY.............. (7<br />
SLOW MOTION FORWARD AND<br />
REVERSE PLAY.......................................................... (7<br />
SINGLE STEPPING................................................. (8<br />
REPEATING PLAYBACK.......................................... (8<br />
DISPLAYING THE TITLE MENU........................... (9<br />
DISPLAYING SUBTITLES........................................ (9<br />
SELECTING A CHAPTER, TITLE, OR<br />
TRACK BY NUMBER............................................... {10<br />
PROGRAMMING A SELECTION OF<br />
CHAPTERS OR TRACKS ........................................ {10<br />
SAVING A PROGRAM............................................ {11<br />
ZOOMING THE PICTURE..................................... {13<br />
CHOOSING A CAMERA ANGLE....................... {13<br />
Connecting the V10 DVD Player<br />
BACK PANEL CONNECTIONS........................... {15<br />
VIDEO OUTPUTS..................................................... {16<br />
AUDIO OUTPUTS.................................................... {16<br />
CONNECTING TO THE PRIMARE P30<br />
PROCESSOR ............................................................. {16<br />
iii
Preface<br />
Configuring the V10 DVD Player<br />
USING THE SETUP MENU................................... {17<br />
CHOOSING THE DEFAULT LANGUAGES....... {18<br />
SETTING THE DEFAULT SCREEN FORMAT .... {19<br />
SETTING THE RATING LEVEL............................. {19<br />
SPECIFYING THE AUDIO OUTPUT................... {21<br />
SPECIFYING ADDITIONAL SETUP<br />
OPTIONS................................................................... {21<br />
LANGUAGE CODES............................................... {23<br />
Index<br />
iv
Introduction<br />
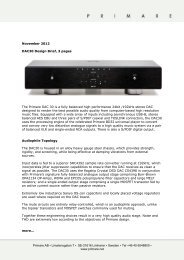
Welcome to the <strong>Primare</strong> V10 DVD Player! This chapter introduces you to its key<br />
features, and explains how you can use it to take advantage of any of the<br />
video and audio formats currently available.<br />
WELCOME TO THE V10 DVD PLAYER<br />
The V10 provides a comprehensive range of features to make it ideal as the<br />
heart of a superb home entertainment system.<br />
Enjoy DVD movies at their best<br />
The <strong>Primare</strong> V10 DVD Player will show all your favorite movies in DTS, Dolby<br />
Digital, or Dolby Pro logic surround. It supports both PAL and NTSC format,<br />
and if your television does not support both formats it can perform automatic<br />
conversion between them.<br />
Play your existing music collection and Super CDs<br />
The <strong>Primare</strong> V10 DVD Player can also play your entire CD music collection, as<br />
well as CDVs and 24/96 Super CDs. It will also play recordable CDs, as<br />
well as MP3 encoded music collections on CD-ROM.<br />
No compromise design for superb sound and picture quality<br />
The V10 DVD Player uses the best components available to ensure a troublefree<br />
operation for many years. The resulting sound quality is comparable to<br />
dedicated CD players in the same price range.<br />
Careful mechanical design for long-life<br />
As with all <strong>Primare</strong> units, the solid mechanical design further enhances the<br />
functionality and quality, and ensures that the V10 DVD Player will continue to<br />
provide trouble-free operation for years to come.<br />
Intuitive user interface<br />
In keeping with the philosophy of the <strong>Primare</strong> range of systems, the V10’s<br />
powerful range of features can be controlled through a very simple and<br />
intuitive interface, designed so that it will not distract you from the pleasure of<br />
watching movies or listening to music on your system.<br />
In fact most of the features of the V10 can be accessed through just six front<br />
panel push buttons. Alternatively the full set of functions, including menu<br />
selection and programmability, is available using the DVD remote control<br />
supplied with the V10.<br />
1
Introduction<br />
USING THE V10 WITH OTHER PRIMARE PRODUCTS<br />
TECHNICAL SPECIFICATION<br />
Although the V10 DVD Player is flexible enough to work with virtually any<br />
other equipment you have in your system, it is ideally suited for use with the<br />
<strong>Primare</strong> P30 Processor and <strong>Primare</strong> A30.5 multi-channel amplifier. The P30<br />
Processor will decode the DTS or Dolby Digital output from the V10 to<br />
provide five discrete analogue outputs, and the A30.5 provides the<br />
amplification necessary to drive the five separate loudspeakers in a surround<br />
system.<br />
Video section:<br />
Video signal systems<br />
Horizontal resolution<br />
SCART<br />
S-video Y signal<br />
C-signal<br />
Video signal-to-noise<br />
Video DAC<br />
NTSC/PAL, color<br />
> 500 lines<br />
1Vp-p, 75Ω<br />
1Vp-p, 75Ω<br />
0.286Vp-p, 75Ω<br />
-70dB<br />
10 BIT<br />
Audio section:<br />
Frequency response<br />
44.1kHz, 10Hz – 20kHz<br />
48kHz, 10Hz – 22kHz<br />
96kHz, 10Hz – 44kHz<br />
THD
Using the V10 DVD Player<br />
This chapter explains how to operate the basic functions of the V10 DVD Player,<br />
which are available using either the front panel controls or the remote control.<br />
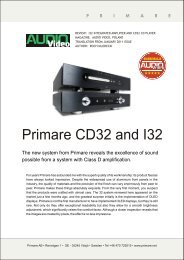
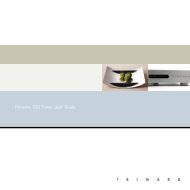
FRONT PANEL CONTROLS<br />
The simplest functions of the V10 DVD Player can be accessed using the three<br />
front panel push buttons, and information about its operation is displayed on<br />
the front panel display:<br />
]A The OPEN button opens or closes the disc tray.<br />
]B The PLAY button plays or pauses a disc.<br />
]C The STANDBY button switches the V10 to standby, or brings it out of<br />
standby.<br />
]A ]B ]C<br />
>= CHAPTER 1 2 3<br />
DVD<br />
4 5 6<br />
7 8 9<br />
10 11 12<br />
NTSC<br />
13 14 15<br />
09 53:29<br />
OPEN<br />
PLAY<br />
STANDBY<br />
V10 DISC PLAYER<br />
3
Using the V10 DVD Player<br />
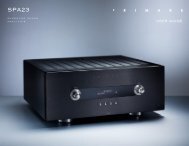
FRONT PANEL DISPLAY<br />
The following illustration shows the information on the front panel display:<br />
]A ]B<br />
DVD<br />
NTSC<br />
]H<br />
]A Disc format.<br />
]B Play mode.<br />
>= CHAPTER<br />
]C ]D ]E<br />
REPEAT<br />
ALL<br />
DOLBY<br />
DIGITAL PROGRAM<br />
09 53:29<br />
]I<br />
]C Display mode: CHAPTER OR TRACK.<br />
]D Repeat mode: REPEAT 1, ALL, or A-B.<br />
]E Audio format.<br />
]F Program mode.<br />
]G Chapters/tracks.<br />
]H Video format: PAL or NTSC.<br />
]I Currently selected chapter/track.<br />
]J Current playing time.<br />
]J<br />
]F ]G<br />
1 2 3<br />
4 5 6<br />
7 8 9<br />
10 11 12<br />
13 14 15<br />
To dim the front panel display<br />
• Press the DIM button on the DVD or C30 remote control.<br />
The display will dim to a single bar.<br />
To restore the front panel display<br />
• Press the PLAY button twice on the DVD or C30 remote control.<br />
SWITCHING ON AND OFF<br />
To switch on<br />
• Use the switch under the left-hand edge of the front panel.<br />
During normal operation you can leave the V10 switched on and in standby.<br />
To switch to standby<br />
• Press the STANDBY button on the front panel or the STBY button on the<br />
DVD or C30 remote control.<br />
PLAYING A DISC<br />
To insert a disc<br />
• Press the OPEN button on the front panel or the DVD or C30 Remote<br />
Control to open the tray.<br />
The on-screen display shows .<br />
• Place the DVD or CD in the tray. If it is a CD or a single-sided DVD the<br />
label should be uppermost.<br />
4
Using the V10 DVD Player<br />
<<br />
• Press the OPEN button again to close the tray, or gently push the front of<br />
the tray.<br />
The on-screen display shows .<br />
The disc will start playing automatically.<br />
As the disc starts playing the on-screen display identifies the type of disc as<br />
follows:<br />
Symbol<br />
Disc<br />
DVD movie.<br />
Audio CD.<br />
To stop play<br />
• Press the STOP button on the DVD or C30 Remote Control.<br />
The on-screen display shows .<br />
The DVD player remembers your current position on the disc and you can<br />
resume from the same position by pressing the PLAY button on the front panel<br />
or DVD or C30 Remote Control.<br />
The on-screen display shows<br />
To pause play<br />
• Press the PLAY button on the front panel or DVD or C30 Remote Control.<br />
Video CD.<br />
Super Video CD.<br />
The on-screen display shows<br />
PLAY button again.<br />
. You can then resume play by pressing the<br />
DTS music CD.<br />
CD-ROM containing MP3 <strong>file</strong>s.<br />
Unrecognised format or disc inserted incorrectly.<br />
To reset play<br />
• Press the STOP button twice on the DVD or C30 Remote Control.<br />
The display shows and the disc will be reset to the beginning.<br />
5
Using the V10 DVD Player<br />
LOCATING A POSITION ON THE DISC<br />
DVD movies are normally divided into chapters corresponding to scenes in the<br />
movie, and you can step between chapters to choose the scene you want to<br />
watch. Audio CDs are divided into tracks.<br />
To step between chapters on a DVD or tracks on a CD<br />
• Press the ” or ’ buttons on the DVD remote control, or the [ or ]<br />
buttons on the C30 Remote Control.<br />
The on-screen display will show or as you step, and the front panel<br />
display shows the current chapter or track number.<br />
If you step between chapters on a DVD while the disc is paused it will wait for<br />
you to press the PLAY button before playing from the chapter you have<br />
selected.<br />
6
Advanced use<br />
This chapter explains how to use the more advanced features of the V10 DVD<br />
Player which you can access from the DVD remote control.<br />
FAST FORWARD AND REVERSE PLAY<br />
You can play back DVD movies or audio CDs at 2x or 8x the normal speed in<br />
forward or reverse. This is the especially useful for locating a particular position<br />
on a disc.<br />
When playing DVDs faster than normal the sound is muted, but with audio<br />
CDs you can hear the sound to help you locate the section you want to find.<br />
To play faster than normal<br />
• Press the >> or
Advanced use<br />
SINGLE STEPPING<br />
You can step forward from a position on a DVD a frame at a time, to allow<br />
you to locate a position exactly.<br />
• Press the STEP button on the DVD remote control.<br />
If the disc is playing it will automatically be paused, and you can then keep<br />
pressing the STEP button to step forward a frame at a time.<br />
REPEATING PLAYBACK<br />
You can choose to repeatedly play back the current chapter or title of a DVD,<br />
or the current track of a CD. You can also repeatedly play back a section of a<br />
DVD or CD between two specified positions.<br />
To repeat the current title, chapter, or track<br />
• Press the REPEAT button on the DVD or C30 Remote Control.<br />
The repeat symbol in the on-screen display bar will show C (chapter):<br />
• Press the REPEAT button again to select T (title repeat), or OFF (no<br />
repeat):<br />
• Press the DISPLAY button to hide the on-screen display.<br />
The front panel display shows REPEAT 1 for chapter or track repeat, or<br />
REPEAT ALL for title or disc repeat.<br />
To repeat a specific section of a disc<br />
• Press the A-B button on the DVD remote control, or the A/B button on the<br />
C30 Remote Control, at the start of the section you want to repeat.<br />
The repeat symbol in the on-screen display bar shows A-:<br />
• Press the A-B button again at the end of the section you want to repeat.<br />
The repeat symbol in the on-screen display bar shows AB:<br />
The DVD player will then automatically return to the start of the section you<br />
have marked and play it back repeatedly.<br />
To turn off repeat<br />
• Press the REPEAT or A-B button again.<br />
The repeat symbol in the on-screen display bar shows OFF:<br />
• On an audio CD press the REPEAT button to select between the options:<br />
T (track repeat), D (disc repeat), or OFF (no repeat).<br />
8
Advanced use<br />
<<br />
DISPLAYING THE TITLE MENU<br />
Most DVD movies provide a title menu to allow you to choose between the<br />
different options provided by the disc, such as special features, extra scenes,<br />
and theatrical trailers.<br />
To display the title menu<br />
• Press the MENU or TITLE button on the DVD remote control, or the MEM<br />
button on the C30 Remote Control.<br />
• Use the arrow buttons on the DVD remote control, or the VOL V (left), VOL<br />
A (right), SEL A (up), and SEL V (down) buttons on the C30 Remote<br />
Control, to highlight an option on the title menu.<br />
• Press the SELECT button on the DVD remote control, or the MENU button<br />
on the C30 Remote Control, to select the item you have highlighted.<br />
DISPLAYING SUBTITLES<br />
DVD movies can contain audio soundtracks in up to eight languages, and<br />
subtitles in up to 32 different languages. You can choose which languages are<br />
selected by default using the SETUP menu; for more information see Using the<br />
Setup menu, page 17.<br />
To choose the subtitle language<br />
• Press the SUBTITLE button on the DVD remote control.<br />
The on-screen display bar identifies the current subtitle language as a threeletter<br />
code; for example SPA is Spanish, followed by the total number of<br />
alternative subtitle languages:<br />
To turn subtitles on or off<br />
• Press the ON/OFF button on the DVD remote control.<br />
When subtitles are turned off the on-screen display bar shows OFF:<br />
To choose the soundtrack<br />
• Press the AUDIO button on the DVD remote control to step through the<br />
alternative audio soundtracks.<br />
The on-screen display bar identifies the current soundtrack language (eg FRE is<br />
French), and recording system (Dolby DigitaL/5.1, LPCM, MPEG, or DTS).<br />
You can also turn subtitles on or off, and choose the audio and subtitle<br />
languages, while a disc is playing.<br />
9
Advanced use<br />
SELECTING A CHAPTER, TITLE, OR TRACK BY<br />
NUMBER<br />
You can play a specific chapter or title of a DVD movie, or a specific track of<br />
an audio CD, using the number buttons on the DVD remote control.<br />
To go to a specific chapter<br />
• Use the number buttons to enter the chapter number.<br />
The C symbol in the on-screen display bar shows the number you have<br />
entered. For example, to go to chapter 12 press 1, 2:<br />
• Press the SELECT button to go to the chapter you have specified.<br />
• Press the SELECT button to go to the track you have specified.<br />
PROGRAMMING A SELECTION OF CHAPTERS OR<br />
TRACKS<br />
The V10 DVD Player allows you to program your own selection of titles and<br />
chapters on a DVD movie, or tracks on an audio CD. You can then play the<br />
sequence you have programmed.<br />
To program a selection of chapters or tracks<br />
• Press the PROGRAM button on the DVD remote control.<br />
If you are programming a DVD movie the PROGRAM MENU allows you to<br />
specify a sequence of titles and chapters:<br />
To go to a specific title<br />
• Press the GOTO button, and then use the number buttons to enter the title<br />
number.<br />
• Press the SELECT button to go to the title you have specified.<br />
To go to a specific track on an audio CD<br />
• Use the number buttons to enter the number of the track you want to play.<br />
The T symbol in the on-screen display bar shows the number you have entered:<br />
10
Advanced use<br />
<<br />
If you are programming an audio CD the PROGRAM MENU allows you to<br />
specify a sequence of tracks:<br />
To change a selection<br />
• Use the ↑ and ↓ buttons to highlight it, and then press the SELECT button to<br />
edit it.<br />
• Edit the entry in the same way as for programming a new entry.<br />
To remove an entry<br />
• Use the ↑ and ↓ buttons to highlight it, and then press the CLEAR button to<br />
clear it.<br />
To play the selection you have programmed<br />
• Press the PLAY button while the PROGRAM MENU is displayed.<br />
To program an entry<br />
• Use the number buttons to enter the title or track number of the entry, and<br />
press the SELECT button to confirm your entry.<br />
• On the DVD remote control use the number buttons to enter the chapter<br />
number of the entry or press the SELECT button to play all chapters, and<br />
press the SELECT button to confirm your entry.<br />
• Press the ↓ button to highlight the next entry.<br />
• Repeat until you have specified all the chapters or tracks you want to play.<br />
You can enter a total of 20 entries. Highlight NEXT ↓ and press the SELECT<br />
button to display the second page of entries. Highlight PREVIOUS ↑ and<br />
press the SELECT button to display the previous page of entries.<br />
When you are playing a programmed selection, the program icon in the onscreen<br />
display bar shows the number of the current entry:<br />
SAVING A PROGRAM<br />
Once you have programmed a favorite selection for a disc, the V10 DVD<br />
Player allows you to save it with a name of your choice. It will then be<br />
available whenever you reinsert the same disc. You can save programs for up<br />
to 30 discs.<br />
To save the programmed selection permanently<br />
• Display the PROGRAM MENU with the program you want to save.<br />
• Press the RETURN button.<br />
11
Advanced use<br />
The DISC SETUP menu will be displayed:<br />
• Use the ↓ and ↑ buttons to change the letter you are entering, and the →<br />
button to move to the next letter:<br />
• Highlight FAVORITE COND and press the SELECT button to display the<br />
FAVORITE COND menu:<br />
• Press the SELECT button to save the program with the name you have<br />
specified.<br />
The DISC SETUP menu will show FAVORITE COND ON to indicate that<br />
the program is saved.<br />
To delete a program<br />
• Highlight CLEAR DISC ID on the DISC SETUP menu and press the<br />
SELECT button to select it.<br />
• Highlight SAVE FC and press the SELECT button to save the program.<br />
You will be prompted to enter a title for the program to identify the disc.<br />
12
Advanced use<br />
<<br />
The DELETE ID menu shows a list of the programs you have created:<br />
When the zoom function is active a cursor is displayed on the screen, with<br />
horizontal and vertical bars representing the section of the whole video image<br />
being magnified:<br />
• Use the arrow buttons to move the section you are magnifying.<br />
• Highlight the program you want to delete and press the CLEAR button to<br />
delete it.<br />
• Press the SETUP button to exit from the DELETE ID menu.<br />
ZOOMING THE PICTURE<br />
The V10 DVD Player includes a zoom function that allows you to magnify a<br />
section of the video image to either 2x or 4x normal scale.<br />
To zoom in<br />
• Press the ZOOM button on the DVD remote to step between 2x normal<br />
scale, 4x normal scale, and then revert to normal scale.<br />
You can use the ZOOM SETUP option on the CUSTOM SETUP menu to<br />
specify the default zoom settings; see To set up the zoom options, page 18.<br />
CHOOSING A CAMERA ANGLE<br />
Some DVD movies allow you to choose between one of several alternative<br />
camera angles to give you a different view of the scene.<br />
To change the camera angle<br />
• Press the ANGLE button on the DVD remote control.<br />
The camera symbol in the on-screen display bar shows the number of the<br />
camera angle you have selected, together with the total number of alternative<br />
angles:<br />
13
14<br />
> Advanced use
Connecting the V10 DVD Player<br />
This chapter explains how to connect the V10 to the other components in your<br />
system, using the connections on the back panel.<br />
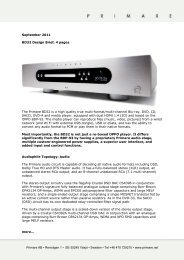
BACK PANEL CONNECTIONS<br />
]A<br />
SCART<br />
S-VIDEO<br />
RCA<br />
L<br />
R<br />
VIDEO OUT<br />
LINE OUT<br />
DIGITAL AUDIO OUT<br />
]B ]C ]D ]E ]F ]G<br />
]A RGB video output.<br />
]B S-Video output.<br />
]C RCA composite video output.<br />
]E Digital optical TOSlink output.<br />
]F Digital SPDIF output.<br />
]G Mains power input.<br />
]D Stereo phono audio output.<br />
15
Connecting the V10 DVD Player<br />
VIDEO OUTPUTS<br />
The V10 provides a choice of either SCART or S-Video outputs. If your source<br />
or monitor provides both connections we recommend using the SCART<br />
connection, as this provides higher quality.<br />
Connecting to a television or monitor<br />
• Connect the appropriate output to your television or monitor.<br />
AUDIO OUTPUTS<br />
The V10 provides three alternative audio outputs.<br />
Analogue output<br />
The analogue output provides stereo phono connections for connection to a<br />
conventional stereo preamplifier. To use these outputs you should set the<br />
AUDIO OUTPUT option on the SETUP menu to LPCM. For more<br />
information see Specifying the audio output, page 21.<br />
CONNECTING TO THE PRIMARE P30 PROCESSOR<br />
The <strong>Primare</strong> P30 Processor is an ideal digital sound processor for use with the<br />
<strong>Primare</strong> V10 DVD Player to give superb quality video and 5.1 channel digital<br />
surround.<br />
• Connect the S-Video output from the DVD player to S-Video input 1 on the<br />
P30.<br />
• Connect the digital RCA output from the DVD player to digital input 2 on<br />
the P30.<br />
• Set the AUDIO OUTPUT option on the SETUP menu to BITSTREAM.<br />
For more information see Specifying the audio output, page 21.<br />
Digital outputs<br />
The V10 DVD Player provides an optical TOSlink digital output and an SPDIF<br />
digital output for connection to a digital surround processor. To use these<br />
outputs you should set the AUDIO OUTPUT option on the SETUP menu to<br />
BITSTREAM. For more information see Specifying the audio output,<br />
page 21.<br />
16
Configuring the V10 DVD Player<br />
This chapter explains how to use the SETUP menu to configure the operation of<br />
the V10 DVD Player.<br />
USING THE SETUP MENU<br />
The SETUP menu provides a series of options which allow you to customize<br />
different aspects of the operation of the V10 DVD Player:<br />
To step between options<br />
• Press the ↑ or ↓ buttons on the DVD remote control to step between options<br />
until the one you want to change is highlighted.<br />
• Press SELECT to select the option you have highlighted.<br />
For more information about each of the options refer to the following sections.<br />
To return to the previous menu<br />
• Press the RETURN button.<br />
To exit from the SETUP menu<br />
• Press the SETUP button.<br />
To display the SETUP menu<br />
When the DVD is stopped:<br />
• Press the SETUP button on the DVD remote control.<br />
17
Configuring the V10 DVD Player<br />
CHOOSING THE DEFAULT LANGUAGES<br />
A menu of the available languages will be displayed:<br />
Most DVD movies include a selection of audio tracks, subtitles, and menu<br />
languages which you can choose between while playing a disc. The<br />
LANGUAGES menu allows you to specify which language should be<br />
selected by default for each option.<br />
To display the LANGUAGES menu<br />
• Highlight LANGUAGES on the SETUP menu and press the SELECT<br />
button:<br />
The LANGUAGES menu allows you to choose the language you want to<br />
use:<br />
• Use the ↑ and ↓ buttons to highlight the language you want to select as the<br />
default and press the SELECT button to select it.<br />
Alternatively to choose a language not on this list highlight OTHERS, use the<br />
number buttons to enter the four-digit number identifying the language you<br />
want to use, and press the select button to select it.<br />
For a full list of languages together with their codes see Language codes,<br />
page 19.<br />
• Highlight the option you want to change and press the SELECT button.<br />
The AUDIO menu provides an additional ORIGINAL option, which selects<br />
the original soundtrack language for the movie.<br />
The SUBTITLE menu provides an additional AUTO option, which<br />
automatically displays subtitles in the specified audio language if no<br />
soundtrack is available for that language.<br />
18
Configuring the V10 DVD Player<br />
<<br />
SETTING THE DEFAULT SCREEN FORMAT<br />
Some DVD movies allow you to choose between a normal or widescreen<br />
version of the movie.<br />
If you have a standard 4:3 television you also have the choice of displaying<br />
widescreen pictures cropped to fill your television screen (Pan-Scan), or with<br />
black bars above and below the picture (Letterbox).<br />
To set the default screen format<br />
• Highlight TV SCREEN on the SETUP menu and press the SELECT button.<br />
SETTING THE RATING LEVEL<br />
The V10 DVD Player allows you to set a parental lock which will prevent<br />
playback of discs whose content exceeds a specified rating level. Note that<br />
not all DVDs support this function.<br />
To set a parental lock<br />
• Highlight RATING LEVEL on the SETUP menu and press the SELECT<br />
button.<br />
The following screen prompts you to enter the parental password:<br />
The TV SCREEN menu allows you to choose the screen format you want to<br />
use:<br />
• Enter your four-digit password and press the SELECT button.<br />
• Highlight the option you want to use and press the SELECT button to<br />
select it.<br />
Initially the password is set to 7890, but you can change it to any password<br />
you choose as described in To change the password, page 20.<br />
The currently selected option is displayed in the SETUP menu.<br />
19
Configuring the V10 DVD Player<br />
The following screen then allows you to set the rating level:<br />
The following screen allows you to specify the new password:<br />
• Press ↑ and ↓ to highlight the rating level you want to set, or highlight OFF<br />
to turn the parental lock off, and press SELECT to select it.<br />
Level 1 corresponds to general viewing, level 3 is equivalent to the USA movie<br />
rating PG, and level 8 corresponds to adult viewing.<br />
The rating level you have set will be displayed in the SETUP menu.<br />
• Enter the four-digit password you want to use and press the SELECT button<br />
to select it.<br />
Note that the password cannot start with a zero.<br />
If you forget your password contact your <strong>Primare</strong> dealer who will be able to<br />
reset it for you.<br />
To change the password<br />
• Highlight CHANGE PWD on the RATING LEVEL screen and press the<br />
SELECT button to select it.<br />
20
Configuring the V10 DVD Player<br />
<<br />
SPECIFYING THE AUDIO OUTPUT<br />
The AUDIO OUTPUT menu allows you to specify whether the V10 DVD<br />
Player should perform Dolby Pro Logic decoding internally, or whether it should<br />
provide a 5-channel encoded output for a separate surround decoder.<br />
To specify the audio output<br />
• Highlight AUDIO OUTPUT on the SETUP menu and press the SELECT<br />
button to select it.<br />
SPECIFYING ADDITIONAL SETUP OPTIONS<br />
The CUSTOM SETUP menu allows you to specify additional more advanced<br />
options affecting the configuration of the V10 DVD player.<br />
To display the CUSTOM SETUP menu<br />
• Highlight CUSTOM SETUP on the SETUP menu and press the SELECT<br />
button to select it:<br />
The following menu allows you to specify the output format:<br />
• Highlight BITSTREAM to provide a multi-channel bitstream on the digital<br />
output, suitable for decoding by an external digital surround processor such<br />
as the <strong>Primare</strong> P30.<br />
• Highlight LPCM to specify that you want the V10 DVD Player to perform<br />
decoding internally, and provide a stereo LPCM digital output.<br />
To select close caption subtitles<br />
Some DVD videos include close caption subtitles, which provide a description<br />
of sound effects for the hard of hearing; for example, “clock chimes”.<br />
• Highlight CLOSE CAPTION on the CUSTOM SETUP menu and press<br />
the SELECT button to select it.<br />
• Highlight ON or OFF as required and press the SELECT button to select it.<br />
To use the analog phono outputs select LPCM.<br />
21
Configuring the V10 DVD Player<br />
To set up the zoom options<br />
These determine the operation of the ZOOM button on the DVD remote<br />
control.<br />
• Highlight ZOOM SETUP on the CUSTOM SETUP menu and press the<br />
SELECT button to select it:<br />
To specify the TV system<br />
DVD movies are produced in both PAL and NTSC television formats. The V10<br />
DVD Player is capable of converting between formats, to allow you to view<br />
DVD movies in either format even if your television is not capable of displaying<br />
that format. However the conversion process introduces some picture<br />
degradation.<br />
• Highlight TV SYSTEM in the CUSTOM SETUP menu and press the<br />
SELECT button to select it.<br />
• Choose AUTO if your television can display both PAL and NTSC video, or<br />
choose the option corresponding to the format supported by your television.<br />
If your television is capable of displaying both formats the recommended<br />
setting is AUTO, which supplies the unconverted video signal to the television.<br />
The ZOOM SETUP menu allows you to select between the following options:<br />
Option<br />
Choices<br />
START POINT<br />
UPPER LEFT, CENTRE, LAST POINT<br />
PAN SCALE<br />
NORMAL, ROUGH, FINE<br />
To choose the color scheme for on-screen displays<br />
• Highlight COLOR SCHEME in the CUSTOM SETUP menu and press the<br />
SELECT button to select it.<br />
• Choose between YELLOW, GREEN, BLUE, or RED, and press the<br />
SELECT button to select the option you have highlighted.<br />
To specify the video mode<br />
The VIDEO MODE option determines the format of video on the video<br />
outputs, when available.<br />
• Highlight VIDEO MODE on the CUSTOM SETUP menu and press the<br />
SELECT button to select it.<br />
The following options are available:<br />
Option<br />
Description<br />
Y/C<br />
S-Video format/composite video.<br />
SCART<br />
Red, Green, and Blue signals.<br />
22
Configuring the V10 DVD Player<br />
<<br />
LANGUAGE CODES<br />
Language Code Language Code Language Code<br />
Abkhazian 6566 Hausa 7265 Romanian 8279<br />
Afar 6565 Hebrew 7387 Russian 8285<br />
Afrikaans 6570 Hindi 7273 Samoan 8377<br />
Albanian 8381 Hungarian 7285 Sanskrit 8365<br />
Ameharic 6577 Icelandic 7383 Scots Gaelic 7168<br />
Arabic 6582 Indonesian 7378 Serbo-Croat 8372<br />
Armenian 7289 Intelingua 7365 Serbian 8382<br />
Assamese 6583 Irish 7165 Shona 8378<br />
Aymaran 6588 Italian 7384 Sindhi 8368<br />
Mzerbaijani 6590 Japanese 7465 Singhalese 8375<br />
Bashkir 6665 Javanese 7487 Slovak 8375<br />
Basque 6985 Kannada 7578 Slovenian 8376<br />
Bengali; Bangla 6678 Kashmiri 7583 Somali 8379<br />
Bhutani 6890 Kazakh 7575 Spanish 6983<br />
Bihari 6672 Kirghiz 7589 Sudanese 8385<br />
Breton 6682 Korean 7579 Swahili 8387<br />
Bulgarian 6671 Kurdish 7585 Swedish 8386<br />
Burmese 7789 Laotian 7679 Tajik 8471<br />
Byelorussian 6669 Latin 7665 Tagalog 8476<br />
Cambodian 7577 Latvian, Lettish 7686 Tamil 8465<br />
Catalan 6765 Lingala 7678 Tatar 8484<br />
Chinese 9072 Lithuanian 7684 Telugu 8469<br />
Language Code Language Code Language Code<br />
Corsican 6779 Macedonian 7775 Thai 9472<br />
Croatian 7282 Malagasy 7771 Tibetan 6679<br />
Czech 6783 Malay 7783 Tigrinya 8473<br />
Danish 6865 Malayalam 7776 Tonga 8479<br />
Dutch 7876 Maori 7773 Turkish 8482<br />
English 6978 Maltese 7784 Turkmen 8475<br />
Esperanto 6979 Marathi 7782 Twi 8487<br />
Estonian 6984 Moldavian 7779 Ukranian 8575<br />
Faroese 7079 Mongolian 7778 Urdu 8582<br />
Fijian 7074 Nauru 7865 Uzbek 8590<br />
Finish 7073 Nepali 7869 Vietnamese 8673<br />
French 7082 Norwegian 7879 Volap ük 8679<br />
Frisian 7089 Oriya 7982 Wolof 8779<br />
Galician 7176 Punjabi 8065 Welsh 6789<br />
Georgian 7565 Pashto, Pushto 8083 Xhosa 8872<br />
German 6869 Persian 7065 Yiddish 7473<br />
Greek 6976 Polish 8076 Yoruba 8979<br />
Greenlandic 7576 Portuguese 8084 Zulu 9085<br />
Guarani 7178 Quechua 8185<br />
Gujarati 7185 Rhäto-Romanic 8277<br />
23
24<br />
> Configuring the V10 DVD Player
Index<br />
A<br />
angle .................................................... 10<br />
audio output, specifying ......................... 21<br />
audio outputs ................................. 15, 16<br />
audio soundtrack ..................................... 9<br />
B<br />
back panel connections .......................... 15<br />
C<br />
chapters<br />
selecting ........................................... 10<br />
stepping between ................................ 6<br />
colours for on-screen displays ................. 22<br />
connections ........................................... 15<br />
CUSTOM SETUP menu ........................... 21<br />
D<br />
digital outputs ................................. 15, 16<br />
F<br />
fast forward ............................................ 7<br />
FAVORITE COND .................................. 12<br />
front panel controls .................................. 3<br />
front panel display ................................... 4<br />
dimming ............................................. 4<br />
I<br />
introduction ............................................. 1<br />
L<br />
LANGUAGES menu ............................... 18<br />
choosing default languages................ 18<br />
displaying ........................................ 18<br />
O<br />
outputs<br />
audio ........................................ 15, 16<br />
digital ....................................... 15, 16<br />
video ......................................... 15, 16<br />
P<br />
parental lock ......................................... 19<br />
pausing play ........................................... 5<br />
playing a disc .......................................... 4<br />
pausing .............................................. 5<br />
repeating ............................................ 8<br />
resetting ............................................. 5<br />
stopping ............................................. 5<br />
<strong>Primare</strong> P30 Processor<br />
connecting to .................................... 16<br />
PROGRAM MENU ................................. 10<br />
programming a selection ........................ 10<br />
R<br />
rating level ............................................ 19<br />
repeat play.............................................. 8<br />
resetting play ........................................... 5<br />
S<br />
screen format ........................................ 19<br />
setting the default .............................. 19<br />
25
Index<br />
SETUP menu .......................................... 17<br />
slow motion ............................................. 7<br />
soundtrack language, choosing................. 9<br />
specification ............................................ 2<br />
standby, switching to ................................ 4<br />
stepping between chapters or tracks .......... 6<br />
stopping play .......................................... 5<br />
SUBTITLE LANGUAGE menu ................... 18<br />
subtitles ................................................... 9<br />
choosing the language ........................ 9<br />
selecting close caption ....................... 21<br />
turning on and off ............................... 9<br />
switching on and off ................................ 4<br />
switching to standby................................. 4<br />
V<br />
video mode, specifying .......................... 22<br />
video outputs .................................. 15, 16<br />
Z<br />
zooming ............................................... 13<br />
setting up options .............................. 22<br />
T<br />
title menu, displaying ............................... 9<br />
title, specifying....................................... 10<br />
tracks<br />
specifying ......................................... 10<br />
stepping between ................................ 6<br />
TV system, specifying ............................. 22<br />
26