Focus Drive Mounting Instructions for Leica DML Range - H122LB
Focus Drive Mounting Instructions for Leica DML Range - H122LB
Focus Drive Mounting Instructions for Leica DML Range - H122LB

You also want an ePaper? Increase the reach of your titles
YUMPU automatically turns print PDFs into web optimized ePapers that Google loves.
<strong>Focus</strong> <strong>Drive</strong> <strong>Mounting</strong> <strong>Instructions</strong> <strong>for</strong><br />
<strong>Leica</strong> <strong>DML</strong> <strong>Range</strong> - <strong>H122LB</strong><br />
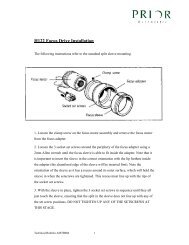
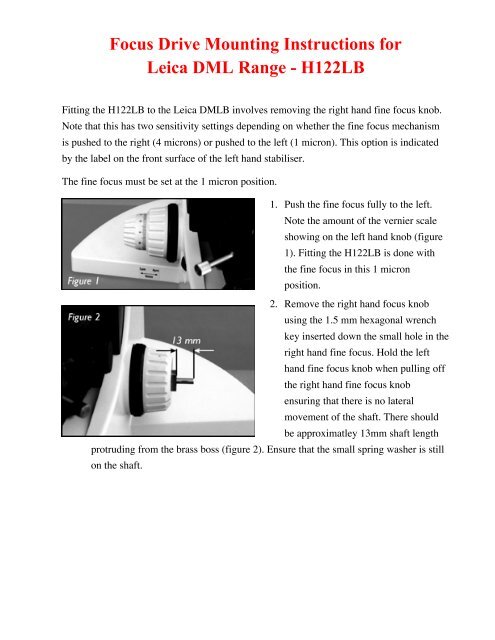
Fitting the <strong>H122LB</strong> to the <strong>Leica</strong> <strong>DML</strong>B involves removing the right hand fine focus knob.<br />
Note that this has two sensitivity settings depending on whether the fine focus mechanism<br />
is pushed to the right (4 microns) or pushed to the left (1 micron). This option is indicated<br />
by the label on the front surface of the left hand stabiliser.<br />
The fine focus must be set at the 1 micron position.<br />
1. Push the fine focus fully to the left.<br />
Note the amount of the vernier scale<br />
showing on the left hand knob (figure<br />
1). Fitting the <strong>H122LB</strong> is done with<br />
the fine focus in this 1 micron<br />
position.<br />
2. Remove the right hand focus knob<br />
using the 1.5 mm hexagonal wrench<br />
key inserted down the small hole in the<br />
right hand fine focus. Hold the left<br />
hand fine focus knob when pulling off<br />
the right hand fine focus knob<br />
ensuring that there is no lateral<br />
movement of the shaft. There should<br />
be approximatley 13mm shaft length<br />
protruding from the brass boss (figure 2). Ensure that the small spring washer is still<br />
on the shaft.
3. Fit the large adapter ring over the brass<br />
boss. Note that the orientation of the<br />
adapter ring should be such that the<br />
grub screw in the adapter ring screws<br />
down onto the centre of the radius<br />
(curved part of the brass boss) -<br />
(figure 3)<br />
4. Push this fully towards the body of the<br />
microscope leaving approximately<br />
9mm of shaft protruding from the<br />
adapter ring whilst tightening up the<br />
adapter ring using the 2mm<br />
hexagonal wrench key (figure 4).<br />
5. Fit the drive coupling on the fine<br />
focus shaft using the 1.5mm<br />
hexagonal wrench key. Orient the<br />
shaft so that the grub screw will<br />
locate on the flat of the shaft. Push<br />
the drive coupling gently towards the<br />
adapter ring whilst tightening the<br />
grub screw.<br />
Check that the fine focus rotates<br />
freely and is still set at 1 micron.<br />
6. Fit H569 motor sleeve on the adapter<br />
ring. Tighten up 3 grub screws in<br />
sequence using the 2mm Hexagonal<br />
wrench key (figure 5). It may be<br />
necessary to rotate the motor sleeve to gain access to each grub screw. The motor<br />
sleeve and adapter ring are now attached to the coarse focus.<br />
Slide the H249 Microstep <strong>Focus</strong> motor assembly into the motor sleeve and tighten the S690 thumb screw whilst<br />
gently pushing the focus motor assembly towards the microscope such that there is a good contact between the<br />
rubber surfaces of the drive of the motor and the drive coupling (figure 5). The fitting is now complete.