Please Click Here for the Manufacturer's PDF - Projector
Please Click Here for the Manufacturer's PDF - Projector
Please Click Here for the Manufacturer's PDF - Projector

Create successful ePaper yourself
Turn your PDF publications into a flip-book with our unique Google optimized e-Paper software.
New LiteShow III<br />
Technical Training<br />
Innovation Now and Beyond<br />
Opening a new era <strong>for</strong> business display connectivity<br />
With LiteShow III you can wirelessly connect<br />
to any display device<br />
Steve Reynolds, CTS/ISF-C<br />
C<br />
Technical Marketing Engineer<br />
2
Training Outline<br />
Section 1: Introduction & Highlights<br />
Section 2: LiteShow III Windows Client<br />
Section 3: LiteShow III MAC Client<br />
Section 4: LiteShow III Device Options under Web Admin<br />
Section 5: LiteShow III Installation Configurations<br />
Section 6: LiteShow III Add-on Drivers & Utilities<br />
Section 7: LiteShow III Mobile Client<br />
3
LiteShow III Introduction & Overview<br />
Section 1<br />
4
4<br />
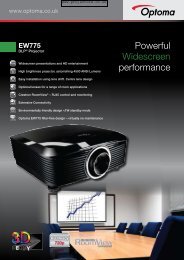
RJ45 Connection <strong>for</strong><br />
Enterprise mode<br />
3 simple connections<br />
<strong>for</strong> wireless & 4 <strong>for</strong><br />
wired<br />
<strong>for</strong> network<br />
audio/video/data<br />
1<br />
VGA input<br />
2<br />
LiteShow power<br />
on<br />
InFocus displays<br />
3<br />
audio input
LiteShow II mount bracket can be installed pointing down on <strong>the</strong> rear of<br />
<strong>the</strong> projector in <strong>the</strong> case whereas <strong>the</strong> ceiling mount pole is not installed.<br />
Adjustable antenna depending on<br />
installation
high speed | long range<br />
802.11n wireless | 150 Mbps | up to 300 feet
onboard video decoding <strong>for</strong> seamless HD video
Flexible & Secure<br />
Configure to fit your organization<br />
Multiple security levels including WPA2‐<br />
PSK
Networking & Wireless options<br />
(LS III)<br />
Control <strong>the</strong> projector over <strong>the</strong> network<br />
Display over network<br />
Moderator<br />
With LiteShow III you connect, project & collaborate…<br />
Over <strong>the</strong> Wireless or Wired network backbone
LiteShow III Windows Client<br />
Section 2<br />
12
Connect <strong>the</strong> LiteShow III device AC Power adapter from <strong>the</strong> LiteShow III to an active AC power outlet.<br />
Note when power is initially applied to <strong>the</strong> LiteShow III it takes a short while to run through its power on<br />
diagnostic. First <strong>the</strong> front panel LED will change from red to blue <strong>the</strong>n take approximately 4-5 seconds.<br />
Connect projector VGA cable to LiteShow III device VGA connector and turn on projector power.<br />
Once <strong>the</strong> LiteShow III device is ready and <strong>the</strong> display device is active on <strong>the</strong> appropriate VGA source, a<br />
LiteShow splash screen will appear. This splash screen provides you all necessary in<strong>for</strong>mation required to<br />
connect, configure, and project.<br />
Power LED<br />
13
When <strong>Projector</strong> shows<br />
With <strong>the</strong> LiteShow III<br />
<strong>the</strong> default menu on <strong>the</strong><br />
device in <strong>the</strong> ready state<br />
screen it indicates <strong>the</strong><br />
as shown to <strong>the</strong> left you<br />
LiteShow III hardware<br />
are ready to connect and<br />
device is ready to setup through <strong>the</strong> WEB<br />
connect.<br />
UI interface.<br />
To connect/configure requires a wired or wireless connection to <strong>the</strong><br />
physical LiteShow III device you wish to connect with.<br />
14
Open your internet browser and it will redirect to LiteShow III main page automatically, or you can enter <strong>the</strong> IP<br />
address to access <strong>the</strong> LiteShow III web home page.<br />
The default IP address of LiteShow III<br />
is 192.168.100.10 or refers to <strong>the</strong> IP<br />
address shown on <strong>the</strong> left corner of<br />
projector screen.<br />
To simply download <strong>the</strong> client software select “None” on <strong>the</strong> Login leaving <strong>the</strong> Password blank.<br />
Select “Software Download”<br />
15
This brings you to <strong>the</strong> Download <strong>the</strong> client software depending on your source device <strong>the</strong>n execute <strong>the</strong><br />
installation program (” Windows 7 / Vista / XP / 2000” , “Windows Mobile 5.0” or “MacBook 10.4/10.5”)<br />
After installing <strong>the</strong> program, you will see <strong>the</strong> LiteShow III shortcut on <strong>the</strong> PC screen.<br />
16
Once <strong>the</strong> application is installed it will auto launch <strong>the</strong> first time starting LiteShow Manager<br />
Enter <strong>the</strong> Login Code on upper left corner of <strong>the</strong> projected LiteShow splash screen, <strong>the</strong>n select OK<br />
Press <strong>the</strong> light blue PLAY button to start projecting<br />
17
LiteShow Manager Main Windows User Interface<br />
18
Projection Mode<br />
19
LiteShow Screen Projection control allows you to select full screen or one of <strong>the</strong> four quadrants of <strong>the</strong> display<br />
LiteShow “Pause” button allows you to freeze you projection screen image.<br />
LiteShow “Stop” button to stop projecting your screen.<br />
20
Video Mode<br />
21
LiteShow Video/Music file “Play” button allows you to play a selected video or music file<br />
LiteShow “Stop” button allows you to stop <strong>the</strong> video or music file playing<br />
LiteShow “Open File” button allows you to select which video or music file<br />
Supported <strong>for</strong>mats include:<br />
MPEG1/2, DivX(3.4.5),<br />
XviD(MPEG4), H.264,<br />
WMV9, MP3, WMA.<br />
Note: For higher quality video or music playback,<br />
stream <strong>the</strong> files from your computer to <strong>the</strong> LiteShow<br />
module from “Video Mode”. Decompression,<br />
buffering, and video processing all take place in <strong>the</strong><br />
LiteShow module reducing <strong>the</strong> load on your<br />
computer and network. <strong>Click</strong> on <strong>the</strong> Video Mode Tab<br />
to switch to Video Mode.<br />
LiteShow “Mute” button allows you to mute <strong>the</strong> audio during playback<br />
22
Menu Tool Bar<br />
Menu opens a user configurable pull‐down menu<br />
23
Menu Tool Bar (cont.)<br />
Selecting Menu provides <strong>the</strong> user a series of options:<br />
Show Login Code - Shows <strong>the</strong> code on <strong>the</strong> LiteShow Manager computers screen<br />
Send Audio to Display – Requires VAC add-on <strong>for</strong> audio through Presentation Mode (default setting is No).<br />
Set to “Yes” <strong>for</strong> enabling audio in “Presentation Mode” (screen scrape).<br />
Note: The setting of this has no affect in “Video Mode” since in video mode <strong>the</strong> content is streamed to <strong>the</strong> LiteShow III.<br />
Streaming <strong>the</strong> content does not require <strong>the</strong> virtual audio codec functionality since it is embedded within <strong>the</strong> streamed<br />
content to <strong>the</strong> device.<br />
Web Admin –LiteShow III Web UI <strong>for</strong> a variety of administrative configurable options (detailed in Web Admin section)<br />
Search Server – Re-queries <strong>for</strong> available LiteShow III devices (disconnects from current LiteShow III connection)<br />
24
Menu Tool Bar (cont.)<br />
Projection Quality - Allows you to toggle between “Normal” <strong>for</strong> faster projection speed with lower<br />
screen image quality (default setting) and “Best” <strong>for</strong> clear screen image quality, but with slower<br />
projection speed.<br />
Projection Source - Allows you to mirror your computer screen onto <strong>the</strong> projection screen (default setting) or to<br />
extend your computer monitor onto <strong>the</strong> projection screen (“Virtual Extended Screen”).<br />
Note:<br />
1) If using Windows XP, virtual extended Windows Desktop to <strong>the</strong> LiteShow III devices requires an additional<br />
Driver “VDD.exe” to function properly. Install “VDD.exe” from <strong>the</strong> USB token (or from <strong>the</strong> web at:<br />
www.infocus.com/support).<br />
2) Windows Vista and Windows 7 do not require additional drivers.<br />
25
Menu Tool Bar (cont.)<br />
Connection Profile - Allows you to save <strong>the</strong> current connection configuration as a Profile <strong>for</strong> quick access later.<br />
Advantage here is <strong>for</strong> users that connect to <strong>the</strong> same LiteShow III devices, it creates quick connect shortcut having<br />
saved all necessary access/security details. Good example <strong>for</strong> Profile use would be a school where <strong>the</strong> teacher<br />
Has a set room number everyday. Setup <strong>the</strong> LiteShow security with fixed access code, login connect <strong>the</strong>n save <strong>the</strong><br />
profile as <strong>the</strong> Room Number. When <strong>the</strong> teacher brings up LiteShow Manager it immediately brings up <strong>the</strong> saved<br />
Profile to select <strong>for</strong> quick ef<strong>for</strong>tless connect and project.<br />
When you have one or more saved connection profiles, <strong>the</strong> LiteShow application<br />
will prompt you each time it starts up to select a connection profile. <strong>Click</strong> Connect<br />
to establish a connection as defined by <strong>the</strong> selected profile, click Skip to select a<br />
network and module, or click Edit to add delete or modify a profile.<br />
26
Menu Tool Bar (cont.)<br />
Auto WiFi Connect – When Auto WiFi Connect is selected, <strong>the</strong> LiteShow application will search out and list all<br />
available wireless networks and automatically switch to <strong>the</strong> selected network be<strong>for</strong>e searching <strong>for</strong> available LiteShow<br />
modules. When Auto WiFi Connect is not selected, <strong>the</strong> LiteShow application will only search <strong>the</strong> computer’s<br />
existing network connection <strong>for</strong> LiteShow modules.<br />
Auto Power Manager - To optimize projection per<strong>for</strong>mance, <strong>the</strong> LiteShow application will automatically turn <strong>the</strong><br />
computer’s Windows power scheme to “highest per<strong>for</strong>mance.” When this option is active <strong>the</strong> laptop power<br />
management switches over to <strong>the</strong> “LiteShow” controlled power scheme while LiteShow Manager is open <strong>the</strong>n switch<br />
back to <strong>the</strong> laptop power management preset setting when LiteShow Manager is closed.<br />
When “Auto Power management” is disabled laptop remains in it set configured power management state whe<strong>the</strong>r<br />
LiteShow Manager is active or not.<br />
27
Menu Tool Bar (cont.)<br />
Hide UI - Allows you to choose to hide or display <strong>the</strong> application control panel on <strong>the</strong> projection screen. This is<br />
useful if <strong>the</strong> IT/AV installer/,management does not want viewers of <strong>the</strong> presentation to see <strong>the</strong> LiteShow Manager<br />
client utility.<br />
Advanced Screen Capture - - LiteShow application in its default configuration communicates only <strong>the</strong> primary<br />
display layer from <strong>the</strong> computers display memory <strong>for</strong> a flicker-free image. It is possible to display different layers as<br />
well by enabling "Advanced Screen Capture" in <strong>the</strong> LiteShow application menu under Admin functions. Windows 7<br />
utilizes different layers <strong>for</strong> specific pop-up windows<br />
Note:<br />
1) A good rule of thumb here is if <strong>the</strong> application you are running shows up properly on your source computer screen but<br />
not on <strong>the</strong> projected LiteShow III display try to turn on this feature to see if it now displays properly.<br />
2) If <strong>the</strong> application you are running shows up properly without this function enabled do not turn it on since it affects<br />
overall system per<strong>for</strong>mance.<br />
28
Menu Tool Bar (cont.)<br />
Repeat - Loops <strong>the</strong> current video/audio file so that it plays repeatedly.<br />
Make PnS Token - Creates a duplicate USB LiteShow Token. You can insert a USB thumb drive and follow <strong>the</strong><br />
Setup Wizard to make <strong>the</strong> Token. Users can execute <strong>the</strong> LiteShow application directly from <strong>the</strong> Token, avoiding<br />
<strong>the</strong> need <strong>for</strong> guests to install <strong>the</strong> application.<br />
29
Menu Tool Bar (cont.)<br />
Copy Application to Desktop - Copies <strong>the</strong> LiteShow application to your desktop. Administrator rights on your<br />
computer are not required.<br />
The use model here is where a client is using <strong>the</strong> PnS LiteShow client USB stick to load LiteShow manager.<br />
Once loaded <strong>the</strong> client could run this function and copy <strong>the</strong> application to <strong>the</strong>ir desktop allowing <strong>the</strong>m to run<br />
LiteShow client from <strong>the</strong>ir desktop verses <strong>the</strong> PnS LiteShow client USB stick. This is most valuable in environments<br />
where local admin rights are not available.<br />
About - Displays system in<strong>for</strong>mation, including client version, IP address and login code.<br />
Exit - Exits <strong>the</strong> LiteShow application. It will stop whatever is being displayed and close <strong>the</strong> application immediately.<br />
30
LiteShow III MAC Client<br />
Section 3<br />
31
MAC Client<br />
Launch Application<br />
1) <strong>Click</strong> <strong>the</strong> LiteShow shortcut.<br />
2) Select <strong>the</strong> network you want to project over, and <strong>the</strong>n <strong>the</strong> LiteShow module you wish to use.<br />
3) If <strong>the</strong> LiteShow module is found, a Login Code dialog box will be displayed on your projector.<br />
4) Enter <strong>the</strong> Login Code visible on <strong>the</strong> projector and click Connect.<br />
LiteShow should automatically begin displaying your computer screen to <strong>the</strong> connected projector.<br />
32
LiteShow Manager Main MAC User Interface<br />
33
MAC Client<br />
Application Control Panel<br />
34
MAC Client<br />
Projection Mode Tab<br />
LiteShow Screen Projection control<br />
allows you to select full screen or one<br />
of <strong>the</strong> four quadrants of <strong>the</strong> display<br />
LiteShow Screen Projection control<br />
allows you to pause/freeze or stop<br />
presentation display<br />
35
MAC Client<br />
Video Mode Tab<br />
36
MAC Client<br />
Menu Functions<br />
When you click <strong>the</strong> Menu button shown above,<br />
an additional menu window will appear.<br />
37
MAC Client<br />
Menu Functions<br />
Web Management –LiteShow III Web UI <strong>for</strong> a variety of administrative configurable options (detailed in Web Admin<br />
section)<br />
Search Server – Re-queries <strong>for</strong> available LiteShow III devices (disconnects from current LiteShow III connection)<br />
Repeat - Loops <strong>the</strong> current video/audio file so that it plays repeatedly.<br />
About - Displays system in<strong>for</strong>mation, including client version, IP address and login code.<br />
Exit - Exits <strong>the</strong> LiteShow application. It will stop whatever is being displayed and close <strong>the</strong> application immediately.<br />
38
LiteShow III Device Options under Web Admin<br />
(Same functionality <strong>for</strong> both Windows and MAC Client’s)<br />
Section 4<br />
Note: “Admin Menu” available only to users logged in as Admin<br />
Users. <strong>Click</strong>ing on Admin brings up a new webpage with additional<br />
menu items.<br />
39
Web Admin Menu<br />
Selecting Web Admin Menu or accessing it directly from your internet browser directly both provides<br />
access to LiteShow III Web UI interface: (None, User, or Admin)<br />
Each of <strong>the</strong> Login users have <strong>the</strong>ir own specific purpose as well as access as shown in <strong>the</strong> table below.<br />
LOGIN Default Password Menu Options<br />
None Not applicable – No password required Download, System Status<br />
Basic User basic Download, System Status,<br />
Moderator Control<br />
Admin User admin Download, System Status<br />
Moderator Control, Admin Menu<br />
From a simplification point of view menu option features will be discussed once <strong>the</strong>n highlighted as we step through <strong>the</strong><br />
three login types beginning with “None”, “Basic User”, and <strong>the</strong>n “Admin User”.<br />
40
Web Admin Menu<br />
“None” Login<br />
Selecting “None” login is utilized <strong>for</strong> <strong>the</strong> primary purpose of downloading <strong>the</strong> client software normally per<strong>for</strong>med by<br />
accessing <strong>the</strong> Web Admin main menu UI through a internet browser using <strong>the</strong> LiteShow III IP in <strong>the</strong> address line.<br />
The “None” login selection does not require password to access its functions due to <strong>the</strong> limited scope/access this level<br />
login provides.<br />
Login provides two basic functions: Client “Software Download” and “System Status”<br />
Note: In all cases <strong>the</strong> Web Admin UI can be access through ei<strong>the</strong>r Web Admin<br />
Menu or accessing it directly from your internet browser directly both provide<br />
access to LiteShow III Web UI interface: (None, User, or Admin)<br />
41
Web Admin Menu<br />
“None” Login (cont.)<br />
“Software Download” provides client download options <strong>for</strong> Windows, MAC MacBook, and Windows Mobile <strong>for</strong> PDA<br />
Note: iPhone application (MobiShow) needs to be downloaded from iTunes<br />
Supported OS versions are Windows 7/ Vista / XP / 2000, Windows<br />
Mobile 5.0 / 6.0, and MacBook 10.5 / 10.6<br />
Additionally this Software download page includes a web hyperlink to <strong>the</strong><br />
InFocus LiteShow III Support page <strong>for</strong> <strong>the</strong> following windows client add-on<br />
applications:<br />
1) VAC.exe - Virtual Audio Cable <strong>for</strong> audio projection<br />
2) VDD.exe - Virtual Desktop Display <strong>for</strong> extended screen on<br />
Windows 2000/XP/Vista only (not required <strong>for</strong> Windows 7/Vista<br />
3) PtG Converter.exe - Presentation to Go <strong>for</strong> Power Point conversion<br />
4) IB Maker 1201.exe - Splash screen creation<br />
42
Web Admin Menu<br />
“None” Login (cont.)<br />
“System Status” is available to all users, regardless of which login is used. This page displays a variety of networkrelated<br />
in<strong>for</strong>mation, including <strong>the</strong> IP address of LiteShow. The System Status page also shows whe<strong>the</strong>r LiteShow is<br />
currently projecting and how many users are currently connected to <strong>the</strong> device.<br />
43
Web Admin Menu<br />
“Basic User” Login<br />
Selecting “Basic User” login provides <strong>the</strong> same functions available under “None” login previously described with <strong>the</strong><br />
addition of <strong>the</strong> “Moderator Control” feature.<br />
The “Basic User” login selection by default is “basic”. If this does not work have <strong>the</strong>m contact <strong>the</strong>ir IT/AV team <strong>for</strong> <strong>the</strong><br />
correct password (changeable under <strong>the</strong> “Admin User” login).<br />
Login provides three functions: Client “Software Download”, “System Status”, and “Moderator Control”.<br />
Note: Software Download and Status have been described in previous slides.<br />
Note: In all cases <strong>the</strong> Web Admin UI can be access through ei<strong>the</strong>r Web Admin<br />
Menu or accessing it directly from your internet browser directly both provide<br />
access to LiteShow III Web UI interface: (None, User, or Admin)<br />
44
Web Admin Menu<br />
“Basic User” Login (cont.)<br />
“Moderator Control” - This feature allows <strong>the</strong> moderator user (first to login as moderator) to control who displays to <strong>the</strong><br />
projector and in what configuration. This is only available to users logged in as ei<strong>the</strong>r Basic User or Admin User.<br />
Moderator Control allows you to easily change presenters and to display up to four presentations at one time.<br />
Number of computers (users) available <strong>for</strong> <strong>the</strong> Moderator control depends on how many are connected to <strong>the</strong> specific<br />
LiteShow<br />
Number of computer connections are dependant on network bandwidth to <strong>the</strong> LiteShow network, however only four<br />
computers can be displayed simultaneously.<br />
If a user attempts to project through a specific LiteShow III device that is under control of an Moderator <strong>the</strong>y will be<br />
denied access as shown. Until Moderator logs out <strong>the</strong>y have full control on <strong>the</strong> projected image on that specific device.<br />
Moderator can control only one LiteShow III device display at a time.<br />
45
Web Admin Menu<br />
“Basic User” Login (cont.)<br />
Moderator controls <strong>the</strong> display of multiple computers over <strong>the</strong> network and project up to 4 screens at <strong>the</strong> same time<br />
*** No Streaming Video Support when Moderator is logged in ***
Web Admin Menu<br />
“Basic User” Login (cont.)<br />
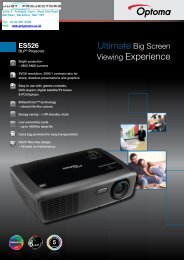
The QuadView function allows you to display up to four connected computers at <strong>the</strong> same time – ideal <strong>for</strong> web meetings,<br />
collaboration and classroom projects.<br />
Mix any screen sources toge<strong>the</strong>r ei<strong>the</strong>r Windows, MAC or PDA<br />
Control split projection from <strong>the</strong> Mediator function<br />
1<br />
2<br />
4<br />
3<br />
4-to-1 QuadView Screen Projection
Web Admin Menu<br />
“Admin User” Login<br />
Selecting “Admin User” login provides <strong>the</strong> same functions available under “Basic User ” login previously described with<br />
<strong>the</strong> addition of <strong>the</strong> “Admin” configuration functions.<br />
The “Admin User” login selection by default is “admin”. If this does not work have <strong>the</strong>m contact <strong>the</strong>ir IT/AV team <strong>for</strong> <strong>the</strong><br />
correct password (changeable under <strong>the</strong> “Admin User” login).<br />
Login provides four functions: Client “Software Download”, “System Status”, “Moderator Control”, and “Admin”.<br />
Note: Software Download, Status, and moderator have been described in previous slides.<br />
Note: In all cases <strong>the</strong> Web Admin UI can be accessed through ei<strong>the</strong>r Web<br />
Admin Menu or by accessing it directly from your internet browser directly both<br />
provide access to LiteShow III Web UI interface: (None, User, or Admin)<br />
48
Web Admin Menu<br />
“Admin User” Login (cont.)<br />
“Admin” - This option brings up a new webpage with additional menu items which allow <strong>the</strong> IT/AV administrator to setup<br />
<strong>the</strong> LiteShow III device according to specific environmental requirements (dependent of use case).<br />
Menu Selections: (Network Setup Options screen opens by default)<br />
• Network Setup<br />
• OSD Setup<br />
• Projection setup<br />
• Change Passwords<br />
• Reset to Default<br />
• Firmware Update<br />
• Reboot<br />
49
Web Admin Menu<br />
“Admin User” Login (cont.)<br />
“Network Setup” - This page allows <strong>the</strong> IT/AV administrator to setup <strong>the</strong> LiteShow III device according to <strong>the</strong>ir network<br />
requirement. The default setting of <strong>the</strong> LiteShow box is DHCP client. When <strong>the</strong> LiteShow module is connected to a LAN<br />
that already has a DHCP server present, <strong>the</strong> LiteShow module takes an<br />
IP address assigned to it by <strong>the</strong> server. When <strong>the</strong> LiteShow module is<br />
connected to a LAN that does not have a DHCP server, <strong>the</strong> LiteShow<br />
module becomes <strong>the</strong> DHCP server in <strong>the</strong> network.<br />
Category Selections under “Network Setup”:<br />
• IP Setup<br />
• DHCP Server Setup<br />
• Wireless Setup<br />
• Wireless Client Setup (Wireless LiteShow III AP to AP)<br />
• GateKeeper<br />
50
Web Admin Menu<br />
“Admin User” Login (cont.)<br />
IP Setup<br />
• “Obtain IP address automatically” (DHCP) or “Use <strong>the</strong> following IP<br />
address” (Static IP)<br />
• IP Address: The default value is 192.168.100.10.<br />
• Subnet Mask: The default value is 255.255.255.0<br />
• Default Gateway: The default value is 192.168.100.10<br />
• DNS Server<br />
DHCP Server Setup –<br />
• Enable or Disable <strong>the</strong> DHCP server automatically, or simply<br />
disable (radio button option).<br />
• Start IP: The start IP address of LiteShow III DHCP Server.<br />
• End IP: The end IP address of LiteShow III DHCP Server.<br />
• Subnet Mask<br />
• Default Gateway<br />
• DNS Server<br />
51
Web Admin Menu<br />
“Admin User” Login (cont.)<br />
Wireless Setup -<br />
• Wireless LAN: “Enable” or “Disable” <strong>the</strong> Wireless LAN. For enterprise<br />
without wireless <strong>for</strong> IT departments that want minimal management<br />
and maximum security connect via wired LAN and “Disable” wireless.<br />
This removes need <strong>for</strong> managed WEP key <strong>for</strong> <strong>the</strong>se devices.<br />
• Region: Choose your geographic g region. “Worldwide” default.<br />
•SSID Broadcast: “Enable” or “Disable” SSID string, maximum<br />
length is 32 bytes. (No spaces). Default is enabled.<br />
Disable selection would be used where <strong>the</strong> IT/AV<br />
organization wants to restrict access to specific LiteShow III<br />
devices by setting up profiles.<br />
In <strong>the</strong>se cases <strong>the</strong> SSID would not be broadcast/visible<br />
when viewing <strong>the</strong> available access point list under LiteShow<br />
Manager.<br />
52
Wireless Setup – (cont.)<br />
Web Admin Menu<br />
“Admin User” Login (cont.)<br />
• Channel: You can set fixed channel or choose Auto. After<br />
powering on <strong>the</strong> LiteShow, choosing “Auto” will scan all wireless<br />
channels and select one clear channel automatically.<br />
• Encryption: Disable or select a wireless encryption preference<br />
(WEP/WPA/WPA2 64-bit or 128-bit in ASCII or HEX string).<br />
• Key: If Encryption is enabled, a key value must be set based on<br />
<strong>the</strong> selected encryption mode.<br />
53
Web Admin Menu<br />
“Admin User” Login (cont.)<br />
Wireless Client Setup – (AP Client - Note: requires LiteShow III firmware version 1.0.0.2 or higher)<br />
• Enable/Disable: To setup LiteShow as a wireless client, choose<br />
“Enable.” Note: Enabling <strong>the</strong> Wireless Client will disable both <strong>the</strong><br />
wired RJ45 connection and Gatekeeper (Gatekeeper will be set to<br />
“All Pass”). Disabling <strong>the</strong> Wireless Client will restore <strong>the</strong> RJ45<br />
wired connection.<br />
• Existing AP SSID: <strong>the</strong> SSID string of <strong>the</strong> corporate wireless LAN<br />
(maximum length 32 bytes; no spaces).<br />
• Encryption: <strong>the</strong> encryption method required to access <strong>the</strong> corporate<br />
wireless LAN (WEP/WPA/WPA2 64-bit or 128-bit in ASCII or HEX<br />
string).<br />
• Key: <strong>the</strong> value required to access <strong>the</strong> corporate wireless LAN.<br />
Used only when Encryption is enabled.<br />
54
Web Admin Menu<br />
“Admin User” Login (cont.)<br />
GateKeeper – Designed to ensure enterprise network security.<br />
• All Pass: Allows Guest Users connected through a wireless<br />
connection to access <strong>the</strong> office network (LAN).<br />
If using this setting it is recommended to enable wireless<br />
security (encryption/key).<br />
• All Block: Prevents Guest Users connected through a wireless<br />
connection from accessing <strong>the</strong> office network (LAN).<br />
• Internet Only: Prevents Guest Users through a wireless connection<br />
from accessing <strong>the</strong> office network (LAN), but still allows internet traffic<br />
(browser packets i.e. port 80, 443) to pass through. IT will need to<br />
Make sure <strong>the</strong>y open <strong>the</strong>ses ports throughout <strong>the</strong> network to allow<br />
<strong>for</strong> internet access.<br />
55
Web Administration over Routers<br />
LiteShow uses <strong>the</strong> following ports <strong>for</strong> network traffic. It may be necessary <strong>for</strong> <strong>the</strong> network administrator to<br />
configure <strong>the</strong> network to pass broadcast packets on ports 1047, 1048, and 1049 to enable <strong>the</strong> LiteShow<br />
application to correctly discover LiteShow modules on a complex network.<br />
56
“OSD Setup” –<br />
Web Admin Menu<br />
“Admin User” Login (cont.)<br />
• Set Background –<br />
• Restore Initial - Allows you to customize <strong>the</strong> LiteShow standby image with a personal image and/or restore<br />
<strong>the</strong> original standby image<br />
• Image File Upload –<br />
Requires external LiteShow III Splash Screen Creator called “IB Maker” downloadable from <strong>the</strong><br />
LiteShow USB token and/or on <strong>the</strong> InFocus Support website: www.infocus.com/support<br />
This option allows you to insert a customized LiteShow III splash screen or restore <strong>the</strong> splash<br />
screen back to <strong>the</strong> default.<br />
When using a custom splash screen it <strong>the</strong>n becomes <strong>the</strong> background. The login code, IP, SSID, etc.<br />
in<strong>for</strong>mation is still provided as an overlay.<br />
57
“OSD Setup” –<br />
Web Admin Menu<br />
“Admin User” Login (cont.)<br />
• Set Background –<br />
• Image File Upload – (cont.)<br />
To define a custom image, you must convert <strong>the</strong> custom image using <strong>the</strong> IB Maker Utility which<br />
creates an filename with <strong>the</strong> extension of “*.ib”. Maximum supported file size <strong>for</strong> upload is 120 KB. If<br />
you try to upload a larger file size <strong>the</strong> below message appears: (see next slide <strong>for</strong> IB Maker Utility<br />
walkthrough)<br />
Note: If <strong>the</strong> customer wants to utilize a custom screen it is recommended <strong>the</strong>y utilize a black<br />
bordered image placing <strong>the</strong>ir image in <strong>the</strong> center section of <strong>the</strong> splash screen. This ensures that <strong>the</strong><br />
overlay in<strong>for</strong>mation remains clear. (see example below)<br />
58
Web Admin Menu<br />
“Admin User” Login (cont.)<br />
“OSD Setup” - Screen Image Background Maker Tool install and Usage<br />
1) Download <strong>the</strong> IBmaker1201.exe file from <strong>the</strong> LiteShow USB token or from <strong>the</strong> InFocus website at:<br />
www.infocus.com/support.<br />
2) Run <strong>the</strong> Image Background Maker and follow <strong>the</strong> wizard instructions.<br />
3) When instructed, click Open and select <strong>the</strong> desired image you want to convert into your custom LiteShow background.<br />
4) <strong>Click</strong> Save to save <strong>the</strong> file and close <strong>the</strong> window.<br />
59
Web Admin Menu<br />
“Admin User” Login (cont.)<br />
“OSD Setup” - Screen Image Background Maker Tool install and Usage (cont.)<br />
5) Login to <strong>the</strong> LiteShow Web Management webpage as an Admin User (default password = admin) and click on OSD<br />
Setup.<br />
6) <strong>Click</strong> Browser and locate <strong>the</strong> new background image (*.ib) you just created.<br />
7) <strong>Click</strong> Image File Upload to complete <strong>the</strong> process.<br />
60
Web Admin Menu<br />
“Admin User” Login (cont.)<br />
“Projection Setup” - This page allows <strong>the</strong> IT/AV administrator to setup <strong>the</strong> LiteShow III device according to <strong>the</strong>ir<br />
• Resolution – Allows you to change <strong>the</strong> projector’s resolution<br />
(options: 1024 x 768, 1280 x 768, 1280x800)<br />
• Login Code - Allows you to disable, randomize or apply a static<br />
Login Code. If setting up a user profile under<br />
LiteShow Manager it is recommended to utilize a<br />
fixed (set) Login Code.<br />
61
“Change Passwords” -<br />
Web Admin Menu<br />
“Admin User” Login (cont.)<br />
• Basic User – Allows user/administrator, based on access.<br />
• Admin User - Allows user/administrator, based on access.<br />
62
Web Admin Menu<br />
“Admin User” Login (cont.)<br />
“Reset to Default” - Restores LiteShow to factory default settings.<br />
*** Alternatively, factory default settings can also be restored as follows: ***<br />
1) Turn off <strong>the</strong> LiteShow module.<br />
2) Press and hold <strong>the</strong> Reset button on <strong>the</strong> back of <strong>the</strong> LiteShow module.<br />
3) Turn on <strong>the</strong> LiteShow module.<br />
4) Wait <strong>for</strong> at least 10 seconds and release <strong>the</strong> Reset button.<br />
5) Factory default settings should be restored.<br />
63
Web Admin Menu<br />
“Admin User” Login (cont.)<br />
“Firmware Update” - Used <strong>for</strong> updating <strong>the</strong> firmware of LiteShow III Hardware module. Once <strong>the</strong> LiteShow III<br />
is updated <strong>the</strong>n <strong>the</strong> clients can be updated from <strong>the</strong> Web Admin main screen.<br />
To update your LiteShow firmware:<br />
1) Download <strong>the</strong> latest firmware image file (*.awd) from <strong>the</strong> InFocus support site (www.infocus.com/support) to your<br />
computer.<br />
2) Choose Firmware Update from <strong>the</strong> left-hand menu.<br />
3) <strong>Click</strong> Browse and open <strong>the</strong> firmware image file you previously downloaded to your computer.<br />
64
To update your LiteShow firmware: (cont.)<br />
Web Admin Menu<br />
“Admin User” Login (cont.)<br />
4) <strong>Click</strong> Upgrade. Note: This process will take several minutes.<br />
Note: The LiteShow III module firmware update timer is fixed at a long interval to ensure that <strong>the</strong> firmware is properly<br />
upgraded. Actual upgrade takes much less time and can be determined by watching <strong>the</strong> projected LiteShow image through<br />
<strong>the</strong> projectors VGA port.<br />
While upgrading <strong>the</strong> splash screen goes away and upon <strong>the</strong> completion <strong>the</strong> LiteShow III will reboot itself and redisplay <strong>the</strong><br />
Splash screen with <strong>the</strong> IP address, etc. Once this appears <strong>the</strong> upgrade is complete yet <strong>the</strong> timer on <strong>the</strong> computer web<br />
browser continues to count.<br />
5) After a message appears stating <strong>the</strong> update has been successful, click OK and begin using LiteShow.<br />
65
Web Admin Menu<br />
“Admin User” Login (cont.)<br />
“Reboot” - Used <strong>for</strong> updating <strong>the</strong> firmware of LiteShow III Hardware module. Once <strong>the</strong> LiteShow III is updated <strong>the</strong>n <strong>the</strong><br />
clients can be updated from <strong>the</strong> Web Admin main screen.<br />
“Logout” - Exits <strong>the</strong> LiteShow web page<br />
66
LiteShow III Installation Configurations<br />
Section 5<br />
67
Network Configurations<br />
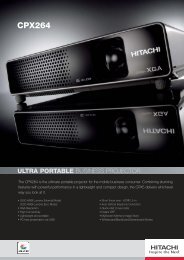
Enterprise Mode Configuration<br />
Corporate LAN/WAN with Guests (wireless access project only): This mode<br />
reserves <strong>the</strong> LiteShow III wired LAN port <strong>for</strong> infrastructure projection. Anyone who<br />
has access to <strong>the</strong> network that <strong>the</strong> LiteShow device is connected to can project.<br />
On <strong>the</strong> o<strong>the</strong>r hand, <strong>the</strong> wireless LAN of <strong>the</strong> LiteShow II is reserved <strong>for</strong> a “guest”,<br />
which is equivalent to <strong>the</strong> peer-to-peer use model. The guest can project<br />
wirelessly, but is denied access to <strong>the</strong> corporate infrastructure network and<br />
internet.<br />
Corporate LAN/WAN no wireless Guest: This mode reserves <strong>the</strong><br />
LiteShow III wired LAN port <strong>for</strong> infrastructure projection as<br />
described but “guests” aren’t permitted; <strong>the</strong> wireless subsystem of<br />
<strong>the</strong> device is simply turned off. In this configuration company<br />
personnel can access <strong>the</strong> LiteShow III through ei<strong>the</strong>r <strong>the</strong> wired<br />
backbone or <strong>the</strong>ir internal wireless access points.<br />
This is <strong>the</strong> recommended configuration <strong>for</strong> clean and secure<br />
environments where maximum network security is required.
Network Configurations<br />
Enterprise Mode Configuration (cont.)<br />
Corporate LAN/WAN with wireless Guests (guest access to project an connect to<br />
internet): This mode reserves <strong>the</strong> LiteShow III wired LAN port <strong>for</strong> infrastructure<br />
projection. Anyone who has access to <strong>the</strong> network that <strong>the</strong> LiteShow device is<br />
connected to can project. On <strong>the</strong> o<strong>the</strong>r hand, <strong>the</strong> wireless LAN of <strong>the</strong> LiteShow II<br />
is reserved <strong>for</strong> a “guest”, which is equivalent to <strong>the</strong> peer-to-peer use model with<br />
<strong>the</strong> exception that <strong>the</strong>y can access <strong>the</strong> internet. The guest can project wirelessly,<br />
but is denied access to <strong>the</strong> corporate infrastructure network while being allowed to<br />
access <strong>the</strong> internet through managing browser packets to pass through via ports<br />
80 & 443.<br />
Corporate LAN/WAN using AP Mode (access point to access point wireless): This<br />
mode <strong>the</strong> LiteShow III wireless LAN access point connects to <strong>the</strong> corporate<br />
backbone through <strong>the</strong> corporate access point. Both LiteShow III and <strong>the</strong> corporate<br />
access point must have <strong>the</strong> same WEP Key.<br />
In this configuration LiteShow network per<strong>for</strong>mance/throughput is affected by <strong>the</strong><br />
quality of <strong>the</strong> wireless environment from both <strong>the</strong> source PC to <strong>the</strong> LiteShow III<br />
and between <strong>the</strong> LiteShow III Access Point to <strong>the</strong> corporate Access Point.<br />
Note: Wireless client control access is managed similar to previous examples<br />
detailed (project only, project/internet, full access).
Network Configurations<br />
Peer to Peer<br />
Peer to Peer: This mode reserves <strong>the</strong> LiteShow III wireless LAN port <strong>for</strong> peer to<br />
peer projection. Anyone who has access to <strong>the</strong> LiteShow device can project.<br />
Multiple users can be connected to <strong>the</strong> LiteShow device at <strong>the</strong> same time but only<br />
one can project at a time. Security can be managed if desired, through access<br />
security through <strong>the</strong> LiteShow III web administration.
LiteShow III Add-on Drivers & Utilities<br />
Section 6<br />
71
LiteShow III Standalone Drivers<br />
VAC.exe – LiteShow III can redirect your computer’s audio to <strong>the</strong> projector using an optional driver, “VAC.exe”.<br />
To enable “Presentation Mode” audio projection, this driver is required (Microsoft Windows XP-SP3, Vista, and Windows 7<br />
operating systems).<br />
To utilize this function install <strong>the</strong> VAC.exe executable file located ei<strong>the</strong>r on <strong>the</strong> USB token which came with your LiteShow<br />
or downloaded from <strong>the</strong> InFocus web site. Recommend<br />
Once VAC is installed, open <strong>the</strong> LiteShow application menu, select “Send Audio to Display”, select “Yes”, And restart<br />
LiteShow application.<br />
Note: If you are only playing audio when in “Video Mode” <strong>the</strong> VAC driver is not required.<br />
VDD.exe (For Virtual Extended Screen) – LiteShow III extended monitor driver <strong>for</strong> Windows XP-SP3 only. Not required<br />
<strong>for</strong> Windows Vista or Windows 7.<br />
72
LiteShow III Standalone Drivers<br />
IBmaker1201.exe (For changing <strong>the</strong> LiteShow Startup Screen)<br />
1) Download <strong>the</strong> IBmaker1201.exe file from <strong>the</strong> LiteShow USB token or from <strong>the</strong> InFocus website at:<br />
www.infocus.com/support.<br />
2) Run <strong>the</strong> Image Background Maker and follow <strong>the</strong> wizard instructions.<br />
3) When instructed, click Open and select <strong>the</strong> desired image you want to convert into your custom LiteShow<br />
background.<br />
4) <strong>Click</strong> Save to save <strong>the</strong> file and close <strong>the</strong> window.<br />
73
Utilities & Drivers<br />
“PtG Converter <strong>for</strong> PowerPoint<br />
PtG PowerPoint Converter – “PtGConverter.exe” (Primarily <strong>for</strong> MobiShow PtG function), allows <strong>for</strong> PowerPoint<br />
demonstrations (with transition effects) to be presented in a 1,024 x 768 pixel resolution on any VGA-connected<br />
display without <strong>the</strong> need <strong>for</strong> a PC -- everything is controlled from <strong>the</strong> Windows Mobile or iPhone handset applications.<br />
Using PtG Converter<br />
1. Download <strong>the</strong> PtG Converter.exe file from <strong>the</strong> LiteShow USB token or from <strong>the</strong> InFocus website at:<br />
www.infocus.com/support.<br />
2. Once installed, <strong>the</strong> converter will reside in <strong>the</strong> PtG Converter folder within Programs.<br />
3. Launch <strong>the</strong> PtG Converter and <strong>the</strong> following control panel will display:<br />
74
Using PtG Converter (cont.)<br />
Utilities & Drivers<br />
PtG Converter <strong>for</strong> PowerPoint<br />
4. <strong>Click</strong> Convert to select and start conversion of <strong>the</strong> desired PowerPoint presentation. PtG Converter will convert <strong>the</strong><br />
PowerPoint file to a PtG <strong>for</strong>mat.<br />
Note: If you have PowerPoint open <strong>the</strong> PtG Utility will not load <strong>the</strong> PowerPoint Presentation until closed. If you attempt<br />
this <strong>the</strong> following message appears:<br />
5. After successfully converting <strong>the</strong> file, you can use any of <strong>the</strong> following controls:<br />
Preview will expand or collapse <strong>the</strong> preview pane.<br />
Play will playback <strong>the</strong> selected PtG file.<br />
Open can be used to select ano<strong>the</strong>r PtG file.<br />
75
LiteShow III Mobile Client<br />
Section 7<br />
76
Utilities & Drivers<br />
“Windows Mobile Utility”<br />
Download From Device<br />
1) Verify that your Smartphone or PDA’s wireless connection is enabled and connect to <strong>the</strong> LiteShow wireless network.<br />
The SSID is displayed on screen.<br />
2) Open your browser. Although <strong>the</strong> LiteShow page should display automatically, you can also enter <strong>the</strong> IP address<br />
displayed on <strong>the</strong> projector into your web browser. Note: The default IP address of LiteShow is 192.168.100.10.<br />
3) At <strong>the</strong> LiteShow Login screen, enter one of <strong>the</strong> following combinations to access <strong>the</strong> Download options:<br />
Note: If <strong>the</strong> default password listed above does not work, contact your IT administrator.<br />
4) Download and install <strong>the</strong> MobiShow Utility, and follow <strong>the</strong> Installation Wizard instructions. (Or download <strong>the</strong> Utility<br />
from <strong>the</strong> LiteShow USB token.)<br />
5) Open Explorer on your phone and find <strong>the</strong> CAB file.<br />
6) Double click on <strong>the</strong> CAB file to start installation.<br />
7) Follow on-screen instructions to finish installation.<br />
77
Utilities & Drivers<br />
“Windows Mobile Utility (cont.)”<br />
Using MobiShow with a Smartphone<br />
1) Open “Programs” on your phone and find <strong>the</strong> “MobiShow” application.<br />
2) <strong>Click</strong> <strong>the</strong> MobiShow shortcut to launch <strong>the</strong> client software.<br />
3) MobiShow will turn on Wi-Fi on your phone and list <strong>the</strong> available Wireless Networks.<br />
4) Connect to <strong>the</strong> desired LiteShow wireless network.<br />
5) MobiShow will connect to that access point and search <strong>for</strong> LiteShow modules automatically. When a LiteShow<br />
module is found, it will automatically login and <strong>the</strong> following main menu will be displayed on your phone.<br />
Note: If more than one MobiShow device is found, a list will be displayed <strong>for</strong> you to select <strong>the</strong> one you would like to<br />
use.<br />
6) Select <strong>the</strong> desired feature:<br />
To project <strong>the</strong> screen of your phone: select Screen.<br />
To do a computer-less presentation: select PtG.<br />
To project a slideshow of photos: select Photo.<br />
To play a video or MP3 from your phone: select Media.<br />
Note <strong>the</strong>re may be slight differences in layout and features<br />
between different Smartphone operating systems<br />
78
Utilities & Drivers<br />
“Windows Mobile Utility (cont.)”<br />
Screen Projection:<br />
MobiShow will project anything displayed on your screen. You may launch ano<strong>the</strong>r application (such PowerPoint<br />
Viewer) or open any file (such as a Word document or JPG image) and it will be projected on <strong>the</strong> projector.<br />
Note: In order to keep your screen projected, do not exit <strong>the</strong> MobiShow application while opening ano<strong>the</strong>r application.<br />
Play: (starts projection)<br />
Stop: (stops projection)<br />
Pause: (alternately, pauses and resumes projection)<br />
Zoom: (extends <strong>the</strong> longest side of your screen to<br />
fill <strong>the</strong> screen)<br />
79
Utilities & Drivers<br />
“Windows Mobile Utility (cont.)”<br />
Wireless Presentation-to-Go:<br />
When selecting <strong>the</strong> Presentation-to-Go (PtG) function, MobiShow client will automatically open Explorer <strong>for</strong> you to<br />
select a PtG file. Once you have opened <strong>the</strong> desired file, <strong>the</strong> PtG slides will be projected and <strong>the</strong> following screen is<br />
displayed on your phone <strong>for</strong> you to control your presentation.<br />
PgUp & Prev: (goes to <strong>the</strong> previous slide)<br />
Next & PgDn: (goes to <strong>the</strong> next slide)<br />
Play/Stop: (alternately starts and stops projection)<br />
Home: (goes to <strong>the</strong> first slide in <strong>the</strong> file)<br />
Jump: (shows thumbnails of all <strong>the</strong> slides in <strong>the</strong><br />
file <strong>for</strong> easy selection of a desired slide)<br />
Open: (allows ano<strong>the</strong>r PtG file to be opened)<br />
80
Utilities & Drivers<br />
“Windows Mobile Utility (cont.)”<br />
Photo Slideshow:<br />
MobiShow can be used to project photos stored on your phone.<br />
Notes: Photos will be resized <strong>for</strong> playback on a large screen, ra<strong>the</strong>r than <strong>for</strong> a small cell phone screen, <strong>the</strong>re<strong>for</strong>e <strong>the</strong><br />
resolution quality will be very noticeable when <strong>the</strong> photos are projected. For best results, display high resolution<br />
photos.<br />
Prev: (goes to <strong>the</strong> previous photo in <strong>the</strong> folder)<br />
Play/Pause: (alternately starts and pauses Projection)<br />
Next: (goes to <strong>the</strong> next photo in <strong>the</strong> folder)<br />
Open: (allows ano<strong>the</strong>r photo file to be opened)<br />
81
Utilities & Drivers<br />
“Windows Mobile Utility (cont.)”<br />
Media Sender:<br />
When you click on <strong>the</strong> Media button, <strong>the</strong> MobiShow client will automatically open Explorer <strong>for</strong> you to select a media<br />
file. (Compatible file <strong>for</strong>mats: mpeg, WMV9, and MP3 music files.) After choosing <strong>the</strong> desired file, it may take a<br />
few seconds to buffer be<strong>for</strong>e playback begins, depending on <strong>the</strong> wireless signal and media bit rate.<br />
When <strong>the</strong> file is open, <strong>the</strong> media will be projected, and <strong>the</strong> following screen is displayed on <strong>the</strong> phone <strong>for</strong> you to<br />
control your media playback.<br />
FR: (goes to <strong>the</strong> previous slide)<br />
FF: (goes to <strong>the</strong> next slide)<br />
Vol-: (decreases <strong>the</strong> volume)<br />
Vol+: (increases <strong>the</strong> volume)<br />
Pause: (alternately, pauses and resumes projection)<br />
Play/Stop: (alternately starts and stops projection)<br />
Mute: (disables <strong>the</strong> volume)<br />
Open: (allows ano<strong>the</strong>r file to be opened)<br />
82