Nickelodeon Retrofit Kit Install Manual - QRS Music Technology
Nickelodeon Retrofit Kit Install Manual - QRS Music Technology
Nickelodeon Retrofit Kit Install Manual - QRS Music Technology

Create successful ePaper yourself
Turn your PDF publications into a flip-book with our unique Google optimized e-Paper software.
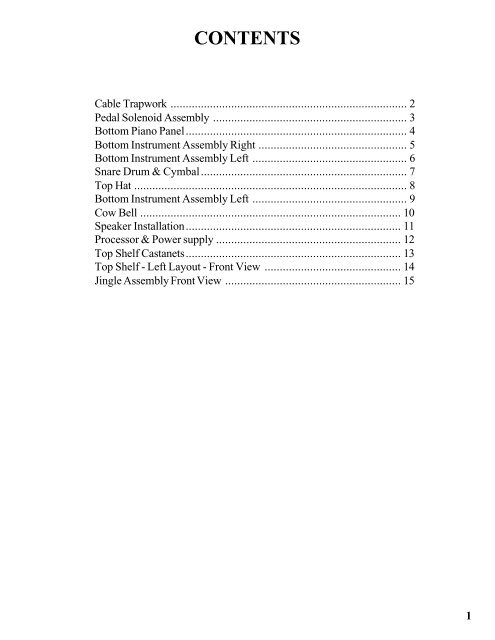
CONTENTS<br />
Cable Trapwork .............................................................................. 2<br />
Pedal Solenoid Assembly ................................................................ 3<br />
Bottom Piano Panel......................................................................... 4<br />
Bottom Instrument Assembly Right ................................................. 5<br />
Bottom Instrument Assembly Left ................................................... 6<br />
Snare Drum & Cymbal.................................................................... 7<br />
Top Hat .......................................................................................... 8<br />
Bottom Instrument Assembly Left ................................................... 9<br />
Cow Bell ...................................................................................... 10<br />
Speaker <strong>Install</strong>ation....................................................................... 11<br />
Processor & Power supply ............................................................. 12<br />
Top Shelf Castanets....................................................................... 13<br />
Top Shelf - Left Layout - Front View ............................................. 14<br />
Jingle Assembly Front View .......................................................... 15<br />
1
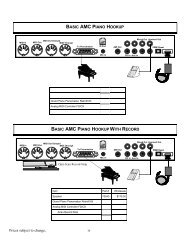
Cable Trapwork<br />
A unique system of cables are employed to elminate space consuming bar trapwork. The layout is depicted<br />
below.<br />
Bottom Assembly Piano Floor<br />
Cable Bracket<br />
Cat. No. 0820<br />
Pulley<br />
Cat. No. 70808<br />
Cable Connector<br />
Cat. No. 70814<br />
Pin<br />
Cat. No. 70229<br />
Cable Mounting Bracket<br />
Cat. No. 70803<br />
Existing Pedal<br />
Soft Shift Trapwork - Upright & Nick<br />
3/8"<br />
Screw<br />
Eye<br />
3/16"<br />
Screw<br />
Eye<br />
Predrill into the ends of the<br />
action parts so they don't<br />
split. Open the eyes enough<br />
to remove cable for servicing.<br />
Spring<br />
Rail<br />
Hammer<br />
Rail<br />
Note that the tensioning bracket need<br />
not be right next to the wheel<br />
assemlby. The calbe is okay with<br />
straight, free length if needed for<br />
clearance around pedals.<br />
Tensioning Bracket<br />
Position thus for access<br />
to both screws<br />
Looser<br />
Tighter<br />
Wheel Assembly<br />
Wheel has nylon<br />
spacers for positioning<br />
and friction control<br />
Cable<br />
Conduit<br />
Push-in<br />
Pedal<br />
Nylon Washer<br />
Felt Pad<br />
Locking Collar<br />
2
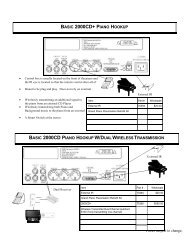
Pedal Solenoid Assembly<br />
Both the sustain and soft play pedals are active. The sustain action can be activated by either the foot pedal or<br />
in the play mode automatically by the pedal solinoid. The design activates the movement of the sustain pedal in<br />
the playback mode.<br />
Top Assembly Key Bed<br />
Alumium Bar 8"<br />
Cat. No. 70827<br />
Solenoid<br />
Cat. No. 70132<br />
Solenoid Bracket<br />
Cat. No. 70136<br />
Cable<br />
Cat. No. 70815<br />
PEDAL SOLENOID HOOKUP<br />
Pedal Solenoid should push normal to<br />
arc of bar to operate smoothly and<br />
quietly.<br />
Adjust stop nuts on pusher stem so<br />
spring quiets and limits drop back.<br />
Push<br />
Rod<br />
.250 Nom<br />
0.250"<br />
3
Bottom Piano Panel<br />
To remove bottom glass piano panel,open CD player doorand then turn locking latch fully counter clockwise.<br />
Be sure to hold panel so that it dosn't free fall. This panel must be removed to gain access to the bottom<br />
instrument platforms.<br />
L = Less<br />
1/2"<br />
W = Less 1/4"<br />
Cut Here<br />
Cut Here<br />
Window<br />
Bottom Panel<br />
Replacement of leaded glass window.<br />
The leaded glass window is held in place with glaziers push points. To remove use putty knife to pry<br />
from wood frame. Seeillustration below.<br />
Push<br />
Points<br />
Bottom Panel<br />
4
Bottom Instrument Assembly Right<br />
Both bottom instrument assemblies are removable. Two screws on each platform hold them in place. Remove<br />
these screws and gentlely lift up and tip the platforms toward the front of the piano. Do not tug or try to force<br />
the instrument panels from the piano. Tilt the instrument platform on the floor and detach the wires leading to<br />
the solenoids. The unit is now clear of all encumberances.<br />
Top View Cymbal Platform<br />
26 1/2" x 7 3/4" x 1/2"<br />
To access right platform, remove two<br />
screws at these locations<br />
Top View Drum Platform<br />
23 1/2" x 7 3/4" x 1/2"<br />
To access left platform, remove two<br />
screws at these locations<br />
Dia<br />
1/2"<br />
Dia<br />
1/2"<br />
Spacer Wood Blocks for<br />
mounting lower instrument<br />
panels floor of piano.<br />
Blocks<br />
1" x 2" x 2-3/4" 3/<br />
16" Thru<br />
6 Pcs per Nick 1/2<br />
Countersink<br />
Dia<br />
1/2"<br />
Dia<br />
3/16"<br />
Dia<br />
3/16"<br />
Dia<br />
3/16"<br />
Dia<br />
3/16"<br />
5
Bottom Instrument Assembly Left<br />
Bass & Snare Drum Assembly<br />
Bass Drum<br />
Cat. No. 70784<br />
1-1/4" Ball<br />
drill 1/4" Hole<br />
Varnish<br />
Cat. No. 70791<br />
Beater Stick<br />
6 3/4" x 1/4"OD<br />
Cat. No. 70777<br />
Snare Drum<br />
Cat. No. 70796<br />
Snare<br />
Cat. No. 70772<br />
Hidden from view<br />
3"<br />
Plunger Length 3"<br />
exclusive of rubber tip<br />
Left Metal Base<br />
Cat. No. 70844<br />
Jack Spring<br />
Schaff Piano<br />
#3776<br />
5/8"" Ball<br />
drill 1/4" Hole<br />
Varnish<br />
Cat. No. 70798<br />
Triple beaters<br />
Cat. No. 70789<br />
Bass drum stick 6-3/4"<br />
1-1/8" Ball drilled out with 1/4" hole. Hole depth 3/8"<br />
6
Snare Drum<br />
Snare Drum & Cymbal<br />
Attach Snare to Drum<br />
Cut snare in 1/2 with shears<br />
Bend end bracket perpendicular to wire<br />
strands.<br />
Use two # 70116 to fasten to rim of drum.<br />
Make sure wire strands are lying flat on inside<br />
of drum head.<br />
Snare stick 5-3/8"<br />
5/8' Ball drilled out with 1/4" hole.<br />
Hole depth 3/8"<br />
Glue in place with Elmer's glue.<br />
Cymbal<br />
Cymbal<br />
Cat# 70774<br />
)<br />
Single beater Housing Cat# 70781<br />
(not shown)<br />
Mounting Post Cat# 70775<br />
(not shown)<br />
7
Top Hat<br />
Cymbal<br />
Cat # 70776<br />
Cymbal<br />
Cat # 70778<br />
Pusher Guide Threaded<br />
Nylon<br />
Bushing<br />
Jam Nut Locking<br />
Collar<br />
Cat. No.<br />
70822<br />
Assembly order<br />
Felt Washer<br />
Cat. No.<br />
70142<br />
Locking<br />
Collar<br />
Cat. No.<br />
70822<br />
#70822 Locking Collar<br />
#70142 Felt<br />
1"<br />
Plunger Length 1"<br />
exclusive of rubber tip<br />
#70776 Cymbal<br />
#70142 Felt<br />
#70835 Nylon Sleeve<br />
#70783 Spring<br />
Threaded Nylon<br />
#70778 Cymbal<br />
Jam Nut<br />
8
Bottom Instrument Assembly Left<br />
Tamborine Assembly<br />
Tamborine<br />
Cat. No. 70768<br />
Rubber Tip Here<br />
*NOTE: Left bracket is<br />
different from right bracket -<br />
not matched pairs.<br />
1/4" Nylon Washer<br />
Cat. #70832<br />
Back View<br />
1/4" Locking Collar<br />
Cat. #70822<br />
9
Cow Bell<br />
Cow Bell<br />
Cat. No.<br />
70764<br />
Thumb<br />
screw<br />
secures<br />
cow bell<br />
Beater is<br />
positioned<br />
at 1/3<br />
distance<br />
from<br />
bottom of<br />
bell<br />
10
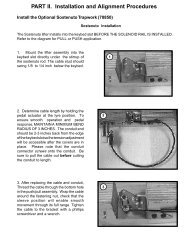
Speaker <strong>Install</strong>ation<br />
Speaker<br />
Refer to manufacturer's<br />
instructions for<br />
maintenance and servicing<br />
details of AR speaker.<br />
Volume setting on this<br />
unit determines the upper<br />
volume at which the<br />
audio tracks can be<br />
played. User volume<br />
control is located<br />
adjacent to user box.<br />
AR Speaker<br />
Cat. No. 70040<br />
The diagram below shows the appropriate dimensions for mounting the speaker.<br />
11
Processor & Power supply<br />
The power supply is mounted on the bottom floor of the piano on the right hand side. It is under the right<br />
platform. Cable connections face left.<br />
The processor is mounted directly behind the power supply. It is mounted vertically with access to cables<br />
facing upward. The processor is held in place with Velcro to permit easy access and removal.<br />
Note driver boards are situated under the xylophone. The position and spacing of these boards is important as<br />
the solenoid cables are of specific lengths and might not reach if the position of the note driver board is<br />
changed.<br />
Cable Headers<br />
34"<br />
20-1/4"<br />
41-1/2"<br />
51-3/4"<br />
Note Driver Board Placement<br />
12
Top Shelf Castanets<br />
Two diferent materials of construction are used to enhance the tonal quality of the nickelodeon.<br />
Locking<br />
Collars<br />
Cat. No.<br />
70822<br />
Bakelite<br />
Castanet<br />
Cat. No.<br />
70786<br />
Wood<br />
Castanet<br />
Cat. No.<br />
70790<br />
Triangle<br />
Triangle<br />
Cat. No.<br />
70770<br />
13
Top Shelf - Left Layout - Front View<br />
xylophone<br />
Beater Ball<br />
Cat. No.<br />
70779<br />
Xylophone<br />
Beater Stick<br />
Cat. No.<br />
70777<br />
Finger Jingle<br />
Cat. No. 70788<br />
6" Triangle<br />
Cat. No. 70770<br />
Top Section Brackets and mouning of top instrument support rail<br />
Locate brackets above backchecks 1/4" - 1/2",<br />
approximately 13-3/4" below top. This height<br />
puts the glockenspiel tops even with leaded<br />
glass line.<br />
Inside Front Panel<br />
x<br />
o o<br />
x<br />
3/8"<br />
13-3/4"<br />
To remove entire top rail assembly, remove<br />
two screws located at far left and right of<br />
the support rail. Unplug solenoid cable.<br />
5/8"<br />
14
Jingle Assembly Front View<br />
Finger Jingles<br />
Foam<br />
Locking Nut<br />
Locking Nut<br />
Foam<br />
Collar<br />
Solenoid Plunger<br />
Jingle<br />
Cat. No.<br />
70788<br />
Jingle Bracket<br />
Jingle Assembly Bottom View<br />
Solenoid mounted<br />
vertically<br />
Jingle with Punched Hole<br />
Cat. No. 70788<br />
Wood Block<br />
Wood Block<br />
Cat. No. 70766<br />
Beaters are staggered to<br />
enhance tonal playback<br />
quality<br />
15
Instrument Assignments<br />
Driver Board #6<br />
Base Solenoid Address 5x<br />
Conn. Addr. Notes<br />
J1 x0 Wood Block Center<br />
J2 x1 Wood Block Left<br />
J3 x2 Xylophone A7<br />
J4 x3 Xylophone G#7<br />
J5 x4 Xylophone G7<br />
J6 x5 Xylophone F#7<br />
J7 x6 Xylophone F7<br />
J8 x7 Xylophone E7<br />
J9 x8 Xylophone D#7<br />
J10 x9 Open<br />
J11 xA Finger Cymbals<br />
J12 xB Finger Cymbals<br />
J13 xC Bass Right<br />
J14 xD Bass Center<br />
J15 xE Bass Left<br />
J16 xF Tambourine<br />
Driver Board #7<br />
Base Solenoid Address 6x<br />
Conn. Addr. Notes<br />
J1 x0 Snare Right<br />
J2 x1 Snare Center<br />
J3 x2 Snare Left<br />
J4 x3 Cow Bell<br />
J5 x4 Crash Cymbal<br />
J6 x5 Hi-Hat<br />
J7 x6 Xylophone D7<br />
J8 x7 Xylophone C#7<br />
J9 x8 Xylophone C7<br />
J10 x9 Xylophone B6<br />
J11 xA Xylophone A#6<br />
J12 xB Xylophone A6<br />
J13 xC Xylophone G#6<br />
J14 xD Xylophone G6<br />
J15 xE Xylophone F#6<br />
J16 xF Xylophone F6<br />
Driver Board #8 (1/2)<br />
Base Solenoid Address 7x<br />
Conn. Addr. Notes<br />
J1 x0 Xylophone E6<br />
J2 x1 Xylophone D#6<br />
J3 x2 Xylophone D6<br />
J4 x3 Xylophone C#6<br />
J5 x4 Xylophone C6<br />
J6 x5 Xylophone B5 Castanets Right<br />
J7 x6 Xylophone A#5 Castanets Left<br />
J8 x7 Triangle<br />
16
Wiring<br />
45 1/2"<br />
Top Driver Signal<br />
38"<br />
24"<br />
Top Driver Power<br />
#8<br />
#7 #6<br />
Nick Top Instrument Cable CDR<br />
PMM Key<br />
Power Section<br />
Split<br />
Power<br />
Supply<br />
Nick<br />
Signal<br />
Middle Cable<br />
Processor<br />
PMM Key<br />
Signal Section<br />
#70752 Nick Processor<br />
Signal Cable<br />
Split here & attach standard<br />
81-1433 to driverboard<br />
Nick lower instrument cable CDR<br />
Cowbell<br />
Hi Hat<br />
Crash<br />
Tambo<br />
Snare<br />
Bass<br />
17
Wiring<br />
<strong>Nickelodeon</strong> Top Cable<br />
CAT# 70762<br />
28 AWG<br />
RS232 Male<br />
ALL MTA.100<br />
7-J1<br />
7-J2<br />
7-J3<br />
7-J4<br />
7-J5<br />
7-J6<br />
6-J13<br />
6-J14<br />
6-J15<br />
6-J16<br />
28 16<br />
1<br />
2<br />
3<br />
4<br />
5<br />
6<br />
7<br />
8<br />
9<br />
10<br />
11<br />
12<br />
13<br />
x<br />
x<br />
x<br />
x<br />
x<br />
x<br />
x<br />
x<br />
x<br />
x<br />
x<br />
x<br />
x<br />
x<br />
x<br />
x<br />
x<br />
x<br />
x<br />
x<br />
x<br />
x<br />
x<br />
x<br />
x<br />
14<br />
15<br />
16<br />
17<br />
18<br />
19<br />
20<br />
21<br />
22<br />
23<br />
24<br />
25<br />
<strong>Nickelodeon</strong> Lower Cable<br />
RS232 Female<br />
25<br />
24<br />
23<br />
22<br />
21<br />
20<br />
19<br />
18<br />
17<br />
16<br />
15<br />
14<br />
x<br />
x<br />
x<br />
x<br />
x<br />
x<br />
x<br />
x<br />
x<br />
x<br />
x<br />
x<br />
x<br />
x<br />
x<br />
x<br />
x<br />
x<br />
x<br />
x<br />
x<br />
x<br />
x<br />
x<br />
x<br />
13<br />
12<br />
11<br />
10<br />
9<br />
8<br />
7<br />
6<br />
5<br />
4<br />
3<br />
2<br />
1<br />
28 AWG<br />
60 64 68 72 80 90<br />
ALL MTA.100<br />
L<br />
C<br />
R<br />
L<br />
C<br />
R<br />
Cymbal<br />
HiHat<br />
Cowbell<br />
Snare<br />
Tambo<br />
Bass<br />
18
³3/8"<br />
#8<br />
14-1/2"<br />
#7<br />
1/8" Gap<br />
14-3/8"<br />
#6<br />
³5/8"<br />
Wiring<br />
Note Driver Board Assembly<br />
Hi Hat<br />
Cymbal<br />
Cowbell<br />
Snare - L<br />
Snare - C<br />
Snare - R<br />
Tambourine<br />
Base - L<br />
Base - C<br />
Base - R<br />
Cymballette - L<br />
Cymballette - R<br />
Open<br />
C/L<br />
Power<br />
Pins<br />
(3)<br />
J20 J21<br />
16<br />
15<br />
14<br />
13<br />
12<br />
11<br />
10<br />
9<br />
8<br />
7<br />
6<br />
5<br />
4<br />
3<br />
2<br />
1<br />
16<br />
15<br />
14<br />
13<br />
12<br />
11<br />
10<br />
9<br />
8<br />
7<br />
6<br />
5<br />
4<br />
3<br />
2<br />
1<br />
16<br />
15<br />
14<br />
13<br />
12<br />
11<br />
10<br />
9<br />
8<br />
7<br />
6<br />
5<br />
4<br />
3<br />
2<br />
1<br />
Triangle<br />
Castanet - L<br />
Castanet - R<br />
C<br />
C#<br />
D<br />
D#<br />
E<br />
F<br />
F#<br />
G<br />
G#<br />
A<br />
A#<br />
B<br />
C<br />
C#<br />
D<br />
D#<br />
E<br />
F<br />
F#<br />
G<br />
G#<br />
A<br />
Wood Block - R<br />
Wood Block - L<br />
19