Tru-Test Pull Out (WB) - Quality Certification Services
Tru-Test Pull Out (WB) - Quality Certification Services
Tru-Test Pull Out (WB) - Quality Certification Services

Create successful ePaper yourself
Turn your PDF publications into a flip-book with our unique Google optimized e-Paper software.
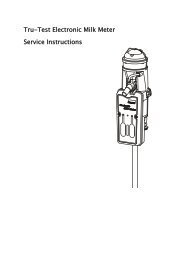
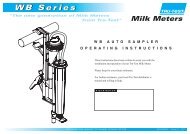
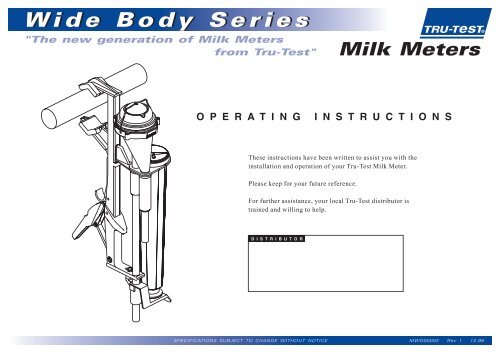
Wide Body Series<br />
"The new generation of Milk Meters<br />
from <strong>Tru</strong>-<strong>Test</strong>"<br />
Milk Meters<br />
O P E R A T I N G<br />
I N S T R U C T I O N S<br />
These instructions have been written to assist you with the<br />
installation and operation of your <strong>Tru</strong>-<strong>Test</strong> Milk Meter.<br />
Please keep for your future reference.<br />
For further assistance, your local <strong>Tru</strong>-<strong>Test</strong> distributor is<br />
trained and willing to help.<br />
D I S T R I B U T O R<br />
SPECIFICATIONS SUBJECT TO CHANGE WITHOUT NOTICE<br />
MWD00002 Rev 1 12.98
Installation and Brackets<br />
In all cases the Milk Meter should be mounted in a vertical position.<br />
The Milk Meter should be located as close as possible to the milk line.<br />
All milk hoses from the claw to the Milk Meter, and from the Milk Meter to the milk line,<br />
should be kept to a minimum to avoid excessive vacuum drop, slower milking and possible<br />
milk yield errors.<br />
Your Milk Meter is equipped with one of the mounting brackets (or similar) shown below.<br />
JAW HOOK<br />
Super-Clamp Bracket<br />
To install, extend the jaws to<br />
the open position by pulling<br />
down on the jaw hook, place<br />
jaws over the pipe and hold<br />
bracket down whilst closing<br />
trigger to clamp firmly onto<br />
pipe. To remove, release<br />
trigger and push Meter up.<br />
HIGH-LINE POSITION<br />
RIGHT ANGLE FLANGE<br />
CLAMP UNIT<br />
MULTI-GRIP DOVETAIL<br />
PLASTIC<br />
MOUNTING FLANGE<br />
Multi-Grip<br />
Bracket<br />
To install, firmly<br />
attach plastic<br />
mounting flange to<br />
facia board, steel<br />
member or pipe, with<br />
the slotted section in<br />
the vertical plane.<br />
Slide the Multi-Grip<br />
dovetail into the<br />
plastic mounting<br />
flange.<br />
TRIGGER<br />
Hanger Bracket<br />
Two sizes of Hanger<br />
Brackets are<br />
available; these being<br />
3” and 2”.<br />
Simply hang Meter<br />
over pipework taking<br />
into account the<br />
above installation<br />
guide lines.<br />
EXTENDIBLE TUBE<br />
Tube Bracket<br />
To install, firmly<br />
attach right angle<br />
flange to facia board,<br />
steel member or pipe,<br />
with the slotted<br />
sectioninthe<br />
horizontal plane.<br />
Slide the extendible<br />
tube through the<br />
clamp unit to adjust<br />
height of Meter.<br />
LOW-LINE POSITION<br />
RIGHT ANGLE FLANGE<br />
EXTENDIBLE TUBE<br />
CLAMP UNIT
Connection of Hoses<br />
Attach the milk hoses from the milking claw to the Milk Meter inlet tube and from<br />
the Milk Meter outlet to the milk line ensuring that hoses are kept to a minimum to<br />
avoid sagging and consequently possible errors in milk yield reading. If a take-off<br />
unit is used, connect your Milk Meter between the take-off and the milk line.<br />
HIGH MOUNTED<br />
MILK LINE<br />
Milking Hook-Up<br />
Operating Your Meter<br />
Removing the Flask<br />
and Taking a Sample<br />
During milking, milk flows up the Milk Meter inlet tube onto the Meter cover, where the milk<br />
spreads evenly and an exact proportion passes through a nozzle to the calibrated flask. The rest<br />
of the milk flows out through the Milk Meter outlet and to the milk line.<br />
OUTLET TUBE<br />
INLET TUBE<br />
LOW MOUNTED<br />
MILK LINE<br />
OUTLET TUBE<br />
INLET TUBE<br />
1. As each cow finishes milking, remove the flask by pushing down on the lower end of the<br />
flask foot with the palm of your hand. While doing this place your thumb on the thumb stop<br />
on the side of the flask foot. Simultaneously pull on the flask to free it from the seal in the<br />
flask top. As this happens a shut off valve closes the Milk Meter outlet to prevent loss of<br />
vacuum.<br />
2. Replace this flask with an empty flask by putting the upper lip of the new flask into the<br />
inside edge of the seal in the flask top. Then snap the flask back into the flask support foot.<br />
FOAM LINE<br />
MILK LINE<br />
FLASK TOP<br />
3. To record the milk weight, hold the flask you have removed from the Meter so that it is<br />
vertical and the milk line is at eye level. If a flask hanger is supplied, the flask can be hung<br />
from a pipeline until the user is ready to record yield and take a sample. Alternatively, the<br />
flask can be stood on a flat, even surface.<br />
4. Be careful to read the milk line (bottom of the meniscus) and not the foam line. To assist, it<br />
is useful to have a bright light behind the flask.<br />
5. To take a composite milk sample, cap the flask, then invert the flask at least two or three<br />
times to mix sample, then decant the required volume into a small sample vial.<br />
THUMB STOP<br />
FLASK FOOT
Washing Your Meter<br />
Manual Cleaning<br />
Wipe exterior surfaces with a clean damp cloth to remove dirt.<br />
Wash the Milk Meter in a hot detergent solution and rinse thoroughly with clean warm water.<br />
Cleaning in Place<br />
Connect the hoses so that the detergent solution flows through the Milk Meter in the opposite direction to normal<br />
i.e. entering the Meter via the exit and exiting the Meter via the inlet. This normally involves reversing the hose<br />
connections. Flasks and sealing rings will require separate handwashing after the Meter has been cleaned.<br />
We recommend that abrasive detergents are not used and that detergents are used at strengths recommended by<br />
the chemical manufacturer.<br />
Washing Hook-up<br />
(if washed in utensil room)<br />
WASHING MANIFOLD<br />
The use of brushes other than those supplied by <strong>Tru</strong>-<strong>Test</strong> on plastic surfaces must be avoided, as they may<br />
permanently affect metering accuracy.<br />
Washing Hook-up (if washed in place)<br />
OUTLET TUBE<br />
RETURN WASH LINE<br />
RETURN WASH LINE<br />
HIGH MOUNTED MILK LINE<br />
INLET TUBE<br />
OUTLET TUBE<br />
OUTLET TUBE<br />
LOW MOUNTED MILK LINE<br />
INLET TUBE<br />
INLET TUBE
Benefits Offered by New Wide Body Components<br />
SAMPLING NOZZLE<br />
Wide Body<br />
Green sampling nozzle enables greater Meter capacity.<br />
Wider inlet tube and internal diameter milking tube enables faster milking times.<br />
High flow rate milking cows have less effect on Meter and claw flooding.<br />
Use of clear polysulfone plastic allows easy identification of the new generation<br />
Wide Body Meters.<br />
FLUTES<br />
Wide Flask<br />
Unique concave flutes provide protection for the flask print and a level gauge for reading.<br />
Flask design enables easy gripping of flask for removal and turning.<br />
Meter capacity has been increased to 110 lb yields with a shorter length flask.<br />
Rubber flask plug has a flat base to allow flasks to be stood on a horizontal surface.<br />
INLET TUBE<br />
FLASK PLUG<br />
Flask Holder<br />
Lightweight, strong and compact design enables ideal placement for spare flask.<br />
Adjustable fitting allows the user to position the holder to suit.<br />
BACK EDGE<br />
Flask Foot<br />
Ergonomic design enables palm or thumb placement for ease of flask removal.<br />
Back edge of foot ensures flask can be readily snapped into position on the Meter.<br />
THUMB STOP
TroubleShooting<br />
Symptom<br />
Abnormal Reading<br />
Milk Meter more than 5 degrees from<br />
vertical<br />
Flask seal leaking air<br />
Insufficient vacuum<br />
Dirty Milk Meter<br />
Air hole in claw cap plugged<br />
Cracked cover or body<br />
Cover deflector point damaged or blunt<br />
Cracked flask<br />
Partially plugged/obstructed nozzle<br />
Damaged nozzle<br />
Solution<br />
Reposition to vertical<br />
Replace flask seal (should be<br />
replaced at least once a year)<br />
Have milking plant checked<br />
Remove from operation and clean<br />
Clean air hole<br />
Replace cover or body<br />
Replace cover<br />
Replace flask<br />
Carefully clean obstruction or nozzle<br />
Replace part and re-test<br />
Product Guarantee<br />
THIS PRODUCT IS GUARANTEED AGAINST<br />
FAILURE OR BREAKDOWN DURING NORMAL<br />
OR RECOMMENDED USE FOR ONE YEAR<br />
FROM THE DATE OF PURCHASE.<br />
IN ADDITION THE FOLLOWING ARE<br />
GUARANTEED FOR A FURTHER TWO YEARS<br />
<br />
<br />
Meter Body guaranteed to remain within specified tolerance levels<br />
when tested using a <strong>Tru</strong>-<strong>Test</strong> approved Water <strong>Test</strong> Rig.<br />
Flask printing guaranteed to remain legible under recommended<br />
washing and use procedures.<br />
Conditions of Guarantee<br />
Flask Filling Too Fast<br />
Hoses reversed<br />
Wrong nozzle used<br />
Damaged cap or metering nozzle<br />
No Sample in Flask<br />
Hoses not connected<br />
Flask seal in Milk Meter body<br />
pinched or missing<br />
Damaged flask<br />
Rocker valve stuck<br />
Cracked cover or body<br />
Partially plugged/obstructed nozzle<br />
Install hoses correctly, with the milk<br />
cluster connected to the Milk Meter<br />
inlet tube<br />
Use proper size nozzle<br />
Send to Milk Meter service centre<br />
or replace part<br />
Connect tightly<br />
Replace flask seal and reset properly<br />
(should be replaced at least once a year)<br />
Check sealing edge/replace or send to<br />
Milk Meter service centre<br />
Free or replace rocker valve<br />
Replace cover or body<br />
Carefully clean obstruction or nozzle<br />
<br />
<br />
<br />
<br />
<br />
The unit must have been used in accordance with the manufacturer's<br />
instructions supplied with each unit.<br />
The faulty unit must be returned to a service agent accredited by the<br />
distributor.<br />
This guarantee relates only to the standard of manufacture and the<br />
manufacturer will not be liable for any injury or damage sustained in<br />
the use of the product.<br />
This guarantee covers defective parts and faulty workmanship; it<br />
does not extend to wear and tear and defects resulting from other<br />
factors. It shall not apply when the unit has not been continuously in<br />
the possession of the purchaser.<br />
All claims under the guarantee must be made through the outlet from<br />
whom the unit was purchased and they will refer the claim to the<br />
distributor.<br />
®<br />
<strong>Tru</strong>-<strong>Test</strong> Limited, Auckland, New Zealand, www.tru-test.com