bdusc-060 - Big Dog Treestands
bdusc-060 - Big Dog Treestands
bdusc-060 - Big Dog Treestands

You also want an ePaper? Increase the reach of your titles
YUMPU automatically turns print PDFs into web optimized ePapers that Google loves.
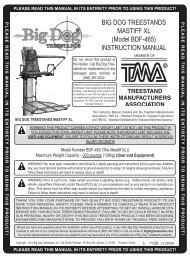
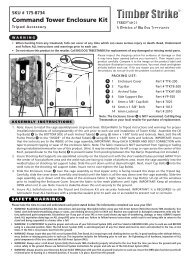
Model: BDUSC-<strong>060</strong><br />
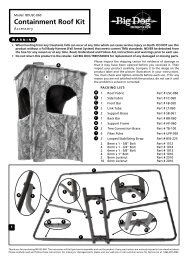
Containment Roof Kit<br />
Accessory<br />
W A R N I N G<br />
• When hunting from any treestand, falls can occur at any time which can cause serious injury or death. DO NOT use this<br />
product without a Full Body Harness (Fall Arrest System) that meets current TMA standards. NEVER be detached from<br />
the tree for any reason or at any time. Read, Understand and Follow ALL instructions and warnings prior to each use.<br />
• Do not return this product to the retailer. Call BIG DOG TREESTANDS for replacement of any damaged or missing parts.<br />
B<br />
A<br />
Please inspect the shipping carton for evidence of damage or<br />
that it may have been opened before you received it. Then<br />
inspect your product carefully. Compare it to the image on the<br />
product label and the picture illustration in your instructions.<br />
You must check and tighten all bolts before each use. If for any<br />
reason you are not satisfied with the product, do not use it until<br />
the problem is solved or corrected.<br />
A<br />
B<br />
C<br />
D<br />
E<br />
F<br />
G<br />
H<br />
I<br />
J<br />
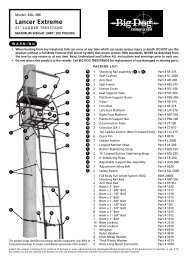
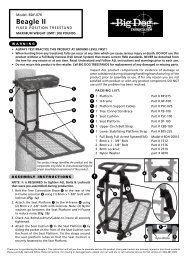
PACKING LIST:<br />
1 Roof Fabric Part # USC-<strong>060</strong><br />
1 Side Fabric Part # FC-<strong>060</strong><br />
1 Front Bar Part # FB-050<br />
2 Link Tube Part # LT-<strong>060</strong><br />
2 Support Brace Part # SB-061<br />
1 Back Bar Part # BB-<strong>060</strong><br />
1 Support Frame Part # HF-<strong>060</strong><br />
2 Tree Connection Brace Part # TB-100<br />
6 Fiber Poles Part # UFP-050<br />
2 Looped Stabilizing Strap Part # BSS-225<br />
2 8mm x 1 - 3/8" Bolt Part # 1512<br />
4 6mm x 1 - 3/4" Bolt Part # 1014<br />
2 6mm x 1 - 5/8" Bolt Part # 1013<br />
4 6mm x 1" Bolt Part # 1010<br />
2 8mm Locknut Part # 2510<br />
10 6mm Locknut Part # 2010<br />
C<br />
G<br />
G<br />
D<br />
E<br />
E<br />
H<br />
H<br />
D<br />
E<br />
G<br />
G<br />
D<br />
F<br />
F<br />
1<br />
H<br />
F<br />
Thank you for purchasing BDUSC-<strong>060</strong>. This instruction will tell you how to assemble and use the product. Every year hunters are seriously injured in tree stand accidents.<br />
Please carefully read and follow these instructions. For missing or damaged parts, please visit our web site or call customer service for fast service at 1-866-387-2002.
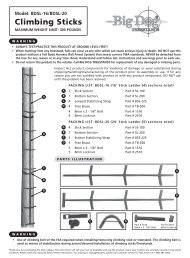
A S S E M B LY I N S T R U C T I O N S<br />
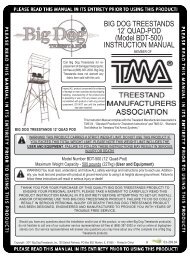
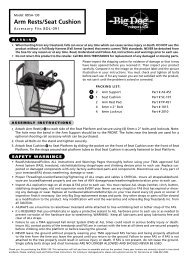
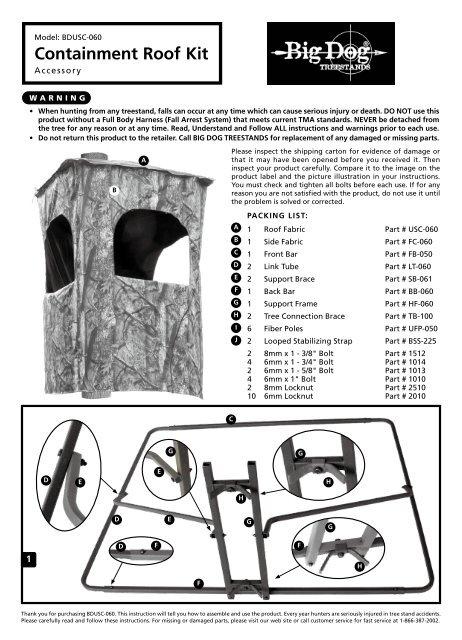
1. Bolt the Back Bar F to the Support Frame G using (2) 6mm x 1-3/4" bolts and locknuts. Note: The Support Frame<br />
should be to the OUTSIDE or roof area or BACK side of the Back Bar. Next, attach the (2) Tree Connection Brace(s) H<br />
to the short welded tubes on the Support Frame G on BACK side of Back Bar F and secure each using (1) 8mm x 1-3/8"<br />
bolt and locknut.<br />
2. Insert the Side Frame D INTO the Back Bar F , align the holes in both and secure together using (1) 6mm x 1" bolt and<br />
locknut. Next, insert the Front Tube C over the Side Frame D and align holes and secure with (1) 6mm x 1" bolt and<br />
locknut. Insert the opposite Side Frame D INTO the Back Bar F and Front Tube C and align the holes at each end and<br />
secure using (1) 6mm x 1" bolt and locknut at each end. Note: Insure ALL locknuts are to the opposite side of the Roof<br />
Fabric side. Wrap ALL bolts/locknuts with tape to prevent wear on the Roof Fabric/Side Fabric. (Fig. 1)<br />
3. Attach the Support Brace(s) E to the INSIDE of each Side in the Link Tube D and secure using (1) 6mm x 1-5/8" bolt<br />
and locknut and attach the opposite end of the Support Brace to the OUTSIDE of the Support Frame G and secure<br />
using (1) 6mm x 1-3/4" bolt and locknut on each side. NOTE: Insure the locknuts are to the INSIDE of the Side Bars.<br />
4. Install the Roof Fabric A onto the assembled frame assembly. Insure the Roof Fabric is orienated correctly with the<br />
sewn pockets for the Fiber Poles running from Left to Right. Next, starting at one end, insert the Fiber Poles through<br />
the sewn pockets across the Roof Fabric. [Note: Clean the paint out of the holes in the Side Frame(s) to aide in<br />
inserting of the Fiber Pole(s)] Insert one end of the Fiber Pole into the hole on the Side Frame, carefully flex the pole<br />
and insert the opposite end of the Fiber Pole into the opposite Side Frame hole. Repeat on remaining Fiber Poles.<br />
5. Side Fabric (Item B): The Side Fabric ties off to the Roof Frame and behind the tree. To install, locate the center<br />
window and work your way around securing the side fabric to the roof frame. Go back through and check all bolts<br />
to insure all are securely tightened.<br />
I N S T R U C T I O N S f o r u s e<br />
1. This unit can be used on a treestand or on the ground. In both cases, this unit will need to be installed to a tree. The<br />
sewn loops at the bottom are used when used on the ground with the ground stakes supplied.<br />
2. Determine the location of the Roof Assembly in relation to the treestand platform or ground by the length of the<br />
side panels in the Side Fabric. Next, secure the top location strap (at upper Tree Connection Brace) around the tree<br />
and secure firmly against the tree. See Strap Instructions for attaching and securing the straps. Next, secure the<br />
bottom strap to the tree (on second Tree Connection location).<br />
3. Drape the side panels to the outside of the platform area of the treestand. Tie off both sides of the side panels<br />
behind the tree. Note: Insure to tie the bottom bungy strap is tied behind the tree located near the bottom. Note:<br />
Insure to have the door and window openings un-zipped during attaching to tree for visibility.<br />
4. While facing the Enclosure Assembly, insure the door opening is zipped closed, pull on the bottom bungy until the<br />
sides are tight around the platform area. Tie off the loose ends underneath the platform. Moving the Roof assembly<br />
up will tighten the side panels after the bottom is secured around platform area. USE OF TMA APPROVED FALL<br />
ARREST SYSTEM (FAS) IS REQUIRED AT ALL TIMES DURING SET-UP/REMOVAL/AND USE OF THIS PRODUCT OR WITH<br />
ANY TREESTAND AT AN ELEVATED POSITION.<br />
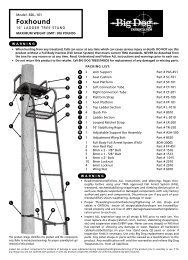
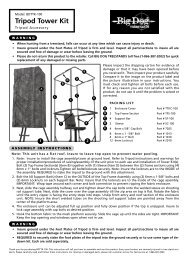
Strap Attachment/Threading Instructions<br />
1 2 3<br />
Wrap the sewn loop end of the<br />
cam buckle around the tube.<br />
Spread the looped end open and pull<br />
the cam buckle through the sewn loop.<br />
Pull the cam buckle tight until the<br />
strap is tight around the tube.<br />
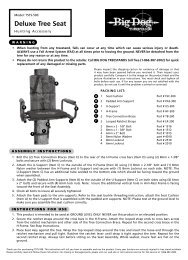
1 2<br />
3<br />
Push cam buckle down and insert<br />
the strap end up through cam buckle.<br />
While holding the button down, pull<br />
the strap through the cam buckle.<br />
Pull on the strap end until tight against the tree.<br />
Release button to secure cam buckle to the strap.<br />
<strong>Big</strong> <strong>Dog</strong> <strong>Treestands</strong> ® , Inc. 120 Detroit Parkway, PO Box 952,Morton, Illinois 61550<br />
Toll Free 1-866-387-2002 www.bigdogtreestands.com<br />
©2010 <strong>Big</strong> <strong>Dog</strong> <strong>Treestands</strong> ® , Inc.<br />
Printed in China