JV-2080 FAQ (PDF) - Roland
JV-2080 FAQ (PDF) - Roland
JV-2080 FAQ (PDF) - Roland

Create successful ePaper yourself
Turn your PDF publications into a flip-book with our unique Google optimized e-Paper software.
®<br />
ÂØÒňΠ©<br />
Supplemental<br />
Notes<br />
<strong>JV</strong>-<strong>2080</strong> Frequently Asked Questions<br />
March 4th, 1999<br />
SN101 v1.0<br />
The <strong>Roland</strong> <strong>JV</strong>-<strong>2080</strong> Synthesizer Module builds on the power<br />
of the popular Super <strong>JV</strong>-1080 Synthesizer Module. This versatile<br />
16-part multitimbral synthesizer module features 64-voices<br />
of polyphony and a total of 768 Patches including a bank for<br />
General MIDI. The <strong>JV</strong>-<strong>2080</strong>’s eight expansion slots for SR-<br />
<strong>JV</strong>80 Expansion Boards provide a wide palette of sounds for<br />
any project. Five effect processors and cool sync features offer<br />
additional tools. If you are new to the <strong>JV</strong>-<strong>2080</strong> and would like<br />
an overview of some basic concepts, refer to the <strong>JV</strong>-<strong>2080</strong><br />
TurboStart, which is available from our FaxBack system (document<br />
#20054) or from our Website (www.rolandus.com). This<br />
supplemental document is not meant to be a replacement of<br />
the the Owner’s Manual, but simply a collection of answers to<br />
common questions received in the Product Support Department<br />
at <strong>Roland</strong> U.S. For more in-depth information, please consult<br />
the <strong>JV</strong>-<strong>2080</strong> Owner’s Manual.<br />
Topics<br />
We will cover the following topics in this document:<br />
I. How do I set up a Performance for sequencing?<br />
II. How do I select Patches via MIDI?<br />
III. How do I create a custom drum kit?<br />
IV. How do I pan individual instruments in a drum kit?<br />
V. How do I change the speed of the rotary effect via<br />
MIDI?<br />
VI. How do I sync the LFO to an internal or external clock?<br />
VII. How do I sync phrase/beatloops to a sequencer?<br />
VIII. How do I sync the effects to an external clock?<br />
IX. How do I copy the effects settings of a Patch to a<br />
Performance?<br />
X. What is the difference between the various effect routing<br />
options?<br />
XI. How do I route parts through the direct outputs using an<br />
insert effect (EFX)?<br />
XII. How do I use system controllers?<br />
XIV. How do I perform data transfers and bulk dumps?<br />
©1999 <strong>Roland</strong> Corporation U.S. <strong>JV</strong>-<strong>2080</strong> Frequently Asked Questions Faxback # 21074 Page 1
®ÂØÒňΠSupplemental Notes <strong>JV</strong>-<strong>2080</strong> Frequently Asked Questions<br />
I. How Do I Set Up a Performance for Sequencing?<br />
Fig. 1<br />
Palette View of the<br />
Perform/Part screen<br />
II.<br />
The <strong>JV</strong>-<strong>2080</strong> has three modes: Performance, Patch, and<br />
Rhythm. Performance mode allows you to have multiple<br />
instruments playing at the same time, which is ideal for<br />
sequencing. Each Performance contains up to 15 different<br />
Patches, plus a Rhythm Kit. To configure your MIDI gear<br />
with the <strong>JV</strong>-<strong>2080</strong>, connect a MIDI cable from the MIDI OUT<br />
of your MIDI interface or hardware sequencer to the MIDI IN<br />
of the <strong>JV</strong>-<strong>2080</strong>. The <strong>JV</strong>-<strong>2080</strong> contains many preset<br />
Performances that can be used for sequencing. Let’s take a<br />
look at one of these Performances and get familiar with<br />
some of the parameters commonly used when sequencing.<br />
1) Press PERFORM, so it is lit.<br />
2) Press PRESET (located in the upper right section of<br />
the front panel).<br />
3) Use the VALUE dial to select “Preset A: 01 [Seq:Pop].”<br />
This Performance is ideal for sequencing because each<br />
Part is set to its own MIDI channel.<br />
4) Press F3[PART] to access the Part parameters including<br />
volume, panning, etc.<br />
5) Press F6[PALETTE]. Now, instead of<br />
looking at the parameters for a single<br />
Part, we can see the parameters for<br />
eight Parts at the same time (see Fig.1).<br />
6) Use the CURSOR buttons to select the<br />
desired Part(1-16).<br />
7) Set the MIDI transmit channel on your keyboard to<br />
match the number of the Part you want to hear. For<br />
example, MIDI channel 1 plays the instrument (Patch)<br />
assigned to Part 1. MIDI channel 2 plays Part 2, etc.<br />
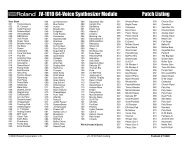
How Do I Select Patches Via MIDI?<br />
In addition to choosing sounds from the front panel, all of the<br />
sounds in the <strong>JV</strong>-<strong>2080</strong> can be accessed through MIDI. There<br />
are 128 Program Change messages available in MIDI. For<br />
instruments that contain more than 128 sounds, Bank Select<br />
messages (continuous controllers 0 and 32) are used to select<br />
groups (banks) of Patches. The <strong>JV</strong>-<strong>2080</strong> uses controller 0 to<br />
select the main Patch bank that you want (e.g., internal memory,<br />
card, or expansion board), then it uses controller 32 to<br />
choose the appropriate “sub-bank” (e.g., expansion board A,<br />
Patches 1-128). Software sequencers (e.g., Cubase, Logic,<br />
Performer, Vision, Cakewalk) often have built-in Patch lists for<br />
various MIDI instruments. Simply<br />
©1999 <strong>Roland</strong> Corporation U.S. <strong>JV</strong>-<strong>2080</strong> Frequently Asked Questions Faxback # 21074 Page 2
®ÂØÒňΠSupplemental Notes <strong>JV</strong>-<strong>2080</strong> Frequently Asked Questions<br />
Selecting Patches Via MIDI (continued)<br />
configure your software so it recognizes it is working with<br />
the <strong>JV</strong>-<strong>2080</strong>. A Patch list is usually accessed in a Patch column<br />
within the software. If your software does not have a<br />
specific Patch list for the <strong>JV</strong>-<strong>2080</strong>, then you can use the<br />
following chart (see Fig. 2) to input the appropriate bank<br />
select and program change messages manually.<br />
These commands must appear in the following order: controller<br />
0, controller 32, then the program change. Some<br />
sequencers use a single bank number in place of CC0 and<br />
CC32. If that is the case, use the value listed under Bank #<br />
in Fig. 2 in place of the CC00 and CC32 values. Be sure to<br />
leave some blank space (one measure is usually enough) at<br />
the beginning of your song, so your keyboard will have time<br />
to recall the right Patches before the music starts.<br />
CC 00 CC 32 Program # Bank # Patch Bank Patch Number<br />
Fig. 2<br />
Bank Select<br />
Messages<br />
80 0 0-127 10,240 User (INT) #1-128<br />
82 0 0-127 10,496 User (CRD) #1-128<br />
81 0 0-127 10,368 Presets A #1-128<br />
81 1 0-127 10,369 Presets B #1-128<br />
81 2 0-127 10,370 Presets C #1-128<br />
81 3 0-127 10,371 Presets D (GM) #1-128<br />
81 4 0-127 10,372 Presets E #1-128<br />
83 0 0-127 10,624 PCM Card #1-128<br />
84 0 0-127 10,752 Expansion Board A #1-128<br />
84 1 0-127 10,753 Expansion Board A #129-255<br />
84 2 0-127 10,754 Expansion Board B #1-128<br />
84 3 0-127 10,755 Expansion Board B #129-255<br />
84 4 0-127 10,756 Expansion Board C #1-128<br />
84 5 0-127 10,757 Expansion Board C #129-255<br />
84 6 0-127 10,758 Expansion Board D #1-128<br />
84 7 0-127 10,759 Expansion Board D #129-255<br />
84 8 0-127 10,760 Expansion Board E #1-128<br />
84 9 0-127 10,761 Expansion Board E #129-255<br />
84 10 0-127 10,762 Expansion Board F #1-128<br />
84 11 0-127 10,763 Expansion Board F #129-255<br />
84 12 0-127 10,764 Expansion Board G #1-128<br />
84 13 0-127 10,765 Expansion Board G #129-255<br />
84 14 0-127 10,766 Expansion Board H #1-128<br />
84 15 0-127 10,767 Expansion Board H #129-255<br />
For example, to call up Patch 21 from the Wave Expansion<br />
Board A, put the following information into your sequence:<br />
Controller 0 = 84<br />
Controller 32 = 0<br />
Program Change = 21<br />
©1999 <strong>Roland</strong> Corporation U.S. <strong>JV</strong>-<strong>2080</strong> Frequently Asked Questions Faxback # 21074 Page 3
®ÂØÒňΠSupplemental Notes <strong>JV</strong>-<strong>2080</strong> Frequently Asked Questions<br />
Fig. 3<br />
Wave Parameter<br />
Page<br />
III.<br />
Currently Selected<br />
Percussion Instrument<br />
IV.<br />
How Do I Create a User Drum Kit?<br />
The default instruments within a ROM rhythm kit can be<br />
assigned to other instruments. You can quickly select a<br />
percussion instrument to be edited by using a MIDI keyboard<br />
or other controller. Use the following procedure to<br />
customize the instruments used in a drum kit:<br />
1) Press RHYTHM.<br />
2) Press F2[WG] to display the Wave<br />
parameter page (see Fig. 3).<br />
3) Press a key on your MIDI keyboard to<br />
select a percussion instrument.<br />
4) Rotate the VALUE dial or use the<br />
INC/DEC buttons to select the desired<br />
instrument.<br />
5) Repeat steps 3-4 to configure additional percussion<br />
instruments as desired.<br />
6) Press UTILITY to access the WRITE function when<br />
you are finished.<br />
7) Press F1[WRITE] to display the Write page.<br />
8) Rotate the VALUE dial to select a User location<br />
(User 01-02).<br />
9) Press F6[EXECUTE] to store the current settings to<br />
a User location. This will erase the settings for the<br />
User kit selected in step 8 and replace them with the<br />
current settings. If you do not want to erase the<br />
selected User kit, press EXIT.<br />
How Do I Pan Individual Instruments in a Rhythm Kit?<br />
Every rhythm kit in the <strong>JV</strong>-<strong>2080</strong> can be customized so<br />
that individual instruments are panned within the stereo<br />
field. Both left and right outputs must be connected in<br />
order for these changes to be heard. Remember to write<br />
your changes into a User location once editing is completed.<br />
Use the following procedure to pan individual<br />
instruments in a rhythm kit:<br />
1) Press RHYTHM.<br />
2) Press F4[KEY TVA] to display level and pan parameters.<br />
3) Use the CURSOR buttons to select “Tone Pan.”<br />
4) Press the appropriate key on your keyboard to<br />
select the desired instrument.<br />
5) Use the VALUE dial to set the panning for that<br />
instrument as desired.<br />
©1999 <strong>Roland</strong> Corporation U.S. <strong>JV</strong>-<strong>2080</strong> Frequently Asked Questions Faxback # 21074 Page 4
®ÂØÒňΠSupplemental Notes <strong>JV</strong>-<strong>2080</strong> Frequently Asked Questions<br />
Panning Individual Instruments in a Drum Kit (continued).<br />
6) Repeat steps 4-5 to adjust the panning for additional<br />
instruments in the Rhythm kit as desired.<br />
7) Press UTILITY.<br />
8) Press F1[WRITE] to display the Write parameter page.<br />
9) Use the VALUE dial to select a User location (01-02).<br />
10) Press F6[EXECUTE] to save the changes to your kit.<br />
This will erase the settings for the User kit selected in<br />
step 9 and replace them with the current settings. If you<br />
do not want to erase the selected User kit, press EXIT.<br />
Using effects on a rhythm instrument can<br />
affect its pan position.<br />
V. How Do I Change the Speed of the Rotary Effect Via MIDI?<br />
Fig. 4<br />
Control Source<br />
Parameter Page<br />
The <strong>JV</strong>-<strong>2080</strong> allows you to control the speed of the<br />
rotary speaker effect algorithm remotely via MIDI continuous<br />
controller messages. Assigning rotary speed to an<br />
expression pedal is a useful feature that saves your<br />
hands from having to trigger the effect with a bender or<br />
by applying aftertouch. For the following example, we<br />
are going to control rotary speed from a pedal connected<br />
to an external device:<br />
1) Set the external device so that pressing the pedal<br />
transmits Foot Controller messages (CC#4).<br />
2) Press PATCH.<br />
3) Press PRESET.<br />
4) Press the TONE SWITCH 1 button (under USER).<br />
5) Use the VALUE dial to select “PR-A:54 Rocker Spin.”<br />
6) Press F6[EFFECTS] to display the Effects parameter<br />
page.<br />
7) Press F3[EFX Ctl] to display the Control<br />
Source parameter page (see Fig. 4).<br />
8) Use the CURSOR buttons to select the<br />
EFX Ctrl 1 Control Source parameter.<br />
9) Use the VALUE dial to select “Foot.”<br />
10) Use the VALUE dial to set the Depth<br />
parameter to “+63.”<br />
Other Patches that use the rotary effect algorithm are:<br />
PR-A:49 AugerMentive<br />
PR-A:50 Perky B<br />
PR-A:51 The Big Spin<br />
PR-A:52 Roller Spin<br />
©1999 <strong>Roland</strong> Corporation U.S. <strong>JV</strong>-<strong>2080</strong> Frequently Asked Questions Faxback # 21074 Page 5
®ÂØÒňΠSupplemental Notes <strong>JV</strong>-<strong>2080</strong> Frequently Asked Questions<br />
Controlling the Rotary Effect Via MIDI (continued)<br />
You can also control the speed of the rotary<br />
speaker effect in Performance mode, although<br />
you will need to make sure that the MIDI receive<br />
channel for the Part you wish to affect is the<br />
same as the control channel (on the System MIDI<br />
page).<br />
VI.<br />
How Do I Sync the LFO to the Internal or External Clock?<br />
Fig. 5<br />
LFO Parameter<br />
Page<br />
The Low Frequency Oscillator (LFO) adds varying rates<br />
and depths of modulation to a given waveform in a Patch.<br />
It is often desirable to use the LFO to accentuate the character<br />
of a Patch. The LFO is commonly used to control<br />
pitch, volume, or panning. The <strong>JV</strong>-<strong>2080</strong> lets you sync the<br />
tempo of the LFO to its internal clock, so the changes in<br />
sound caused by the LFO sound in time with the internal<br />
clock tempo of the <strong>JV</strong>-<strong>2080</strong>. Use the following procedure<br />
to edit a Patch so its LFO syncs to an external clock:<br />
For a Patch:<br />
1) Press PATCH.<br />
2) Press F5[LFO&CTL] to<br />
display the LFO parameter<br />
pages (see Fig. 5).<br />
3) Press F1[LFO 1] or<br />
F2[LFO 2] to select one<br />
of two LFOs.<br />
4) Use TONE SELECT [1]-[4] to select the Tone to<br />
which the settings will apply.<br />
5) Use the CURSOR buttons to select “Ext Sync.”<br />
6) Use the VALUE dial to select “CLK.”<br />
7) Use the CURSOR buttons to select “Rate.”<br />
8) Use the VALUE dial to specify the rate/speed of the<br />
LFO cycle (e.g.,h , q , e ).<br />
9) Press F1 for COMMON.<br />
10) Press F1 for GENERAL.<br />
11) Use the CURSOR buttons to select “Clock Source.”<br />
12) Use the VALUE dial to set the Clock Source to<br />
“SYSTEM.”<br />
©1999 <strong>Roland</strong> Corporation U.S. <strong>JV</strong>-<strong>2080</strong> Frequently Asked Questions Faxback # 21074 Page 6
®ÂØÒňΠSupplemental Notes <strong>JV</strong>-<strong>2080</strong> Frequently Asked Questions<br />
Syncing the LFO (continued)<br />
Now let’s write this edited Patch into a User location to<br />
be used in a Performance:<br />
1) Press UTILITY.<br />
2) Press F1[WRITE] to call up the Write screen.<br />
3) Use the VALUE dial to select a User location.<br />
4) Press F6[EXECUTE] to write.<br />
5) Press PERFORMANCE.<br />
6) Press F3[PART] to display the Part Param page.<br />
7) Press F6[PALETTE] to display the Part Palette page.<br />
8) Use the LEFT/RIGHT CURSOR buttons to select a Part.<br />
9) Use the UP/DOWN CURSOR buttons to select<br />
“Patch Group.”<br />
10) Use the VALUE dial to select “USR.”<br />
11) Press the CURSOR DOWN button once to select<br />
“Patch Number.”<br />
12) Use the VALUE dial to select the Patch that was<br />
edited and written to the User bank in steps 3 and 4.<br />
In addition to syncing its LFOs to an internal clock, the<br />
<strong>JV</strong>-<strong>2080</strong> can also set its LFOs to sync to external MIDI clock<br />
messages. For example, the LFO can be synced to a MIDI<br />
sequencer so that the rate of modulation is in time with the<br />
tempo of the song. Use the following procedure to sync the<br />
LFOs in the <strong>JV</strong>-<strong>2080</strong> to external MIDI clock:<br />
1) Select a Patch that uses external LFO sync (as<br />
described previously).<br />
2) Press PERFORM.<br />
3) Press F1[Common].<br />
4) Use the CURSOR buttons to select “Clock Source.”<br />
5) Use the VALUE dial to set the Clock Source to<br />
“SYSTEM.”<br />
6) Press SYSTEM.<br />
7) Press F1[SETUP].<br />
8) Use the CURSOR buttons to select “Clock Source.”<br />
9) Use the VALUE dial to set the Clock Source to “MIDI.”<br />
The tempo from the external device will be<br />
displayed under “External Tempo” on the<br />
Performance Common screen.<br />
Tip<br />
You can enter Patch Edit mode from within<br />
Performance Mode by holding PERFORM and pressing<br />
PATCH. Any edits done here will, however, be<br />
temporary until that Patch is saved to a User location.<br />
©1999 <strong>Roland</strong> Corporation U.S. <strong>JV</strong>-<strong>2080</strong> Frequently Asked Questions Faxback # 21074 Page 7
®ÂØÒňΠSupplemental Notes <strong>JV</strong>-<strong>2080</strong> Frequently Asked Questions<br />
Fig. 6<br />
Waveform<br />
Parameter Page<br />
VII.<br />
How do I sync Phrase/Beatloops to a<br />
Sequencer (External Clock Source)?<br />
The <strong>JV</strong>-<strong>2080</strong> has eight expansion slots for SR-<strong>JV</strong>80<br />
Expansion Boards. Some of these expansion boards (e.g.,<br />
SR-<strong>JV</strong>80-10 Bass & Drums, SR-<strong>JV</strong>80-11 Techno, SR-<strong>JV</strong>80-<br />
12 Hiphop) have phrase/beatloops that are set to play at a<br />
specified tempo. The <strong>JV</strong>-<strong>2080</strong> allows each tone [1]-[4] used<br />
in a Patch to be synced to a sequencer’s clock so that the<br />
tempos match. This ‘sync’ feature enables you to manipulate<br />
beatloop tempos to match the tempo of your song. Use<br />
the following procedure to set the <strong>JV</strong>-<strong>2080</strong> to sync a<br />
phrase/beatloop to an external MIDI clock source:<br />
1) Hold PERFORM and press PATCH.<br />
2) Press F2[WG] to select the Waveform Display page.<br />
3) Press F1[WG Prm] to<br />
select the Waveform<br />
Parameter page (see<br />
Fig.6).<br />
4) Use the CURSOR buttons<br />
to select a Tone [1]-[4]<br />
which uses a wave<br />
(phrase/beatloop) that has<br />
a tempo (BPM) display.<br />
5) Use the VALUE dial to set the Tone Delay Mode to<br />
“TEMPO-SYNC.”<br />
6) Press PERFORM.<br />
7) Press F1[COMMON] to display the Performance<br />
Common parameters.<br />
8) Use the CURSOR buttons to select “Clock Source.”<br />
9) Use the VALUE dial to select “SYSTEM.”<br />
10) Press SYSTEM.<br />
11) Press F1[SETUP] to display the global system<br />
parameter page.<br />
12) Use the CURSOR buttons to select “Clock Source.”<br />
13) Use the VALUE dial to set the Clock Source to MIDI.<br />
Tip<br />
It is a good idea to save this Patch to a User<br />
location, as detailed in the previous section<br />
(“Syncing the LFO” - page 7), for future use.<br />
©1999 <strong>Roland</strong> Corporation U.S. <strong>JV</strong>-<strong>2080</strong> Frequently Asked Questions Faxback # 21074 Page 8
®ÂØÒňΠSupplemental Notes <strong>JV</strong>-<strong>2080</strong> Frequently Asked Questions<br />
VIII.<br />
How Do I Sync the Effects to an External Clock?<br />
The <strong>JV</strong>-<strong>2080</strong> allows some of the internal effect algorithms<br />
to be synced with external MIDI clock. For example,<br />
you can set delay times to sync to the tempo of<br />
your song. This is a real time-saver because it saves you<br />
from having to adjust the settings manually. The <strong>JV</strong>-<br />
<strong>2080</strong>’s effect settings will be controlled by the tempo of<br />
your sequencer.<br />
Use the following procedure to sync “19:TRIPLE-TAP-<br />
DELAY” to an external clock:<br />
1) Press PERFORM.<br />
2) Press F5[EFFECTS] to display the Effects page.<br />
3) Press F2[EFX Prm] to display the Effects Parameter page.<br />
4) Use the CURSOR buttons to select “Delay Center.”<br />
5) Use the VALUE dial to select “e” (an eighth note value).<br />
6) Use the CURSOR buttons to select “Delay Right.”<br />
7) Use the VALUE dial to select “e” (an eighth note value).<br />
8) Use the CURSOR buttons to select “Delay Left.”<br />
9) Use the VALUE dial to select “x ” (a sixteenth note<br />
value).<br />
10) Press PERFORM.<br />
11) Press F2[WG] to display the Wave Parameter page.<br />
12) Use the CURSOR buttons to select “Clock Source.”<br />
13) Use the VALUE dial to select “SYSTEM.”<br />
14) Press SYSTEM.<br />
15) Press F1[SETUP] to select the Setup parameter<br />
page.<br />
16) Use the CURSOR buttons to select “Clock Source.”<br />
17) Use the VALUE dial select “MIDI.”<br />
The following effects can be configured so that they<br />
sync to an external MIDI clock:<br />
16:STEP-FLANGER<br />
19:TRIPLE-TAP-DELAY<br />
20:QUADRUPLE-TAP-DELAY<br />
©1999 <strong>Roland</strong> Corporation U.S. <strong>JV</strong>-<strong>2080</strong> Frequently Asked Questions Faxback # 21074 Page 9
®ÂØÒňΠSupplemental Notes <strong>JV</strong>-<strong>2080</strong> Frequently Asked Questions<br />
IX.<br />
Fig. 7<br />
Effects Copy Page<br />
How Do I Copy the Effects Settings of a Patch to a<br />
Performance?<br />
Often, it is desirable to use Patches in Performance<br />
Mode and have them sound exactly as they do in Patch<br />
Mode. The <strong>JV</strong>-<strong>2080</strong> allows you to copy the effects settings<br />
of a Patch to a Performance. This enables you to<br />
replicate the reverb, chorus, and insert effect (EFX) settings<br />
from Patch Mode in your Performance. Use the following<br />
procedure to copy the effects settings of a Patch<br />
to a Performance:<br />
1) Press UTILITY.<br />
2) Press F2[COPY] to select the Copy function.<br />
3) Press F2[EFFECT] to<br />
select the Effect Copy<br />
page (see Fig. 7).<br />
4) Use the CURSOR buttons<br />
to select the “Source”<br />
parameter.<br />
5) Use the VALUE dial to select “PATCH.”<br />
6) Use the CURSOR buttons and the VALUE dial to select<br />
the Patch from which you wish to copy the effects.<br />
7) Use the CURSOR buttons to select “Copy Type.”<br />
8) Use the VALUE dial to select “ALL.”<br />
9) Press F6[EXECUTE] to copy the effects from the<br />
selected Patch to the Performance.<br />
10) Press EXIT twice to return to Performance Play<br />
Mode.<br />
Once the Patch effects settings have been copied to the<br />
current Performance, we need to ensure that Patches<br />
assigned to the desired Parts are routed to the various<br />
effects processors just as they would be in Patch Mode.<br />
This is determined by the Output Assign setting for each<br />
Part in the Performance. An Output Assign setting of<br />
“Pt” (A, B, or C) indicates that the Patch assigned to<br />
that Part will determine the EFX settings for the corresponding<br />
processor (A, B, or C). Up to three Parts can<br />
be routed this way. Use the following procedure to set<br />
the output assignments for a Part:<br />
1) Press F5[EFFECT] to display the Effects page.<br />
2) Press F6[PALETTE] to view eight parts simultaneously.<br />
3) Use the CURSOR buttons to select “Output Assign”<br />
for the desired Part.<br />
4) Use the VALUE dial to select “Pt-A.”<br />
5) Use the CURSOR buttons to select “Output Level.”<br />
©1999 <strong>Roland</strong> Corporation U.S. <strong>JV</strong>-<strong>2080</strong> Frequently Asked Questions Faxback # 21074 Page 10
®ÂØÒňΠSupplemental Notes <strong>JV</strong>-<strong>2080</strong> Frequently Asked Questions<br />
Adjusting the Output Settings for a Part (continued).<br />
6) Use the VALUE dial to select “127.”<br />
7) Use the CURSOR buttons to select “Chorus Send.”<br />
8) Use the VALUE dial to select “127.”<br />
9) Use the CURSOR buttons to select “Reverb Send.”<br />
10) Use the VALUE dial to select “127.”<br />
11) Press F6[PART 1] to return to the single Part view.<br />
12) Press F1[GENERAL] to select the EFX Information<br />
editing page.<br />
13) Use the CURSOR buttons to select “EFX-A.”<br />
14) Use the VALUE dial to set the EFX-Source to<br />
“PERFORM.”<br />
15) Repeat steps 3-14 for any two additional Parts using<br />
“Pt-B” or “Pt-C” as Output Assignments.<br />
X. What is the Difference Between the Various Effect<br />
Routing Options?<br />
The <strong>JV</strong>-<strong>2080</strong> has five independent effects processors:<br />
three insert effects plus reverb and chorus. The effects<br />
parameters for each of these processors can be chosen<br />
per Performance. Each of the 16 Parts in a Performance<br />
can be routed through these processors if desired. There<br />
are nine options for routing Parts through the built-in<br />
effects processors:<br />
MIX: Routes the sound to the MIX L&R outputs<br />
without using the EFX (insert) processors.<br />
Fx-A Routes the sound to MIX L&R outputs<br />
with the EFX (insert) A processor.<br />
Fx-B Routes the sound to MIX L&R outputs<br />
with the EFX (insert) B processor.<br />
Fx-C Routes the sound to MIX L&R outputs<br />
with the EFX (insert) C processor.<br />
DI1 Routes the sound to the DIRECT1 L&R<br />
outputs without the EFX (insert) processors.<br />
DI2 Routes the sound to the DIRECT2 L&R<br />
outputs without the EFX (insert) processors.<br />
Pt-A Uses the Patch’s output settings to determine<br />
the above mentioned routing for<br />
EFX (insert) A. This allows for individual<br />
routing per Tone.<br />
Pt-B Uses the Patch’s output settings to determine<br />
the above mentioned routing for<br />
EFX (insert) B. This allows for individual<br />
routing per Tone.<br />
Pt-C Uses the Patch’s output settings to determine<br />
the above mentioned routing for<br />
EFX (insert) C. This allows for individual<br />
routing per Tone.<br />
©1999 <strong>Roland</strong> Corporation U.S. <strong>JV</strong>-<strong>2080</strong> Frequently Asked Questions Faxback # 21074 Page 11
®ÂØÒňΠSupplemental Notes <strong>JV</strong>-<strong>2080</strong> Frequently Asked Questions<br />
Effects Routing Options (continued)<br />
The difference between the Fx and Pt output assignments<br />
is that Fx looks to the Performance settings to<br />
determine the EFX parameters whereas Pt uses the<br />
Patch settings. For example, let’s say Part 1 is using the<br />
insert effect “Overdrive” and uses “Fx-A” as an output<br />
assignment. Any Patch assigned to Part 1 will have the<br />
“Overdrive” effect applied in an amount determined on<br />
the Effects page. Now, let’s say we change the output<br />
assignment for Part 1 to “Pt-A.” If we assign a Patch to<br />
Part 1 that uses the “Overdrive” effect in Patch mode<br />
(such as a distorted guitar), then the “Overdrive” effect<br />
will still be applied to Part 1. The settings will be determined<br />
by the default settings of the Patch assigned to<br />
Part 1. And, if we change the Patch assigned to Part 1<br />
to an organ Patch, the insert effect for Part 1 will<br />
change to match the default settings of the new Patch<br />
(probably a “Rotary” effect).<br />
Use the following procedure to apply Effects using<br />
Output Assignments:<br />
1) Press PERFORM.<br />
2) Press F5[EFFECTS] to display the Effects page.<br />
3) Press F6[PALETTE] to display eight parts simultaneously.<br />
4) Use the CURSOR buttons to select “Output Assign.”<br />
5) Use the VALUE dial to select the desired routing.<br />
6) Use the CURSOR buttons to select the desired Part.<br />
7) Use the CURSOR buttons and VALUE dial to set the<br />
“Reverb Send Level,” “Chorus Send Level,” and<br />
“Mix/EFX Send Level” for each Part to “127.”<br />
Press F1 to toggle between viewing Parts [1]-<br />
[8] and [9]-[16] respectively.<br />
©1999 <strong>Roland</strong> Corporation U.S. <strong>JV</strong>-<strong>2080</strong> Frequently Asked Questions Faxback # 21074 Page 12
®ÂØÒňΠSupplemental Notes <strong>JV</strong>-<strong>2080</strong> Frequently Asked Questions<br />
Fig. 8<br />
Effects/Output<br />
Assign Page<br />
XI.<br />
How do I Route Parts Through the Direct Outputs<br />
Using an Insert Effect (EFX)?<br />
In most synthesizers and/or sound modules, using direct<br />
outputs disables any internal effects processing before the<br />
signal passes through the outputs. This is fine when you are<br />
processing the signal with an external effects processor, but<br />
let’s say you wanted to use an internal effect and an external<br />
processor on the same signal; The <strong>JV</strong>-<strong>2080</strong> allows you<br />
to route a Part through one of its insert effect processors<br />
before it passes through the direct output jacks. Use the following<br />
procedure to apply an insert effect to a Part and then<br />
route it through a direct output:<br />
1) Press PERFORM.<br />
2) Press F5[EFFECTS] to display the Effects page.<br />
3) Press F6 until the General page (see Fig. 8) is<br />
displayed.<br />
4) Use the CURSOR buttons to the<br />
select the “Output” parameter.<br />
5) Use the VALUE dial to select “EFX-A,”<br />
”EFX-B,” or “EFX-C.”<br />
6) Press CURSOR RIGHT three times<br />
and CURSOR DOWN twice to select<br />
the EFX Output Assign parameter.<br />
7) Use the VALUE dial to select DIR1 or DIR2 depending<br />
on which set of direct outputs you wish to use.<br />
The selected Part will use an insert effect (EFX) routed<br />
through the direct output (1/2).<br />
XII.<br />
How Do I Use System Controllers?<br />
Certain effects parameters can be modified in realtime<br />
by controllers, adding an additional element of expressiveness<br />
to a Performance. These controllers include<br />
aftertouch (key pressure), modulation, foot pedal, or a<br />
special type called “System Controllers.” System<br />
Controllers allow you to globally assign a MIDI controller<br />
message to one of two System Controller locations. For<br />
example, the <strong>JV</strong>-<strong>2080</strong> contains many Patches that<br />
respond to aftertouch. Let’s say you are using a keyboard<br />
that transmits modulation but does not transmit<br />
aftertouch. Because most of these Patches are programmed<br />
to respond to aftertouch as a System<br />
Controller, you can reassign modulation as a System<br />
Controller, in place of aftertouch, and use it to control<br />
the Patches in the <strong>JV</strong>-<strong>2080</strong>.<br />
©1999 <strong>Roland</strong> Corporation U.S. <strong>JV</strong>-<strong>2080</strong> Frequently Asked Questions Faxback # 21074 Page 13
®ÂØÒňΠSupplemental Notes <strong>JV</strong>-<strong>2080</strong> Frequently Asked Questions<br />
Using System Controllers (continued)<br />
Fig. 9<br />
Control Assign<br />
Page<br />
Use the following procedure to assign System Controllers<br />
to control the rotary speed on an organ Patch:<br />
1) Press SYSTEM, so it is lit.<br />
2) Press F4[CONTROL] to<br />
display the Control<br />
Assign page (see Fig. 9).<br />
3) Use the CURSOR buttons<br />
to select “System Control<br />
1.” Here you can assign a<br />
MIDI continuous controller<br />
(CC#) such as<br />
CC#16 (General Purpose).<br />
4) Use the VALUE dial to select “CC#16.”<br />
5) Use the CURSOR buttons to select “System Control 2.”<br />
Here you can assign a MIDI continuous controller (CC#)<br />
such as CC#74 (Brightness).<br />
6) Use the VALUE dial to select “CC#74.”<br />
7) Press PATCH.<br />
8) Use the VALUE dial to select Patch “PR-A:051 The<br />
Big Spin.”<br />
9) Press F5[EFFECTS] to display the Effects page.<br />
10) Press F3[EFX Ctl] to display the EFX Control page.<br />
The two rotary (Leslie speaker) effect parameters<br />
that can be controlled in realtime are speed and level.<br />
11) Use the CURSOR buttons to select “MODULATION”<br />
(the parameter currently assigned to control the rotary<br />
speed).<br />
12) Use the VALUE dial to select “SYS-CTRL1.”<br />
13) Assign a slider (or foot pedal) on your keyboard to<br />
transmit controller #16 to the <strong>JV</strong>-<strong>2080</strong>; it will control<br />
the rotation speed of the Rotary effect.<br />
You can also assign the system controllers to<br />
EFX parameters in Performance Mode although<br />
you will need to make sure that the MIDI<br />
receive channel for the Part you wish to effect<br />
is the same as the Control Channel.<br />
Tip<br />
You can assign both speed and level to SYS-<br />
CTRL1 so that when you send CC#16 to the <strong>JV</strong>-<br />
<strong>2080</strong>, the rotary speed and level will change<br />
simultaneously.<br />
©1999 <strong>Roland</strong> Corporation U.S. <strong>JV</strong>-<strong>2080</strong> Frequently Asked Questions Faxback # 21074 Page 14
®ÂØÒňΠSupplemental Notes <strong>JV</strong>-<strong>2080</strong> Frequently Asked Questions<br />
XIII.<br />
How Do I Perform Data Transfers & Bulk Dumps?<br />
The Data Transfer functions on the <strong>JV</strong>-<strong>2080</strong> allow users<br />
to move data to various destinations. Patches,<br />
Performances, Rhythm, and System data can all be<br />
transferred for external or internal storage. There is also<br />
a useful feature in the <strong>JV</strong>-<strong>2080</strong> that lets you take a<br />
complete “snapshot” of all temporary settings and send<br />
them to an external sequencer to be used in a song file.<br />
Once the data transfer containing the temporary settings<br />
has been sent to your MIDI sequencer, the current settings<br />
can be recalled automatically when the song is<br />
played. Using this feature is a great alternative to taking<br />
up User Patch and Performance locations to store your<br />
settings for each song.<br />
The Bulk Dump function on the <strong>JV</strong>-<strong>2080</strong> allows User<br />
data to be stored to a memory card or externally, to a<br />
MIDI sequencer. Bulk dumping is an effective means of<br />
storing your Patch and Performance data. It is a good<br />
idea to backup your custom settings often. Also, label<br />
your backups clearly; that will make it easier to reference<br />
them for future use. Use the following procedure<br />
to perform a Data Transfer of all temporary data to an<br />
external MIDI sequencer:<br />
1) Press UTILITY.<br />
2) Press F4[XFER] to display the Data Transfer<br />
page (see Fig. 10 on page 16).<br />
3) Press F1[to MIDI].<br />
4) Use the CURSOR buttons to select “Source.”<br />
5) Use the VALUE dial to select “ALL.”<br />
6) Press CURSOR RIGHT once.<br />
7) Use the VALUE dial to select “TEMP.”<br />
8) Start recording on your sequencer.<br />
9) Press F6[Execute] to execute the transfer.<br />
It is a good idea to leave a few blank measures<br />
at the beginning of your song. That way,<br />
you can record the data transfer to those measures<br />
and the desired settings will be recalled<br />
before the song actually starts.<br />
©1999 <strong>Roland</strong> Corporation U.S. <strong>JV</strong>-<strong>2080</strong> Frequently Asked Questions Faxback # 21074 Page 15
®ÂØÒňΠSupplemental Notes <strong>JV</strong>-<strong>2080</strong> Frequently Asked Questions<br />
Data Transfers and Bulk Dumps (continued)<br />
Use the following procedure to perform a Bulk Dump of<br />
all User data to an external MIDI sequencer:<br />
1) Repeat steps 1-5 on the previous page.<br />
2) Use the CURSOR buttons to select “Source.”<br />
3) Use the VALUE dial to select “ALL.”<br />
4) Press CURSOR RIGHT once.<br />
5) Use the VALUE dial to select “USER.”<br />
6) Start recording on your sequencer.<br />
7) Press F6[Execute] to execute the Bulk Dump.<br />
Fig. 10<br />
Data Transfer<br />
Page<br />
As you can see, the <strong>JV</strong>-<strong>2080</strong> is a powerful sound module,<br />
full of many useful and helpful features. We hope<br />
that this document has provided you the answers to<br />
some of the questions most commonly asked of the<br />
<strong>Roland</strong> Product Support team here at <strong>Roland</strong> U.S.<br />
Get Connected!<br />
For the latest info on new products, support documents, upcoming<br />
<strong>Roland</strong> events and more, visit our Website, www.rolandus.com or<br />
www.rolandgroove.com.<br />
☎<br />
24 hours a day, 7 days a week, you can receive a library of support<br />
materials and product information on your fax machine - and it’s all<br />
FREE! Just call (323) 685-5141 ext. 2271.<br />
If it’s a real-live person you want, we’ve got a team of Product<br />
Specialists that can’t be beat. They’re on call from 8:30am to 5:00pm<br />
PST Monday through Friday at (323) 685-5141 ext. 2770.<br />
©1999 <strong>Roland</strong> Corporation U.S. <strong>JV</strong>-<strong>2080</strong> Frequently Asked Questions Faxback # 21074 Page 16