About the Wireless LAN Function - Roland
About the Wireless LAN Function - Roland
About the Wireless LAN Function - Roland

You also want an ePaper? Increase the reach of your titles
YUMPU automatically turns print PDFs into web optimized ePapers that Google loves.
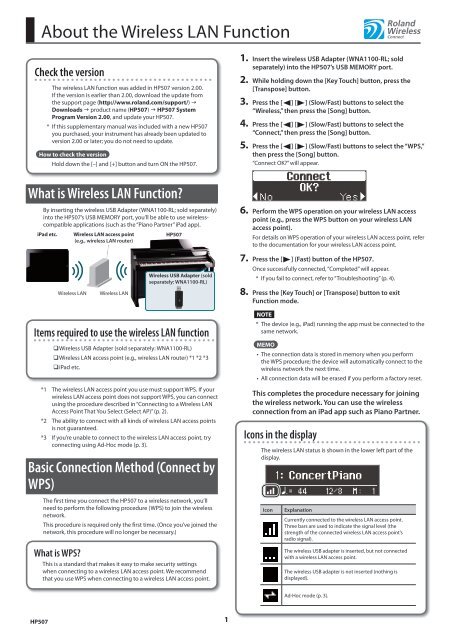
<strong>About</strong> <strong>the</strong> <strong>Wireless</strong> <strong>LAN</strong> <strong>Function</strong><br />
Check <strong>the</strong> version<br />
The wireless <strong>LAN</strong> function was added in HP507 version 2.00.<br />
If <strong>the</strong> version is earlier than 2.00, download <strong>the</strong> update from<br />
<strong>the</strong> support page (http://www.roland.com/support/) g<br />
Downloads g product name (HP507) g HP507 System<br />
Program Version 2.00, and update your HP507.<br />
* If this supplementary manual was included with a new HP507<br />
you purchased, your instrument has already been updated to<br />
version 2.00 or later; you do not need to update.<br />
How to check <strong>the</strong> version<br />
Hold down <strong>the</strong> [–] and [+] button and turn ON <strong>the</strong> HP507.<br />
1. Insert <strong>the</strong> wireless USB Adapter (WNA1100-RL; sold<br />
separately) into <strong>the</strong> HP507’s USB MEMORY port.<br />
2. While holding down <strong>the</strong> [Key Touch] button, press <strong>the</strong><br />
[Transpose] button.<br />
3. Press <strong>the</strong> [ ] [ ] (Slow/Fast) buttons to select <strong>the</strong><br />
“<strong>Wireless</strong>,” <strong>the</strong>n press <strong>the</strong> [Song] button.<br />
4. Press <strong>the</strong> [ ] [ ] (Slow/Fast) buttons to select <strong>the</strong><br />
“Connect,” <strong>the</strong>n press <strong>the</strong> [Song] button.<br />
5. Press <strong>the</strong> [ ] [ ] (Slow/Fast) buttons to select <strong>the</strong> “WPS,”<br />
<strong>the</strong>n press <strong>the</strong> [Song] button.<br />
“Connect OK?” will appear.<br />
What is <strong>Wireless</strong> <strong>LAN</strong> <strong>Function</strong>?<br />
By inserting <strong>the</strong> wireless USB Adapter (WNA1100-RL; sold separately)<br />
into <strong>the</strong> HP507’s USB MEMORY port, you’ll be able to use wirelesscompatible<br />
applications (such as <strong>the</strong> “Piano Partner” iPad app).<br />
iPad etc. <strong>Wireless</strong> <strong>LAN</strong> access point<br />
HP507<br />
(e.g., wireless <strong>LAN</strong> router)<br />
6. Perform <strong>the</strong> WPS operation on your wireless <strong>LAN</strong> access<br />
point (e.g., press <strong>the</strong> WPS button on your wireless <strong>LAN</strong><br />
access point).<br />
For details on WPS operation of your wireless <strong>LAN</strong> access point, refer<br />
to <strong>the</strong> documentation for your wireless <strong>LAN</strong> access point.<br />
<strong>Wireless</strong> <strong>LAN</strong><br />
<strong>Wireless</strong> <strong>LAN</strong><br />
<strong>Wireless</strong> USB Adapter (sold<br />
separately: WNA1100-RL)<br />
7. Press <strong>the</strong> [ ] (Fast) button of <strong>the</strong> HP507.<br />
Once successfully connected, “Completed” will appear.<br />
* If you fail to connect, refer to “Troubleshooting” (p. 4).<br />
8. Press <strong>the</strong> [Key Touch] or [Transpose] button to exit<br />
<strong>Function</strong> mode.<br />
Items required to use <strong>the</strong> wireless <strong>LAN</strong> function<br />
<strong>Wireless</strong> USB Adapter (sold separately: WNA1100-RL)<br />
<strong>Wireless</strong> <strong>LAN</strong> access point (e.g., wireless <strong>LAN</strong> router) *1 *2 *3<br />
iPad etc.<br />
*1 The wireless <strong>LAN</strong> access point you use must support WPS. If your<br />
wireless <strong>LAN</strong> access point does not support WPS, you can connect<br />
using <strong>the</strong> procedure described in “Connecting to a <strong>Wireless</strong> <strong>LAN</strong><br />
Access Point That You Select (Select AP)” (p. 2).<br />
*2 The ability to connect with all kinds of wireless <strong>LAN</strong> access points<br />
is not guaranteed.<br />
*3 If you’re unable to connect to <strong>the</strong> wireless <strong>LAN</strong> access point, try<br />
connecting using Ad-Hoc mode (p. 3).<br />
Basic Connection Method (Connect by<br />
WPS)<br />
NOTE<br />
* The device (e.g., iPad) running <strong>the</strong> app must be connected to <strong>the</strong><br />
same network.<br />
MEMO<br />
• The connection data is stored in memory when you perform<br />
<strong>the</strong> WPS procedure; <strong>the</strong> device will automatically connect to <strong>the</strong><br />
wireless network <strong>the</strong> next time.<br />
• All connection data will be erased if you perform a factory reset.<br />
This completes <strong>the</strong> procedure necessary for joining<br />
<strong>the</strong> wireless network. You can use <strong>the</strong> wireless<br />
connection from an iPad app such as Piano Partner.<br />
Icons in <strong>the</strong> display<br />
The wireless <strong>LAN</strong> status is shown in <strong>the</strong> lower left part of <strong>the</strong><br />
display.<br />
The first time you connect <strong>the</strong> HP507 to a wireless network, you’ll<br />
need to perform <strong>the</strong> following procedure (WPS) to join <strong>the</strong> wireless<br />
network.<br />
This procedure is required only <strong>the</strong> first time. (Once you’ve joined <strong>the</strong><br />
network, this procedure will no longer be necessary.)<br />
What is WPS?<br />
This is a standard that makes it easy to make security settings<br />
when connecting to a wireless <strong>LAN</strong> access point. We recommend<br />
that you use WPS when connecting to a wireless <strong>LAN</strong> access point.<br />
Icon<br />
Explanation<br />
Currently connected to <strong>the</strong> wireless <strong>LAN</strong> access point.<br />
Three bars are used to indicate <strong>the</strong> signal level (<strong>the</strong><br />
strength of <strong>the</strong> connected wireless <strong>LAN</strong> access point’s<br />
radio signal).<br />
The wireless USB adapter is inserted, but not connected<br />
with a wireless <strong>LAN</strong> access point.<br />
The wireless USB adapter is not inserted (nothing is<br />
displayed).<br />
Ad-Hoc mode (p. 3).<br />
HP507<br />
1
<strong>About</strong> <strong>the</strong> <strong>Wireless</strong> <strong>LAN</strong> <strong>Function</strong><br />
<strong>Wireless</strong> <strong>LAN</strong> <strong>Function</strong> Settings<br />
You can view or edit <strong>the</strong> wireless settings.<br />
Basic Operation<br />
1. While holding down <strong>the</strong> [Key Touch] button, press <strong>the</strong><br />
[Transpose] button.<br />
2. Press <strong>the</strong> [ ] [ ] (Slow/Fast) buttons to select <strong>the</strong><br />
“<strong>Wireless</strong>,” <strong>the</strong>n press <strong>the</strong> [Song] button.<br />
Connecting to a <strong>Wireless</strong> <strong>LAN</strong> Access Point<br />
That You Select (Select AP)<br />
This method lets you connect by choosing a wireless <strong>LAN</strong> access<br />
point from <strong>the</strong> list that is displayed.<br />
* <strong>Wireless</strong> standards 802.11g/n (2.4 GHz) and au<strong>the</strong>ntication<br />
methods WPA/WPA2 are supported.<br />
1. Select “<strong>Wireless</strong>” g”Connect” g “Select AP,” <strong>the</strong>n press <strong>the</strong><br />
[Song] button.<br />
The Select Access Point screen will appear.<br />
3. Press <strong>the</strong> [ ] [ ] (Slow/Fast) buttons to select menu,<br />
<strong>the</strong>n press <strong>the</strong> [Song] button.<br />
Menu Explanation<br />
Status This shows <strong>the</strong> wireless <strong>LAN</strong> status.<br />
Connect Connect to a wireless <strong>LAN</strong> access point.<br />
Option Make settings for <strong>Wireless</strong> ID or Ad-Hoc mode (p. 3).<br />
In <strong>the</strong> explanations that follow, procedures will be indicated<br />
using arrows, like this: “<strong>Wireless</strong>” g “Status.”<br />
Status Indication<br />
This shows <strong>the</strong> wireless <strong>LAN</strong> status.<br />
1. Select “<strong>Wireless</strong>” g “Status.”<br />
The status screen will appear.<br />
• An “*” symbol is shown for <strong>the</strong> currently-connected wireless <strong>LAN</strong><br />
access point.<br />
2. Press <strong>the</strong> [–] [+] button to choose <strong>the</strong> wireless <strong>LAN</strong> access<br />
point to which you want to connect, and press <strong>the</strong> [Song]<br />
button.<br />
• You will be connected to <strong>the</strong> selected wireless <strong>LAN</strong> access point.<br />
• If you’re using this wireless <strong>LAN</strong> access point for <strong>the</strong> first time,<br />
you’ll proceed to <strong>the</strong> Passphrase screen.<br />
• If this is a wireless <strong>LAN</strong> access point to which you have connected<br />
in <strong>the</strong> past, just press <strong>the</strong> [Song] button and you’ll be connected.<br />
Once successfully connected, “Completed” will appear.<br />
Passphrase screen<br />
3. Enter <strong>the</strong> security code (passphrase) of your wireless <strong>LAN</strong><br />
access point, and press <strong>the</strong> [Song] button.<br />
Display<br />
Access Point<br />
Now Connecting<br />
Not Connected<br />
Not Available<br />
Ad-Hoc SSID<br />
Explanation<br />
Currently connected to <strong>the</strong> wireless <strong>LAN</strong> access point.<br />
Three bars are used to indicate <strong>the</strong> signal level (<strong>the</strong><br />
strength of <strong>the</strong> connected wireless <strong>LAN</strong> access point’s<br />
radio signal).<br />
The identifier (name) of <strong>the</strong> connected wireless <strong>LAN</strong><br />
access point is shown.<br />
A connection with <strong>the</strong> wireless <strong>LAN</strong> access point is<br />
being established.<br />
The wireless USB adapter is inserted, but not<br />
connected to a wireless <strong>LAN</strong> access point.<br />
The wireless USB adapter is not inserted.<br />
Ad-Hoc mode (p. 3).<br />
The Ad-Hoc SSID is shown. Press <strong>the</strong> [ ] (Fast) button<br />
to display <strong>the</strong> Ad-Hoc key.<br />
For details, refer to “Connecting in Ad-Hoc mode” (p. 3).<br />
How to enter characters<br />
Use <strong>the</strong> [ ] [ ] (Slow/Fast) buttons to select <strong>the</strong> position at<br />
which you want to specify a character. Use <strong>the</strong> [–] [+] buttons to<br />
change <strong>the</strong> character.<br />
* You cannot enter a space at <strong>the</strong> end of <strong>the</strong> passphrase.<br />
Once successfully connected, “Completed” will appear.<br />
* If you fail to connect, refer to “Troubleshooting” (p. 4).<br />
4. Press <strong>the</strong> [Key Touch] or [Transpose] button to exit<br />
<strong>Function</strong> mode.<br />
2. Press <strong>the</strong> [ ] (Fast) button to display <strong>the</strong> IP address.<br />
2
<strong>About</strong> <strong>the</strong> <strong>Wireless</strong> <strong>LAN</strong> <strong>Function</strong><br />
O<strong>the</strong>r Settings (Option)<br />
Make settings for <strong>Wireless</strong> ID or Ad-Hoc mode.<br />
1. Select “<strong>Wireless</strong>” g “Option.”<br />
2. Press <strong>the</strong> [ ] [ ] (Slow/Fast) buttons to select <strong>the</strong><br />
parameter that you want to change.<br />
3. Press <strong>the</strong> [–] [+] button to edit <strong>the</strong> value of <strong>the</strong> setting.<br />
1. Select “<strong>Wireless</strong>” g”Option” g “Ad-Hoc,” <strong>the</strong>n press <strong>the</strong><br />
[Song] button.<br />
2. Press <strong>the</strong> [ ] (Fast) button to turn <strong>the</strong> Ad-Hoc Mode “On.”<br />
* To turn off Ad-Hoc Mode, press <strong>the</strong> [ ] (Slow) button.<br />
3. Once in Ad-Hoc Mode, <strong>the</strong> Ad-Hoc SSID (HP507) will be<br />
displayed. Press <strong>the</strong> [ ] (Fast) button to display <strong>the</strong><br />
Ad-Hoc key (a five-character text string). Write down this<br />
number.<br />
Parameter<br />
<strong>Wireless</strong> ID<br />
Ad-Hoc<br />
Ch.<br />
Explanation<br />
Specifies <strong>the</strong> final digits of <strong>the</strong> HP507’s device name and<br />
Ad-Hoc SSID (HP507) that will be shown as <strong>the</strong> instrument<br />
in <strong>the</strong> wirelessly connected app.<br />
Normally, you should specify “0,” but if you have more than<br />
one of <strong>the</strong> same instrument, you can set <strong>the</strong> <strong>Wireless</strong> ID in<br />
<strong>the</strong> range of 1–99 to change <strong>the</strong> device name and Ad-Hoc<br />
SSID for each instrument, as follows.<br />
If <strong>Wireless</strong> ID=0, “HP507” (default value)<br />
If <strong>Wireless</strong> ID=1, “HP507_1”<br />
:<br />
If <strong>Wireless</strong> ID=99, “HP507_99”<br />
Specifies <strong>the</strong> channel (1–11) for Ad-Hoc mode.<br />
Normally, you won’t need to change <strong>the</strong> channel.<br />
Try changing <strong>the</strong> channel only if you have problems<br />
connecting.<br />
Connecting in Ad-Hoc mode<br />
Here’s how to connect in Ad-Hoc mode.<br />
What is Ad-Hoc mode?<br />
Ad-Hoc mode lets you connect <strong>the</strong> HP507 directly to an iPad<br />
or o<strong>the</strong>r wireless device without using a wireless <strong>LAN</strong> access<br />
point. This is a convenient way to use <strong>the</strong> HP507 with an<br />
iPad or o<strong>the</strong>r wireless device if you’re in a location where <strong>the</strong><br />
wireless <strong>LAN</strong> access point you normally use is unavailable,<br />
such as when you’re away from home.<br />
iPad etc.<br />
HP507<br />
The Ad-Hoc key is <strong>the</strong> five-digit number that’s displayed here.<br />
Each piano has its own unique number.<br />
MEMO<br />
• The Ad-Hoc SSID (HP507) will be <strong>the</strong> value that you specified in<br />
<strong>the</strong> WIRELESS OPTIONS screen “<strong>Wireless</strong> ID” setting.<br />
• The Ad-Hoc SSID and <strong>the</strong> Ad-Hoc key can also be verified in <strong>the</strong><br />
status screen.<br />
4. On <strong>the</strong> iPad or o<strong>the</strong>r wireless device that you want to<br />
connect, select <strong>the</strong> Ad-Hoc SSID shown in <strong>the</strong> above screen<br />
to make <strong>the</strong> connection. (For example, on an iPad, choose<br />
[Settings] g [Wi-Fi] g [Choose a Network] to select <strong>the</strong><br />
above Ad-Hoc SSID (HP507). A password entry screen will<br />
appear; enter <strong>the</strong> above Ad-Hoc key.)<br />
For details on how to connect to a wireless <strong>LAN</strong> from an iPad or o<strong>the</strong>r<br />
device, refer to <strong>the</strong> owner’s manual of that device.<br />
5. Press <strong>the</strong> [Key Touch] or [Transpose] button to exit<br />
<strong>Function</strong> mode.<br />
6. When you have finished <strong>the</strong> Ad-Hoc mode connection,<br />
restore <strong>the</strong> iPad settings in [Settings] g [Wi-Fi] g [Choose a<br />
Network] to <strong>the</strong>ir previous state.<br />
<strong>Wireless</strong> <strong>LAN</strong><br />
<strong>Wireless</strong> USB Adapter (sold<br />
separately: WNA1100-RL)<br />
Limitations<br />
The iPad or o<strong>the</strong>r wireless device connected in Ad-Hoc mode<br />
will be unable to communicate with <strong>the</strong> Internet or with ano<strong>the</strong>r<br />
wireless device. However, an iPad or o<strong>the</strong>r wireless device that<br />
has cellular capability will be able to connect to <strong>the</strong> Internet via<br />
<strong>the</strong> cellular connection.<br />
Please be aware that if you use a cellular connection for Internet<br />
connectivity, you may incur costs depending on your rate plan.<br />
3
<strong>About</strong> <strong>the</strong> <strong>Wireless</strong> <strong>LAN</strong> <strong>Function</strong><br />
Troubleshooting<br />
* For problems related to communication, refer also to <strong>the</strong> owner’s manual of your wireless <strong>LAN</strong> access point.<br />
* For details on operating your wireless <strong>LAN</strong> access point, refer to its owner’s manual.<br />
Problem<br />
Can’t connect to a wireless <strong>LAN</strong> access<br />
point<br />
The display indicates “Error 46,” and<br />
can’t connect to <strong>the</strong> wireless <strong>LAN</strong><br />
access point<br />
Communication is unstable<br />
The HP507 is not found in <strong>the</strong> instrument<br />
connections of <strong>the</strong> app (such as<br />
<strong>the</strong> iPad app Piano Partner)<br />
Your iPad won’t connect to <strong>the</strong><br />
Internet<br />
Action<br />
• Make sure that your wireless <strong>LAN</strong> access point supports WPS.<br />
If your wireless <strong>LAN</strong> access point does not support WPS, you can connect using <strong>the</strong> procedure described in “Connecting to a<br />
<strong>Wireless</strong> <strong>LAN</strong> Access Point That You Select (Select AP)” (p. 2).<br />
• The 802.11a/b wireless standard is not supported. Please use <strong>the</strong> 802.11g/n (2.4 GHz) wireless standard.<br />
• The WEP au<strong>the</strong>ntication method is not supported. Please use <strong>the</strong> WPA or WPA2 au<strong>the</strong>ntication method.<br />
• Make sure that DHCP is enabled for your wireless <strong>LAN</strong> access point.<br />
• If you don’t get connected to <strong>the</strong> previously-connected wireless <strong>LAN</strong> access point when you turn on <strong>the</strong> unit, check and make<br />
sure <strong>the</strong> setting described in “Connecting in Ad-Hoc mode” (p. 3) is OFF.<br />
• The connection might not occur successfully due to <strong>the</strong> state of <strong>the</strong> radio signal. If so, use <strong>the</strong> procedure described in “Connecting<br />
to a <strong>Wireless</strong> <strong>LAN</strong> Access Point That You Select (Select AP)” (p. 2), and select your wireless <strong>LAN</strong> access point and reconnect.<br />
• There is a limit to <strong>the</strong> connection data that can be remembered. Making a new connection may cause older connection data to<br />
be deleted.<br />
All connection data will be deleted if you execute a factory reset.<br />
If <strong>the</strong> connection data has been deleted, please re-connect to <strong>the</strong> wireless <strong>LAN</strong> access point.<br />
• This Access Point is not supported. Please use <strong>the</strong> WPA or WPA2 au<strong>the</strong>ntication method.<br />
Communication may be unstable depending on <strong>the</strong> usage of <strong>the</strong> radio frequency spectrum.<br />
If communication is unstable, <strong>the</strong> response may be sluggish, or if using audio communication, <strong>the</strong>re may be dropouts in <strong>the</strong> audio.<br />
The following actions may improve <strong>the</strong> situation.<br />
• Move <strong>the</strong> wireless <strong>LAN</strong> access point and <strong>the</strong> HP507 closer to each o<strong>the</strong>r.<br />
• Change <strong>the</strong> channel setting of <strong>the</strong> wireless <strong>LAN</strong> access point.<br />
• Is <strong>the</strong> HP507 powered up?<br />
• Is <strong>the</strong> wireless USB adapter (WNA1100-RL) inserted to <strong>the</strong> HP507?<br />
• Is <strong>the</strong> HP507 connected to <strong>the</strong> wireless <strong>LAN</strong>?<br />
• Are <strong>the</strong> HP507 and <strong>the</strong> iPad connected to <strong>the</strong> same network (<strong>the</strong> same wireless <strong>LAN</strong> access point)?<br />
• Is <strong>the</strong> wireless <strong>LAN</strong> access point set to allow communication between wireless <strong>LAN</strong> devices?<br />
For details on settings, refer to <strong>the</strong> owner’s manual of your wireless <strong>LAN</strong> access point.<br />
• Is <strong>the</strong> wireless <strong>LAN</strong> access point connected to <strong>the</strong> Internet?<br />
• Could you be connected in Ad-Hoc mode?<br />
The iPad or o<strong>the</strong>r wireless device connected in Ad-Hoc mode will be unable to communicate with <strong>the</strong> Internet or with ano<strong>the</strong>r<br />
wireless device. However, an iPad or o<strong>the</strong>r wireless device that has cellular capability will be able to connect to <strong>the</strong> Internet<br />
via <strong>the</strong> cellular connection. Please be aware that if you use a cellular connection for Internet connectivity, you may incur costs<br />
depending on your rate plan.<br />
Checking <strong>the</strong> MAC Address<br />
The MAC address indicated on <strong>the</strong> bottom of <strong>the</strong> wireless USB adapter (WNA1100-RL; sold separately).<br />
Company names and product names appearing in this document are registered trademarks or trademarks of <strong>the</strong>ir respective owners.<br />
Copyright © 2012 RO<strong>LAN</strong>D CORPORATION<br />
All rights reserved. No part of this publication may be reproduced in any form without <strong>the</strong> written permission of RO<strong>LAN</strong>D CORPORATION.<br />
4<br />
1PS