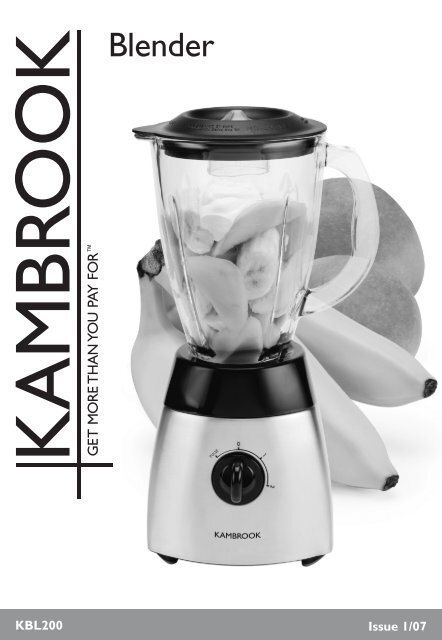
Blender
Blender
Blender

Create successful ePaper yourself
Turn your PDF publications into a flip-book with our unique Google optimized e-Paper software.
<strong>Blender</strong><br />
KBL200 Issue 1/07
FEATURES OF YOUR KAMBROOK BLENDER<br />
1<br />
2<br />
3<br />
4<br />
6<br />
5<br />
1.<br />
Large 1.5 litre glass jug<br />
4.<br />
550 watts of power<br />
2.<br />
60ml measuring cap<br />
5.<br />
Sturdy non-slip feet<br />
3.<br />
Stainless steel ice crushing blades<br />
6.<br />
2 speed control dial plus pulse function
Kambrook Safety<br />
Welcome to Kambrook and your new Kambrook<br />
blender. At Kambrook we believe that the safe<br />
performance is the first priority in any consumer<br />
product so that you, our valued customer, can<br />
confidently use and trust our appliances. We ask<br />
that any electrical appliance you use be operated<br />
in a sensible fashion with due care and attention<br />
placed on the following important operating<br />
instructions.<br />
IMPORTANT SAFEGUARDS FOR YOUR<br />
KAMBROOK BLENDER<br />
• Carefully read all instructions before<br />
operating the blender and save for future<br />
reference.<br />
• Remove and safely discard any packaging<br />
material and promotional labels before using<br />
the blender for the first time.<br />
• To eliminate a choking hazard for young<br />
children, remove and safely discard the<br />
protective cover fitted to the power plug of<br />
the blender.<br />
• Do not place the blender near the edge of a<br />
bench or table during operation. Ensure that<br />
the surface is level, clean and free of water,<br />
flour and other substances. Vibration during<br />
operation may cause the appliance to move.<br />
• Do not use the blender on a a sink drain<br />
board.<br />
• Do not place the blender on or near a hot gas<br />
or electric burner, or where it could touch a<br />
heated oven.<br />
• Always ensure the blender is properly<br />
assembled before use. Refer to the assembling<br />
and operating instructions in this book.<br />
• Use only the blender jug and lid supplied with<br />
the blender.<br />
• Always ensure the blender lid is firmly<br />
positioned on the blender jug before<br />
operating.<br />
• Do not leave the blender unattended when in<br />
use.<br />
• Always ensure the blender is turned off by<br />
selecting “0” on the speed control dial. Then<br />
switch the appliance off at the power outlet<br />
and unplug the power cord. Ensure the motor<br />
and blades have completely stopped before<br />
attempting to move the appliance, or<br />
when the blender is not in use and before<br />
disassembling, cleaning and storing.<br />
• Do not operate the appliance continuously<br />
with heavy loads for more than 1 minute.<br />
Allow the motor to rest for 1 minute between<br />
each use. None of the recipes in this<br />
instruction book are considered a heavy load.<br />
• If food becomes lodged around the blending<br />
blades, turn the blender off by selecting “0”<br />
on the speed control dial. Then switch the<br />
appliance off at the power outlet and unplug<br />
the cord. Ensure the motor and blades have<br />
completely stopped before removing the jug<br />
from the motor base, use a spatula to dislodge<br />
or stir the food before continuing. Do not use<br />
fingers as the blades are sharp.<br />
• Keep hands, fingers, hair, clothing, as well<br />
as spatulas and other utensils away from the<br />
blender jug during operation. Never place<br />
your fingers, hands or utensils inside the<br />
blender jug without unplugging the appliance<br />
from the power outlet.<br />
• Ensure care is taken when handling the sharp<br />
blades, emptying the blender jug and when<br />
cleaning the blender jug.<br />
• Do not disassemble the blender blade<br />
assembly as the blades are very sharp.<br />
Mishandling of the blades may cause injury.<br />
• Do not attempt to disassemble the blender<br />
jug from the blade assembly. The blade<br />
assembly is not removable from the jug. To<br />
clean the blender, refer to the Disassembling<br />
and Cleaning section of this book.<br />
• Do not remove the blender jug from the<br />
motor base whilst in operation.<br />
• Do not operate the blender without food or<br />
liquid in the blender jug.<br />
• Do not process hot or boiling liquids. Allow<br />
to cool before placing into the blender jug.<br />
• Do not subject the blender jug to extremes of<br />
hot or cold, for example, placing a cold jug in<br />
hot water or vice versa.<br />
• Keep appliance clean. Follow the cleaning<br />
instructions provided in this book.<br />
• IMPORTANT SAFEGUARDS FOR ALL<br />
ELECTRICAL APPLIANCES<br />
• Unwind the power cord fully before use.<br />
• To protect against electric shock do not<br />
immerse the power cord, power plug or<br />
appliance in water or any other liquid.<br />
• Do not let the power cord hang over the edge<br />
of a bench or table, touch hot surfaces or<br />
become knotted.
• This appliance is not intended for use by<br />
persons (including children) with reduced<br />
physical, sensory or mental capabilities, or<br />
lack of experience and knowledge, unless they<br />
have been given supervision or instruction<br />
concerning use of the appliance by a person<br />
responsible for their safety.<br />
• Children should be supervised to ensure they<br />
do not play with the appliance.<br />
• This appliance is suitable for domestic use<br />
only. Do not use in moving vehicles or<br />
boats. Do not use outdoors. Do not use this<br />
appliance for anything other than its intended<br />
use. Misuse may cause injury.<br />
• It is recommended to regularly inspect<br />
the appliance. Do not use the appliance if<br />
power supply cord, power plug, or appliance<br />
becomes damaged in anyway. Return the<br />
entire appliance to the nearest authorised<br />
Kambrook Service Centre for examination<br />
and/or repair.<br />
• Any maintenance, other than cleaning, should<br />
be performed at an authorised Kambrook<br />
Service Centre.<br />
• The installation of a residual current device<br />
(safety switch) is recommended to provide<br />
additional safety protection when using<br />
electrical appliances. It is advisable that a<br />
safety switch with a rated residual operating<br />
current not exceeding 30mA be installed in<br />
the electrical circuit supplying the appliance.<br />
See your electrician for professional advice.<br />
USING YOUR KAMBROOK<br />
BLENDER<br />
BEFORE FIRST USE<br />
Before using your Kambrook <strong>Blender</strong> for the<br />
first time, remove and safely discard all packaging<br />
material and promotional labels. Ensure the<br />
appliance is switched off at the power outlet and<br />
power cord is unplugged.<br />
Wash the lid, inner cap and blender jug in warm<br />
soapy water with a soft cloth. Rinse and dry<br />
thoroughly (refer to disassembly and cleaning<br />
instructions).<br />
The motor base can be wiped with a damp cloth.<br />
Dry thoroughly.<br />
ASSEMBLING / OPERATING YOUR<br />
KAMBROOK BLENDER<br />
Place the motor base on a flat, dry surface. Ensure<br />
that the blender is switched off by selecting “0”<br />
on speed control dial, the power is switched off at<br />
<br />
the power outlet and the power plug is unplugged<br />
from the power outlet.<br />
Place the blender jug onto the motor base.<br />
Ensure that the blender jug is securely positioned.<br />
Add food or liquid to the blender jug. Place the lid<br />
on the blender jug, and push down to seal. Insert<br />
the inner cap into the feeder hole of the blender<br />
jug lid.<br />
Plug the power cord into a 230V / 240V power<br />
outlet and switch on at the power outlet.<br />
Turn the speed control dial clockwise for speeds<br />
1 and 2 or anti clockwise for pulse. The speed<br />
can be changed at any time during the blending<br />
process. Ideally, start mixing on speed 1 for 30<br />
seconds and then speed 2 to blend until smooth.<br />
For ingredients that require short burst of power,<br />
use the pulse speed. This is ideal for liquids<br />
containing ice or nuts.<br />
To stop the blending at any time, turn the speed<br />
control dial to “0”.<br />
NOTE: During the blending process, ingredients may<br />
stick to the sides of the blender jug. To push the food<br />
back on the blades, turn the speed control dial to “0”,<br />
switch the power off at the power outlet and remove<br />
the power cord. Remove the lid and use a plastic<br />
spatula to scrape down the sides of the jug. Replace<br />
lid before recommencing blending.<br />
NOTE: If the blades become stuck, immediately turn<br />
the speed control dial to “0” and switch the power<br />
off at the power outlet and remove the power cord.<br />
Remove the lid and use a plastic spatula to dislodge<br />
the food or liquid from the blades. Replace lid before<br />
recommencing blending.<br />
TIPS FOR THE BEST USE OF YOUR<br />
KAMBROOK BLENDER<br />
• Ensure the maximum level on the blender jug<br />
is not exceeded, the lid fits securely and the<br />
inner cap is inserted.<br />
• Use speed 1 for dressings, marinades and<br />
foods that require mixing until just combined.<br />
• Use speed 2 for pureeing, smoothie or<br />
cocktail making.<br />
• Use Pulse for mixtures that require short<br />
bursts of power such as liquids containing ice<br />
and nuts.<br />
• Ensure all removable parts have been<br />
thoroughly washed and dried before assembly.<br />
• Ensure the blender is correctly assembled<br />
before operating.<br />
• Ensure the blender is used on a clean, dry<br />
surface.
• Place liquids into blender jug before solid<br />
ingredients except where specified in recipes.<br />
• Cut all food into small cubes (approx 2-3 cm<br />
square) to achieve an even result.<br />
• If mixing hard and soft foods together, begin<br />
with the hard foods, blend for a few seconds<br />
and then add soft foods. Continue blending<br />
until you have an even texture.<br />
• To add ingredients during blending, remove<br />
the inner cap from the lid and drop solid<br />
ingredients or pour liquids through the feeder<br />
hole in the lid. Use a container with a pouring<br />
lip, such as a measuring jug, when adding<br />
liquids.<br />
• Place one hand on top of the blender lid and<br />
hold it down when processing large quantities<br />
of thin liquids. This will prevent the lid from<br />
popping off due to excessive pressure.<br />
• Do not blend dry ingredients in this blender.<br />
To blend thick or heavy mixtures, use the<br />
pulse setting and do not blend for longer<br />
than 1 minute without switching off the<br />
blender and stirring the ingredients with a<br />
plastic spatula. For normal blending tasks, for<br />
example mayonnaise, dressings, etc, do not<br />
operate for longer than 1 minute at one time.<br />
• Do not use the blender to store food.<br />
• Do not use the blender to beat egg whites as<br />
it will not incorporate air.<br />
• Do not use the blender to mash cooked<br />
potatoes.<br />
• Do not use the blender to knead dough or<br />
other heavy mixtures.<br />
• Do not use the blender as a food processor.<br />
• Do not place large pieces of solid or frozen<br />
foods into the blender jug. Always break<br />
pieces before blending.<br />
• Do not remove the blender jug or lid while<br />
the blender is operating. Always switch off<br />
at the power outlet and unplug at the power<br />
outlet before removing the blender jug.<br />
• Do not overfill by exceeding the maximum<br />
mark on the blender jug. Some mixtures<br />
increase in volume during blending.<br />
• Do not overload the blender with more than<br />
specified amounts. Overloading could cause<br />
the motor to stall. Switch the blender off by<br />
turning the speed control dial to “0”, switch<br />
off at the power outlet and unplug from the<br />
power outlet then remove a portion of the<br />
<br />
mixture before continuing.<br />
• Do not process boiling liquids or hot<br />
ingredients. Allow hot ingredients to cool<br />
before placing them into the blender jug.<br />
• Do not expose the glass jug to sudden<br />
temperature changes (i.e.: immersing the jug<br />
into hot water directly after immersing it into<br />
cold water or vice versa.)<br />
DISASSEMBLING / CLEANING YOUR<br />
KAMBROOK BLENDER<br />
• Ensure the blender has stopped operation by<br />
turning the speed control dial to “0”.<br />
• Switch off at the power outlet and unplug the<br />
power cord.<br />
• Lift the blender jug upwards from the motor<br />
base to remove.<br />
• Ensure all food has been removed from the<br />
blender jug.<br />
• Wash the blender jug, lid, and inner cap in<br />
warm, soapy water, rinse and dry thoroughly.<br />
NOTE: A bottle cleaning brush may be used to clean<br />
under and around the fixed blade assembly.<br />
CAUTION: BLADES MUST BE<br />
HANDLED CAREFULLY AS THEY ARE<br />
SHARP<br />
NOTE: Do not place any part of the blender in the<br />
dishwasher.<br />
NOTE: Do not immerse the motor base, power cord<br />
or power plug in water or any other liquid.<br />
CLEANING THE MOTOR BASE<br />
The motor base can be cleaned with a soft, damp<br />
cloth (do not use abrasive agents or cloths which<br />
can damage the surface). Dry and polish with a<br />
soft, lint free cloth.<br />
STORAGE<br />
• Before storing, thoroughly wash and dry the<br />
blender jug, lid and inner cap.<br />
• Assemble the blender and store on the<br />
kitchen bench or in an easy to accessible<br />
cupboard.<br />
• Store out of reach of children.<br />
• Store the appliance upright.<br />
• Do not store anything on top of the appliance.
Hearty Potato Soup<br />
Serves 4 – 6<br />
1 cup sliced carrots<br />
2 cloves garlic, peeled and finely chopped<br />
1 medium onion, peeled and cut into eighths<br />
3 medium potatoes, peeled and cut into eighths<br />
2 tablespoons olive oil<br />
2 cups / 500ml water<br />
2 cups / 500ml chicken stock<br />
1 teaspoon dried parsley<br />
1 teaspoon celery salt<br />
Pinch black pepper<br />
Place the blender jug on the motor base and<br />
ensure it is securely positioned. Place the lid on<br />
and remove inner cap. Operate pulse switch with<br />
one hand whilst dropping the vegetables into the<br />
blender through the hole in lid with the other<br />
hand, beginning with the carrots and ending with<br />
the potatoes. Do this in small batches. Remove<br />
and reserve vegetables as they are chopped.<br />
Sauté the chopped vegetables in oil in a large<br />
saucepan for 2 minutes. Add the remaining<br />
ingredients, bring the soup to boil and reduce to a<br />
simmer. Cook 30 minutes. Serve immediately.<br />
Pureed Garden Variety Soup<br />
Serves 4<br />
3 medium tomatoes, cut into quarters<br />
1 leek, white part only, cut into quarters<br />
1 clove garlic, peeled and chopped<br />
1 tablespoon chopped dill<br />
1 carrot, cut into quarters<br />
1 stalk celery, cut into quarters<br />
2 cups / 500ml water<br />
2 chicken stock cubes<br />
2 tablespoons chopped parsley<br />
Place all ingredients into a large saucepan bring<br />
to boil and then reduce heat to a simmer. Cook<br />
for 10 minutes. Set aside, cool before blending.<br />
Carefully spoon cooked vegetables into the<br />
blender with 200ml of the liquid. Cover tightly<br />
with lid. Use Speed 2 and blend for 30 seconds.<br />
Remove the inner cap from lid and pour remaining<br />
liquid into blender jug.<br />
Blend using speed 2 for 30 seconds until<br />
mixture is smooth. Return pureed soup to the<br />
saucepan and gently heat on simmer until warm,<br />
approximately 5 minutes. Serve immediately.<br />
RECIPES<br />
Easy Hollandaise Sauce<br />
Makes 150ml ( 2 ⁄3 cup)<br />
3 egg yolks<br />
2 tablespoons lemon juice<br />
½ teaspoon salt<br />
Pinch pepper<br />
125g butter, melted<br />
Place egg yolks, lemon juice, salt and pepper into<br />
the blender jug. Cover with lid. Blend using speed<br />
1 for 10 seconds. Open inner cap and slowly pour<br />
in melted butter while blender is running, blend<br />
for 1 minute or until the mixture thickens.<br />
Béarnaise Sauce<br />
Makes 250ml (1 cup)<br />
1 recipe for Hollandaise Sauce (as above)<br />
1 shallot, chopped<br />
1 tablespoon butter<br />
2 tablespoons white wine<br />
1 tablespoons tarragon vinegar<br />
½ teaspoon dried tarragon<br />
Prepare Hollandaise Sauce as directed above.<br />
Sauté shallots in butter in a small saucepan and<br />
add remaining ingredients. Bring to a boil and<br />
cook until most of the liquid has evaporated. Add<br />
shallot mixture to the blender jug containing the<br />
Hollandaise Sauce. Cover tightly with lid. Blend<br />
using speed 2 for 15 seconds or until smooth.<br />
BIG BERRY SMOOTHIE<br />
Makes 2 – 3 large glasses<br />
1½ cups / 375ml chilled milk<br />
150g strawberries, hulled and halved<br />
150g fresh or frozen blueberries<br />
100g fresh or frozen raspberries<br />
3 sprigs fresh mint<br />
3 scoops vanilla ice cream<br />
Place all ingredients into the blender jug and blend<br />
using speed 1 for 30 seconds, increase to speed 2<br />
for 30 seconds. Smoothie should be smooth and<br />
thick. Serve immediately into large glasses.
DOUBLE CHOC NUT SMOOTHIE<br />
Makes 2 – 3 large glasses<br />
1½ cups / 375ml chilled milk<br />
1 x 100ml carton chocolate mousse dessert<br />
4 scoops chocolate ice cream<br />
¼ cup caramel fudge sauce<br />
2 tablespoons ground almonds<br />
Place all ingredients into the blender jug and blend<br />
using speed 2 for 30-40 seconds or until smooth<br />
and thick. Serve immediately into chilled glasses.<br />
Low Fat Zip Zip Smoothie<br />
Makes approx. 2 large glasses<br />
1 cup / 250ml chilled skim milk<br />
125ml skim milk natural yoghurt<br />
2 scoops low fat vanilla ice cream<br />
3 prunes, pitted<br />
¼ teaspoon ground nutmeg<br />
1 tablespoon honey<br />
Place all ingredients into the blender jug and blend<br />
using speed 1 for 30 seconds, increase to speed 2<br />
for 30 seconds. Smoothie should be smooth and<br />
thick. Serve immediately into chilled glasses.<br />
Low Fat Pink Pirouette Smoothie<br />
Makes 2 – 3 large glasses<br />
1 cup / 250ml chilled cranberry juice<br />
1 x 200g carton low fat cherry yoghurt<br />
1 x 425g can stoneless black cherries, drained<br />
Place all ingredients into the blender jug and blend<br />
using speed 1 for 30 seconds, increase to speed 2<br />
for 30 seconds. Smoothie should be smooth and<br />
thick. Serve immediately into chilled glasses.<br />
Low Fat White Wonder Smoothie<br />
Makes 2 – 3 large glasses<br />
1 cup / 250ml chilled low fat or skim milk<br />
1 x 200g carton unflavoured low fat yoghurt<br />
4 scoops low fat vanilla ice cream<br />
2 tablespoons maple syrup<br />
1 teaspoon vanilla essence<br />
Place all ingredients into the blender jug and blend<br />
using speed 2 for 30-40 seconds or until smooth<br />
and thick. Serve immediately into chilled glasses.<br />
RECIPES<br />
Pineapple Bite Frappe<br />
Makes 2 – 3 large glasses<br />
½ cup / 125ml chilled unsweetened pineapple<br />
juice<br />
1 tablespoon fresh lime juice<br />
2 scoops fruit salad frozen yoghurt<br />
2 slices fresh ripe or canned pineapple<br />
1 cup honeydew melon, peeled and chopped<br />
1 cup small ice cubes<br />
Place all ingredients into the blender jug and<br />
blend using speed 1 for 30 seconds, increase to<br />
speed 2 for 30 seconds. Serve immediately into<br />
chilled glasses.<br />
LEMON ICE TEA<br />
Makes 2 – 3 glasses<br />
1½ cups / 375ml freshly brewed lemon flavoured<br />
tea, cooled<br />
½ cup frozen lemon sorbet<br />
1 tablespoon finely grated lemon rind<br />
½ teaspoon ground ginger<br />
1 cup small ice cubes<br />
Place all ingredients into the blender jug and<br />
blend using speed 1 for 30 seconds, increase<br />
speed 2 for 30 seconds. Serve immediately into<br />
chilled glasses.<br />
FROZEN BERRY DAIQUIRI<br />
Makes about 2 – 3 glasses<br />
½ cup / 125ml white rum<br />
1 tablespoon lime juice<br />
1 tablespoon orange juice<br />
1 cup frozen berries (strawberries, blueberries or<br />
raspberries)<br />
3 scoops Vitari Blackberry and Apple Fruit Ice<br />
Confection<br />
½ cup small ice cubes<br />
Place all ingredients into the blender jug and<br />
blend using speed 1 for 30 seconds, increase to<br />
speed 2 for 30 seconds. Serve immediately into<br />
chilled glasses.
GRAPEFRUIT GRIN COCKTAIL<br />
Makes 2 – 3 glasses<br />
½ cup / 125ml gin<br />
1½ tablespoons orange flavoured liqueur<br />
3 cups fresh pink grapefruit segments, frozen<br />
½ teaspoon ground cinnamon<br />
Place all ingredients into the blender jug and blend<br />
using speed 1 for 30 seconds, increase to speed<br />
2 for 30 seconds. Serve immediately into chilled<br />
glasses.<br />
PINK MARY MOCKTAIL<br />
Makes 2 glasses<br />
1 cup / 250ml tomato juice<br />
½ cup / 125ml white cranberry juice<br />
1 teaspoon Worcestershire sauce<br />
2-3 drops Tabasco sauce<br />
½ cup small ice cubes<br />
Salt and pepper, if desired<br />
Celery tops, for serving<br />
Place juices, sauces and ice into the blender jug,<br />
season to taste and blend using speed 1 for 30-40<br />
seconds. Serve immediately into 2 chilled glasses,<br />
garnish with celery tops.<br />
APRICOT AMBROSIA MOCKTAIL<br />
Makes about 2 glasses<br />
1 cup / 250ml apricot nectar<br />
½ cup soft silken tofu<br />
1 tablespoon coconut cream<br />
2 tablespoon desiccated coconut<br />
1 cup fresh apricots, peeled, diced and frozen<br />
Place all ingredients into the blender jug and blend<br />
using speed 1 for 30 seconds, increase speed 2<br />
for 30 seconds. Serve immediately into 2 chilled<br />
glasses.<br />
RECIPES<br />
STRAWBERRY SORBET<br />
Makes 2 cups<br />
½ cup / 125ml water<br />
¼ cup / 60ml apple juice<br />
¼ cup sugar<br />
2 cups frozen strawberries, frozen without liquid<br />
Place all ingredients into the blender jug and blend<br />
using speed 2 for 30 -45 seconds until berries are<br />
pureed and mixture is smooth. Spoon puree into a<br />
plastic container, cover and place in the freezer for<br />
several hours or until firm.<br />
FROZEN PEACH YOGHURT<br />
Makes 2 cups<br />
¾ cup / 200ml non-fat yoghurt<br />
½ cup sugar<br />
1 teaspoon vanilla<br />
1 cup drained peach slices, frozen<br />
Place all ingredients into the blender jug and blend<br />
using speed 2, until smooth, about 30 seconds.<br />
Spoon into a plastic container, cover and place in<br />
the freezer for several hours or until firm.
NOTES
KAMBROOK 12 MONTH REPLACEMENT WARRANTY<br />
Kambrook warrants the purchaser against defects<br />
in workmanship and material for a period of 12<br />
months from the date of purchase (3 months<br />
commercial use).<br />
Guarantee and purchase receipt for this product<br />
are to be retained as proof of purchase and<br />
must be presented if making a claim under the<br />
Kambrook guarantee.<br />
Kambrook reserves the right to replace or repair<br />
the appliance within the warranty period.<br />
Warranty does not apply to any defect,<br />
deterioration, loss, injury or damage occasioned<br />
by, or as a result of the misuse or abuse, negligent<br />
handling or if the product has not been used in<br />
accordance with the instructions. The guarantee<br />
excludes breakages and consumable items such as<br />
kneading blades.<br />
This warranty is void if there is evidence of the<br />
product being tampered with by unauthorised<br />
persons.<br />
If the product includes one or a number of<br />
accessories only the defective accessory<br />
or product will be replaced. In the event of<br />
Kambrook choosing to replace the appliance, the<br />
guarantee will expire at the original date, i.e. 12<br />
months from the original date of purchase.<br />
In Australia, this KAMBROOK Guarantee is<br />
additional to the conditions and guarantees which<br />
are mandatory as implied by the Trade Practises<br />
Act 1974 and State and Territory legislation.<br />
For service, spare parts or product information<br />
in Australia, please call KAMBROOK on the<br />
Customer Service Line; 1300 139 798.<br />
For service, spare parts or product information<br />
in New Zealand, please call KAMBROOK New<br />
Zealand; 0800 273 845. For spare parts phone<br />
0800 273 845.<br />
If claiming this guarantee the product must be<br />
returned freight prepaid.<br />
KAMBROOK 12 MONTH REPLACEMENT WARRANTY<br />
YOUR PURCHASE RECORD (Please complete)<br />
Attach a copy of the purchase receipt here.<br />
DATE OF PURCHASE<br />
MODEL NUMBER<br />
SERIAL NUMBER<br />
PURCHASED FROM<br />
(Please don’t return purchase record until<br />
you are making a claim)<br />
Register your warranty at www.kambrook.com.au/service.asp<br />
Kambrook - Australia<br />
461 Plummer Street, Port Melbourne, 3207, Australia<br />
Customer Service Line 1300 139 798<br />
Customer Service Fax 1800 621337<br />
Kambrook - New Zealand<br />
Private Bag 94411, Greenmount, Auckland, New Zealand<br />
Customer Service Line/Spare Parts 09 271 3980<br />
Customer Service Fax 0800 288 513<br />
Due to continual improvement in design or otherwise, the product you purchase may differ slightly from the illustration in this book. Issue 1/07