ROPECC Epoxy Caulking Compound - Roppe Corporation
ROPECC Epoxy Caulking Compound - Roppe Corporation
ROPECC Epoxy Caulking Compound - Roppe Corporation
Create successful ePaper yourself
Turn your PDF publications into a flip-book with our unique Google optimized e-Paper software.
<strong>ROPECC</strong> <strong>Epoxy</strong> <strong>Caulking</strong> <strong>Compound</strong><br />
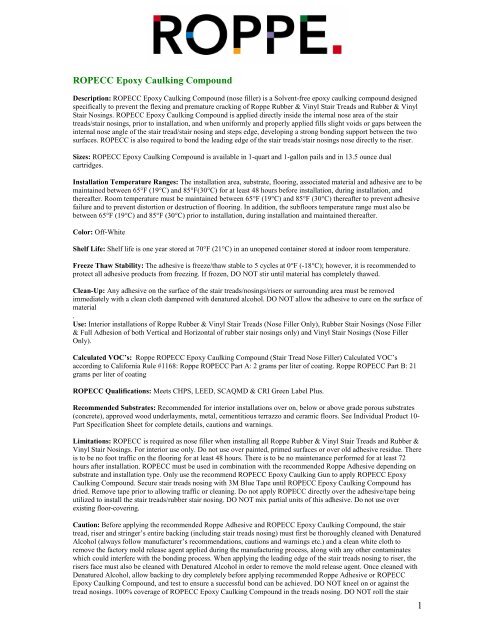
Description: <strong>ROPECC</strong> <strong>Epoxy</strong> <strong>Caulking</strong> <strong>Compound</strong> (nose filler) is a Solvent-free epoxy caulking compound designed<br />
specifically to prevent the flexing and premature cracking of <strong>Roppe</strong> Rubber & Vinyl Stair Treads and Rubber & Vinyl<br />
Stair Nosings. <strong>ROPECC</strong> <strong>Epoxy</strong> <strong>Caulking</strong> <strong>Compound</strong> is applied directly inside the internal nose area of the stair<br />
treads/stair nosings, prior to installation, and when uniformly and properly applied fills slight voids or gaps between the<br />
internal nose angle of the stair tread/stair nosing and steps edge, developing a strong bonding support between the two<br />
surfaces. <strong>ROPECC</strong> is also required to bond the leading edge of the stair treads/stair nosings nose directly to the riser.<br />
Sizes: <strong>ROPECC</strong> <strong>Epoxy</strong> <strong>Caulking</strong> <strong>Compound</strong> is available in 1-quart and 1-gallon pails and in 13.5 ounce dual<br />
cartridges.<br />
Installation Temperature Ranges: The installation area, substrate, flooring, associated material and adhesive are to be<br />
maintained between 65°F (19°C) and 85°F(30°C) for at least 48 hours before installation, during installation, and<br />
thereafter. Room temperature must be maintained between 65°F (19°C) and 85°F (30°C) thereafter to prevent adhesive<br />
failure and to prevent distortion or destruction of flooring. In addition, the subfloors temperature range must also be<br />
between 65°F (19°C) and 85°F (30°C) prior to installation, during installation and maintained thereafter.<br />
Color: Off-White<br />
Shelf Life: Shelf life is one year stored at 70°F (21°C) in an unopened container stored at indoor room temperature.<br />
Freeze Thaw Stability: The adhesive is freeze/thaw stable to 5 cycles at 0°F (-18°C); however, it is recommended to<br />
protect all adhesive products from freezing. If frozen, DO NOT stir until material has completely thawed.<br />
Clean-Up: Any adhesive on the surface of the stair treads/nosings/risers or surrounding area must be removed<br />
immediately with a clean cloth dampened with denatured alcohol. DO NOT allow the adhesive to cure on the surface of<br />
material<br />
.<br />
Use: Interior installations of <strong>Roppe</strong> Rubber & Vinyl Stair Treads (Nose Filler Only), Rubber Stair Nosings (Nose Filler<br />
& Full Adhesion of both Vertical and Horizontal of rubber stair nosings only) and Vinyl Stair Nosings (Nose Filler<br />
Only).<br />
Calculated VOC’s: <strong>Roppe</strong> <strong>ROPECC</strong> <strong>Epoxy</strong> <strong>Caulking</strong> <strong>Compound</strong> (Stair Tread Nose Filler) Calculated VOC’s<br />
according to California Rule #1168: <strong>Roppe</strong> <strong>ROPECC</strong> Part A: 2 grams per liter of coating. <strong>Roppe</strong> <strong>ROPECC</strong> Part B: 21<br />
grams per liter of coating<br />
<strong>ROPECC</strong> Qualifications: Meets CHPS, LEED, SCAQMD & CRI Green Label Plus.<br />
Recommended Substrates: Recommended for interior installations over on, below or above grade porous substrates<br />
(concrete), approved wood underlayments, metal, cementitious terrazzo and ceramic floors. See Individual Product 10-<br />
Part Specification Sheet for complete details, cautions and warnings.<br />
Limitations: <strong>ROPECC</strong> is required as nose filler when installing all <strong>Roppe</strong> Rubber & Vinyl Stair Treads and Rubber &<br />
Vinyl Stair Nosings. For interior use only. Do not use over painted, primed surfaces or over old adhesive residue. There<br />
is to be no foot traffic on the flooring for at least 48 hours. There is to be no maintenance performed for at least 72<br />
hours after installation. <strong>ROPECC</strong> must be used in combination with the recommended <strong>Roppe</strong> Adhesive depending on<br />
substrate and installation type. Only use the recommend <strong>ROPECC</strong> <strong>Epoxy</strong> <strong>Caulking</strong> Gun to apply <strong>ROPECC</strong> <strong>Epoxy</strong><br />
<strong>Caulking</strong> <strong>Compound</strong>. Secure stair treads nosing with 3M Blue Tape until <strong>ROPECC</strong> <strong>Epoxy</strong> <strong>Caulking</strong> <strong>Compound</strong> has<br />
dried. Remove tape prior to allowing traffic or cleaning. Do not apply <strong>ROPECC</strong> directly over the adhesive/tape being<br />
utilized to install the stair treads/rubber stair nosing. DO NOT mix partial units of this adhesive. Do not use over<br />
existing floor-covering.<br />
Caution: Before applying the recommended <strong>Roppe</strong> Adhesive and <strong>ROPECC</strong> <strong>Epoxy</strong> <strong>Caulking</strong> <strong>Compound</strong>, the stair<br />
tread, riser and stringer’s entire backing (including stair treads nosing) must first be thoroughly cleaned with Denatured<br />
Alcohol (always follow manufacturer’s recommendations, cautions and warnings etc.) and a clean white cloth to<br />
remove the factory mold release agent applied during the manufacturing process, along with any other contaminates<br />
which could interfere with the bonding process. When applying the leading edge of the stair treads nosing to riser, the<br />
risers face must also be cleaned with Denatured Alcohol in order to remove the mold release agent. Once cleaned with<br />
Denatured Alcohol, allow backing to dry completely before applying recommended <strong>Roppe</strong> Adhesive or <strong>ROPECC</strong><br />
<strong>Epoxy</strong> <strong>Caulking</strong> <strong>Compound</strong>, and test to ensure a successful bond can be achieved. DO NOT kneel on or against the<br />
tread nosings. 100% coverage of <strong>ROPECC</strong> <strong>Epoxy</strong> <strong>Caulking</strong> <strong>Compound</strong> in the treads nosing. DO NOT roll the stair<br />
1
tread or stair nosings nose. Rolling the nosing will squeeze out the epoxy nose filler. Cautions: When installing<br />
flooring, either use a kneeling board, or for best results, work off the flooring to avoid shifting, adhesive displacement<br />
& adhesive telegraphing. Remove wet adhesive immediately. Do not allow adhesive to dry on the flooring, tools or<br />
surrounding areas since it may be impossible to remove. Do not allow adhesive to dry or skin-over which will result in<br />
either none or inadequate adhesive transfer resulting in an installation failure. All flooring must be properly rolled and<br />
re-rolled to ensure proper adhesive transfer. Do Not apply <strong>ROPECC</strong> directly over stair tread adhesive/tape being<br />
utilized to install stair treads/stair nosings.<br />
Subfloor/Substrate Inspection and Preparation: All subfloors/substrates must be inspected prior to installation. All<br />
substrates must be clean, smooth, permanently dry, flat, and structurally sound. The substrate must be free of moisture,<br />
dust, sealers, primers, paint, oxidation, curing compounds, parting agents, residual adhesives, adhesive removers,<br />
hardeners, resinous compounds, solvents, wax, oil, grease, asphalt, gypsum compounds, alkaline salts, excessive<br />
carbonation or laitance, mold, mildew, any other extraneous coatings, films, materials and all other foreign matter<br />
which might interfere/restrict proper adhesive bonding. DO NOT use sweeping compounds, solvents, citrus adhesive<br />
removers, or acid etching to clean the substrate. DO NOT install flooring over gypsum-based or plaster based leveling<br />
or patching compounds. DO NOT install new floor covering over old floor covering, as the old floor covering may not<br />
be adequately bonded, hide possible structural defects, or cause plasticizer migration into the new flooring. In<br />
renovation or remodel work, remove all existing* adhesive residue so that 100% of the overall area of the original<br />
subfloor/substrate is exposed. Follow The Resilient Floor Covering Institute’s (RFCI) “Recommended Work Practice<br />
for Removal of Existing Floor Covering and Adhesive, and all applicable industry, local, state, and federal standards.<br />
Care must be taken to analyze the conditions and correct any problems prior to installation. Follow the manufacturer’s<br />
recommendations for any patching or underlayment materials, excluding gypsum based or plaster based levelers or<br />
patching compounds.<br />
*Some previous manufactured asphaltic “cutback” contained asbestos. For removal instructions, refer to the Resilient<br />
Floor Covering Institute’s publication “Recommended Work Practices for Removal of Resilient Floor Covering”.<br />
Concrete Substrates: Concrete substrates on all Grade Levels must be tested in accordance with ASTM F 1869<br />
Standard Test Method for Measuring Moisture Vapor Emission Rate of Concrete Subfloor Using Anhydrous Calcium<br />
Chloride or ASTM F 2170 Standard Test Method for Determining Relative Humidity in Concrete Floor Slabs using in<br />
situ Probes to quantitatively determine the amount of moisture vapor emission at least one week prior to the<br />
installation. Caution: ASTM F 1869 or ASTM F 2170 tests cannot predict long-term moisture conditions of concrete<br />
slabs. Moisture testing only indicates moisture conditions at the time the tests are performed. Before conducting<br />
Calcium Chloride test & Relative Humidity test, the installation area must be maintained between for 65ºF (19ºC) and<br />
85ºF (30ºC) or at least 48 hours prior to testing, during testing and thereafter. In addition, the concrete’s temperature<br />
range must also be identical to that of the installation area. Conduct three tests for the first 1,000 sq. ft. and one<br />
additional test for each 1,000 sq. ft. or fraction thereof per grade level (on, below or above grade). The moisture<br />
emission shall not exceed 5.0 lbs per 1000 square feet per 24 hours as per ASTM F1869 and 75% RH as per ASTM<br />
F2170. A pH level of 8 or less is acceptable.<br />
Wood Subfloors: Wood subfloors to be used as subfloors/substrates are to follow the procedures recommended for<br />
Subfloor/Substrate Inspection and Preparation (see above). Wood subfloors should be of double layer construction with<br />
a minimum thickness of 1”. Crawl spaces underneath wood subfloors shall be in compliance with local building code<br />
ventilation practices and have clearance of at least 18” of cross-ventilated space between the ground level and joists.<br />
Wood joists should be spaced on no more than 16” centers. Place a moisture retarder; having a maximum rating of 1.0<br />
perm, on the top of the ground under the wood subfloor overlapped at least 8”. APA, The Engineered Wood<br />
Association, Underlayment Grade plywood, minimum 3/8” thick, with a fully sanded face is to be used. Use APA<br />
approved exterior grade plywood if finished floors are subjected to moisture. OSB, lauan, maranti, solid-core<br />
mahogany, waferboard, particleboard, chipboard, flakeboard, tempered hardboard, glass mesh mortar units or<br />
cementitious tile backer boards, sheathing-grade plywood, preservative-treated plywood, or fire-retardant treated<br />
plywood are not recommended as some manufacturers may use resins or other adhesives in the manufacturing of the<br />
product that may cause discoloration or staining of the flooring. Wood subfloor movement, flexing or instability will<br />
cause the flooring installed to release, buckle or become distorted. Do not proceed with the installation until corrective<br />
measures have been made. The warranties, performance, installation, and use are the responsibility of the manufacturer<br />
and/or contractor. DO NOT use plastic or resin filler to patch cracks. DO NOT use cement or rosin coated nails or<br />
staples or solvent-based construction adhesive to adhere the plywood. Installation on a sleeper, a wood subfloor system<br />
constructed over the top of concrete, is not recommended. Installation directly over Sturd-I-Floor panels is not<br />
recommended. All wood subfloors, single construction plywood floors, single and/or double tongue-and-groove strip<br />
floors, and wood plank floors must be prepared to receive resilient flooring in accordance with federal and industry<br />
standards. Follow the recommendations of the APA, The Engineered Wood Association, Design/Construction Guide,<br />
Residential and Commercial, and ASTM F 1482, Standard Guide to Wood Underlayment Products Available for Use<br />
Under Resilient Flooring, for the installation and proper construction of the panels to receive resilient flooring. It is the<br />
contractor’s responsibility to determine if the subfloor is acceptable to receive the flooring.<br />
Metal Floors: Metal floors to be used as subfloors/substrates must be thoroughly cleaned of any residue, oil, paint,<br />
sealer, rust, and oxidation and properly sanded/grinded to provide a smooth, level, clean substrate to receive stair treads<br />
and flooring. Metal floors and other substrates can only be slightly flexing. Do not install over extremely flexing<br />
substrates. The stair treads and flooring must be installed within 12 hours after sanding/grinding to prevent the metal<br />
from re-oxidizing. The metal subfloor shall be structurally sound. Deflection of the metal can cause a bond failure<br />
between the adhesive, Quik-Stik Adhesive Tape, <strong>ROPECC</strong> <strong>Epoxy</strong> <strong>Caulking</strong> <strong>Compound</strong> and the metal substrate. It is<br />
the contractor’s responsibility to decide the feasibility of the application, and <strong>Roppe</strong> <strong>Corporation</strong> will not be held liable<br />
2
for failures caused by flexing or deterioration of metal substrates. Caution: The installation of Stair Treads, risers or<br />
other flooring material will not prevent deterioration of metal substrates from occurring.<br />
Cementitious Terrazzo and Ceramic Floors: Cementitious Terrazzo and ceramic floors to be used as<br />
subfloors/substrates are to follow the procedures recommended for concrete (see above). Ceramic tile must be solidly<br />
adhered and all loose tiles must be removed and repaired or replaced. Ensure all glazed, sealed, smooth, and/or shiny<br />
surfaces are properly sanded and cleaned. Fill all grout lines and other irregularities with a manufacturer’s<br />
recommended Portland cement-based underlayment with a minimum compressive strength of 3500 psi. The subfloor<br />
must be structurally sound. Inspect and ensure there is an adequate bond of the old flooring to the original substrate. Do<br />
not install over epoxy based terrazzo. Cementitious terrazzo must first be sanded to remove all finishes, and then<br />
cleaned. Conduct a bond test with adhesive to ensue a successful bond can be achieved before installing. <strong>Roppe</strong> will<br />
not warranty the product if there is a bond failure caused by problems relating to the old flooring.<br />
Mixing:<br />
o<br />
o<br />
Quart and One-Gallon Pails: Mixing required. Remove the lids and add all of Part B into Part A. Mix the<br />
combined parts by hand using the furnished paddle using a rotary motion while at the same time lifting from the<br />
bottom. DO NOT mix partial units of this adhesive! <strong>ROPECC</strong> is packaged in two separate containers marked<br />
Part A (epoxy resin) and Part B (polyamide resin, hardener). A slow speed, less than 300 RPM maximum, drill<br />
with an attached mixing paddle may also be used. Mix approximately 4 minutes. After mixing, the adhesive<br />
must be one consistent solid color. Caution: Higher mixing speeds and/or longer mixing time will reduce the<br />
open time/working time and can cause premature curing of the adhesive. Adhesive will not cure if not properly<br />
mixed. DO NOT allow the mixed epoxy adhesive to remain in the container.<br />
13.5 ounce Dual Cartridges: Material is self-mixed when pumped thru cartridge tip furnished. When applying<br />
<strong>ROPECC</strong> <strong>Epoxy</strong> <strong>Caulking</strong> <strong>Compound</strong> (nose filler) in cartridges, the first six inches (6”) of unmixed material<br />
from each cartridge must be discarded to prevent bond failure and oozing of unmixed material down the face<br />
of the riser! Only use the recommend <strong>ROPECC</strong> <strong>Epoxy</strong> <strong>Caulking</strong> Gun to apply <strong>ROPECC</strong> <strong>Epoxy</strong> <strong>Caulking</strong><br />
<strong>Compound</strong>.<br />
Application: Spread coverage is approximately 200 linear feet per US gallon on a smooth substrate. Spread rate using<br />
the 13.5 oz. dual cartridge applicator with the required 1/2” bead in the stair treads nosing is approximately 25 linear<br />
feet. Coverage will vary according to the type of surface, surface texture, and adhesive temperature. When applying<br />
<strong>ROPECC</strong> to Round Nose Vinyl Stair Treads, apply nose caulk approximately 1/2” inch from the top curvature of the<br />
stair tread completely covering the entire backing of the nosing to achieve a successful bond directly to the steps<br />
nosing. <strong>ROPECC</strong> <strong>Epoxy</strong> <strong>Caulking</strong> <strong>Compound</strong> must also be applied in a tight serpentine bead pattern covering the<br />
entire width and length of the stair treads nosing in order to adhere directly to the steps riser. 100% transfer to the<br />
products backing is required.<br />
Warning: Follow all local, state, and federal standards and practices for the proper removal and disposal of flooring,<br />
adhesives, or other materials. Follow all local, state, federal, and manufacturer’s safety standards for the use of all<br />
products and equipment.<br />
* Notice: This document is intended as a general guide only. Therefore, refer to Individual Product 10-Part<br />
Specification Sheet for complete details, cautions and warnings.<br />
Manufacturer<br />
<strong>Roppe</strong> <strong>Corporation</strong><br />
1602 N. Union Street<br />
P.O. Box 1158<br />
Fostoria, Ohio USA 44830-1158<br />
Phone: (419) 435-8546<br />
Toll-Free (800) 537-9527<br />
Fax: (419) 435-1056<br />
Sample Hotline: (877) 726-7534<br />
Email:<br />
sales@roppe.com<br />
Web-Site:<br />
www.roppe.com<br />
12-8-08<br />
3


