String Painting - Dick Blick - Dick Blick Art Materials
String Painting - Dick Blick - Dick Blick Art Materials
String Painting - Dick Blick - Dick Blick Art Materials

You also want an ePaper? Increase the reach of your titles
YUMPU automatically turns print PDFs into web optimized ePapers that Google loves.
<strong>Dick</strong><strong>Blick</strong>.com 1-800-447-8192<br />
Copyright © 2011<br />
<strong>Dick</strong> <strong>Blick</strong> <strong>Art</strong> <strong>Materials</strong><br />
All rights reserved<br />
JD<br />
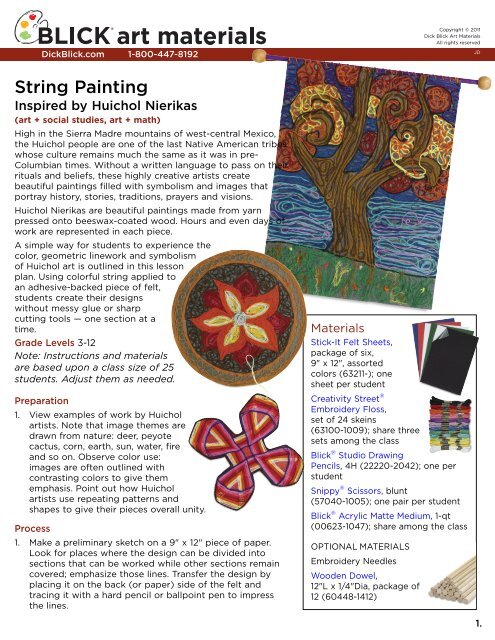
<strong>String</strong> <strong>Painting</strong><br />
Inspired by Huichol Nierikas<br />
(art + social studies, art + math)<br />
High in the Sierra Madre mountains of west-central Mexico,<br />
the Huichol people are one of the last Native American tribes<br />
whose culture remains much the same as it was in pre-<br />
Columbian times. Without a written language to pass on their<br />
rituals and beliefs, these highly creative artists create<br />
beautiful paintings filled with symbolism and images that<br />
portray history, stories, traditions, prayers and visions.<br />
Huichol Nierikas are beautiful paintings made from yarn<br />
pressed onto beeswax-coated wood. Hours and even days of<br />
work are represented in each piece.<br />
A simple way for students to experience the<br />
color, geometric linework and symbolism<br />
of Huichol art is outlined in this lesson<br />
plan. Using colorful string applied to<br />
an adhesive-backed piece of felt,<br />
students create their designs<br />
without messy glue or sharp<br />
cutting tools — one section at a<br />
time.<br />
Grade Levels 3-12<br />
Note: Instructions and materials<br />
are based upon a class size of 25<br />
students. Adjust them as needed.<br />
Preparation<br />
1. View examples of work by Huichol<br />
artists. Note that image themes are<br />
drawn from nature: deer, peyote<br />
cactus, corn, earth, sun, water, fire<br />
and so on. Observe color use:<br />
images are often outlined with<br />
contrasting colors to give them<br />
emphasis. Point out how Huichol<br />
artists use repeating patterns and<br />
shapes to give their pieces overall unity.<br />
Process<br />
1. Make a preliminary sketch on a 9" x 12" piece of paper.<br />
Look for places where the design can be divided into<br />
sections that can be worked while other sections remain<br />
covered; emphasize those lines. Transfer the design by<br />
placing it on the back (or paper) side of the felt and<br />
tracing it with a hard pencil or ballpoint pen to impress<br />
the lines.<br />
<strong>Materials</strong><br />
Stick-It Felt Sheets,<br />
package of six,<br />
9" x 12", assorted<br />
colors (63211-); one<br />
sheet per student<br />
Creativity Street ®<br />
Embroidery Floss,<br />
set of 24 skeins<br />
(63100-1009); share three<br />
sets among the class<br />
<strong>Blick</strong> ® Studio Drawing<br />
Pencils, 4H (22220-2042); one per<br />
student<br />
Snippy ® Scissors, blunt<br />
(57040-1005); one pair per student<br />
<strong>Blick</strong> ® Acrylic Matte Medium, 1-qt<br />
(00623-1047); share among the class<br />
OPTIONAL MATERIALS<br />
Embroidery Needles<br />
Wooden Dowel,<br />
12"L x 1/4"Dia, package of<br />
12 (60448-1412)<br />
1.
Process, continued<br />
2. The release paper covering the adhesive<br />
can be easily “cut” with hard pencil lines.<br />
Simply draw over the sketch one section at<br />
a time using firm pressure. Multiple strokes<br />
may be required in order for the cuts to go<br />
all the way through the paper. When you<br />
are finished, lift off the paper. The lines<br />
made by the pencil will be jagged.<br />
3. “Paint” the image by filling in the area with<br />
colorful string, pressing it gently onto the<br />
adhesive. Here are some guidelines:<br />
— Use one hand to arrange the string and<br />
the other to follow it and tap the string<br />
gently into place. Once an area is filled, it<br />
can be burnished down completely.<br />
— Place long strings side by side to make<br />
smooth fills, then loop, swirl, zig-zag, cut,<br />
fray and cross the strands to create texture.<br />
— It's easy to make changes by pulling up<br />
the string and repositioning it. Whereas<br />
yarn would leave residue, string will leave<br />
very little and will not pull up the adhesive.<br />
— Try to keep fingers from too much<br />
contact with the adhesive or it will lose its<br />
tackiness. Working with clean hands is<br />
always best.<br />
4. Repeat the process by cutting away<br />
another section and applying string<br />
until the piece is complete.<br />
5. Permanently seal the finished piece<br />
by brushing a coat of matte<br />
medium over the surface.<br />
Options<br />
1. Huichol artists are also known for<br />
“Chaquira,” or beaded artworks. As an<br />
embellishment to the string painting, press<br />
tiny beads into the adhesive as a final step<br />
before sealing your work. Potpourri Glass<br />
Beads Mix (61518-) contains seed beads,<br />
bugle beads and rocaille beads in assorted<br />
colors.<br />
2. Thread the remaining embroidery floss<br />
through a needle and finish the piece with stitching.<br />
Make a blanket stitch around the edges, add French<br />
knot accents or use other embroidery techniques.<br />
Stitch the top edge around a dowel to make a<br />
hanging piece.<br />
3. For faster projects, cut the adhesive felt in half or<br />
quarter-sheet pieces.<br />
Step 1: Draw a design on the<br />
paper-backed felt. Use a hard<br />
pencil to “cut” pieces out and<br />
expose the adhesive.<br />
Step 3: Continue cutting away<br />
one area at a time and<br />
applying string until the piece<br />
is complete.<br />
Step 2: Press colorful string<br />
into the adhesive to create the<br />
design.<br />
Step 4: Seal the piece with a<br />
coating of matte medium.<br />
National Standards for<br />
Visual <strong>Art</strong>s Education<br />
Content Standard #3 — Choosing and<br />
evaluating a range of subject matter,<br />
symbols and ideas.<br />
K-4 Students explore and understand<br />
prospective content for works of art.<br />
5-8 Students integrate visual, spatial and<br />
temporal concepts with content to<br />
communicate intended meaning in their<br />
artworks.<br />
9-12 Students integrate visual, spatial and<br />
temporal concepts with content to<br />
communicate intended meaning in their<br />
artworks.<br />
Content Standard #4 Understanding the<br />
visual arts in relation to history and<br />
cultures.<br />
K-4 Students demonstrate how history,<br />
culture and the visual arts can influence<br />
each other in making and studying works<br />
of art.<br />
5-8 Students know and compare the<br />
characteristics of artworks in various eras<br />
and cultures.<br />
9-12 Students differentiate among a<br />
variety of historical and cultural contexts in<br />
terms of characteristics and purposes of<br />
works of art.<br />
<strong>Dick</strong><strong>Blick</strong>.com 1-800-447-8192<br />
2.