You also want an ePaper? Increase the reach of your titles
YUMPU automatically turns print PDFs into web optimized ePapers that Google loves.
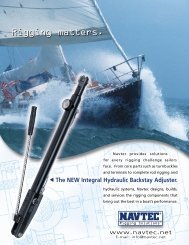
About your<br />
new <strong>Navtec</strong> <strong>System</strong> <strong>50</strong><br />
Hydraulic Control Panel.<br />
Congratulations on the purchase<br />
of your new <strong>System</strong> <strong>50</strong>, by <strong>Navtec</strong>.<br />
<strong>Navtec</strong> Hydraulic <strong>System</strong>s are an industry standard and have<br />
been for more than a decade. The <strong>System</strong> <strong>50</strong> you’ve<br />
purchased represents the ongoing ergonomic and mechanical<br />
design program <strong>Navtec</strong> has initiated to address the<br />
changing needs of modern yachts and the people who<br />
sail them.<br />
<strong>System</strong> <strong>50</strong> is designed for improved functioning at all levels<br />
– operational, mechanical, and ergonomic. It also is<br />
designed to accommodate a two-speed auto-pump or<br />
a hydraulic power pack. The end result is an advanced,<br />
flexible, intelligently designed hydraulic control system for<br />
yachts 35 to 70 feet long.<br />
www.navtec.net<br />
info@navtec.net<br />
351 New Whitfield Street • Guilford, CT 06437 USA • Tel (203) 458-3163 • Fax (203) 458-9291
Installation Instructions<br />
Locate the panel position keeping in mind normal position of crew members while pumping.<br />
Use a high-quality marine sealant between panel and bulkhead to prevent leaks.<br />
2<br />
5<br />
3<br />
Mount the separate reservoir with the hose fittings at the bottom. Be sure to leave room<br />
above the removable cap at the top of the reservoir for filling. See Table II for reservoir<br />
capacity and dimensions. If possible, the bottom of the reservoir should be above the pump<br />
as pump suction will be more positive, but this is not essential for satisfactory operation.<br />
Place the reservoir as close to the pump as possible to minimize the effect of pitch and heel.<br />
Installing plumbing.<br />
Single function/single speed pump<br />
1<br />
Connect either hose barb at the bottom of the reservoir with the pump intake hose barb<br />
(#1), using the low pressure hose supplied. Be sure there is a plastic oil filter in this line.<br />
(part # H0-012)<br />
Connect the other hose barb on the bottom of the reservoir with hose barb (#2) on the<br />
back of the panel for the return, using a second low-pressure hose.<br />
2<br />
5<br />
A single high-pressure reinforced hose or stainless steel tube (rated for at least 5,000 psi)<br />
must be run from the valve on the central panel to each operating cylinder. High-pressure<br />
hose, cylinders and boom vangs are available from your <strong>Navtec</strong> distributor.<br />
If the panel is single function the hose or tube runs from fitting (#3).<br />
If multiple function, the hose runs from 1 of 4 ports on 4-way selector valve (#4).<br />
For push-pull cylinders, when a 4-way valve is used (this is different than the 4-way selector<br />
valve), consult your <strong>Navtec</strong> distributor or <strong>Navtec</strong> Inc. for plumbing instructions.<br />
For the <strong>System</strong> <strong>50</strong> with a two speed pump you have two returns to the reservoir. One from<br />
the manifold #2, the second from the pump #6. You will need a “t” fitting. (not included)<br />
4<br />
6<br />
1<br />
Multi-function/two speed pump<br />
Information and advice on<br />
oil and filter.<br />
<strong>Navtec</strong> recommends the following oils: Shell Tellus T15 ® , Mobil DTE 11M ® , Texaco Rando<br />
HD<strong>215</strong> ® , Royal Purple Syndraulic 15 ® . Never use brake fluid because it will attack the seals.<br />
Oil should be checked periodically for cleanliness. Any particulate matter in the oil will<br />
decrease the life of the moving parts and may also cause malfunctions. The oil filter should<br />
be changed if there is any indication of pump skipping due to oil starvation. If using a<br />
system in cold climates contact <strong>Navtec</strong>.
Table II RESERVOIR CAPACITY & DIMENSIONS<br />
SIZE USABLE VOL X Y DEPTH<br />
(in 3 ) (cm 3 ) (in) (mm) (in) (mm) (in) (mm)<br />
2 Qt. 60 983 6.88 174.8 8 203.2 4.88 124<br />
4 Qt. 120 1967 7.75 196.9 10.88 276.4 5.75 146.1<br />
Pressurizing the cylinder.<br />
X<br />
Standard <strong>Navtec</strong> cylinders are equipped with an air pressure return. This return is pressurized<br />
through the ‘tire’ valve at the clevis end of the cylinder. A bicycle pump or service<br />
station air hose can be used to charge the return up to 100 psi. The air pressure should be<br />
adjusted to give the desired rate of return.<br />
WARNING: Once charged, do not attempt to disassemble the cylinder. Only an<br />
authorized <strong>Navtec</strong> Hydraulic Service Center or <strong>Navtec</strong> Inc should do this.<br />
Y<br />
How and when to bleed<br />
the system.<br />
After installing the panel, cylinders, and plumbing, oil should be added to the reservoir and the<br />
system bled of all air. Each cylinder and line must be bled separately.<br />
Step 1. Open release valve fully. If system is multi functioning, select function to be bled first.<br />
Step 2. With hose attached to cylinder, extend cylinder fully. If there is air pressure in lower<br />
chamber the cylinder will extend automatically.<br />
Step 3. Disconnect hose at cylinder. Note: Always disconnect slowly to allow remaining pressure<br />
to decrease slowly. Be prepared for possible oil drips.<br />
Step 4. Close release valve and pump, holding the hose end in a can to collect oil. When oil is<br />
bubble-free, reconnect hose to cylinder.<br />
Step 5. Pump cylinder all the way down (with cylinder detached from rigging). Then open release<br />
valve and allow cylinder to return fully. Check to be sure there is sufficient oil in the<br />
reservoir so that it won’t run dry.<br />
Step 6. Repeat above procedure for each cylinder and line.<br />
Step 7. Check oil level / do not overfill.<br />
Adjusting the relief valve.<br />
The relief valve (#5) is factory-set to approximately 4000 psi. Adjustment is provided by the 1"<br />
(25mm) round threaded cap in the aluminum valve block at the back of the panel. Maximum<br />
relief setting is <strong>50</strong>00 psi. Turning the cap counter-clockwise will lower the setting. Clockwise<br />
will raise it. The adjustment is about 1000 psi per complete turn. To determine the setting without<br />
tensioning the rig, disconnect any cylinder from the rigging and pump that cylinder until<br />
it bottoms and the relief valve engages, which will be evident when continuous pumping fails<br />
to raise the gauge pressure. The maximum pressure observed is the relief valve setting.<br />
Operating Instructions<br />
For Single Function <strong>System</strong><br />
(Without Selector Valve)<br />
To increase tension in the cylinder, make sure that the release valve is closed. Do not over<br />
tighten. Doing so will shorten the life of the valve. Then pump. The valve body has a special<br />
zero-leakage check valve so no manual-locking valve is necessary. To reduce tension, open<br />
the release valve. Remember that it is not necessary to turn very hard to close the valve.<br />
continued on back...
{Operating Instructions cont.)<br />
For Multi-Function <strong>System</strong><br />
(With Selector Valve)<br />
This system operates the same way that the single function system operates (see previous page), except that the selector valve must<br />
be positioned before pumping or releasing tension. To position, turn the selector valve handle in either direction to the desired<br />
function (at rear of valve) to which the appropriate hose is attached until you feel the knob click. Function labels are available from<br />
<strong>Navtec</strong> at no charge.<br />
Note: The single-function panel can be converted to the multi-function panel at a later date. The conversion part number is A320-SMC-01.<br />
Two-speed pump version<br />
The two-speed pump will automatically shift down from the low(high flow) gear when the internal pressure shift point is reached.<br />
The shifting point is adjustable to suit the desired level of pumping pressure needed to physically operate the pump. To adjust the<br />
shifting point turn the set screw on the back of the pump counter clockwise to lower and clockwise to raise (#7). To check what<br />
pressure point the auto shift valve is set at, disconnect a cylinder from the rigging and pump it down until the pressure builds. Upon<br />
reaching the set pressure, the 2 larger pump pistons will close and the pump will suddenly become easier to operate. The shift<br />
pressure point can be noted by reading the gauge when it shifts. The standard pressure setting as set at the factory is 1800 lbs.<br />
Reading the gauge.<br />
The <strong>Navtec</strong> gauge has a double-ended needle so that two scales can be used. The top scale, which reads in thousands of pounds per<br />
square inch, is always included and indicates the pressure within the cylinder and the connecting plumbing. A lower scale, which reads<br />
in thousands of pounds of force, can be overlaid on the gauge face if the cylinder size is known. These gauge face overlays are<br />
available from <strong>Navtec</strong>. Please specify cylinder size when ordering. The pressure within the system can be converted to actual force<br />
exerted by the cylinder, using Table IV or the formula below:<br />
Pressure (lbs/inch2) X Cylinder area (inch2) = Force (lbs)<br />
Gauges have a backing card that is specially treated to provide night illumination. If backing card does not<br />
provide enough light, recharge by passing a flashlight beam slowly over the gauge.<br />
Table III<br />
Cylinder Force vs. Pressure<br />
CYL/VANG ROD DIAM CYL. AREA “OBSERVED PRESSURE (from gauge, in psi)”<br />
1000 3000 <strong>50</strong>00<br />
SIZE (in) (mm) (in 2 ) (cm 2 ) (lbs) (kg) (lbs) (kg) (lbs) (kg)<br />
6 cyl. 0.437 11.1 0.639 4.12 640 290 1920 870 3190 14<strong>50</strong><br />
6 vang 0.625 15.9 0.482 3.11 480 220 14<strong>50</strong> 656 2410 1090<br />
10 cyl. 0.5 12.7 1.16 7.48 1180 530 3480 1580 5800 2630<br />
10 vang 0.75 19.1 0.914 5.89 910 410 2740 1240 4570 2070<br />
12 cyl. 0.625 15.9 1.525 9.63 1525 690 4580 2080 7620 3460<br />
12 vang 0.875 22.2 1.28 7.93 1230 560 3690 1670 61<strong>50</strong> 2790<br />
17 cyl. 0.625 15.9 2.173 14.02 2170 990 6520 2960 10860 4930<br />
17 vang 1 25.4 1.695 10.93 1690 770 <strong>50</strong>80 2300 8470 3840<br />
22 cyl. 0.75 19.1 2.785 17.96 2780 1260 83<strong>50</strong> 2306 13920 6310<br />
22 vang 1 25.4 2.442 15.75 2440 1110 7330 3320 12210 5540<br />
30 cyl. 0.875 22.2 4.414 28.47 4410 2000 13240 6000 22070 10000<br />
30 vang 1.25 31.8 3.778 24.37 3780 1710 11330 5140 18890 8570<br />
40 cyl. 1 25.4 6.435 41.51 6430 2920 19300 87<strong>50</strong> 32170 14580<br />
40 vang 1.25 31.8 5.993 38.66 5990 2720 17980 81<strong>50</strong> 29960 13590<br />
60 cyl. 1.25 31.8 8.571 55.3 8570 3890 25710 11660 428<strong>50</strong> 19430<br />
60 vang 1.5 38.1 8.031 51.81 8030 3640 24090 10930 401<strong>50</strong> 18210<br />
NAVTEC LIMITED WARRANTY<br />
1. WARRANTY: <strong>Navtec</strong> warrants its products, in normal usage, to be free of defects in materials and workmanship for a period of one year from date of original purchase by the user, subject to the conditions and<br />
limitations below. Any part that proves to be defective in normal usage during that one year period will be repaired or replaced <strong>Navtec</strong>. This warranty is subject to the following conditions and limitations:<br />
A. <strong>Navtec</strong>’s liability shall be limited to repair or replacement (choice of remedy at <strong>Navtec</strong>’s option) of goods or parts defective in materials or workmanship. This shall be the buyer’s exclusive remedy in contract, tort<br />
or otherwise. B. Except as otherwise provided, quality shall be in accordance with <strong>Navtec</strong>’s specifications. C. Determination of the suitability of the material for the use contemplated by the buyer is the sole<br />
responsibility of the buyer, and <strong>Navtec</strong> shall have no responsibility in connection with such suitability. D <strong>Navtec</strong> shall not be liable for any harm resulting from: (1) failures due to use of products in applications for which<br />
they are not intended. (2) failures due to corrosion, wear and tear, or improper installation. In the case of rod rigging products, improper installation includes, but is not limited to, the use of rod rigging end fittings<br />
other than those manufactured by <strong>Navtec</strong> or meeting <strong>Navtec</strong> specifications. Improper installation also includes, but is not limited to, the use of dies other than those leased by <strong>Navtec</strong> to Authorized <strong>Navtec</strong> Representatives,<br />
to form the head which is part of the patented <strong>Navtec</strong> Headed Rod Rigging <strong>System</strong>. E. <strong>Navtec</strong> shall not be responsible for shipping charges or installation labor associated with any warranty claims. F. Service by<br />
anyone other than Authorized <strong>Navtec</strong> Representatives shall void this warranty unless in accordance with <strong>Navtec</strong> guidelines and standards of workmanship.<br />
2. DISCLAIMER OF IMPLIED WARRANTIES. There are no warranties of merchantability, fitness for purpose, or any other kind, express or implied, and none shall be implied by law. The duration of any such warranties<br />
that are nonetheless implied by law for the benefit of a consumer shall be limited to a period of one year from original purchase by the user. Some states do not allow limitations on how long an implied warranty lasts<br />
so the above limitations may not apply to you.<br />
3. LIMITATIONS OF CONSEQUENTIAL DAMAGES. <strong>Navtec</strong> shall not be liable for consequential damages to yachts, equipment or other property, or persons due to any failure of <strong>Navtec</strong> equipment. Some states do not<br />
allow the exclusion or limitation of incidental or consequential damages, so the above limitation or inclusion may not apply to you.<br />
4. This warranty gives you specific legal rights and you may also have other rights which vary from state to state.