Windows 8 Upgrade Step by Step Guide - Samsung
Windows 8 Upgrade Step by Step Guide - Samsung
Windows 8 Upgrade Step by Step Guide - Samsung

You also want an ePaper? Increase the reach of your titles
YUMPU automatically turns print PDFs into web optimized ePapers that Google loves.
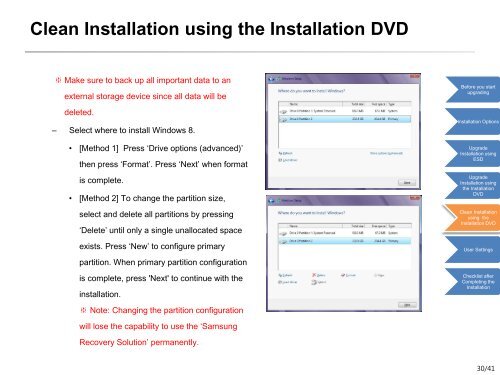
Clean Installation using the Installation DVD<br />
※ Make sure to back up all important data to an<br />
external storage device since all data will be<br />
deleted.<br />
– Select where to install <strong>Windows</strong> 8.<br />
• [Method 1] Press ‘Drive options (advanced)’<br />
then press ‘Format’. Press ‘Next’ when format<br />
is complete.<br />
• [Method 2] To change the partition size,<br />
select and delete all partitions <strong>by</strong> pressing<br />
‘Delete’ until only a single unallocated space<br />
exists. Press ‘New’ to configure primary<br />
partition. When primary partition configuration<br />
is complete, press 'Next' to continue with the<br />
installation.<br />
Before you start<br />
upgrading<br />
Installation Options<br />
<strong>Upgrade</strong><br />
Installation using<br />
ESD<br />
<strong>Upgrade</strong><br />
Installation using<br />
the Installation<br />
DVD<br />
Clean Installation<br />
using the<br />
Installation DVD<br />
User Settings<br />
Checklist after<br />
Completing the<br />
Installation<br />
※ Note: Changing the partition configuration<br />
will lose the capability to use the ‘<strong>Samsung</strong><br />
Recovery Solution’ permanently.<br />
30/41