Model PC-500 Portion Control Scale Technical Manual - Scalesonline
Model PC-500 Portion Control Scale Technical Manual - Scalesonline
Model PC-500 Portion Control Scale Technical Manual - Scalesonline

You also want an ePaper? Increase the reach of your titles
YUMPU automatically turns print PDFs into web optimized ePapers that Google loves.
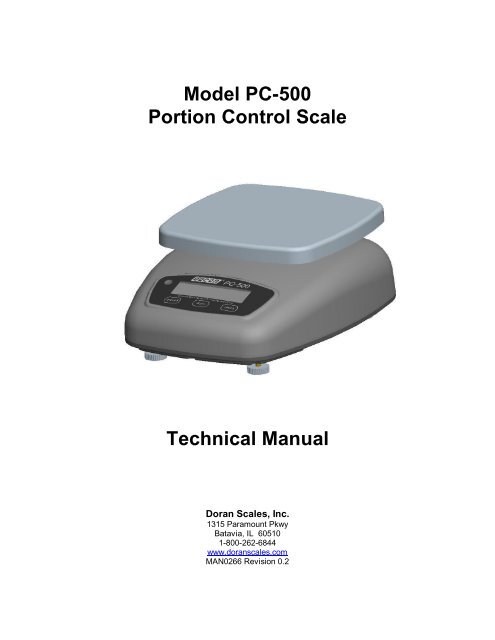
<strong>Model</strong> <strong>PC</strong>-<strong>500</strong><br />
<strong>Portion</strong> <strong>Control</strong> <strong>Scale</strong><br />
<strong>Technical</strong> <strong>Manual</strong><br />
Doran <strong>Scale</strong>s, Inc.<br />
1315 Paramount Pkwy<br />
Batavia, IL 60510<br />
1-800-262-6844<br />
www.doranscales.com<br />
MAN0266 Revision 0.2
Table of Contents<br />
Section 1. Unpacking and Installation............................................................................. 1<br />
Unpacking:.........................................................................................................................................................1<br />
Installation:........................................................................................................................................................ 1<br />
Electrical Connections:....................................................................................................................................... 1<br />
Care & Cleaning: ...............................................................................................................................................2<br />
Section 2. <strong>Scale</strong> Operations Guide................................................................................ 3<br />
Display Functions:..............................................................................................................................................3<br />
Basic Weighing:................................................................................................................................................. 3<br />
Units Select:....................................................................................................................................................... 3<br />
Low Battery:....................................................................................................................................................... 3<br />
Power:................................................................................................................................................................3<br />
Automatic Sleep Function: ................................................................................................................................. 3<br />
Section 3. Setup and Calibration Guide......................................................................... 4<br />
Optional AC Power Connection: ........................................................................................................................ 4<br />
Optional RS-232 Connection:.............................................................................................................................4<br />
Optional Remote Zero Switch:............................................................................................................................ 5<br />
Calibration and Parameter Setup: ....................................................................................................................... 6<br />
Calibration Troubleshooting:.............................................................................................................................. 7<br />
Section 4. Parameter Setup ........................................................................................... 8<br />
Entering and Exiting Setup Mode: .....................................................................................................................8<br />
Scrolling Through Parameters:........................................................................................................................... 8<br />
Changing a Parameter:....................................................................................................................................... 8<br />
Saving Parameter Changes:................................................................................................................................ 8<br />
Changing Start up Units:.................................................................................................................................... 8<br />
Legal for Trade Restrictions: .............................................................................................................................. 8<br />
Section 5. Setup Menus Explained ................................................................................ 9<br />
Resolution Setup Menu.......................................................................................................................................9<br />
Capacity Setup Menu .........................................................................................................................................9<br />
Calibration Menu(s) ........................................................................................................................................... 9<br />
Reset All Parameters to Default Settings?........................................................................................................... 9<br />
Auto Off Mode................................................................................................................................................. 10<br />
Operation Mode ............................................................................................................................................... 10<br />
Auto Zero Tracking.......................................................................................................................................... 10<br />
Motion Aperture............................................................................................................................................... 10<br />
Start Up Zero ................................................................................................................................................... 11<br />
Data Output...................................................................................................................................................... 11<br />
Data Format ..................................................................................................................................................... 12<br />
Baud Rate......................................................................................................................................................... 12<br />
lb, oz, kg Units Enabled ................................................................................................................................... 12<br />
g Units Enabled................................................................................................................................................ 13<br />
Startup Units.................................................................................................................................................... 13<br />
Raw Counts...................................................................................................................................................... 13<br />
Section 6. Data Communications................................................................................. 14<br />
Introduction to data communications:............................................................................................................... 14<br />
Remote <strong>Scale</strong> Commands: ................................................................................................................................ 17<br />
Section 7. Specifications............................................................................................... 18<br />
Section 8. Troubleshooting .......................................................................................... 19<br />
General problem resolution: ............................................................................................................................. 19<br />
Error Messages: ............................................................................................................................................... 20
Section 1. Unpacking and Installation<br />
Unpacking:<br />
Installation:<br />
Before unpacking your Doran scale, please read the instructions in this<br />
section. Your new scale is a durable industrial product, but it is also a<br />
sensitive weighing instrument. Normal care should be taken when<br />
handling and using this product. Improper handling or abuse can<br />
damage the scale and result in costly repairs that may not be covered<br />
by the warranty. If you notice any shipping damage, notify the shipper<br />
immediately. Carefully remove the scale from the shipping carton. Be<br />
sure to retain all shipping materials in case the scale must be shipped<br />
elsewhere.<br />
Place the scale on a stable flat surface. Verify that the bubble level<br />
located left of the scale display shows that the scale is level. Adjust the<br />
four feet to obtain a level condition (bubble level centered).<br />
Electrical Connections:<br />
An optional transformer is available for 115 or 230 VAC operation. See<br />
section 3 for installation instructions.<br />
Be sure the AC power is not excessively noisy – this can occur if large<br />
inductive loads, such as solenoids or motors, are on the same power<br />
line. Subjecting electronics to problematic AC power lines may result in<br />
damage not covered by the warranty. Also be sure that the power outlet<br />
and transformer are not exposed to water while the scale is plugged in.<br />
1
Care & Cleaning:<br />
With reasonable care, this product will last for many years. Here are<br />
some tips to care for your <strong>PC</strong>-<strong>500</strong> <strong>Portion</strong> <strong>Control</strong> <strong>Scale</strong>.<br />
! DO NOT drop the scale.<br />
! DO NOT immerse the scale.<br />
! DO NOT drop objects on the scale.<br />
Hand clean with a damp cloth using mild detergent.<br />
Do not wash the scale in a dishwasher – the removable platter is<br />
dishwasher safe.<br />
Do not use strong solvents or abrasive cleaners as this can damage<br />
the touch panel or other plastic parts.<br />
Do not overload the scale.<br />
Do not use sharp objects to press any of the buttons.<br />
Always use the <strong>PC</strong>-<strong>500</strong> on a stable, vibration-free surface for best<br />
weighing results.<br />
<br />
<br />
Do not lift the scale by the weighing platform.<br />
To ensure the scale retains its IP66 rating, keep the battery<br />
compartment fully installed and keep the rubber plug on the battery<br />
compartment in place.<br />
2
Section 2. <strong>Scale</strong> Operations Guide<br />
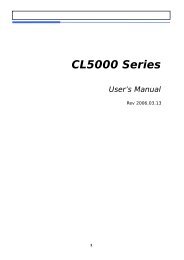
Fig. 1 Display<br />
Display Functions:<br />
The <strong>Model</strong> <strong>PC</strong>-<strong>500</strong> controls consist of ON/OFF, UNITS and ZERO buttons<br />
located under the main LCD display. The display is used to provide weight<br />
indications and operator messages describing scale operation.<br />
Basic Weighing:<br />
1. Select the desired weighing units by pressing the UNITS button.<br />
2. Empty the scale platter and press ZERO to zero the scale. The center of zero<br />
annunciator will activate, indicating an accurate zero has been achieved.<br />
3. Place an item on the scale platter and wait for the MOTION indicator to go<br />
out.<br />
4. Read the weight on the display.<br />
Units Select:<br />
Press the UNITS button to change weight display units from lb - oz - kg - g - lb:oz.<br />
Low Battery:<br />
When the batteries need to be changed, the “LOW BATT” indicator illuminates.<br />
Power:<br />
The <strong>PC</strong>-<strong>500</strong> is powered by six (6) D alkaline batteries or an optional AC wall<br />
transformer. Turn the scale on or off by pressing ON/OFF.<br />
Automatic Sleep Function:<br />
The <strong>PC</strong>-<strong>500</strong> has a feature called “Auto Shut-down” that turns the scale off after a<br />
preset time of no activity. This helps conserve battery life. The preset time is<br />
selectable from 1 minute to 60 minutes or it can be disabled so the scale<br />
remains on continuously. The default setting is 5 minutes.<br />
3
Section 3. Setup and Calibration Guide<br />
Optional AC Power Connection:<br />
The optional AC transformer has a power cord which plugs into the power jack<br />
located under the battery compartment cover. WARNING: Installing this option<br />
incorrectly will allow water to enter the scale and void the scale warranty.<br />
To install this option:<br />
1. Remove the battery compartment cover<br />
2. Open the rubber plug in the battery compartment cover<br />
3. Feed the AC jack and some cord through the rubber plug<br />
4. Connect the AC jack to the Power socket inside battery compartment<br />
5. Replace the battery compartment cover, leaving some slack on the AC<br />
cord<br />
6. Then push the rubber plug completely back into place, creating a seal<br />
around the AC cord. NOTE: Regularly check the rubber plug to ensure a<br />
proper seal is attained.<br />
Optional RS-232 Connection:<br />
The <strong>PC</strong>-<strong>500</strong> has a standard RS-232 output. To use this feature, the optional<br />
RS-232 cable is required. WARNING: Installing this option incorrectly will allow<br />
water to enter the scale and void the scale warranty.<br />
To install this option:<br />
1. Remove the battery compartment cover<br />
2. Open the rubber plug in the battery compartment cover<br />
3. Feed the RS-232 cable jack and some cord through the rubber plug<br />
4. Connect the jack to the RS-232 connector inside battery compartment<br />
5. Replace the battery compartment cover, leaving some slack on the RS-<br />
232 cord<br />
6. Then push the rubber plug completely back into place, creating a seal<br />
around the AC cord. NOTE: Regularly check the rubber plug to ensure a<br />
proper seal is attained.<br />
4
Optional Remote Zero Switch:<br />
The <strong>PC</strong>-<strong>500</strong> has an optional remote zero switch. To use this feature, the<br />
optional Zero Switch is required. WARNING: Installing this option incorrectly will<br />
allow water to enter the scale and void the scale warranty.<br />
To install this option:<br />
1. Remove the battery compartment cover<br />
2. Open the rubber plug in the battery compartment cover<br />
3. Feed the Remote Zero jack and some cord through the rubber plug<br />
4. Connect the jack to the Remote Switch connector inside battery<br />
compartment<br />
5. Replace the battery compartment cover, leaving some slack on the RS-<br />
232 cord<br />
6. Then push the rubber plug completely back into place, creating a seal<br />
around the AC cord. NOTE: Regularly check the rubber plug to ensure a<br />
proper seal is attained.<br />
Displaying Calibration and Audit Counters:<br />
To display the values of the audit counters:<br />
1. Turn on the scale.<br />
2. Press and hold the ZERO button until the C X is displayed.<br />
3. The scale will return to the weighing mode.<br />
5
Calibration and Parameter Setup:<br />
1. After turning on the <strong>PC</strong>-<strong>500</strong>, turn the scale over. If the battery compartment<br />
has a lead and wire seal, you will require the assistance of a state certified<br />
scale technician to retain legal for trade status. Remove the battery<br />
compartment, and push the CAL button. The scale will enter the<br />
Setup/Calibration mode.<br />
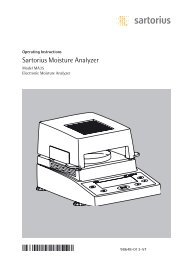
2. Turn the scale upright, and the scale will briefly display the calibration and<br />
parameter counters and will then display “div 2.5” (or “div 5.0“or “div 10”<br />
depending on the scale resolution). Press the UNITS button twice. The<br />
scale should now display “CAL 0”.<br />
Fig. 2 Battery Compartment<br />
3. Remove all weight from the scale platter. Press ZERO. Wait for the scale to<br />
count down from “7” to “0”. If the scale detects motion, the count down will<br />
restart. When finished, the display will display “CAL F5”.<br />
NOTE: If “rg Err” appears on the display, the calibration zero is out of range.<br />
Press ZERO to clear this error. Refer to the Calibration Troubleshooting<br />
section for additional information.<br />
6
4. The display will read CALXX, where XX is the span calibration weight in lb or<br />
kg. The units annunciator to the right of the weight display will indicate the<br />
current unit selected. Press ZERO to change the calibration unit.<br />
5. Place full capacity on the platter and press ZERO. Wait for the scale to count<br />
down from “7” to “0. If the scale detects motion, the count will restart. When<br />
finished, the scale will return to the weigh mode and the calibration audit<br />
counter will be incremented.<br />
NOTE: If “SPnL” or “SPnH” appears on the display, the calibration span is out of<br />
range. Verify that the calibration weight is correct and repeat the<br />
calibration. Refer to the Calibration Troubleshooting section for<br />
additional information.<br />
6. Replace the battery compartment and tighten knobs.<br />
Calibration Troubleshooting:<br />
The following table shows the acceptable “Raw Counts” for no load and full load.<br />
“Raw Counts” can be viewed through the last setup parameter. Refer to Section<br />
4, Parameter Setup, for more information regarding parameter viewing.<br />
If the scale’s raw counts are not within the ranges specified in the following<br />
table, contact a Doran certified scale technician or Doran’s <strong>Technical</strong> Assistance<br />
department at 800-262-6844.<br />
Acceptable “Raw Counts” Acceptable “Raw Counts”<br />
for no load<br />
for full load<br />
-8,000 – 100,000 30,000 – 242,000<br />
7
Section 4. Parameter Setup<br />
Entering and Exiting Setup Mode:<br />
Quick Setup:<br />
Quick Setup is recommended for customer use as this setup mode allows the nonmeteorological<br />
parameters to be modified and will not affect scale calibration.<br />
Parameters with the symbol in section 5 are available in this menu.<br />
To enter the front-panel setup mode, perform the following steps:<br />
1. Turn off the scale.<br />
2. Press and hold the UNITS button.<br />
3. Press and hold the ON/OFF button for approximately one second.<br />
4. Release both buttons.<br />
The scale will now be in the Quick Setup mode as indicated by “Ao XX”.<br />
Full Setup:<br />
The Full Setup mode is recommended for authorized technician use only. To<br />
enter the complete setup menu, perform the following steps:<br />
1. Turn on the <strong>PC</strong>-<strong>500</strong>.<br />
2. Turn the scale over and remove the battery compartment cover.<br />
3. Press the calibration switch.<br />
The scale should enter the Setup/Calibration mode as indicated by “div 2.5”,<br />
“div 5.0”, or “div 10”, (depending on the scale’s resolution.)<br />
Scrolling Through Parameters:<br />
Pressing UNITS button will cause the scale to step to the next parameter on the list.<br />
Changing a Parameter:<br />
Once the desired parameter is displayed, it may adjusted. Press ZERO to step<br />
through the parameter selections.<br />
Saving Parameter Changes:<br />
To exit the setup mode, press and release the UNITS button until the scale returns to<br />
the weighing mode. At this time the parameter changes will be saved. Setup<br />
information is not saved until the <strong>PC</strong>-<strong>500</strong> exits the setup mode. A power failure while<br />
in the Setup Mode will cause changes to be lost.<br />
Changing Start up Units:<br />
The scale will “power-up” with the same units that it was using when it was last turned<br />
off.<br />
Legal for Trade Restrictions:<br />
The Legal for Trade mode disables the lb:oz mode and forces several parameters to<br />
specific settings. These restricted parameters are indicated by an asterisk. Changes<br />
to these parameters will increment the calibration audit counter.<br />
8
Section 5. Setup Menus Explained<br />
Resolution Setup Menu<br />
div Select <strong>Scale</strong> Capacity (lbs)<br />
2.5 # of scale displayed divisions is 2,<strong>500</strong>.<br />
NOTE: Use this resolution for Legal for<br />
Trade applications.<br />
5.0 # of scale displayed divisions is 5,000<br />
10 # of scale displayed divisions is 10,000<br />
Capacity Setup Menu<br />
CAP Select <strong>Scale</strong> Capacity (lbs)<br />
5 <strong>Scale</strong> capacity set to 5 pounds<br />
10 <strong>Scale</strong> capacity set to 10 pounds<br />
25 <strong>Scale</strong> capacity set to 25 pounds<br />
50 <strong>Scale</strong> capacity set to 50 pounds<br />
Calibration Menu(s)<br />
CAL Zero Calibration Point<br />
0 Press ZERO to calibrate zero point<br />
CAL<br />
Span Calibration Point<br />
Full scale calibration is required. Press<br />
ZERO to select calibration units.<br />
NOTE: This parameter is only visible after<br />
a zero calibration is performed.<br />
Reset All Parameters to Default Settings?<br />
rst Default parameters?<br />
n No. Parameters are not defaulted.<br />
y Yes. Set all parameters to their default<br />
values when UNITS is pressed.<br />
9
Auto Off Mode<br />
Ao<br />
M<br />
Auto Off Mode<br />
The amount of time before the scale will<br />
shut off, if not in use. (Stays on if<br />
plugged in.)<br />
oF<br />
60 60 minutes<br />
30 30 minutes<br />
20 20 minutes<br />
10 10 minutes<br />
5 5 minutes<br />
4 4 minutes<br />
3 3 minutes<br />
2 2 minutes<br />
1 1 minute<br />
Off. <strong>Scale</strong> will run continually<br />
Operation Mode<br />
oP Sets the scale for Legal for Trade mode<br />
St Standard mode. NOT legal for trade.<br />
44 Legal for trade setting<br />
Auto Zero Tracking<br />
2t *<br />
# of displayed divisions that are<br />
automatically zeroed from displayed<br />
zero, while the scale is stable.<br />
of<br />
0.5 1/2 division<br />
3.0 3 divisions<br />
1.0 1 division<br />
Zero tracking is disabled<br />
Motion Aperture<br />
nnA * # of displayed divisions that must<br />
change before motion is detected.<br />
1 1 division<br />
3 2 divisions<br />
5 3 divisions<br />
NOTE: The Legal for Trade mode disables certain options and selections listed above.<br />
These items have been indicated by an asterisk ( * ).<br />
Indicates non-metrological parameters available from the quick setup mode.<br />
10
Start Up Zero<br />
Suo * <strong>Control</strong>s the start-up zero point<br />
No <strong>Scale</strong> will NOT zero on power up.<br />
Calibrated zero is loaded on power-up.<br />
FS <strong>Scale</strong> will zero up to 100% of scale<br />
capacity on power-up.<br />
20 <strong>Scale</strong> will zero up to 20% of scale capacity<br />
on power-up.<br />
(Legal for Trade Setting)<br />
Data Output<br />
d.o.<br />
<br />
<strong>Control</strong>s when information is<br />
transmitted from the scale though the<br />
serial port<br />
C.P. Continuous data transmission. Transmits<br />
data each time the display is updated.<br />
Readings that occur when the scale is in<br />
motion are identified by the abbreviation<br />
“MOT.” following the weight data.<br />
A.1 Auto Print 1 transmits the first scale<br />
reading after the scale leaves motion. The<br />
reading must be stable and must be a valid<br />
reading before it can be sent.<br />
A.2 Auto Print 2 transmits the first stable scale<br />
reading above 1% of scale capacity. In<br />
Auto Print 2, no further readings will be<br />
sent until the scale returns to within 1% of<br />
displayed zero.<br />
A.5 Auto Print 2 transmits the first stable scale<br />
reading above 0.1% of scale capacity. In<br />
Auto Print 2, no further readings will be<br />
sent until the scale returns to within 0.1%<br />
of displayed zero.<br />
t.d. Transmits data when the “W” command is<br />
received through the serial port. The scale<br />
must be stable and the weight must be<br />
valid (no error codes displayed) before<br />
data is printed.<br />
NOTE: The Legal for Trade mode disables certain options and selections listed above.<br />
These items have been indicated by an asterisk ( * ).<br />
Indicates non-metrological parameters available from the quick setup mode.<br />
11
Data Format<br />
For.<br />
<br />
FO<br />
2P<br />
Baud Rate<br />
F1<br />
SP<br />
Format of transmitted data from the<br />
serial port<br />
Basic data format.<br />
Basic dual print format. Includes metric<br />
weight.<br />
Legacy data format.<br />
Output NOT Legal for Trade.<br />
Basic format for an Eltron SSP printer.<br />
Call Doran for details.<br />
b.r. Serial port transmission rate<br />
<br />
12 1200 Baud (bits per second)<br />
24 2400 Baud (bits per second)<br />
48 4800 Baud (bits per second)<br />
96 9600 Baud (bits per second)<br />
lb Units Enabled<br />
<br />
on<br />
of<br />
lb:oz Units Enabled<br />
M<br />
<br />
on<br />
of<br />
oz Units Enabled<br />
<br />
on<br />
of<br />
kg Units Enabled<br />
<br />
on<br />
of<br />
Enables/Disables pounds<br />
lb is enabled.<br />
lb is disabled.<br />
Enables/Disables pounds:ounces<br />
lb:oz is enabled.<br />
lb:oz is disabled.<br />
Enables/Disables ounces<br />
oz is enabled.<br />
oz is disabled.<br />
Enables/Disables kilograms<br />
kg is enabled.<br />
kg is disabled.<br />
Indicates non-metrological parameters available from the quick setup mode.<br />
12
g Units Enabled<br />
<br />
on<br />
of<br />
Enables/Disables grams<br />
g is enabled.<br />
g is disabled.<br />
Startup Units<br />
Units Determines scale startup units<br />
<br />
lb <strong>Scale</strong> starts up in lb.<br />
lb:oz * <strong>Scale</strong> starts up in lb:oz.<br />
oz <strong>Scale</strong> starts up in oz.<br />
kg <strong>Scale</strong> starts up in kg.<br />
g <strong>Scale</strong> starts up in g.<br />
Raw Counts<br />
######<br />
<br />
Raw counts from A/D converter<br />
View these numbers if calibration is<br />
unsuccessful. Refer to Section 3 for<br />
interpretation of these numbers. Press<br />
UNITS to exit.<br />
Indicates non-metrological parameters available from the quick setup mode.<br />
13
Section 6. Data Communications<br />
Introduction to data communications:<br />
Basic understanding of serial data communications is needed when setting up the<br />
<strong>PC</strong>400 to communicate with a printer or <strong>PC</strong>.<br />
When setting up a serial communications system, there are two concerns which<br />
affect the configuration of that system. These are:<br />
Baud Rate<br />
Data Bits and Parity<br />
The baud rate determines how fast the data is sent from the scale. The sending<br />
and receiving units must be set to the same baud settings. Typical values are<br />
1200, 2400, 4800 and 9600.<br />
The <strong>PC</strong>400 is factory set for eight bits, no parity and one stop bit also known as<br />
8n1. The receiving units must be set to 8n1 for proper communications.<br />
“F0” Example (Negative weight, in motion)<br />
- 2.452 lb MOT.<br />
“F0” Print String Definition for Each Weight Unit:<br />
Pounds<br />
STX | POL | WEIGHT| SP | lb | SP | ST | CR | LF<br />
Ounces<br />
STX | POL | WEIGHT| SP | oz | SP | ST | CR | LF<br />
Kiligrams<br />
STX | POL | WEIGHT| SP | kg | SP | ST | CR | LF<br />
Grams<br />
STX | POL | WEIGHT| SP | g | SP | SP ST | CR | LF<br />
Pounds-ounces<br />
STX | POL | WEIGHTLB| SP | lb | POL | WEIGHTOZ | SP | oz | SP | ST | CR | LF<br />
STX and = ASCII 02.<br />
POL = minus sign for negative weight or a space for a positive weight.<br />
WEIGHT = 6 character field plus decimal if needed.<br />
WEIGHTLB = pound portion of lb-oz weight.<br />
WEIGHTOZ = ounce portion of lb-oz weight. (WEIGHTLB and WEIGHTOZ total 5 characters<br />
plus decimal)<br />
SP = ASCII space.<br />
ST = MOT. if in motion or a space if stable.<br />
CR and = Carriage return.<br />
LF and = Linefeed.<br />
| = Separator, not printed.<br />
14
“F1” Example (Negative weight, in motion)<br />
- 2.452 LBM<br />
“F1” Print String Definition for Each Weight Unit:<br />
Pounds<br />
STX | POL | WEIGHT| SP | LB | ST | CR | LF<br />
Ounces<br />
STX | POL | WEIGHT| SP | OZ | ST | CR | LF<br />
Kiligrams<br />
STX | POL | WEIGHT| SP | KG | ST | CR | LF<br />
Grams<br />
STX | POL | WEIGHT| SP | G | SP | ST | CR | LF<br />
Pounds-ounces<br />
STX | POL | WEIGHTLB| SP | LB | POL | WEIGHTOZ | SP | OZ | SP | ST | CR | LF<br />
STX and = ASCII 02.<br />
POL = minus sign for negative weight or a space for a positive weight.<br />
WEIGHT = 6 character field plus decimal if needed.<br />
WEIGHTLB = pound portion of lb-oz weight.<br />
WEIGHTOZ = ounce portion of lb-oz weight. (WEIGHTLB and WEIGHTOZ total 5 characters<br />
plus decimal)<br />
SP = ASCII space.<br />
ST = M if in motion or a space if stable.<br />
CR and = Carriage return.<br />
LF and = Linefeed<br />
| = Separator, not printed.<br />
“2P” Example (Negative weight, in motion)<br />
- 2.452 lb MOT.<br />
(- 1112 g MOT.)<br />
The dual print mode provides the <strong>PC</strong>400 with the ability to print the current<br />
scale reading followed by the equivalent value in grams.<br />
The weight is first printed using the “F0” format. Then the weight is<br />
recalculated in grams and is sent as a second line of text. The gram data<br />
follows the “F0” data format except where parentheses are placed after the<br />
STX character and before the carriage return & line feed.<br />
15
“SP” Example (Negative weight, in motion)<br />
FR"L1"<br />
?<br />
- 1.052<br />
lb<br />
GS<br />
MOT.<br />
- 0.478<br />
kg<br />
P1,1<br />
“SP” Print String Definition for Each Weight Unit:<br />
Pounds<br />
FR”L1” | LF | ? | LF | POL | WEIGHT | LF | lb | LF | GS | LF | ST | LF | POL | WEIGHT2 | LF | kg | LF | P1,1 | LF<br />
Ounces<br />
FR”L1” | LF | ? | LF | POL | WEIGHT | LF | oz | LF | GS | LF | ST | LF | POL | WEIGHT2 | LF | kg | LF | P1,1 | LF<br />
SP, kilograms<br />
FR”L1” | LF | ? | LF | POL | WEIGHT | LF | kg | LF | GS | LF | ST | LF | POL | WEIGHT2 | LF | kg | LF | P1,1 | LF<br />
Grams<br />
FR”L1” | LF | ? | LF | POL | WEIGHT | LF | g | SP | LF | GS | LF | ST | LF | POL | WEIGHT2 | LF | kg | LF | P1,1 | LF<br />
Pounds - ounces<br />
FR”L1” | LF | ? | LF | POL | WEIGHTLB | SP | lb | POL | WEIGHTOZ | LF | oz | LF | GS | LF | ST | LF | POL | WEIGHT2 | LF |<br />
kg | LF | P1,1 | LF<br />
POL = minus sign for negative weight or a space for a positive weight.<br />
WEIGHT = 6 character field plus decimal if needed.<br />
WEIGHT2 = Kilogram weight. 6 character field plus decimal if needed.<br />
WEIGHTLB = pound portion of lb-oz weight.<br />
WEIGHTOZ = ounce portion of lb-oz weight. (WEIGHTLB and WEIGHTOZ total 5 characters<br />
plus decimal)<br />
SP = ASCII space.<br />
ST = MOT. if in motion or four (4) spaces if stable.<br />
CR and = Carriage return.<br />
LF and = Linefeed<br />
| = Separator, not printed.<br />
16
Remote <strong>Scale</strong> Commands:<br />
The scale will respond to the following single letter ASCII commands.<br />
“W” initiates transmission of current weight data (if scale is stable).<br />
“U” changes the displayed weight units.<br />
“Z” zeroes the scale (if in motion, scale will wait until stable, then zero.)<br />
17
Section 7. Specifications<br />
Resolution:<br />
Power Supply:<br />
2<strong>500</strong>d, <strong>500</strong>0d or 10000d<br />
Six (6) D cell alkaline batteries<br />
1,000 hour battery life<br />
Optional Wall Transformer output:<br />
12VDC, 300mA<br />
Positive (-) center<br />
Display:<br />
Displayed units:<br />
Capacities:<br />
Printer Interface:<br />
<strong>Control</strong>s:<br />
Construction:<br />
0.66” high LCD<br />
lb, oz, kg, g and lb-oz<br />
5,10 and 25 and 50 lbs<br />
Bi-directional RS-232<br />
ON/OFF, ZERO and UNITS buttons<br />
Plastic body with 304 Stainless Steel<br />
Platter<br />
18
Section 8. Troubleshooting<br />
General problem resolution:<br />
Problem:<br />
Weight reading will not repeat or<br />
scale does not return to zero when<br />
weight is removed.<br />
<strong>Scale</strong> overloads early<br />
<strong>Scale</strong> will not come to zero when the<br />
ZERO button is pressed.<br />
Weight readings don’t seem to be<br />
correct.<br />
<strong>Scale</strong> drifts off zero.<br />
Bubble level cannot be centered.<br />
<strong>Scale</strong> shuts itself off or will not turn<br />
on.<br />
What to Do or Check:<br />
Make sure that the scale platter is not<br />
rubbing or touching the scale cover.<br />
Verify that there is nothing caught in the<br />
platform, under or around the load cell or<br />
spider.<br />
Verify scale calibration is correct. If<br />
problem persists, recalibrate the scale.<br />
Make sure that the scale is becoming<br />
stable (Motion annunciator is off.) After<br />
pressing the zero button, the scale should<br />
zero as soon as it becomes stable.<br />
If problem persists, there may be a<br />
problem with the touch panel or<br />
motherboard.<br />
Verify the scale calibration with an<br />
accurate test weight. If the readings are<br />
not correct, recalibrate.<br />
Check for air currents and/or vibration<br />
around the scale. If that is the cause, it<br />
may be necessary to set the AZT and nnA<br />
parameters to wider settings to<br />
compensate (see the parameter section.)<br />
Verify that no mechanical restrictions<br />
exist, i.e. platter rubbing, something<br />
caught under or around the load cell.<br />
Place scale on level surface. If problem<br />
persists, replace the bubble level and<br />
recalibrate.<br />
Check the AO (Auto Off) parameter.<br />
Increase shut off time if necessary.<br />
Batteries may need replacement or may<br />
be inserted improperly.<br />
19
Error Messages:<br />
Error Message:<br />
Ldg 0<br />
ov-Ld<br />
gS-oL<br />
Err 0<br />
Ad oF<br />
Er EP<br />
What to do or check:<br />
The scale is attempting to zero on power-up.<br />
This message will remain until the scale is stable.<br />
Air currents or vibration may be the cause. If<br />
problem persists, the pcb or load cell may be<br />
damaged.<br />
NOTE: This message will not appear if parameter<br />
Suo = no.<br />
The scale is in overload. The load on the scale<br />
platform exceeds the scale capacity by more than<br />
103%.<br />
Remove excess weight from scale platform.<br />
If problem persists, recalibrate.<br />
If problem still persists, the motherboard or load<br />
cell may need to be replaced.<br />
The scale is in gross overload. The load exceeds<br />
the scale rating and might result in damage to the<br />
scale.<br />
Remove excess weight immediately.<br />
If problem persists, recalibrate.<br />
If problem still persists, the motherboard or load<br />
cell will need to be replaced.<br />
Load on the scale exceeds 20% upon scale start<br />
up. Remove excess weight. This error only occurs<br />
when the Start Up Zero Su0 parameter is set to 20.<br />
Change this parameter to FS to allow for automatic<br />
start up zeroing up to 100% of capacity.<br />
If this does not solve the problem, check the load<br />
cell connection.<br />
Verifying load cell wiring connections. Ensure the<br />
load cell connector on the motherboard is seated<br />
properly.<br />
The setup parameters loaded in nonvolatile<br />
memory have become corrupted.<br />
Verify scale parameters and calibrate.<br />
20
g Er<br />
SPnL<br />
SPnH<br />
The calibration zero is out of range.<br />
Error is displayed after a ZERO calibration attempt.<br />
Press zero to clear this error.<br />
Refer to the analog setup section for additional<br />
information.<br />
Motherboard or load cell may need to be replaced.<br />
Raw counts for the span calibration is too low.<br />
Refer to the “Calibration Troubleshooting” section<br />
for raw count ranges.<br />
Raw counts for the span calibration is too high.<br />
Refer to the “Calibration Troubleshooting” section<br />
for raw count ranges.<br />
21
Limited One Year Warranty<br />
Doran <strong>Scale</strong>s, Inc. warrants its products to be free from defects in material and<br />
workmanship for a period of one (1) year from date of shipment. Any product found to<br />
be defective within this time period may be returned to Doran’s factory, freight prepaid,<br />
with prior return authorization and proof of purchase showing date of original sale, for<br />
repair or replacement at no charge.<br />
Doran’s liability under this warranty is limited to the repair or replacement of the<br />
defective product and in no event shall Doran <strong>Scale</strong>s, Inc. be liable for consequential or<br />
indirect damages to equipment or personnel. Nor shall Doran <strong>Scale</strong>s, Inc. be liable for<br />
damages to equipment or for personal injury caused by misuse, overload, accidental<br />
damage, alteration, improper installation, or unauthorized opening of the equipment.<br />
Under no circumstances will Doran <strong>Scale</strong>s, Inc. be responsible for any indirect or<br />
consequential damages due to errors in weighing or failure of a Doran <strong>Scale</strong>s, Inc.<br />
product to perform properly.<br />
THIS WARRANTY IS IN LIEU OF ALL OTHER WARRANTIES, EXPRESS OR<br />
IMPLIED. THIS WARRANTY CONSTITUTES DORAN’S EXCLUSIVE WARRANTY.<br />
THERE ARE NO OTHER WARRANTIES, EXPRESS OR IMPLIED, INCLUDING ANY<br />
WARRANTY OF MERCHANTABILITY OR FITNESS FOR A PARTICULAR PURPOSE.<br />
Doran <strong>Scale</strong>s, Inc.<br />
1315 Paramount Pkwy<br />
Batavia, IL 60510<br />
1-800-262-6844<br />
www.doranscales.com<br />
22